



Hat hair has a way of showing up the moment you think you’re done. A wool collar rubs the back of your head, a scarf drags across the sides, and the front of your hair picks up static the second you step indoors.
The best hairstyle ideas for winter do not fight the season. They sit low enough to survive a coat, hold shape after a hat comes off, and keep the ends from turning into a dry, fuzzy mess by midafternoon. If you wear your hair long, short, curly, or somewhere in between, the trick is usually the same: stop asking it to do too much.
A style that works in warm weather can fall apart fast once the air gets dry. A little bend at the ends, a clean part, or a tucked base often matters more than a pile of product. That’s why the smartest winter looks are usually the ones that look calm, not overworked.
And yes, a good clip helps.
1. Sleek Low Bun for Winter Coats

The sleek low bun is the one I reach for when a coat collar is going to be in my business all day. It sits low enough to stay out of the way, and that alone saves you from the weird flattened patch that shows up after a long commute.
Why it works with heavy layers
The whole point is placement. Keep the bun at the nape, not mid-head, so a scarf or jacket doesn’t crush it into a lump. Smooth the hair back with a light cream or a few drops of oil, then use a brush to keep the surface flat without scraping it too hard.
- Start with hair that’s at least slightly dry; damp roots can puff up later.
- Use a low ponytail first, then twist the length into a tight knot.
- Hide the elastic with a 1-inch strand wrapped around the base.
- Secure with 2 to 4 bobby pins if your hair is thick, fewer if it’s fine.
My rule: if the bun touches the collar, move it lower.
2. Loose French Braid for Windy Days
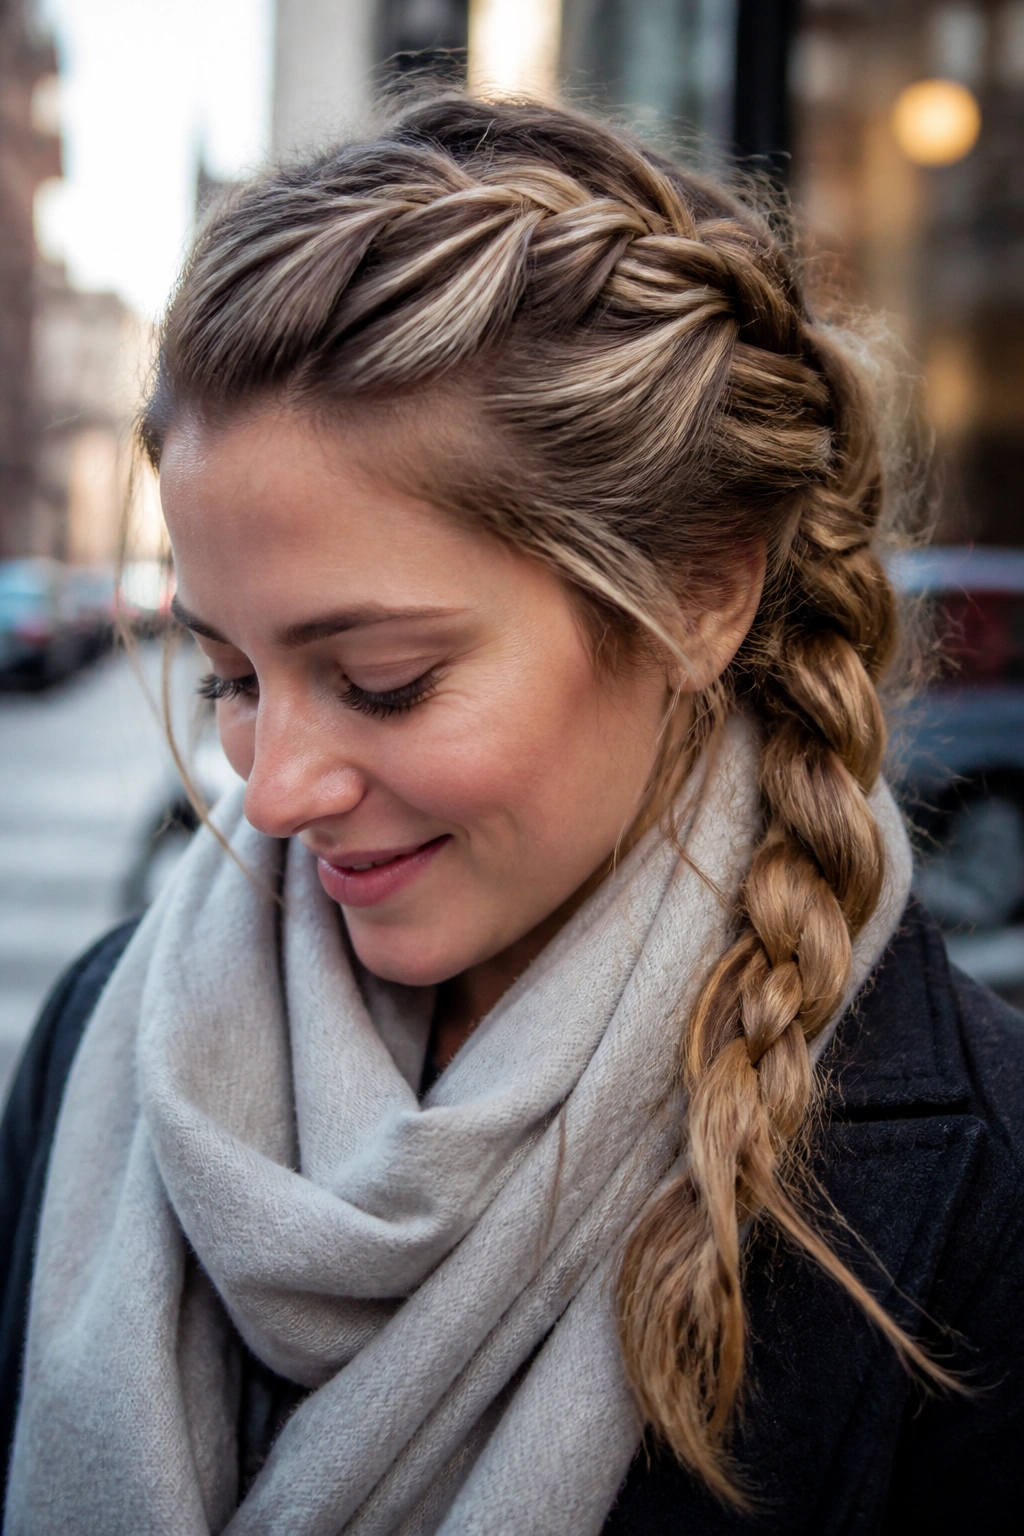
A loose French braid is the style I’d call the quiet workhorse of winter hair. It keeps the length together, but it doesn’t look stiff or severe, which matters when everything else on your face is already covered by a coat, hat, or hood.
Start near the crown with three even sections and keep the braid a little loose as you move down. That looseness is doing real work. It gives the braid enough softness that you can tug out the sides later, which helps it sit better under a scarf and keeps it from looking too neat once the outer layers of hair start shifting around.
I like this most on day-two hair with a touch of texturizing spray. Freshly washed hair can be slippery, and slippery hair does not hold a braid as willingly as you think it will.
3. Claw Clip Twist That Survives a Beanie
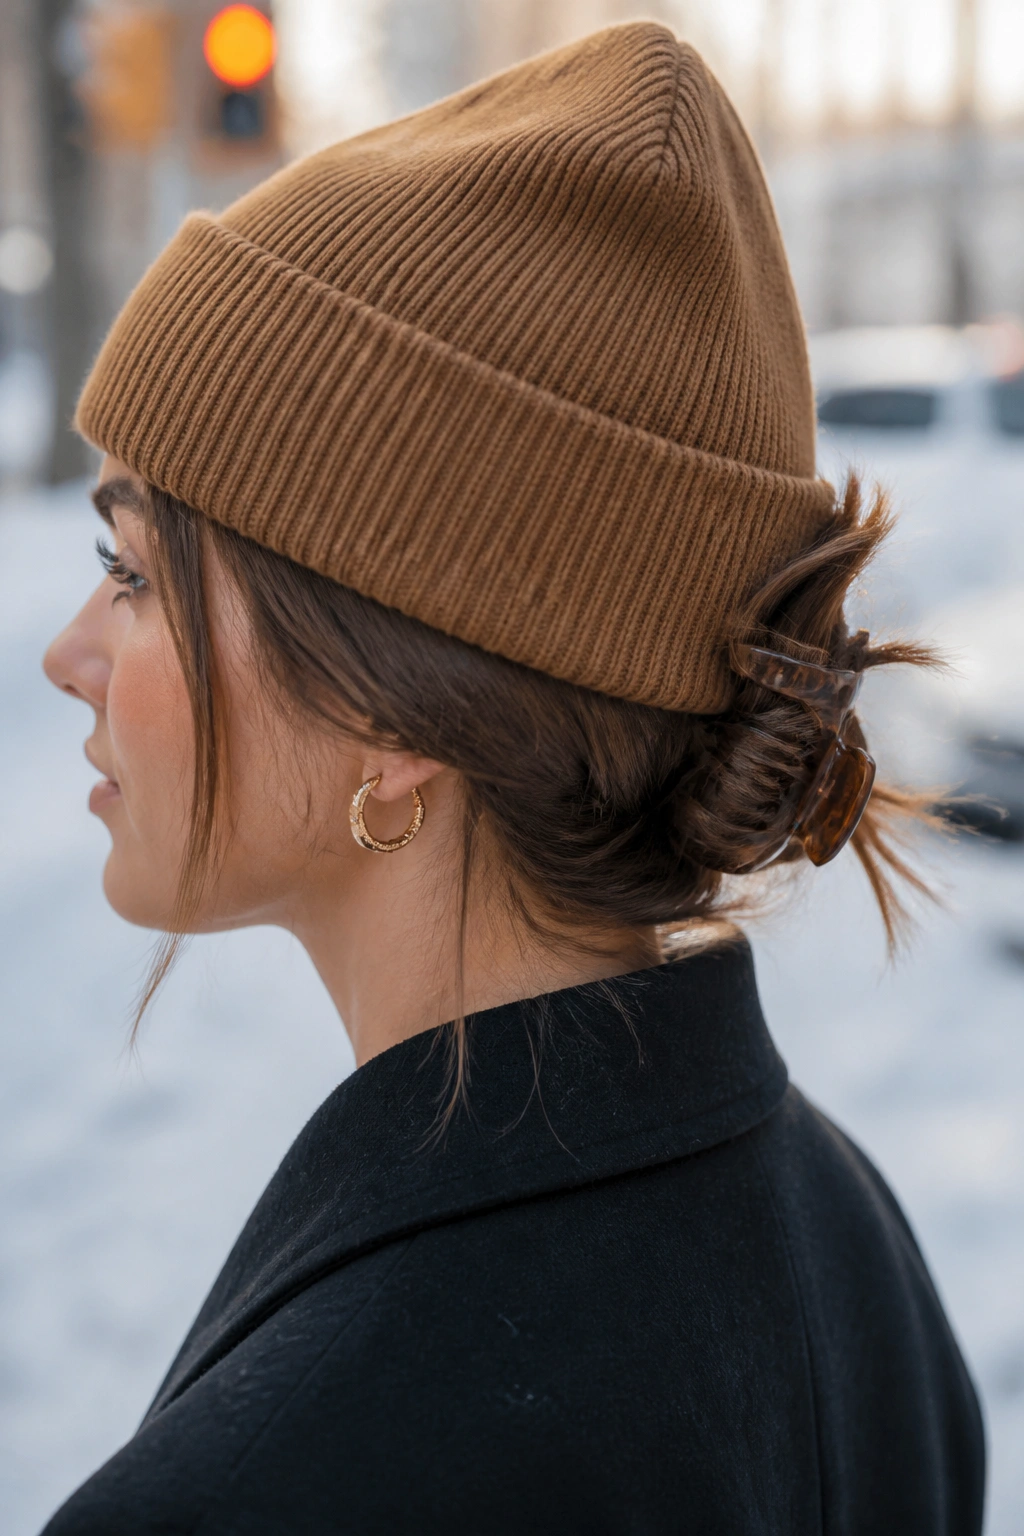
Why does a claw clip feel right in cold weather? Because it solves the two worst winter problems at once: you get the hair off your neck, and you avoid the tension that comes from a tight ponytail under a hat.
The best version uses a medium clip, usually around 3.5 to 4.5 inches wide, depending on your hair density. Twist the length up once, fold the ends under, and clip it low enough that the clip itself sits under the hat line or just above it. A tiny clip can work for shoulder-length hair, but dense hair needs something sturdier or it slips halfway through the day.
How to wear it
- Leave the ends slightly loose for a softer shape.
- Pick a matte clip if your hair is fine; it grips better than a slippery glossy one.
- If the twist feels too tight, loosen the top a little before clipping.
- Keep a spare clip in your bag. Seriously.
This is the style for days when you want your hair up, but not pulled up.
4. Silk-Scarf Ponytail for Winter Friction
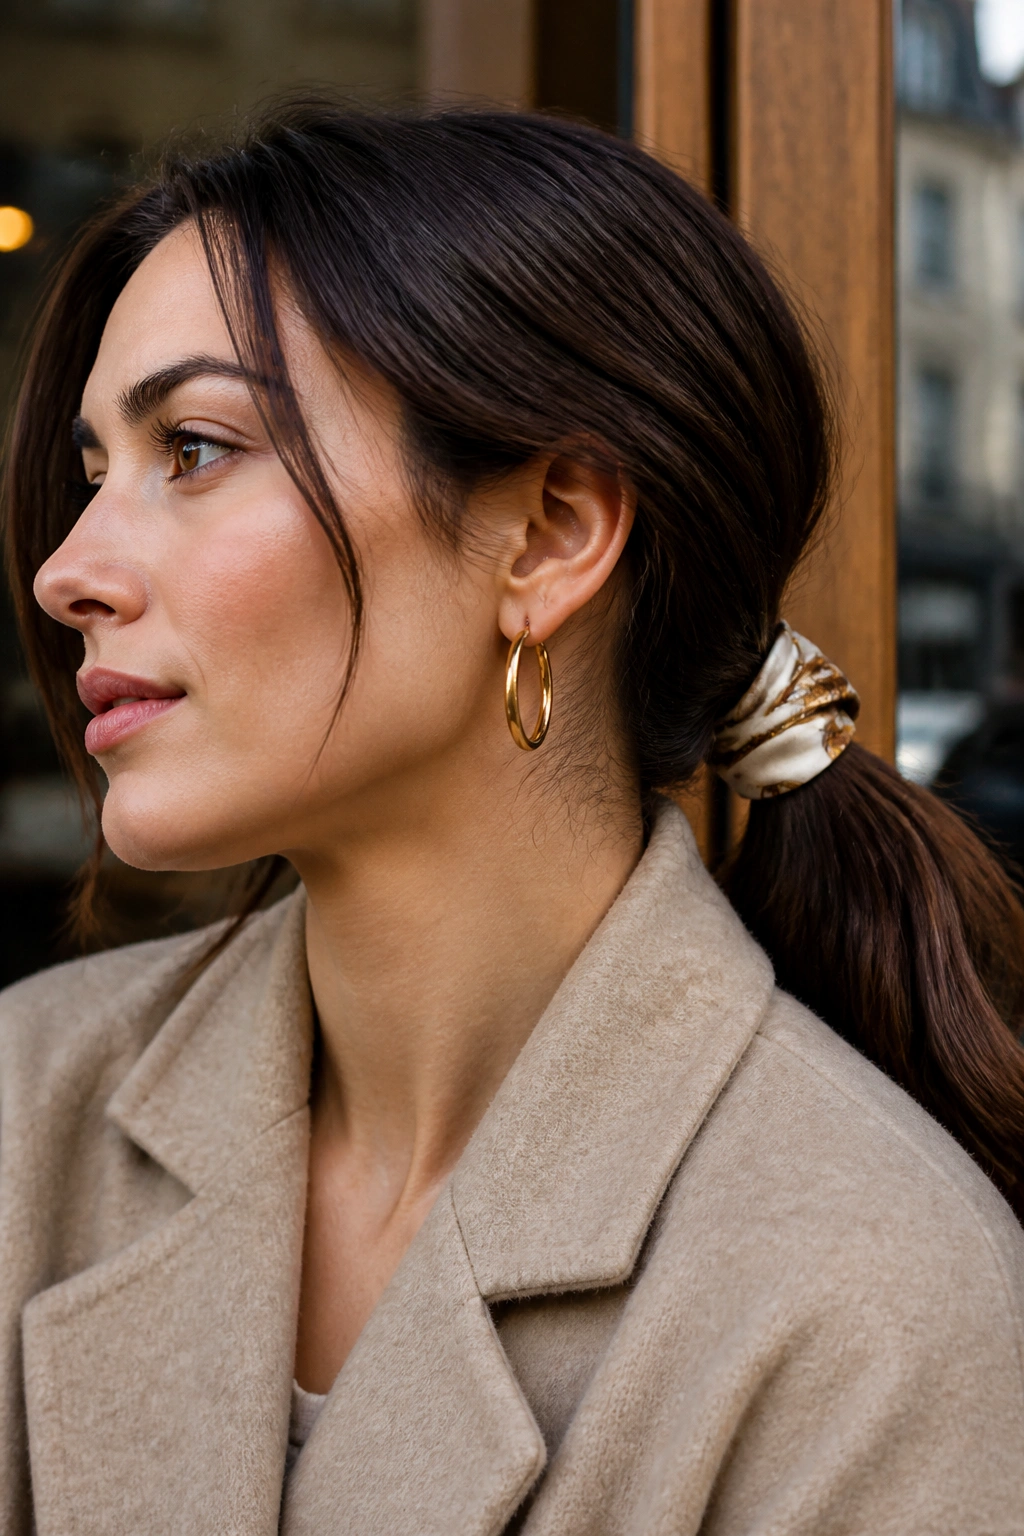
A silk-scarf ponytail looks dressed up, but it’s also practical, which is a nice combination when the air is dry and your ends need a break. The scarf covers the elastic, cuts down on rubbing, and keeps the ponytail from feeling like an afterthought.
I like this style when I’m moving between outdoors and indoors a lot. A scarf tied around the base of a low or mid ponytail gives the whole thing some shape, and it also helps protect the hair where it usually frays first: right at the tie point. The trick is to use a scarf that isn’t too bulky. A narrow silk or satin scarf, around 1.5 to 2 inches wide, is easier to tie and less likely to bunch up under a coat.
- Tie the ponytail first, then wrap the scarf.
- Keep the knot off to one side or underneath the hair.
- Let the tail stay straight, curled, or slightly bent at the ends.
- Choose a scarf that feels smooth, not stiff.
This one has a little polish without trying too hard.
5. Middle-Part Low Ponytail With a Wrapped Base
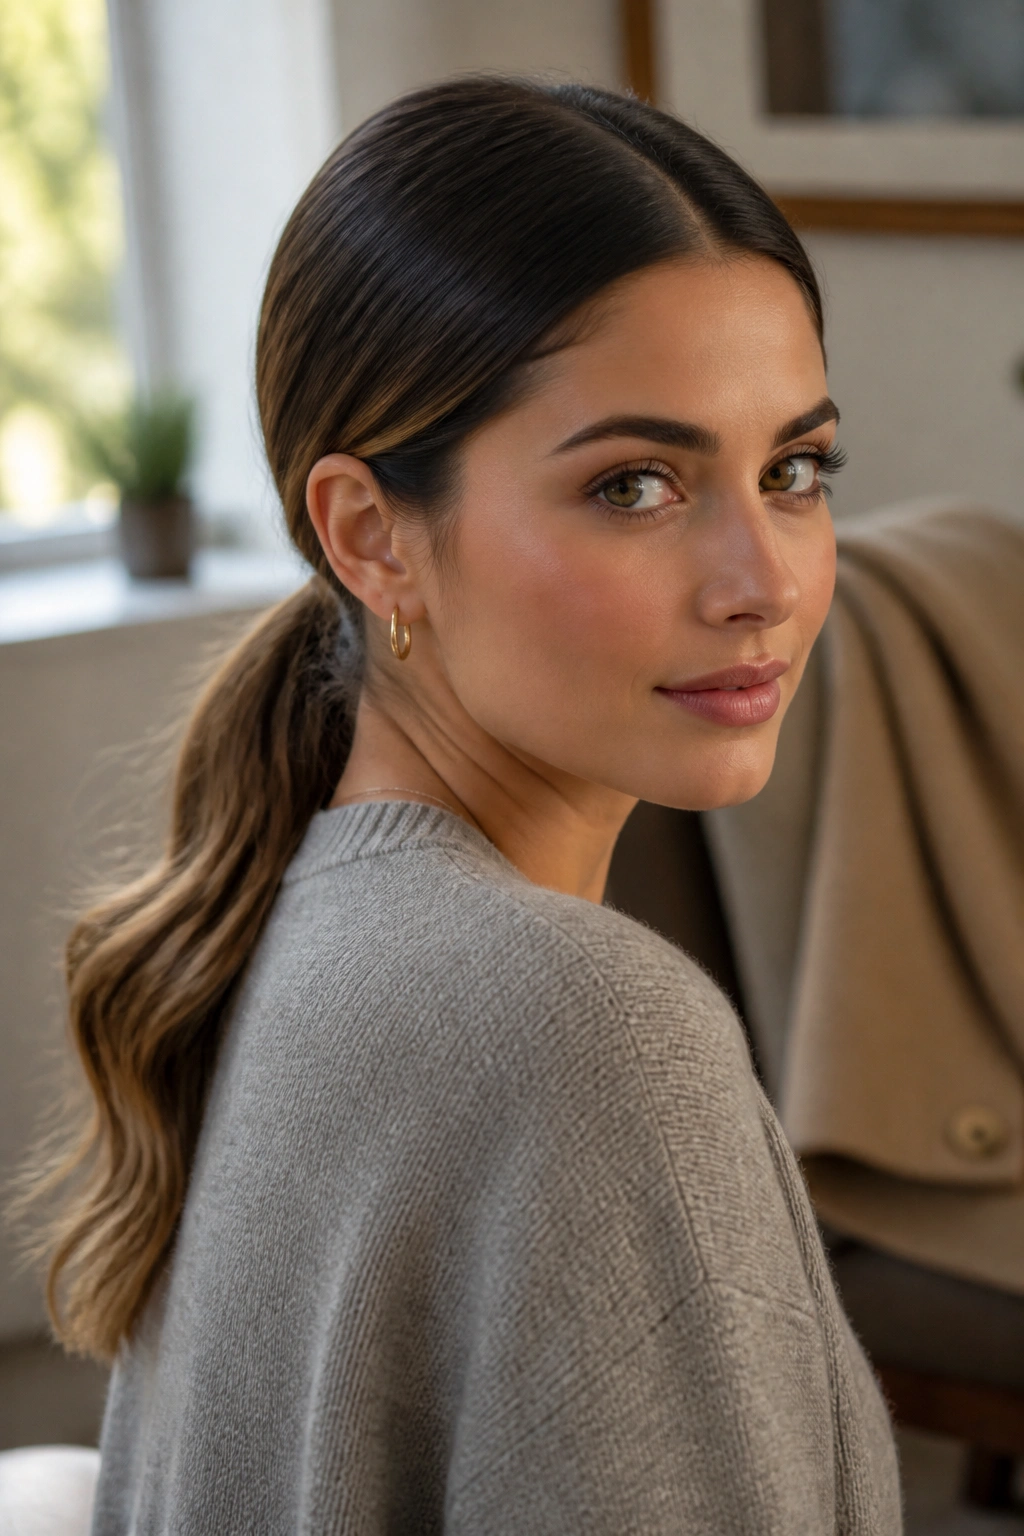
A middle-part low ponytail is one of those styles people skip because it sounds plain, but I think that’s a mistake. With clean parting and a wrapped base, it reads as deliberate instead of basic.
The middle part helps the hair fall evenly on both sides, which matters when you’re wearing a coat or scarf that tends to shift hair around. Then the wrapped base hides the elastic and turns the whole thing into a cleaner line. If your hair has a slight wave, leave it alone. Do not flatten it into glass unless that’s the look you’re actually after. A little movement at the tail keeps the style from looking too stiff.
This is also one of the easiest styles to refresh later in the day. Smooth the front again with your fingers, give the ponytail a quick shake, and you’re done.
It’s modest. It works.
6. Bubble Braid Under a Beanie
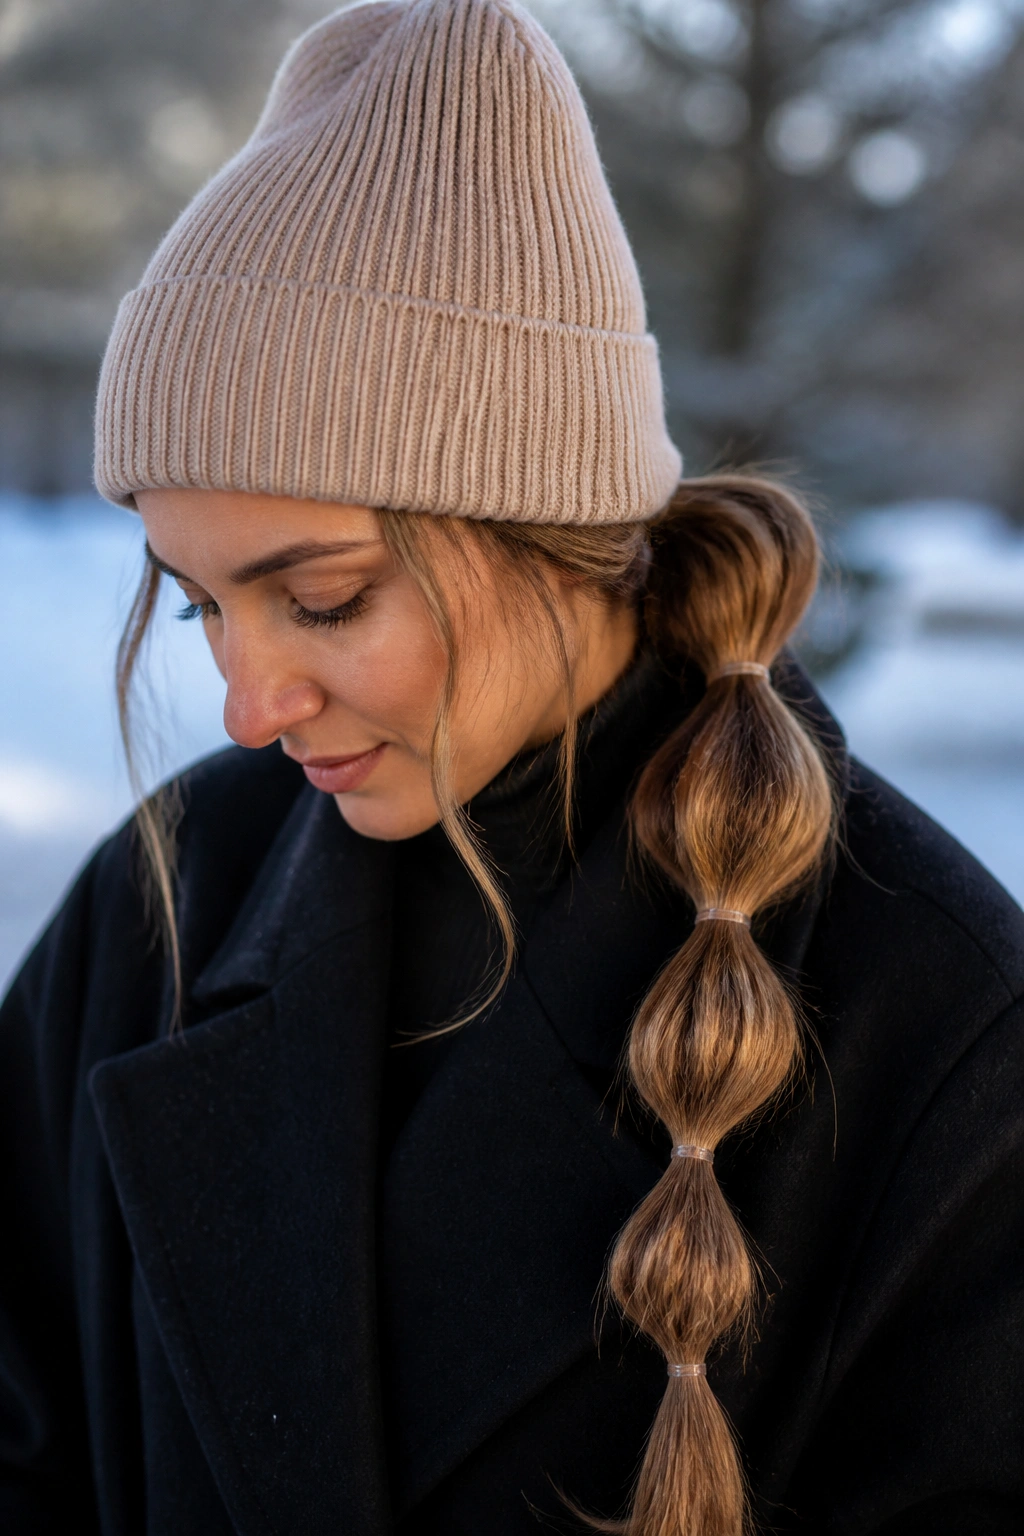
A bubble braid is one of the few styles that still looks good after a hat. That’s the reason I keep coming back to it. A regular braid can get flattened by a beanie, but the rounded sections of a bubble braid keep their shape even when the top gets pressed down.
The setup is simple: tie the hair into a low ponytail, then add small clear elastics every 2 to 3 inches down the length. Gently pull each section outward until it looks full and rounded. If your hair is very long, you can keep going all the way to the ends. If it’s medium-length, three or four bubbles are enough.
What makes it useful
- It holds texture better than a single ponytail.
- It looks intentional even when the top gets squashed.
- Fine hair gets more visual bulk from the rounded sections.
- Thick hair benefits because the elastics keep the weight controlled.
The only catch is that it takes a minute longer than a quick braid. Worth it.
7. Side-Swept Waves With Extra Lift
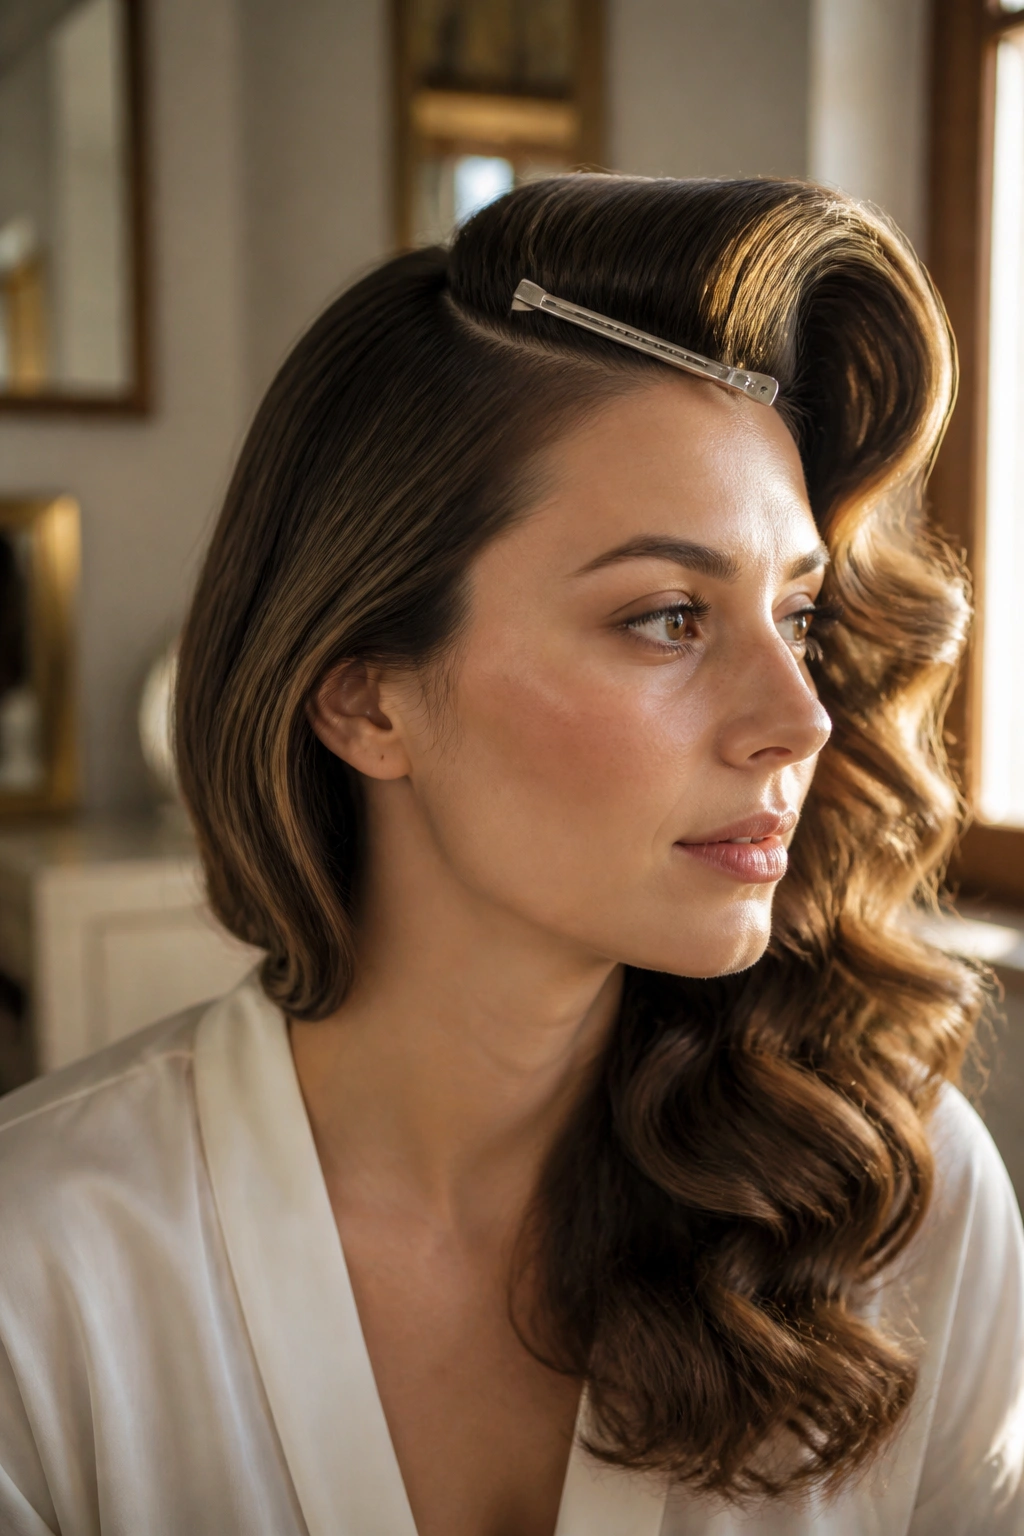
Why do side-swept waves work so well in cold weather? Because they give the crown some shape before a hat or hood flattens it. A deep side part creates instant lift, and the waves keep the hair from falling straight and limp against your coat.
The best version starts with a clean side part made while the hair is still warm from blow-drying or curling. Use a 1.25-inch curling iron or large hot rollers, then pin the front wave in place for a few minutes while it cools. That cooling step matters more than most people think. Hair sets better when it cools in the shape you want.
How to keep the bend
A light mist of flexible hairspray is enough. You want movement, not crunch. If the ends get dry, work in a drop of serum just on the bottom few inches, then leave the crown alone so it keeps its lift.
This is one of those styles that looks softer after it’s been worn for a while.
8. Half-Up Twist for Scarf Days
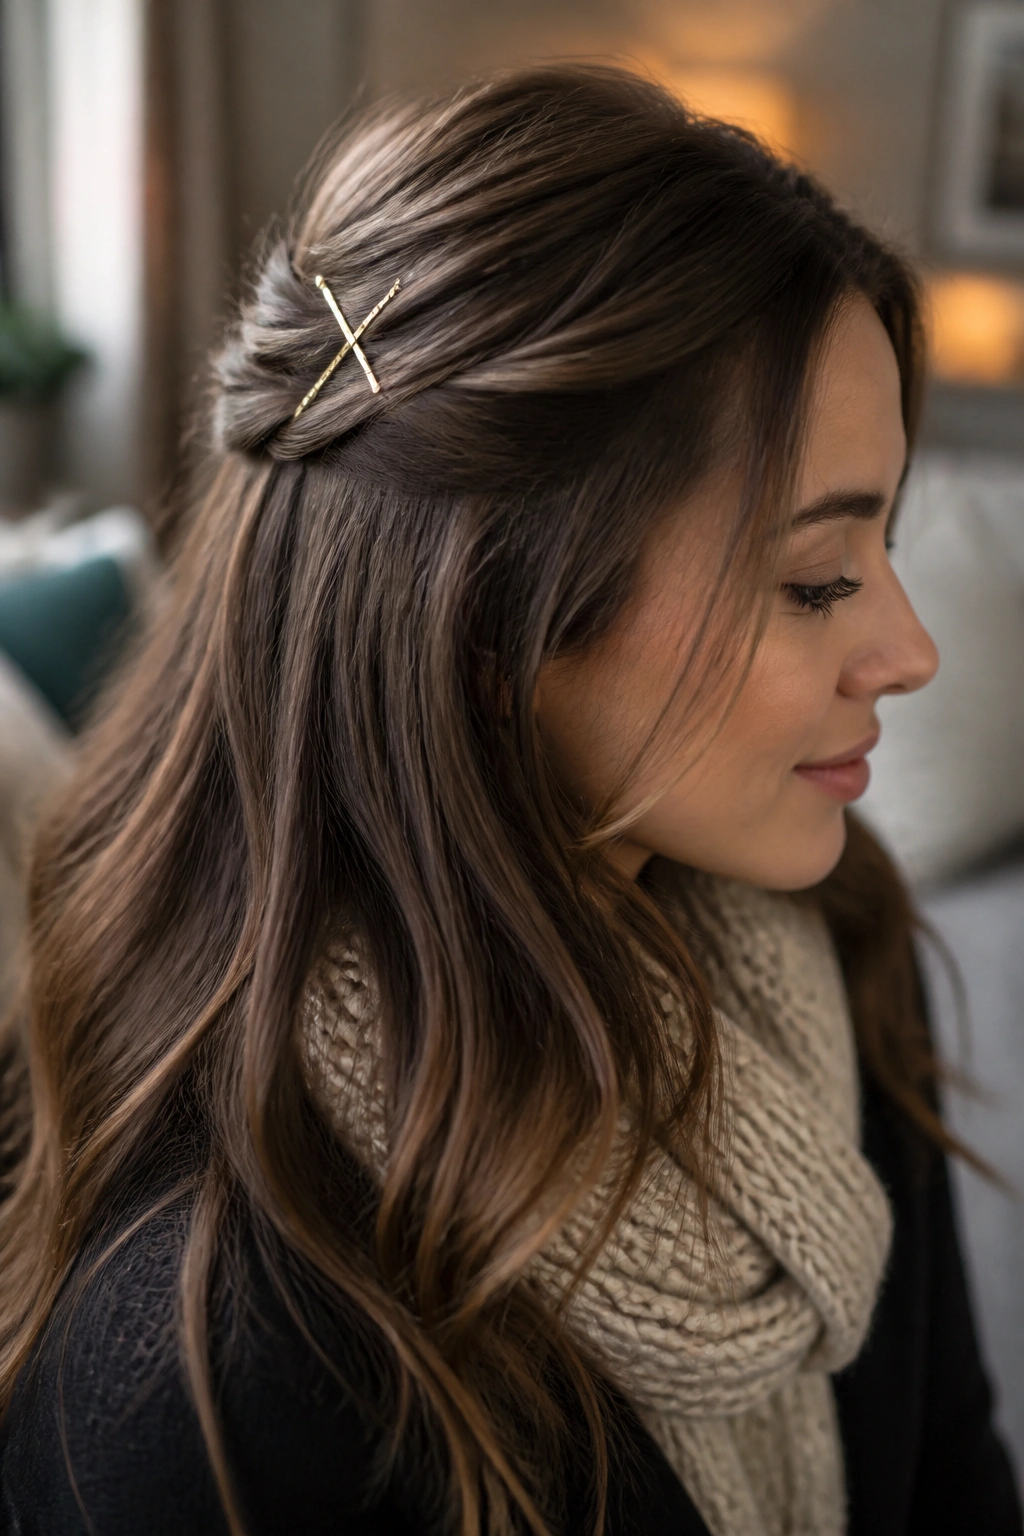
A half-up twist solves a very specific winter problem: you want the front hair off your face, but you do not want a full updo pressing against your collar. That middle ground is where this style shines.
Take a section from each temple, twist them back loosely, and pin them together at the crown with two bobby pins crossed into an X. Leave the rest down. The twist keeps the sides controlled, which is handy when scarves make the front pieces frizz or stick to lipstick and lip balm, and the loose bottom layer still gives you movement.
I like this on layered hair because the shorter pieces around the face can stay soft instead of being yanked up into a ponytail. If the twists feel too tight, loosen them before pinning. The shape should look easy, not severe.
It’s a small change, but small changes are often what keep a winter style from collapsing into static.
9. Braided Crown That Stays Put
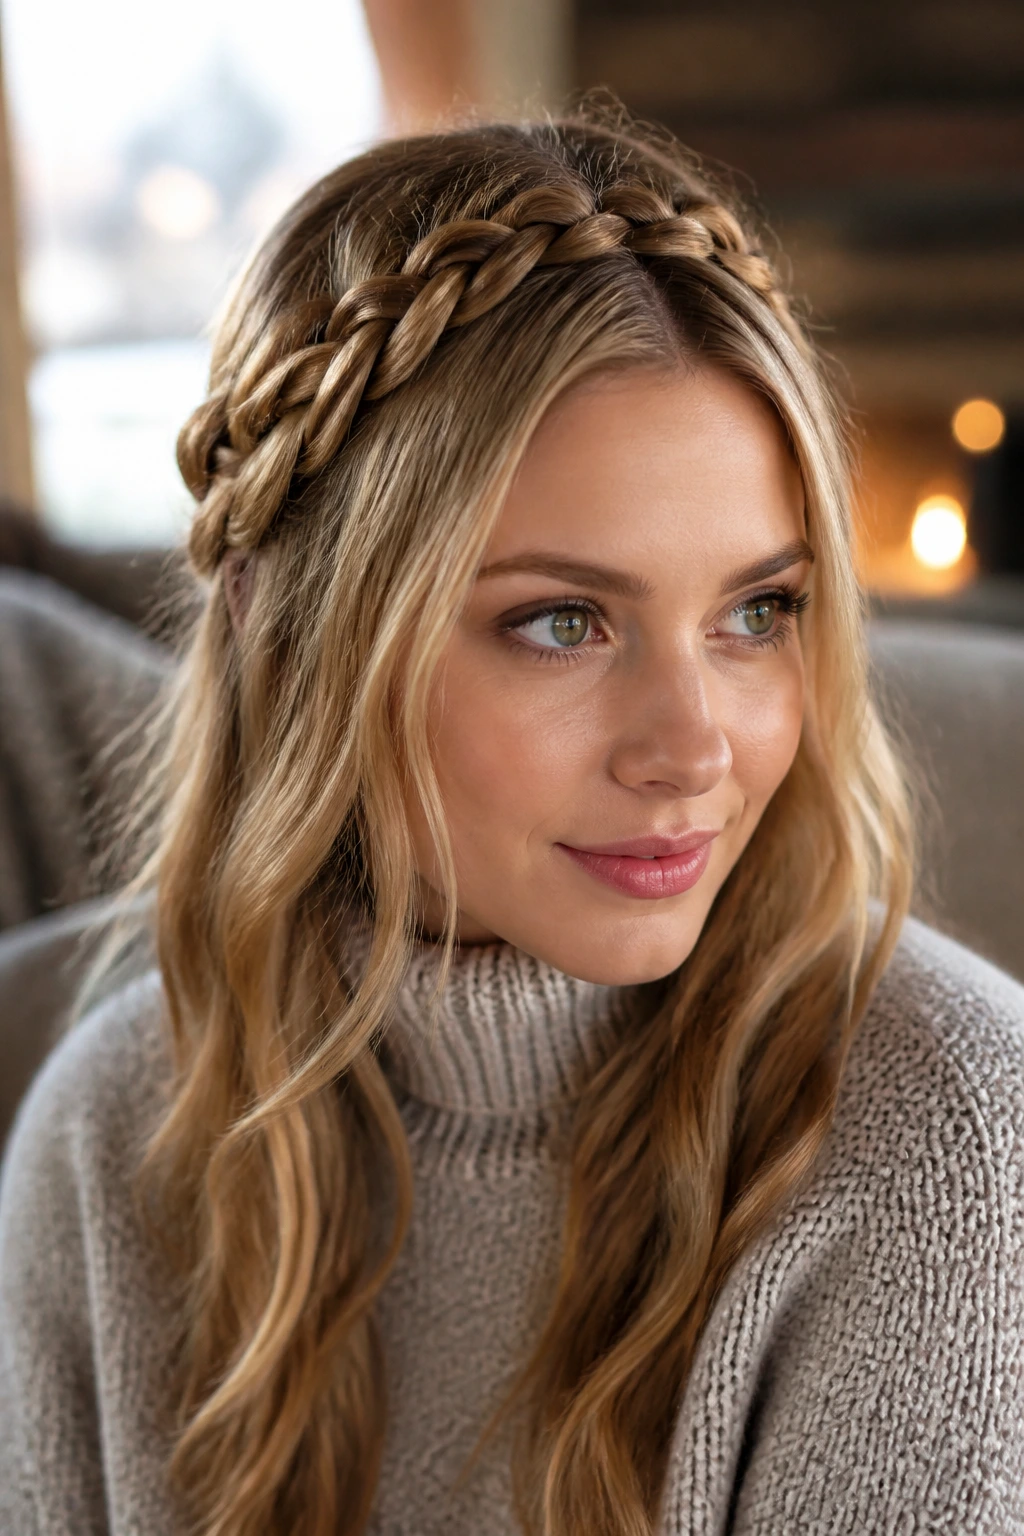
If you want your hair to hold up from morning through dinner, braid the front, not the length. That’s why a braided crown works so well in winter. The braid acts like a frame, keeping the hairline secure while the rest of the length can stay down or tucked.
Start near one ear, braid along the hairline, and pin the braid across the top of the head so it crosses like a soft band. If your hair is thick, the braid can be a little chunkier. Fine hair usually looks better with smaller sections and a bit of texture spray first.
Quick details that help
- Keep the braid close to the hairline so it actually holds the front.
- Use pins that match your hair color.
- Leave the ends loose for softness, or tuck them under if you want a cleaner finish.
- A little dry shampoo at the roots helps the braid grip.
It sounds fussy, but it isn’t. Once you’ve done it twice, it becomes muscle memory.
10. Faux Bob Tuck at the Nape
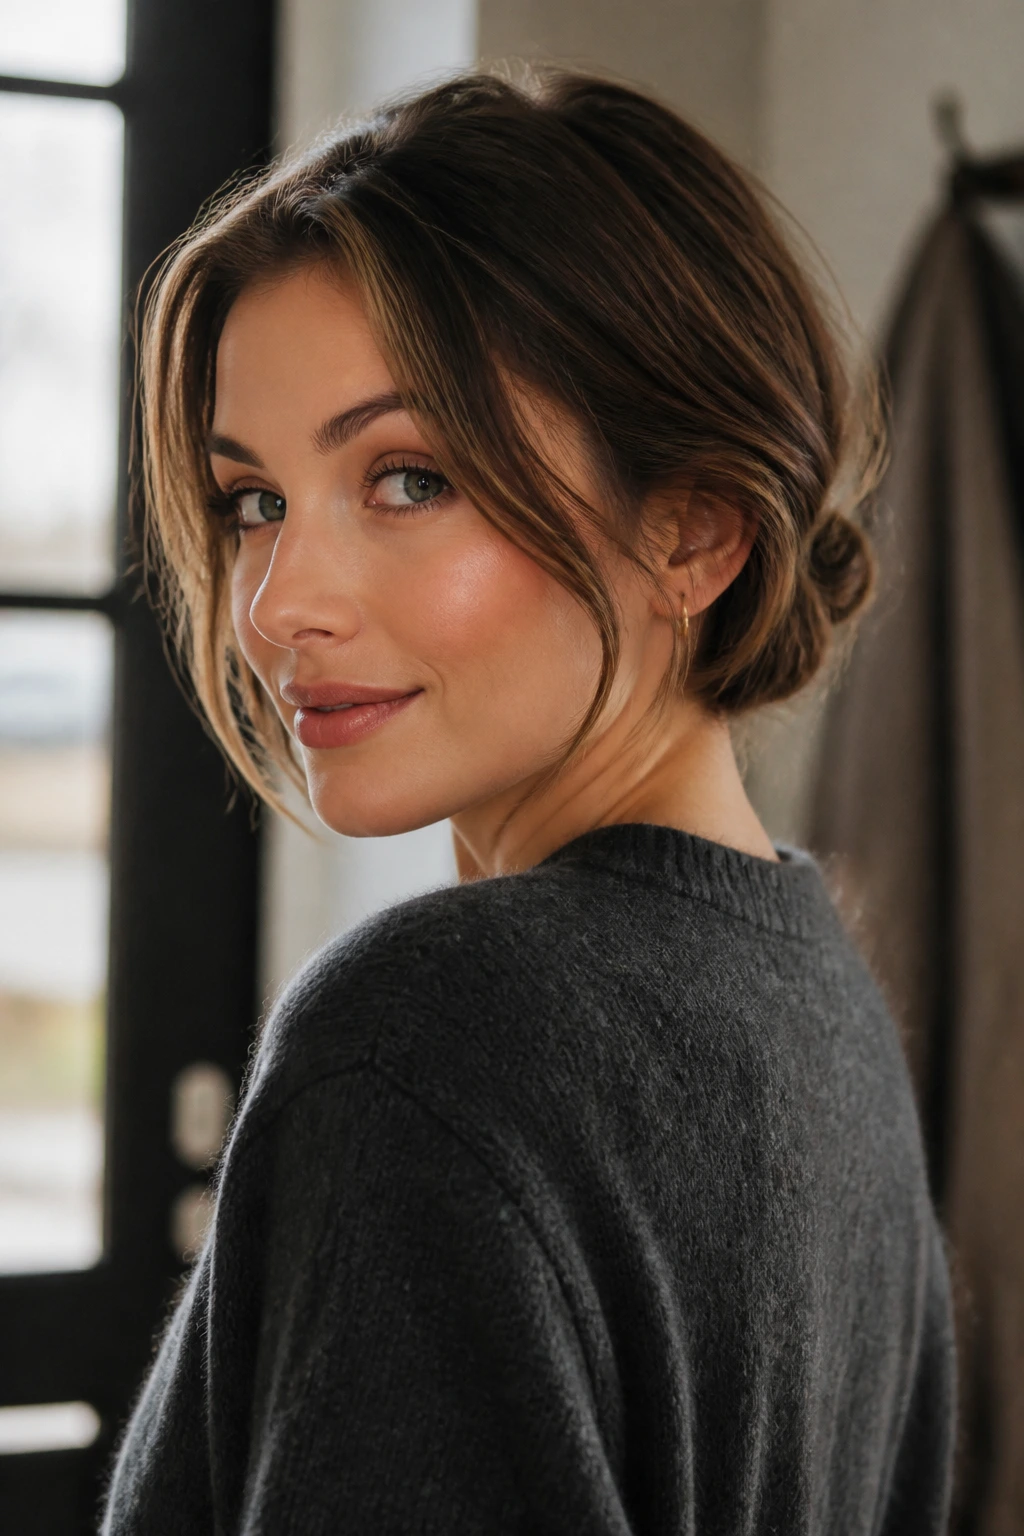
Some mornings you want shorter hair without cutting it. That’s where the faux bob comes in, and winter is a nice time for it because scarves and high necklines make that tucked shape feel natural.
The basic move is to curl or bend the ends first, then fold the length up and pin it under itself at the nape. You’re creating the illusion of a bob by hiding the ends underneath, so the shape looks neat from the front and soft from the side. A few well-placed pins work better than one giant shove. Use four to six pins, depending on how much hair you’re hiding.
This style is happiest on hair that has some texture or a little wave. Pin-straight hair can slip. If that’s your hair type, rough it up first with dry texture spray or a bit of grip cream.
It’s slightly theatrical. That’s half the fun.
11. Messy Chignon With Texture
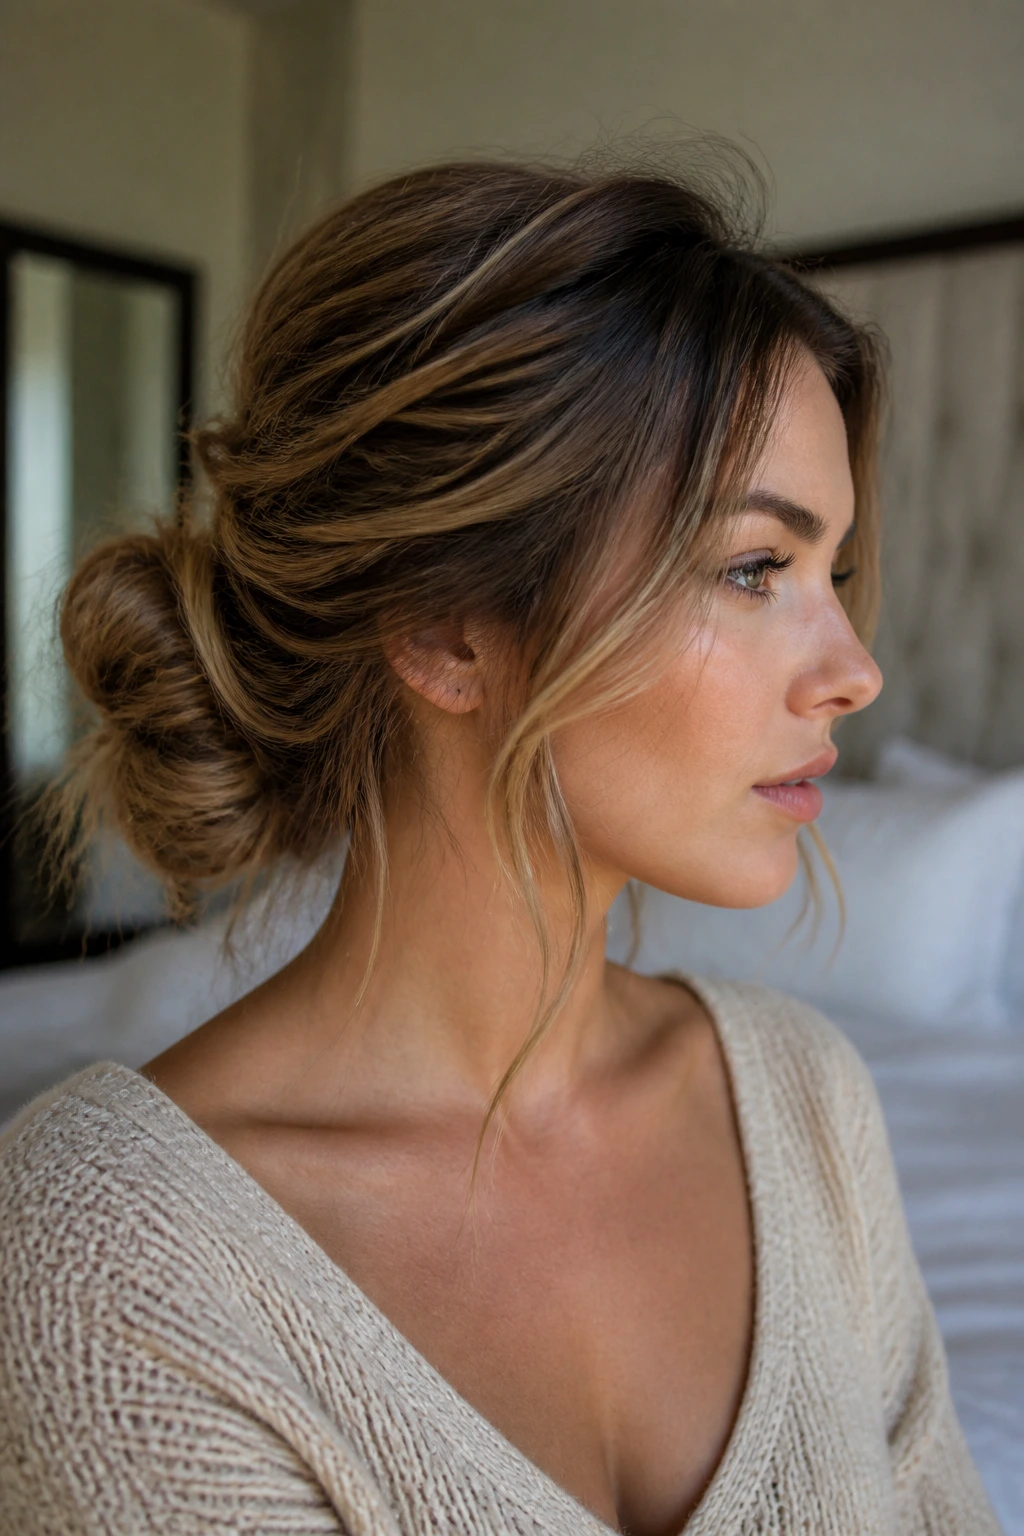
The messy chignon is the low, soft bun I like when sleek hair feels too severe. It has enough shape to look done, but it still lets a few pieces fall out around the face and nape, which keeps it from looking like you were packed into it.
Unlike a smooth bun, this one actually benefits from a little dryness. Day-two hair, or hair with a light mist of dry shampoo, gives the twists something to hold onto. Gather the hair low, twist it loosely, coil it into a knot, and pin the edges in different directions so the bun doesn’t sit like a tight ball.
A chignon works well with chunky sweaters because the loose texture keeps the back from looking flat. I’d call it the sweater-weather bun, except that phrase sounds worse every time I hear it.
Better to keep it simple.
12. Rope Braid for Slippery Hair

Straight, silky hair can slide out of a three-strand braid before lunch. A rope braid grips better because the twist runs in opposite directions and holds the length together with less slippage.
Split the ponytail into two sections, twist each section in the same direction, then wrap them around each other in the opposite direction. That opposite motion is the part people skip, and it matters. If both twists go the same way, the braid loosens fast. Secure the ends with a small elastic and tug the braid gently to widen it if you want a fuller look.
Why it’s worth trying
- It takes less finger work than a classic braid.
- It looks cleaner on fine hair.
- It stays tidy under a scarf.
- It’s fast enough for rushed mornings.
This is a strong option when your hair tends to go flat by noon and you want something that still has shape by dinner.
13. Curly Pineapple Bun for Curls

Curly hair and winter can be a rough match if you keep fighting the curl pattern. The pineapple bun stops that fight. It gathers the curls high enough to protect them while leaving the coil and volume mostly intact.
Use a satin scrunchie, not a thin elastic that bites into the hair. Flip your hair forward, gather it loosely at the crown, and secure it so the curls can fan out without being crushed. The point is not to stretch the curl out. You want the curl to keep doing its own thing while the roots stay lifted and the ends stay out of the way.
What to look for
- A scrunchie with a soft, smooth surface.
- A loose hold at the crown, not a tight wrap.
- A little leave-in cream on the ends if they’re dry.
- Face-framing curls left free around the front.
It works for errands, travel, and even sleeping. That last part is a gift.
14. Padded Headband With Loose Layers
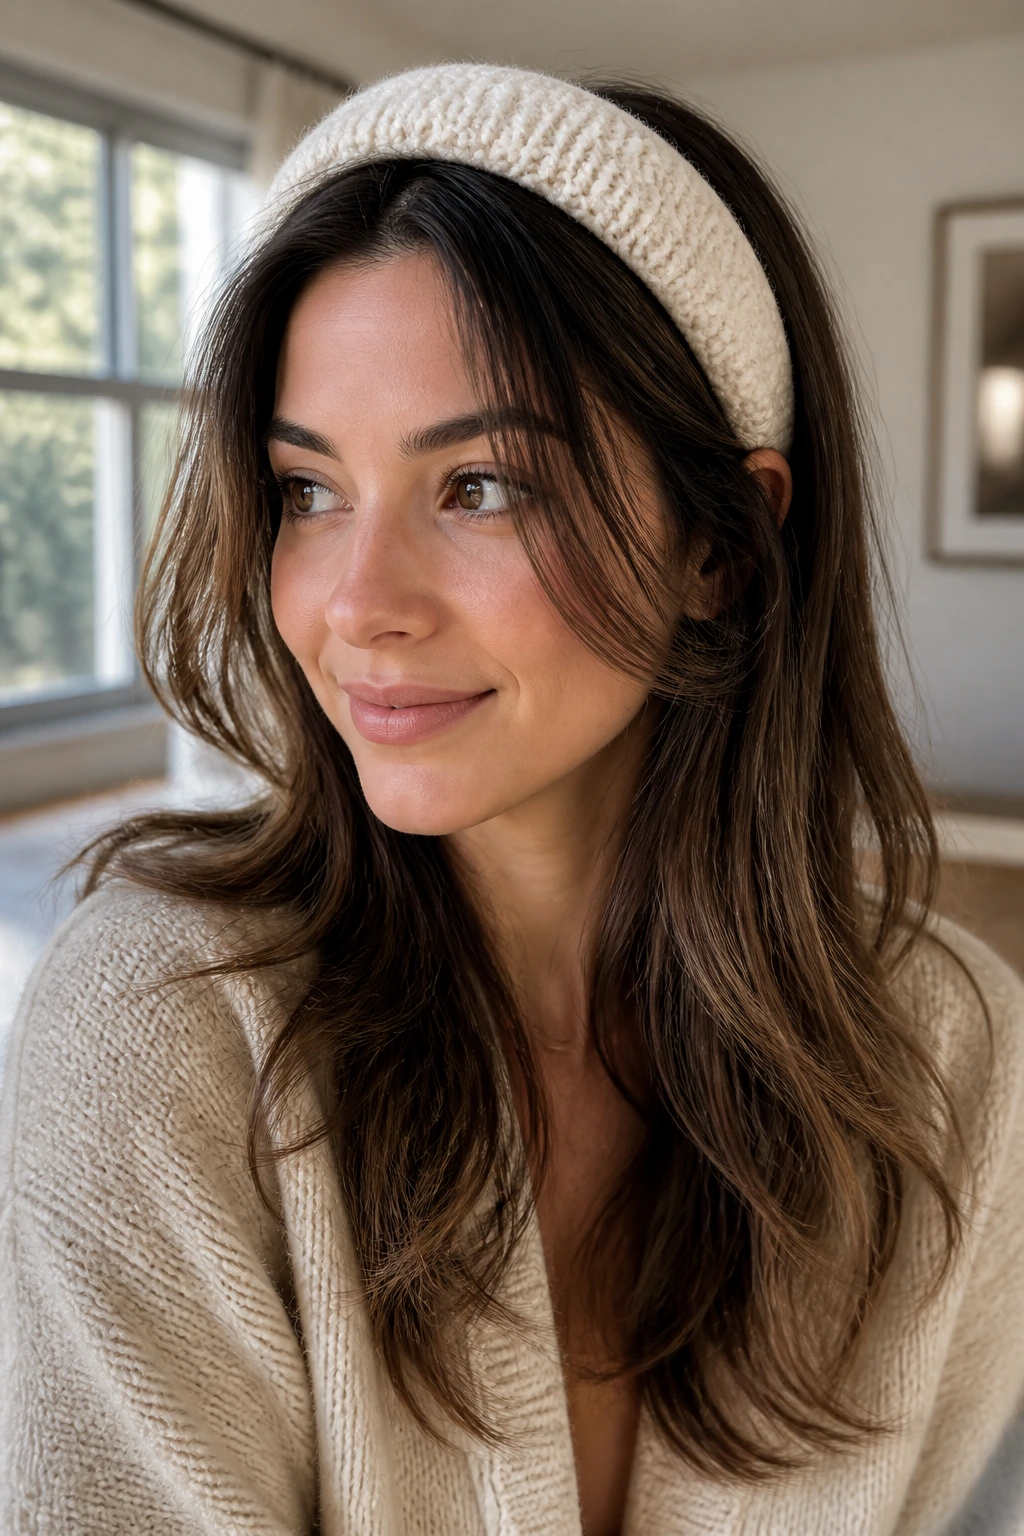
A padded headband can save a day when your front pieces won’t behave. It presses the hair back just enough to keep it off your face, but it doesn’t flatten the whole head the way a tight style sometimes does.
I like this with loose layers because the rest of the hair can stay soft while the front gets controlled. A knit headband is cozier, sure, but a slightly padded one usually has more structure and holds its place better. Set it about 1 to 2 inches behind the hairline, then let the ends fall naturally. If the crown looks too flat, lift the roots with your fingers before putting the band on.
This is one of those styles that looks casual on purpose.
And that matters. Winter hair can go wrong fast when every piece is trying too hard.
15. Deep Side Part Low Knot

Need more lift without teasing your hair into a nest? A deep side part does the job with almost no drama. It shifts the weight of the hair, gives the crown a little air, and makes a low knot feel less predictable.
Part the hair while it’s still slightly damp or freshly brushed, then smooth it into a knot at the nape. The side part is doing the visual work here. It breaks up the flatness that winter coats and hats can create, and it gives the front a little asymmetry that looks sharper than a straight-down center part on some face shapes.
I’d use this on days when you want the hair off your neck but still want some shape around the face. If the part feels too extreme, move it half an inch back. Small shifts matter.
Small but useful detail
A tail comb makes the part cleaner. Your fingers can do it too, but the line won’t be as crisp.
16. Double Dutch Braids for Long Wear
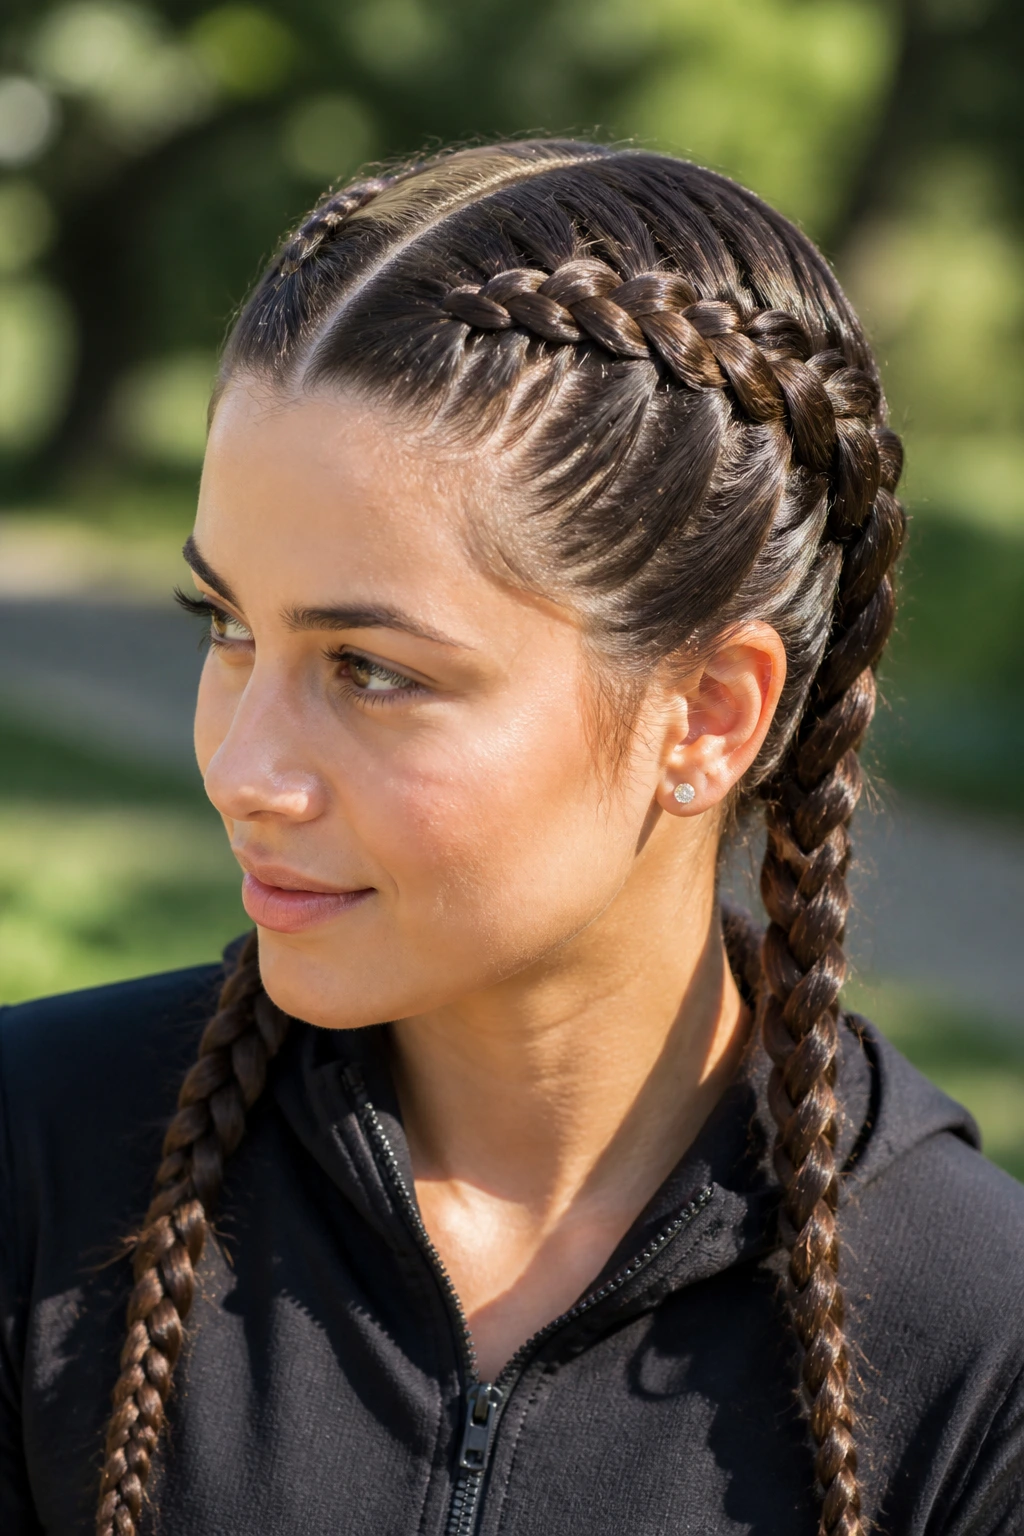
Double Dutch braids are the style I’d trust for a long, busy day. They stay secure, they keep the length controlled, and they don’t get as messy as people think once they’re tugged out a little.
Unlike a regular braid that lies flat, Dutch braids sit on top of the hair, so the pattern stays visible even after a hat has brushed over them. Start with a center part, braid each side downward with even tension, and keep the sections about 1 inch wide so the braids don’t get bulky at the top. If you have layers, spritz the hair lightly with texture spray before you start. That gives the shorter pieces something to cling to.
What I like about them
- They keep the back from tangling in scarves.
- They work on thick or fine hair.
- They can be worn tight for control or loose for a softer shape.
- They still look fine the next day if you sleep on them carefully.
It’s a practical style, but it does not have to look sporty unless you want it to.
17. Sleek Top Knot for Indoor Days

The sleek top knot is a little different from the low bun crowd. It’s better for days when you’re indoors most of the time, or when you want every strand off your neck and shoulders. That’s a real relief when heavy sweaters and dry heat start to feel annoying.
Place the knot high, but not so high that it starts to tilt. Smooth the sides back with cream or gel, twist the ponytail, and wrap it into a tight knot with a few pins. If your hair is very thick, make the ponytail first, secure it, and then pin the bun in layers. That keeps it from sagging by midafternoon.
The catch is obvious: a top knot and a hat don’t always get along. If you’re wearing a hood or beanie, this isn’t the first style I’d pick. But indoors? It’s clean, fast, and out of the way.
Sometimes that’s all you need.
18. Twisted Half-Up Halo

A twisted half-up halo gives you the frame of a braid without the full time commitment. Two twists from the temples meet at the back of the head, and the result feels soft rather than formal.
I prefer this over a full crown braid when I want the front controlled but the rest of the hair left loose. The twists can be loose, which is useful if your hair has a little wave or if you want the ends to move under a coat. Pin the twists flat against the head so they don’t stick up, then let the rest fall down the back.
This style is especially good when your hair is medium length and a full updo would leave you with too much volume at the neck. It keeps the shape up top and gives you room underneath.
A small amount of shine cream at the front helps the pieces sit neatly. Not much. A pea-sized amount is plenty.
19. Slicked-Back Wet Look
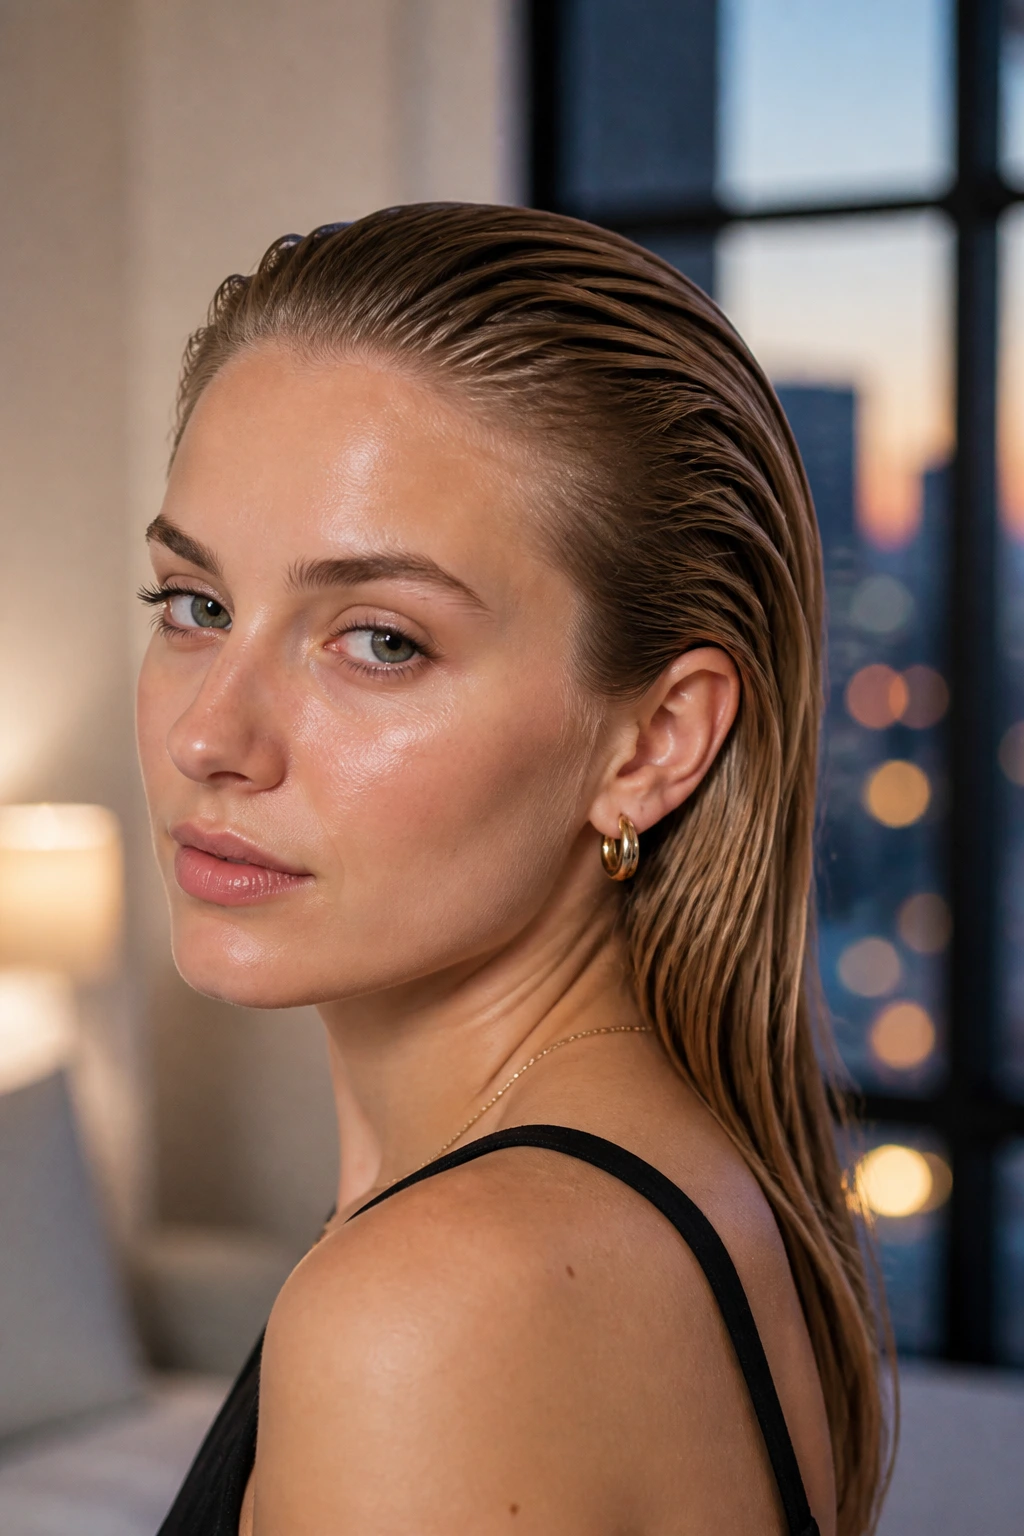
The slicked-back wet look can go wrong fast if you pile on too much product, but a thin layer done well has a sharp, clean finish that works surprisingly well in cold weather. Dry air can make hair puff out at the front; this style does the opposite and keeps everything close to the head.
Start with damp hair, apply a light gel or styling cream from the roots through the mid-lengths, and comb everything straight back. If your ends are dry, put a drop of oil on them before you start so they do not look crispy against the sleek top. The key is control, not heaviness.
I like this style for evenings, dinners, or any situation where a coat and scarf are already adding bulk. It feels modern without needing much effort once it’s set.
One warning: if you use too much product, it can turn sticky under a hat. Keep the layer thin.
20. Loose Low Pigtail Braids

Loose low pigtail braids have a softer feel than people expect. They’re not childish when you keep the part clean and the braids low, and they work especially well with winter scarves because the placement keeps the hair from bunching around the neck.
Part the hair down the middle, braid each side loosely, and stop before the ends if you want a more relaxed finish. You can leave the last few inches straight or curl them under with a flat iron. The style looks best when the braids start just below the ears rather than right at the top of the head. That lower placement keeps the crown from feeling too tight.
- Center parts make the look neater.
- Side parts make it softer.
- Thin elastics keep the ends from getting bulky.
- A little pull at the braid loops adds shape.
It’s simple, but simple is often the point when the coat, hat, and scarf are already doing enough.
21. Bouncy Blowout for Winter Dinners
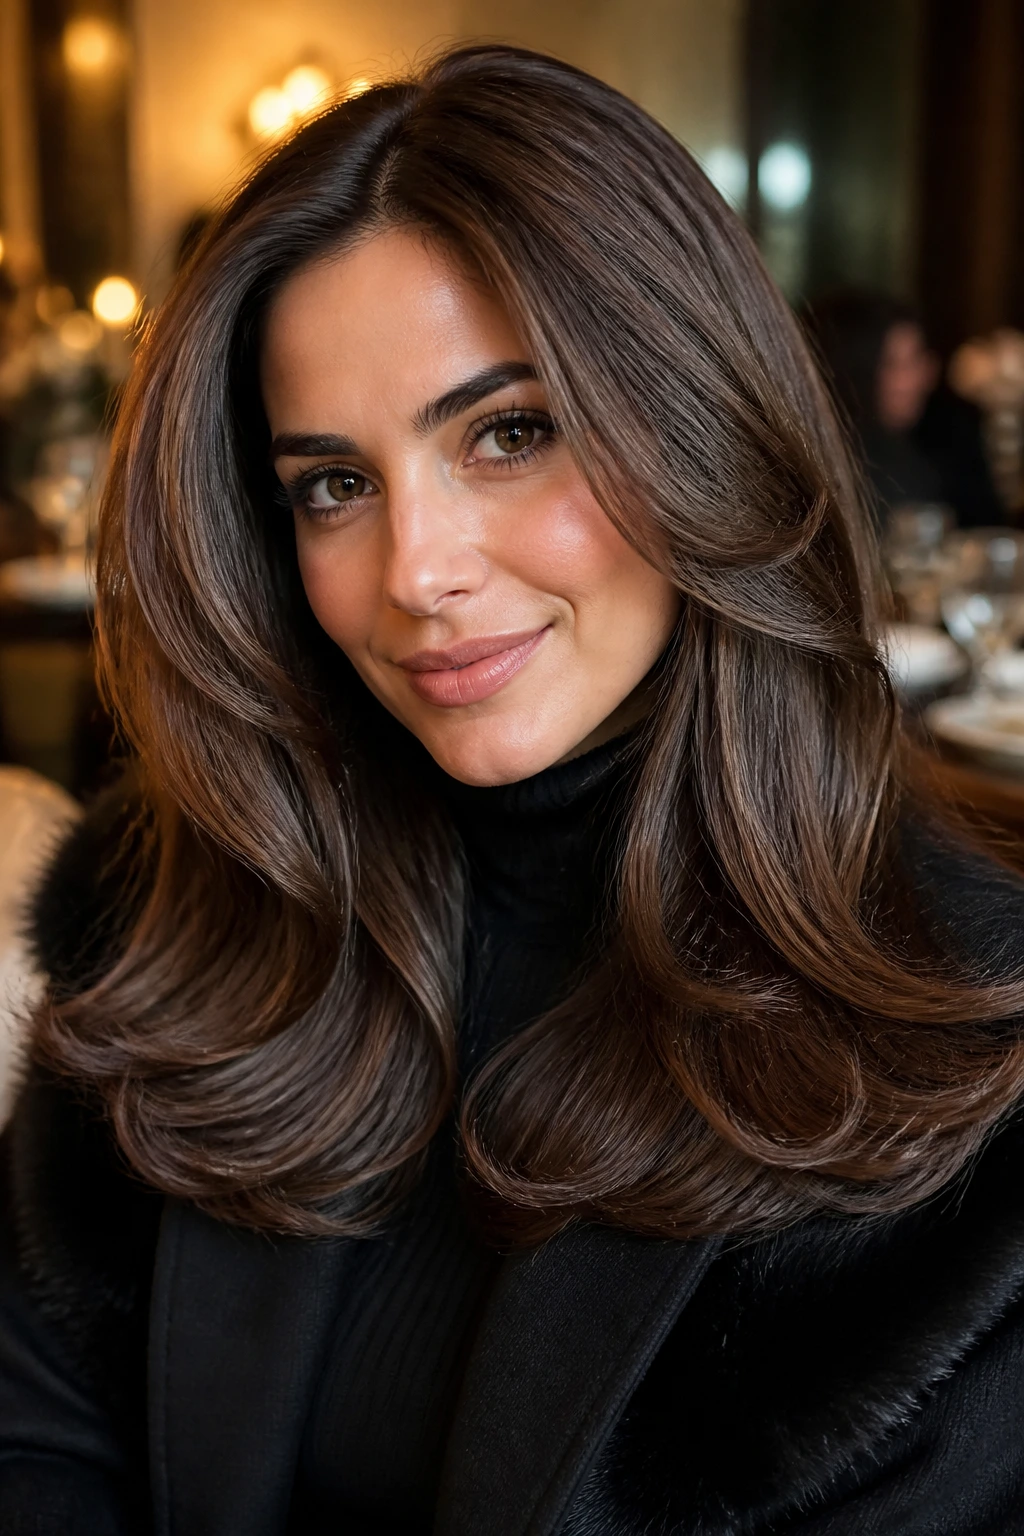
Can a blowout survive winter? Yes, if you set it properly and don’t treat it like a one-step hairstyle. A bouncy blowout with bent ends can hold its shape through a dinner, a commute, and a long coat shuffle, especially if you cool the hair all the way before touching it.
Start with a heat protectant, then blow-dry in sections with a round brush. Roll the ends under or out, depending on the look you want, and let each section cool on the brush or in a loose clip before moving on. That cooling step locks in the bend and keeps the front from going flat too fast.
How to keep it from drooping
- Blow-dry the roots first for lift.
- Use medium heat, not blasting hot air.
- Finish with a light mist of flexible spray.
- Avoid heavy oils near the crown.
I like the bent-end version because it has movement without looking fussy. It’s one of the few styles that feels dressed up without needing a single pin.
22. Soft Low Knot With Ribbon

A soft low knot with a ribbon is one of those styles that looks gentle in a way winter hair often doesn’t. The ribbon hides the elastic, covers the dull part of the base, and gives the knot a finished look without making it formal.
Use a velvet, silk, or satin ribbon that’s about 1/2 inch to 1 inch wide. Tie the low knot first, then wrap the ribbon around the base and knot it beneath the bun or off to one side. Keep the knot loose enough that the ribbon doesn’t flatten the hair. If your hair is shoulder length or longer, a little texture in the knot helps it hold shape better than a perfectly smooth twist.
This is a good one for days when you want something soft, not severe. It also plays nicely with earrings and high necklines, which matters more than people admit.
The nicest part? It makes a simple style look finished with almost no extra work.
Some winter styles last because they are elaborate. The better ones last because they sit low, protect the ends, and don’t fight your clothes. That’s the real pattern here, and once you notice it, choosing gets easier. A braid, a bun, a twist, or a scarf can all do the job if the base is calm and the length is protected.
I’d keep a satin scrunchie, a medium claw clip, and a few good bobby pins near the front of the drawer. That small kit covers most bad hair mornings without making you think too hard.
