



Medium hair is a funny length. It’s long enough to braid, twist, clip, and pin, but short enough that a rushed morning can turn it into a cloud of flyaways by second period. That’s exactly why easy medium hairstyles for school mornings matter so much: they need to look intentional, hold up to backpacks, and take less time than it takes to find both shoes.
No one needs a 30-minute styling routine before the first bell. No one. A good school hairstyle should work with second-day hair, a little frizz, a cowlick that refuses to cooperate, and maybe one bobby pin you lost to the bathroom sink last week. The best styles do not fight your hair. They use what’s already there.
Medium-length hair is actually a sweet spot for this. It has enough weight to stay down in a ponytail, enough length to braid without feeling tiny, and enough movement to make half-up styles look soft instead of stiff. Add a brush, a few clear elastics, a claw clip, and maybe a ribbon or scarf if you feel like it, and you’re set.
Some of these looks are neat and polished. Some are a little messy on purpose. All of them are realistic for a school morning when the clock feels rude and the mirror is not being helpful.
1. Half-Up Claw Clip Twist for Medium Hair
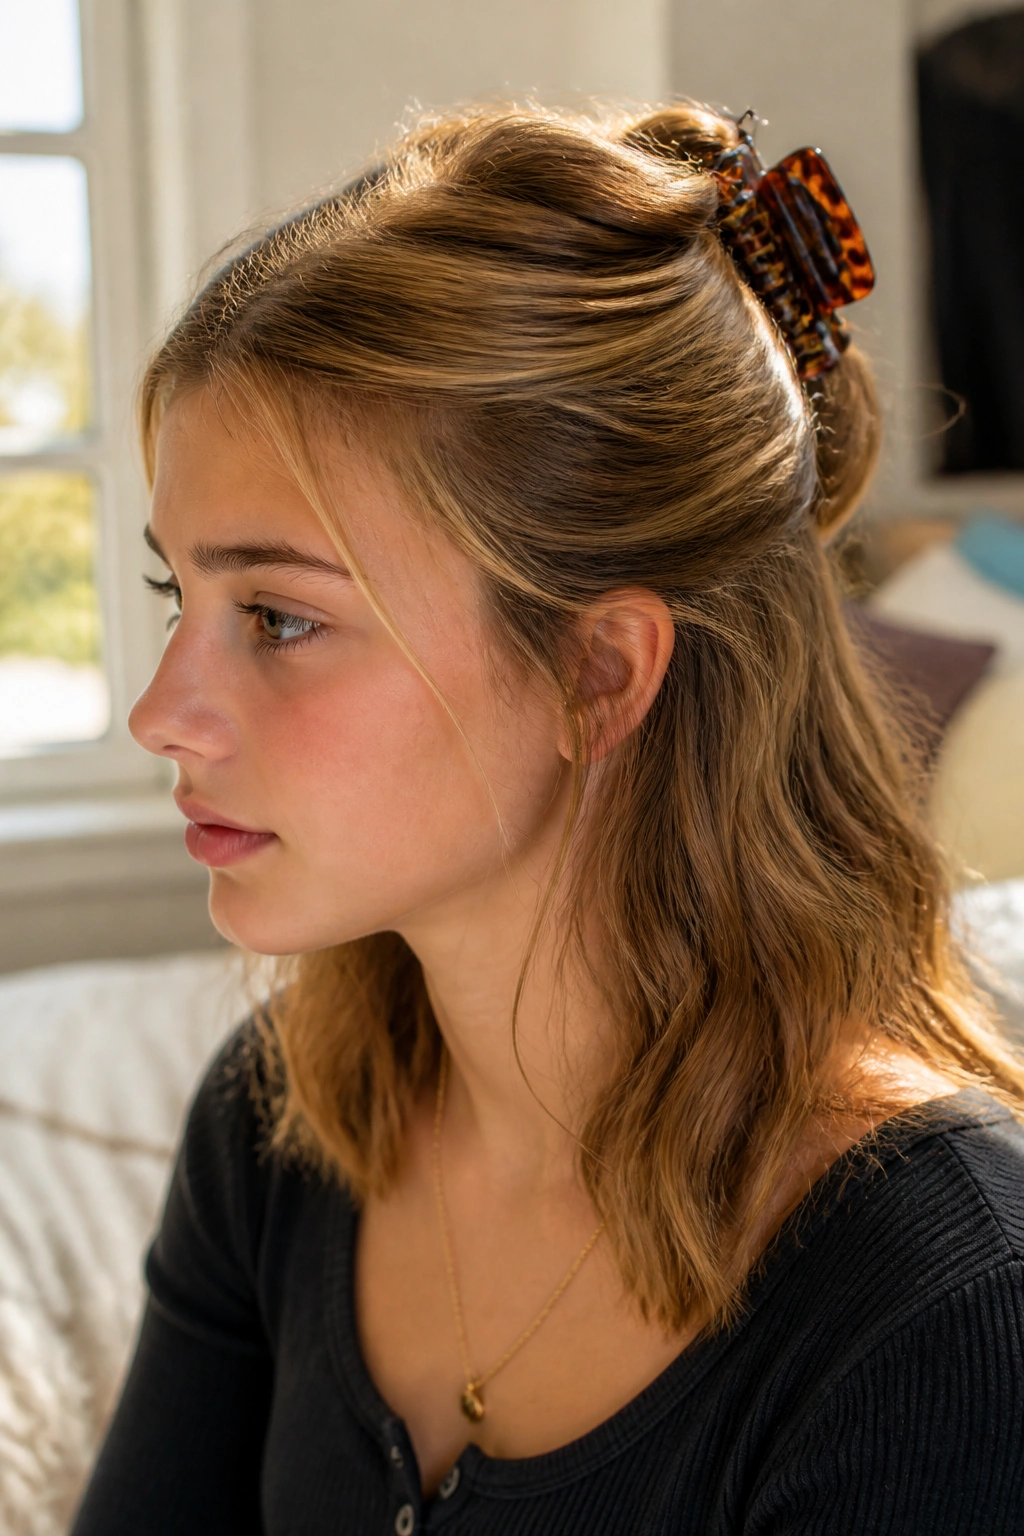
A claw clip earns its keep on medium hair. It takes the top section off your face, keeps the crown from puffing out, and still leaves enough length down that the style does not feel severe.
Start by gathering the hair from your temples back to the top of your ears. Twist it once or twice, fold the twist upward, and clip it in place so the ends tuck into the clip or fan out a little behind it. That loose finish is part of the charm. If you pull everything too tight, the style starts looking like a job interview. Nobody wants that before homeroom.
Why It Works So Fast
The twist gives you shape without needing perfect sectioning. It also hides greasy roots well, which is why this one gets repeated so often on rushed mornings. Medium hair usually sits in the clip better than very long hair, which can drag the clip down.
A few small details make a big difference:
- Use a medium-sized claw clip that grabs the full twist without sliding.
- Add a light mist of water or leave-in spray if the top layer is frizzy.
- Leave two face-framing pieces out if you want it softer.
- If your hair is layered, tuck the shorter ends into the twist first.
My favorite trick: tilt the clip slightly off-center instead of placing it dead in the middle. It looks more relaxed and holds better, too.
2. Sleek Low Ponytail for School Mornings
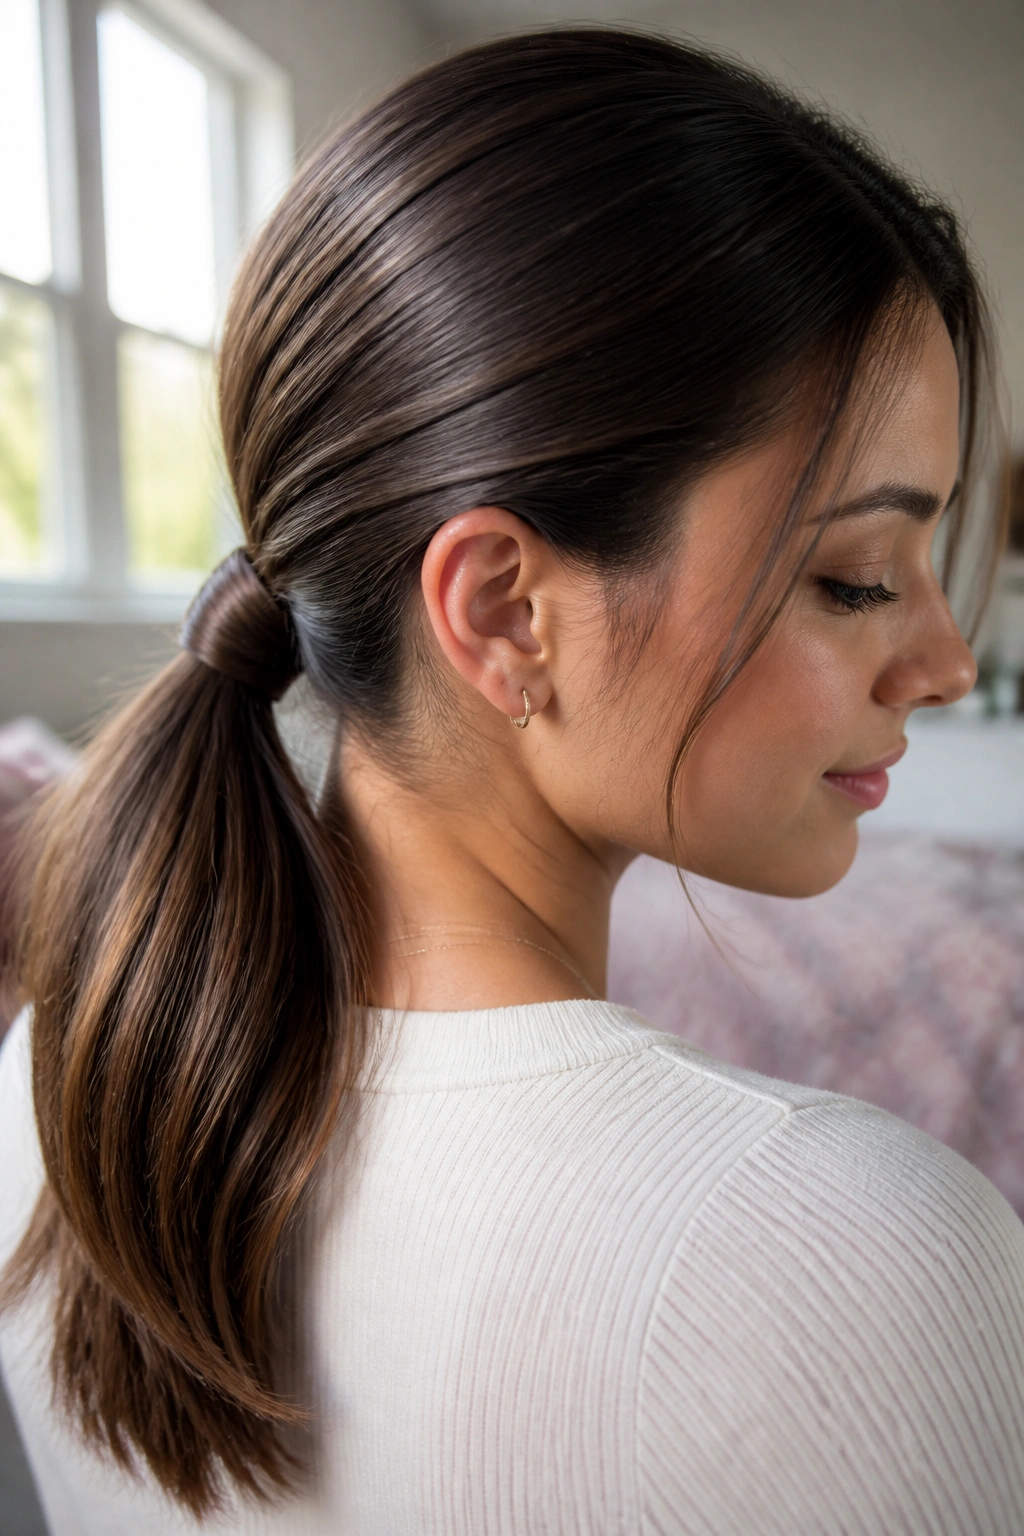
A low ponytail sounds basic until you do it well. Then it looks clean, calm, and far more pulled together than a rushed high pony ever does.
The key is the base. Brush the hair back from a middle part or a soft side part, smooth the top with your hands, and secure the ponytail at the nape of your neck. Wrap a small strand around the elastic if you want it to look finished. That one step changes everything. It takes maybe 20 seconds, and it makes the style look like you tried harder than you did.
This is the style I’d pick on a morning when my hair is a little flat but not dirty enough for dry shampoo. It works best when the ends are still moving a little, because then the ponytail has swing instead of looking stiff. Medium hair sits nicely in this shape; it does not pull as much as longer hair, and it does not disappear the way shorter hair can.
If you want the top to stay smooth, brush with a tiny bit of styling cream or dampen the brush lightly. Too much product makes the roots look greasy. Too little and the flyaways win.
3. Bubble Ponytail for Medium Hair
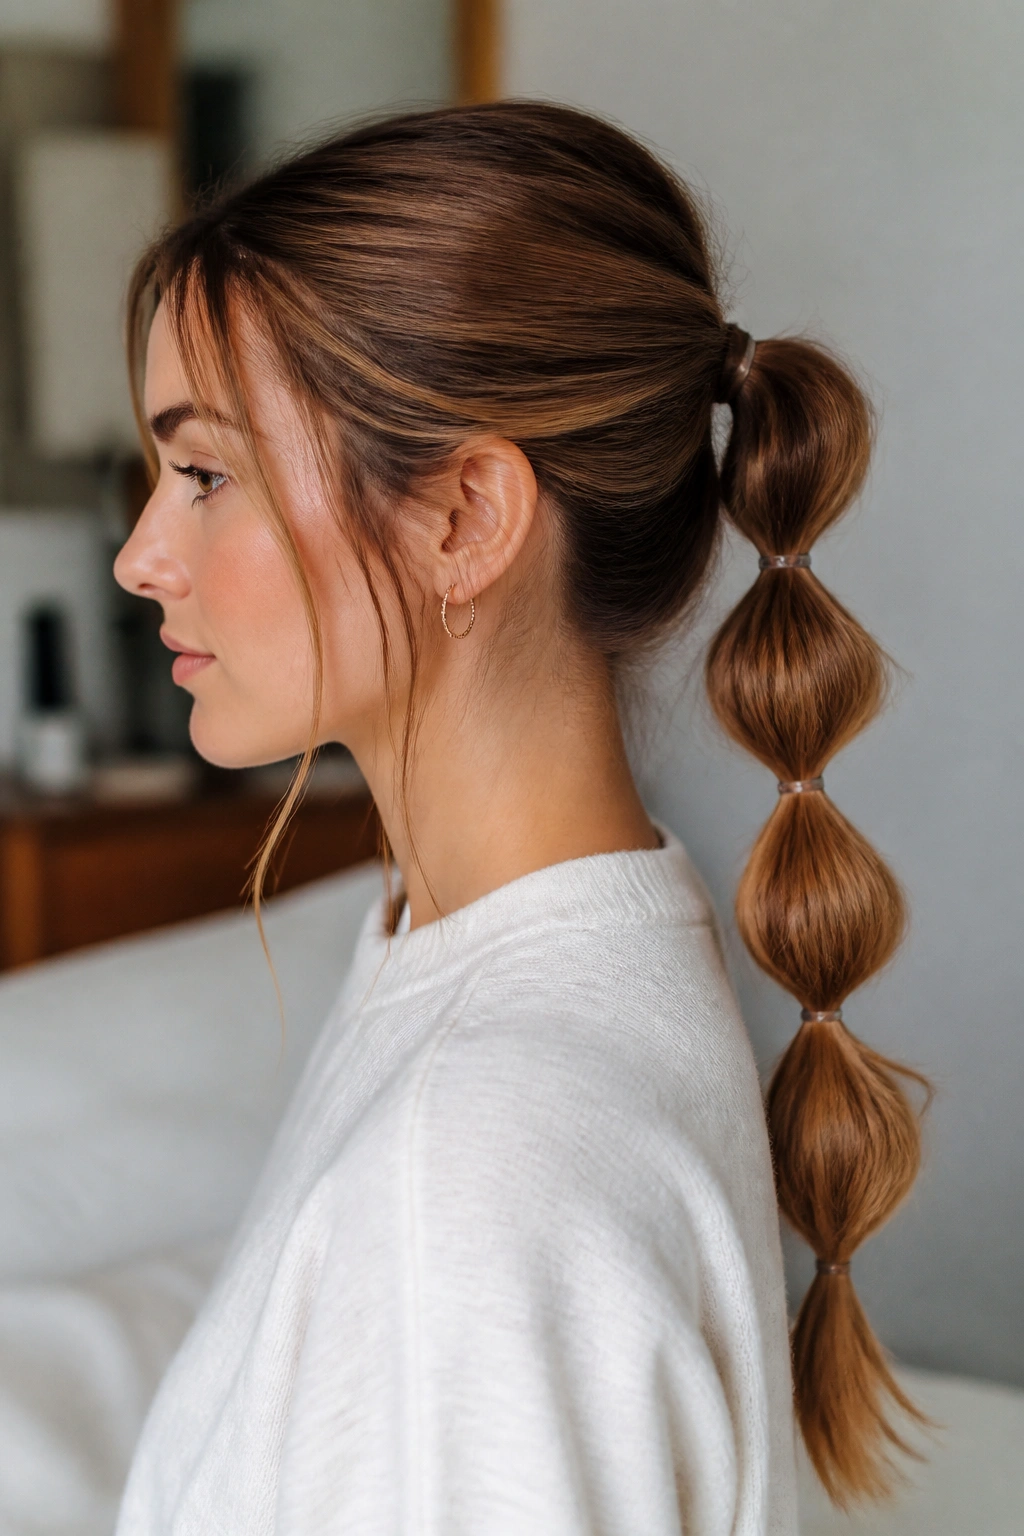
Why do bubble ponytails look so put together even when they take four minutes? Because the style gives structure where a plain ponytail can fall flat.
Tie your hair into a low or mid ponytail, then add small clear elastics every 2 to 3 inches down the length. After each elastic, gently tug the hair between the bands outward until it makes a rounded “bubble.” That’s the whole trick. The shape does the work for you.
How to Keep the Bubbles Even
You do not need perfect spacing, but close spacing helps if your hair is layered or fine. If the bubbles start collapsing, tug them a little more at the sides, not just the center. That keeps the round shape balanced instead of lopsided.
- Use 4 to 6 small elastics for shoulder-length hair.
- Keep the first section above the nape a little tighter.
- Tug each bubble with two fingers, not your whole hand.
- Finish with a tiny bit of hairspray on the surface if your hair slips.
This style is one of my favorites for medium hair because it looks like you made a choice. It has shape. It has movement. And it works even when the ponytail itself is not very thick.
4. Crown Braid Half-Up Style
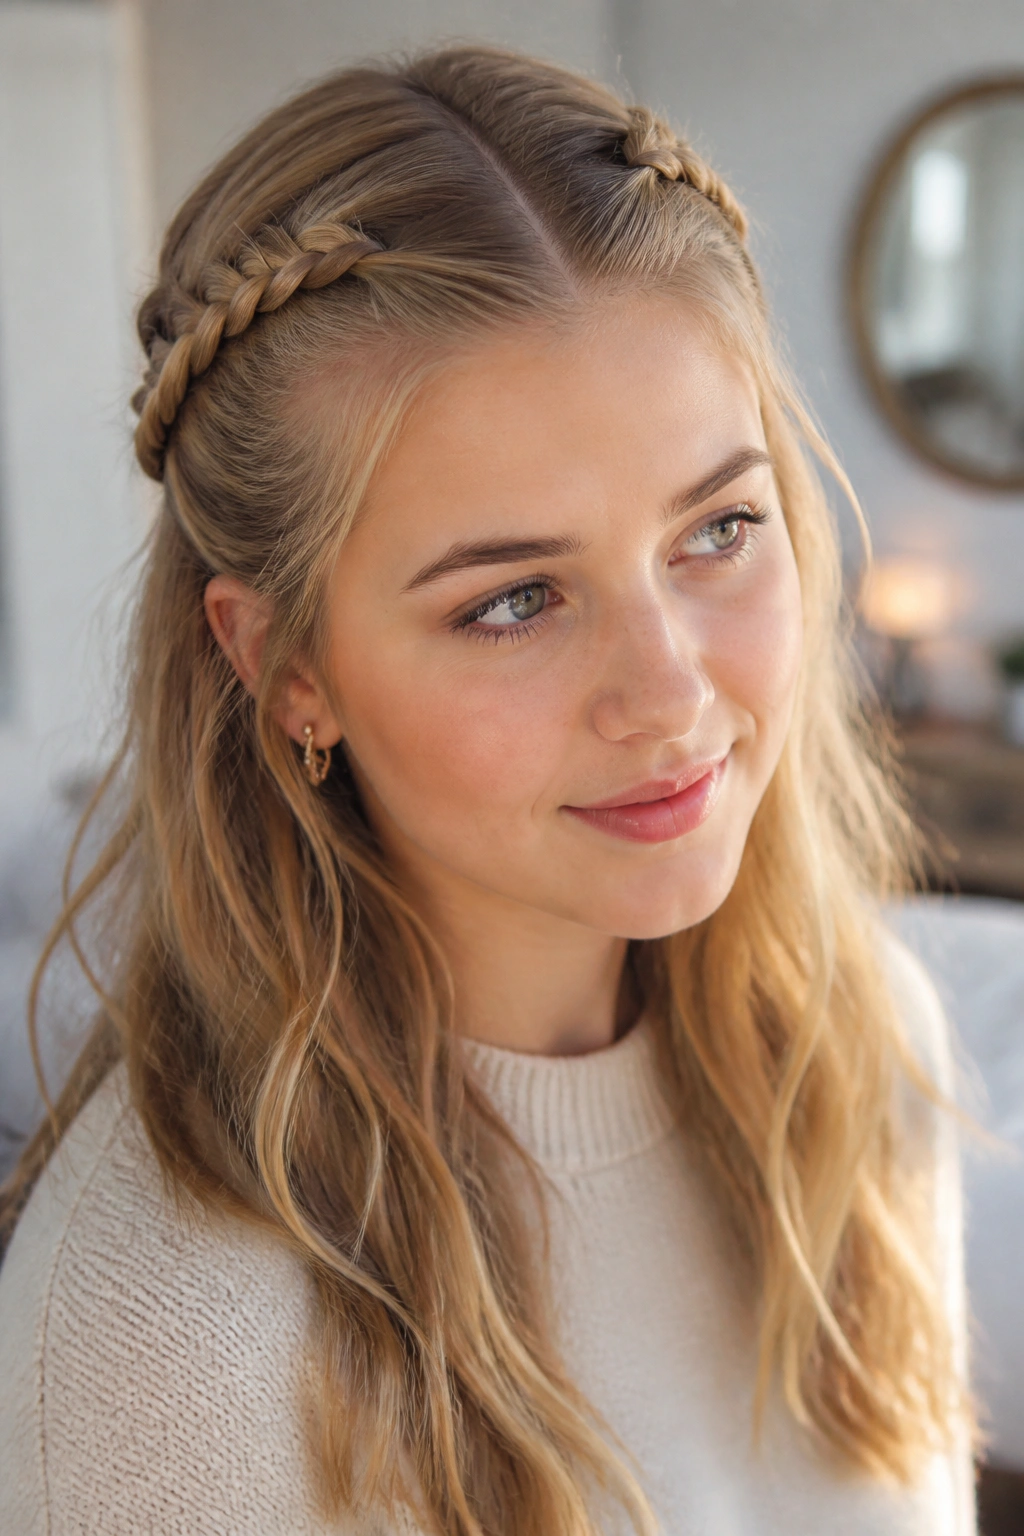
If you like hair off your face but hate the feeling of a full braid dragging your head down, this is the one. A crown braid half-up style gives you that school-day polish without taking all morning.
Take a section from one temple, braid it along the hairline toward the back, and pin it behind the opposite ear. Do the same on the other side if you want a fuller crown, or leave it as one side braid for a quicker version. The rest of the hair stays down, which keeps the look soft and easy.
This style is especially good when your front layers keep falling into your eyes. It also works well with medium hair that has a bit of wave, because the braid blends into the loose hair instead of looking too sharp. Straight hair can do it too; you just need to pull the braid edges out a little so it looks fuller.
A small braid like this can survive a full school day better than people expect. Pin the ends with two bobby pins crossed in an X, and the braid stays put. If your part is messy, the style still works. Honestly, that is part of its appeal.
5. Messy Top Knot with Face-Framing Pieces

Late alarm? Flat crown? Hair that has decided to do its own thing? Fine. Put it up.
A messy top knot is the school-morning style that forgives almost everything. Gather your hair at the crown, twist it into a loose bun, and secure it with a coil elastic or two pins. Pull out a few face-framing pieces near the temples and the front of your ears. Those loose pieces stop the bun from looking harsh.
The Bits That Make It Look Intentional
The bun should sit high enough to clear your neckline, but not so high that it looks like a tiny sculpture. Leave the ends a little uneven. Smooth buns can look nice, sure, but this style works because it feels lived in.
- Twist the hair once before wrapping it.
- Use a second elastic if your hair is thick.
- Tug the bun slightly wider after pinning.
- Keep the front pieces thin, not chunky.
I like this one best on second-day hair. Freshly washed hair can be slippery, and the bun may slide unless you add texture spray or a bit of dry shampoo at the roots. On hair with a little grip, though, it holds beautifully.
6. Rope-Braid Ponytail

A rope braid looks more intricate than it is. That’s the whole appeal.
Pull your hair into a low ponytail, split the tail into two sections, twist each section in the same direction, then wrap them around each other in the opposite direction. Secure the end with a small elastic. If the twist starts unraveling, your sections were probably twisted the wrong way. It happens. Fix it and move on.
This style works especially well on medium hair because the length is enough to show the rope pattern without making your arms tired halfway through. It also holds better than a plain braid on silky hair, which tends to slide loose by lunchtime.
You can keep it neat for a more polished look, or loosen it slightly for something softer. I prefer it a little imperfect. The braid reads better that way, and the hair around the face stays touchable instead of stiff.
If your hair is layered, smooth the top first and let the ends fall a bit unevenly. That keeps the ponytail from looking chopped off at the bottom.
7. Clipped-Back Loose Waves

Sometimes you do not need a full updo. You just need your hair out of your eyes.
Loose waves clipped back from both temples are a quick fix for medium hair that already has texture. If your hair dries with a bend, or you curled it the night before and slept on it, this style takes under five minutes. Pull back the front sections, twist them once, and secure each side with a barrette, snap clip, or tiny claw clip. Leave the rest down.
The trick is to clip slightly above the ear, not too far back. If you go too low, the style disappears. If you go too high, it starts looking overdone. A little lift at the temples makes your hair look fuller on top without needing heat.
I like this one on days when you want your hair down but not in your face. It also plays nicely with layers, because the loose front pieces blend instead of breaking apart. If your ends are a little dry, a pea-sized amount of cream through the tips helps the whole style look softer.
8. Double Mini Buns

Double mini buns are playful, fast, and surprisingly useful when your medium hair is refusing to cooperate. They also make a center part look deliberate instead of plain.
Split the hair down the middle, gather each side near the crown or a little lower, twist each section into a small bun, and pin it down. The buns do not need to be exact twins. In fact, a tiny difference between the two usually makes the style look less stiff.
When This Style Helps Most
This one is a solid choice for hair that is thick at the roots but a little frayed at the ends. The buns keep the top clean while the shorter pieces can stay tucked away. If you have layers, expect a few ends to poke out. That is fine.
- Use small clear elastics first, then pins.
- Keep the buns low if you want a calmer look.
- Make them higher if you want more lift at the crown.
- Smooth the part with a toothbrush or small brush for a cleaner finish.
Medium hair gives you enough length for proper buns without making them heavy. That matters. Heavy buns can slip, and then the whole thing turns into a midmorning rescue mission.
9. Dutch Braid Into a Low Bun

If you need a style that stays put through gym class, wind, and a backpack strap rubbing your shoulder, this one earns its spot.
Start a Dutch braid at the crown or along the top center section. Braid downward for a few inches, then gather the remaining hair and coil it into a low bun at the nape. The braid gives structure, and the bun keeps the ends tucked away. It looks like you spent more time than you did.
This is the style I reach for when I want hair secured but not scraped back so tightly that my head aches by third period. The Dutch braid lifts the front a little, which is nice on medium hair because it adds shape up top without puffing out too much.
A few shorter layers can escape from the braid, and that actually softens the look. If your hair is slippery, braid the first few stitches snugly. The beginning of the braid is what keeps the whole style anchored. After that, the bun can be looser.
It is not the fastest style on this list. But it is one of the most reliable.
10. Side Ponytail with a Ribbon
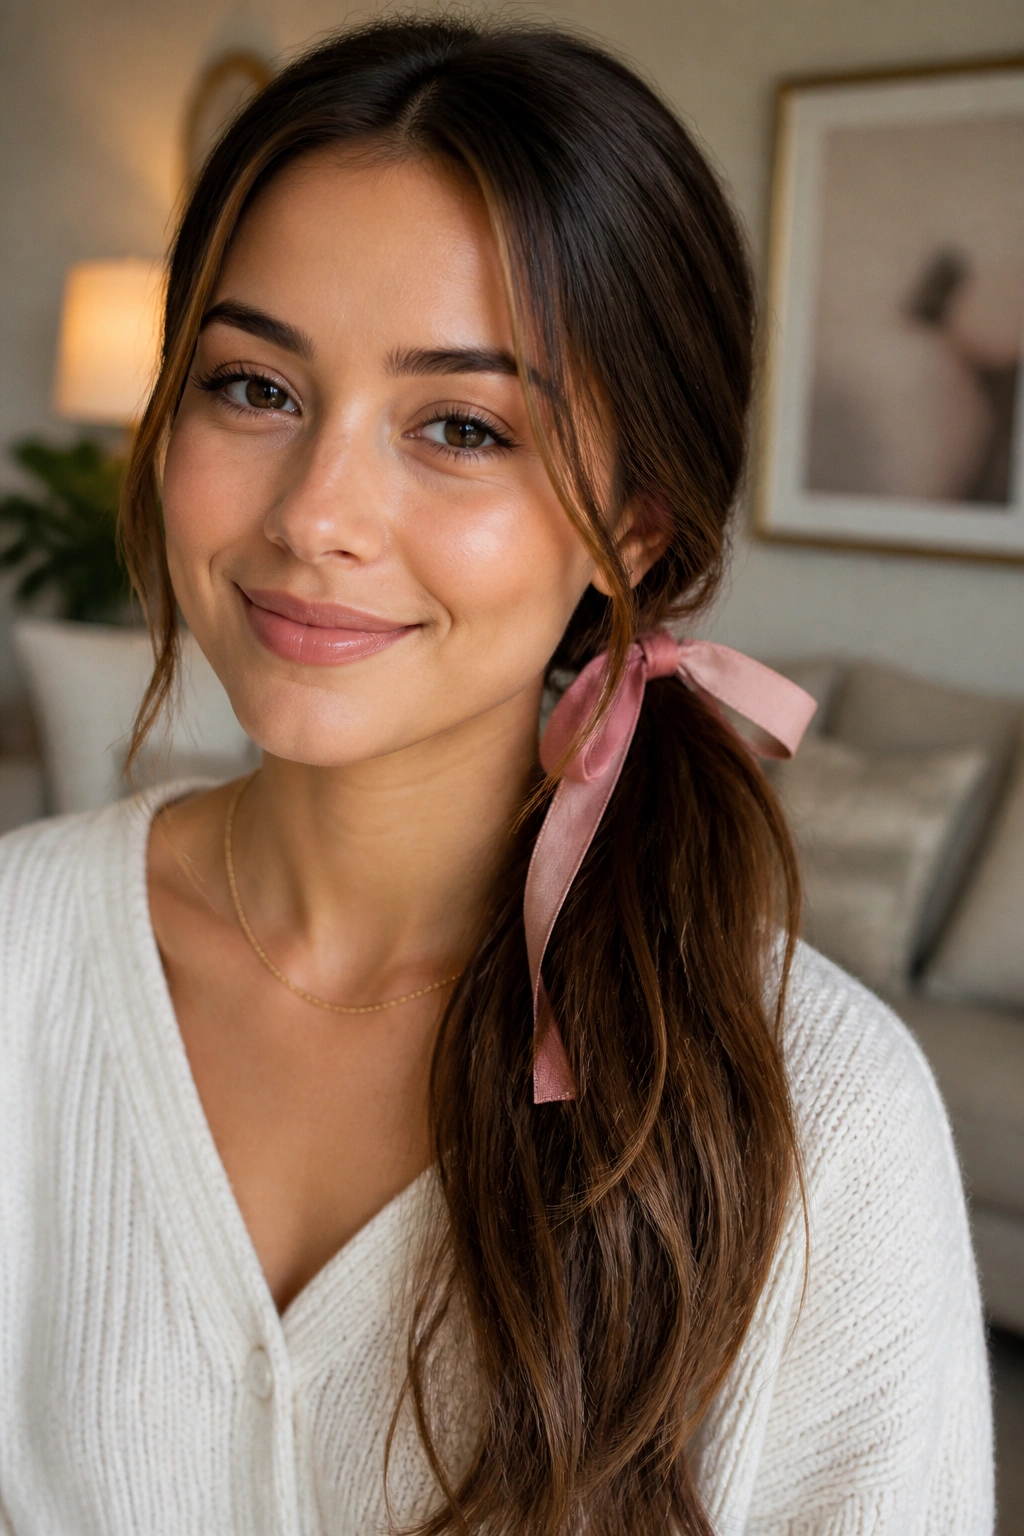
A side ponytail can look juvenile or chic. The difference is usually the finish.
Brush the hair over one shoulder and gather it low and to one side, just under the ear. Tie it with a covered elastic, then wrap a ribbon around the base or tie it into a simple bow. A satin ribbon gives it a softer look. A grosgrain ribbon feels a little sturdier and keeps its shape better.
This style works well when your hair is layered, because the side placement lets the layers fall in a way that looks intentional. It also helps if your hair has a rough texture at the back but looks fine around the front. The ribbon draws the eye upward and distracts from the bits that are not behaving.
The part can be deep or soft. I usually prefer a soft side part because it feels less formal. If you want the ponytail to stay in place, tease the crown very lightly before gathering it. Not much. Just enough to keep the top from collapsing after an hour.
A ribbon makes a plain ponytail feel finished. That’s the point.
11. Half-Up Knotted Crown

What do you do when a braid feels like too much work but leaving everything down feels plain? Tie the front back in a knot.
Take two small sections from each side of your head, bring them to the back, and knot them once or twice over the crown area. Secure the knot with a pin under the fold if needed. Then leave the rest of the hair down. It sounds minimal, and it is, but it changes the shape of the whole style.
Why the Knot Works
The knot creates a clean line across the head without requiring a full braid. It also keeps the front layers from falling into your eyes, which is the main battle on school mornings anyway.
- Use slightly damp fingers to smooth the sections before knotting.
- Cross the pieces evenly so the knot sits flat.
- Hide the pins under the folded part of the knot.
- Leave the lower hair loose and brushed through.
This style is especially good on medium hair with a little wave. The knot keeps the top neat while the bottom keeps some movement. If your hair is very straight, a little texturizing spray at the roots helps the knot hold better.
12. Pigtail Braids with Curled Ends

Pigtail braids are not just for little kids. On medium hair, they can look crisp, fresh, and a little sporty in the best way.
Part the hair straight down the middle and braid each side from just below the ear to the ends. Leave the last inch or two out if you want to curl them under with a small iron, or just let them fall naturally if your texture already bends at the bottom. That tiny detail keeps the style from looking flat.
I like this look when I want my hair to stay controlled all day. It works well for classes, walking between buildings, and anything that involves moving a lot. Medium hair is long enough for the braids to look defined, but not so long that they get heavy.
If your hair has layers, the braids may look a little uneven. Good. That keeps them from looking too strict. Pull the outer edges of each braid gently if you want them thicker. Do not tug too hard or the braid starts loosening from the top, which is annoying to fix once you are already late.
13. Low Side Bun with Hidden Pins

A low side bun is one of those styles that looks calm even when your morning was not.
Sweep all the hair to one side, twist it into a bun just below the ear, and pin it from underneath so the pins stay hidden. The bun should sit close to the head, not floating away from it. That little detail makes the style feel neat instead of fussy.
This is a good choice for medium hair when you want something less predictable than a regular low bun. The side placement gives the whole look a softer line. It also works nicely with side parts, which can make the style feel a bit more relaxed.
If your hair is layered, start with a tight twist and then loosen the bun only after it’s pinned. That way the shorter pieces are less likely to pop free. A few flyaways are fine. A halo of loose ends is not.
I keep coming back to this style because it can look polished with almost no effort. That sounds like hype, but here it’s true in the plainest way.
14. Scarf-Wrapped Ponytail

A scarf-wrapped ponytail fixes two problems at once: it hides a boring elastic, and it gives medium hair a little personality.
Tie your hair into a low or mid ponytail, then wrap a thin scarf around the base and knot it off to one side. Let the tails hang down with the ponytail, or wrap them around the elastic a second time if you want a tighter finish. A narrow scarf works better than a huge one on medium hair because it stays light.
Small Choices That Matter
Choose a scarf that has some grip. Very slippery silk can slide if your ponytail is silky too. A cotton or matte fabric usually stays in place better. If you do use silk, make the first wrap snug.
- Keep the ponytail smooth before adding the scarf.
- Match the scarf width to your hair thickness.
- Tie the knot off-center for a softer look.
- Tuck the scarf tail under the pony if it feels bulky.
This style is a good way to make a simple ponytail feel more finished without using heat or lots of pins. It is one of the easiest school hairstyles to dress up a plain outfit, too.
15. Pull-Through Braid
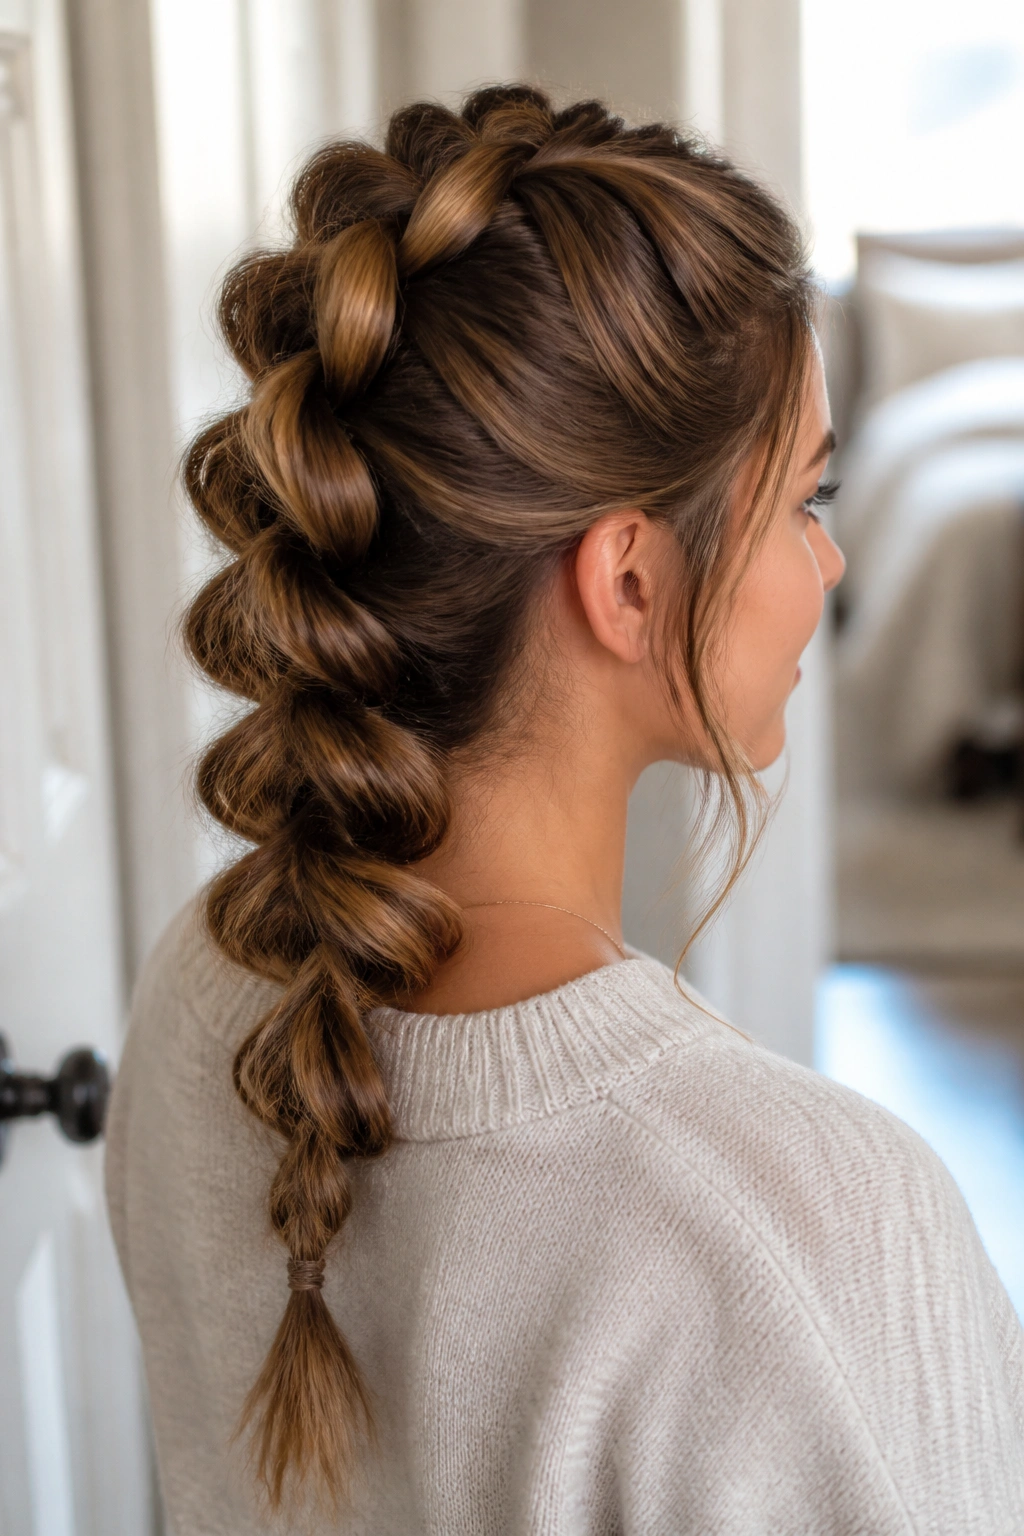
A pull-through braid looks like a thick, complicated braid. It isn’t. That’s what makes it so useful.
Start with a small section at the crown and tie it off. Add another section underneath it and tie that one too. Then split the first ponytail, pull the second ponytail through the middle, and clip the first section out of the way. Repeat this down the length of the hair, adding new sections each time. At the end, tug the sides of each “loop” a little so the braid looks full.
The style is especially good for medium hair that feels too thin for a chunky braid but too busy for a plain ponytail. It creates volume without needing teasing or a lot of product. If your hair is layered, the loops hide the shorter pieces better than a standard three-strand braid.
It does take more elastics than a regular braid, so keep a small stack nearby. Clear elastics are easiest to hide, though black ones work fine on darker hair. The first time you do this, it may feel awkward. After that, it gets fast. Really fast.
16. Twisted Half-Up Ponytail

A twisted half-up ponytail is one of those styles that saves you when you want shape up top but still like having hair down.
Take two sections from the front, twist them back toward the center, and join them with a small elastic. You can stop there, or you can gather a little more hair from behind the twists to make the half-up section feel fuller. The rest hangs loose. Clean, easy, done.
Unlike a full ponytail, this style keeps the crown from flattening too much. That matters on medium hair, where the top can go a little limp if it’s been brushed back all day. The twist also gives the front some lift, which helps if your hair parts itself in weird places before breakfast.
Best Way to Wear It
This is a good choice if you want something softer than a braid and quicker than a bun. It works on straight hair, wavy hair, and hair with a bit of natural bend.
- Twist both sides in the same direction for a cleaner line.
- Pin underneath if the elastic shows.
- Pull the twist slightly outward for volume.
- Leave the ends loose if you want a more casual finish.
It’s a small style, but it changes the whole mood of the hair.
17. Loose French Braid into a Ponytail

A loose French braid into a ponytail is the style I’d pick when I want one look that can survive almost anything a school day throws at it.
Start a French braid at the top of the head, but do not braid all the way down. Stop around the nape, secure the braid with one hand, then pull the rest into a low ponytail. That mix of braid and ponytail keeps the top tidy while the length stays easy to manage.
This works especially well on medium hair because the braid has enough length to show off the pattern without eating up all your hair. It also gives you a little grip at the crown, which helps if your hair is fine or slippery. A light dusting of texturizing spray at the roots can make the braid hold better without turning crunchy.
If you are in a rush, braid only the center top section and leave the sides a little softer. If you have more time, braid a wider panel across the top and tug the edges slightly so it looks fuller. Either way, it stays practical. And practical beats perfect when you are trying to get out the door on time.
