



A twist bun can look more finished than a blowout on a good day. That is the real reason twist bun styles keep showing up for work, weddings, dinners, and those mornings when your hair has a mind of its own.
The useful part is that a polished look does not mean stiff hair plastered to the scalp. A good twist bun has shape, shine, and a clean outline, but it still looks like hair — not a helmet. The difference usually comes down to three small things: where the bun sits, how tightly the twists are pulled, and how the ends are tucked.
People often overdo the front and underdo the structure. They smooth the top until it looks flat, then wonder why the bun collapses by lunchtime. A better approach is to build a firm base with a tail comb, a few well-placed pins, and a little tension where the bun needs it most. The finish can be sleek, soft, or somewhere in the middle, but the bones of the style need to be clean.
That is where twist bun styles earn their keep. Some are better for fine hair, some handle thick hair without turning into a lump, and some are better when you want the room to notice your earrings, your neckline, or the fact that you clearly knew what you were doing with your hair. The first one is the easiest place to start.
1. Sleek Low Twist Bun
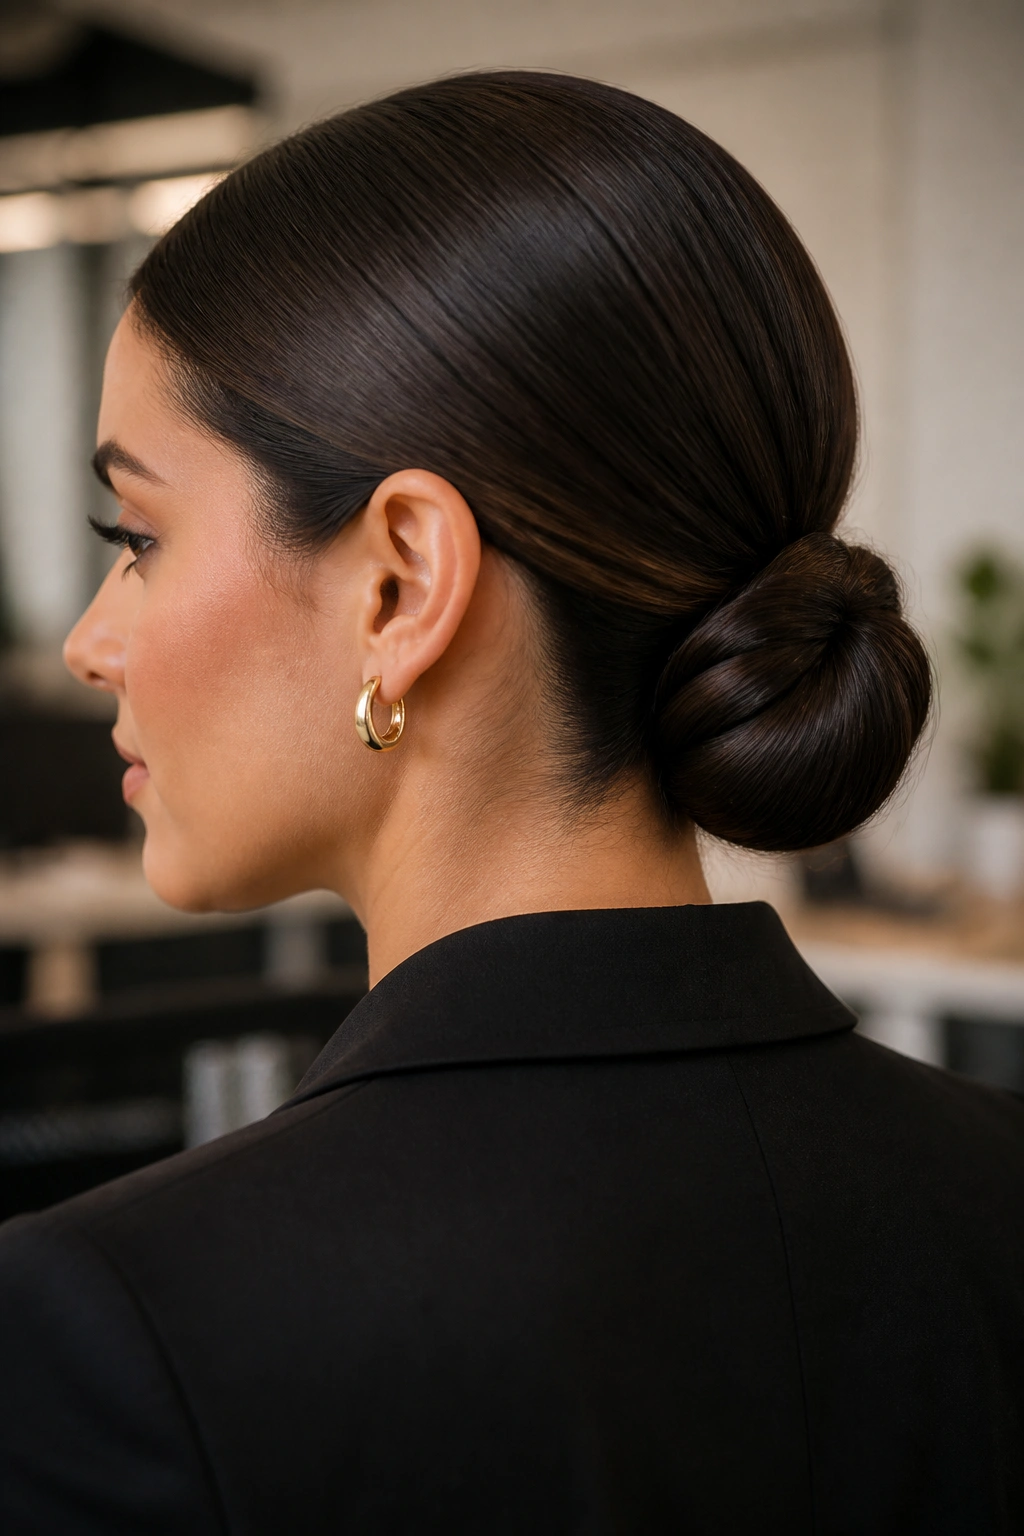
The sleek low twist bun is the one I reach for when the brief says polished, not fussy. It sits low at the nape, keeps the silhouette neat, and avoids the severe look that a slicked-back knot can sometimes have.
Why It Works on Almost Any Hair Type
A low placement gives you control. The bun stays close to the head, so the twists can be snug without pulling the whole style too tight. That matters if your hair is layered or a little slippery, because a low bun gives the pins a place to grip.
Use a small amount of smoothing cream or lightweight gel at the roots, then brush the hair straight back or with a clean side part. Twist each side toward the center, wrap them into a bun, and pin underneath so the surface stays smooth. Four to six bobby pins is often enough if the base is tight.
- Best on medium to long hair
- Works well for office days, interviews, and formal dinners
- Holds better with second-day hair than freshly washed hair
- Needs only one small elastic and a few pins
Pro tip: keep the bun slightly oval, not round. That tiny shape shift makes the style look more tailored and less like a quick knot.
2. Side-Swept Twist Chignon
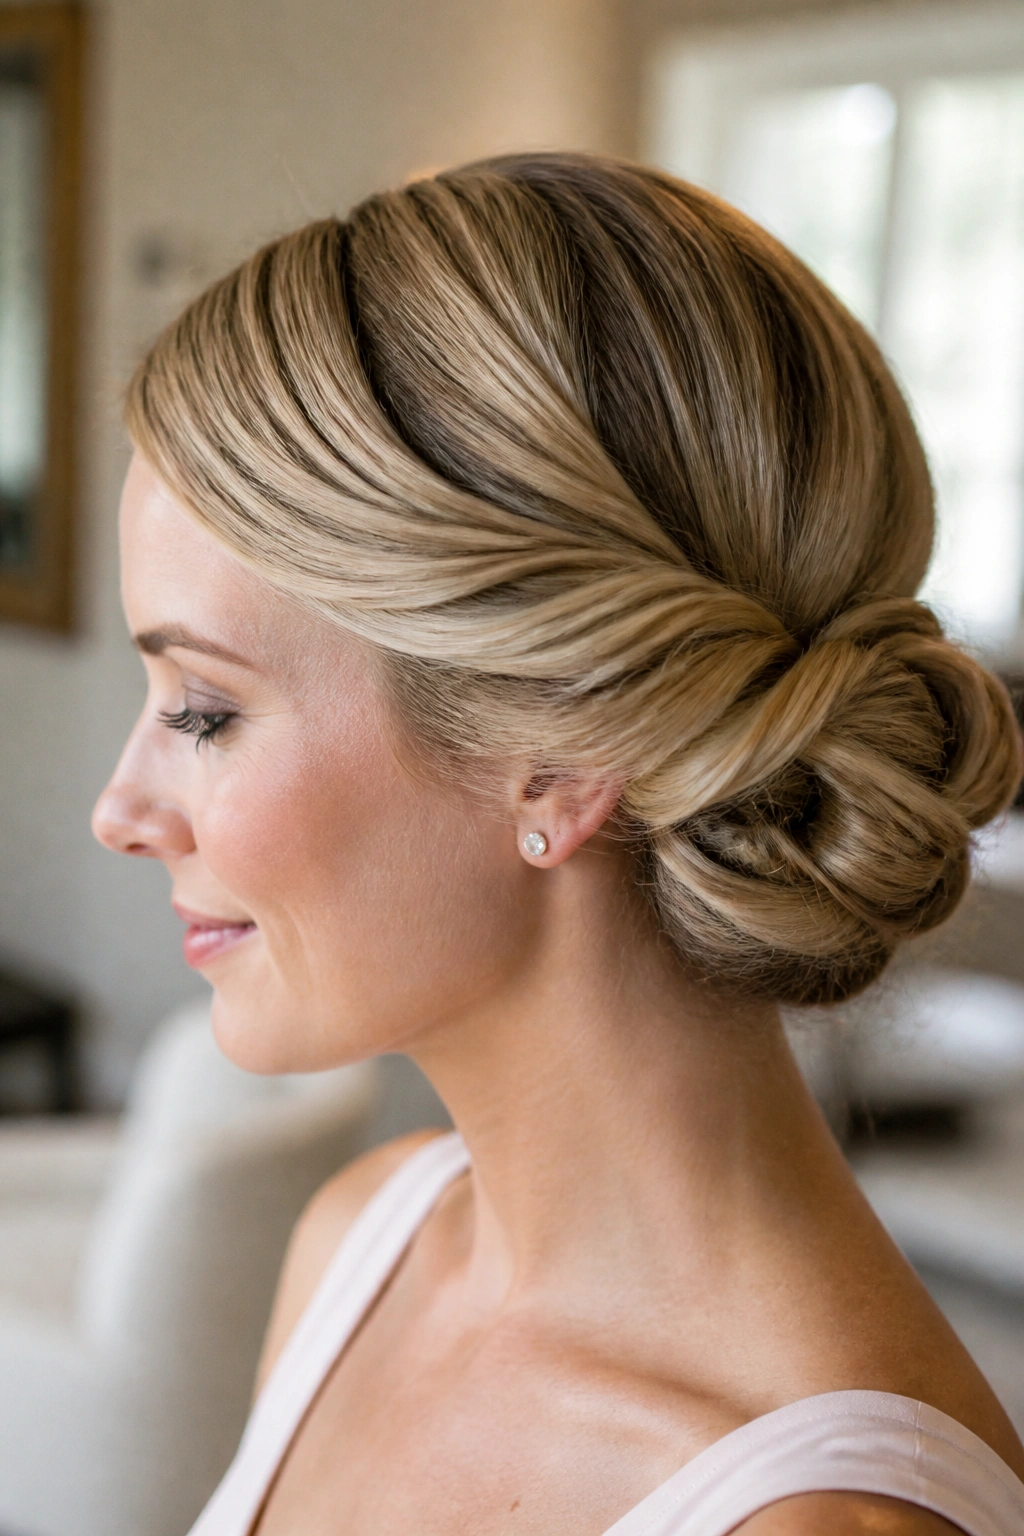
A side-swept twist chignon has a sneaky advantage: it makes even plain hair look deliberate. The off-center placement gives the style a little movement, and that movement is what keeps it from feeling severe.
Start with a deep side part, then gather the hair slightly behind one ear instead of directly at the center of the nape. Twist the larger side first, lay it toward the lower back of the head, and tuck the bun just off-center. The shape should feel controlled, but not frozen in place.
What I like most about this version is the face line. A side sweep softens the cheek area and works well if you want one side of the face more open than the other. It also helps if your hair has a stubborn cowlick at the crown, because the asymmetry distracts from it instead of fighting it.
Keep the twist smooth, but do not iron out every bit of texture. A tiny bit of bend makes the chignon look human. And that is the point.
3. Double Rope Twist Bun
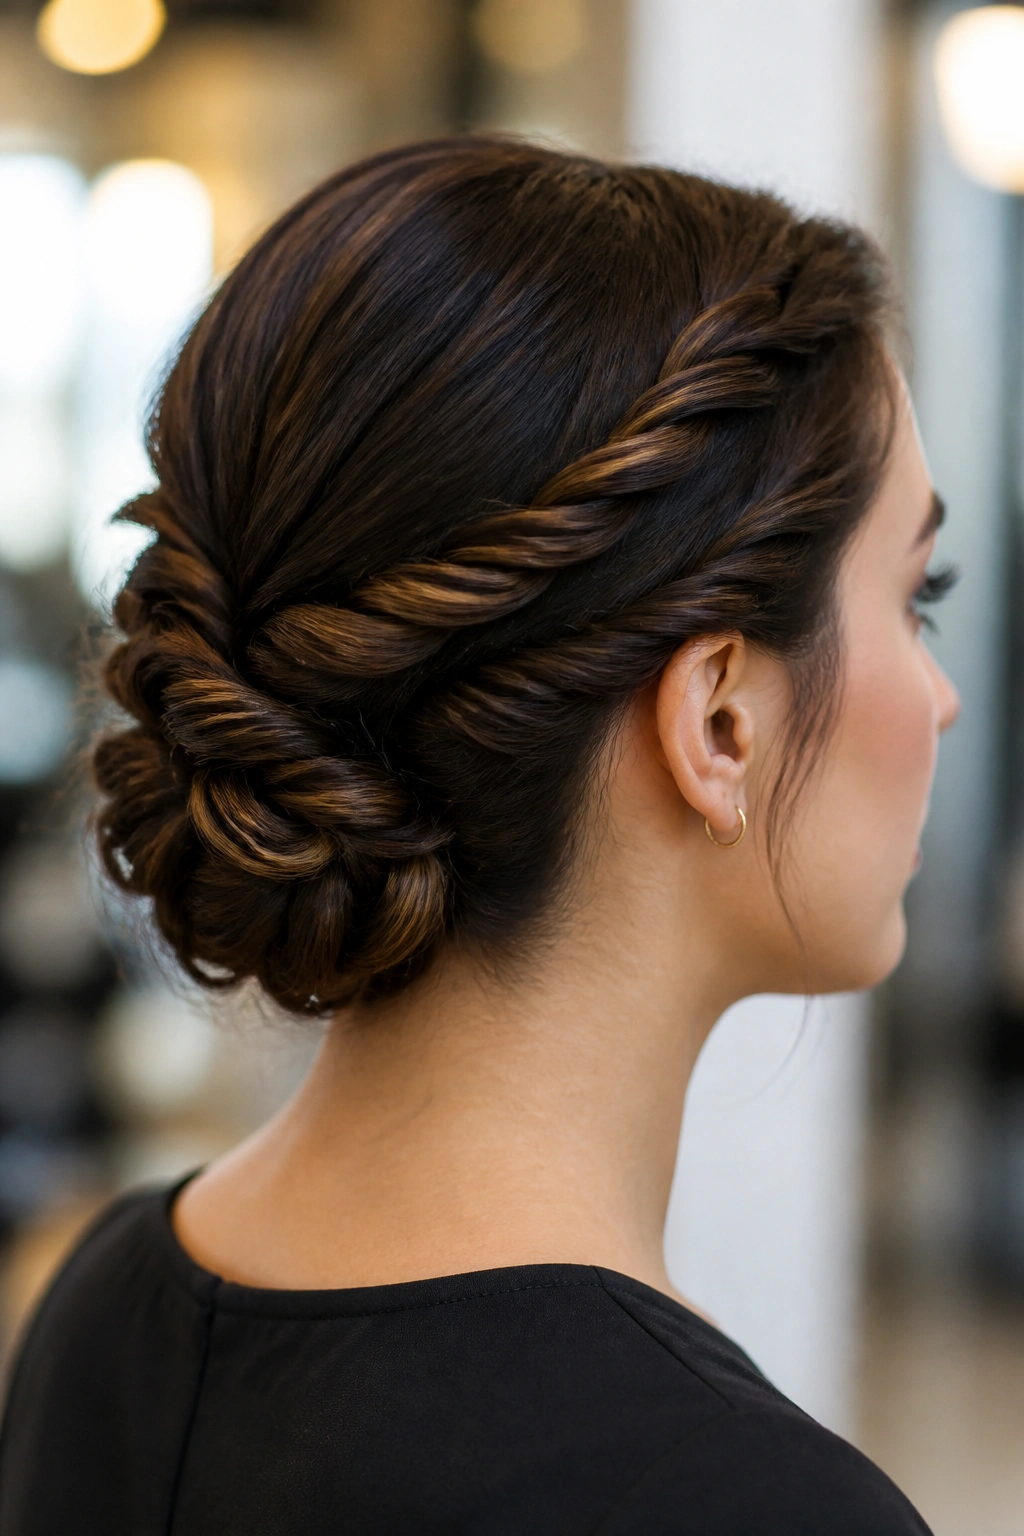
Why does the double rope twist bun look so tidy? Because two rope twists spread the bulk out before it ever reaches the bun, which makes the finish look cleaner and smaller than a single thick twist.
How to Wear It
Split the hair into two equal sections with a center part. Twist each section tightly in the same direction, then wrap them around each other or coil them side by side at the nape. The tension should feel firm, but not painful. If the twists are loose, the bun bulks up fast.
This one is especially good when your hair has layers that like to escape. The rope twist catches those shorter pieces better than a loose wrap does, and the double structure gives the bun a little architectural shape without making it stiff.
- Use on thick or layered hair
- Best with a fine-tooth comb for parting
- Secure with U-pins if you want a flatter finish
- Finish with a light mist of hairspray, not a heavy shell
If you want the bun to read more polished and less sporty, keep the parts straight and the twists even. Uneven sectioning is what turns this from elegant into messy very quickly.
4. French Twist Bun
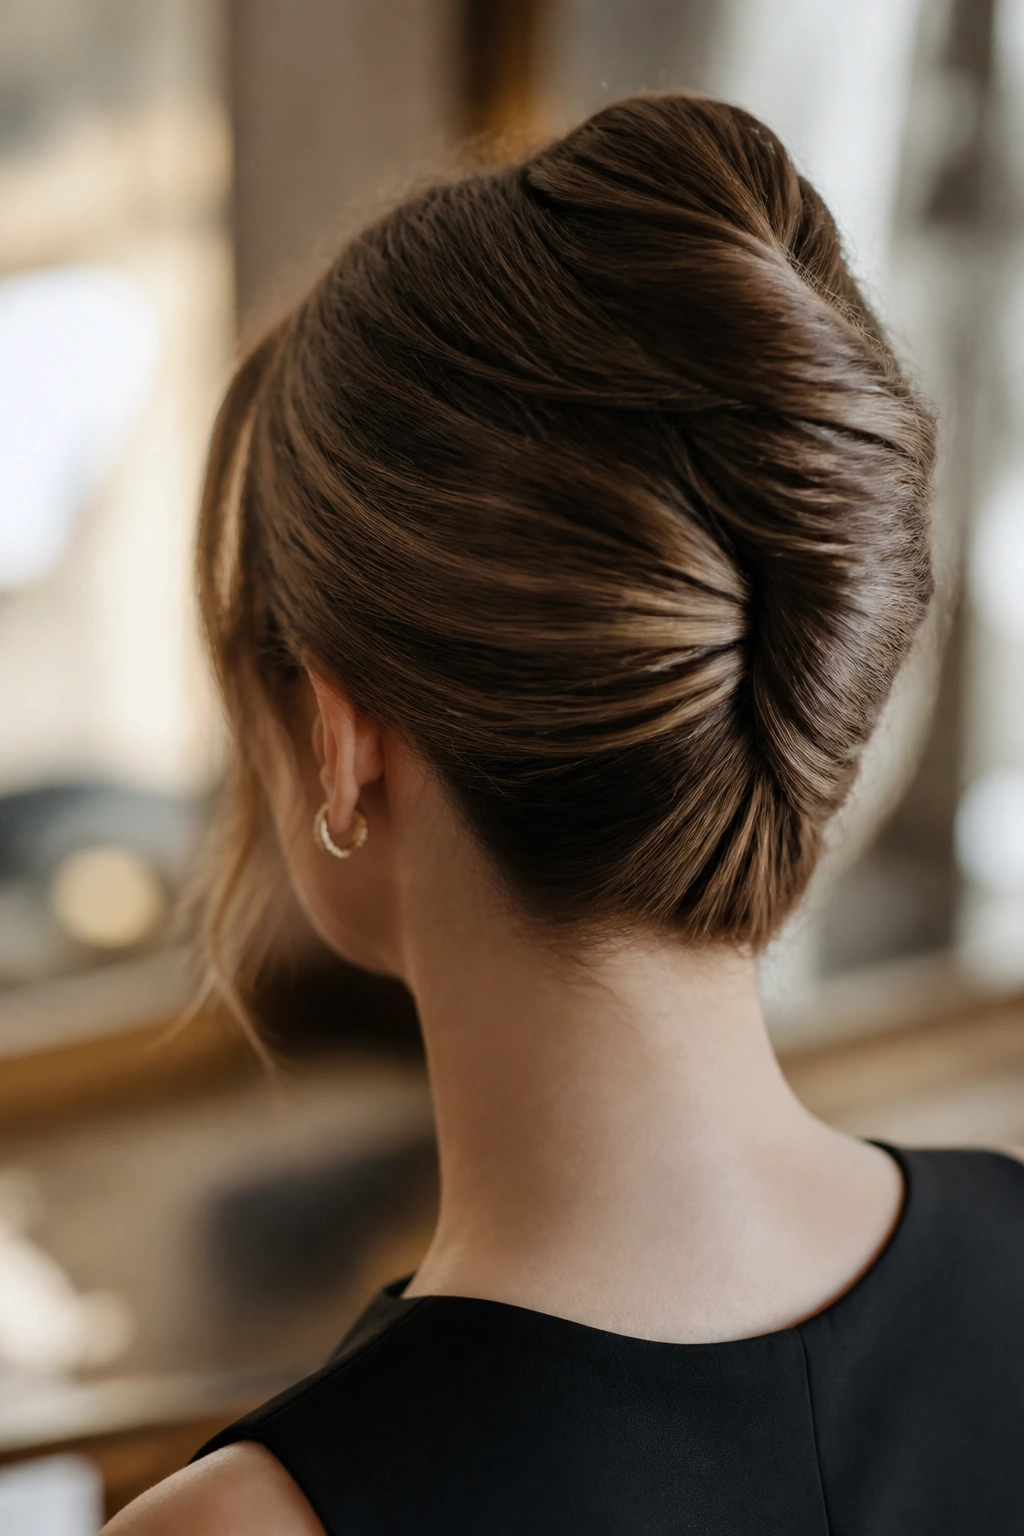
A French twist bun is the hairstyle equivalent of a crisp white shirt. It does not need much help. The shape does the talking.
I think this is the style people underestimate most. They see the vertical roll and assume it is hard, but the basic mechanics are simple: sweep the hair back, gather it as if you are making a low ponytail, then roll the length upward and tuck the ends inside the shell. The twist should sit upright, not slouch backward.
The cleanest versions use a comb and a couple of strong pins placed vertically along the seam. A hairnet can help if the hair is very smooth or slippery, though most people skip it. That is fine, but then the pin placement has to be better.
- Place the roll slightly off the center line if you want a softer look
- Keep the shell tight at the middle and looser at the top
- Smooth the sides before rolling, not after
- Avoid heavy serum at the nape; it can make the style slide
What makes this bun feel polished is the vertical line. It lengthens the neck and frames earrings in a way few other buns can match.
5. Crown Twist Bun
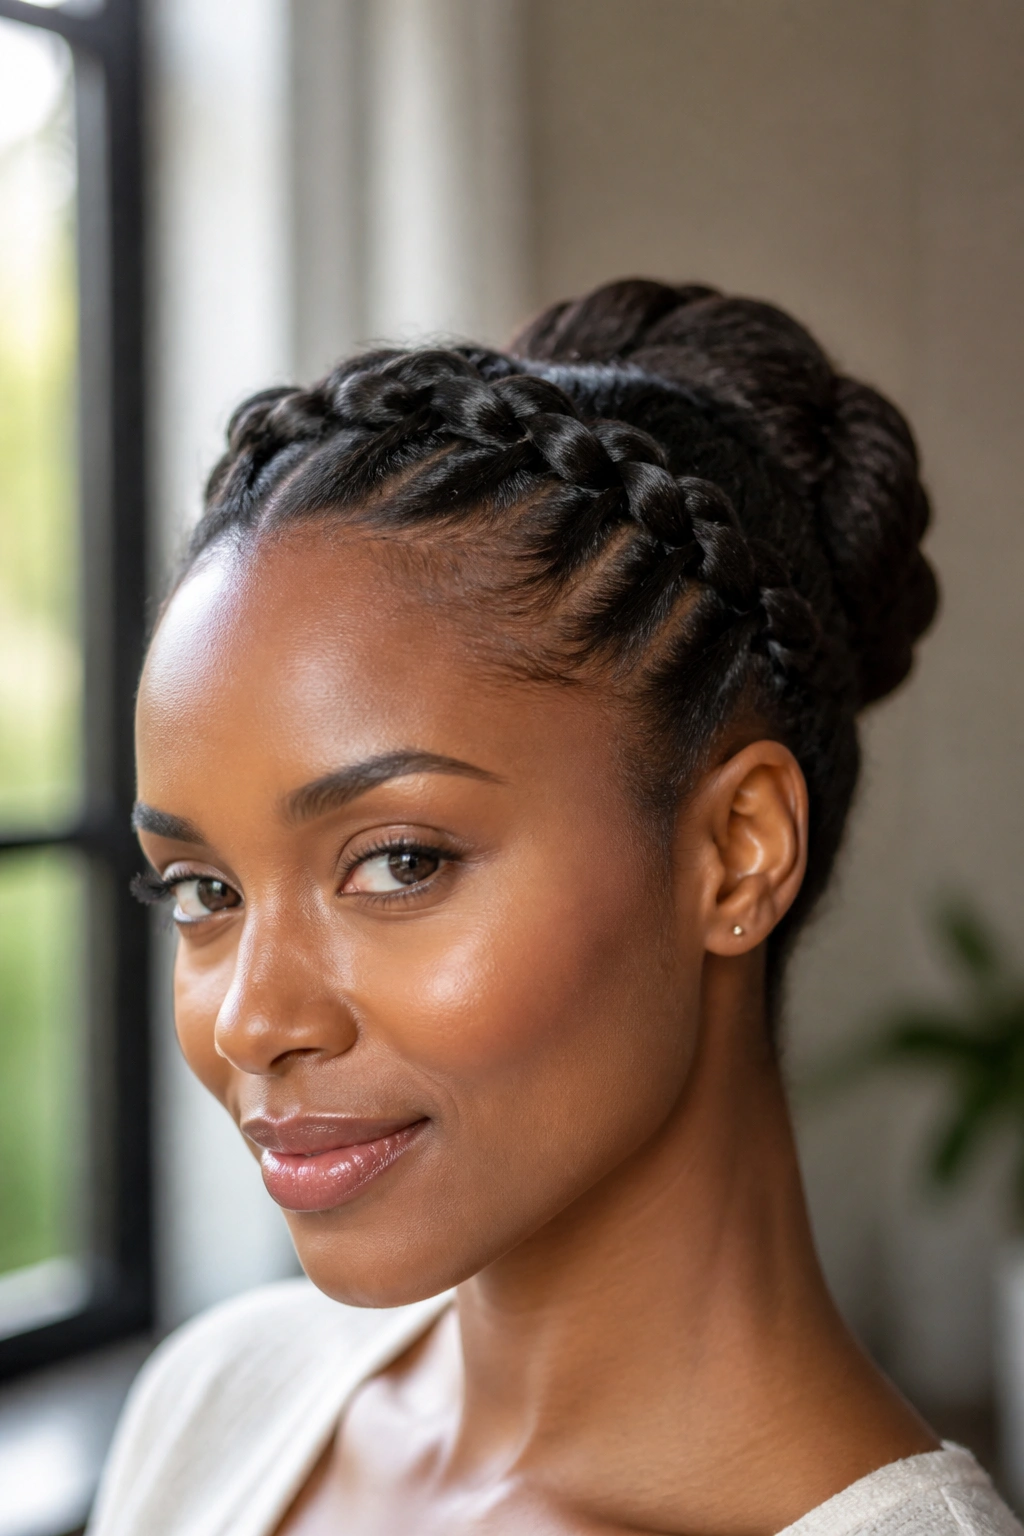
The crown twist bun is all about the front of the hairstyle. The bun itself can be simple, even small, but the twisted sections along the hairline make it look planned from the moment you turn your head.
The crown area is where a lot of buns fall apart visually. Either the top is pulled too tight, or the hair around the face is left too loose and the style feels unfinished. Crown twists solve that middle ground. They trace the head shape, keep the front smooth, and lead the eye toward the bun instead of letting the bun sit there alone.
I like this style on hair that is a little layered around the temples. Those pieces can be twisted back in clean sections, then pinned into the bun or just above it. The result looks polished without relying on a lot of spray. If you go too hard with product, the crown can look shiny in a bad way — flat, almost wet.
The best versions leave a whisper of lift at the top. Not a bump. Just enough height to keep the style from looking pressed down.
6. Braided Twist Bun
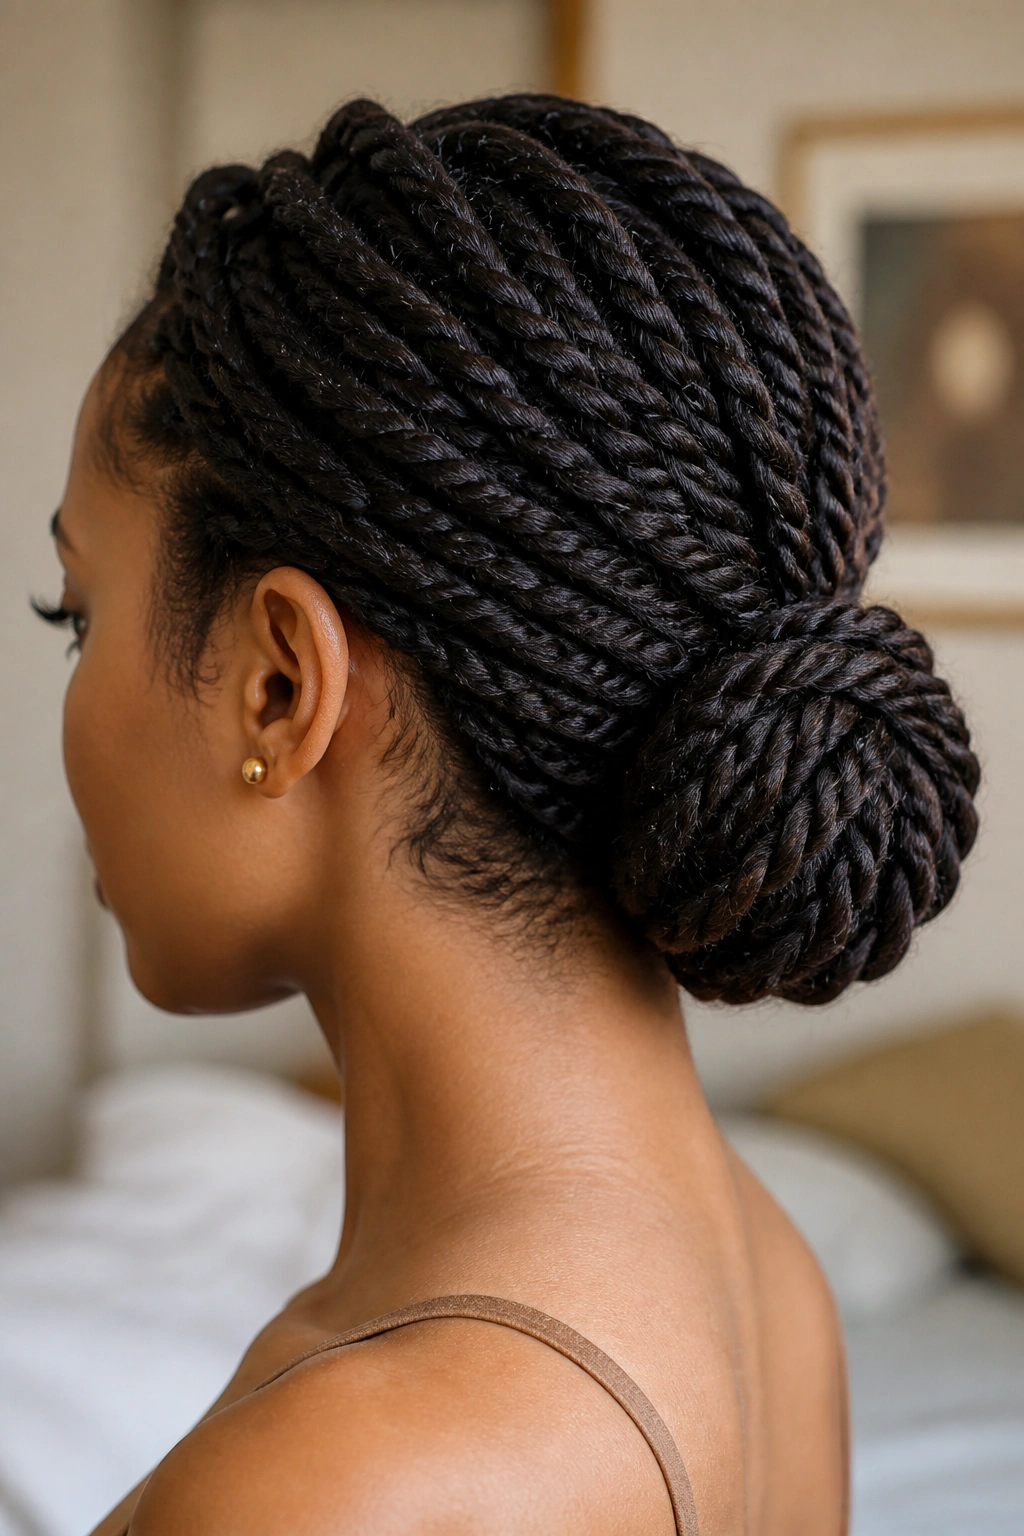
Unlike a full braid bun, the braided twist bun keeps the texture lighter and faster. You get the woven look without having to braid every strand from scratch, which is useful on mornings when your patience is not cooperating.
This style usually starts with two-strand twists or simple rope twists, then wraps them into a bun near the nape or just below the occipital bone. Because the texture is built into the twist itself, the finished bun looks a little more detailed than a plain coil, but not as busy as a thick braid crown.
It suits long hair best, though medium lengths can work if the ends are tucked tightly. If your hair is very layered, twist a little tighter near the ends so the shorter pieces do not pop out halfway through the day.
Best for: busy workdays, dressy lunches, and anyone who wants texture without a lot of fuss.
Best with: a clean part, a few bobby pins, and one small elastic that matches your hair color.
If you want a bun that looks put together but not formal, this is a good one to keep in your pocket.
7. High Twist Bun
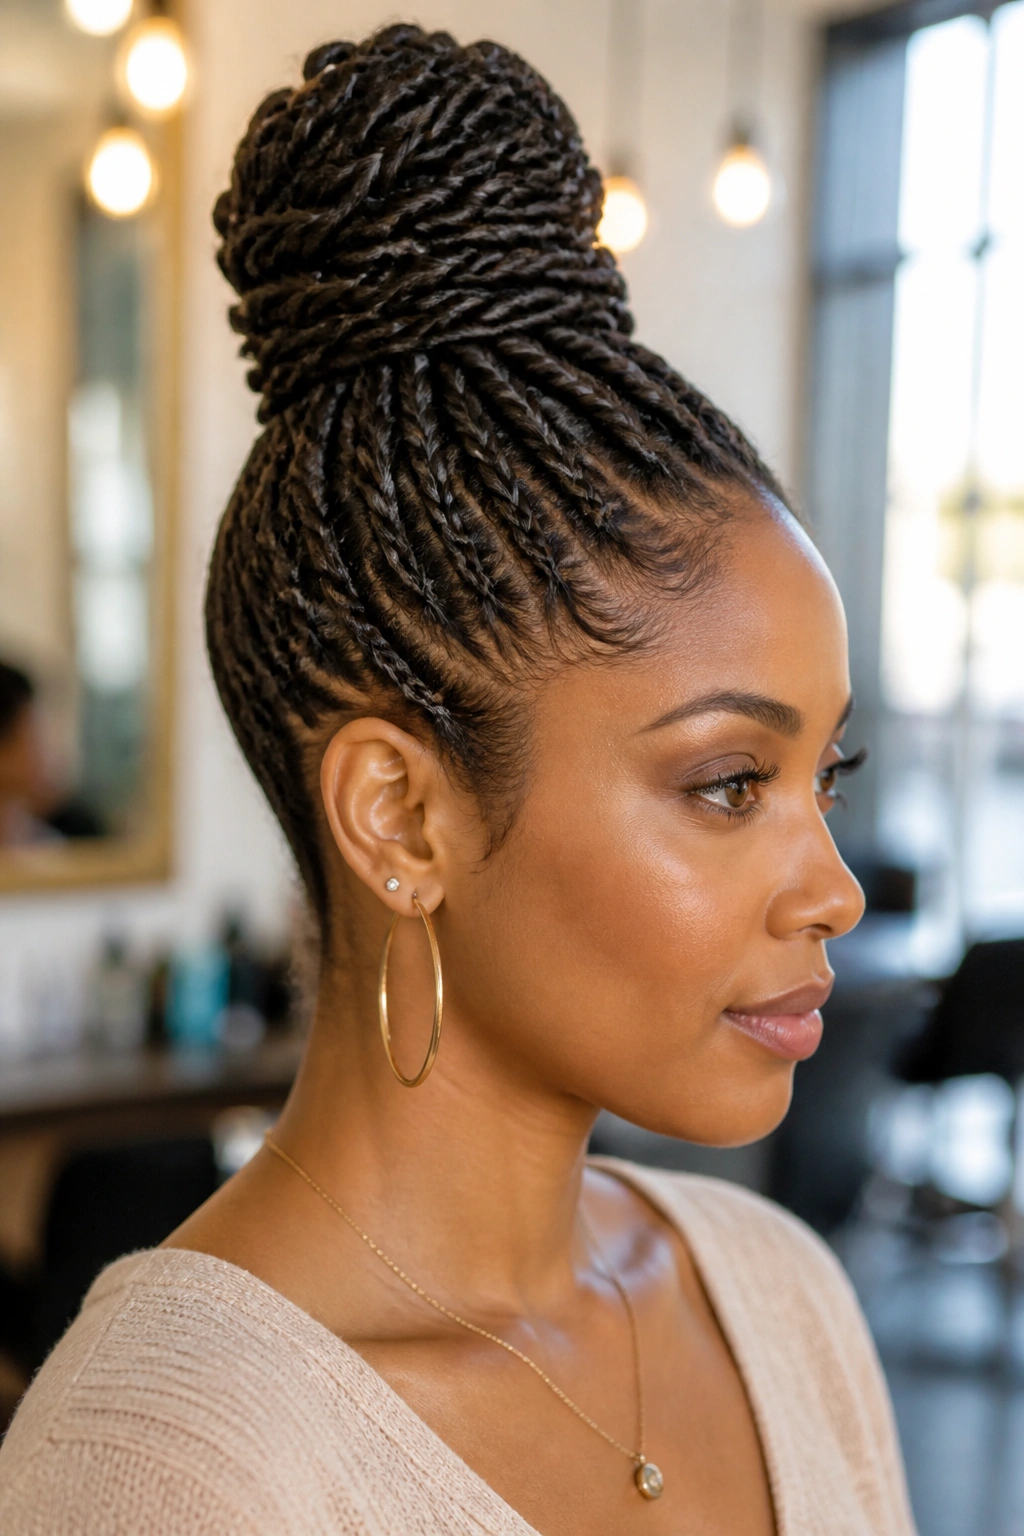
A high twist bun changes the whole posture of a hairstyle. Put the bun near the crown and the face lifts with it. The neck looks longer, the earrings suddenly matter, and the whole look feels more awake.
Why It Looks So Clean
Height forces order. When the bun sits high, the twists have to be compact or they will tip over. That pressure creates a crisp shape, which is why this style often looks more polished than it actually is.
The easiest version starts with a high ponytail. From there, split the length into two or three sections, twist them tightly, and coil them around the base. Use pins that point inward toward the elastic so the bun stays anchored. A small donut pad can help if your hair is fine, but it is not required.
- Best for thick hair that needs lift
- Flatters long necklines and high collars
- Works well with clean edges around the hairline
- Needs a firm base or it will sag
One useful trick: leave the ponytail a little high but not centered on the crown. A touch back from the forehead keeps the bun from looking like a topknot gone rogue.
8. Wrapped-Base Twist Bun
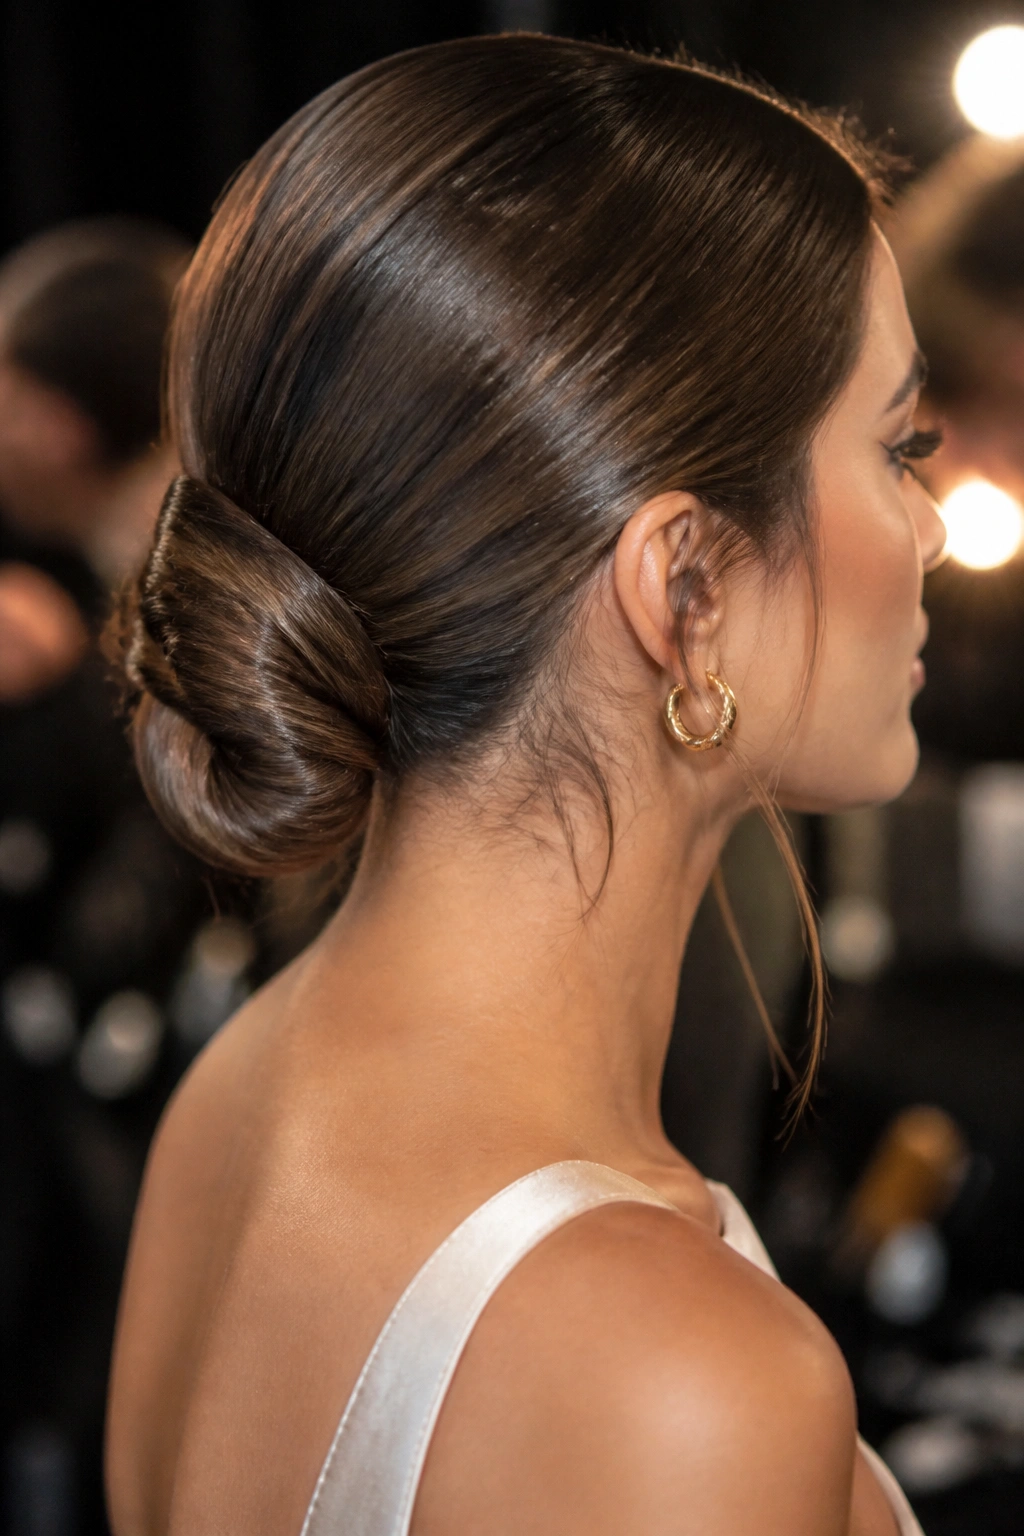
The wrapped-base twist bun looks polished because it hides the ugly part first. That sounds blunt, but it is true. The elastic disappears under a wrapped section of hair, and the whole style reads cleaner right away.
You start by securing the hair into a low or mid ponytail, then take one section and wrap it around the base until the elastic is covered. After that, twist the remaining length and coil it into the bun. The wrapped band makes the style feel finished from every angle, which matters more than people think.
I prefer this version for events where the back of the head will be seen up close — dinners, ceremonies, photos, that sort of thing. It also holds up better when you have to wear it for hours, because the wrapped section creates an extra anchor point.
The main mistake is wrapping too loosely. If the base is soft, the bun starts to wobble. Keep the wrap snug, and pin the tail under the bun instead of letting it dangle.
9. Figure-Eight Twist Bun
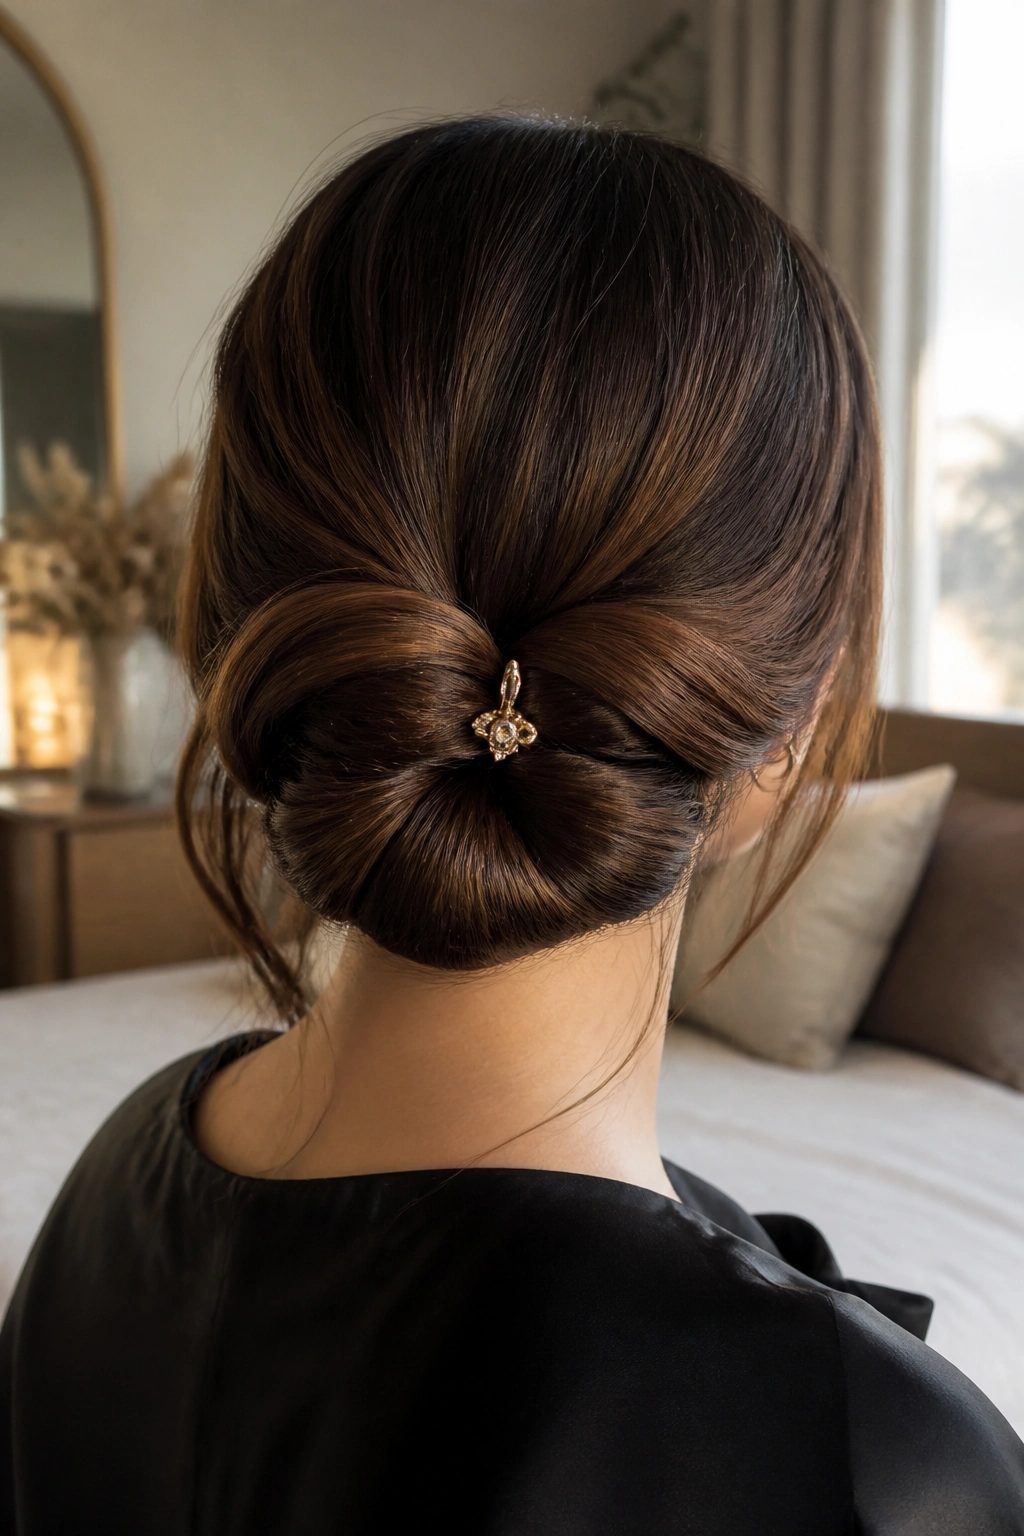
Why does a figure-eight twist bun hold so well? Because the hair is folded back on itself in two loops, which spreads the weight and locks the center into place.
How to Use It
Begin with two twisted sections, one on each side of the head. Bring them to the back, cross them over once, then form two loops that sit like an eight. Pin the middle first. That center point matters more than the outer edges, and if you miss it, the whole style can slide.
This bun is a smart choice for long hair because the figure-eight shape gives you room to tuck the ends neatly. It also keeps the bun from getting too round and bulky, which happens fast with heavy hair. If you want a more formal finish, flatten the loops slightly with your fingers before pinning.
- Works best on shoulder-blade length hair and longer
- Needs two or three strong pins at the center
- Looks cleaner with even sections
- Holds better when the twists are pulled in the same direction
There is a nice balance here. It feels structured, but not hard.
10. Knotted Twist Bun
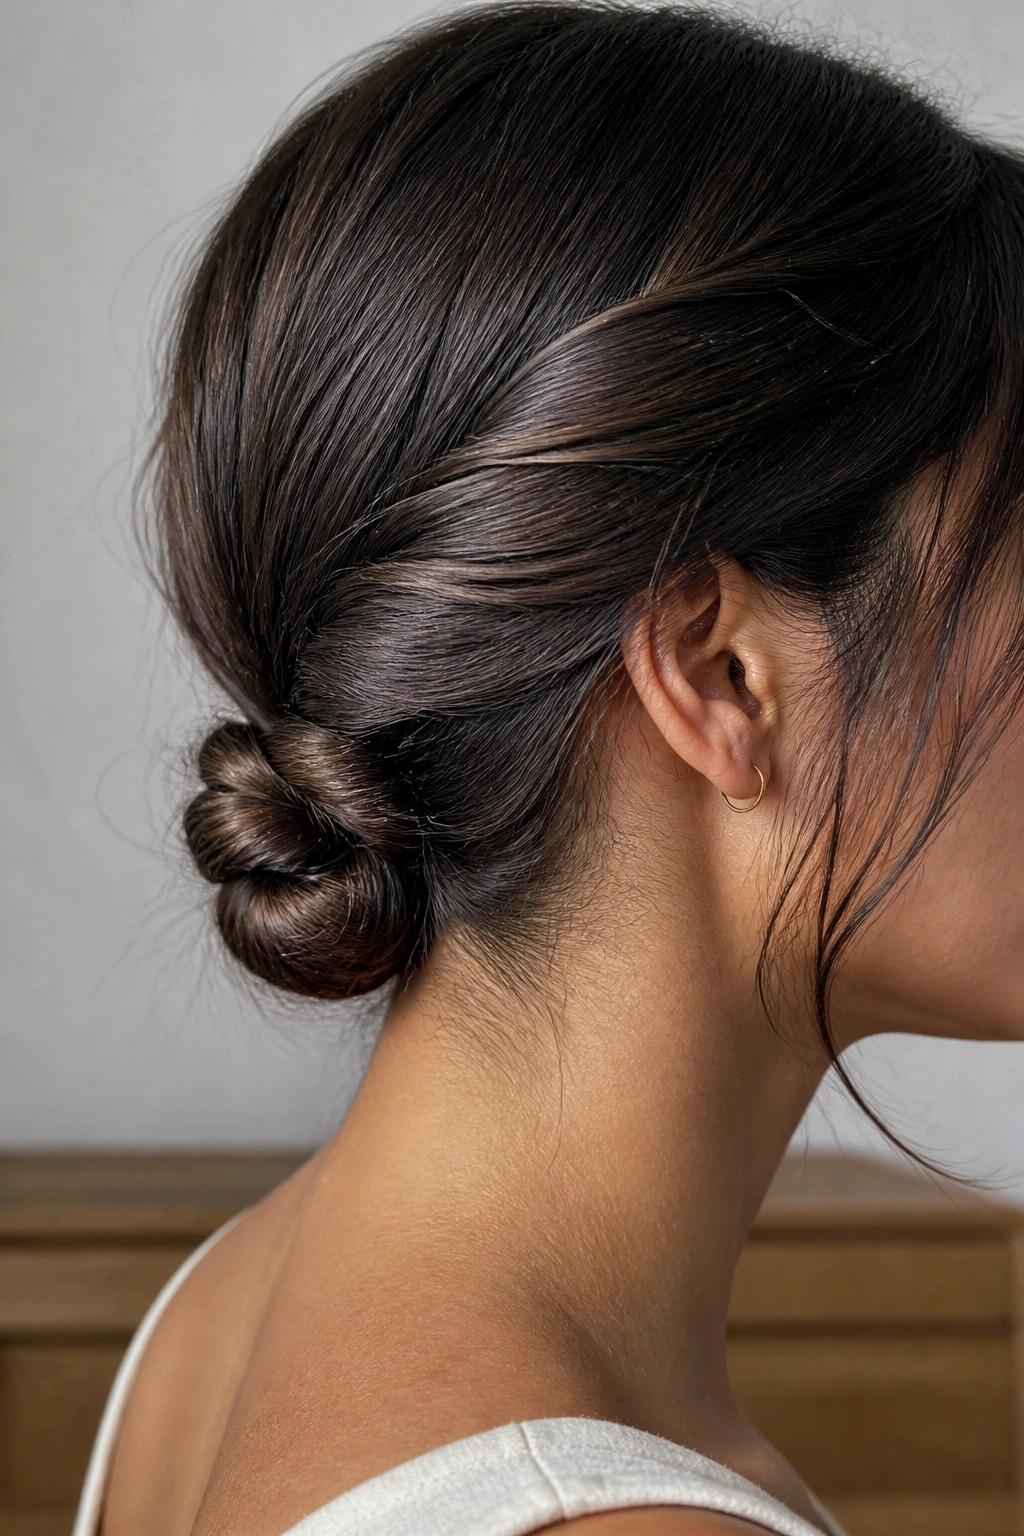
I like the knotted twist bun when hair feels too clean for a messy bun but too flat for something ornate. The knot gives it a little edge, and the twist keeps it from looking like you tied your hair in a hurry.
The trick is to build one visible knot near the nape, then coil the leftover length around it. You do not want a giant knot. One firm loop is enough. The point is to show texture and shape, not to make a sailor’s knot out of your hair.
This style is useful when you want the bun to look deliberate from the side. The knot creates a small focal point, which is handy if you are wearing a plain dress or a simple blouse and want the hair to carry a little more weight.
- Good for medium-density hair
- Nice for day-to-night dressing
- Works with one twist or two, depending on length
- Needs the knot to sit low and tight
If you have ever looked at a plain bun and thought, “This needs one more idea,” this is probably the one.
11. Textured Twist Bun
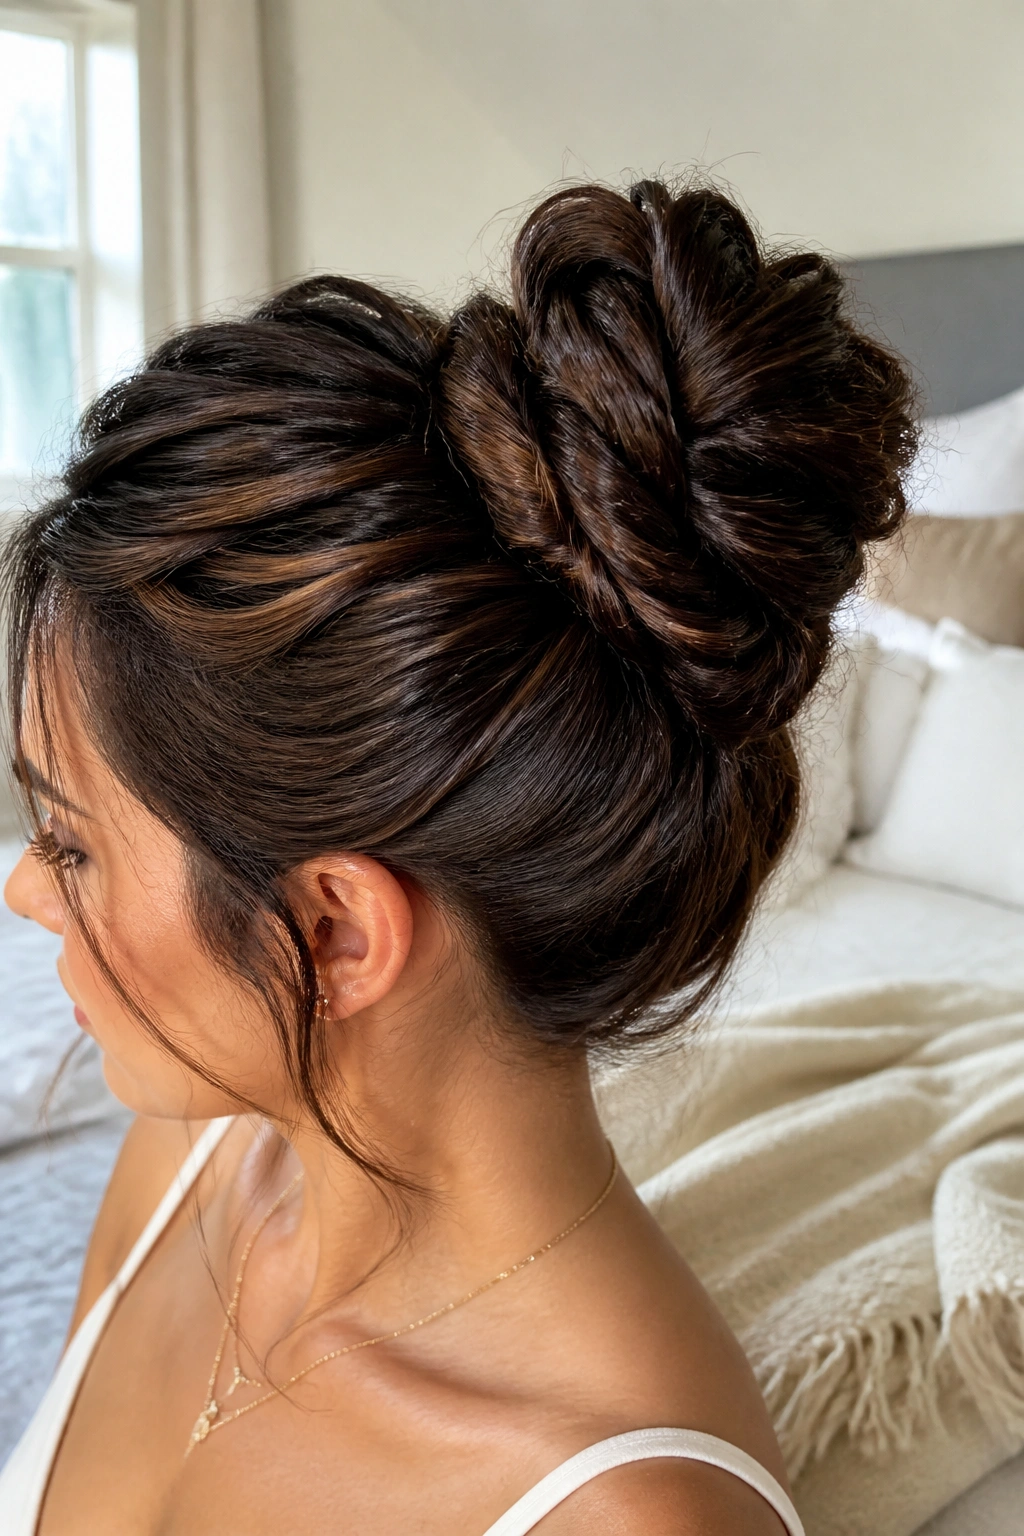
The textured twist bun is the style I reach for when sleek hair would feel too formal. It still looks polished, but the surface has some grip, some movement, and a little air around the twists.
What makes it work is the prep. A dry texture spray or a light dusting of volumizing powder at the roots gives the hair enough hold to twist without slipping. Then you can pull the twists apart just a bit before pinning, which adds width and keeps the bun from shrinking into a little ball at the back of the head.
I prefer this version on freshly washed hair only if I have time to rough it up first. Clean hair can be too silky. It escapes. A little dry shampoo at the roots solves more than people realize, especially near the crown and temple area.
The surface should look softly arranged, not frizzy. There is a difference. Frizz is random. Texture is controlled. If you can see the twist pattern and still notice some movement in the bun, you have it right.
12. Halo Twist Bun
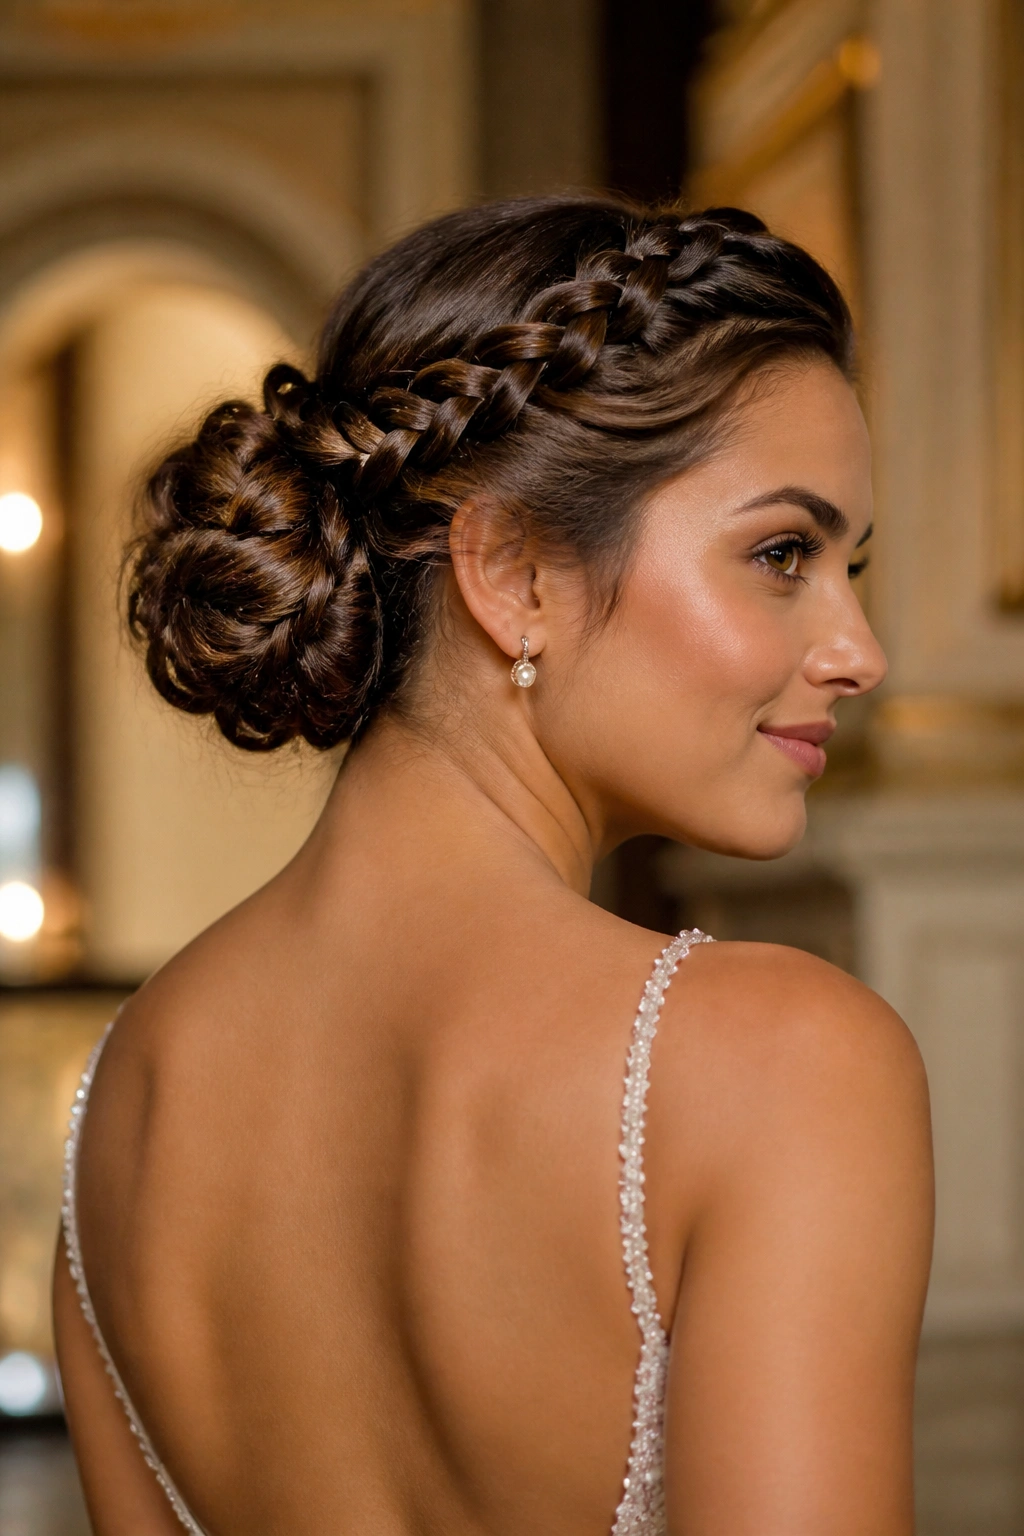
Unlike a standard chignon, a halo twist bun draws the eye upward first. The twisted sections travel around the crown like a frame, then gather into a bun at the back or slightly lower. It is one of those styles that looks more involved than it is.
That crown framing makes this version especially good for weddings, formal dinners, and any situation where the hair needs to feel dressed up without piling a lot of volume at the top. A plain bun can sometimes disappear under a strong outfit. Halo twists do not.
The style works best when the twists are even on both sides. If one side is thicker, the halo can look lopsided, and the whole point is to keep the line clean. Use a tail comb to map the sections before you start twisting. Two sections are enough for a simple halo; four can make the front look busy.
I would keep accessories minimal here. One hairpin, maybe a small comb. Too much sparkle takes attention away from the shape, and the shape is the thing.
13. Center-Part Twist Bun
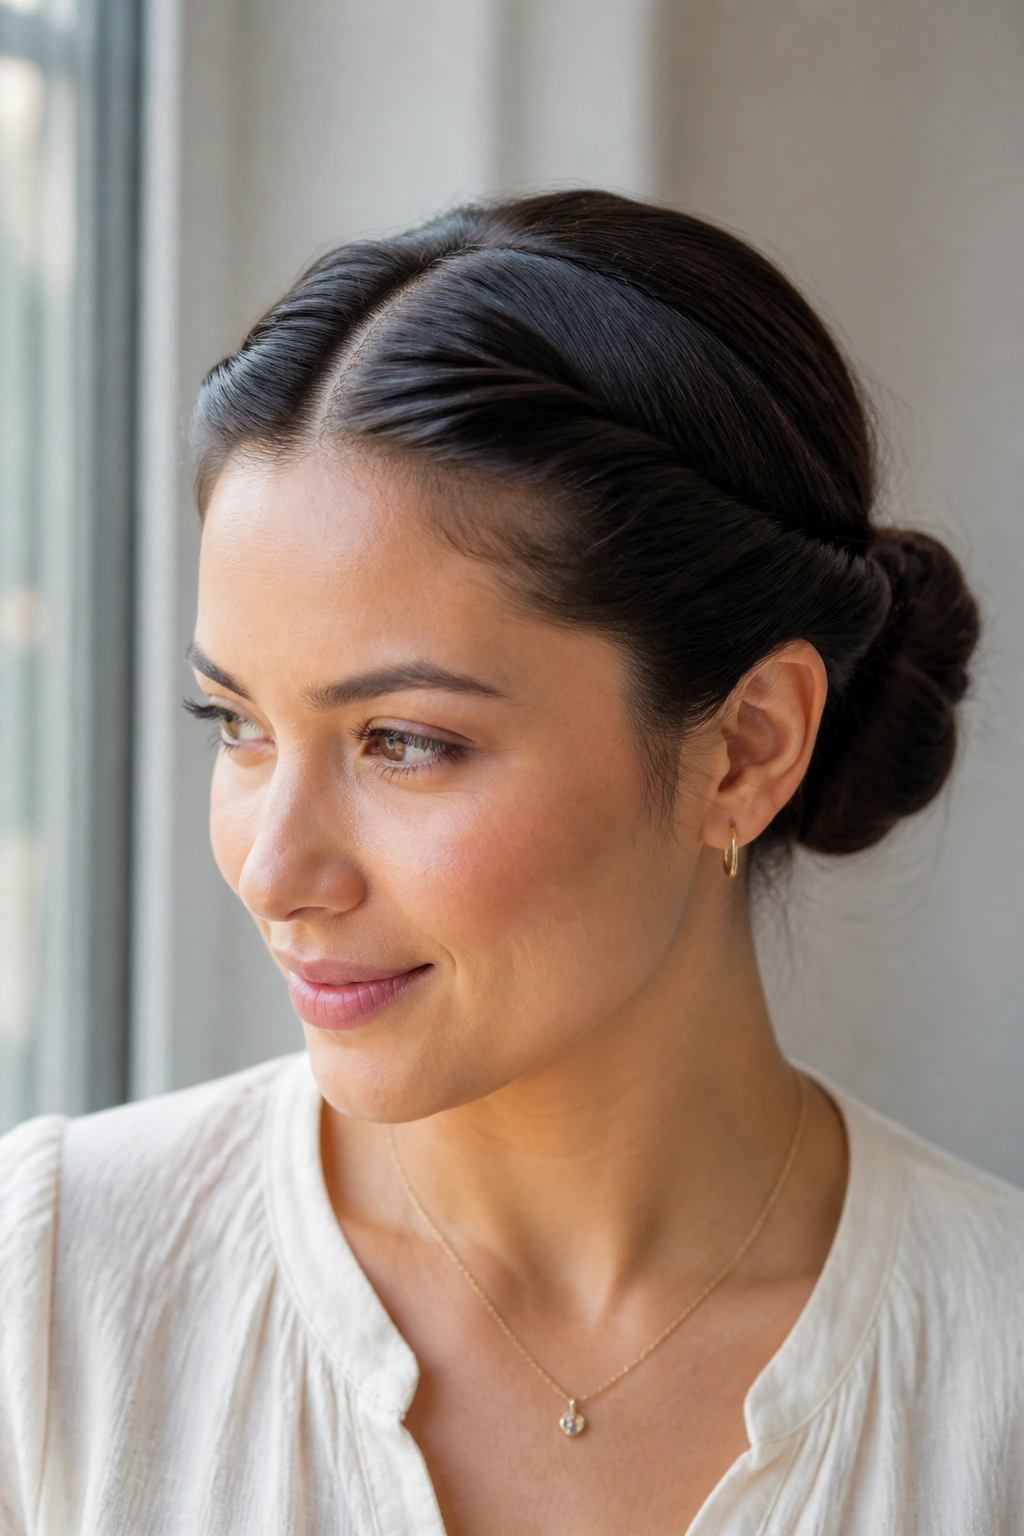
A center-part twist bun gives you symmetry without looking strict. The straight part creates balance, then the twists soften that line as they travel back toward the bun.
Why the Center Part Matters
A center part works best when the bun itself is compact. If the base is too large, the symmetry gets lost. The part should meet the bun in a neat line, almost like two clean rails heading into one finished shape.
This style flatters people who like order in a hairstyle but do not want a slicked-back look. The front stays tidy, the ears can stay exposed, and the bun sits low enough to feel wearable all day. It is also a good option if you wear glasses, because the center part keeps the hair from fighting the frames.
- Best with straight or lightly wavy hair
- Needs a sharp tail-comb part
- Looks best when the twists match in thickness
- Works well for long lunches, work, and formal settings
Use a fine brush at the front and your fingers at the back. That mix keeps the part clean while preserving a little softness near the bun.
14. Accessorized Twist Bun
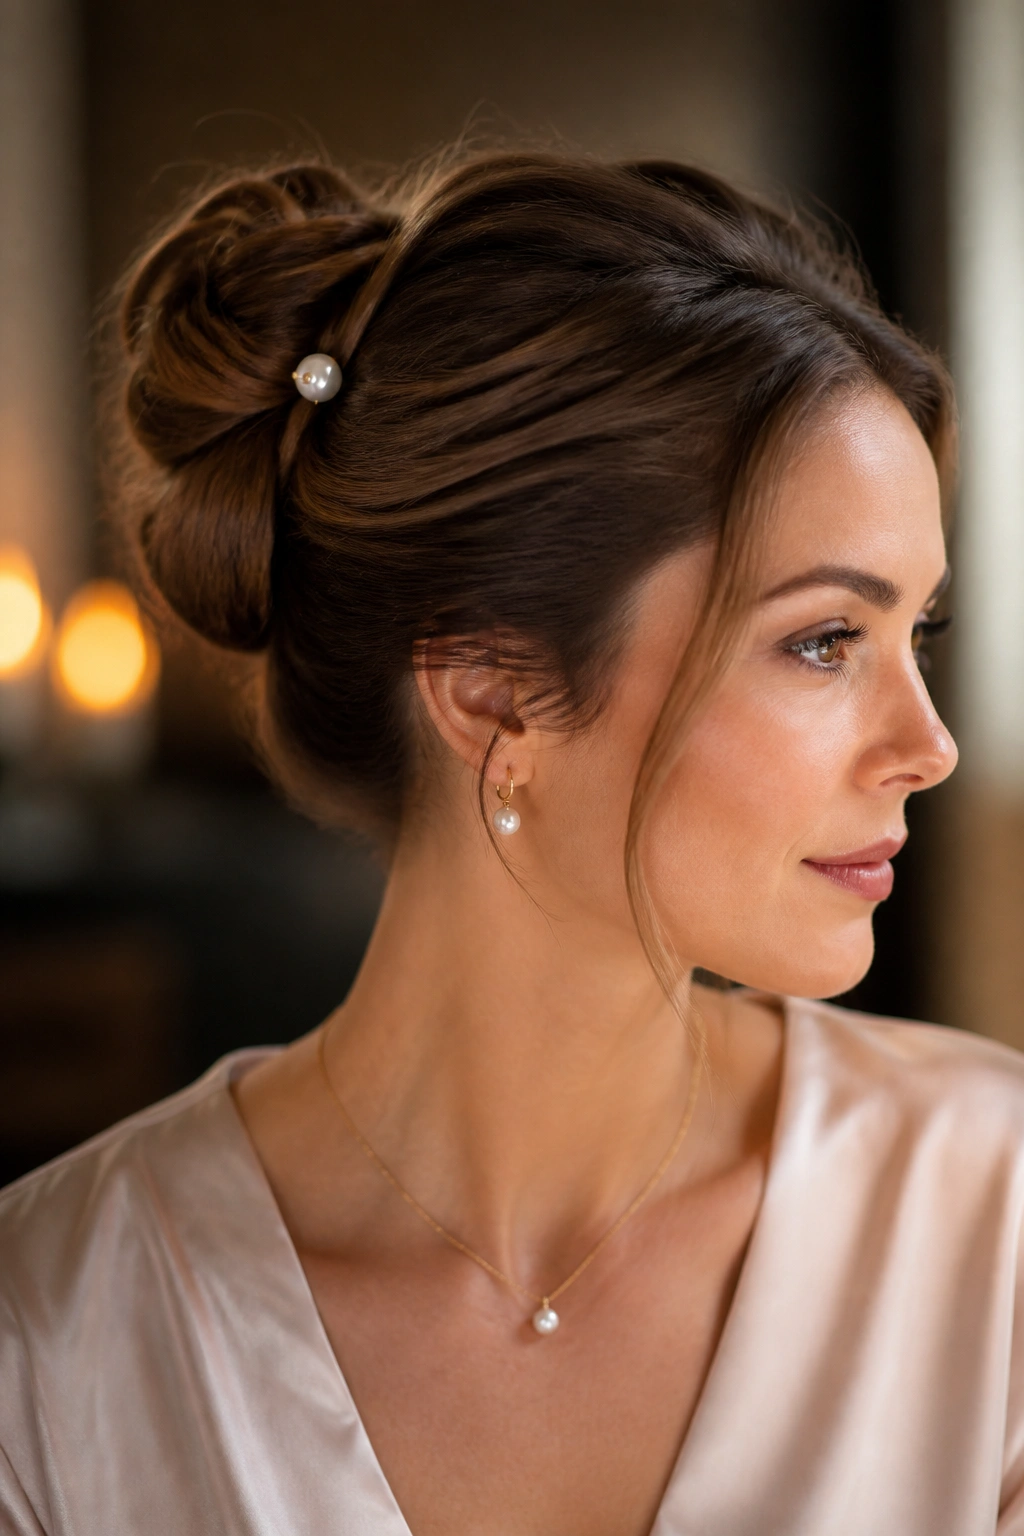
A simple bun changes character fast once you add one good pin, comb, or ribbon. The accessorized twist bun is proof that you do not need to rebuild the whole hairstyle to make it feel special.
Pearl pins make the style lean formal. A tortoiseshell comb gives it a warmer, more everyday look. A slim velvet ribbon makes it feel softer and slightly romantic without turning it into a costume. The best accessory is the one that matches the weight of the bun; a tiny bun with a giant clip looks lopsided, and a thick bun with a fragile pin can swallow the decoration.
I tend to place the accessory where the twist changes direction. That spot already has visual interest, so the add-on feels natural rather than stuck on. If you are using more than one piece, keep them close together. Spreading accessories too far apart makes the style look busy.
The mistake here is obvious once you see it: too many shiny things. Pick one accent and let the bun stay the main event.
15. Compact Twist Bun for Fine Hair
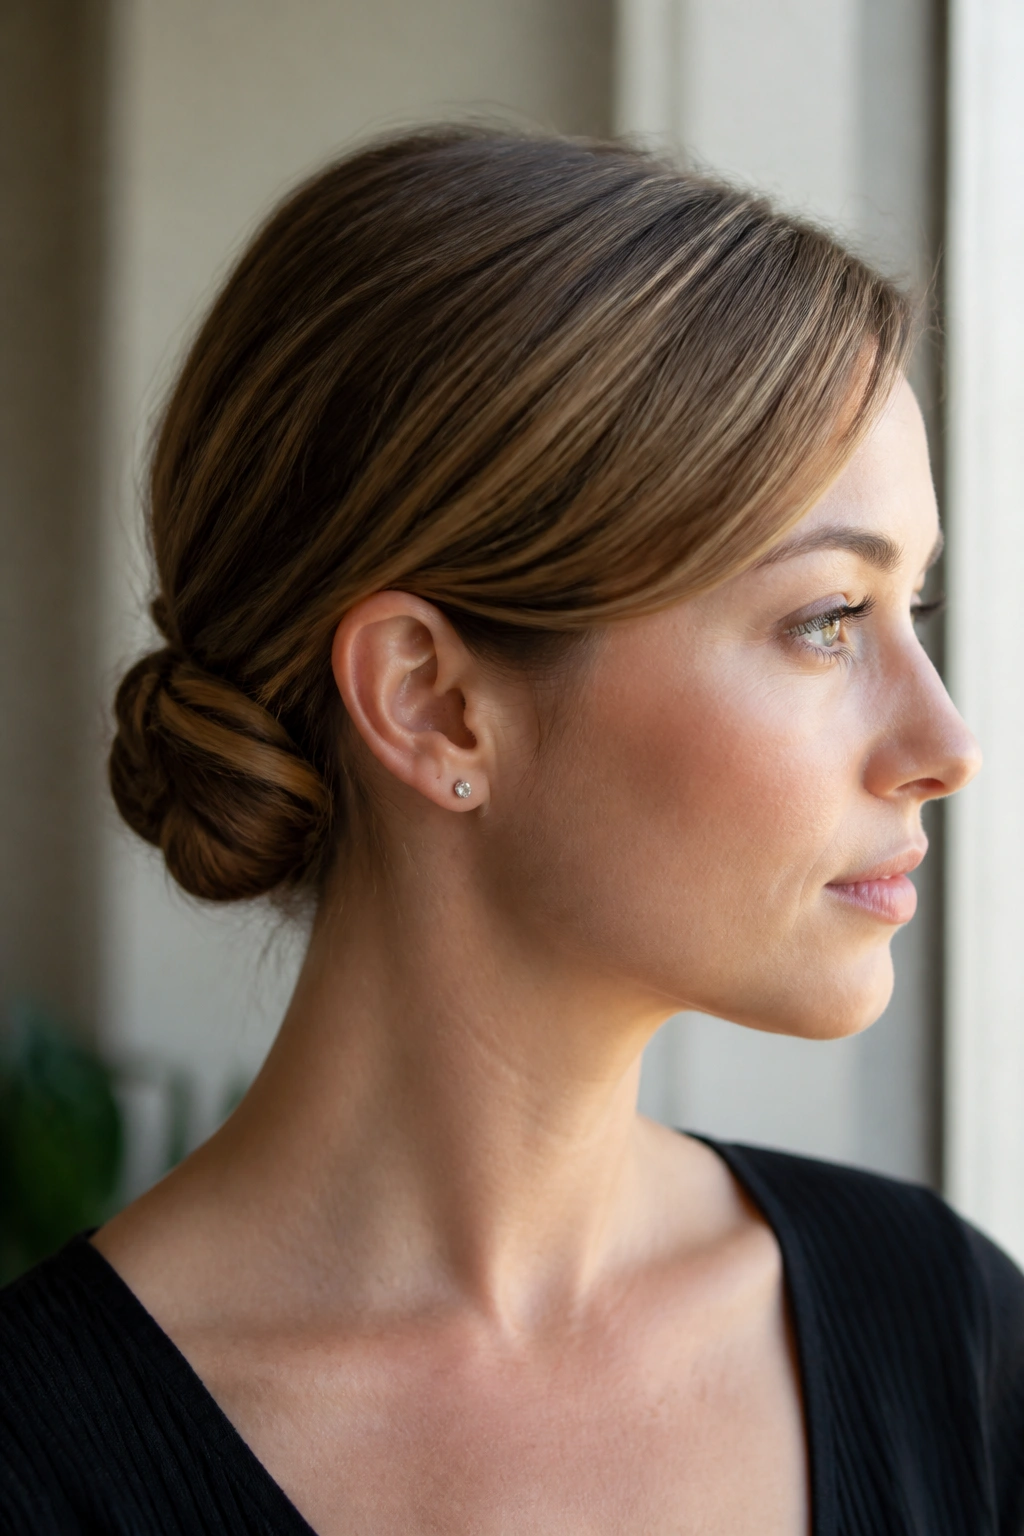
Why does the compact twist bun for fine hair work so well? Because fine hair usually looks fuller when it is gathered tightly and kept close to the head, instead of being stretched into a big bun that collapses.
How to Get More Hold
Start with dry shampoo or volumizing powder at the roots, even if the hair feels clean. Then tease a small section at the crown — just one inch deep, not a bird’s nest — and smooth the top layer over it. That gives the bun something to grip without making the front look messy.
Twist the hair tightly and keep the bun small. A compact shape is your friend here. A giant bun made from fine hair usually looks thin at the edges and thick in the middle, which is the wrong kind of uneven.
- Use mini bobby pins instead of oversized ones
- Keep the bun closer to the nape
- Backcomb only the top inch of hair
- Finish with a flexible-hold spray, not a stiff one
A narrow bun reads cleaner on fine hair than a fluffy one. That is not a flaw. It is the style working with the hair, not against it.
16. Flat Twist Bun
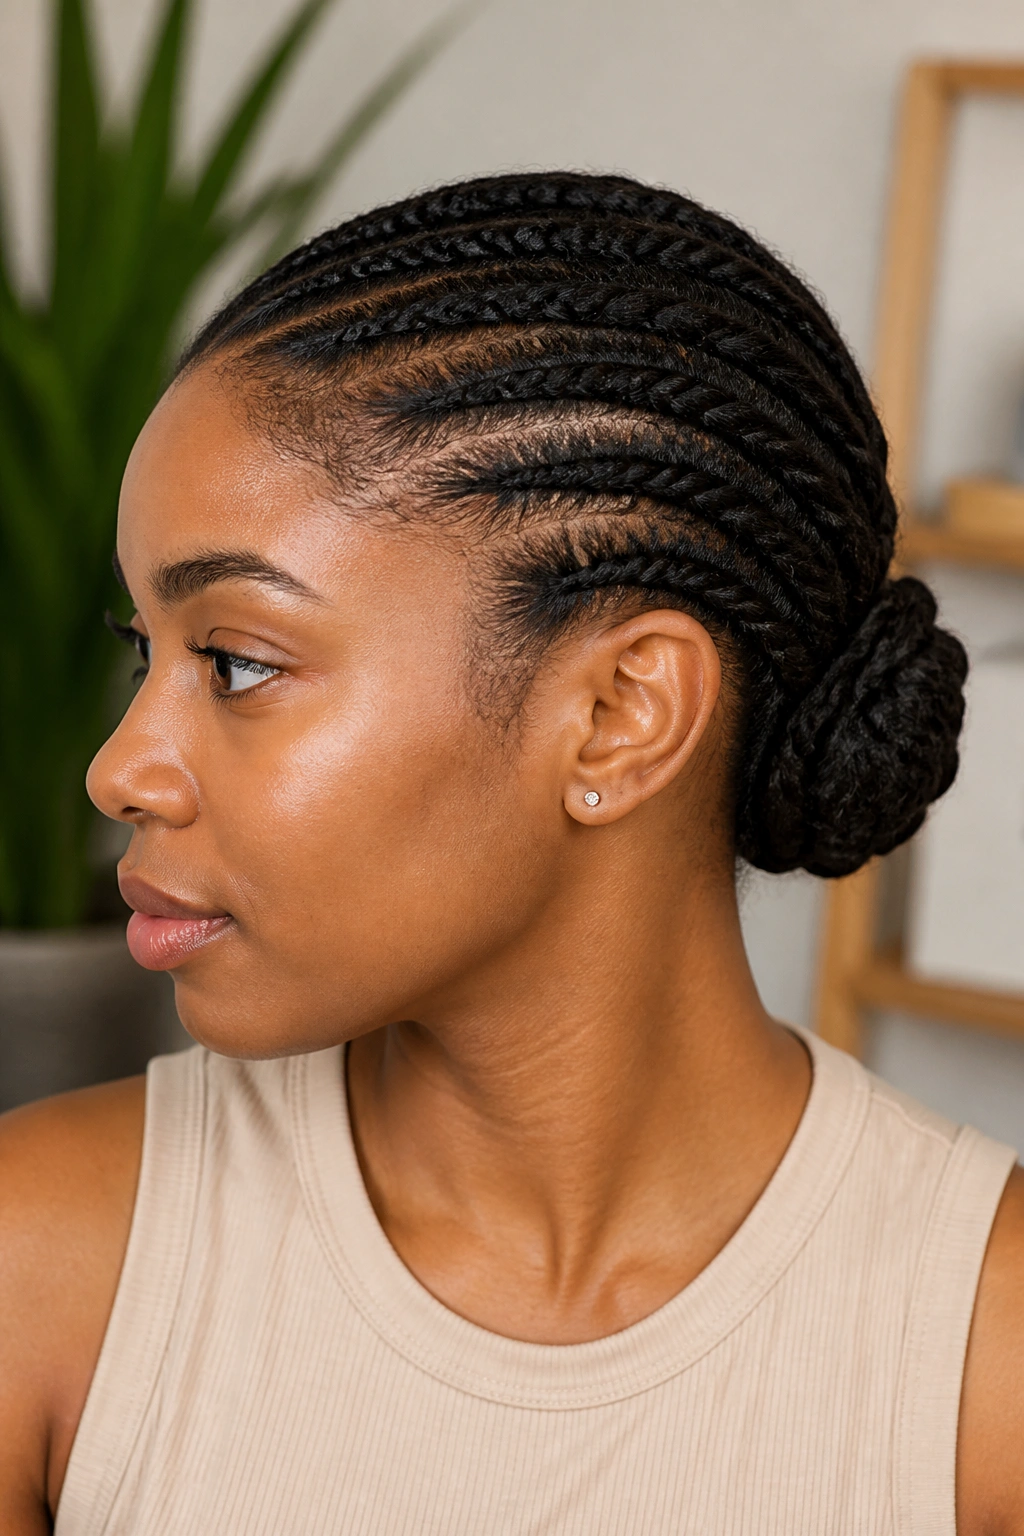
The flat twist bun sits close to the head and keeps the profile smooth, which is why it works so well for natural hair and protective styling. It looks orderly from the side and even cleaner from the back.
The mechanics are simple: section the hair, twist each part flat against the scalp, then gather the ends into a bun at the nape or mid-back of the head. Because the twists lie close to the head, the style avoids that bulky ridge you sometimes get with looser twist-ups.
This one is a favorite when you need the hair to stay tucked and out of the way. Scarves, high-neck sweaters, earrings — the bun leaves room for all of it. It also handles a long day better than a style with a lot of loose pieces, because there is less surface area for frizz to catch.
A silk scarf overnight helps the front stay smooth. So does avoiding too much oil near the roots. A little shine is good. A slippery scalp is not.
17. Half-Up Twist Bun
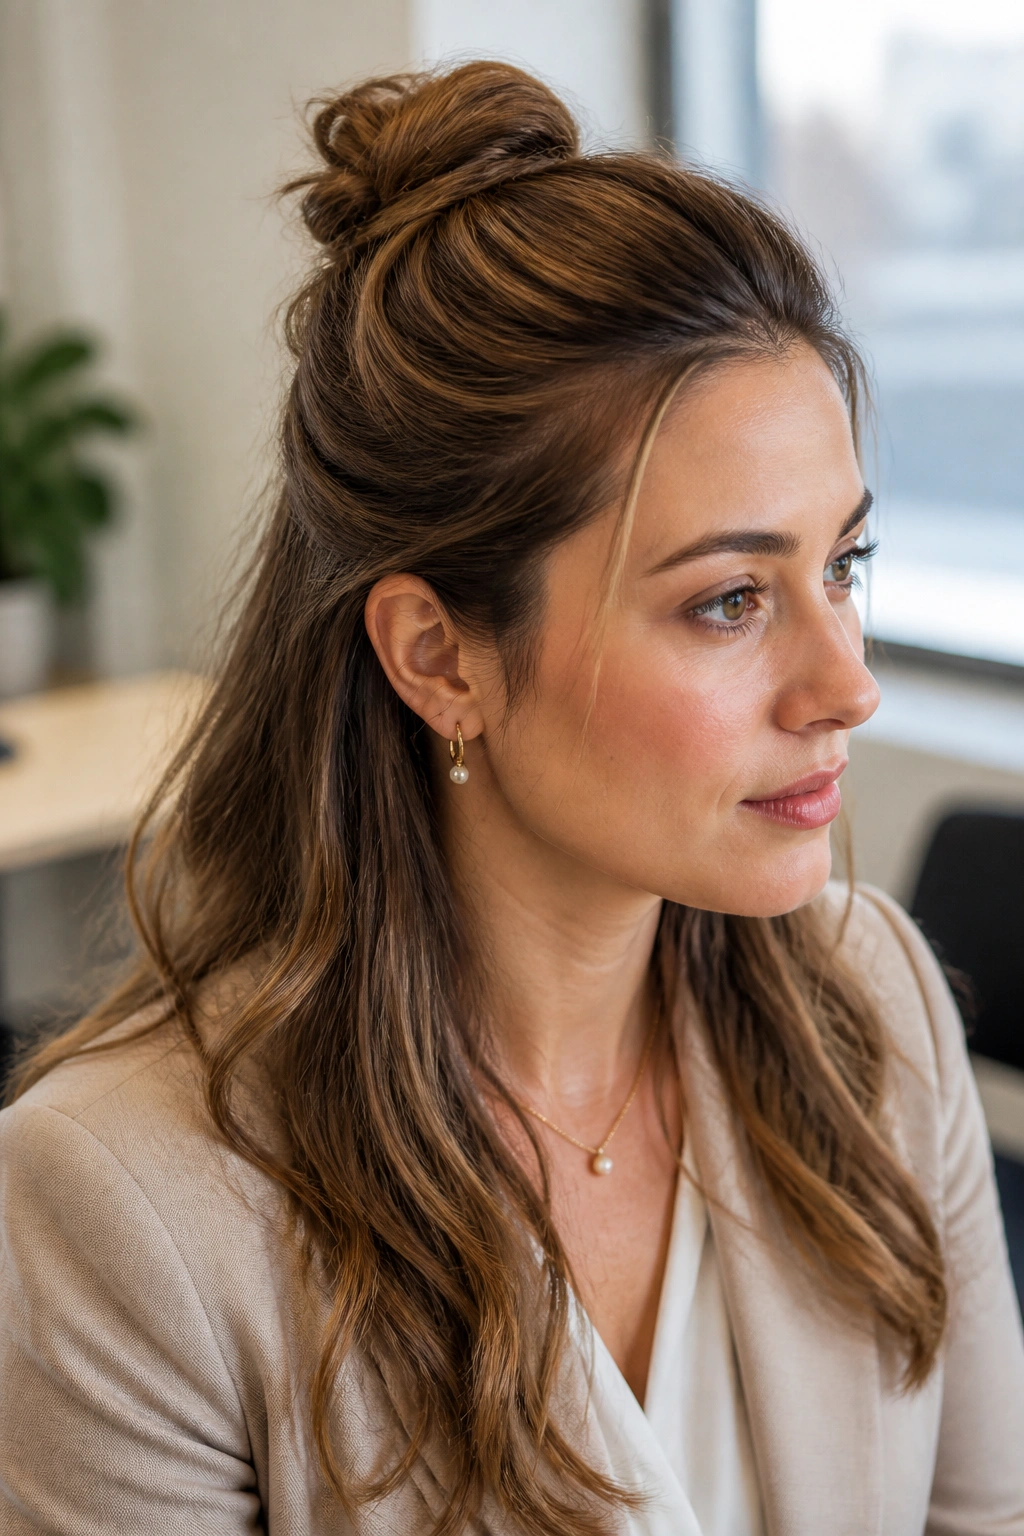
The half-up twist bun is one of the few styles that looks deliberate on shoulder-length hair without making the rest of the length feel forgotten. Half-up styles can go childlike fast if they are too loose. A twist bun keeps them grown-up.
The top section is where the polish comes from. Twist the crown hair back from the temples, gather it into a small bun, and leave the rest of the hair loose and either straight, waved, or lightly curved at the ends. The open lower half gives movement, while the bun keeps the top neat.
I like this style when you want hair off the face but do not want the full commitment of an updo. It works in offices, at dinners, and on days when you want your hair to look intentional without being heavily styled. The contrast between the compact bun and the loose length gives it a softer feel than a full twist chignon.
Keep the bun small. That is the part people miss. If it gets too large, the balance disappears and the top starts to dominate the whole style.
18. Soft Romantic Twist Bun
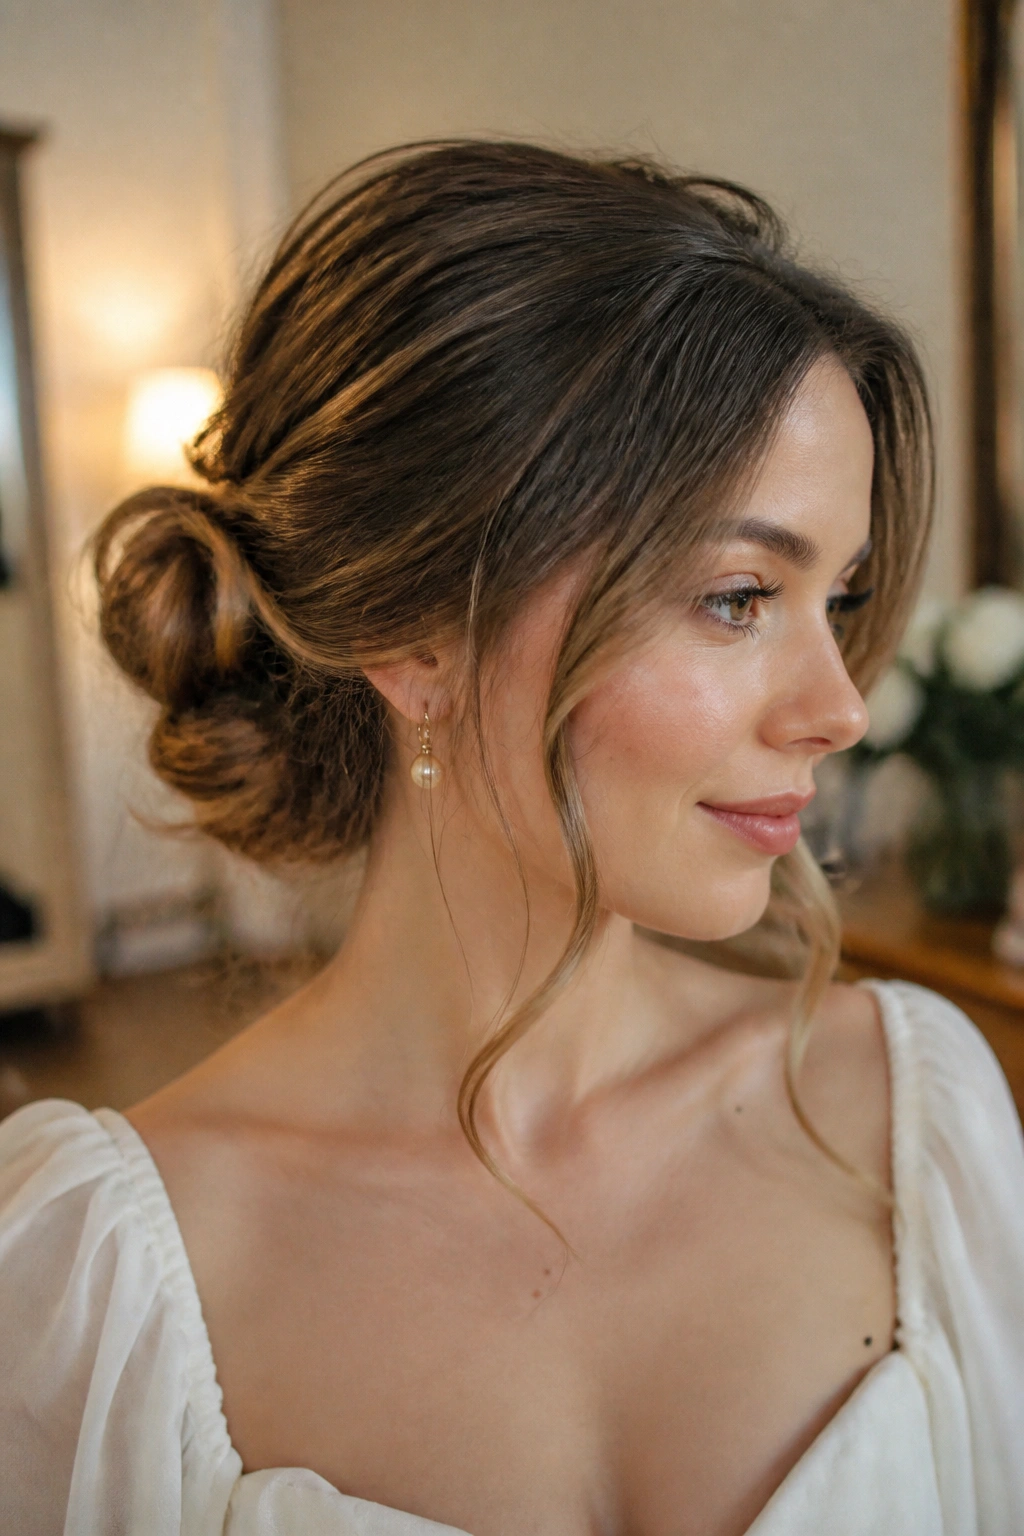
Unlike the sleek version, the soft romantic twist bun gets better when a few pieces are allowed to move. That is the whole point. The hair should feel arranged, not pinned into obedience.
The shape usually starts low or mid-level, with gentle twists pulled loosely into a bun and a couple of face-framing strands left out. A medium curling iron can help the front pieces fall with a soft bend instead of hanging straight. I would not curl every strand. Just the bits around the face and maybe one or two ends near the bun.
This bun works best with dresses, soft knits, and fabrics that have some drape. It can also tone down a very structured outfit. That contrast is useful. A rigid dress with a soft twist bun tends to look more balanced than the same dress with a super slick style.
Do not drown it in hairspray. A light mist is enough. If the front strands are crunchy, the style loses the thing that makes it interesting.
19. Tucked Twist Bun for Shorter Hair
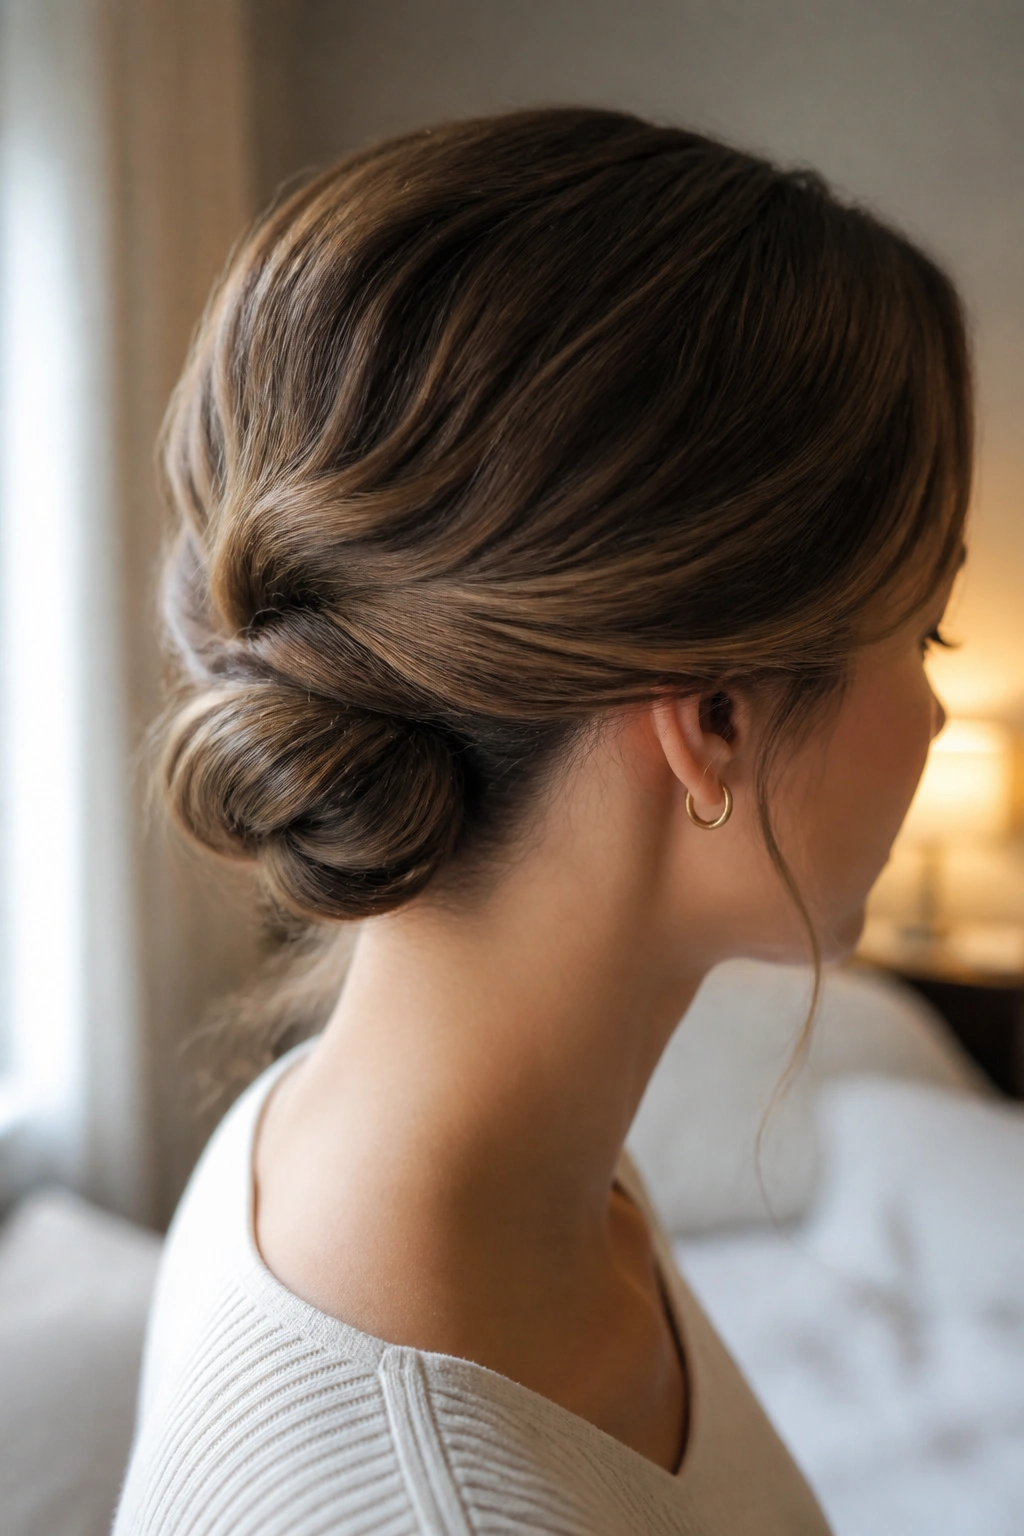
A tucked twist bun for shorter hair is the answer when the ends are not quite long enough to behave like a classic bun but still have enough length to twist and hide. Shoulder-length and collarbone-length hair can do more than people think.
Why It Works on Shorter Lengths
Instead of chasing a large bun, you build a small tucked shape that sits close to the head. Twist the sides back, fold the ends inward, and pin them under the center. The hidden ends are what make the style look finished. If they peek out, the whole thing loses its clean line.
- Use small elastics or no elastic at all
- Pin the ends under and across, not straight down
- Work with slightly dirty hair for better grip
- Keep the bun small and low
A tiny amount of texturizing spray helps a lot here. So does a tail comb for clean sectioning. The style looks best when the nape is tidy and the bun has a compact, tucked shape instead of a puffed-up loop.
20. Hidden-Pin Twist Bun
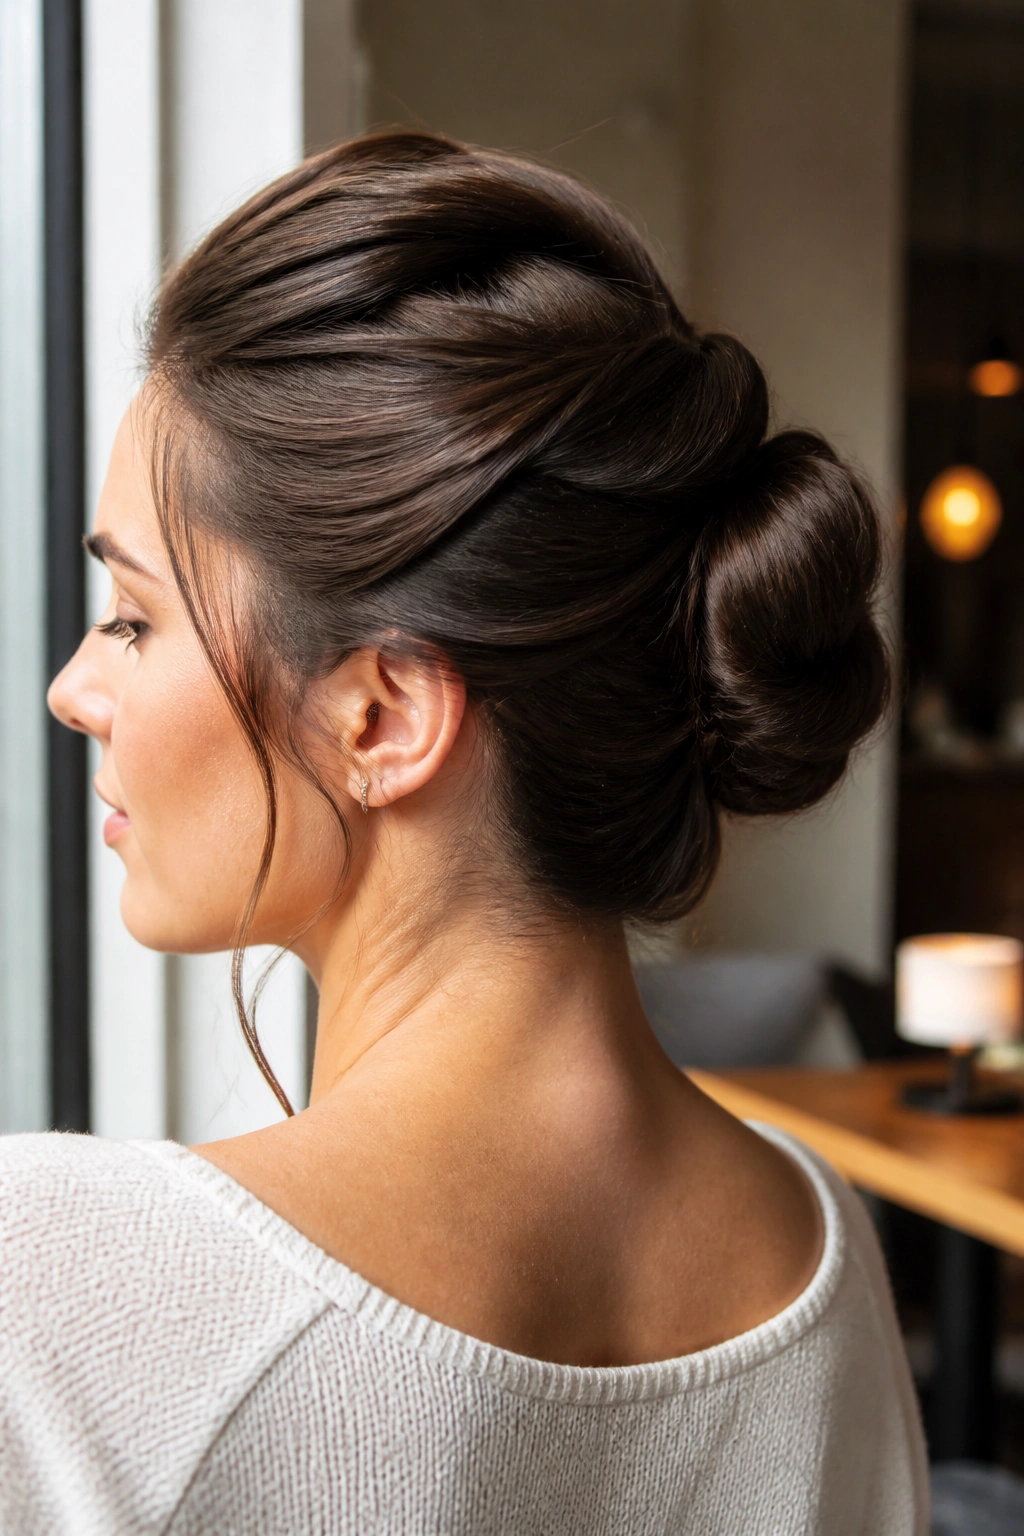
The hidden-pin twist bun is the one that convinces people your hair cooperated more than it did. That is the magic of good pin placement: the bun looks smooth from the outside, and the structure stays tucked away where no one can see it.
The trick is to pin from underneath and slightly inward, so each pin disappears into the overlap of the twists. You want the bun to rest on its own shape, not on a forest of exposed bobby pins. If the pins are visible, the style loses polish fast. Match the pins to your hair color when you can, and place the last one under the bun where the twist crosses itself.
This version works especially well when you need the hair to survive a long stretch of wear. Commutes, events, long dinners, windy walks — all of it. The hidden support keeps the bun cleaner longer because there is less shifting at the surface.
A polished bun usually fails at the edges, not the center. Tame the hairline, hide the pins, and leave the rest alone. That is often the difference between a style that looks done and one that looks dressed.
