



You do not need a miracle before breakfast. You need a hair tie, maybe a clip, and a style that forgives the fact that your alarm lost the fight.
That is why easy hair up ideas for busy mornings matter so much. When you only have a few minutes, the difference between “done” and “I guess I’m wearing a hat” usually comes down to one simple thing: whether the style works with the hair you actually have, not the hair you wish you had. Oily roots, flat bangs, fluffy ends, random layers sticking out like they pay rent — all of that is normal.
I’ve always trusted styles that can survive a rushed coffee grab and still look decent if you take your coat off later. The ones that need twelve bobby pins, a curling iron, and a prayer? Hard pass. The styles below are the opposite. They’re quick, forgiving, and realistic, which is a nicer way of saying they’re built for real mornings.
Some of them look polished. Some look softer and a little lived-in. A few are almost suspiciously simple. Good. That’s exactly the point. Start with the first one that fits your length and mood, and keep a few of these in your back pocket for the mornings when time feels thin.
1. The Low Knot for Easy Hair Up Ideas for Busy Mornings
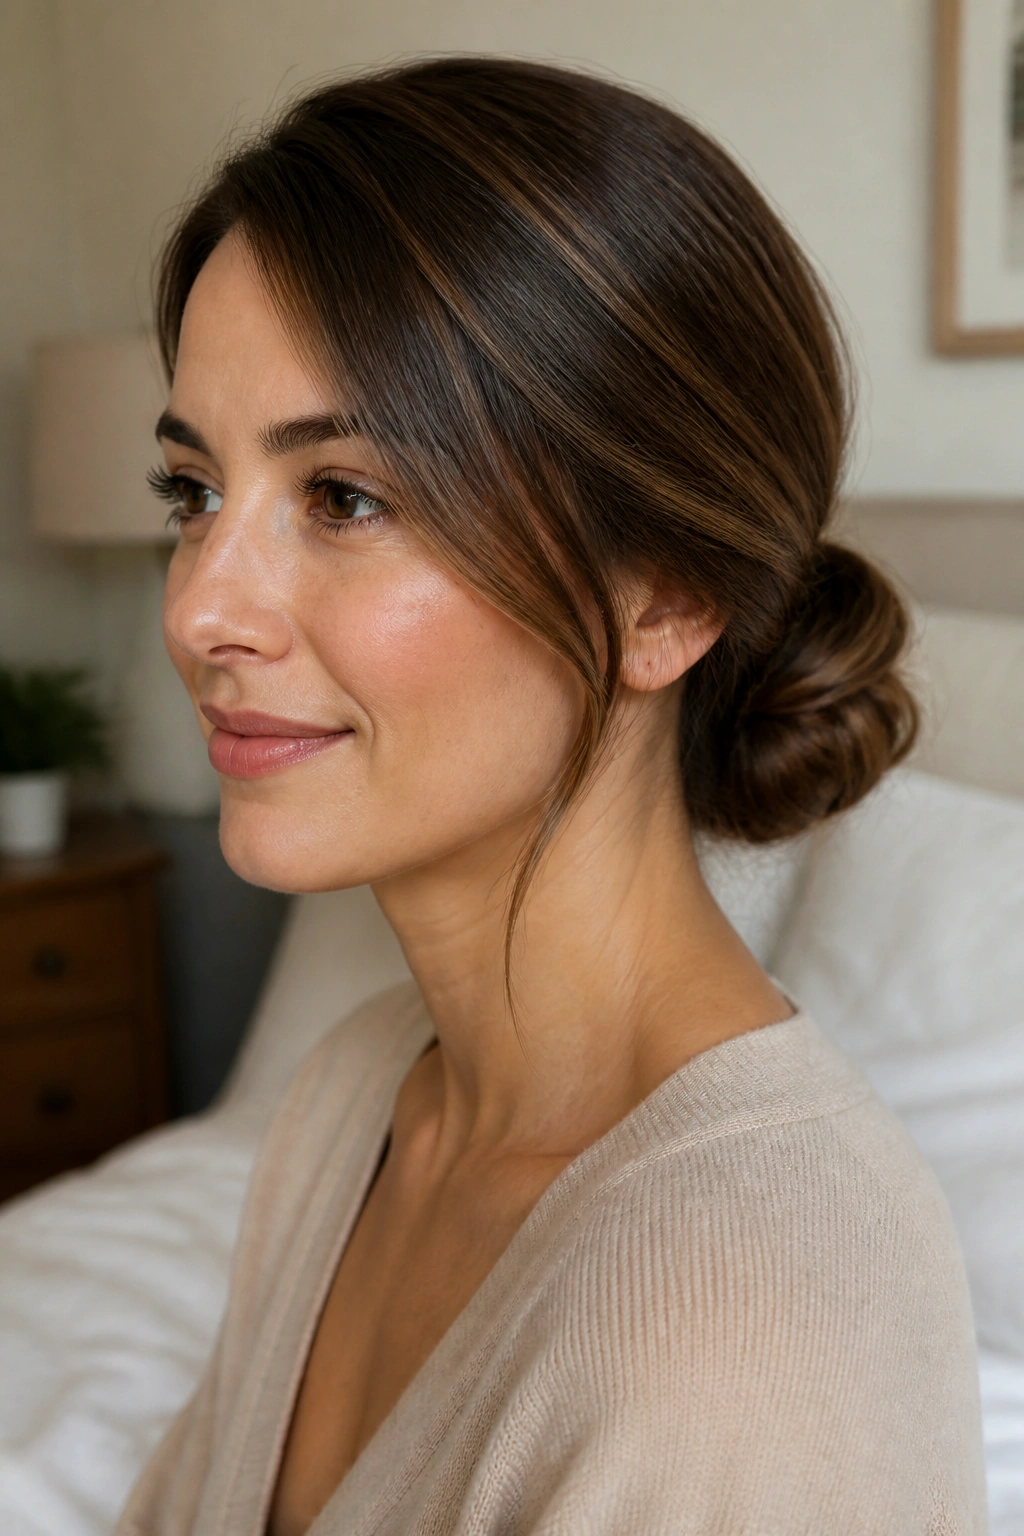
A low knot is the kind of style that saves you when your hair has gone weird at the roots but the ends are still behaving. It sits close to the nape, so it feels calm and tidy, and the side part keeps it from looking too strict. That little shift matters. A center part can make the whole thing feel severe; a side part softens it fast.
Why It Works
The low placement hides a lot. Uneven texture, grown-out layers, a blunt cut that is sticking out a bit — all of that disappears more easily when the knot sits low and compact. You do not need sleek, glassy hair either. A little grip helps.
If your hair is freshly washed and slippery, use a pea-sized amount of styling cream or a light mousse near the front before you gather it. If it’s second-day hair, even better. It usually holds shape with fewer pins.
- Use 1 elastic and 3 to 5 bobby pins.
- Keep the knot about 1 to 2 inches above the nape.
- Leave a few soft pieces around the face if your hair feels flat.
- Twist the ponytail only once or twice before wrapping it into a knot.
Best move: pull the knot apart slightly after pinning it so it looks fuller, not packed into a tight ball.
2. The Claw-Clip French Twist
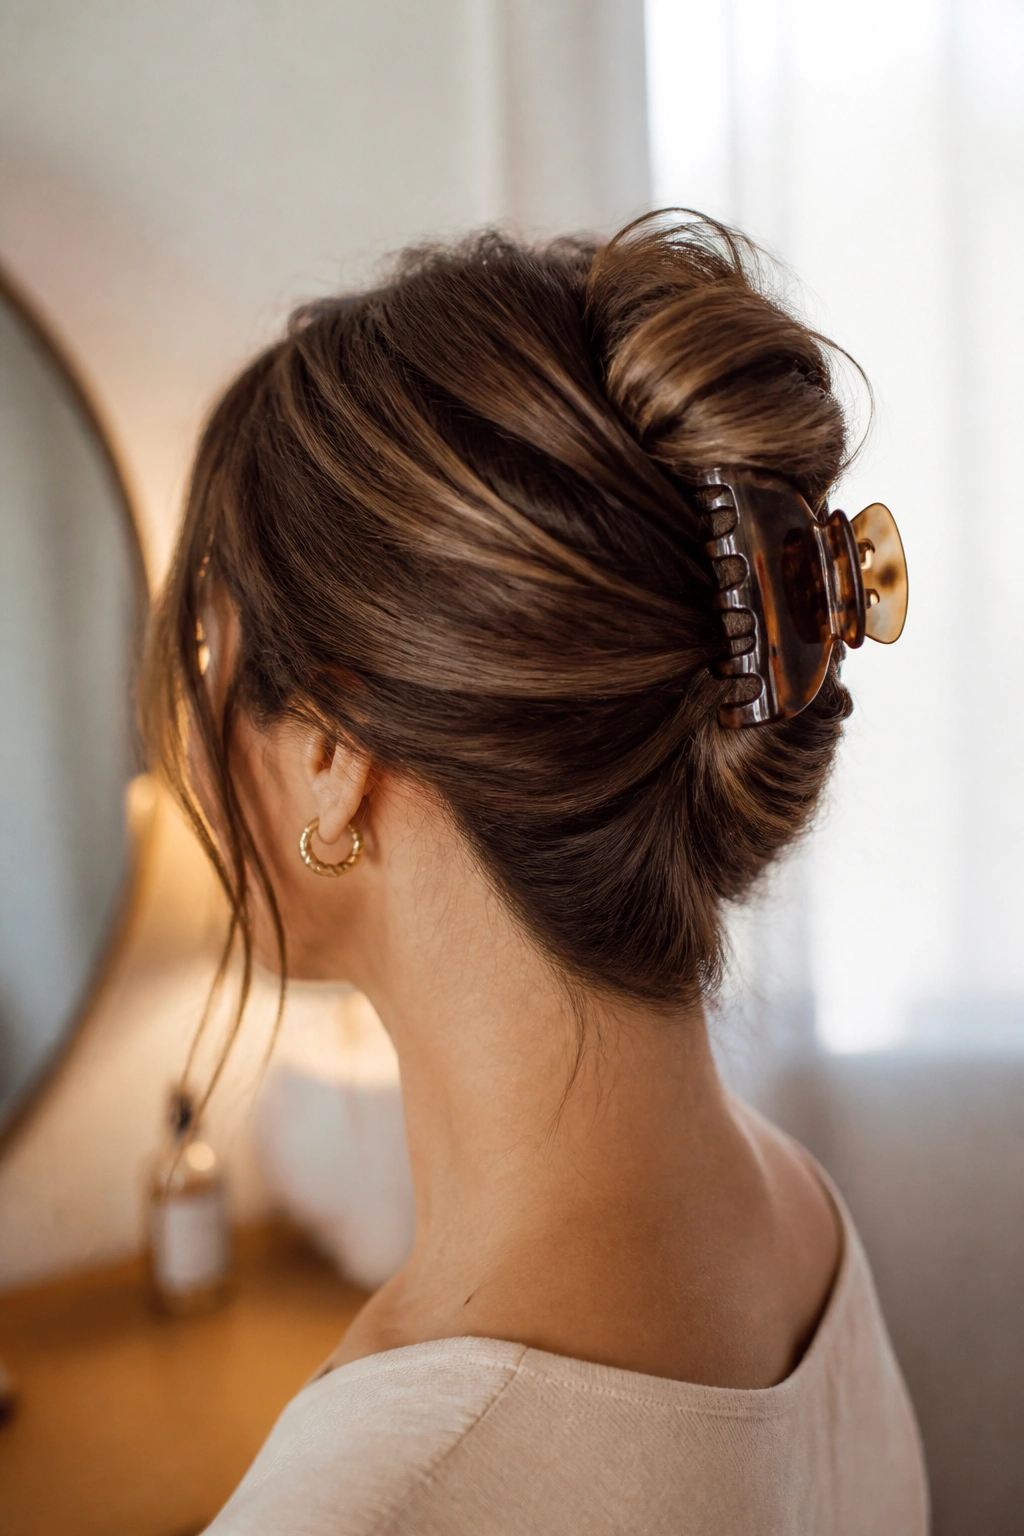
Need something that looks a little put-together even when your ends are fraying and you have no patience for pins? The claw-clip French twist is the answer. It feels more elevated than a basic bun, but it takes less time than wrestling with a perfect chignon.
The trick is in the fold. Gather the hair at the back, twist it upward in one smooth motion, then tuck the ends under before clipping the shell of the twist in place. A medium clip works best for shoulder-length hair; longer, thicker hair usually needs a larger one with strong teeth. Cheap clips slip. I’ve tried to pretend they don’t, and they do.
This style is especially useful when your hair has a little texture. Clean, squeaky hair can slide out of the clip in under an hour. A bit of dry shampoo at the roots gives the twist something to hold onto.
No need to make it pristine. In fact, if the twist is too neat, it can feel stiff. Leave a whisper of volume at the crown, and let the clip do the heavy lifting. That’s the whole charm of it.
3. The Sleek High Ponytail for Easy Hair Up Ideas for Busy Mornings
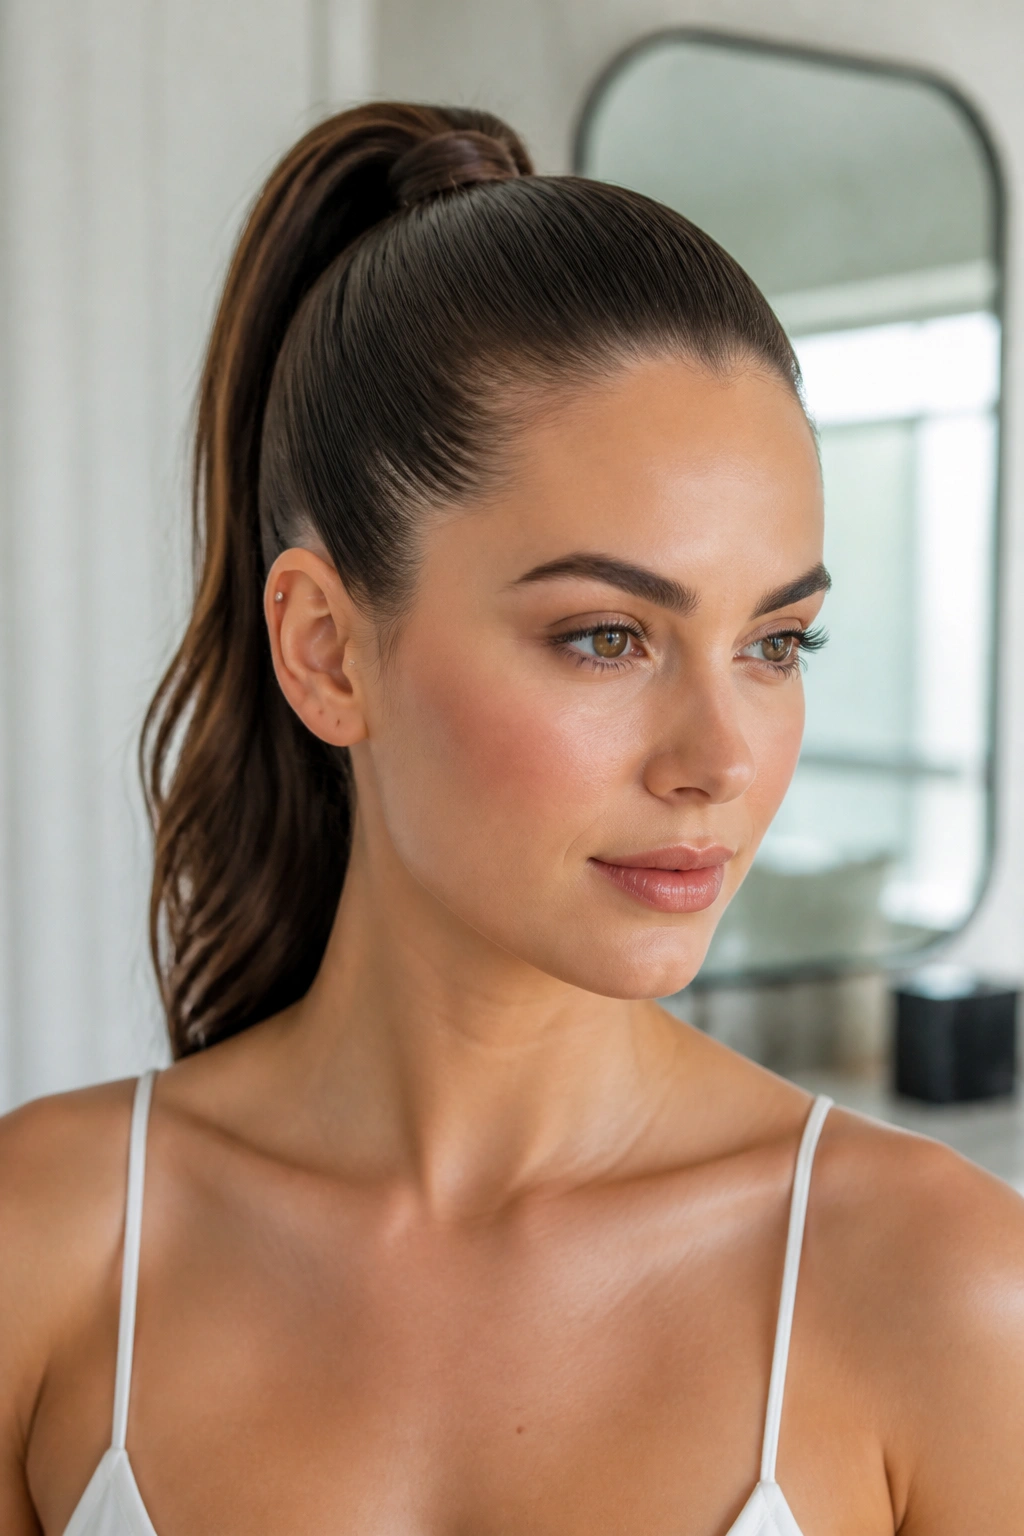
A high ponytail is fast, sharp, and strangely forgiving if your roots are not cooperating. It pulls the hair up and away from your face, which means you can skip a lot of fussing near the temples. When it’s done well, it looks intentional in a way that hides the fact that it took about four minutes.
Start by brushing the hair straight up toward the crown, not backward. That gives you a cleaner lift and keeps the sides from sagging by lunchtime. Tie it snugly, then wrap a small strip of hair around the base to hide the elastic. One bobby pin tucked underneath is enough to hold the wrap in place.
A pea-sized dab of gel or smoothing cream on the front section helps a lot, especially if your flyaways are dramatic. Don’t coat the whole head. That’s how you end up with flat roots and a greasy-looking top layer. Just smooth the first inch or two near the hairline.
This style works especially well if your ends are dry, because the ponytail keeps them together instead of letting them do their own thing. And if the length feels too plain, add a scrunchie or a narrow ribbon. Small change. Big payoff.
4. The Messy Bun With a Spare Elastic
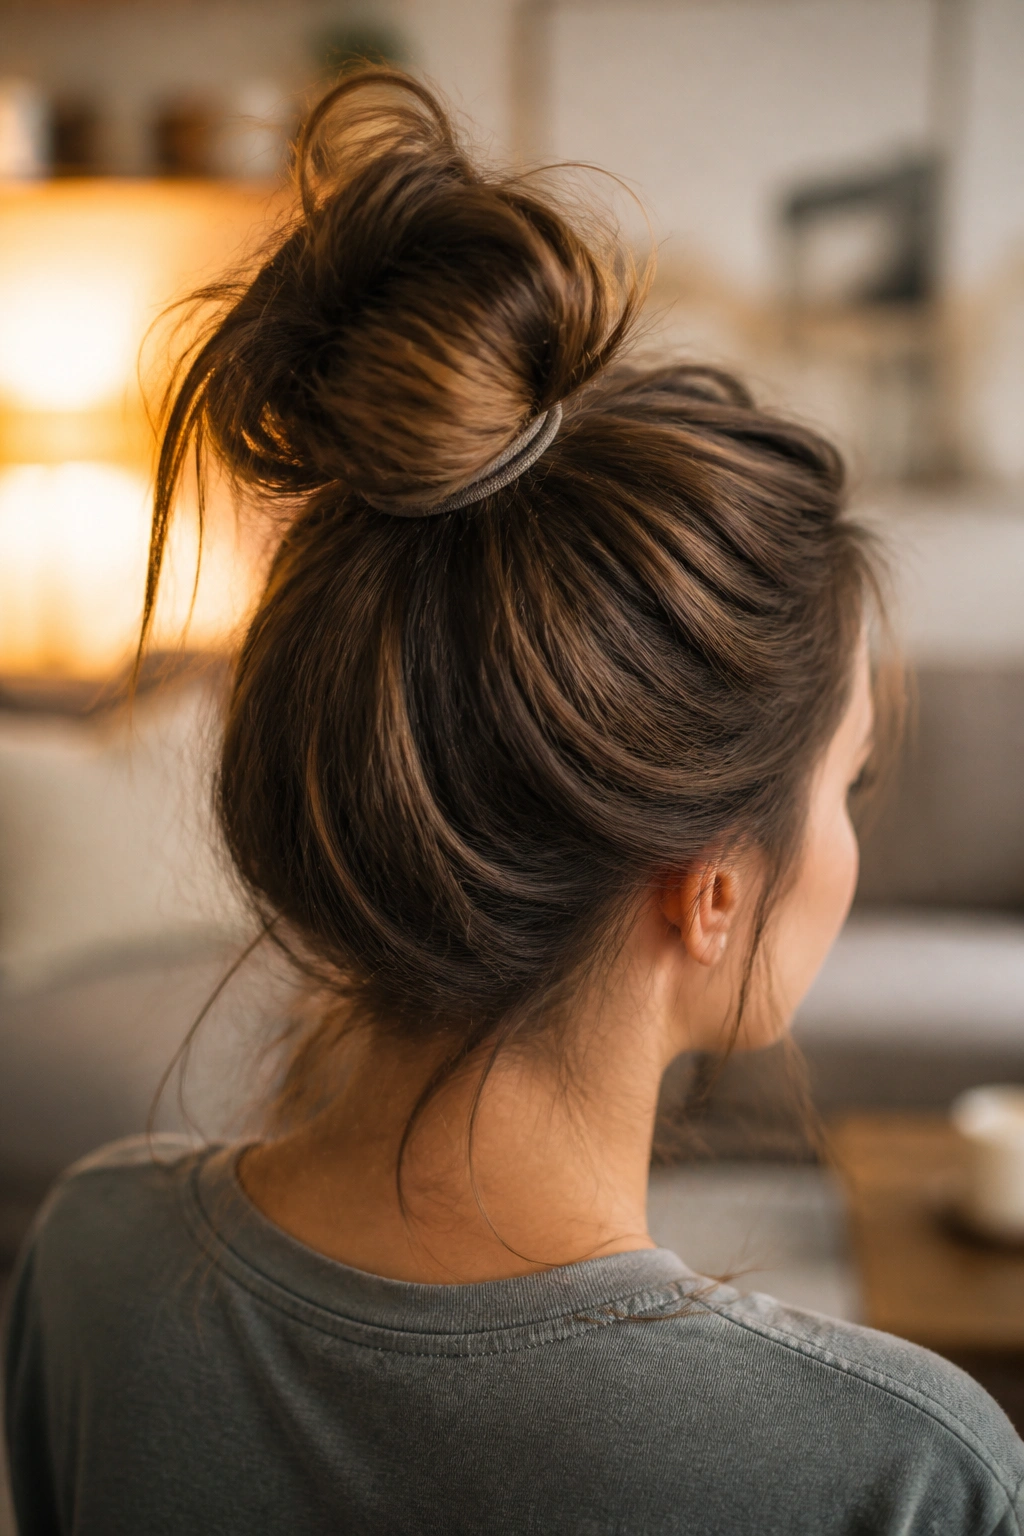
I reach for this style when I’m late, annoyed, or both. It’s the bun version of “good enough,” except it usually looks better than you expected once it’s done.
Gather the hair into a loose ponytail, but stop before you pull the ends all the way through on the last loop of the elastic. That half-finished loop creates the bun shape. Then spread the bun open with your fingers and let a few ends stick out on purpose. That little mess is what makes it look casual instead of accidental.
What Helps It Hold
- Second-day hair grips better than clean hair.
- A second elastic can tighten the bun if the first one feels loose.
- Pin the bun at the base, not just the top.
- If your hair is fine, mist the lengths with texturizing spray first.
The spare elastic matters more than people think. If the bun starts to sag, a quick extra wrap around the base gives it shape again without rebuilding the whole thing. Cheap trick. Works every time.
The best part is that this style does not ask for perfection. In fact, perfection is the wrong goal. You want height, texture, and just enough looseness that the bun looks soft when you turn your head.
5. The Braided Ponytail
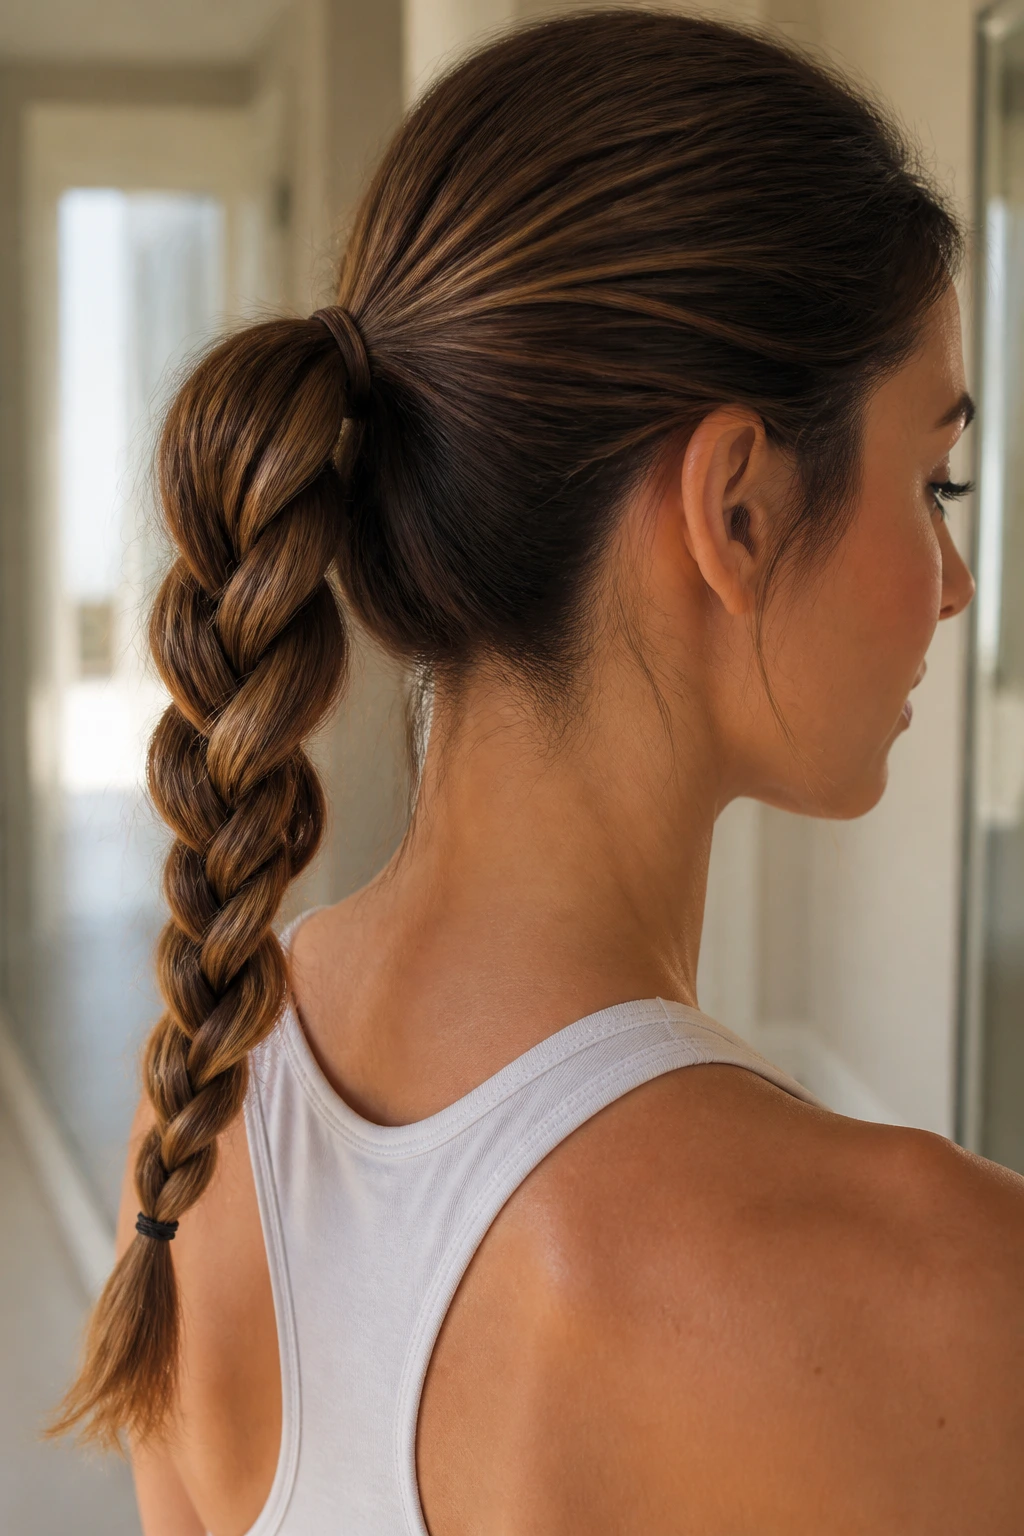
A braid gives a ponytail backbone. That’s the whole reason it earns a place among easy hair up ideas for busy mornings. Loose ponytails can slip, especially if your hair is fine or freshly conditioned. A simple three-strand braid solves that without making the style feel fussy.
Start with a mid or low ponytail and secure it tightly. Braid the length all the way down, then tie off the end with a small elastic. If the braid looks too neat, gently tug the outer loops once it’s finished so it has a little width. Not a lot. Just enough to keep it from looking pinched.
This style is a good fit for layered hair because the braid controls those shorter pieces that usually float away. It’s also one of the easiest ways to make a basic ponytail feel more finished without adding heat. If your hair is wavy or textured, braid while it’s still a little damp and let it dry in place. That gives you softer shape and a bit of bend when you let it out later.
The one thing I’d skip is over-spraying it with hold product. A little is fine. Too much and the braid turns stiff, which is a shame because the whole point is movement.
6. The Half-Up Top Knot
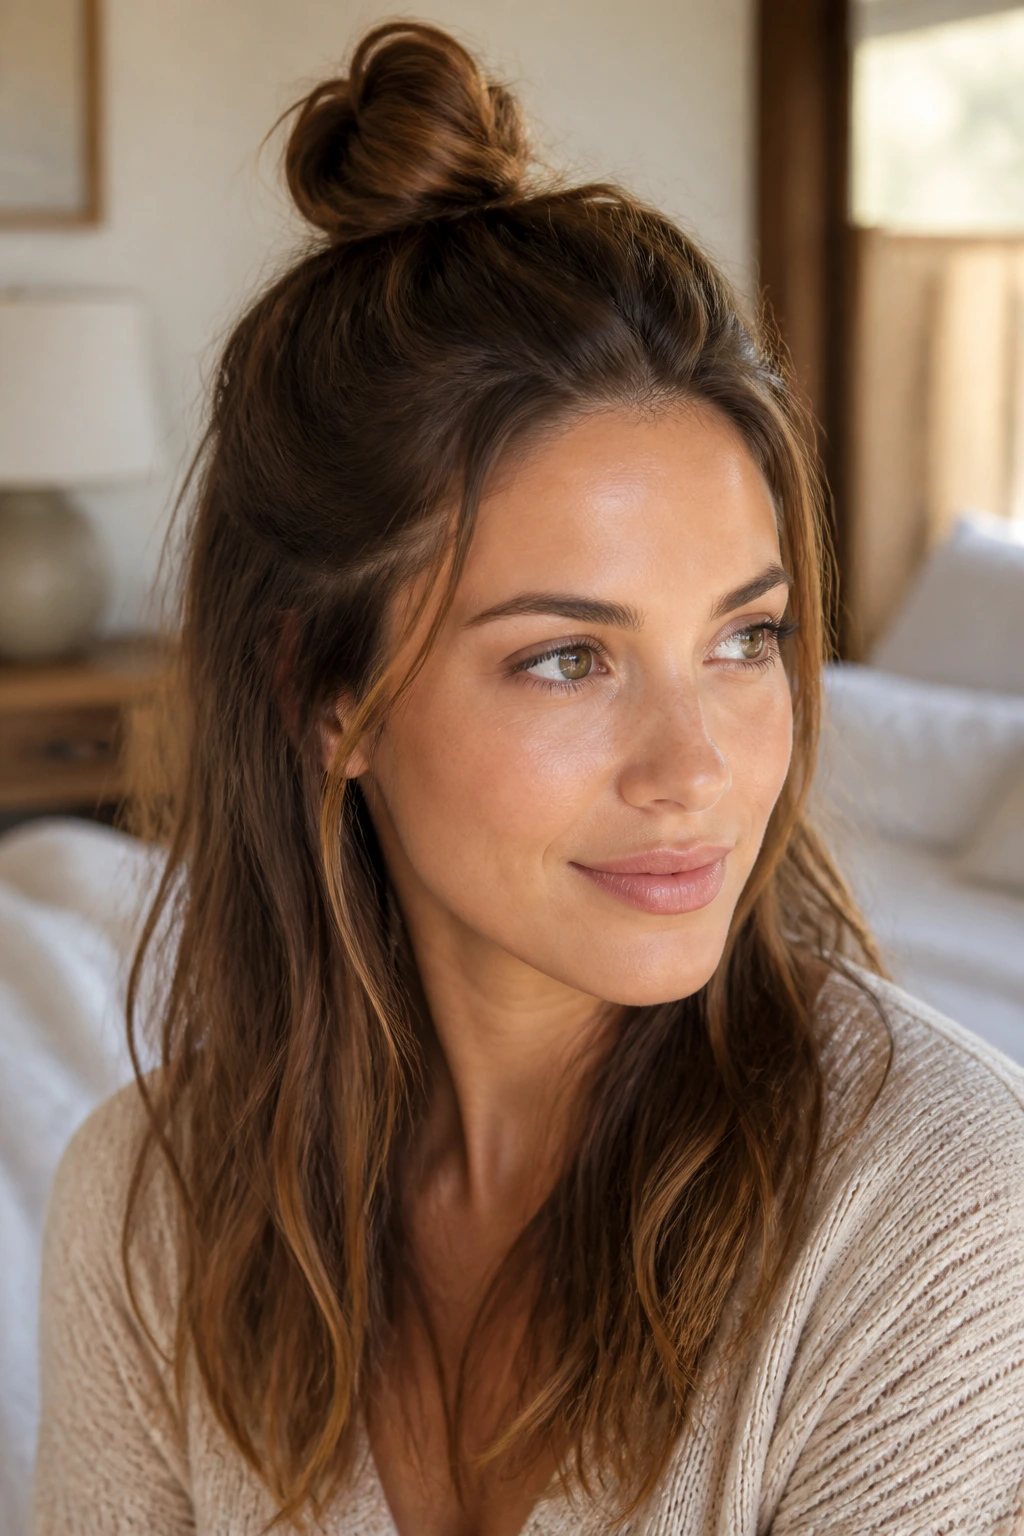
A half-up top knot is the style I recommend when you want your hair off your face but still want to keep some length visible. It gives you the clean feeling of an updo without the commitment of putting everything up. That matters on mornings when full control feels like too much work.
Unlike a full bun, this one does not flatten the whole head. Unlike a loose ponytail, it keeps the front layers out of the way. That makes it a neat middle ground for medium-length hair, and especially for hair with bangs or shorter pieces near the face.
Gather the top section from temple to temple, twist it into a small bun, and secure it with one elastic or two pins. Keep the bun about the size of a plum, not a grapefruit. Bigger than that and it starts to steal the whole look. Smaller than that and it can disappear into the rest of the hair.
This is also the style I’d use if the roots are oily but the lengths still look decent. You get a little lift, a little shape, and none of the effort that a full polished bun demands. Easy. That’s the win.
7. The Twisted Low Chignon
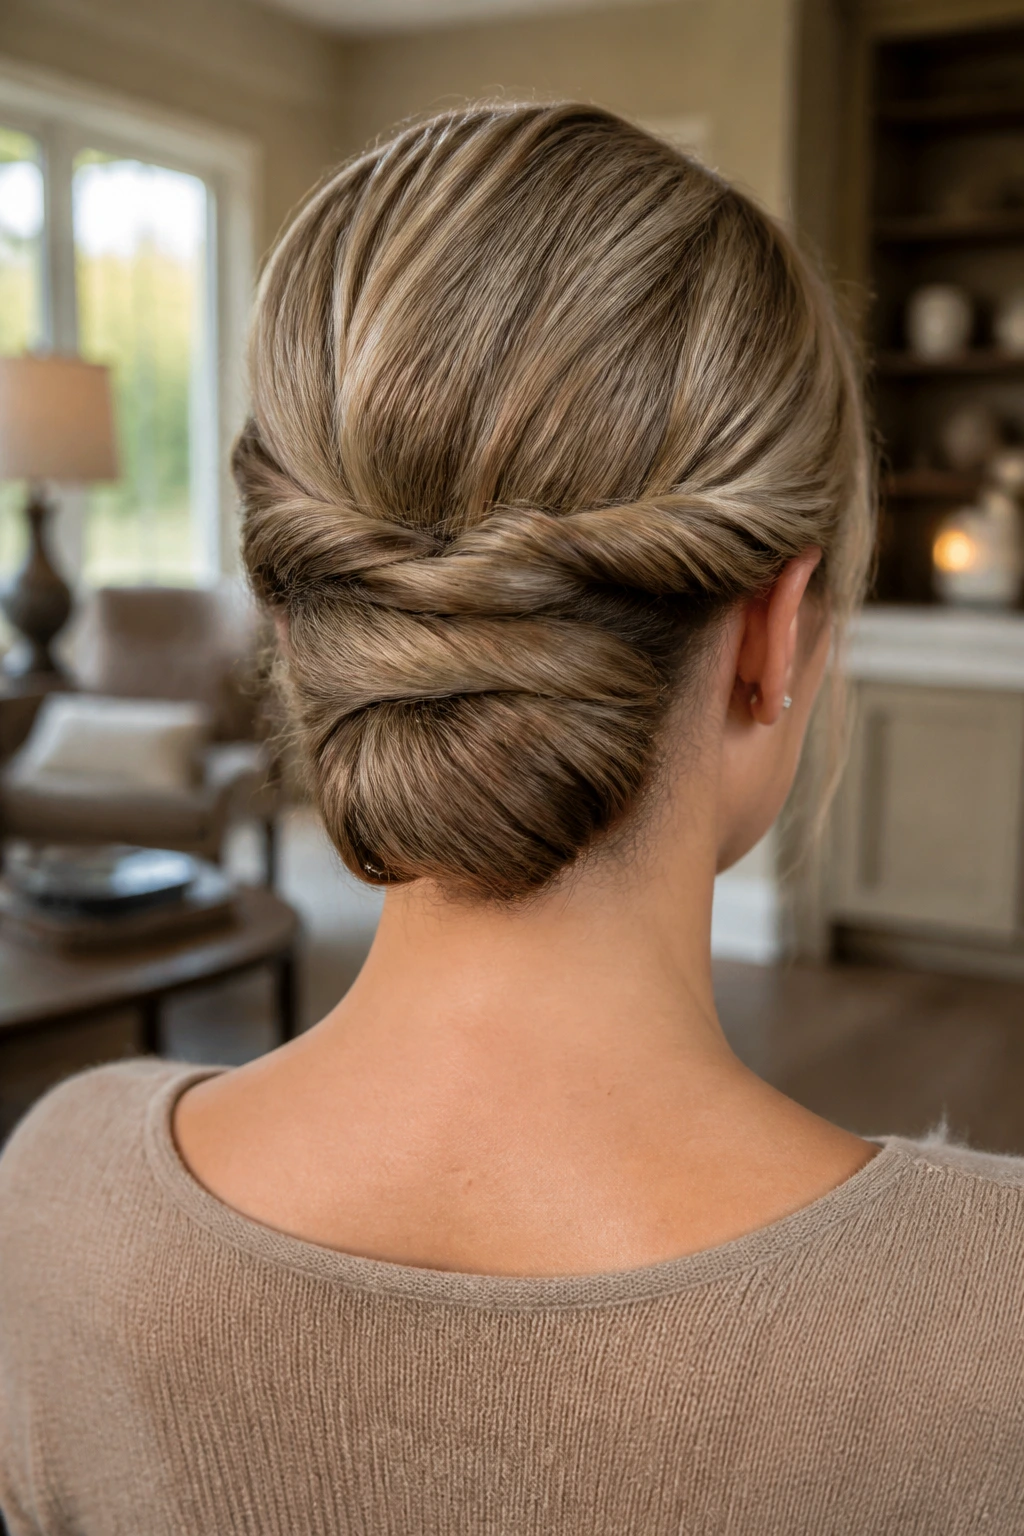
Want something that looks like you meant it, even if you only spent six minutes on your hair? The twisted low chignon is a quiet little cheat. It sits at the nape, which means it stays comfortable, and the twist gives it shape without asking you to braid anything.
How to Keep the Twist Flat
Part the hair into two sections at the back. Twist each section inward, then wrap them together into a low coil and pin them under the fold. If your hair is layered, tuck the shorter pieces first so they don’t pop out later.
A smoothing cream helps here more than gel does. Gel can make the surface too stiff, and a chignon usually looks better when it has a soft finish. Use a small dab, about the size of a pea, on the top and sides before you start twisting.
This style suits longer hair that tends to puff out at the ends. It also works on hair that isn’t freshly washed, which is a blessing on mornings that start with dry shampoo and hope. If you need it to stay put longer, cross two bobby pins in an X under the twist. It sounds fussy. It isn’t.
The whole style has that nice “I got dressed before 8 a.m.” feeling without actually requiring much skill. That’s a solid bargain.
8. The Bubble Ponytail
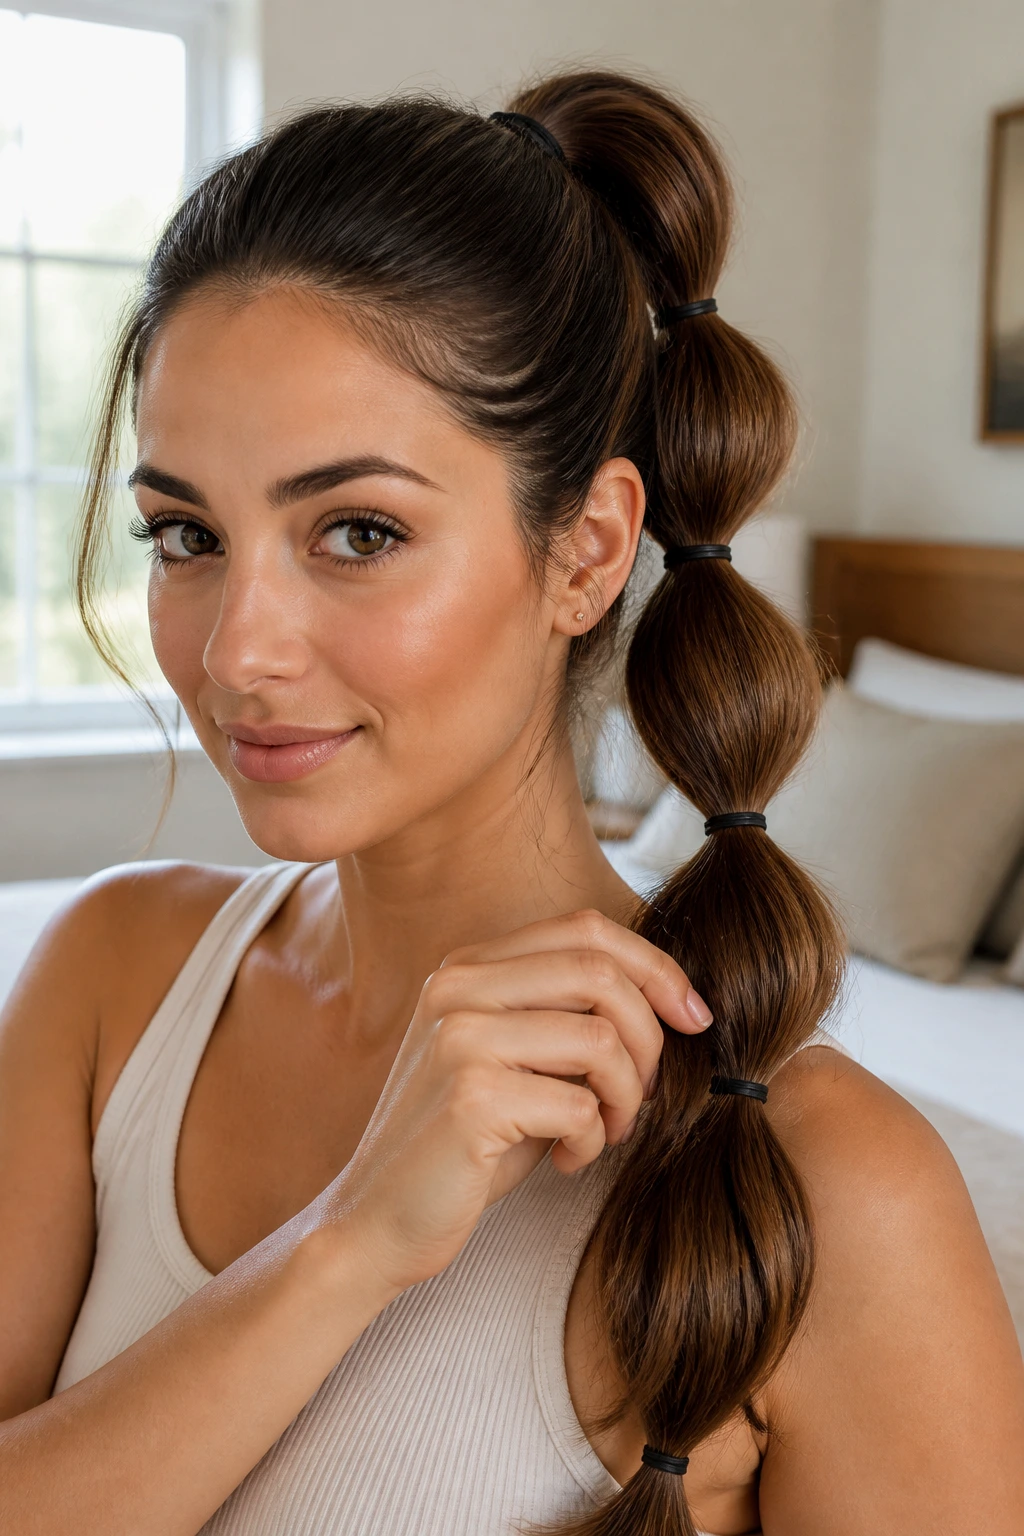
A bubble ponytail is one of those styles that looks deliberate even when the process is hilariously simple. If your mornings are chaotic, this one gives you a styled finish without needing braid skills or a perfect hand.
Tie the hair into a ponytail first, then add small elastics every 2 to 3 inches down the length. After that, gently pull each section outward between the elastics to create the bubble shape. Do it with your fingers, not a brush. A brush makes the bubbles look thin and overworked.
This style works best on medium to long hair because you need enough length to create at least three visible sections. If your hair is shorter, you can still do it, but the effect is softer. Fewer bubbles. Still cute. Still practical.
It’s also a good way to hide hair that isn’t behaving perfectly at the crown. The structure is in the length, not the top, so you can spend less time trying to flatten every tiny flyaway. A small wrap of hair around the first elastic helps if you want the base to look cleaner.
The style has energy without being loud. That’s why people keep coming back to it, even if they never call it by name.
9. The Double Mini Buns
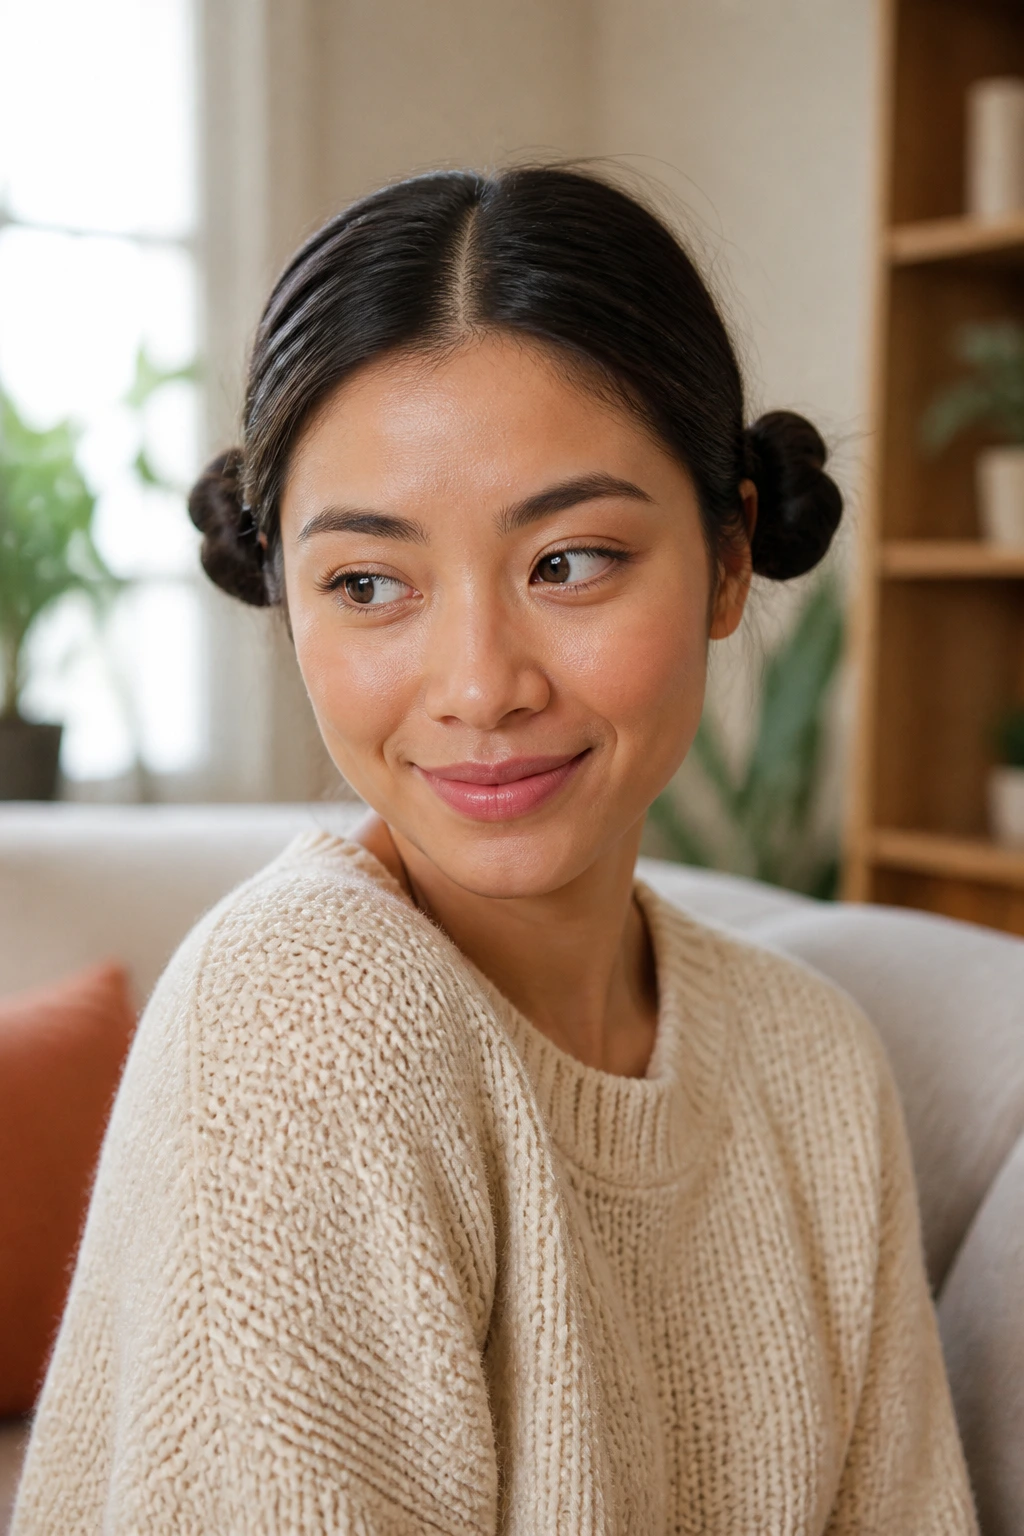
Double mini buns are the answer when you want your hair up, out of the way, and a little less serious. They’re playful, but they also work hard. Two small buns spread the weight out better than one big knot, which makes them handy for thicker hair.
Part the hair down the middle, then gather each side into a small ponytail just behind the ears or a little higher at the crown. Twist each ponytail into a bun and pin it down with two or three pins. If your hair is fine, tease the ponytail lightly before twisting. If it’s thick, keep the buns loose so they do not sit too heavy.
There’s a nice practical side to this style. It keeps hair off the neck, stays put through a commute, and gives a more balanced look than a single bun when your hair has a lot of volume on one side. It also makes growing-out bangs easier to deal with, since you can sweep them into the part instead of fighting them.
Nope, it is not only for weekends. With smaller buns and a clean center part, it can look surprisingly neat. A little edge control or a drop of smoothing cream at the part helps if your roots puff up quickly.
10. The Rope-Braid Bun
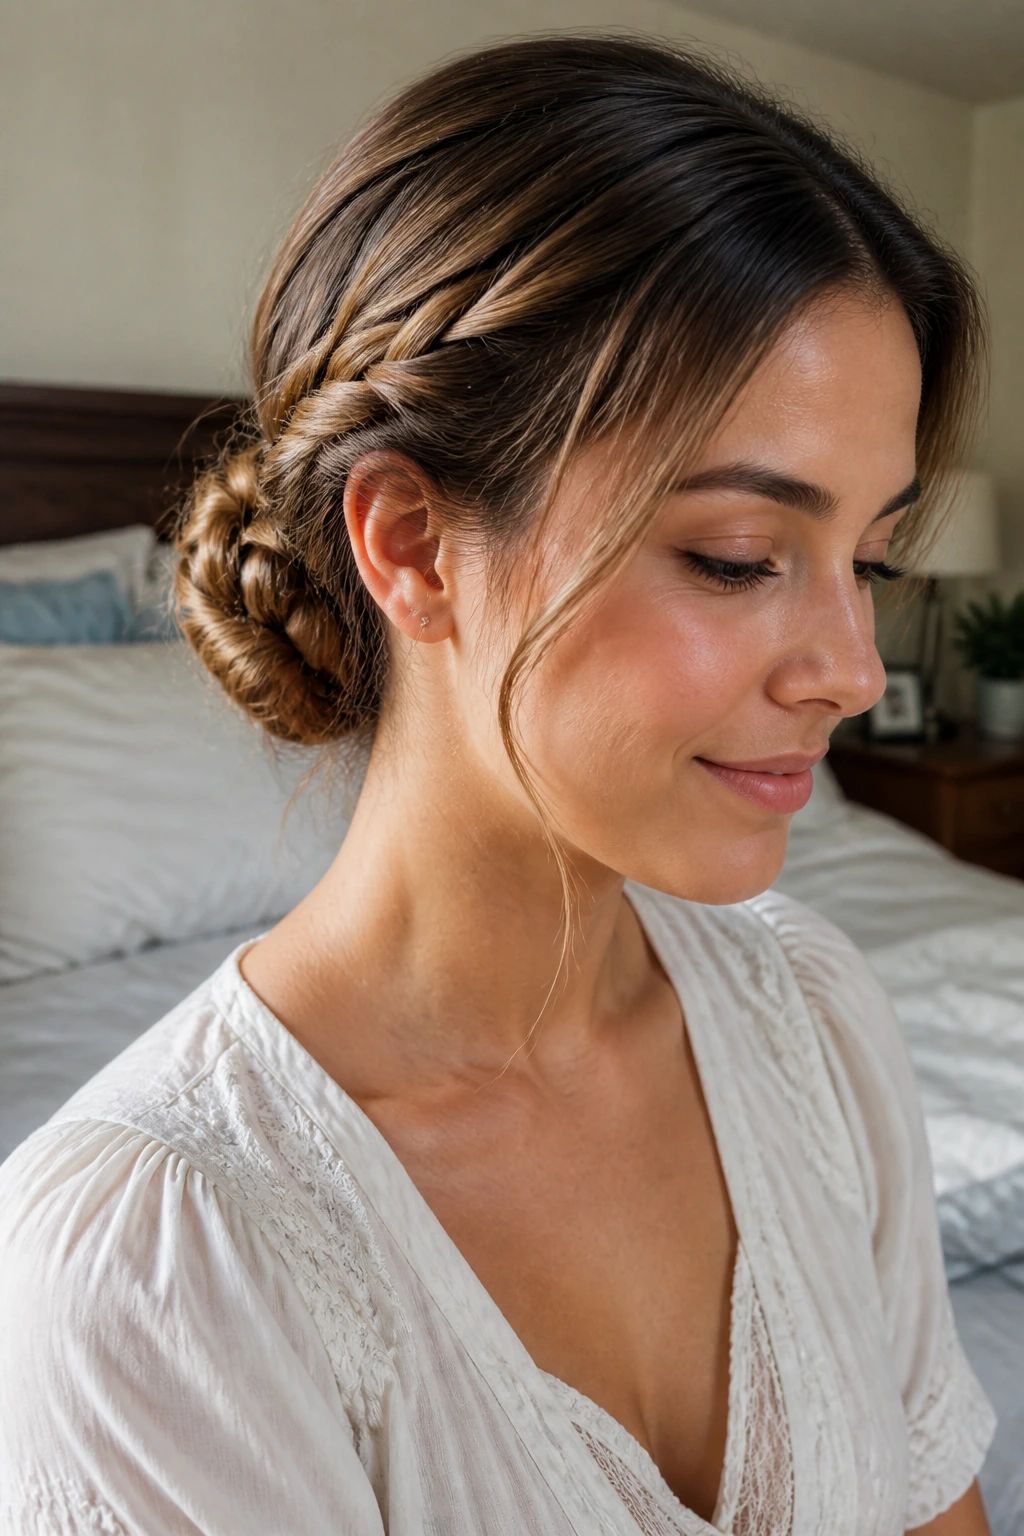
If you can twist two sections of hair, you can make a rope-braid bun. That is the beauty of it. It gives you more texture than a plain bun and less fuss than a full braid, which is a lovely middle ground on rushed mornings.
Split a low ponytail into two pieces, twist each piece in the same direction, then wrap the two twists around each other in the opposite direction. That reverse motion is what makes it hold together. Once you reach the ends, coil the rope braid around itself into a bun and pin it down.
This style shines on layered hair because the twist naturally hides shorter ends. It also adds a bit of bulk, which helps if your hair is fine and tends to look tiny when you pull it up. A light mist of dry shampoo or texturizing spray gives the strands enough grip to keep the twists from slipping apart.
I like this one because it looks more involved than it is. Ten minutes of effort, maybe less once you’ve done it a few times, and it can pass for a style you planned.
A small detail makes a difference here: pinch the finished rope braid gently at a few spots before coiling it. It gives the bun more shape and keeps it from looking too tight.
11. The Topsy-Tail Ponytail
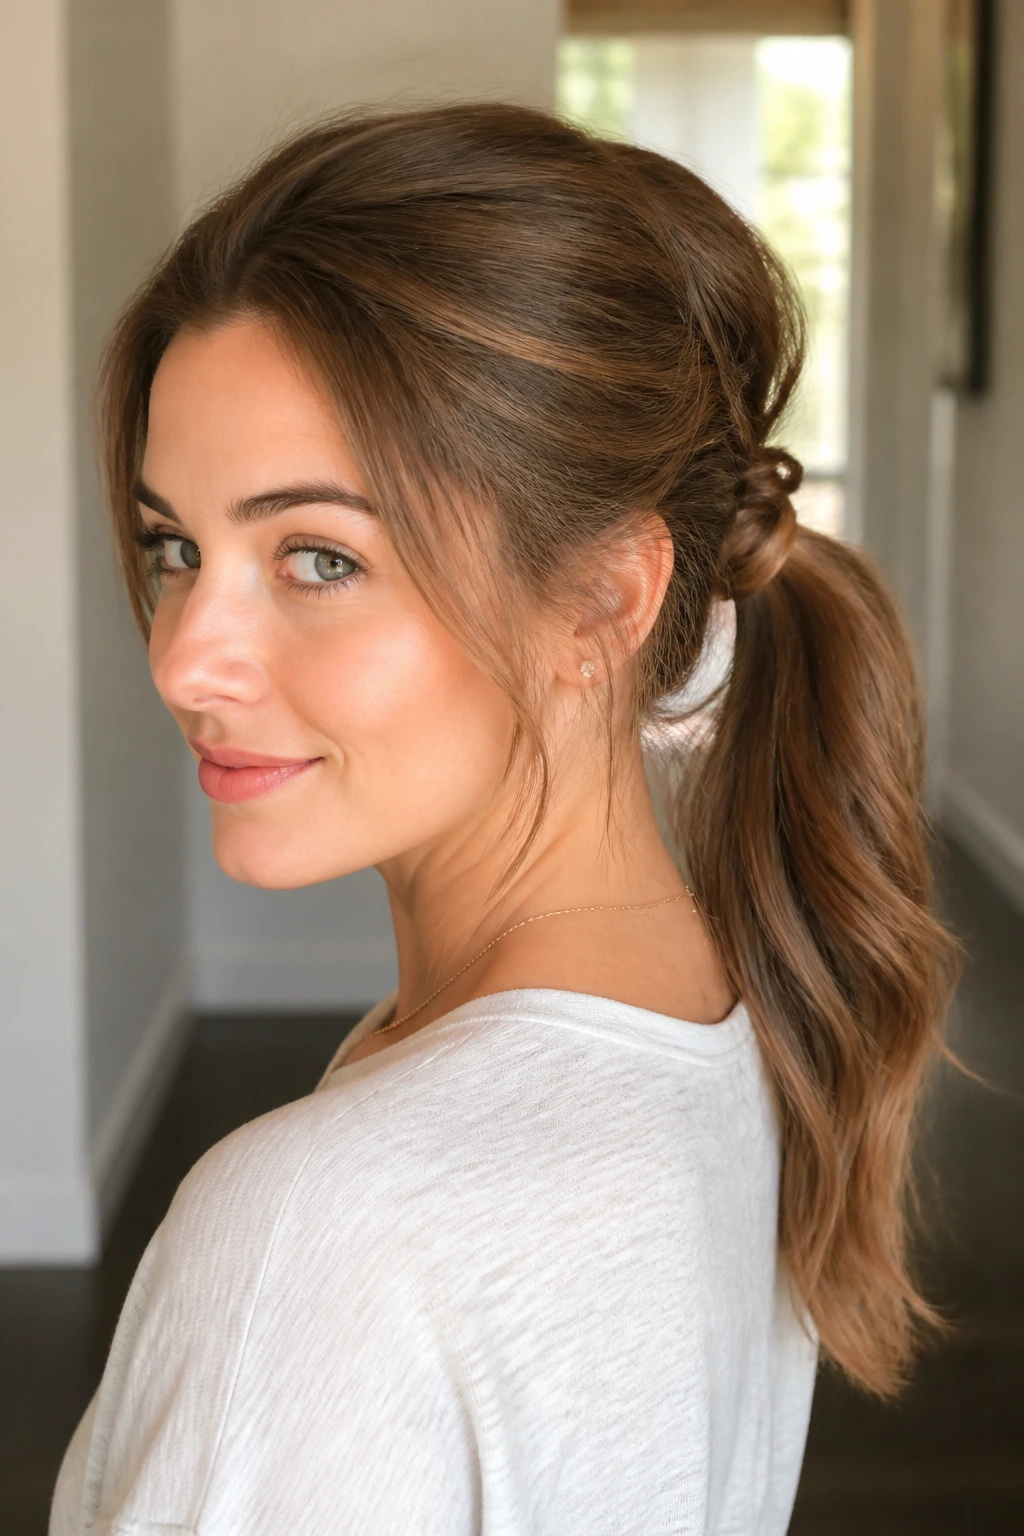
Ever start doing your hair and realize you’ve got about ninety seconds left? The topsy-tail ponytail is made for that moment. It gives a tidy, flipped finish with one elastic and no complicated hand work.
Tie the hair into a mid or low ponytail. Split the hair just above the elastic with your fingers, then flip the length up and through the gap. Pull it down snugly so the twist sits cleanly. That’s it. If you want more polish, wrap a thin strand around the base after the flip.
The style works because the twist breaks up the shape of a plain ponytail. Instead of sitting flat and ordinary, it gets a little bend and lift near the top. That tiny change makes a bigger difference than people expect.
It’s a good option for straight hair that needs a little movement, but it also behaves nicely on wavy hair that keeps collapsing into itself. If your ends are frayed, a small ribbon or narrow scarf tied around the base hides that quickly. No need to overthink it.
A one-inch section of teasing at the crown can help if you want a touch more volume. Not much. Just enough to stop the top from looking pressed down.
12. The Slicked-Back Low Ponytail
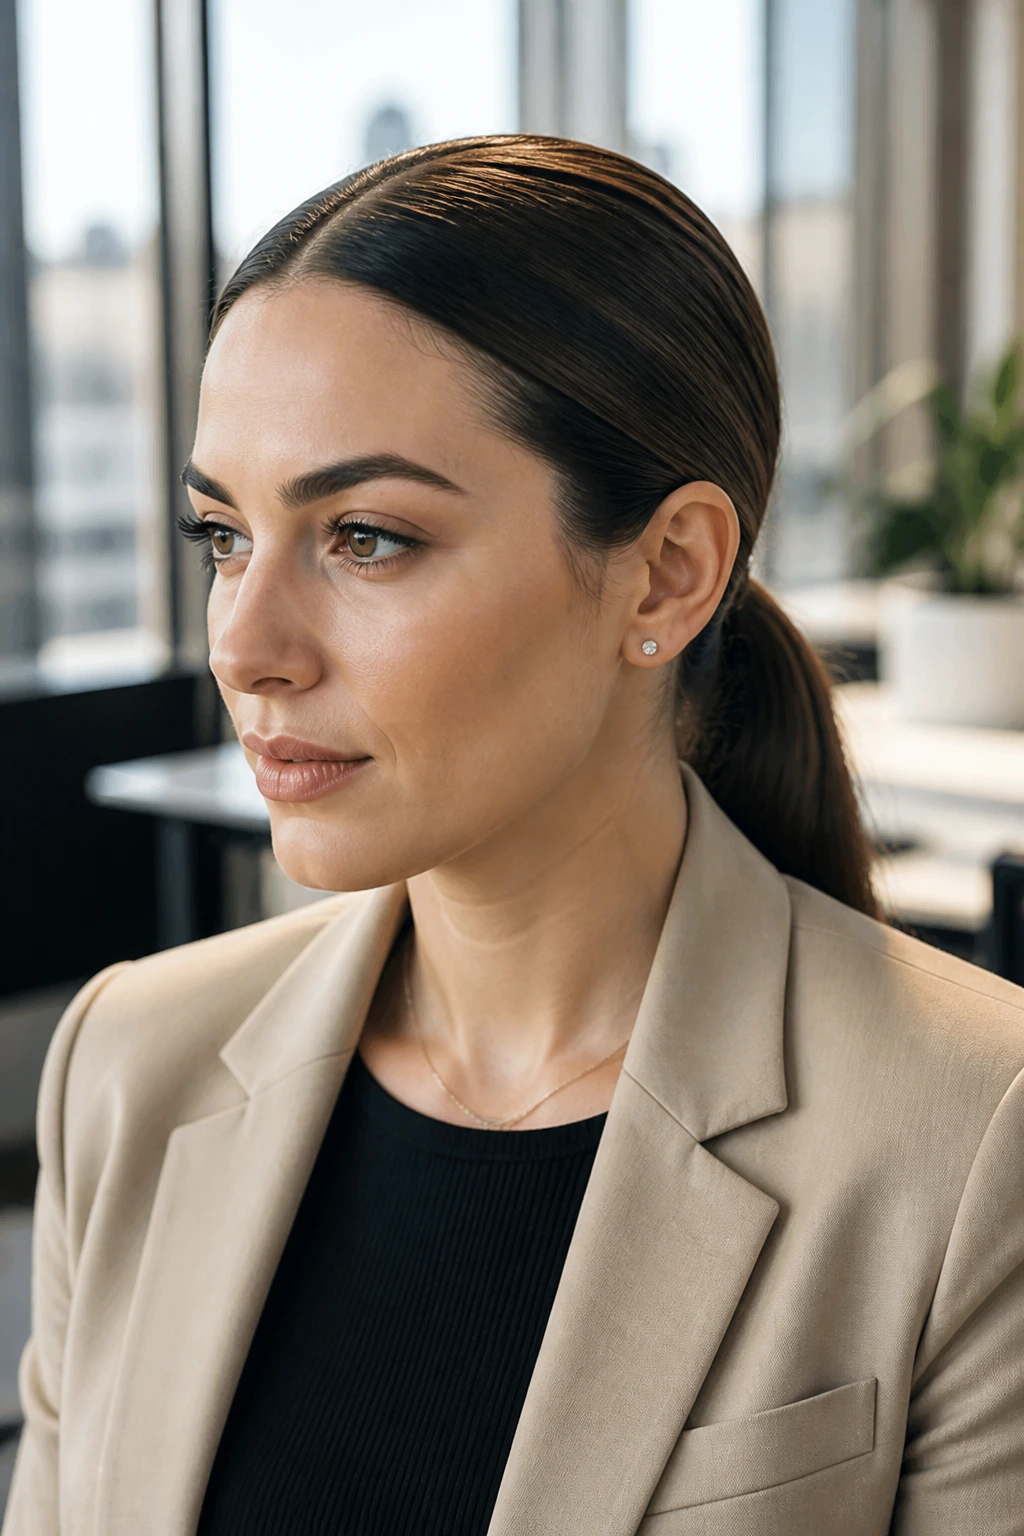
A slicked-back low ponytail is the opposite of boring when the part is sharp and the base is smooth. In fact, the clean lines are the whole point. If your hair is frizzy, humid, or slightly greasy at the roots, this style can look better than almost anything else you try in a panic.
Use a rat-tail comb to draw a straight center part or a deep side part, depending on what suits your face. Smooth a small amount of gel or styling wax through the top section only. Then brush everything back into a low ponytail at the nape and tie it tight. The finish should feel neat, not crunchy.
This style is especially good when you need your face completely clear. Work meeting. School drop-off. Quick errands where you do not want hair tickling your cheeks. It stays put because the tension is low and the line is clean.
The thing to watch is overloading the hair with product. Too much gel makes the top look wet for hours, and that can be worse than a few flyaways. Keep the product light, and use a boar-bristle brush or dense paddle brush to flatten the surface.
If your hair is curly, you do not need to iron it flat first. Pull the top smooth, leave the ponytail curly, and let the texture live where it wants to.
13. The Side-Swept Bun
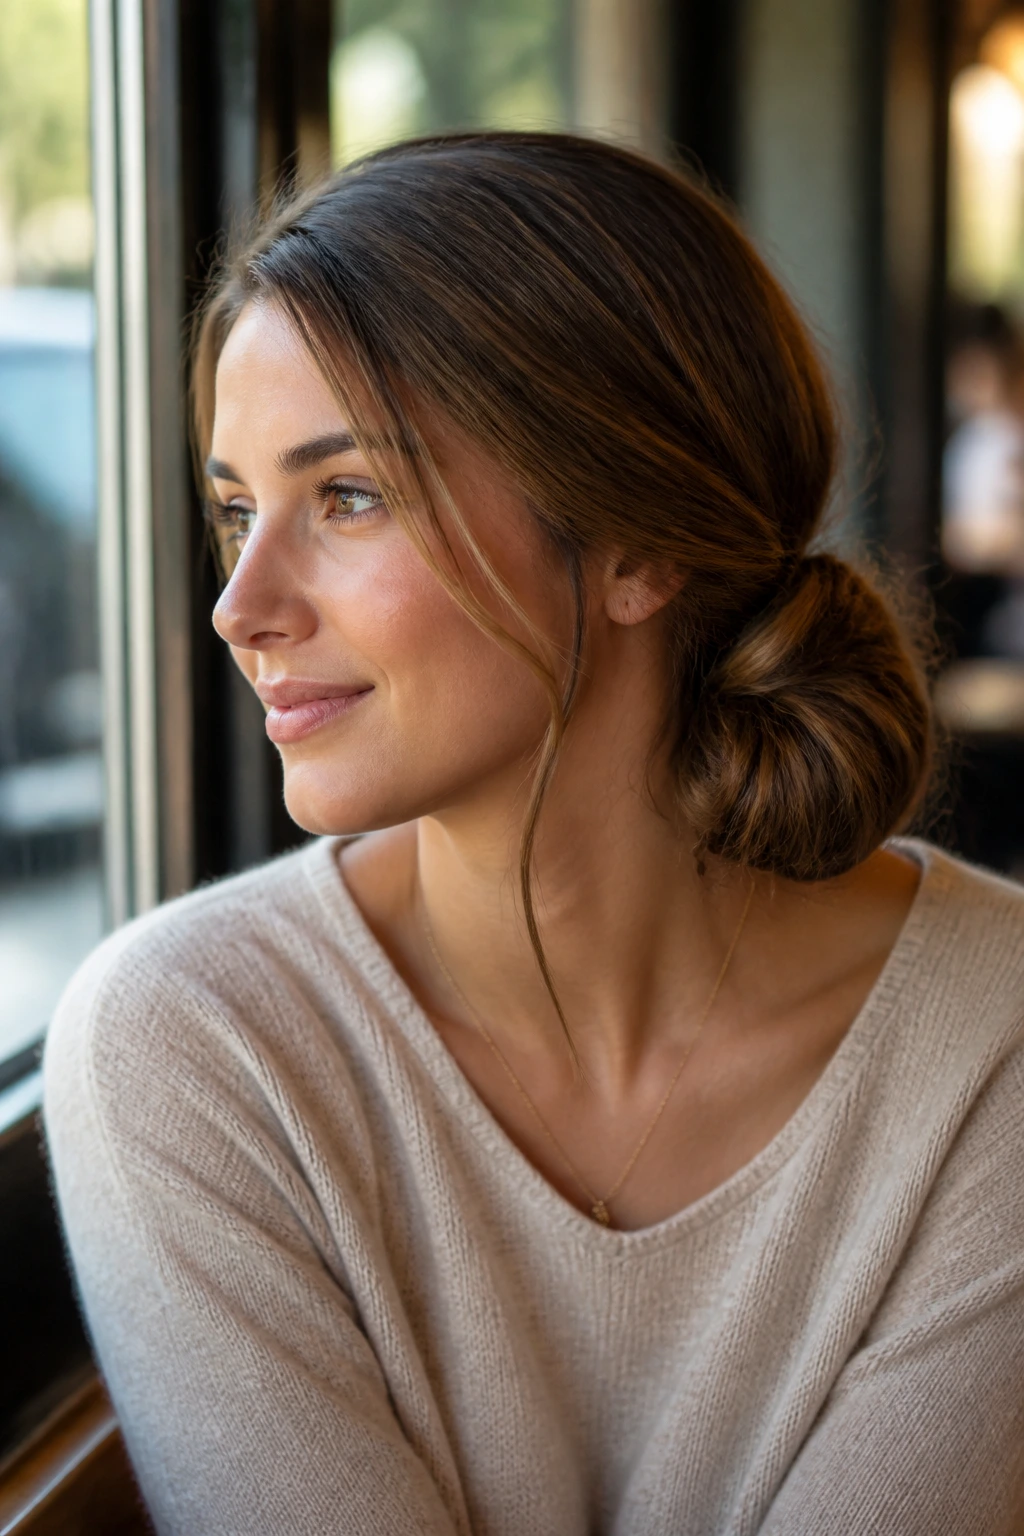
When hair feels a little heavy and you want something gentler than a crown-tight style, the side-swept bun is a smart choice. It shifts the weight off the center of your head, which can make it feel easier to wear all day.
Sweep the hair to one side, just behind one ear, and secure it into a low ponytail. Then twist the length into a bun that sits slightly off-center, near the jawline or just below it. Pin it in place and leave one face-framing piece out if you want a softer edge.
This one is especially kind to day-two waves. You are not fighting the texture; you are using it. The side placement also hides the fact that one side of your hair may be flatter than the other. Everyone has a side like that. It is normal.
A little volume at the crown helps, but do not tease it too much. The charm is in the slope of the style, not in puffiness. If you need hold, spray the roots lightly before you sweep the hair over.
The side-swept bun can lean casual or slightly polished depending on how tight you make the twist. Loose for errands. Tighter for work. Easy enough.
14. The Crown Braid Into a Bun
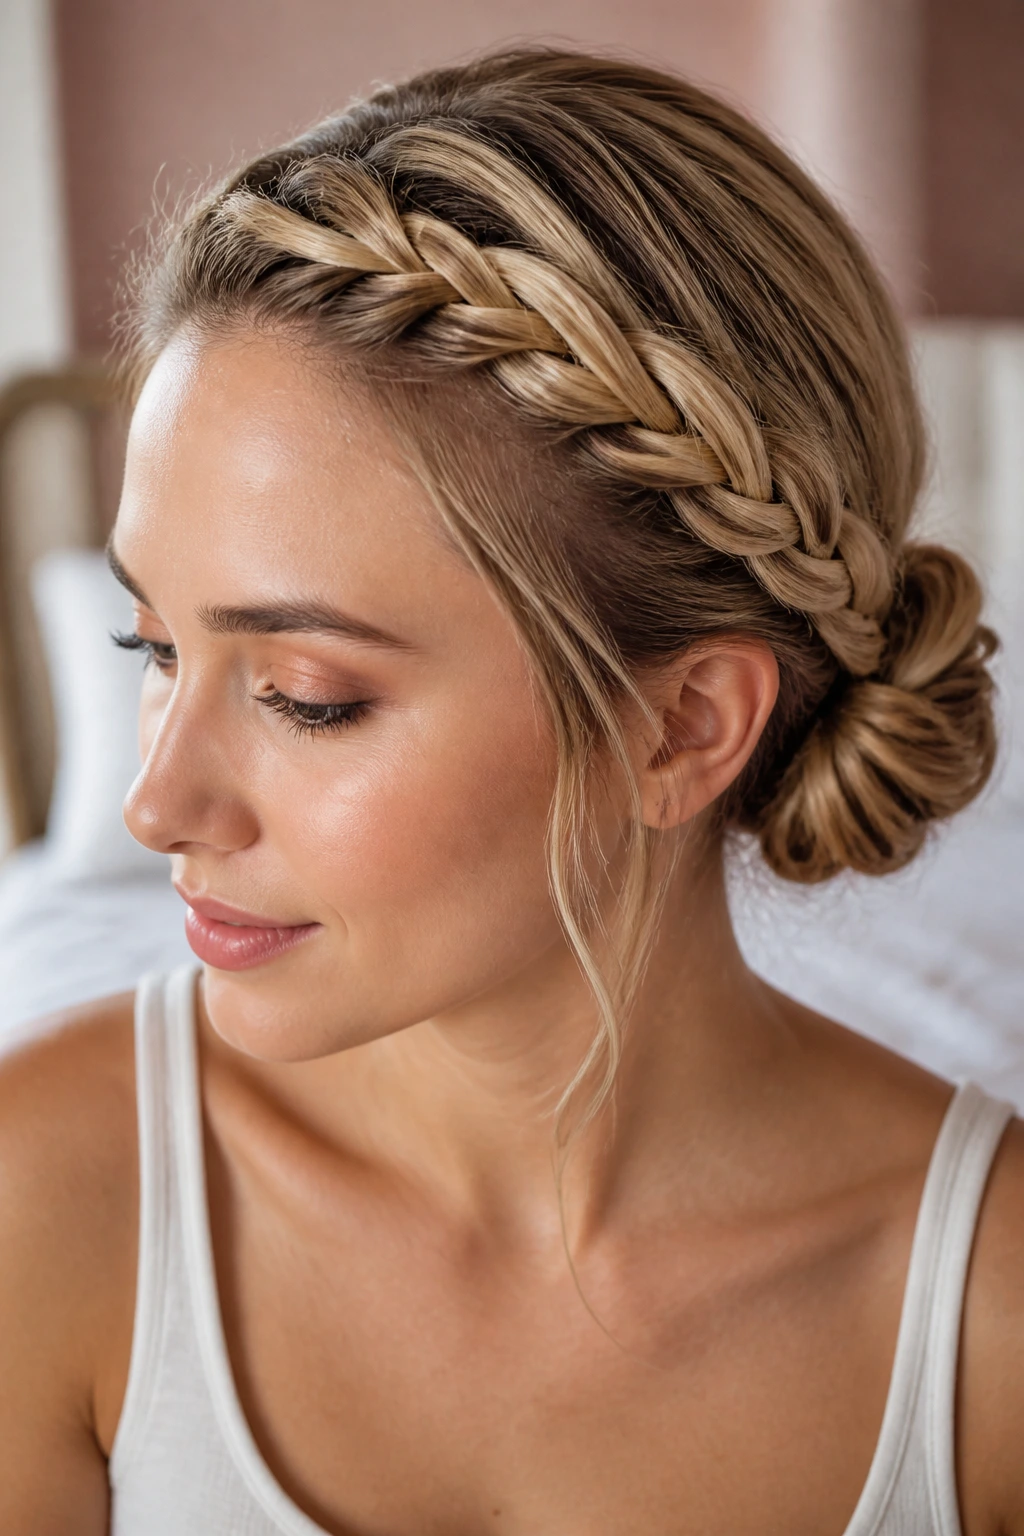
This is the style for mornings when you want your hair fully off your face and still want a bit of shape around the head. It looks more involved than it is, which makes it a useful trick to know.
Start with a braid along one side of the hairline, usually from the temple toward the back of the head. Once you reach behind the ear, gather the rest of the hair and twist everything into a low bun. Pin the braid end underneath so it disappears into the knot.
What Makes It Hold
- Use 4 to 6 bobby pins if your hair is thick.
- Keep the braid close to the scalp so it does not puff out.
- Smooth short layers with a tiny bit of pomade before braiding.
- Pin the bun first, then secure the braid end.
That braid line does a lot of visual work. It frames the face and makes the bun feel more finished, even if the bun itself is plain. And because the braid starts at the front, it helps tame shorter layers that usually escape first.
If your hair is especially slippery, braid a little tighter than you think you should. The braid will soften as you tuck it into the bun, and that keeps it from unraveling while you move around.
15. The Scarf-Wrapped Ponytail for Easy Hair Up Ideas for Busy Mornings
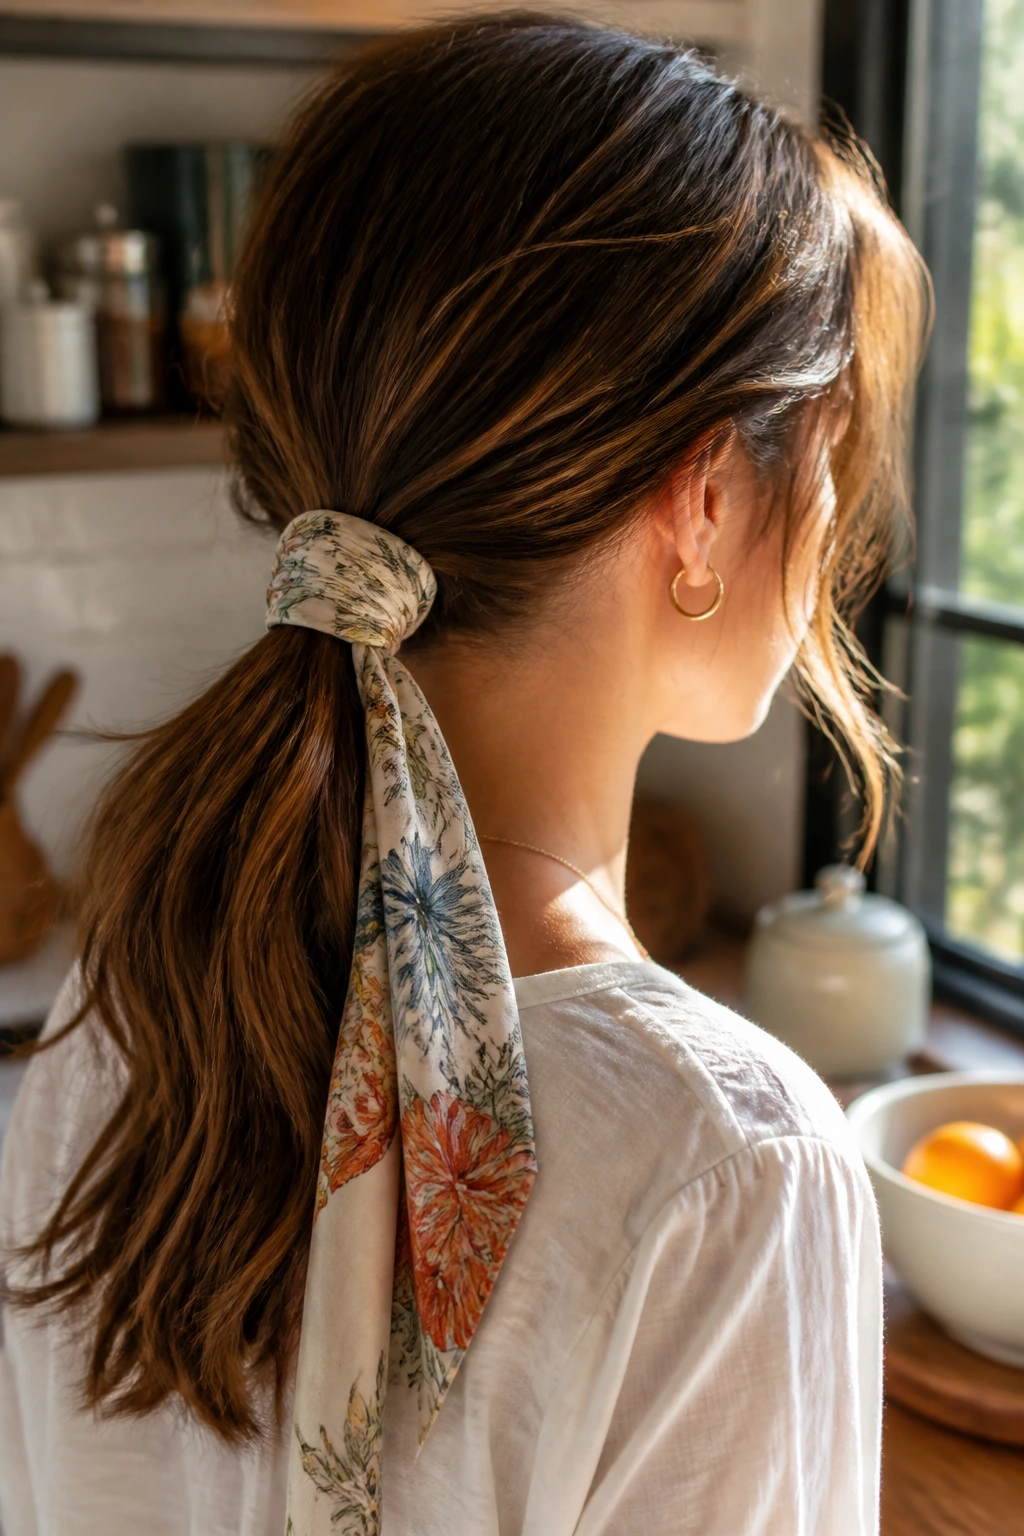
A scarf can turn the simplest ponytail into something that looks thought-out. That is why I keep calling it one of the easiest hair up ideas for busy mornings. It hides an ordinary elastic, adds color, and makes a style feel finished without much work.
Fold the scarf into a strip about 1 to 2 inches wide, then tie it around the base of a low or mid ponytail. Let the ends hang, or wrap them around the elastic for a tighter look. Silk scarves slide more, cotton holds better, and a narrow scarf is easier if your hair is fine.
This works especially well when your hair is not freshly washed. A little texture makes the scarf sit better, and the ponytail gets a bit of grip. If your hair is thick, use a wider scarf so it does not disappear into the length. If it is fine, keep the scarf light and the knot low.
How to Keep It From Slipping
Make the ponytail secure first, then tie the scarf. Don’t use the scarf as the only support. It looks pretty, sure, but it is not a structural tool. That job belongs to the elastic.
A scarf-wrapped ponytail is one of those rare styles that can go from running errands to dinner without needing a redo. It is plain in the best way: clean shape, quick setup, and enough personality to save the whole look.
Final Thoughts
Fast hair does not have to look rushed. That’s the bit people forget. A low knot, a slick ponytail, a braid, or a clip twist can all look polished if the shape is clean and the finish is intentional.
The smartest move is to pick three styles that fit your hair type and keep the tools nearby. One good elastic. A couple of pins. A clip that actually grips. That is usually enough.
And on the mornings when your hair feels impossible, choose the style that asks the least of you. That’s the one you’ll actually wear.
