



Long hair with natural waves can look flat, frizzy, or both if you force it into the wrong shape. The right style lets the bend in the hair do most of the work, which is why 20 natural wavy hairstyles for long hair matter more than another round of tight ponytails that leave a dent at the crown.
What changes everything is weight. Waves that sit at shoulder length can hold almost anything, but once hair drops past the chest, the length starts pulling the pattern down, especially at the ends. A style that keeps lift near the roots and movement through the mids usually looks better than one that tries to smooth every strand into submission.
I’ve always liked styles that look like you had to think a little, but not too much. A loose braid over one shoulder, a half-up twist, or a deep side part can make long waves look deliberate without flattening them, and that balance matters more than perfect symmetry.
The best ones do not fight the wave pattern. They frame it, pin it, or gather it just enough to keep the shape alive.
1. Center-Part Loose Waves with Soft Ends
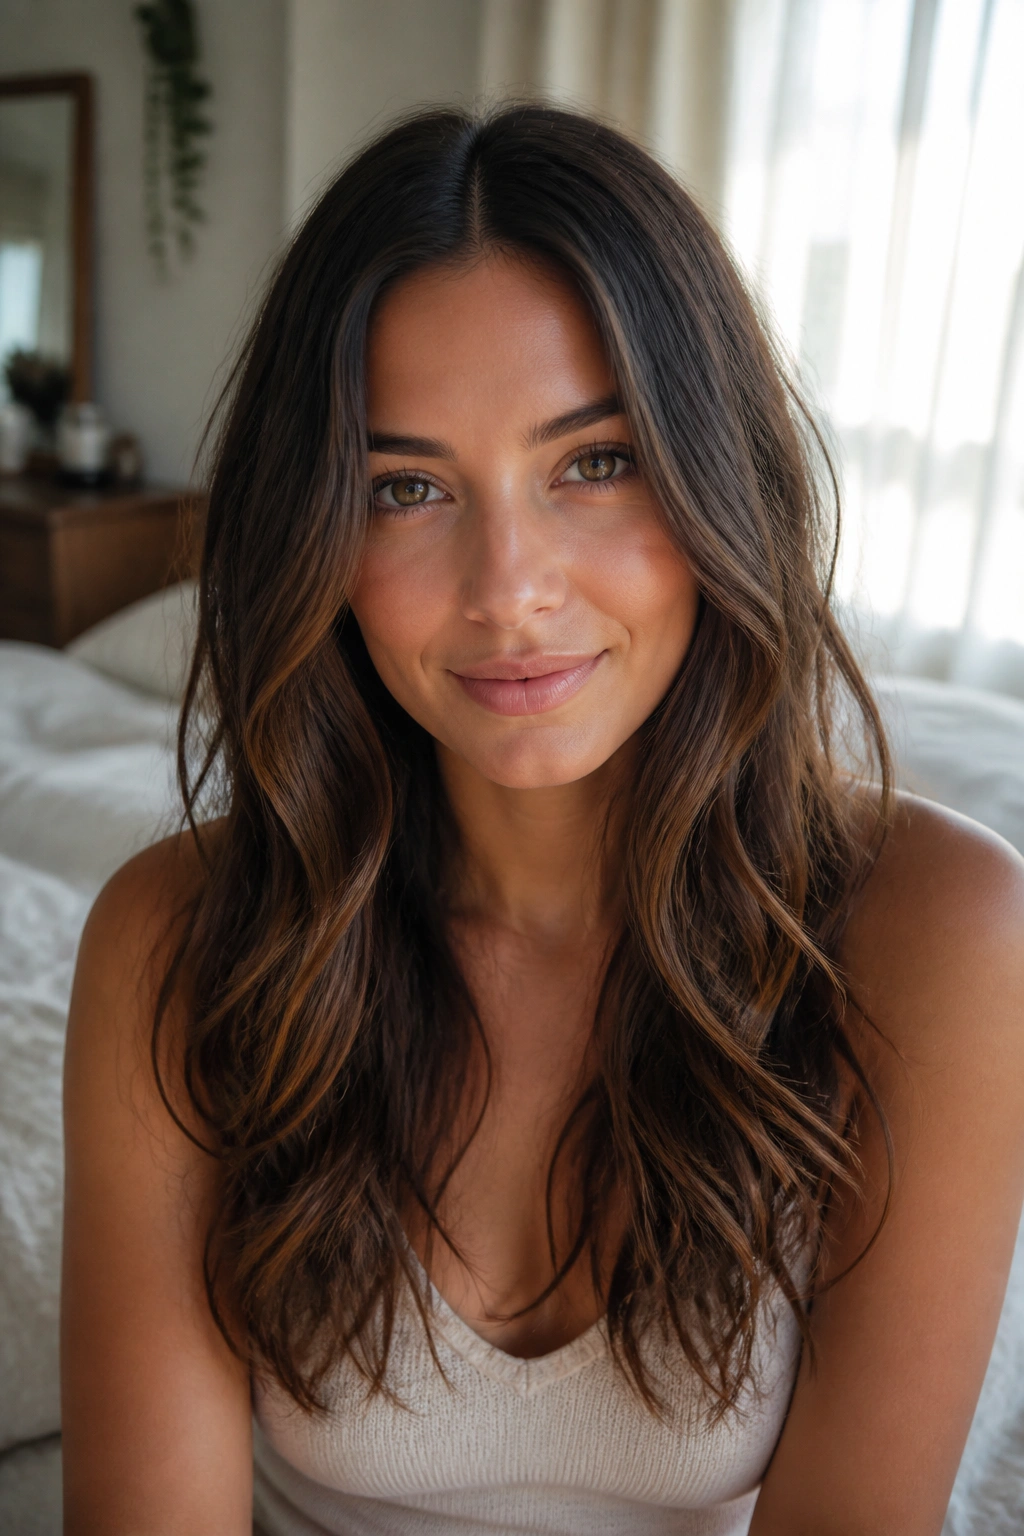
A clean center part is the least flashy way to wear long waves, and that is exactly why it works.
With long hair, a center part creates two vertical lines that help the waves fall in a neat curtain instead of spreading outward. If your hair already bends on its own, this is the style that shows it off without asking for much else. It also works well when the mids are full but the ends need a little discipline.
Why it works on long hair
The center part gives balance, which matters when the length starts to drag the wave pattern down. It keeps the face open and lets the hair move evenly on both sides, so you do not get one side puffing out while the other hangs flat. That symmetry looks calm, which is nice when the hair itself has a bit of a mind.
- Use a tail comb to make the part straight from the hairline to the crown.
- Scrunch a pea-size amount of curl cream into damp mids and ends.
- Let the hair dry with the part in place so the roots do not flip around.
- If the ends go stringy, bend the last 2 inches around your fingers and release.
Pro tip: If your waves collapse near the chin, shift the part a half-inch off center. It is a tiny change, but it can stop the whole style from looking too heavy at the top.
2. Deep Side-Part Waves with Extra Root Lift
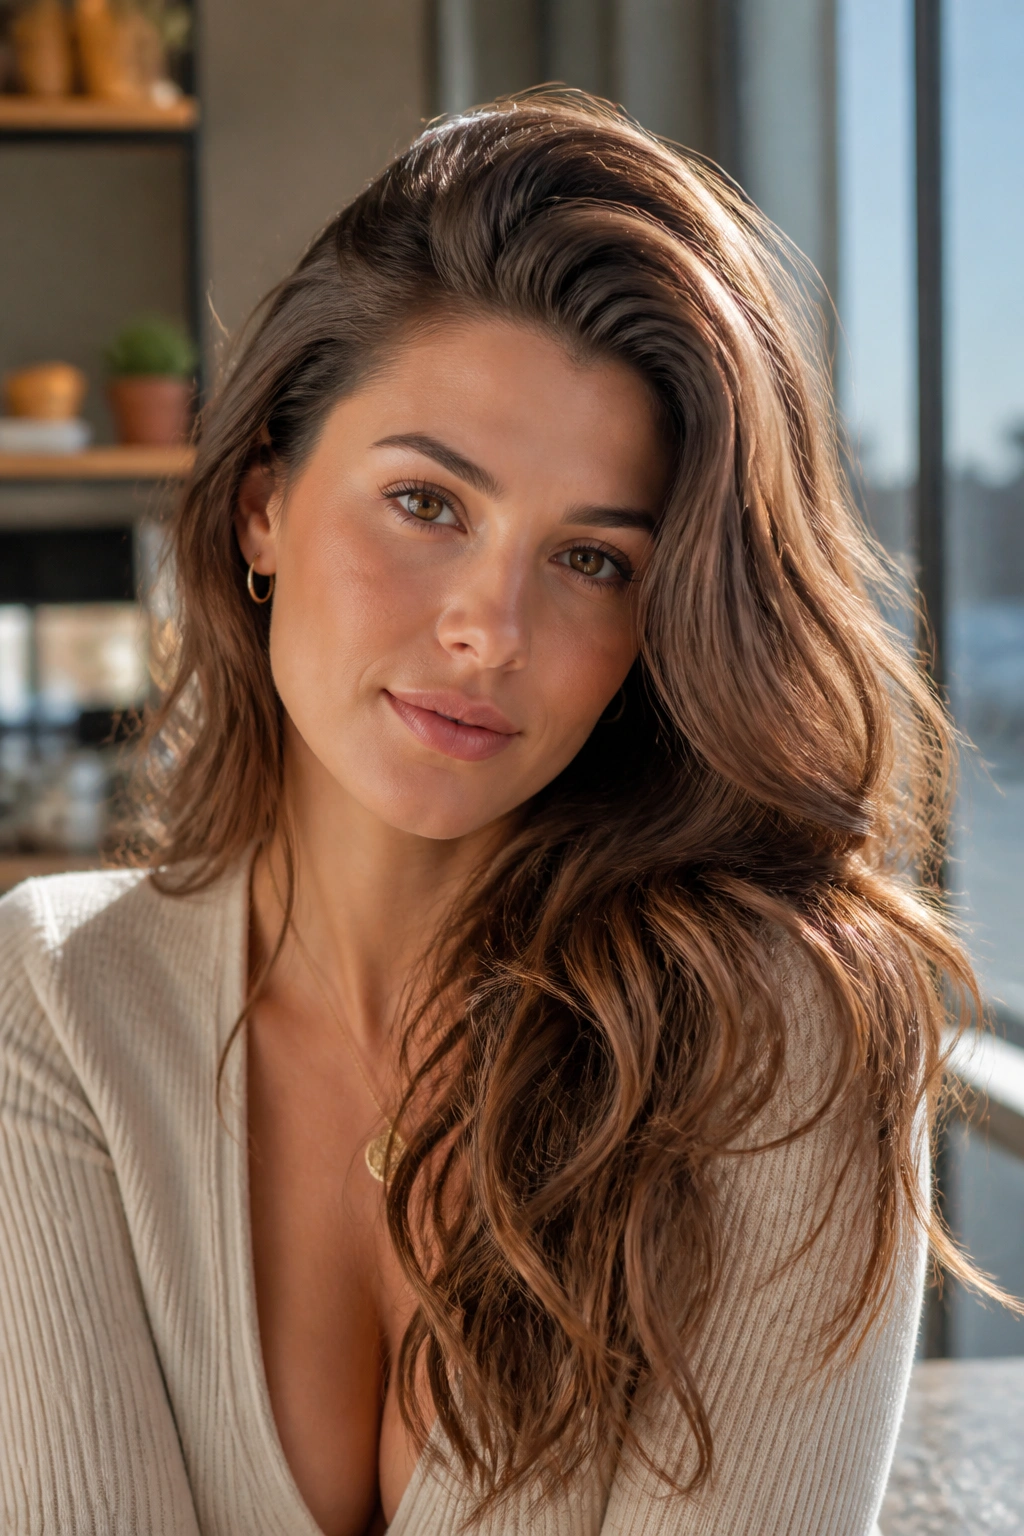
A deep side part gives long wavy hair instant lift at the crown.
That is the whole trick. Shift the part 1 to 2 inches away from your usual center line, and the heavier side suddenly looks fuller while the smaller side softens the face in a more flattering way. On long hair, the difference shows up fast because the roots stop lying so flat against the head.
A tail comb is enough for the job, but the way you place the part matters more than the tool. Push the heavier side over with your fingers, then hold it there for a minute so the hair learns the new direction. If you want a little extra height, mist a light root spray under the lifted side and blow-dry the roots for 20 to 30 seconds.
This style is especially good when your waves are loose and your crown needs help. It also plays well with glasses, strong brows, and long face-framing pieces, because the asymmetry gives the eye something to follow. Not every wavy style needs to be soft in the same way. This one has a little attitude.
3. Curtain Bangs and Long Waves

Why do curtain bangs and natural waves get along so well?
Because both of them move. Curtain bangs soften the forehead without boxing the face in, and long waves carry that softness down through the rest of the hair so the whole look feels connected. The bangs can also hide a flat root day, which is useful when the rest of the hair behaves nicely but the front is having a moment.
The best version is not overstyled. Blow-dry the fringe away from the face with a small round brush, then let the lengths air-dry or diffuse on a low setting. If the bangs separate in the middle too hard, twist each side around your fingers while damp and clip them up for 5 minutes. That little bit of shaping makes a big difference.
How to wear it
- Keep the bangs long enough to hit the cheekbone or just below it.
- Use a light mousse at the roots so the fringe does not stick to the forehead.
- Let the waves stay relaxed through the lengths; don’t flatten them to match the bangs.
- Tuck one side behind the ear if you want the face to look more open.
Best for: long hair that needs a softer frame without losing the natural wave pattern.
4. Half-Up Twist with Loose Length
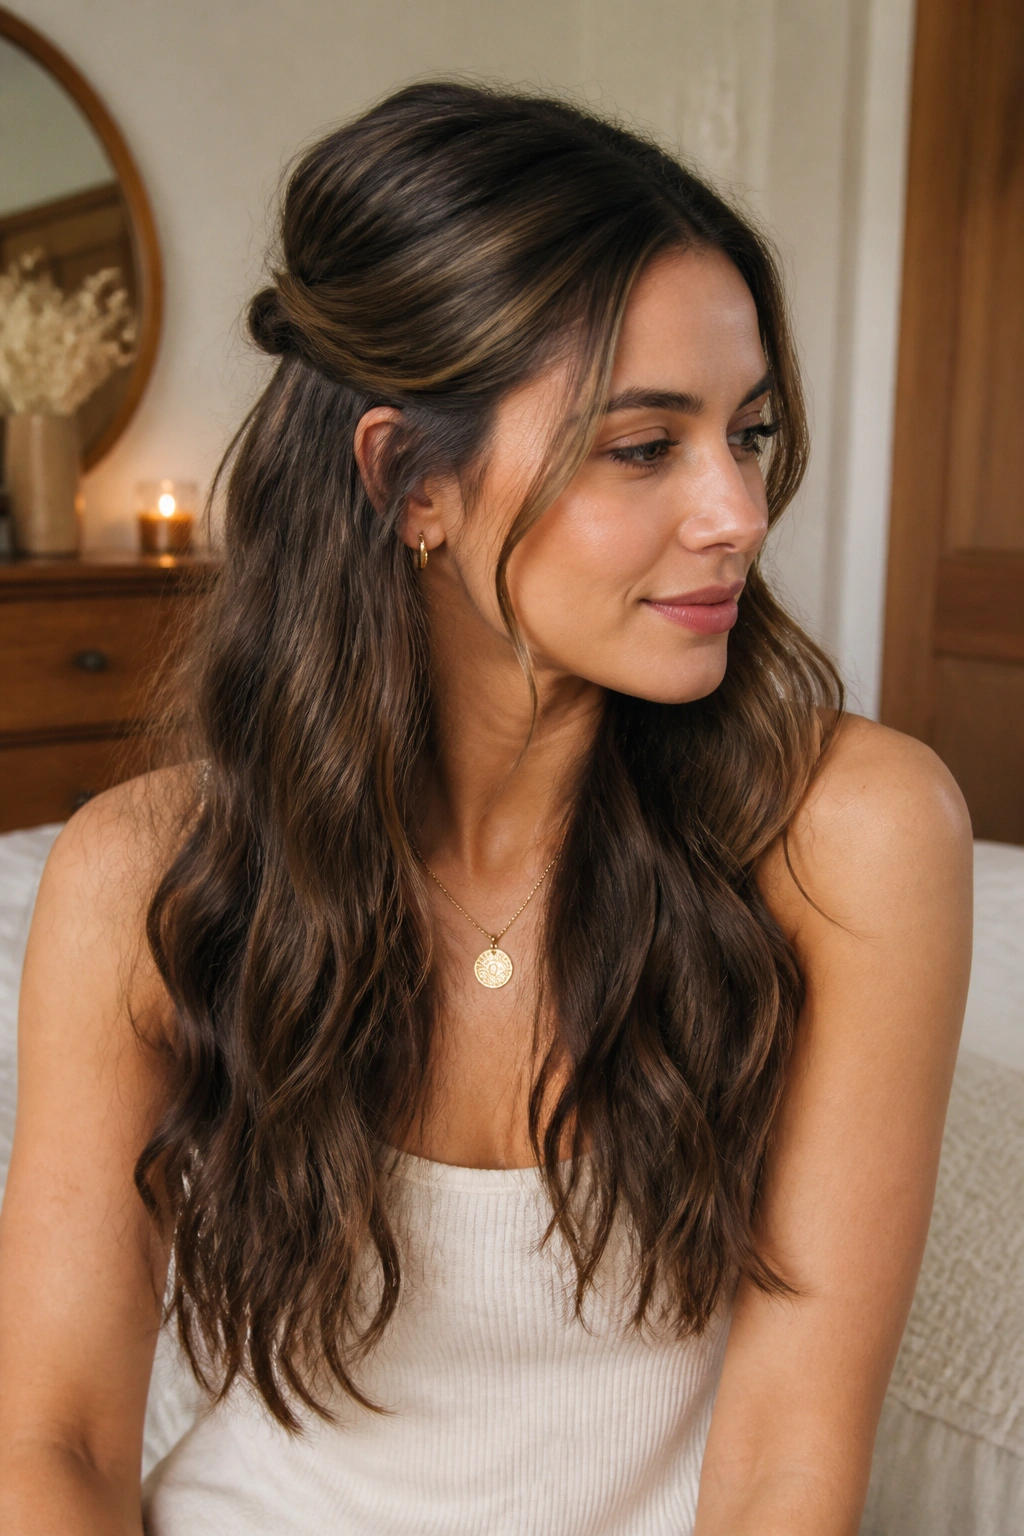
You know that point in the day when your hair is still good, but it keeps falling into your face?
This is the answer. A half-up twist gives you some control at the front while leaving the bottom half alone, so the waves keep their shape and the length still shows. It feels a little more finished than a clip, but it does not erase the texture the way a tight updo can.
Start by taking two sections from just above the temples, each about 2 inches wide. Twist them back toward the crown, cross them once, and pin them with two bobby pins in an X shape. If your hair is thick, tuck the twists a half-inch lower so the pins can hold the weight without sliding.
- Keep the twists loose enough that the crown still has a little lift.
- Pull one or two small face-framing pieces free if the front starts to look severe.
- Use pins that match your hair color so the shape reads, not the hardware.
- Finish with a light mist of flexible hairspray on the top only.
The best part is that the lower waves still move when you turn your head. That matters more than people admit.
5. Claw Clip Half-Up Waves

Unlike a tight ponytail, a claw clip half-up style keeps the wave pattern open.
That is why it works so well on long hair. You gather the top half of the hair, lift it just enough to clear the neck, and let the rest fall loose. The clip holds the crown, but the lengths stay free, so the waves do not get crimped into one hard line.
A medium clip, about 4 inches long, is usually enough for fine to medium hair. Thick hair usually needs a larger clip with stronger teeth, and you want the teeth to grab from the middle of the twist rather than the soft outer layer. If the clip sits too high, the style looks stiff. If it sits too low, it slips. Right in the middle is the sweet spot.
This is one of those styles that looks better after a little mess settles in. Pull a few strands loose near the temples and let the crown relax for 10 minutes before you leave the house. That tiny wait gives the style a softer shape and keeps it from looking freshly assembled in a mirror bathroom way.
6. Low Ponytail with a Wavy Tail

A low ponytail is only boring when it is pulled too hard.
The version that works on long waves keeps the crown a little airy, the elastic low at the nape, and the tail soft enough to show movement. I like this one because it respects the length. It does not hide it. It lets the waves sit where they already want to sit, then nudges them into a cleaner shape.
The trick is in the top section. Smooth the hair with your hands, not a brush if you can help it, and leave a little fullness near the roots. Wrap a small strand of hair around the elastic to cover it, then pin the end underneath the ponytail with a bobby pin. That one detail turns a basic tie-back into something that feels more intentional.
If the tail has gone a little flat, bend the last 3 to 4 inches around a 1-inch curling wand for 5 seconds per section. Don’t curl the whole ponytail unless you want the style to look polished in a very formal way. A touch at the ends is enough.
A low ponytail with waves also plays nicely with collars, jackets, and scarves. It keeps the hair from tangling on everything.
7. Loose Wavy Bun at the Nape

Can a bun still look soft when your hair is long?
Yes, if you stop trying to make it perfect. A loose wavy bun at the nape works because it keeps the twist low and the volume relaxed, which means the hair still looks like hair instead of a shell. Long waves are especially good for this style because the texture gives the bun some grip before it even goes up.
What keeps it from looking stiff
The answer is tension. Or more accurately, the lack of it. Gather the hair at the nape, twist it once or twice, and coil it into a bun that still has a little room between the turns. If you have thick hair, use U-pins at the base rather than one big elastic. They hold better and do not crush the shape.
A few pieces around the ears can stay out if that makes the style feel less severe. I actually prefer that. The little loose bits stop the bun from looking like a work badge hairstyle, and they help the waves around the face stay in the picture.
- Twist the bun loosely so the wave pattern is still visible in the coil.
- Pin the bun low and flat for a cleaner look, or slightly off center for something softer.
- Leave the ends tucked but not invisible.
- Use a matte hairpin if your hair is slippery; shiny pins tend to slide.
That is the whole thing. Nothing fussy.
8. Side Braid Over One Shoulder
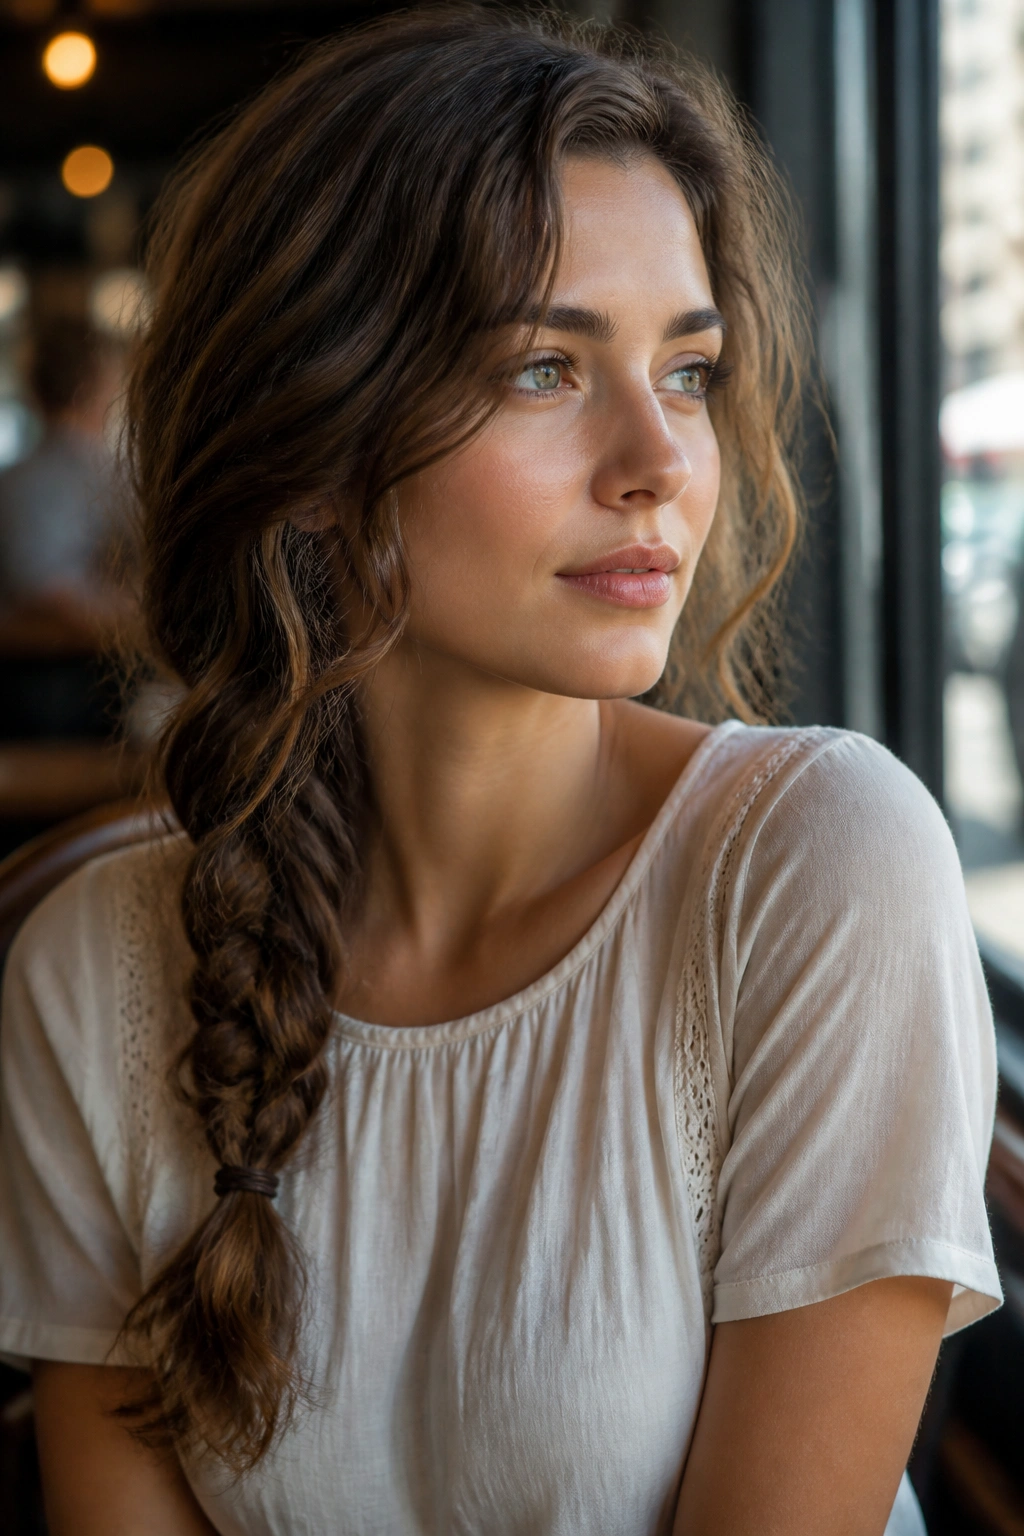
Long waves draped over one shoulder look calmer when one braid interrupts the pattern.
That interruption is the charm. A side braid keeps the length visible while giving the whole style a little structure, and on wavy hair the braid never looks too strict. The texture breaks it up. It also keeps the ends from tangling into your coat or bag strap, which is one of those tiny practical wins people forget to mention.
Why it reads softer on waves
The braid should start low, usually just below the ear, so it feels like a side accent rather than a full-school-day braid. Keep the sections loose as you cross them, then tug the braid outward a little once it is tied off. Not too much. You want width, not frizz.
A side braid works well when the front pieces are left out or tucked behind one ear. The contrast between the smooth front and the textured braid gives long hair a lived-in shape. If your waves are fine, mist the braid lightly before loosening it so the strands do not slip apart. If your hair is thick, skip that and use a clear elastic at the end so the braid stays secure.
Tip: Stop the braid about 4 inches before the ends, then let the rest hang free. That little stretch of loose hair keeps the length visible.
9. Waterfall Braid with Open Waves
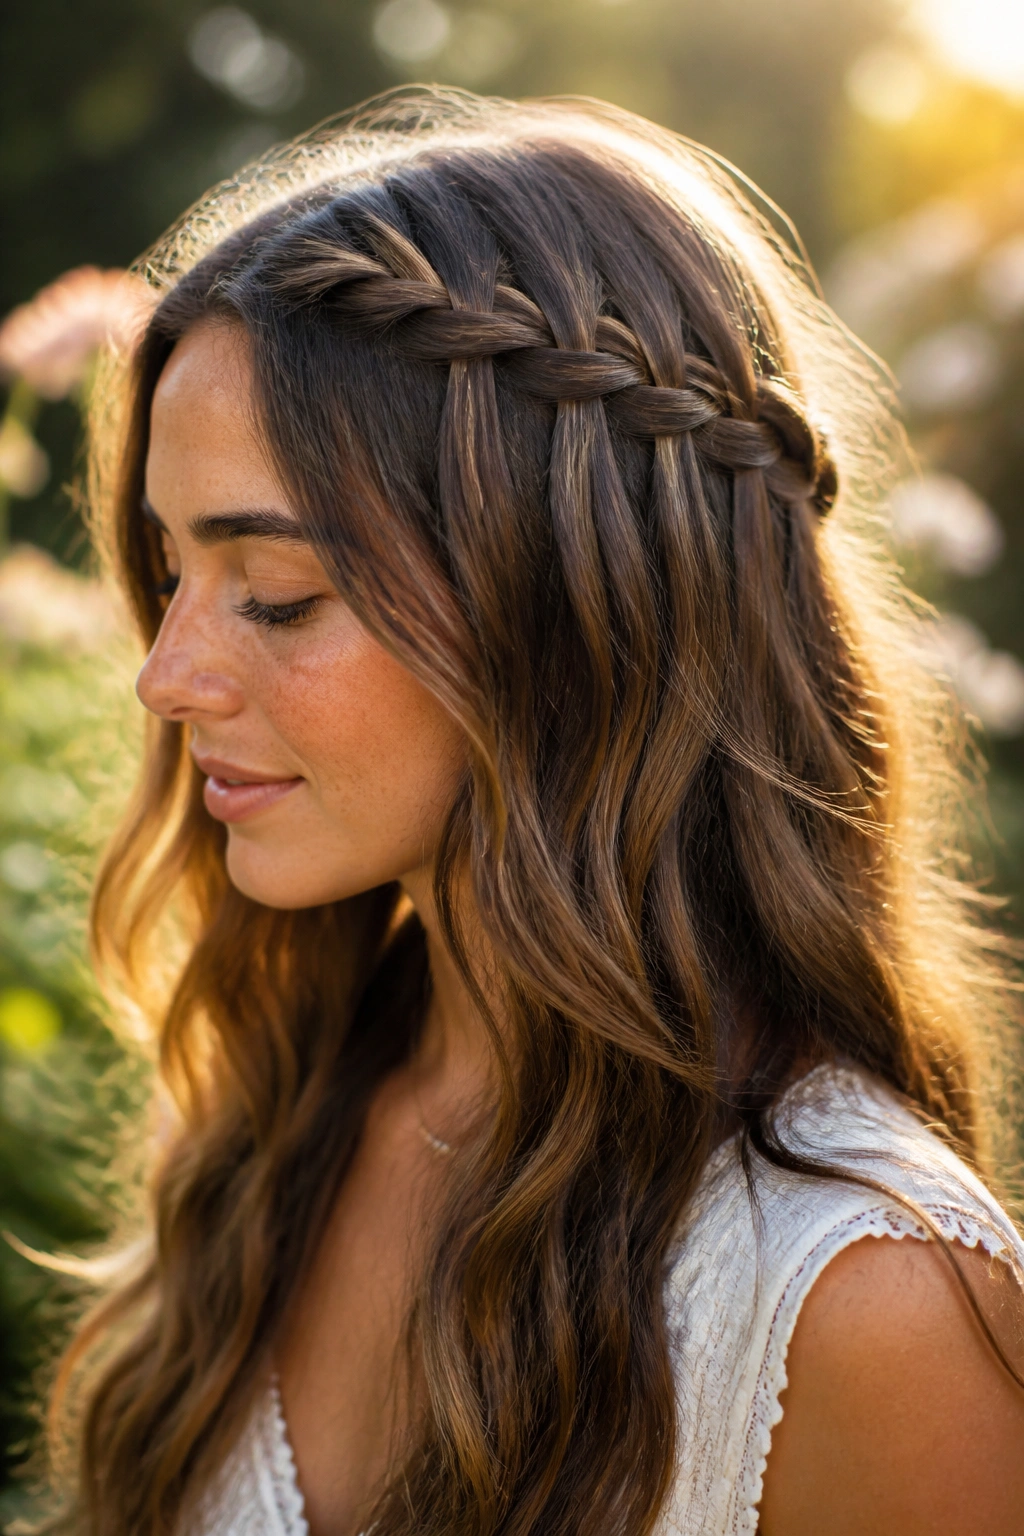
At dinners, showers, and weddings, this is the braid I keep seeing on long wavy hair.
A waterfall braid is half braid, half frame. It drops one strand as it moves, so the lengths remain open underneath while the top section gets the pretty detail. On waves, that balance is lovely because the braid acts like a border instead of taking over the whole head.
The best placement is along one side of the crown, starting near the temple and running back toward the ear. Keep the released strands a little thicker than you think you need; tiny strands vanish once the hair dries or loosens. A few bobby pins hidden under the braid can keep the line clean, especially if your hair is layered.
This style can look delicate, but it is sturdier than it appears. The braid holds the front pieces back, which keeps the face open, while the rest of the hair keeps moving. That is a useful combination when you want a polished look without pinning everything up.
It also photographs well from the side. Not that you need a camera to justify it. It just does.
10. Bubble Ponytail on Long Wavy Hair

A bubble ponytail is not a braid, and that is the point.
It turns one long tail into a chain of soft sections, which makes natural waves look fuller and a little playful without asking for perfect plaiting. On long hair, the bubbles stack nicely down the back and let the length become part of the style instead of disappearing into one flat rope.
Start with a low or mid-height ponytail secured with a small elastic. Add another elastic 3 to 4 inches down, then gently pull the hair between the two elastics outward until it rounds into a bubble. Keep moving down the tail in the same spacing. If your hair is very long, you may get 5 or 6 bubbles. If it is finer, 3 or 4 may be enough before the ends start to look thin.
This style works best when the bubbles are slightly uneven. Human hair is not a measuring tape. A little variation keeps the look soft, especially when the waves are already carrying texture through the tail. If you want more grip, tease the hair inside each section very lightly before you puff it out.
Use clear elastics if you want the bubbles to read first and the ties second. A small ribbon or wrapped strand can hide the bands if you want a cleaner finish.
11. Crown Braid with Loose Length

A crown braid can make long waves look polished without hiding the hair.
That is the real advantage. You get a braid that traces the hairline or the top of the head, but the bulk of the length still hangs free. So instead of feeling fully pinned up, the style keeps its softness. It is one of the few braided looks that does not make long hair disappear.
Start the braid above one ear and carry it across the top of the head or just behind the bangs, depending on how much front coverage you want. Keep the braid close to the scalp if you want it neat, or raise it a little if you want a softer, more relaxed line. Either way, stop at the other ear and secure it with pins under the hair.
Braid placement matters more than people think. Too high, and it looks like a costume. Too low, and the style loses the crown effect. Right at the hairline or just above it usually works best.
One clean line up top and loose waves everywhere else is a strong combination. It says you put in effort, but not a ridiculous amount. That matters.
12. Face-Framing Pins and Tucked Sides
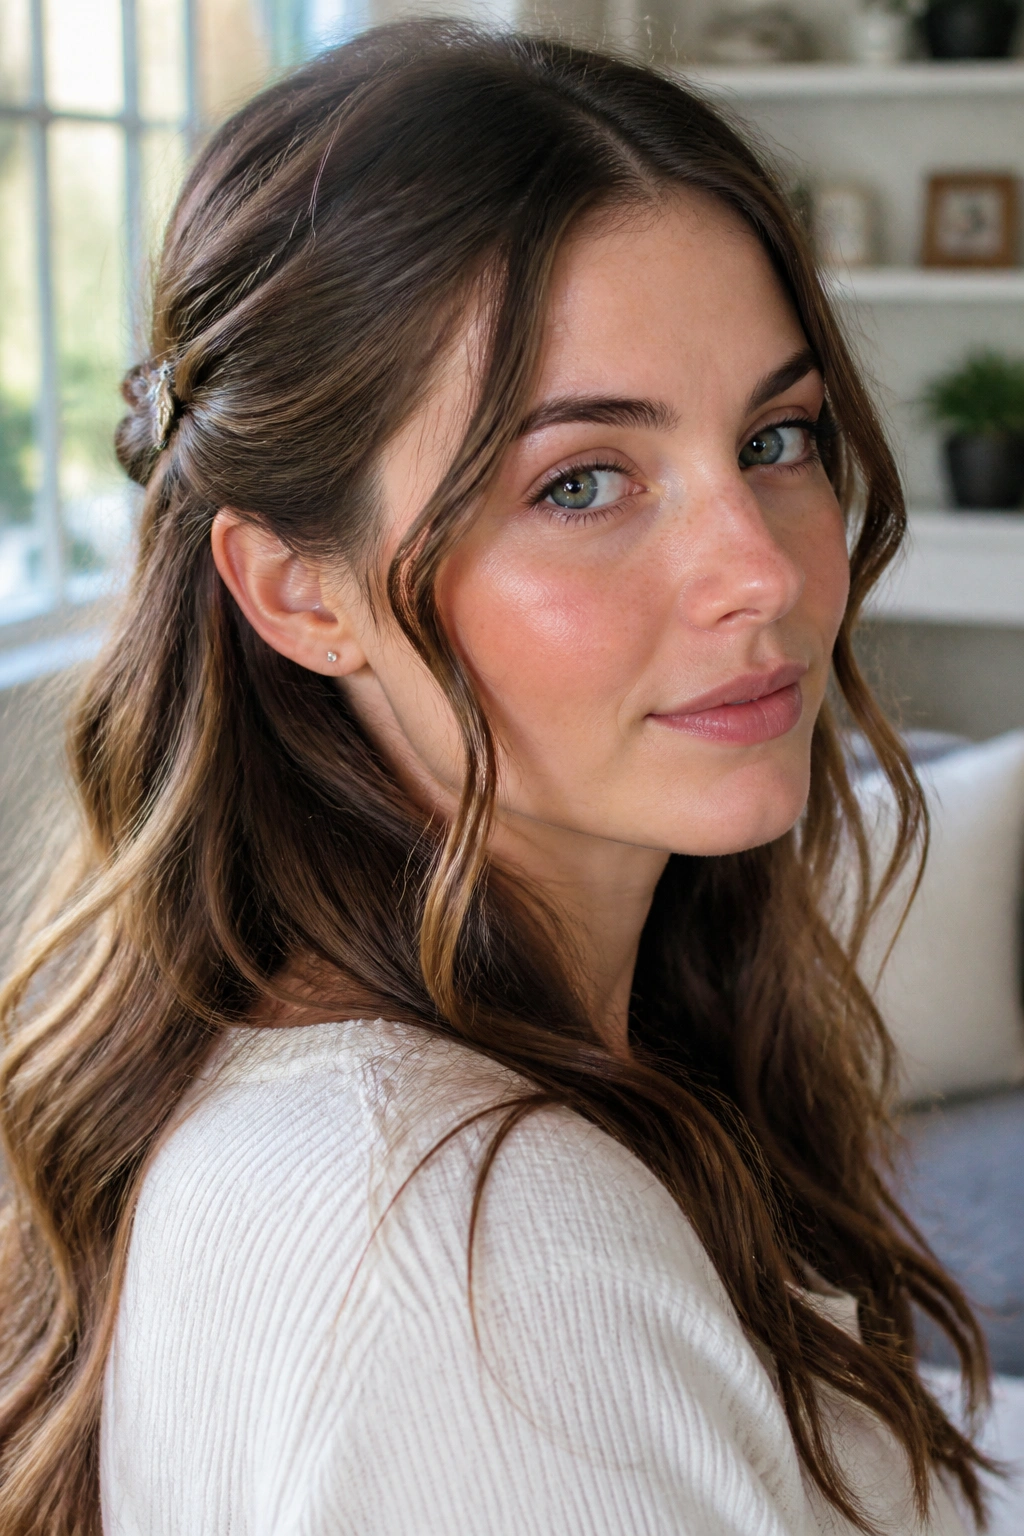
Sometimes the whole style is two bobby pins and a middle part.
That is not a joke. When long waves already look good, the smartest move is often to pin back just enough hair to show the face and let the rest do its thing. Tucking the sides behind the ears or pinning them just above the temple creates a quiet, neat look without disturbing the wave pattern through the back.
The best version uses one-inch sections from each side, twisted back once, then pinned flat behind the ear. If the hair slips, cross two pins in an X and push them in from different directions. That tiny change gives them a much better hold. For slippery hair, a dab of texturizing spray under the top layer can help without making the surface gritty.
This is a style I like on days when the waves themselves are the feature. No braid, no clip, no big shape. Just clean framing. It works with sweaters, simple dresses, and basically any setting where you want your hair to behave without looking overdone.
One small warning: do not pull the tucked sections too tight. If the front goes flat, the whole face can look harsher than it needs to.
13. Scarf-Tied Half-Up Waves

Why does a scarf make wavy hair look more finished?
Because it gives the half-up section a focal point without clamping the hair down. The scarf adds color, texture, and a little softness around the crown, which is handy when long waves need a detail but not a full-up style. It also hides the elastic, which is a nice bonus because bare elastics can look a little plain against long hair.
Fold the scarf into a band about 2 inches wide, then tie it around a small half-up section at the back of the crown. The knot can sit above or below the gathered hair depending on the length of the scarf, but I prefer it just below the crown so the top stays smooth. Silk slides more easily and feels dressier. Cotton grips more and works better if your hair is slippery.
How to place it
- Gather only the top third of the hair so the lower waves stay loose.
- Tie the scarf snug enough to hold, but not so tight that it dents the crown.
- Leave the scarf tails short if you want the look tidy, or long if you want movement.
- Match the scarf to one color in your outfit so the style feels deliberate.
This works especially well on second-day hair, when the roots have a little texture and the waves are not freshly blown out.
14. Heatless Overnight Braids

Loose braids overnight still hold some of the best shape for long waves.
The reason is simple: hair takes the form it dries in. If you braid damp hair before bed, the bend sets while you sleep, and the result in the morning is usually softer and less random than air-drying alone. You can use this method for a loose wave, a more defined bend, or somewhere between the two.
How to get the bend without the crunch
The hair should be damp, not wet. Wet hair takes too long to dry and can feel cold or heavy overnight, which is a miserable way to sleep. I like two braids for thick hair and four smaller braids for finer hair, because smaller sections create more movement and less flatness at the crown. Tie the ends with soft elastics or satin ties so you do not leave hard dents.
- Braid from just below the ears down, not from the roots, if you want softer waves.
- Use a little leave-in conditioner before braiding if the ends tend to frizz.
- Sleep on a satin pillowcase so the braids do not rough up the surface.
- Unbraid only when the hair is fully dry.
Tip: When you let the braids out, shake the roots first and separate the waves with your fingers, not a brush. A brush can turn a nice bend into a puff.
15. Deep Side-Part Glam Waves
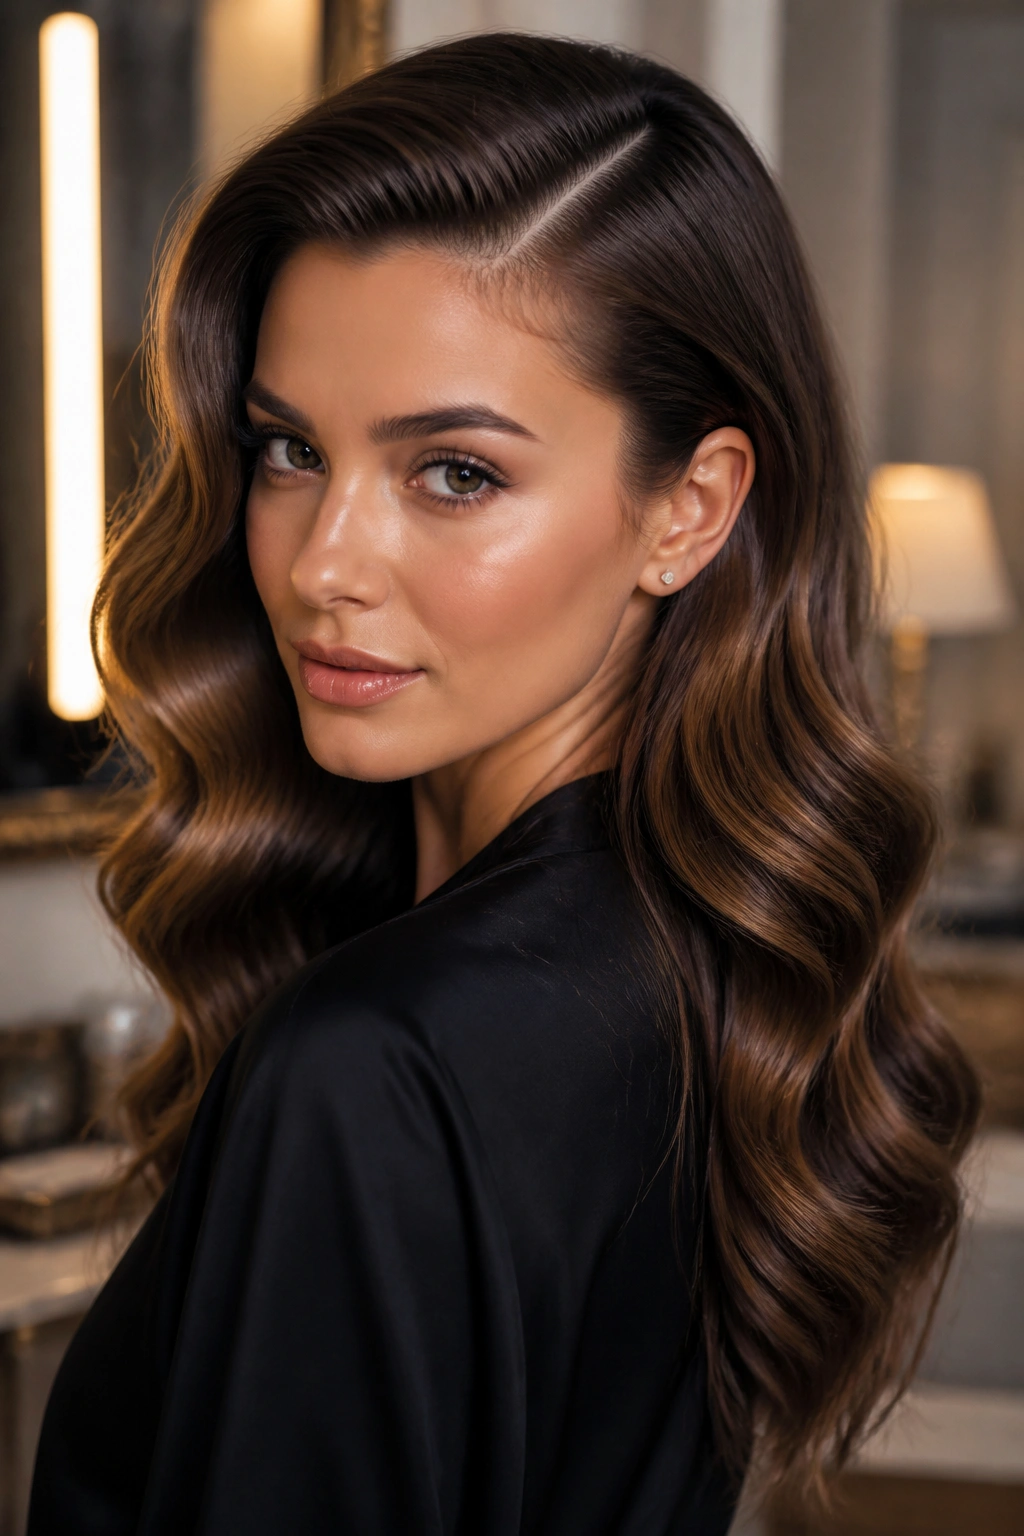
A deep side part does a different job when you brush the waves into a more glam finish.
Compared with the softer side-part style earlier, this one is less casual and a little more sculpted. The part still creates lift, but the waves are brushed into smoother, broader bends that sit closer together through the mids. It is the style that looks right with a bold earring, a simple dress, or any setting where the hair needs to feel dressed up without being stiff.
Use a 1.25-inch curling iron or large hot rollers if the natural wave needs a nudge. Once the curls cool, brush them out with a boar-bristle brush or a wide paddle brush, then set the shape with a light mist of hairspray. Clip one side behind the ear and let the other side fall forward. That asymmetry gives the waves a sweep that feels intentional.
This style is not about tiny defined curls. It is about broad, soft movement that has enough polish to last past dinner. If your hair is very layered, keep the brushing gentle so the ends do not separate too much.
It is a little dramatic. In a good way.
16. Long Layers That Let Air-Dried Waves Move

If your waves collapse by noon, the cut may be the problem, not the styling.
Long layers help because they remove weight without chopping the hair into pieces that stick out at odd angles. On long wavy hair, that weight is a real thing. Too much of it drags the wave pattern straight. Too little of it, though, and the hair can frizz or puff. The sweet spot usually sits in the lower half of the length, where the layers can encourage movement without stealing the shape.
Ask for layers that start around the collarbone or a little lower if you want the length to stay dramatic. Face-framing layers can begin higher, near the chin or cheekbone, if you want the front to move away from the face more easily. Short choppy layers near the crown can work on some heads, but they can also create halo frizz when the hair is humid or coarse.
Air-dried waves look best when the cut does some of the work. A good layer map lets you scrunch, twist, and walk away. That sounds lazy, but it is actually practical. Nobody wants to spend 40 minutes fighting gravity on a long hair day.
A good haircut is not a hairstyle in the narrow sense, I know, but for wavy hair it might be the most useful one.
17. Twisted Low Half-Ponytail

You want the top off your neck, but you still want the length to show.
That is where the twisted low half-ponytail comes in. It sits between a half-up and a full ponytail, which makes it useful for long hair that feels too loose, but not loose enough to fully tie back. The twist keeps the front controlled, and the hanging length still reads as waves instead of a bundled tail.
Take a 1-inch section from each temple, twist them back toward the nape, and secure them together with a small elastic or a hidden clip. Leave the lower hair open. If your hair is thick, twist the sections a little tighter before securing them so the style does not puff out at the sides. If it is fine, loosen the crown slightly after clipping so the top does not look scraped down.
What to watch for
- Keep the twist low enough that the hair still falls past the shoulder blades.
- Use clear elastics if you want the twist to disappear into the style.
- Add a light texturizing mist to the twist only; the loose length should stay soft.
- Pull the twist apart by a quarter inch if you want a fuller shape.
It is a tidy style that still feels relaxed, which is a useful thing to have.
18. Messy Braided Crown Bun

A braided crown bun is the style I reach for when long waves need to stay off the neck.
It starts with a braid that travels around the perimeter of the head, then gathers into a bun at the back or side. The braid gives the crown shape and security, while the bun handles the bulk of the length. Long waves make this easier because the texture gives the braid enough hold to stay put without needing a ton of product.
Do not overwork the braid. If the sections are too tiny or too tight, the look can turn stiff fast. Keep the braid slightly wide, then loosen only the outer edges after you secure it. That softens the line without making it fall apart. A few pins around the bun base will keep it anchored, especially if the hair is heavy.
This is a good style for warm days, busy errands, and events where you need the hair out of the way but do not want a plain bun. It also handles day-two texture well, which is probably why it feels easier than it looks.
One sentence is enough here: messy does not mean careless.
19. Wet-Set S Waves

Why do wet-set waves hold shape better than rushed air-drying?
Because the hair keeps the bend while it dries. Wet-setting works especially well on long hair that likes to stretch out under its own weight, since you are giving the pattern a shape before gravity has time to flatten it. The result is often a smooth, consistent wave that starts near the roots and carries all the way through the length.
How to make the bend
Start with damp hair and apply a lightweight leave-in or setting lotion through the mids. Wrap 1-inch sections around your fingers, small rollers, or soft bendy rods, then pin or secure them until the hair dries fully. If you want an S-wave rather than a curl, keep the wrap looser and flatter. A tighter wrap gives a more spiraled result.
- Work on damp hair, not soaked hair.
- Keep the sections even so the wave pattern does not jump around.
- Let the hair dry completely before taking anything out.
- Separate the waves with your fingers only after they have cooled or dried.
The method takes patience. That part is not glamorous. But it gives long waves a smoother finish than most quick styling tricks, and the shape tends to last longer through the day.
20. Soft Fishtail Over One Shoulder

A fishtail braid over one shoulder looks intricate, but the loose version is easier than it seems.
It suits long wavy hair because the braid itself becomes part of the length rather than hiding it. The weave is thinner than a standard braid, so even when you loosen it, the edges still hold enough detail to look finished. That makes it a good choice when you want texture without a heavy, solid plait.
Start low at the nape or just behind one ear, then keep the braid broad and relaxed as it falls over the shoulder. Stop 3 or 4 inches before the ends so the tail still looks soft. If the braid is too perfect, pull the sides outward a little after tying it off. If your hair is layered, a tiny bit of spray wax or texturizing mist can help the shorter pieces stay inside the braid instead of poking out.
Why it suits long waves
The fishtail breaks up the length into thin, alternating pieces, which makes the braid look airy even when the hair is thick. It also keeps the shoulder side neat while leaving the rest of the body of the hair visible. That combination is useful when you want detail without losing the long shape.
Best for: casual days, long lunches, and any time your waves need one controlled side and one free side.
Final Thoughts
Long wavy hair usually looks best when it is not forced into a shape it does not want. The styles that work here all do the same basic thing: they keep the wave pattern alive while adding a little structure where the hair needs it.
If your hair is fine, lean toward side parts, face-framing pins, and half-up styles that create lift. If your hair is thick, use lower buns, braids, and clips that distribute the weight instead of squeezing it into one tight spot. That difference matters more than people think.
Keep a few bobby pins, a small elastic, and one good clip within reach. Those three tools cover a ridiculous amount of ground on long wave days, and they save you from making every style harder than it needs to be.
