



Long hair gives braid styles for long hair room to do something shorter lengths simply can’t: they stretch, swing, and hold shape in a way that reads on purpose instead of accidental. A braid can calm down frizz, keep layers out of your face, or make day-old hair look like you meant to style it that way from the start.
The trick is matching the braid to the job. A tight French braid keeps everything tucked in. A fishtail looks soft and detailed. Protective styles like cornrows or knotless box braids ask for low tension, clean parts, and a little patience, but they repay you by staying put and taking stress off your ends.
Hair texture changes the whole experience. Fine hair usually needs a dusting of dry shampoo or texture spray so the sections don’t slip. Coarse or curly hair often needs a small amount of leave-in cream, because the braid should glide through your hands without turning into a fuzzy knot halfway down the back.
So the useful question isn’t “what braid is cute?” It’s “what braid fits my hair, my time, and my day?” That’s where the good stuff starts.
1. Classic Three-Strand Braid
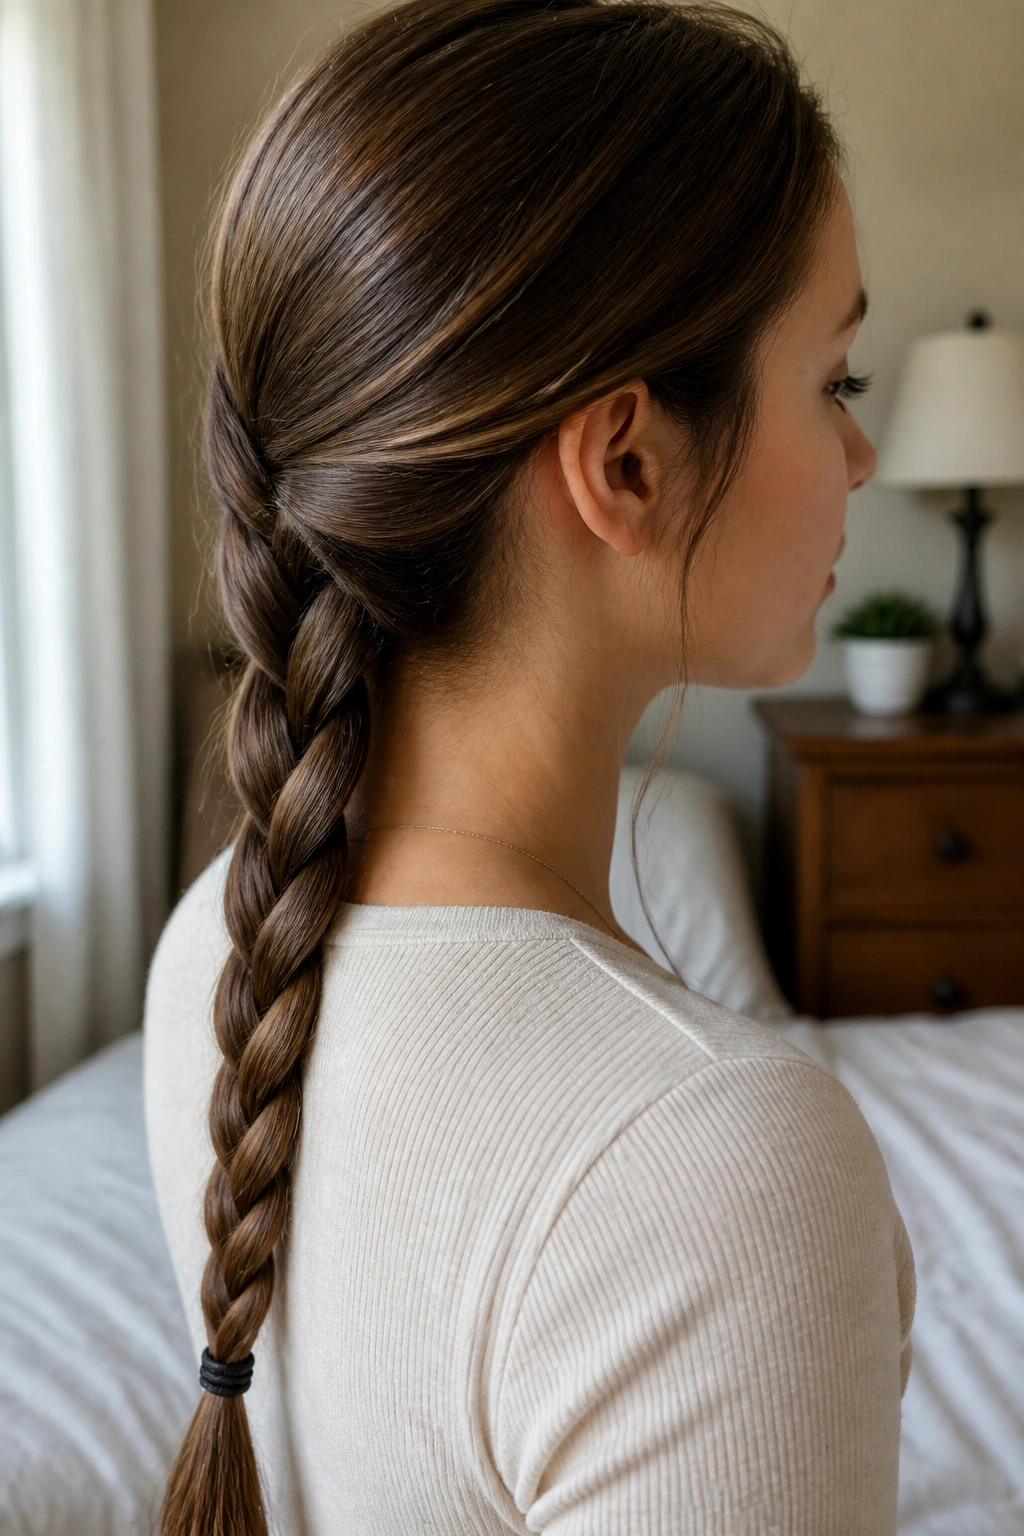
The plain three-strand braid is the one people dismiss right before they end up wearing it three times a week. On long hair, it looks especially clean because the length gives the weave a real line to follow, instead of disappearing after a few inches.
Why It Still Earns a Spot
This is the braid you can do fast and still make look neat. If your hair is smooth, it sits flat; if your hair is textured, it has enough grip to hold without a fight. That makes it a solid choice for school runs, errands, or any day when you want your hair out of the way without turning it into a project.
- Works on freshly washed hair or day-two hair.
- Holds well with a small snag-free elastic at the end.
- Looks fuller if you gently pull the outer loops apart after tying it off.
- Easy to turn into a side braid, low braid, or braided bun later.
Best tip: Start lower at the nape if your hair has layers. The braid hangs better, and the shorter pieces near the crown are less likely to pop out and frizz.
2. French Braid

A French braid is the one I reach for when long hair needs to look controlled but not stiff. It gathers hair as you braid, so the top stays flat and the braid builds into the shape you want instead of sliding loose halfway through the day.
That rising pattern is the whole point. The braid sits close to the scalp, then opens into a long tail, which is why it works so well on thick hair that likes to puff at the roots. It also keeps your neck cooler, which matters more than people admit when hair is heavy.
For the cleanest result, keep your hands close to the head and add hair in even sections from both sides. If you pull the side pieces too far out before crossing them in, the braid starts to twist instead of laying flat. That’s usually the part that makes beginners think they “can’t do” a French braid. They can. They’re just braiding too far away from the scalp.
3. Dutch Braid

Why does a Dutch braid look so bold on long hair? Because the strands cross under, not over, and that one change makes the braid sit on top of the hair instead of sinking into it. The result is fuller and more defined right away.
How to Wear It
The braid can run down the center of the head, split into two Dutch braids, or sweep into a ponytail at the nape. It’s a good pick when you want the braid to show from across the room, not hide in the texture of your hair. I like it on hair that has a little grit, because very silky hair can slip while you’re still getting the first few passes right.
- Use a tail comb to make a crisp part.
- Mist the roots with light-hold spray if your hair is slippery.
- Keep the braid snug at the top, then ease the tension slightly through the tail.
- Finish with a small elastic and a drop of smoothing serum on the ends.
If French braid feels too soft for you, Dutch braid is the sharper, more visible cousin.
4. Fishtail Braid

If your hair is long but feels too fine for a chunky plait, fishtail is the move. It looks intricate without asking for a hard technique, and that is part of its charm. Two sections, tiny pieces, steady hands. That’s the whole deal.
The braid gets its texture from repetition, not bulk. You keep taking small outer pieces and crossing them over to the other side, which creates that woven, scale-like finish. On long hair, the effect is better because the pattern has room to travel. Shorter lengths can make it look cramped. Long lengths let it breathe.
- Divide hair into two equal sections.
- Take a thin piece from the outer edge of one side and cross it over.
- Repeat on the other side, keeping the pieces about the same size.
- Secure the end, then gently pull the braid wider if you want a fuller look.
My honest take: fishtail looks best when it’s slightly imperfect. A too-tight fishtail can read stiff. A looser one has movement.
5. Rope Twist Braid
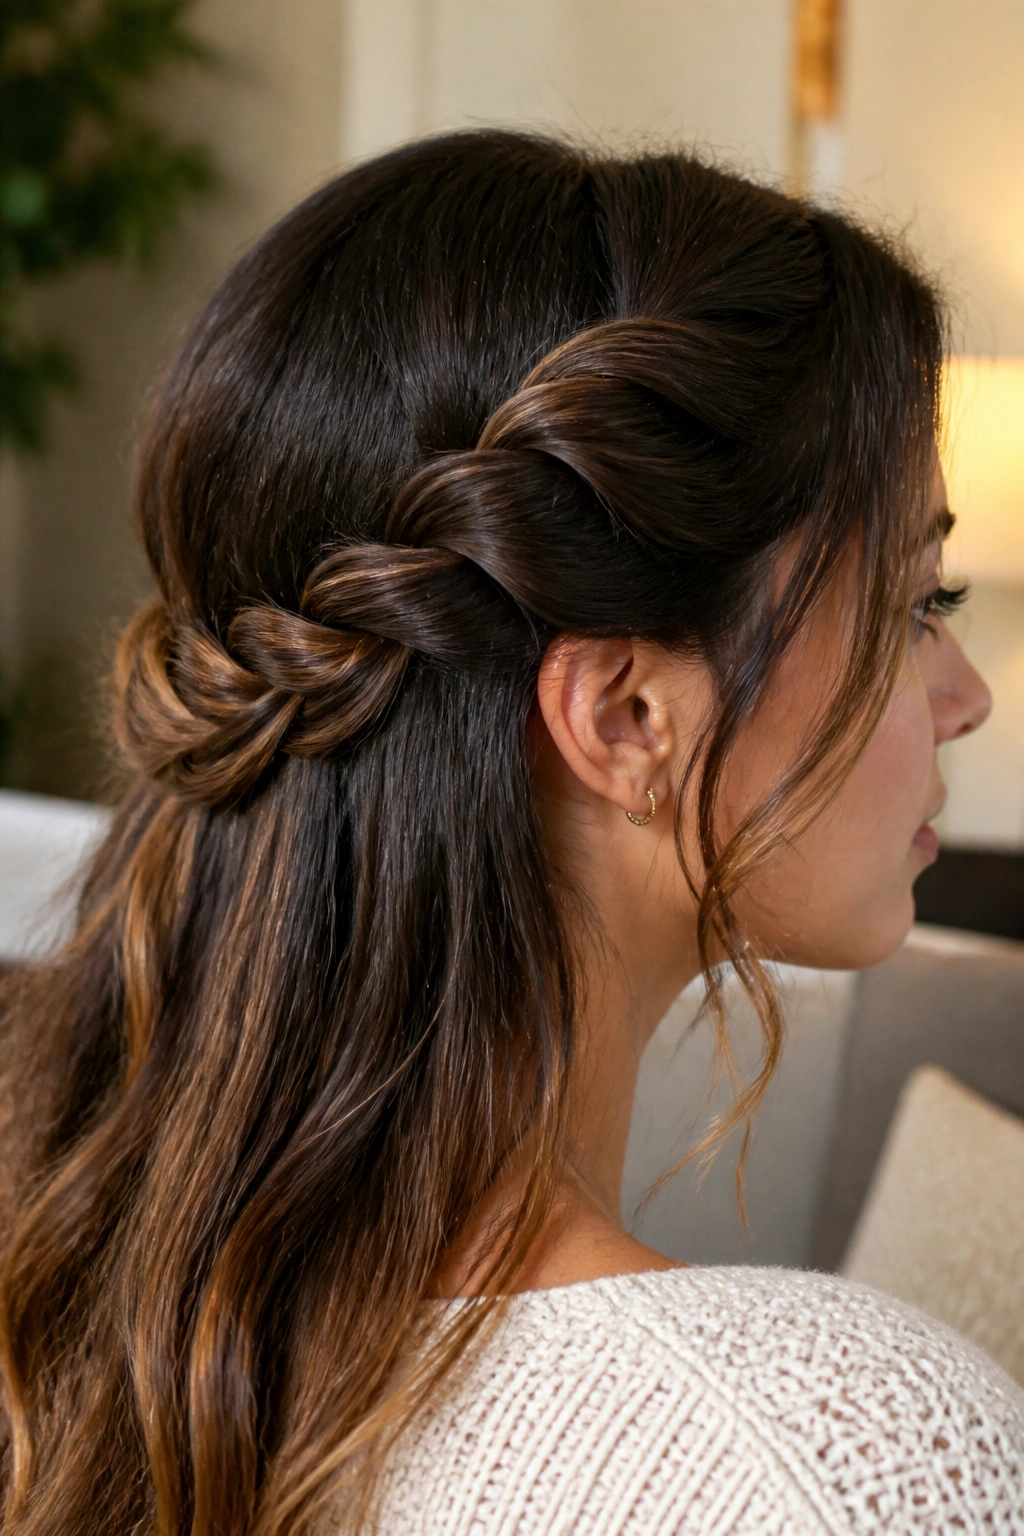
A rope braid is one of those styles that looks more complex than it is. You split the hair into two sections, twist both in the same direction, then wrap them around each other in the opposite direction. That reverse motion is what keeps the twist from collapsing.
It shines on long hair because the length gives the twist a real spiral. You can wear it sleek and tight, or tug it apart a bit for a softer shape. Either way, it takes less hand coordination than a fishtail and less parting precision than a French braid.
I like rope twists for hair that resists traditional braids. Very slippery, very straight hair can sometimes hold a rope braid better because the twist creates its own grip. If your layers are popping out, smooth a pea-sized amount of cream through the mid-lengths first. Not the roots. The roots need lift; the ends need control.
6. Side Braid

A side braid changes the whole mood of long hair. Instead of hanging straight down your back, the weight falls over one shoulder, which makes the style feel softer and a little more deliberate. It also shows off necklace lines, off-shoulder tops, and layered cuts better than a center braid does.
Compared with a back braid, the side version feels easier to wear for a long day. You can start it high for polish or low for a relaxed finish. I usually like it when hair has a little wave, because the braid and the loose texture around the face play nicely together. Straight hair works too, but a few face-framing pieces keep it from looking severe.
If your hair is thick, braid it loosely at first and tighten only near the end. That keeps the front from pulling too hard at the temples. If it’s fine, pancake the braid once it’s tied off. The extra width makes it look intentional instead of thin.
7. Low Loose Braid
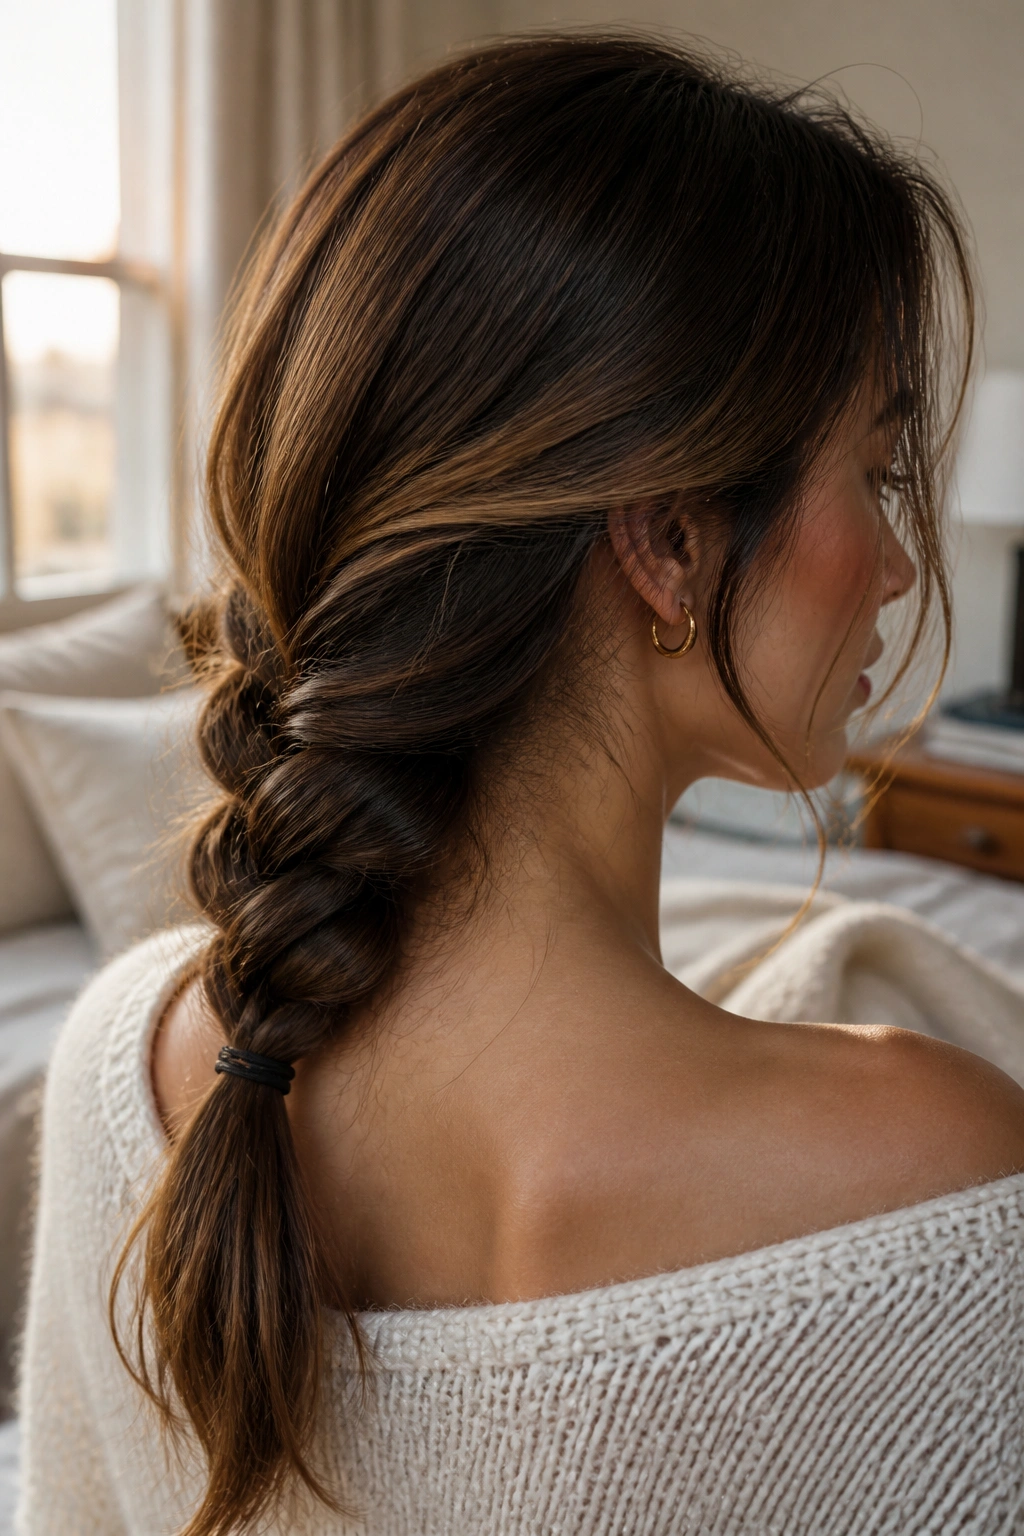
A low loose braid is the hair equivalent of a deep breath. It sits at the nape, keeps the ends controlled, and never asks for a mirror every ten minutes. Long hair benefits from that lower placement because the braid hangs with a clean line instead of getting bulky at the crown.
Best When Your Hair Needs a Break
This style is especially good on days when your scalp wants less tension. The braid stays relaxed around the face, which helps if you wear glasses or just hate the feeling of hair tugging near the temples. A tiny amount of smoothing cream on the top layer keeps flyaways from turning the whole thing fuzzy.
- Keep the braid slightly undone from the start.
- Leave a few soft pieces near the face if you want movement.
- Tie the end with a small elastic, then wrap a strand of hair around it.
- Pull the braid apart only after it’s secure.
It’s not trying to be dramatic. That’s the point.
8. High Braided Ponytail

A high braided ponytail is one of the easiest long-hair styles that still looks sharp. The hair gets lifted up first, so the face feels open, then the braid falls from a high point and gives the whole look some energy.
The high placement changes the silhouette. Instead of dragging heavy length down your back, the braid sits where people notice it right away. That makes it good for workouts, travel, and days when you want hair off your neck without reaching for a bun. If your roots tend to get flat, a quick tease at the crown or a spray of dry shampoo adds a little lift.
I prefer this one when the ends are healthy enough to show off. Dry, split ends are more obvious in a high braid because the tail sits at eye level. Trim first if you need to. No braid hides brittle ends forever.
9. Pull-Through Braid
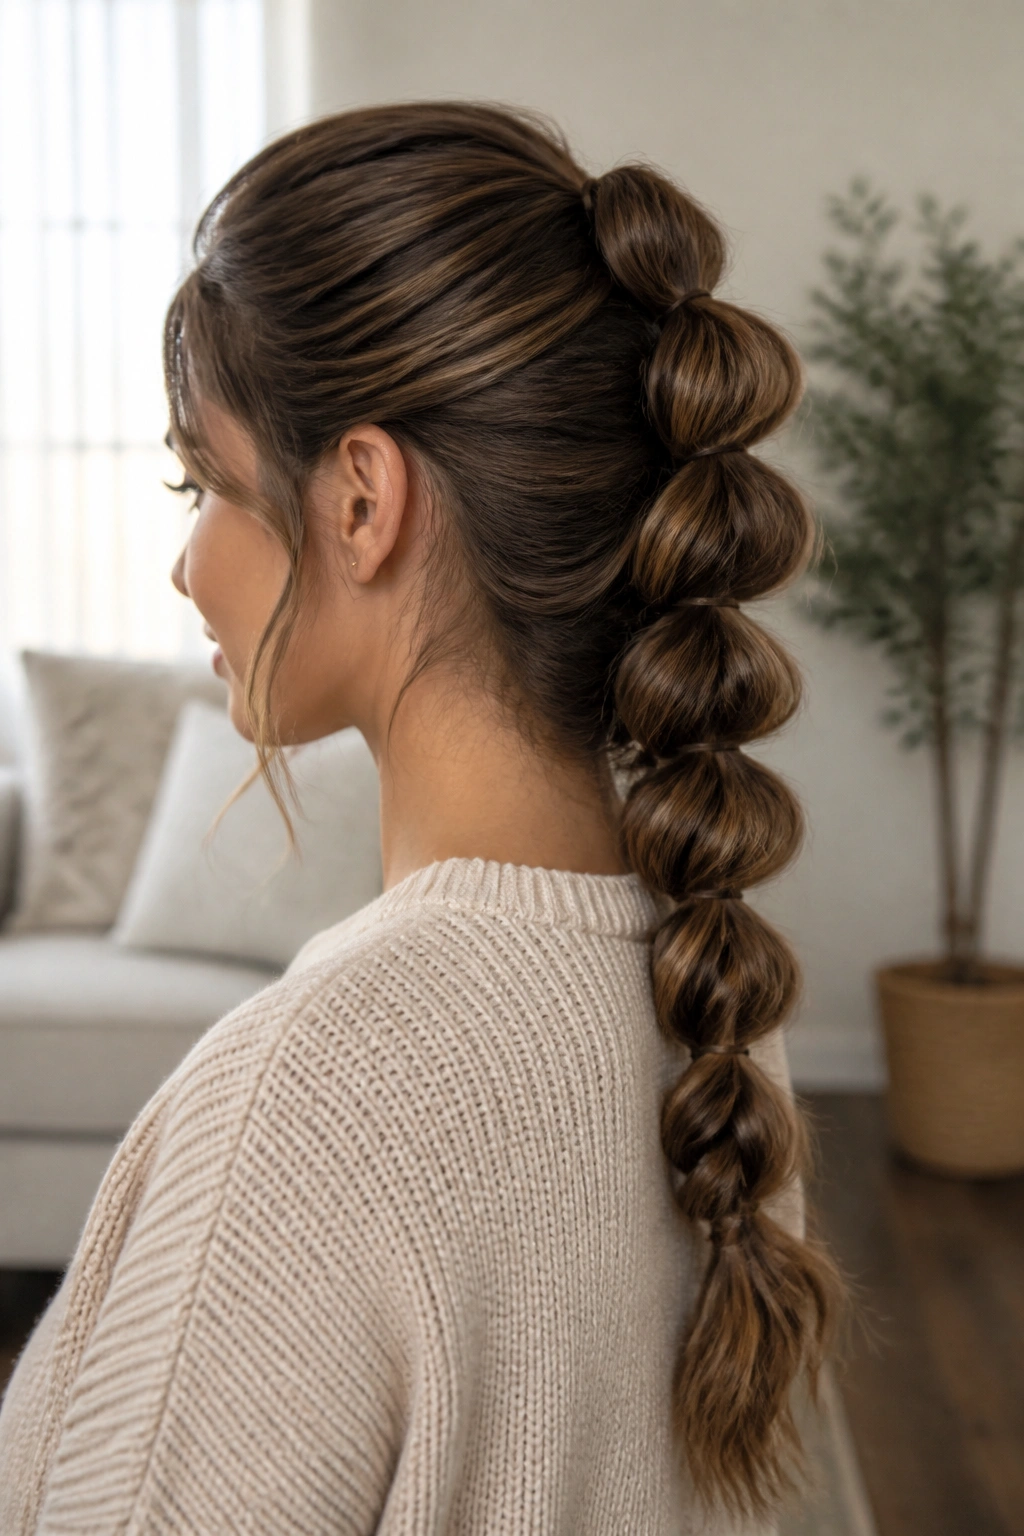
Pull-through braid is the style people turn to when they want braid volume without needing a traditional plait. It uses a chain of ponytails instead of a true three-strand weave, which means the result can look huge and neat at the same time.
The long hair part matters here. Every new section adds length to the tail, so the braid keeps building instead of thinning out. That gives you a dramatic finish without having to fight tiny pieces. It’s also forgiving if your sections are not exact, because the elastics do a lot of the structural work.
What Makes It Different
The braid can look a little like a faux braid crown, a bubble-style ponytail, or a soft event hairstyle depending on how tight you pull the loops. Use clear or matching elastics every 2 to 3 inches, then tug each section outward after securing it. That’s what creates the depth.
If you want a polished look, smooth the top layer with a light cream before you start. If you want it looser, leave the first section a bit puffier and let the braid widen as it goes down.
10. Bubble Braid
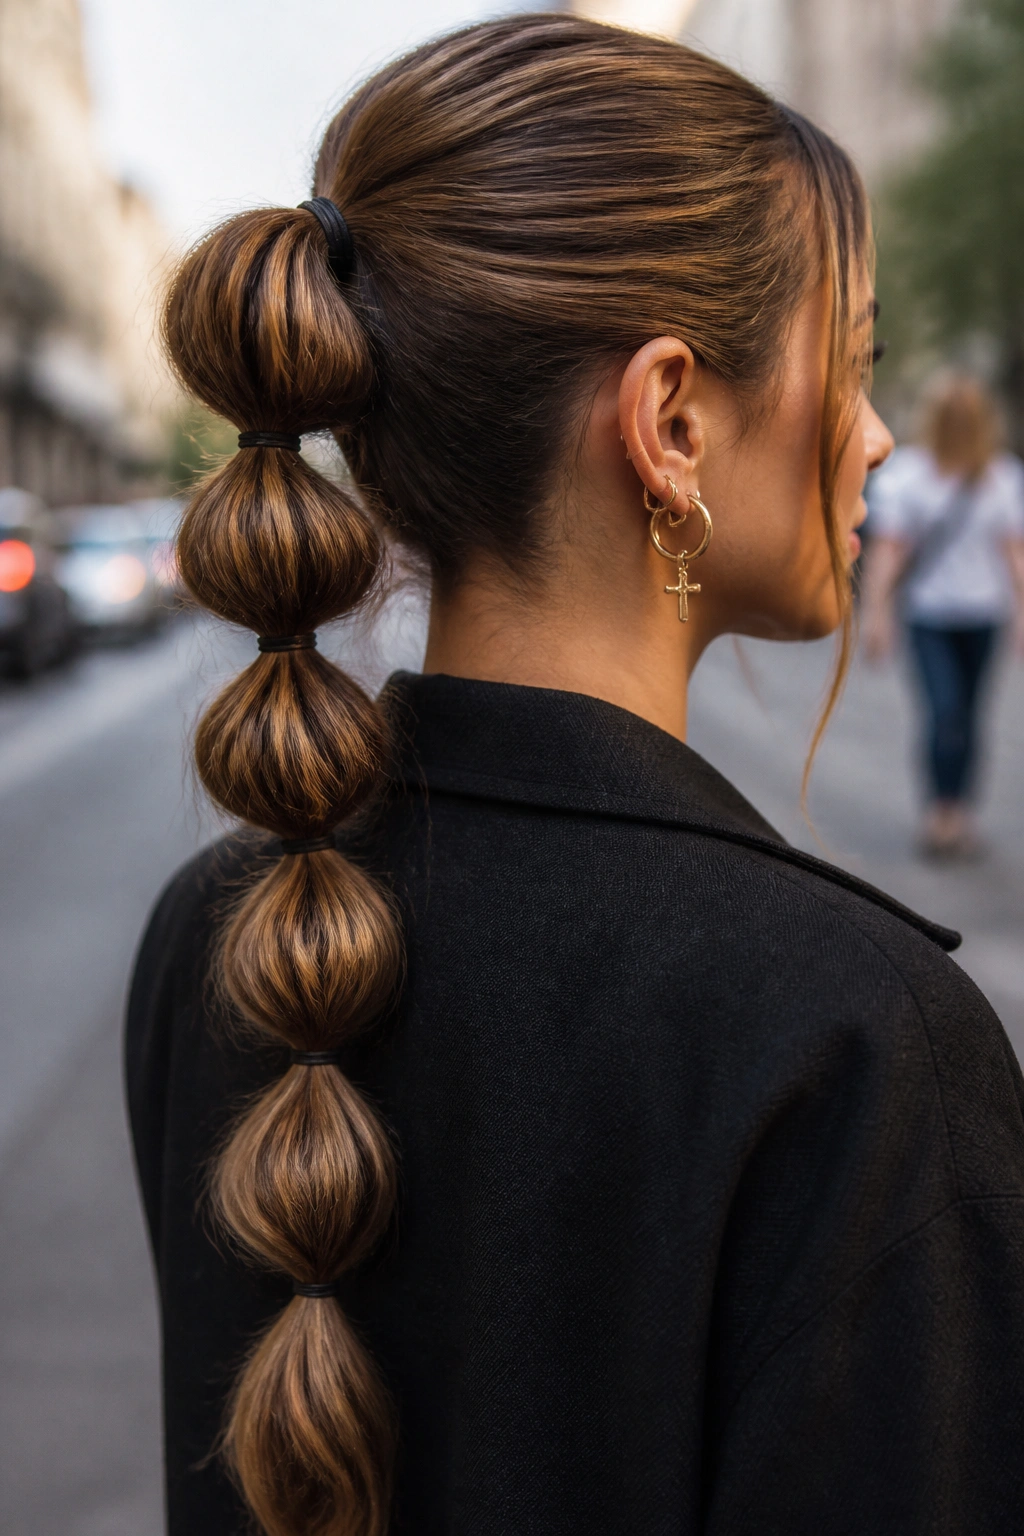
A bubble braid is not a braid in the classic sense, and I don’t think that matters one bit. What matters is that it gives long hair shape fast, with far less finger work than a fishtail or French braid.
The style works by placing small elastics down the length of a ponytail and then pulling each section into rounded “bubbles.” On long hair, those sections show up clearly, which is why the look lands so well. Shorter hair can make it feel stubby. Long hair gives each bubble enough room to read.
Spacing is the part people miss. Put the elastics about 2 to 3 inches apart for a neat finish, or 4 inches apart if you want larger, looser bubbles. Then pinch and pull the hair between the elastics until the round shape is visible. If your hair is extra silky, mist the lengths with texturizing spray before you start. It keeps the sections from sliding out of place.
11. Waterfall Braid
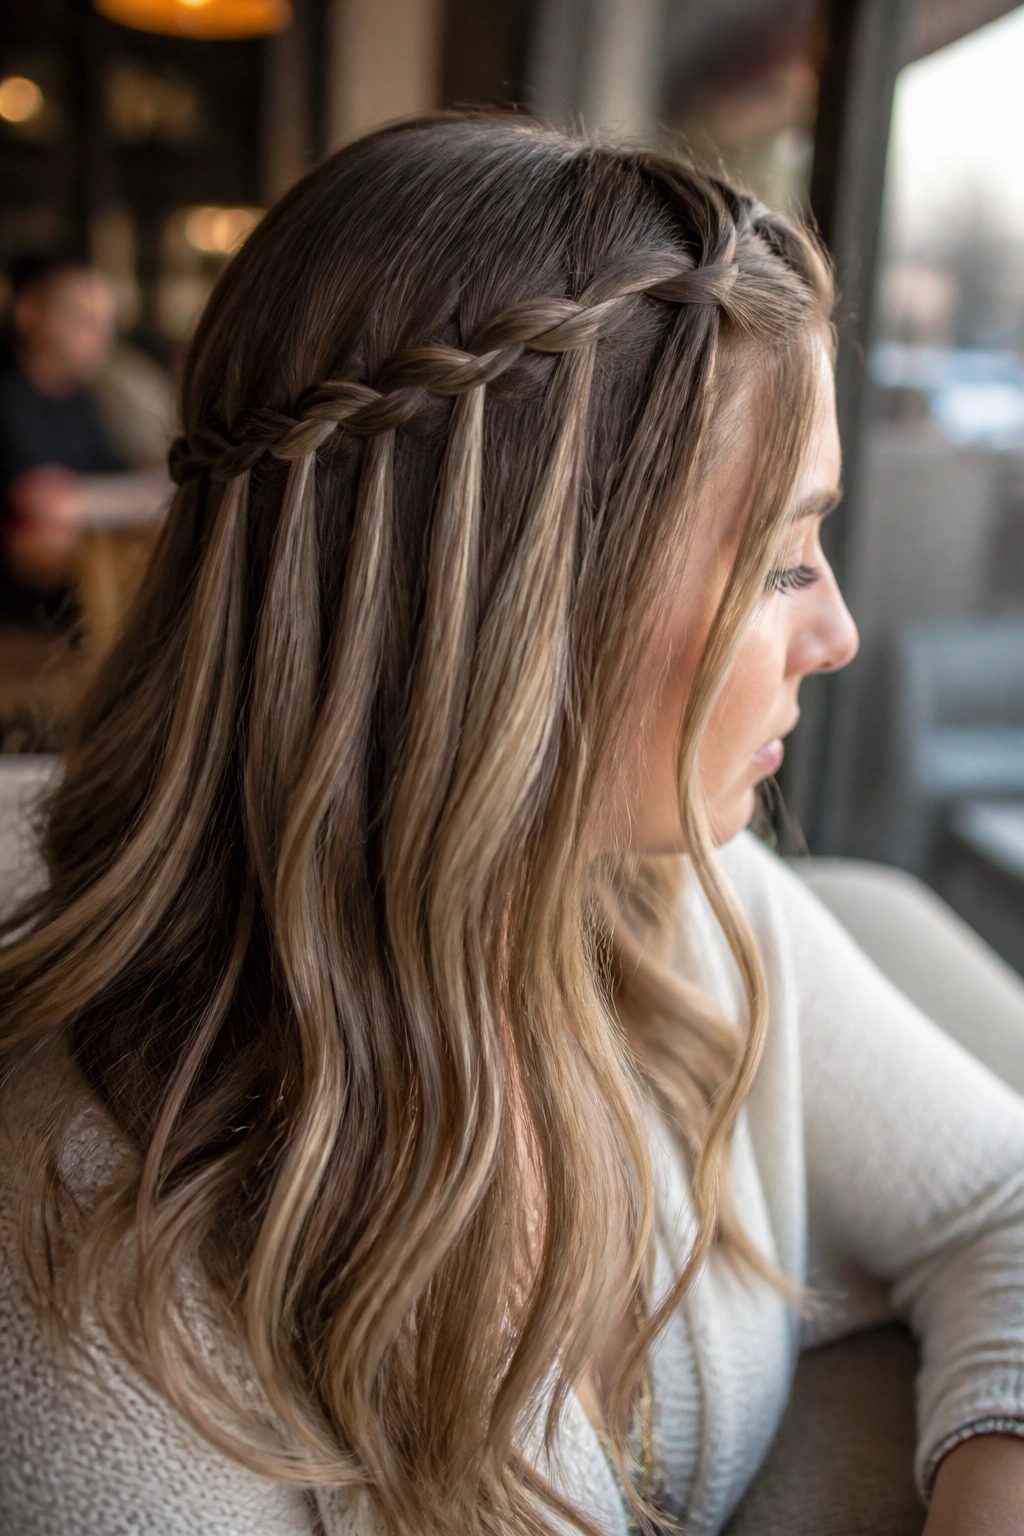
A waterfall braid is one of those styles that looks soft, but not messy. The braid crosses along the head and lets one strand drop free each time, so the loose hair falls through like a little curtain. Long hair makes that effect much prettier because the strands have room to hang and blend with the rest.
I like waterfall braids on layered cuts. The dropped pieces merge into the rest of the hair instead of sticking out like short stubs, which can happen on blunt styles with too much texture. It’s also a good option if you want your hair half-up and still visible from behind.
The big mistake is rushing the dropped strands. Keep each release smooth and even, or the braid starts to kink. A tail comb helps a lot here, especially if your hair tangles easily around the back of the head.
12. Lace Braid
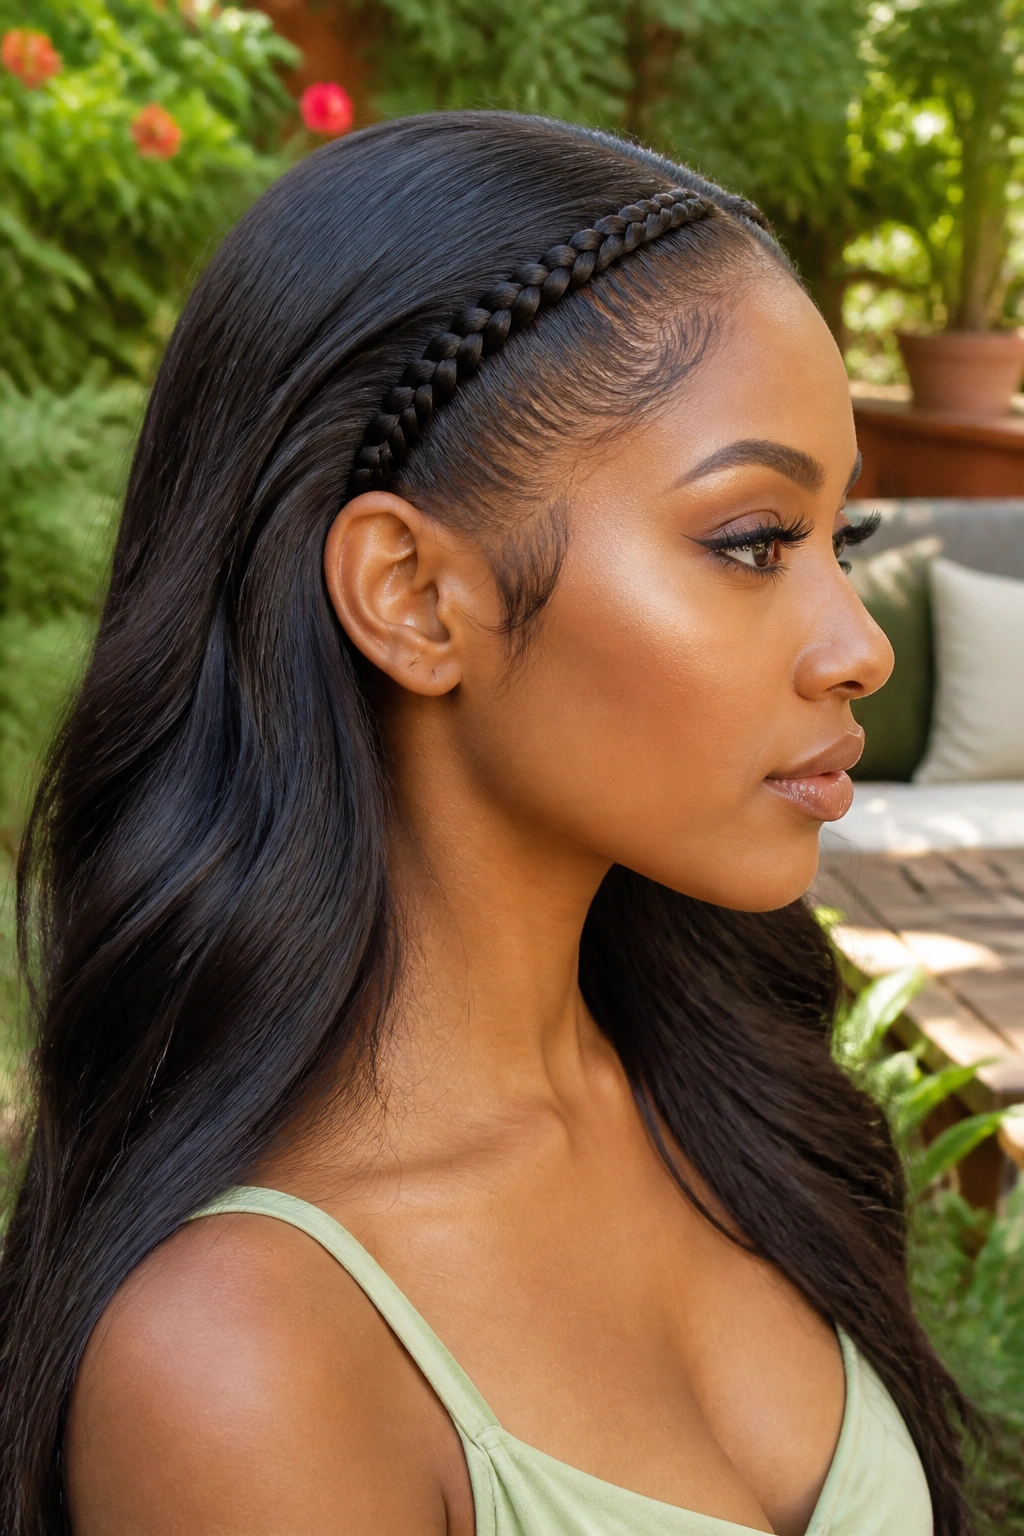
A lace braid is French braid’s one-sided cousin. You only add hair from one side as you braid, which lets the style hug the hairline and sweep across the head without taking over the whole length.
That makes it a smart choice when you want detail near the front but still want most of your hair down. Long hair gives the braid a clean finish because the added section can travel farther before it tapers off. It’s especially handy for grown-out bangs or side pieces that won’t sit still.
Wear it as a single accent braid, fold it into a half-up style, or run it diagonally into a ponytail. I’d pick this one on days when the hair around the face needs help, but I don’t want a full updo. It solves a narrow problem and does it well.
13. Crown Braid
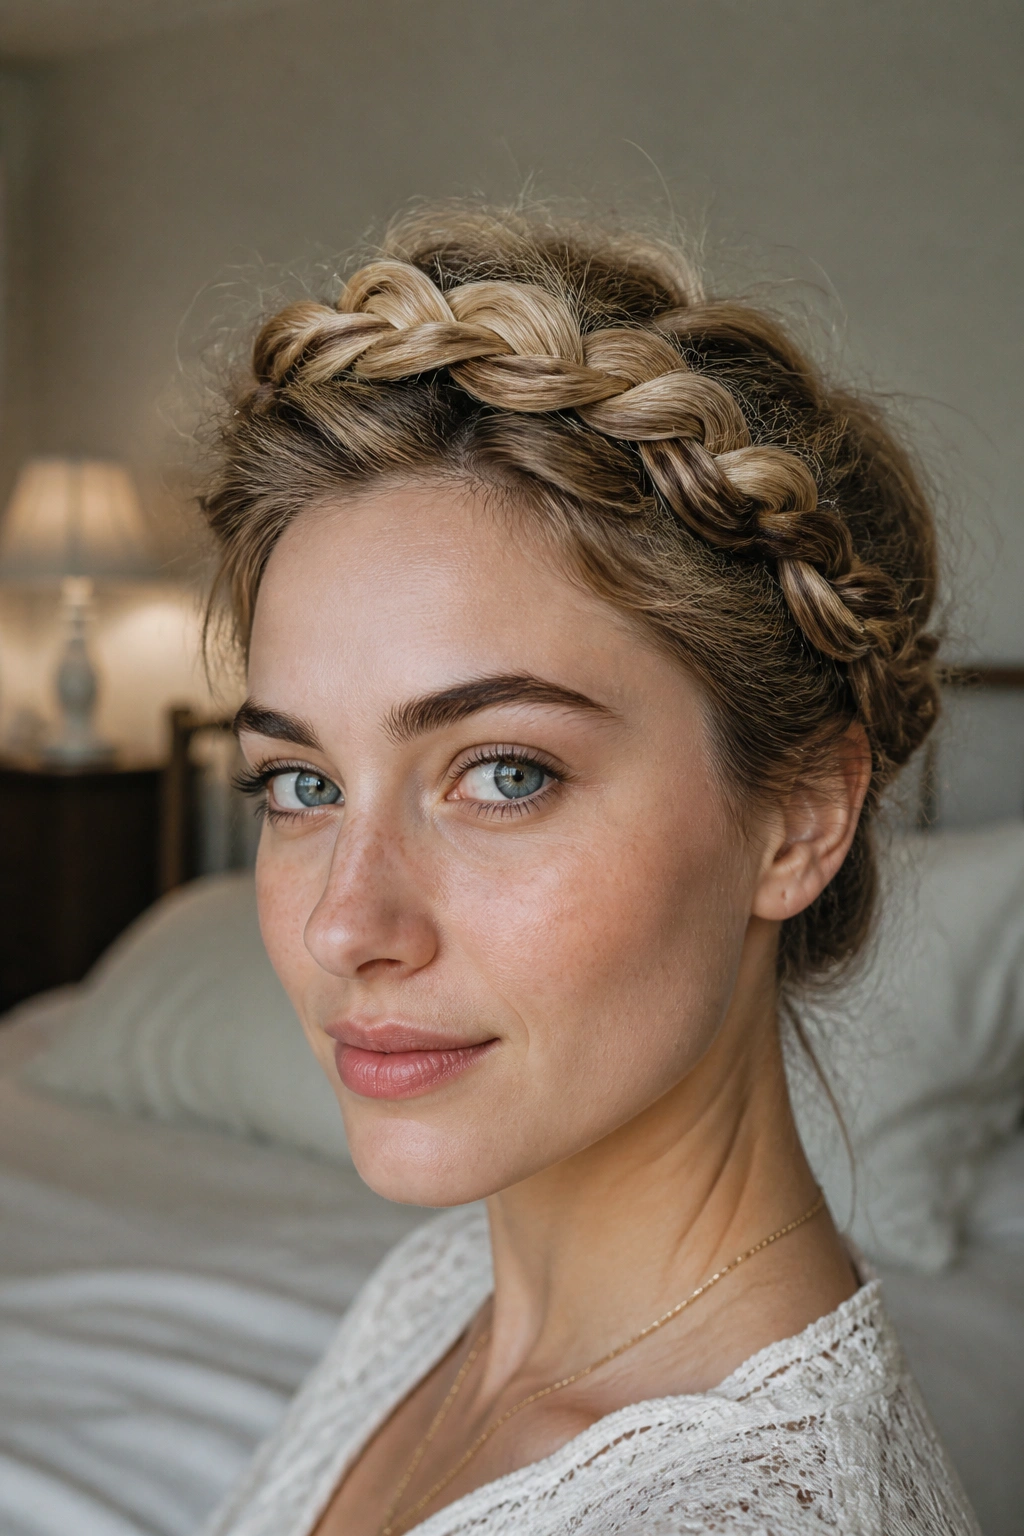
A crown braid wraps around the head like a built-in headband, and long hair makes that circle look fuller. The braid can be tight and tidy or loose and romantic, but the shape stays the same: hair lifted off the face, braid framing the head.
Why It Looks So Good on Long Hair
The length gives you enough material to make the wrap complete without ending in a stubby tail. You can pin the ends under the braid and hide them cleanly, which is half the magic. A few extra bobby pins are not optional here. The style needs support, especially if your hair is heavy.
- Start with a side part or center part, depending on the look you want.
- Braid along the hairline, moving around the head.
- Tuck the ends under the braid and pin them flat.
- Smooth the front with a light wax stick if flyaways bother you.
A crown braid is one of the few styles that can feel formal without looking stiff. That’s rare.
14. Halo Braid

People confuse halo braid and crown braid all the time, and fair enough. They sit in the same visual family. The difference is that a halo braid often feels softer, with the braids wrapped and pinned so the hair seems to float around the head instead of sitting like a rigid band.
Long hair helps because the wrapped length gives the halo more body. Thin or short hair can make the shape look narrow. Thick hair gives you that plush ring effect that photographs nicely from the side and back. I won’t use the overused word here. It just looks rich.
If your hair is layered, keep the braid a touch looser so the shorter pieces can sit inside the shape instead of poking out. Pins matter. Use more than you think you need, then test the style by tilting your head forward and side to side. If the braid shifts, you’ll feel it right away.
15. Milkmaid Braid

A milkmaid braid is one of the cleanest ways to get long hair off the neck while still showing off thickness. You braid two sections, wrap them over the head, and pin them in place so the braids frame the face like bands.
The style works best when the braids are a little plump. That gives the wrapped shape some softness and keeps it from looking too severe. It also hides the ends neatly, which is a relief if your hair is long enough to leave a lot of tail.
I’d pick milkmaid braid when you want structure without a full updo. It’s nice for warmer days, weddings, or any event where loose hair feels like too much. A light mist of hairspray near the temples keeps the front from frizzing out, but don’t overdo it. The braid should still move when you turn your head.
16. Boxer Braids

Boxer braids are the style you choose when you want your hair locked down. Two tight Dutch braids, clean part down the middle, hair held close to the scalp. That’s the whole point, and on long hair it creates a strong line from front to back.
They’re useful in a way that goes beyond looks. The braids keep ends tucked away and reduce the amount of hair swinging around during movement. That makes them solid for workouts, travel days, or long shifts when you cannot keep fixing your hair every hour.
The only real caution is tension. A braid that feels sharp at the hairline is too tight. The scalp should feel held, not sore. I’d rather see a braid that is slightly looser at the front and stays comfortable than one that looks perfect and gives you a headache by lunch.
17. Twin Fishtail Pigtails

What happens when you split a fishtail into two? You get twin pigtails with a little more detail than the usual three-strand version. Long hair gives each tail enough length to show the pattern without getting lost in the back.
These are fun in a way that feels fresh, not childish, if you keep the parts clean and the ends smooth. Start the braid below the ears for a softer look, or higher up if you want the pigtails to sit more playfully. Either way, the fishtail texture adds movement the second you turn your head.
How to Get the Most From Them
- Make the middle part straight and crisp.
- Keep both braids at the same starting height.
- Use small elastics at the ends so the tail stays neat.
- Loosen the sides a bit if you want more width.
This style is one of the better choices for very long hair because the length doesn’t make it look silly or stubby. It just gives it more swing.
18. Four-Strand Braid

A four-strand braid has a ribbon-like finish that stands out from the standard three-strand version without moving into “why did I need a tutorial for this” territory. It’s still manageable once your hands learn the pattern, and long hair shows the structure clearly.
The main advantage is visual texture. The braid looks denser and a little more polished, especially when the hair is smooth. On wavy hair, it can feel more relaxed and dimensional. That range is why I like it. The same braid can land differently depending on the texture you start with.
If your fingers keep mixing up the strands, clip the four sections at the top with small clips for the first few passes. That sounds fussy. It works. After two or three rounds, the pattern settles in and your hands stop overthinking it.
19. Five-Strand Braid

Five strands sound like a headache until you see how nice the final braid looks on long hair. The weave ends up wider and more detailed than a classic braid, which makes it good for thick lengths that can handle a bigger visual pattern.
You do need patience. There’s no way around that. The braid asks for tidy sections and steady hands, or the whole thing turns into a knot halfway down. But if you’ve got the time, the finish is worth it because the pattern reads from a distance and still looks close-up.
A neat five-strand braid is one of the best styles for very full hair. It uses the volume instead of fighting it. If your hair is slippery, a touch of mousse at the roots and a dry finish on the lengths helps the braid hold shape while you work.
20. Pancaked Braid
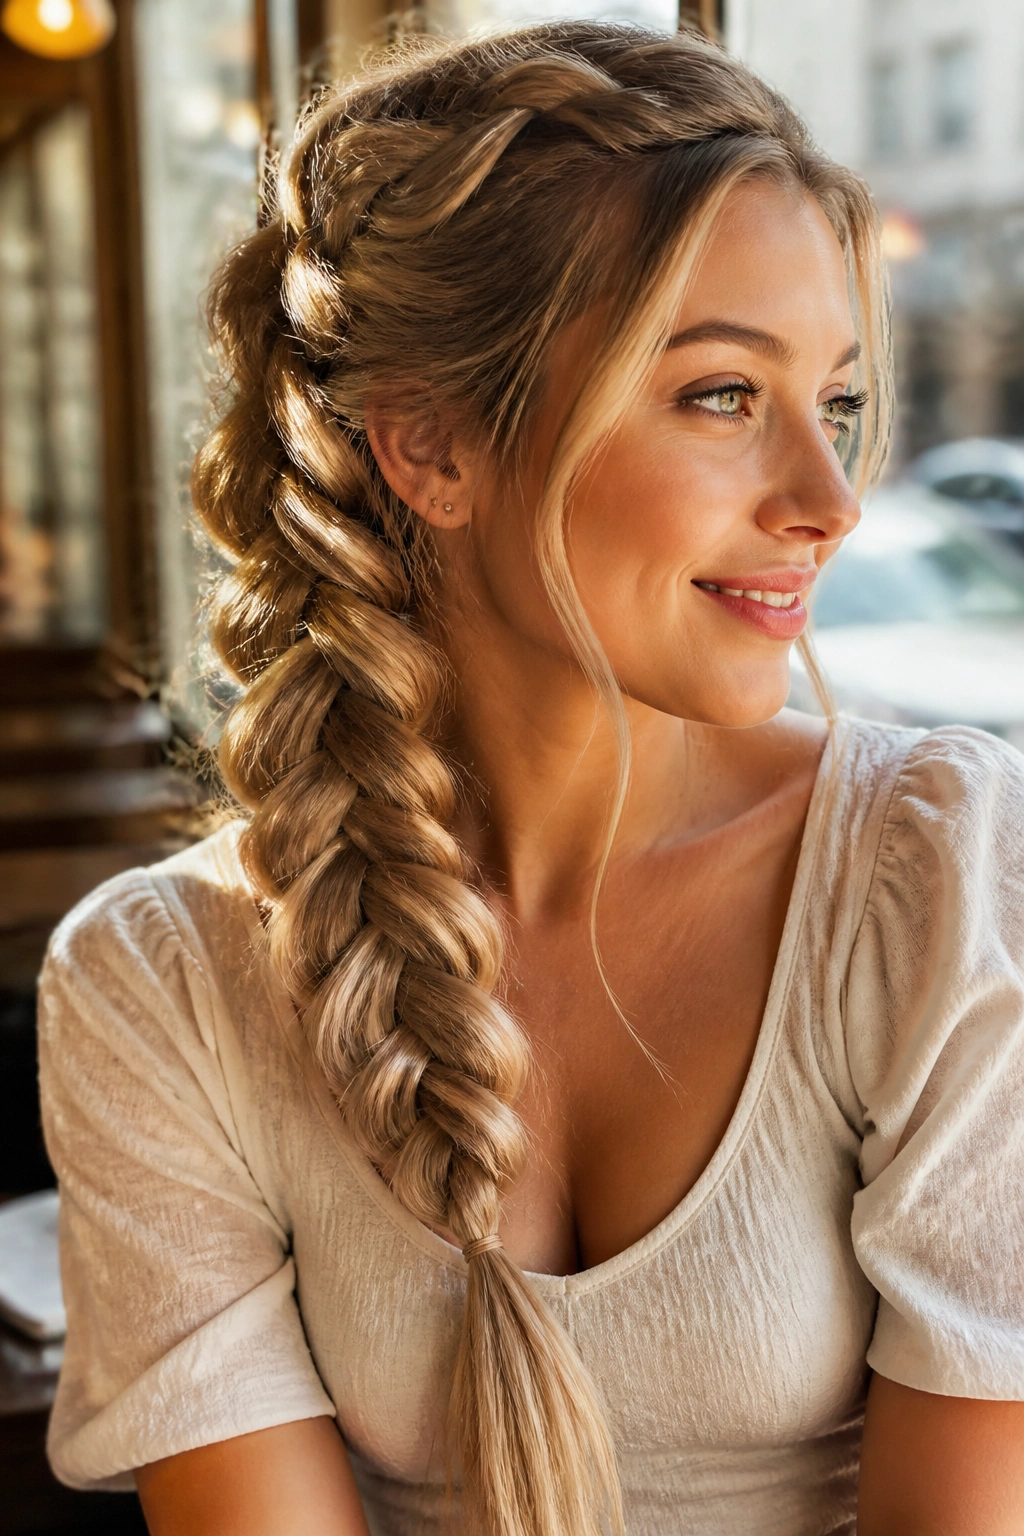
Pancaking is the quiet trick that makes a normal braid look twice as full. You do the braid first, secure it, then gently pull the outer edges apart so the plaits spread wider. On long hair, this can turn a narrow braid into something soft and broad in under a minute.
When to Use It
This is the move for fine hair, thin ponytails, or any braid that looks too small after you finish it. It also helps if you want a softer boho feel without changing the braid pattern itself. Do the stretching only after the elastic is in place. If you tug before securing, the braid can loosen and fall apart.
- Hold the braid near the top while you pull the loops outward.
- Work from the bottom up so the shape stays even.
- Stop if the braid starts to look frayed.
- Use a light spray if the hair keeps slipping back flat.
Sometimes the simplest fix is the best one.
21. Mermaid Braid
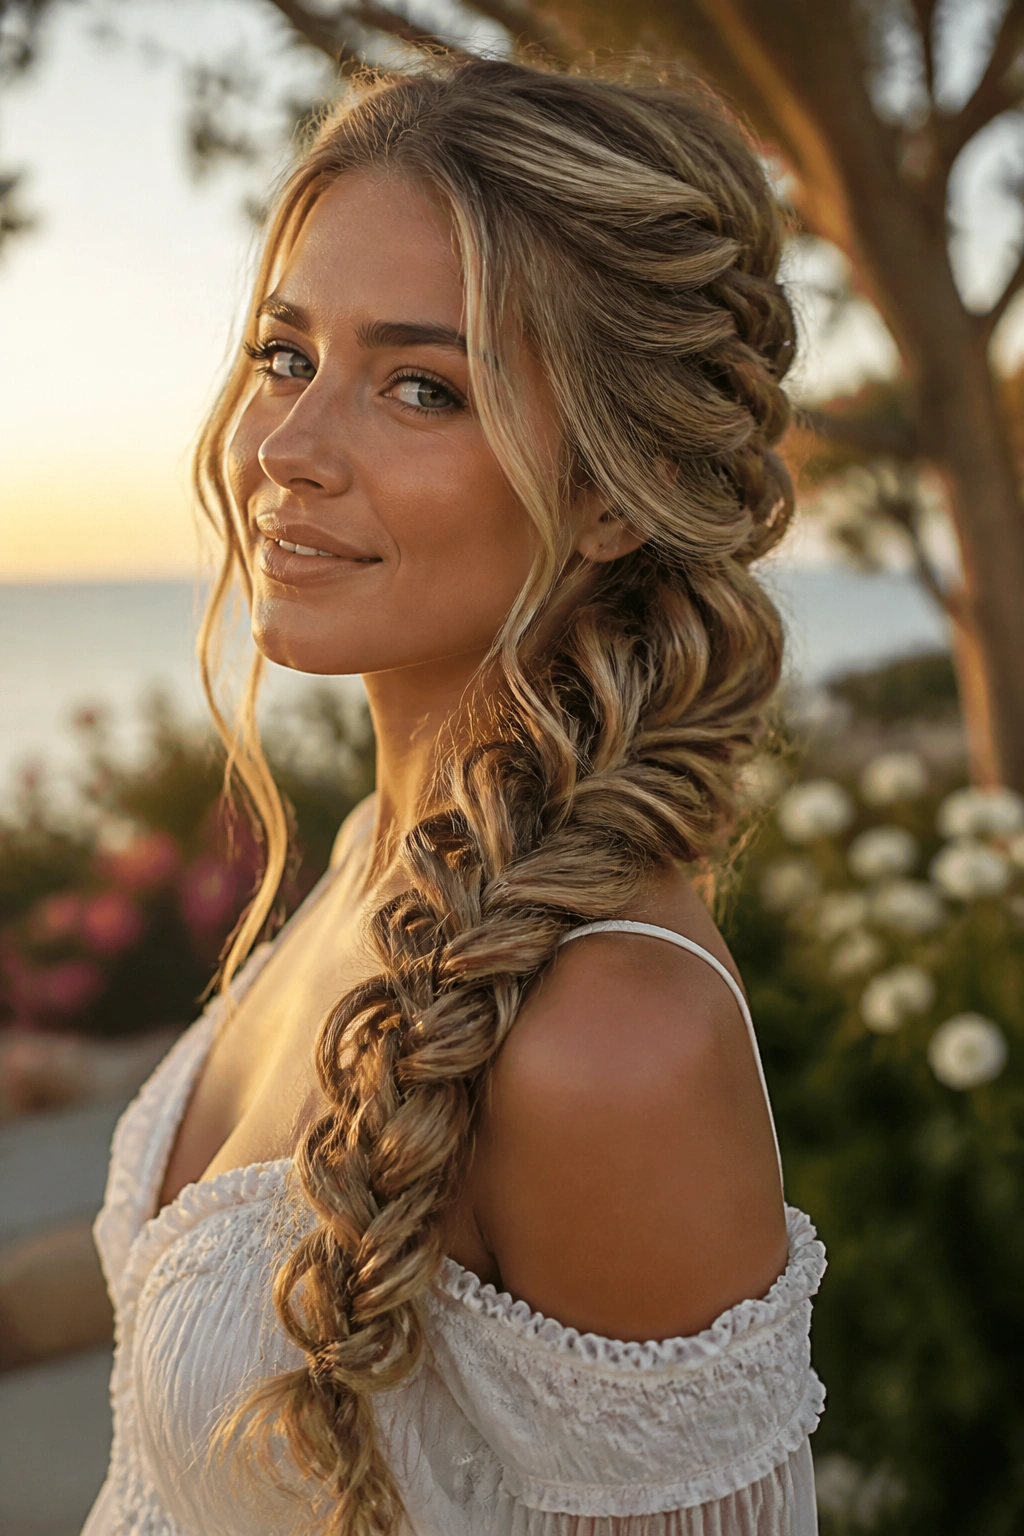
A mermaid braid usually means a large, flowing braid with loose texture and a little drama in the length. It can be worn as a side braid or down the back, and long hair gives it the sweep it needs to look like more than a regular plait with a fancy name.
The charm is in the fullness. Instead of making every section tight and neat, you let the braid stay soft and airy, then widen it a bit after securing. That gives the impression of volume and movement, which plays nicely with waves or loose curls. Straight hair can do it too, but a little texture spray helps the style hold its shape.
I think this braid works best when you let it look touched, not overworked. If every strand is pulled into line, it loses the effect. A few flyaways are not a problem here. They are part of the look.
22. Ladder Braid
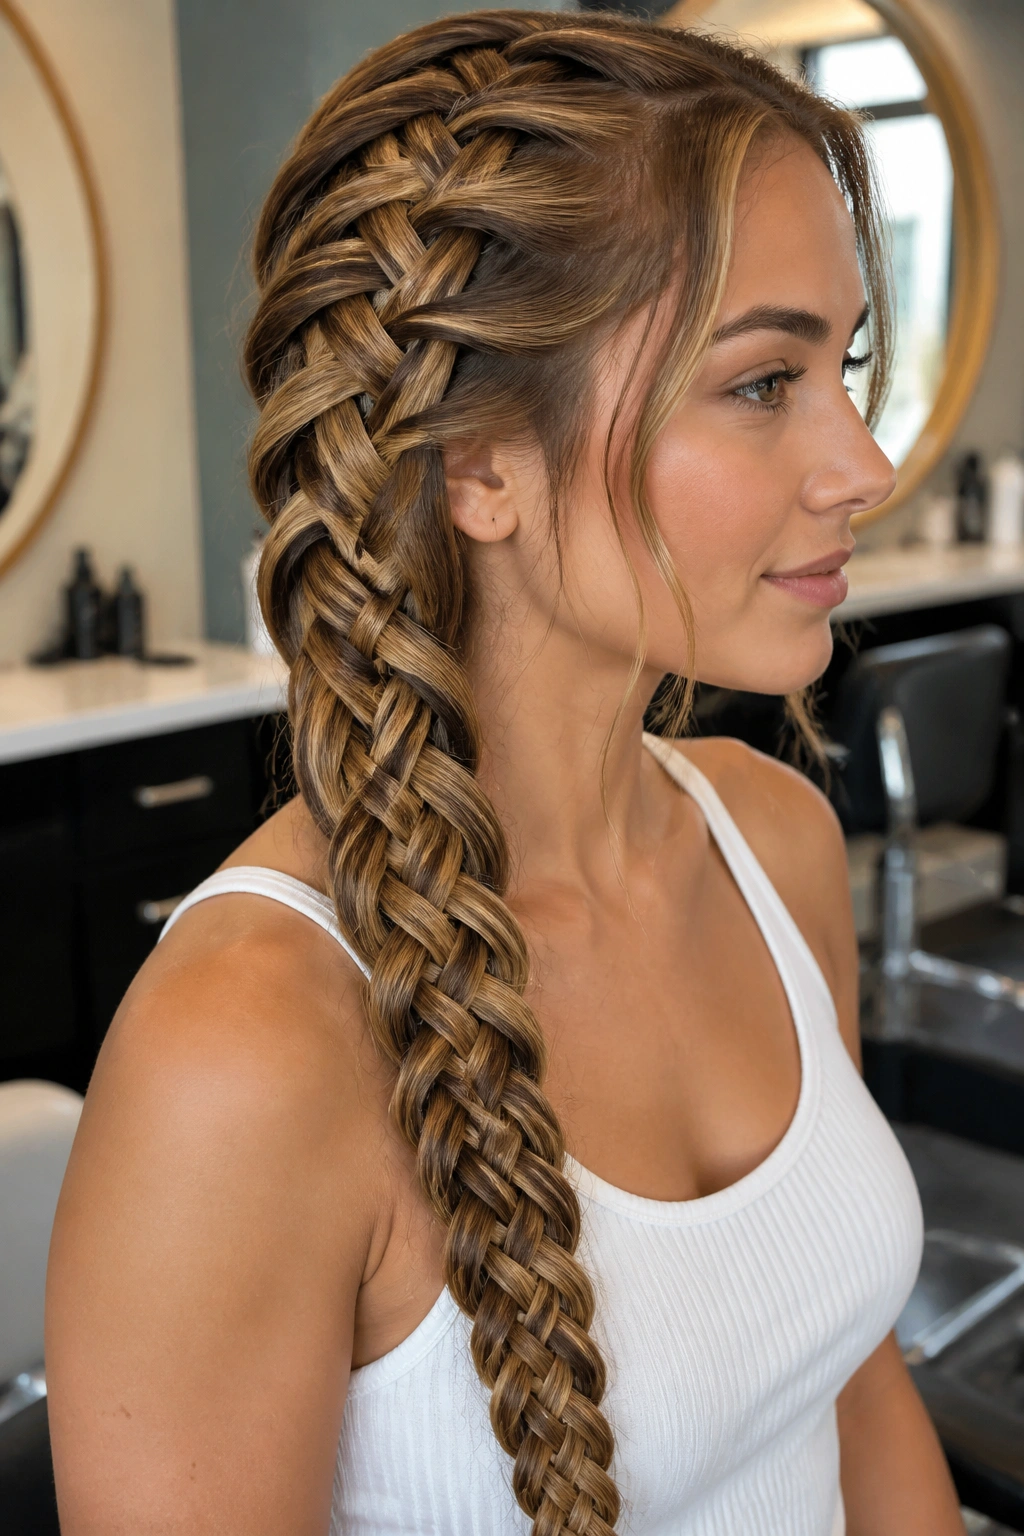
A ladder braid is one of the more eye-catching braid styles for long hair because it creates the look of little rungs crossing a longer braid. It’s not something you throw together in thirty seconds, but the result can be striking on smooth, long lengths.
The structure depends on a base braid and small sections that loop across it to mimic a ladder. That means the hair needs enough length to show the pattern clearly. Long hair has a real advantage here because the rungs have space to repeat before the style runs out of room.
What to Watch For
- Keep the base braid steady and even.
- Use a tail comb for the small crossing pieces.
- Smooth the hair first if it frizzes easily.
- Set each section with a pin or tiny elastic if needed.
This is a style for when you want people to notice the details. It’s not casual, and that’s fine. Some braid styles should look like you spent time on them.
23. Snake Braid

A snake braid is all curve and movement. Instead of hanging straight like a standard braid, it bends and loops across the hair, which gives long lengths a more playful line. I like it as an accent braid more than a full-head style.
The effect comes from loosening and shaping the braid after it’s made, or from braiding a section and then guiding it into a wave-like path. Long hair helps because there’s enough length for the curve to show before it disappears into the ends. Short hair often loses the point halfway through.
If you want this to hold, prep the hair with a little grit first. A light texturizing spray or a bit of mousse helps the braid keep the curve instead of sliding flat again. And don’t pull the braid apart too soon. Let it settle for a minute after securing it.
24. Braided Headband

A braided headband is one of my favorite small-detail styles because it fixes the front of the hair without taking away the length. The braid runs across the hairline like a built-in accessory, which makes it useful for grown-out bangs, face-framing layers, or days when your roots need help.
Why It Works Better Than a Real Headband Sometimes
Unlike a full braid, this style keeps most of the hair down and visible. That matters on long hair, where the length itself is part of the look. The braid also blends better with the rest of the style than a fabric band does, especially if your hair texture is a little uneven.
- Start the braid near the temple.
- Follow the hairline toward the opposite ear.
- Pin it behind the ear or tuck it under the loose hair.
- Keep the braid small so it sits close to the head.
It’s subtle, but not boring. That balance is hard to beat.
25. Braided Bun
A braided bun gives long hair a place to land without hiding the braid completely. You braid the length first, then coil it into a bun and pin it flat. The result is neat, compact, and better than a plain bun when you want the style to look finished.
Because long hair has more weight, the bun holds its shape well once secured. The trick is not to twist the braid so tightly that it flattens into a lump. Wrap it with some room left in the coil, then pin the edges down. Two or three U-pins can do what six bobby pins sometimes cannot.
This is a strong choice for work, dinners, or any day when you need your hair completely off your shoulders. It also works if the ends are getting dry and you want them tucked away for a while. That alone makes it useful.
26. Braided Faux Hawk
A braided faux hawk has a little attitude without cutting a single inch off your hair. The sides get braided or pinned tight, while the center section stays raised and full. On long hair, that ridge can look dramatic in the best way.
The style is good when you want shape and height without a full updo. It feels sharper than a loose braid, and it gives the crown some lift, which is useful if your hair usually falls flat at the top. A little texturizing spray at the roots helps the middle section hold.
I’d wear this one when you want the braid to be the statement, not the background. It suits concerts, nights out, and anything where a plain braid would feel too ordinary. Keep the sides snug and the center soft. That contrast is what makes it work.
27. Feed-In Cornrows
Feed-in cornrows look so clean on long hair because the braid grows gradually from the scalp instead of starting chunky right away. That slow build keeps the hairline neat and the braid flat, which is part of why this style is so respected in protective styling.
The technique takes care. Small sections are added bit by bit so the braid looks seamless as it moves back from the front hairline. On long hair, the extra length means the style can travel farther and stay tidy without needing a lot of bulky buildup near the roots. Low tension matters here. A good install should feel secure, not punishing.
- Ask for clean, even parts.
- Keep the braids close to the scalp without pulling hard.
- Moisturize the hair before styling.
- Sleep with a satin scarf or bonnet to keep the parts neat.
If the scalp aches, the style is too tight. Full stop.
28. Goddess Braids
Goddess braids are thicker, softer cornrow-style braids with room to show off long hair’s natural body. They tend to look more decorative than plain cornrows because the braids are wider and often paired with curls or loose ends.
That extra thickness gives you a calmer shape around the head. It also means the style reads well from the side, which matters if you like braids that actually show in profile. Long hair gives goddess braids more length to work with, so the braids can flow into a low bun, ponytail, or hanging tail without running out of material too fast.
I’d choose this style when I want protection and shape at the same time. It keeps the hair controlled, but it doesn’t feel severe. A light oil on the scalp and a satin wrap at night help the style stay fresh longer, and they keep the braids from looking dusty too quickly.
29. Knotless Box Braids
Knotless box braids are one of the gentler long-term braid options because the braid starts with your own hair first, then extension hair gets fed in gradually. That usually means less bulk at the root and less of that hard, heavy knot that can tug on the scalp.
The long hair angle matters because even when your natural hair is already lengthy, the braid can still feel heavy if the added hair is too thick. Smaller parts and balanced section size make a big difference. The style should sit comfortably at the scalp and move when you move, not dig into your edges every time you turn your head.
Installation takes time. There’s no shortcut there. But the payoff is a cleaner start line, a softer fall through the length, and a braid that tends to look more natural as it settles. If it feels tight enough to throb, it’s too tight. Trust that signal.
30. Braided Ponytail Wrap
A braided ponytail wrap is one of the easiest ways to make a simple ponytail look finished. You gather the hair, braid a small section or the whole tail, then wrap a strand around the elastic so the base looks clean instead of obvious.
On long hair, this trick matters because the length gives the braid enough body to feel intentional. You can keep the wrap tight and polished, or leave a little softness in the ponytail for a more relaxed look. Either way, the style clears the face and gives the tail a cleaner outline.
Small Detail, Big Payoff
This is the kind of style that works on busy mornings, but it still looks like you thought about it. Use a clear elastic at the base, then hide it with a wrapped strand and one pin underneath. That little move makes a plain ponytail look finished in a way a fabric tie never quite does.
Final Thoughts
The braid you reach for most often is usually the one that fits your hair texture without a fight. Fine hair tends to like styles with grip and shape, while thick hair often looks best when the braid has room to breathe instead of being pulled too tight.
Some styles are about control. Others are about volume. A few are there when you want your hair to stay put for hours and stop thinking about it. That mix is the reason long hair and braids work so well together.
If you keep a tail comb, a handful of snag-free elastics, and a couple of extra bobby pins nearby, you can do a lot more than you think. The best braid is the one you’ll actually wear out the door.
