



Long hair makes a side braid look rich in a way shorter lengths rarely can, but it also magnifies every sloppy section and every too-tight pull. A braid can go from polished to puffy in ten minutes if the start point is wrong.
That’s why side braid hairstyles for long hair live or die by small choices: where the part sits, how much tension you use at the temples, whether the ends stay smooth or get roughed up for texture. I like the styles that hold their shape without needing a wall of hairspray. A clean part helps. So does patience.
One thing I keep seeing: people braid the hair they have, not the hair the style needs. Thick hair wants slightly larger sections. Silky hair needs a little grit at the roots. Curly hair usually looks better when the curl pattern is left alone instead of brushed into submission.
Some of the looks below are soft and loose, some are sharp and tidy, and a few pull real protective-style energy into a long-hair shape that stays put. Start with the braid that matches your hair’s behavior, not the one that looks easiest on paper.
1. Loose Dutch Side Braid Over One Shoulder
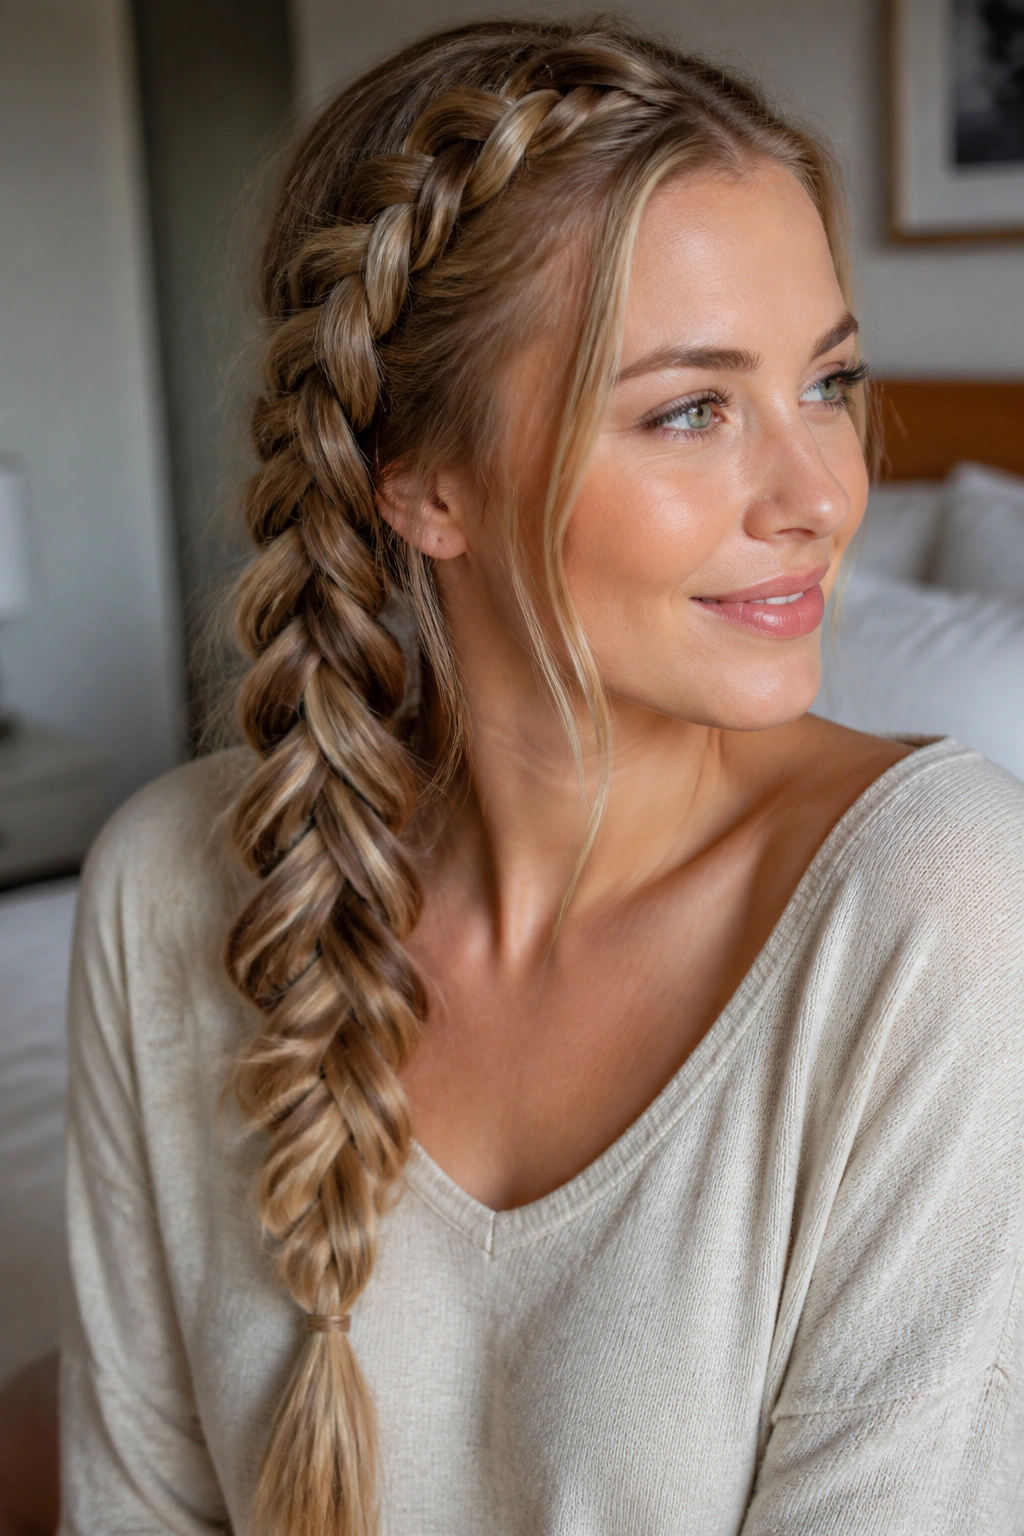
A loose Dutch side braid is the one I reach for when I want the braid itself to be the point. The plait sits on top of the hair instead of sinking into it, which gives long hair a thicker, more visible line. That matters more than people think. On long lengths, the raised shape keeps the braid from disappearing into the rest of the hair.
Why It Shows Up So Well
Start the braid a finger-width behind the temple and keep the first three crossovers snug. After that, ease up. The top should stay neat, but the lower half can be relaxed so the braid doesn’t look stiff or overworked.
- Use 1- to 1½-inch sections near the hairline.
- A little dry shampoo or mousse at the roots helps the braid hold.
- Finish with a snag-free elastic about 3 inches from the ends.
Pro tip: tug the outer loops after you tie it off, not while you’re braiding. That gives you width without turning the whole thing messy.
2. Sleek Fishtail Side Braid
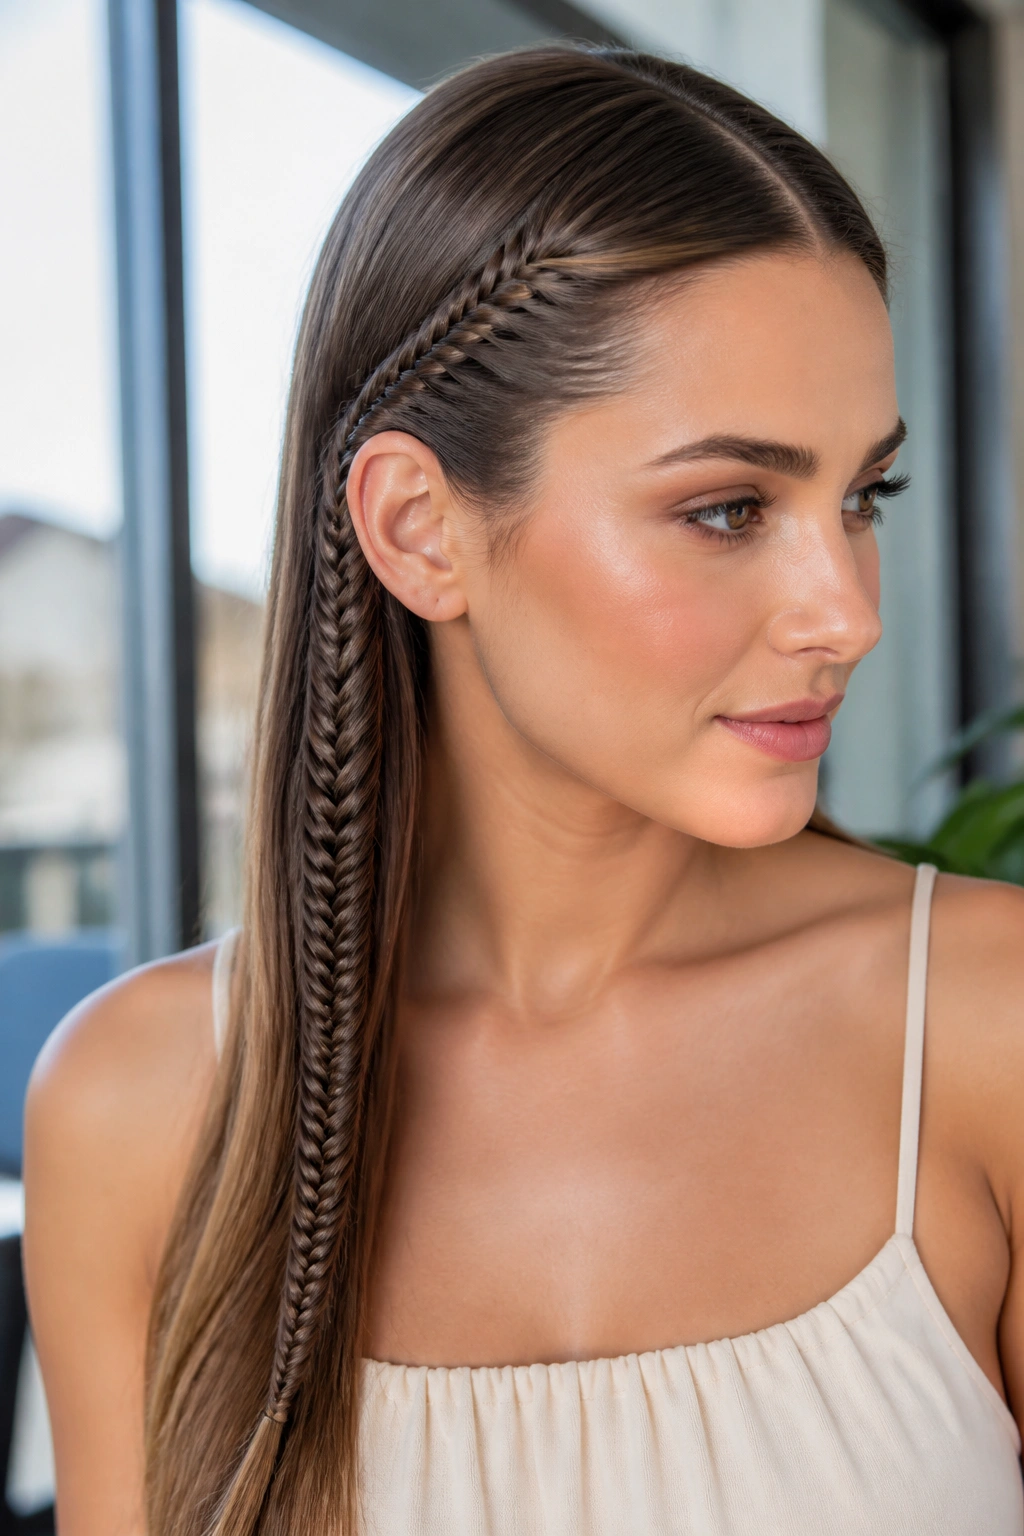
A fishtail braid looks fancier than a regular three-strand braid with almost no extra hardware. That’s the whole appeal. The pattern is tiny and tight, which makes long hair look deliberately styled instead of casually gathered.
The key is size control. Pull 1/4-inch pieces from the outer edge of one section, then cross them into the other side with even tension. If you grab too much hair each time, the braid turns chunky and loses that fine woven look. If you keep the pieces small, the braid reads almost like fabric.
I like this style best on straight or lightly smoothed hair, because the pattern shows more clearly when the surface is clean. A drop of serum on the last 4 inches keeps the ends from fraying. Wear it low and sweep it over one shoulder. That’s the spot where it feels elegant without trying too hard.
3. Soft French Side Braid with Face-Framing Pieces
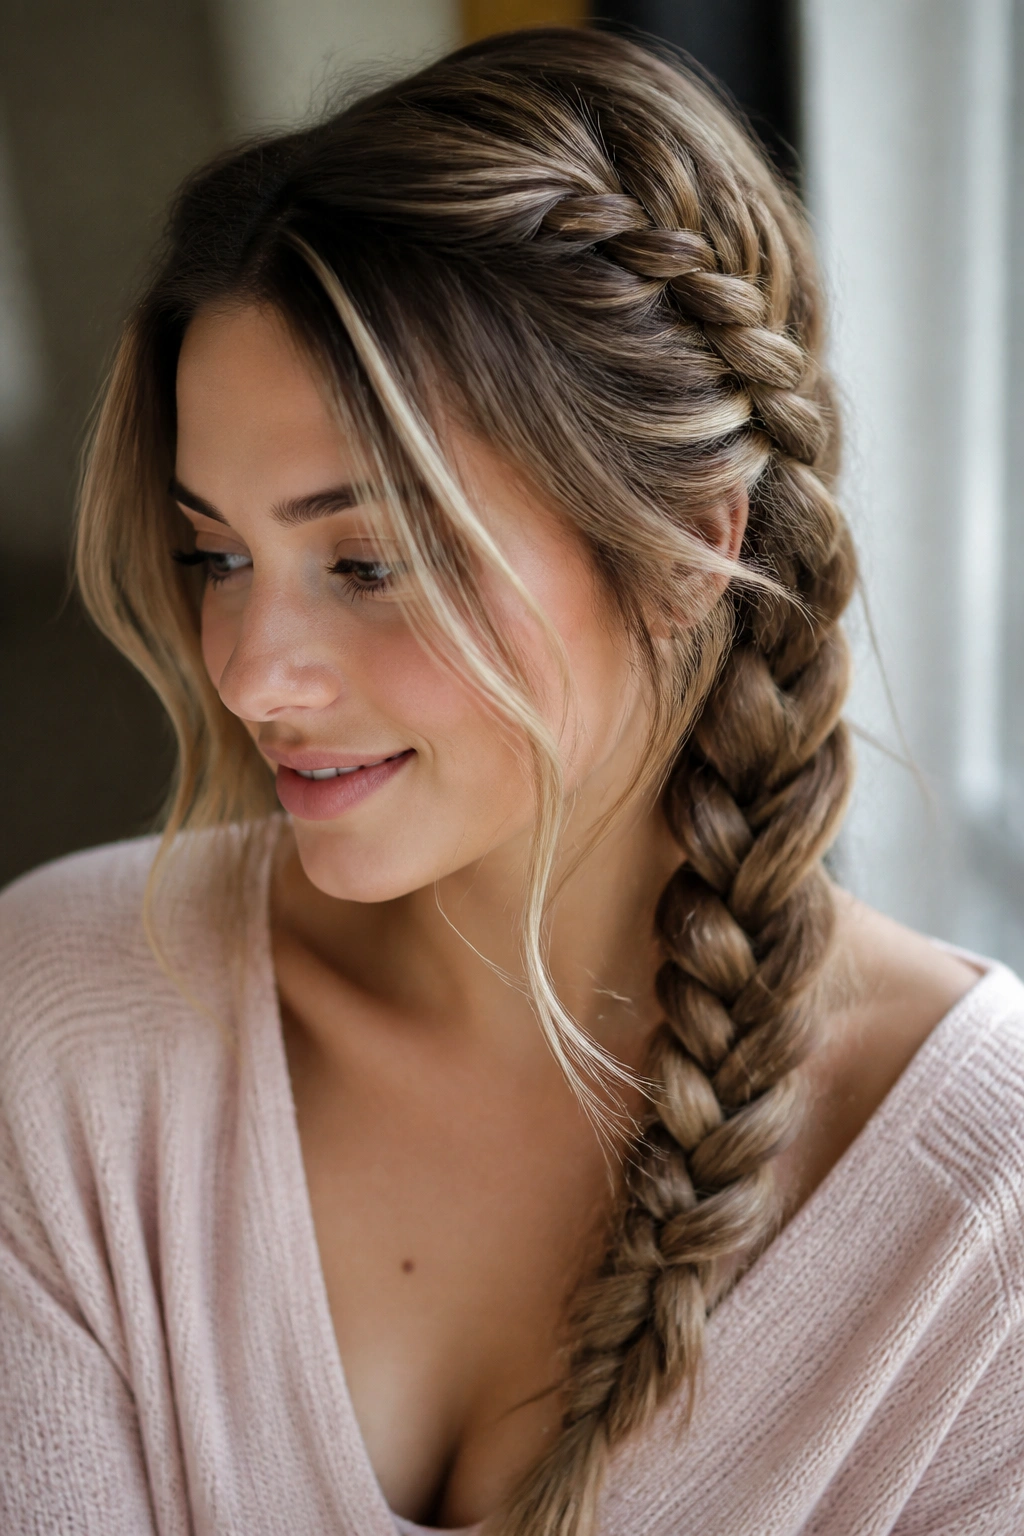
Want something polished that still leaves a little softness around the face? A French side braid does that job beautifully. It starts closer to the crown than a regular side plait, then drifts downward toward one shoulder, which gives the whole style a gentle diagonal shape.
The trick is not to braid too close to the hairline. Leave a narrow veil of hair near the temples, then tuck a few wispy pieces free around the cheekbones. Those little strands keep the style from looking hard. Too many people pull them out after the braid is done and end up with a frizzy mess. Easier to plan for softness from the start.
How to Wear It Without Losing Softness
If your hair is layered, braid a little tighter through the top third so shorter pieces stay in place. Once you hit the middle of the head, widen the braid a touch and let the tail rest over the shoulder. A light mist of flexible hairspray is enough. You want hold, not shell.
4. Rope Twist Side Braid for Thick Lengths
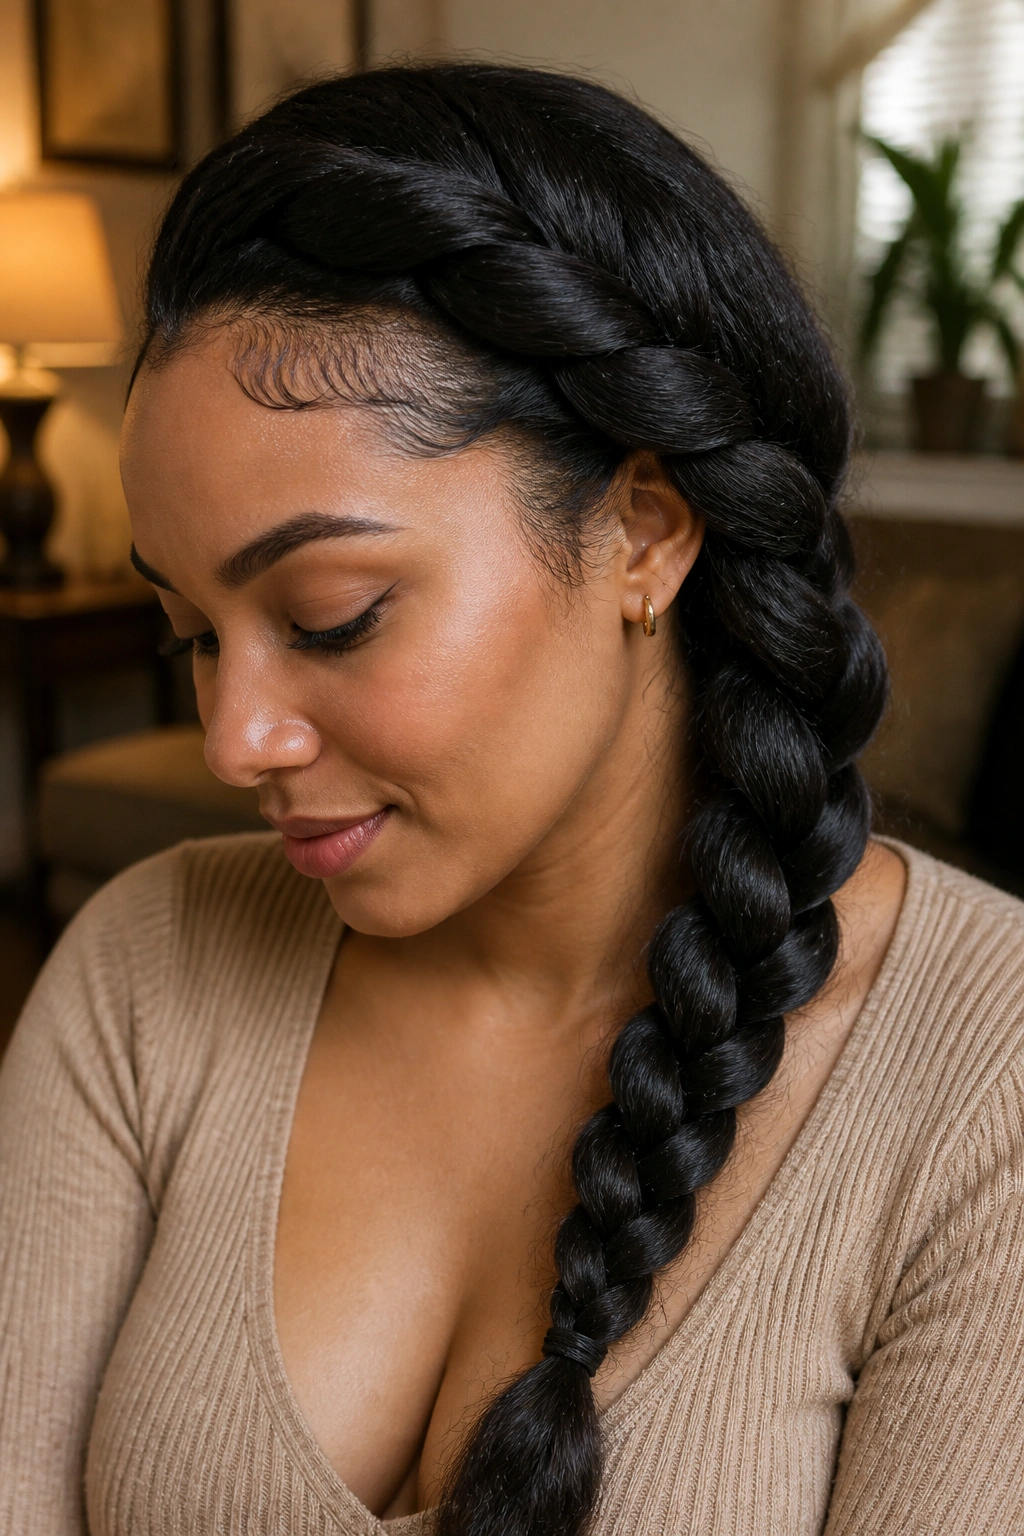
If you’ve ever started braiding thick hair and felt your fingers cramp halfway through, a rope twist is a welcome escape hatch. It uses two sections instead of three, so the motion feels cleaner and faster. The finished braid looks polished, but not fussy.
Twist both sections in the same direction, then wrap them around each other in the opposite direction. That opposite movement is what locks the style together. Get that part wrong and the twist loosens while you walk around. Get it right and the braid stays neat for hours.
- Works well on dense, heavy hair that wants to puff up.
- Needs a firm hold elastic at the end because the twist can unwind.
- Looks best when draped low, close to the shoulder line.
Best part: it gives thick hair shape without piling on more bulk. Sometimes that’s the whole win.
5. Pull-Through Side Braid with Big Loops
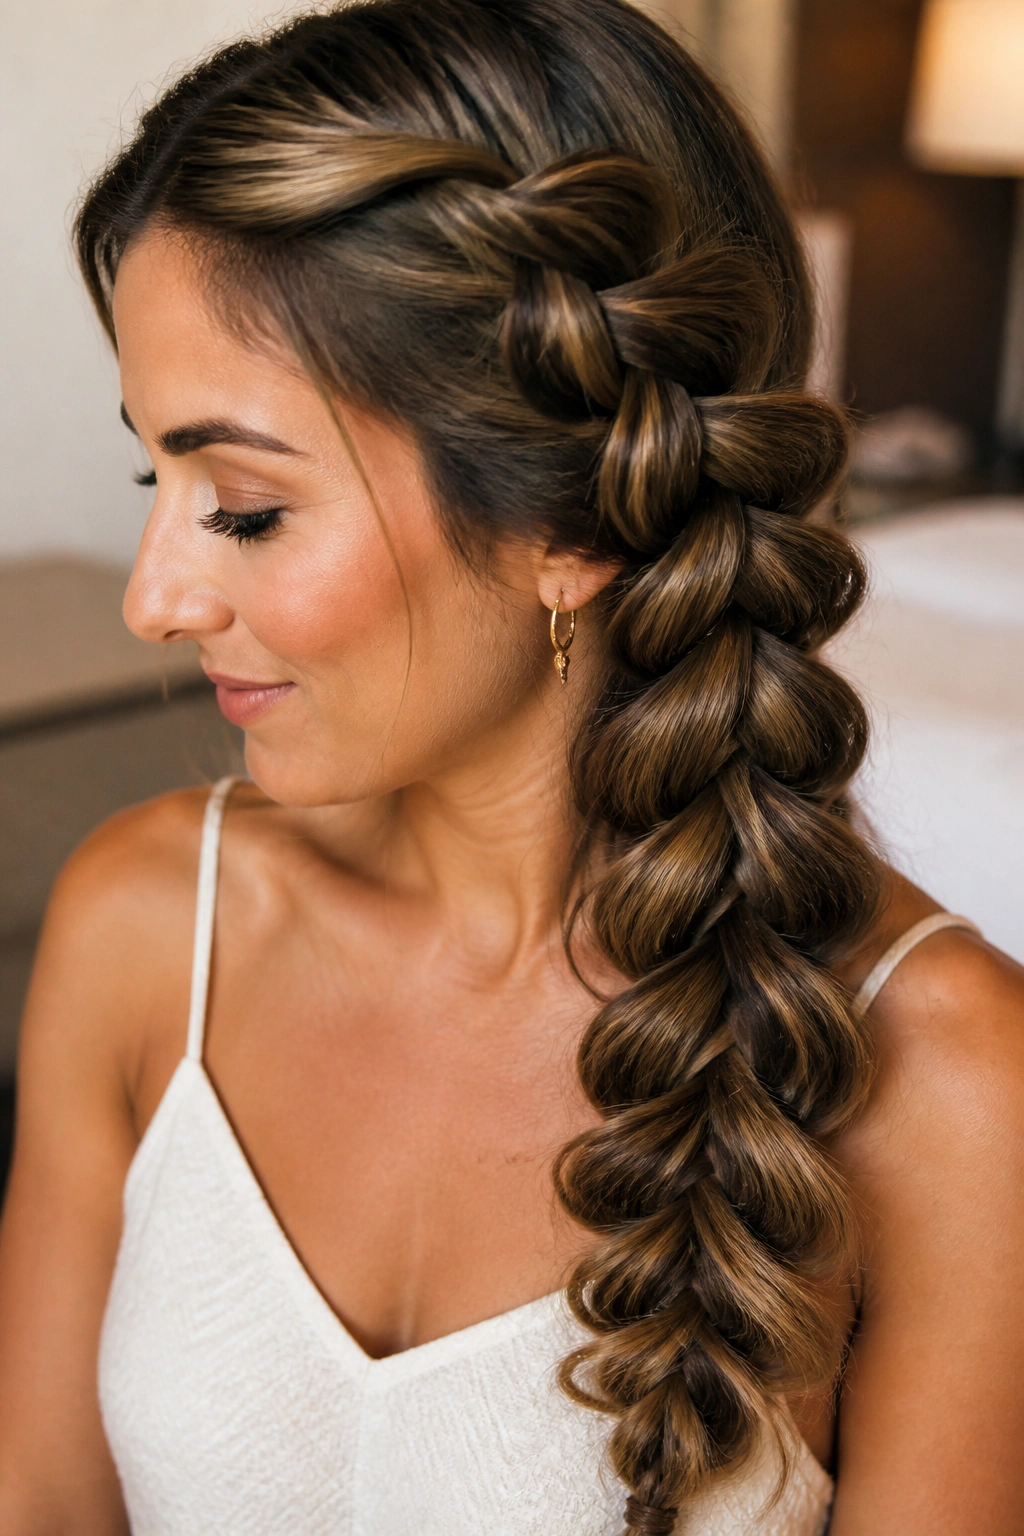
The pull-through braid is part braid, part ponytail trick. It is not technically a braid in the classic sense, and I think that’s why so many people love it. You get all that dramatic size without having to weave three sections for five straight minutes.
The setup is simple: make a row of small ponytails down one side, then split and pull each one through the next. Use tiny elastics, ideally clear or close to your hair color, because bulky bands will show through and make the whole thing look clumsy. A little teasing at the crown helps if your hair is fine. If your hair is thick, skip the teasing and keep the loops wide instead.
This is one of those styles that looks expensive when the loops are deliberately sized. Don’t yank them apart like you’re trying to win a race. Pull each loop open with your fingertips, then stop. The braid should look soft and full, not shredded. It’s a good choice for parties, photos, and any day when you want long hair to look even longer.
6. Side Braid into a Low Ponytail
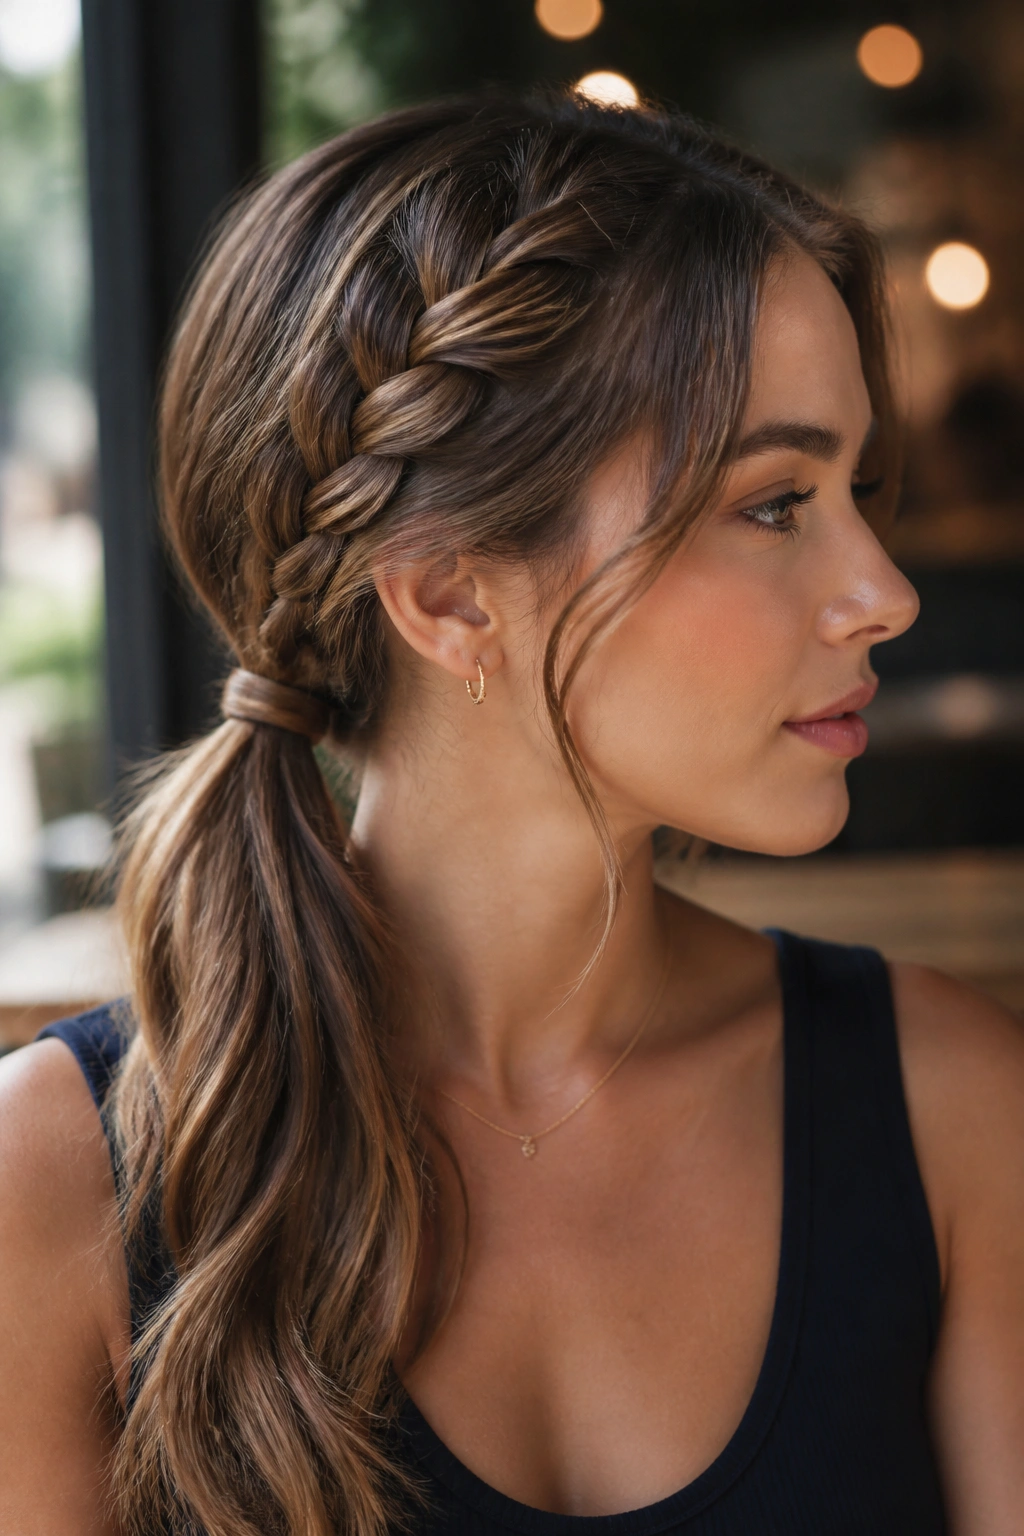
Unlike a full braid that swallows the whole length, this style keeps the braid at the front and lets the ponytail do the rest. That makes it a smart middle ground for long hair. You get a clean sweep off the face, but you still keep movement in the tail.
The braid usually begins at the side part and ends just behind the ear. From there, gather the rest of the hair into a low ponytail and smooth the top lightly with your hands. If you want it sharper, wrap a thin strand of hair around the elastic. If you want it softer, leave a few ends loose around the neck.
I reach for this one on warm days and busy mornings. It stays comfortable under a jacket collar, which matters more than style blogs admit. A lot of long hairstyles look cute until you put on a coat. This one survives real life.
7. Side Braid Wrapped into a Low Bun

A side braid into a low bun looks more complicated than it is. Braid one side first, then coil the remaining length into a bun near the nape or just behind one ear. The braid becomes the decoration and the bun does the practical work.
Where the Bun Sits
Keep the bun low enough that it doesn’t fight the braid. If it sits too high, the style gets top-heavy and starts to look like it’s sliding backward. A bun that nests close to the neck feels steadier and flatter.
- Use 2 or 3 U-pins instead of one oversized clip.
- Tuck the ends under before you pin, not after.
- Leave the braid a little loose at the edges for width.
My rule: secure the bun first, then tug the braid slightly wider. If you do it the other way around, the shape falls apart while you’re trying to pin it.
8. Waterfall Side Braid on Wavy Hair
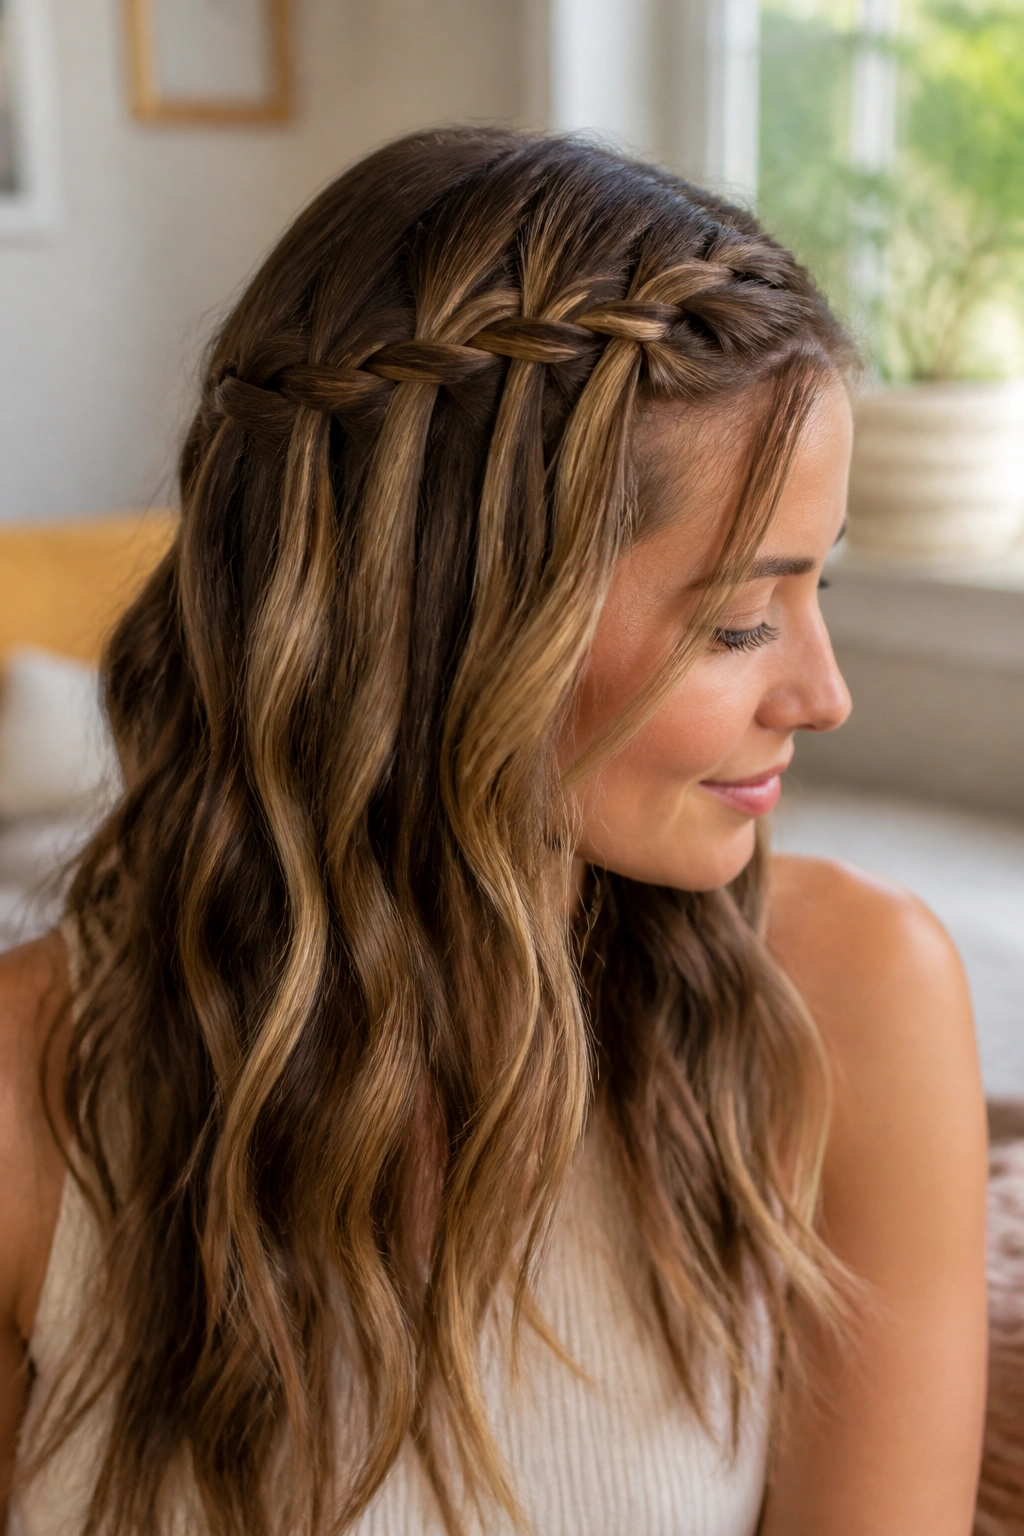
The waterfall braid is the one style here that really likes movement. Flat, pin-straight hair can work, but waves give it the layered effect that makes the pattern pop. The dropped strands create a soft line along the side of the head, almost like the braid is floating over the rest of the hair.
The technique is simple once you stop overthinking it. Each time you cross a section, let one strand fall through and pick up a fresh piece behind it. That creates the “waterfall” look. Keep the braid loose enough that the released pieces can hang instead of getting trapped in the weave.
A light texturizing spray helps more than heavy cream here. Too much slip and the braid slides. Too much oil and the strands lose definition. You want a little grip, a little bend, and enough shine that the dropped sections still look intentional. It’s a lovely choice for soft events, half-up styling, or any day when you want the braid to feel airy rather than strict.
9. Side Crown Braid for Long Layers
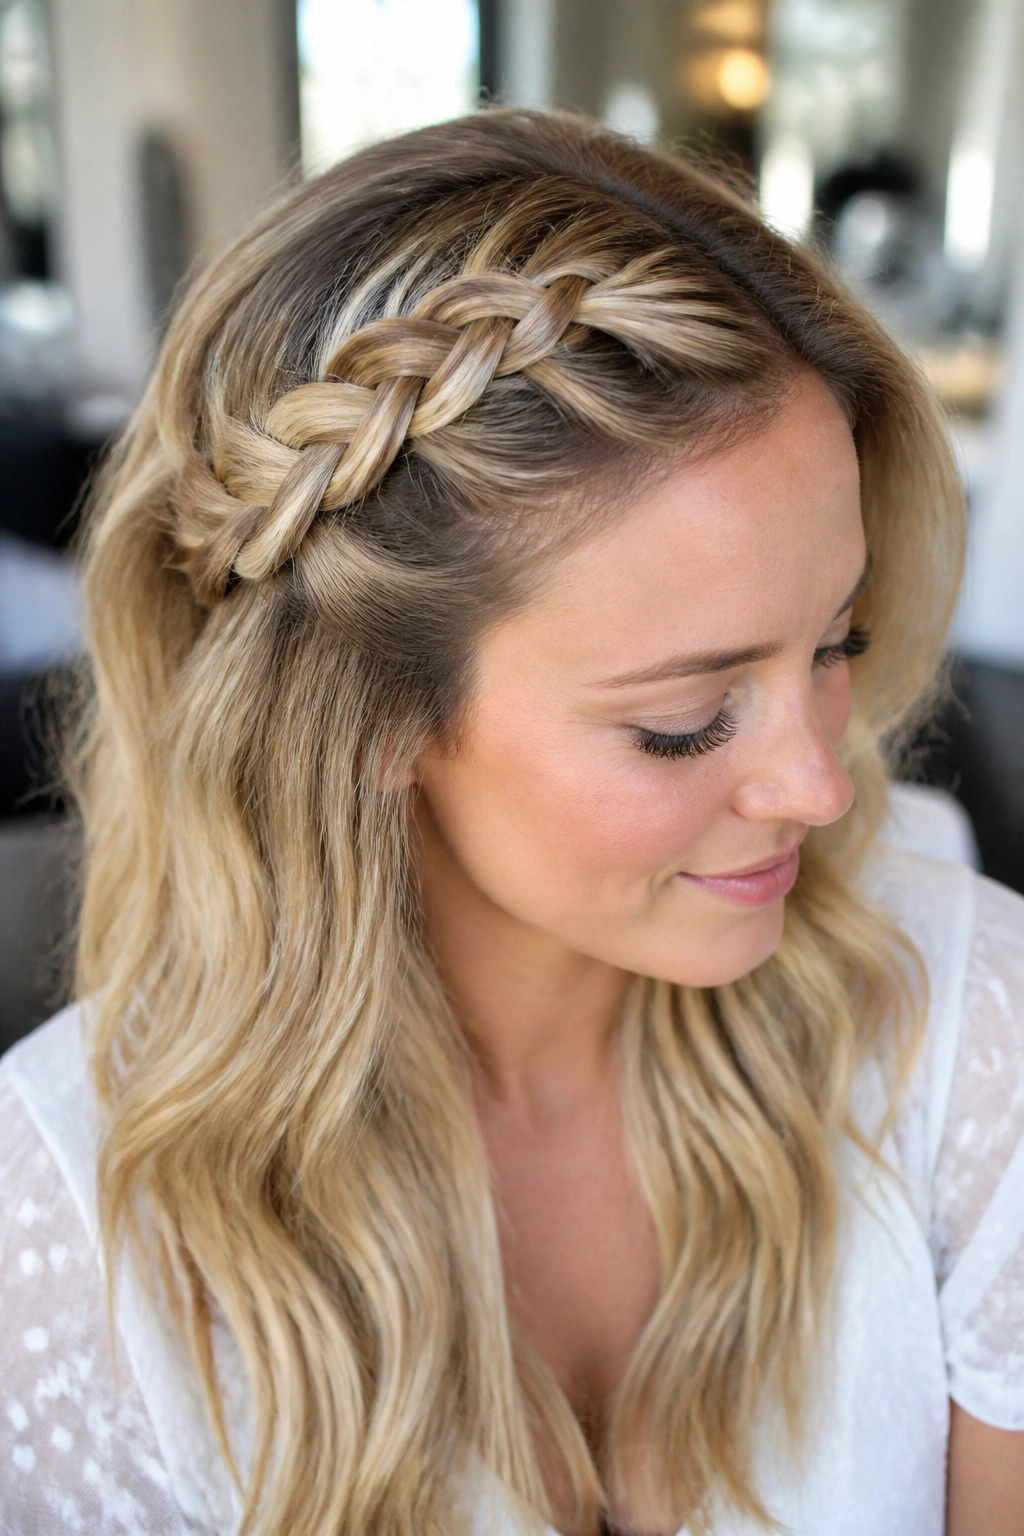
Do your layers fall out of side braids by lunchtime? A side crown braid fixes a lot of that. Because it starts higher along the hairline and curves around the head, more of the shorter pieces get caught early, which means less escaping later.
The braid doesn’t have to circle the whole head to count as a crown style. You can run it from one temple, along the top, and pin it behind the opposite ear. That angle gives the look a little lift and keeps heavy long hair from dragging everything flat. If your hair is thick, braid smaller sections so the plait hugs the head instead of puffing outward.
How to Keep Short Pieces In
Use a tiny amount of styling gel or cream at the front before you start. Not a blob. Just enough to smooth the first inch near the roots. Then braid with steady tension and pin any stubborn layers with bobby pins hidden under the weave.
10. Micro Side Braids Blended into One Big Plait

A few tiny braids at the front change the whole mood. That’s the charm of this style. You braid two or three small pieces near the temple, then fold them into a larger side plait so the front reads textured and the length still feels soft.
I like this on second-day hair because the little braids grab onto slightly lived-in texture better than squeaky-clean strands. They also give you a chance to play with shape without committing to a fully tight braid. The result feels a little more interesting than a plain side braid, but not so busy that it starts competing with your face.
- Keep the micro braids pencil-thin.
- Use 3 tiny elastics at most.
- Add a slim cuff or two only at the ends if you want more finish.
It looks intricate from a few feet away. Up close, it’s mostly smart sectioning and patience. That’s the sweet spot.
11. Four-Strand Side Braid with Extra Texture
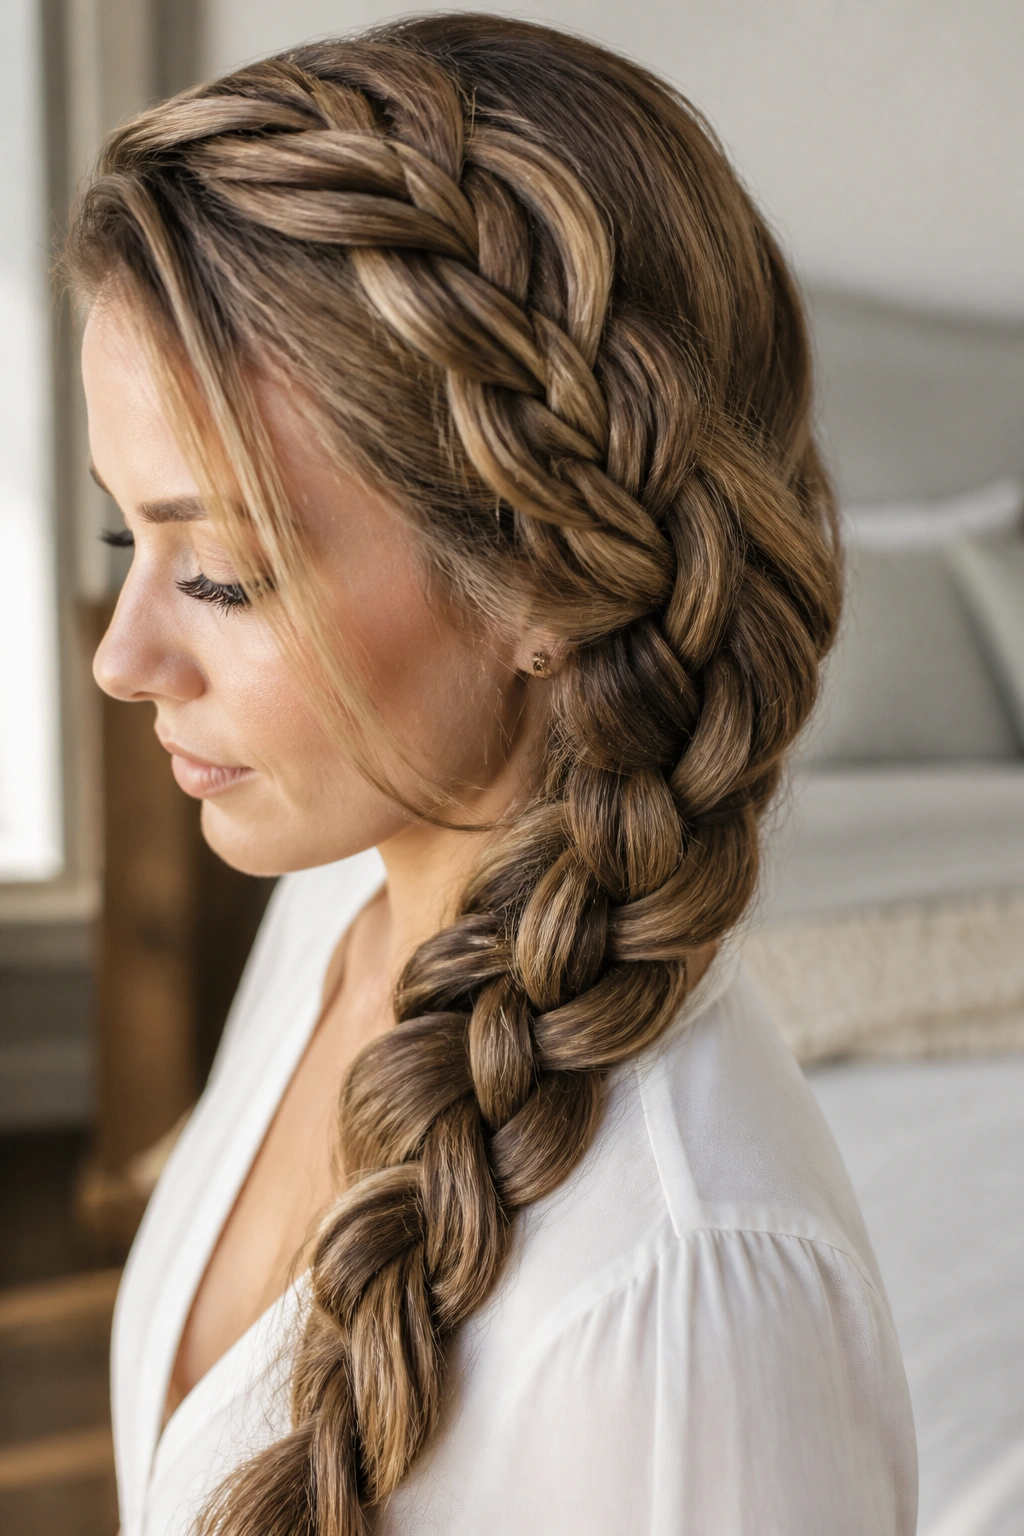
A four-strand braid is the style I like when a regular braid feels too common and a fishtail feels too fussy. The weave lays flatter, the pattern looks richer, and long hair shows every line. On thick lengths, the extra strand gives the braid a ribbon-like surface that feels polished without getting stiff.
The finger work takes a minute to learn, but the payoff is worth it. Once you have the strands separated, the braid repeats in a steady rhythm. Outer over inner, inner across, then back again. It sounds more complicated on paper than it feels in your hands. After a few passes, the motion starts to click.
It is worth learning. Especially if your hair is long enough to show the pattern for more than a few inches.
This braid looks best when the ends stay smooth. A tiny bit of shine cream through the last 4 to 5 inches keeps the finish neat, and a snug elastic helps the structure hold. If your hair is very silky, braid a little tighter than you think you need. Otherwise the strands can drift and flatten before the style has a chance to show off.
12. Ribbon-Woven Side Braid
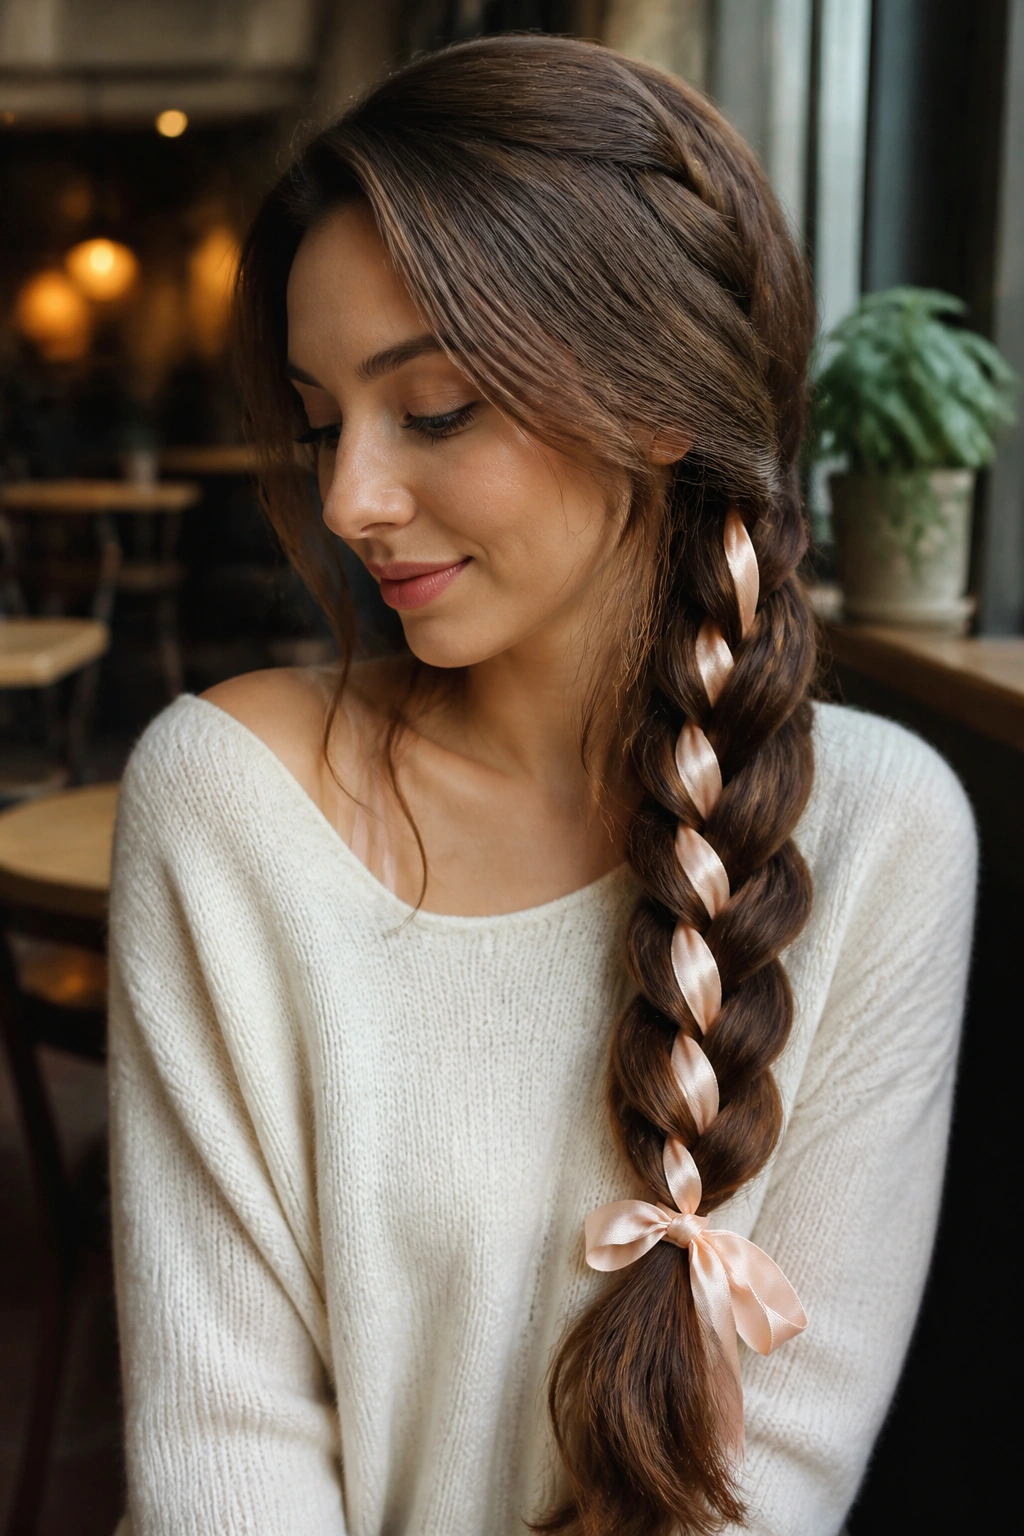
Unlike a plain braid that depends on hair alone, a ribbon-woven side braid lets you control color without changing your hair at all. That makes it a smart choice when you want the style to feel finished, festive, or a little more personal. A 1/4-inch satin ribbon works well because it folds neatly without adding bulk.
Thread the ribbon into the braid near the top, then let it run through the rest of the length. Keep it flat as you weave. If the ribbon twists constantly, the braid starts to look messy in a way that feels accidental. A clean ribbon line gives the whole style a sharper outline.
I’d reach for this on occasions where the outfit needs one more detail. Not because the braid is lacking. Because the ribbon gives you control over the mood. Soft blush, deep navy, black velvet, even a thin metallic strand if you want the braid to read more dressed up. The style itself stays the same; the finish changes completely.
13. Beaded Side Braid for a Stronger Finish

Beads change the mood fast. A side braid with beads feels more deliberate than a braid left bare, especially when the beads sit near the ends and let the length move freely. On long hair, that small weight also helps the braid hang straighter.
What to Add
- Wooden beads give the braid a grounded, matte look.
- Metal cuffs catch the eye without covering the plait.
- Small shell or bone beads work best when the braid is fairly thick.
- Tiny rings can add detail, but use them sparingly.
Keep the hardware in the lower third of the braid so the roots stay comfortable. Too much weight near the scalp is annoying by noon, and it pulls the braid down in a way that feels wrong. I also prefer fewer beads over many tiny ones. A cleaner finish usually looks better and is easier to sleep in if you wear the style overnight.
This is one of those looks where restraint pays off. The braid should still be the star.
14. Side Braid on Curly Hair with Soft Volume
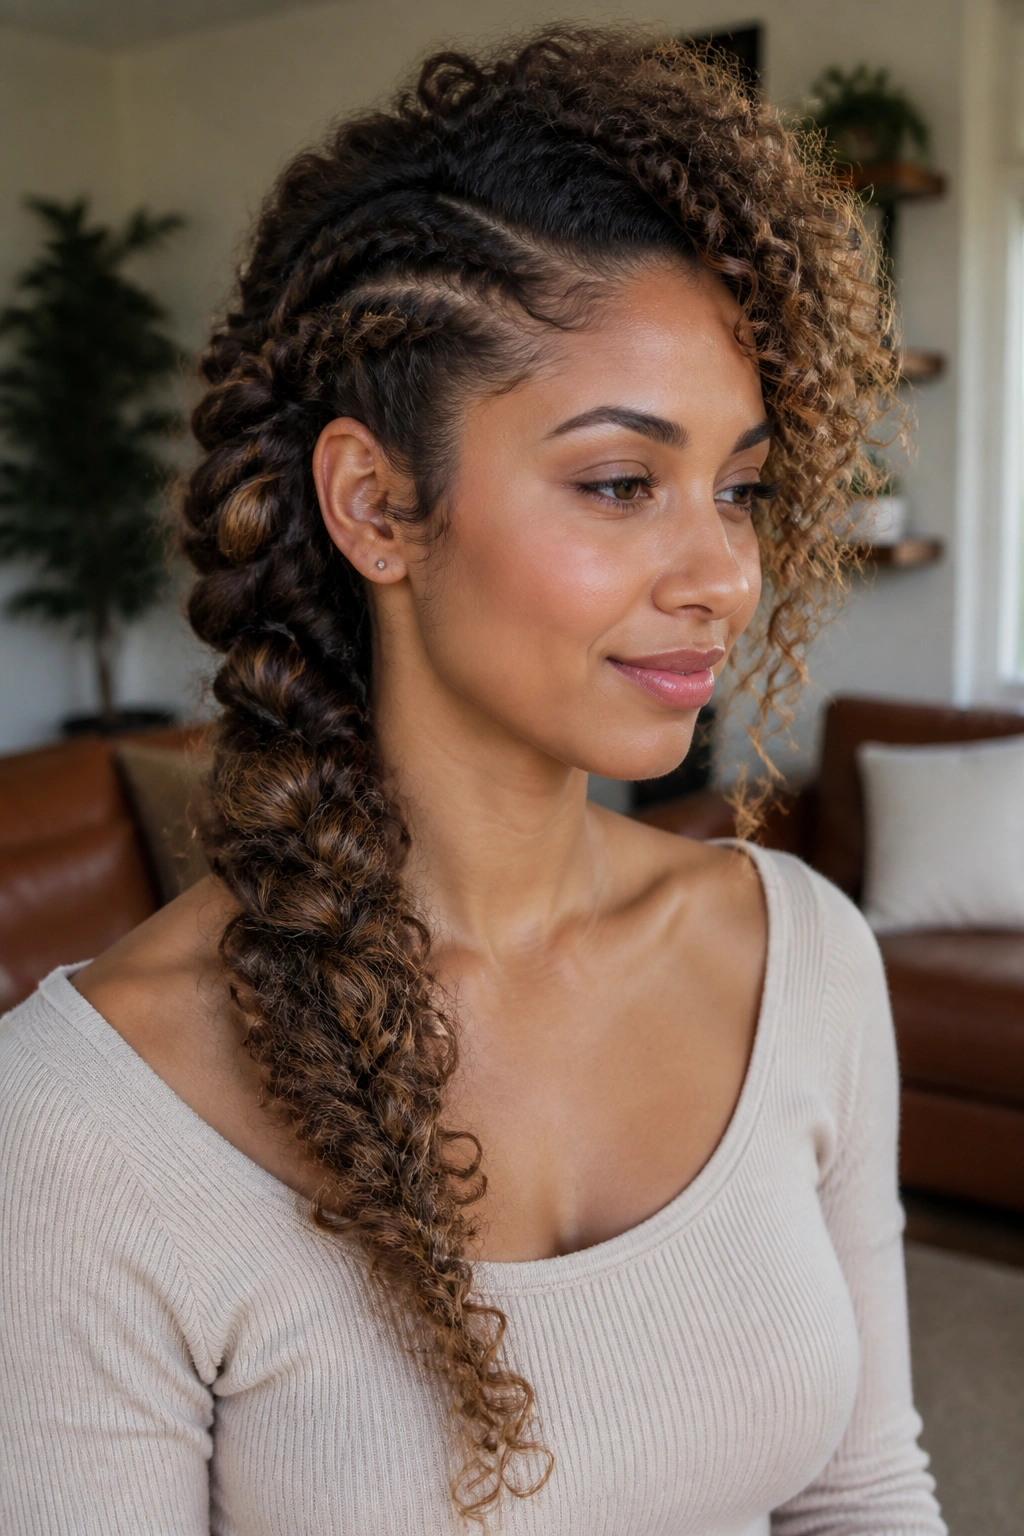
Curly hair makes side braids look fuller from the start, which is half the battle. You do not need to smooth every curl into a flat sheet to make this work. In fact, trying to erase texture usually makes the style look flat and a little tired.
The better approach is to keep the curls defined and lightly stretched before you braid. Use leave-in on the mids and ends, smooth the roots with your hands, and let the braid follow the natural bend of the hair. If you have tighter curls, a twist-out or braid-out texture gives the side braid a nice grip without turning it rigid. The shape feels soft, but the braid still holds.
I like the way this style behaves around the face. The volume keeps the braid from looking thin, and the side placement gives the curls a place to fall without puffing everywhere. A dab of gel at the hairline and a little cream through the lengths is enough. Any more, and the curls can lose that airy finish that makes the style so good in the first place.
15. Feed-In Side Braid for a Smooth Start
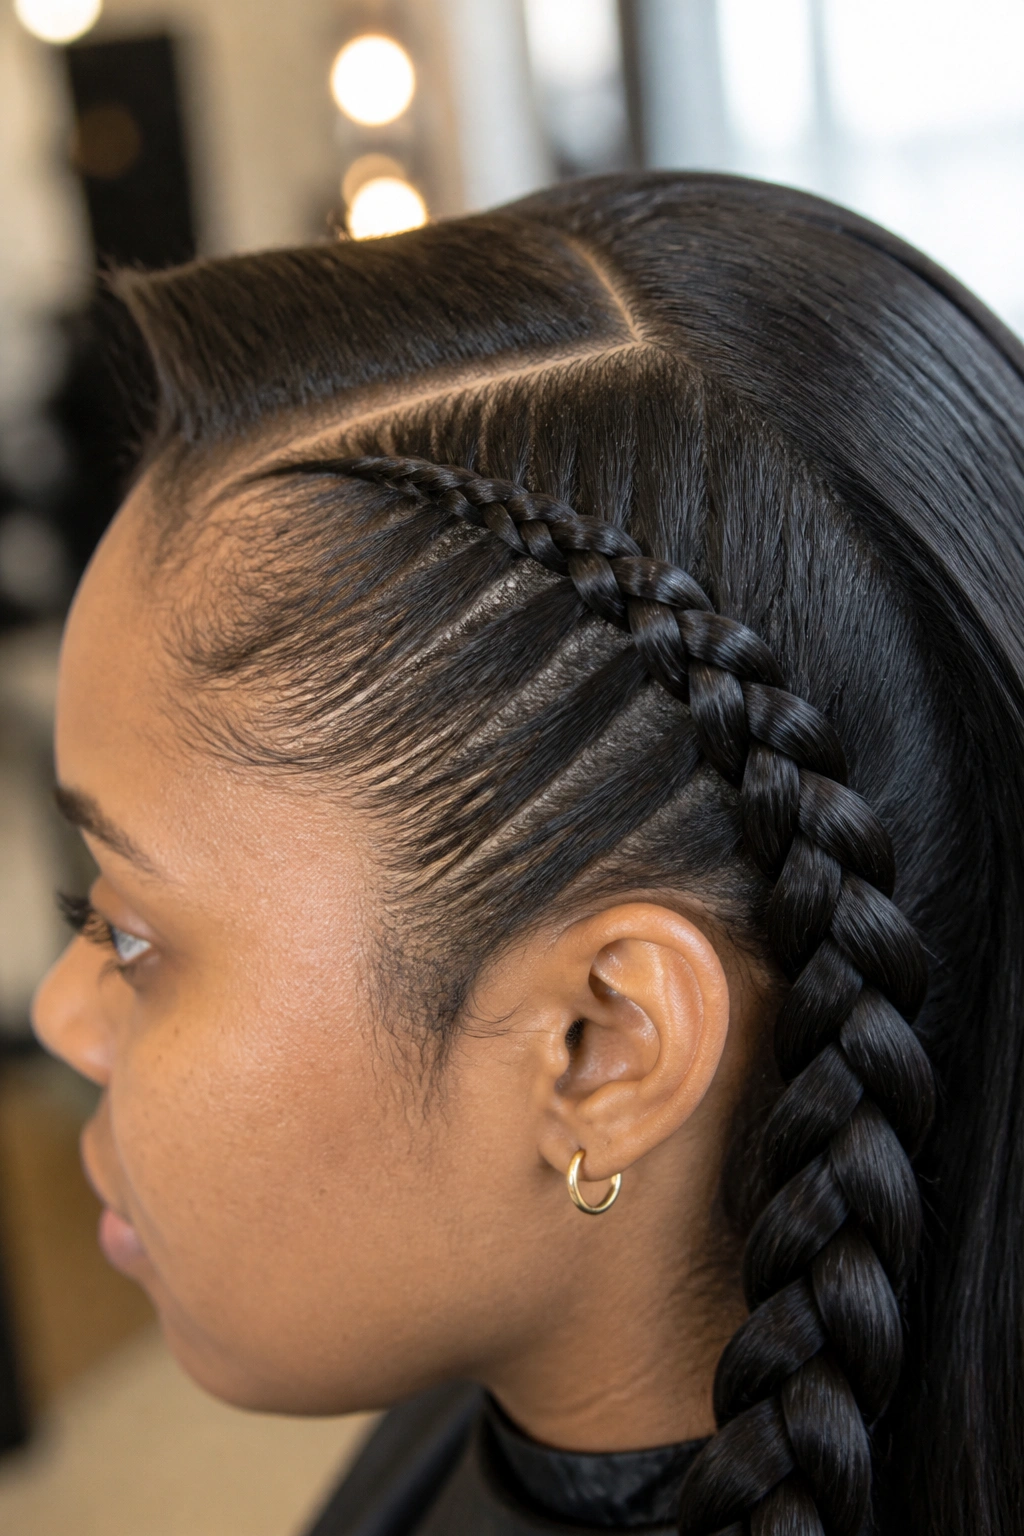
Want the braid to look like it grows straight out of the scalp instead of sitting on top of it? A feed-in side braid does exactly that. The start is slim, controlled, and close to the head, then more hair gets added gradually as the braid moves toward the shoulder.
How to Use It
Begin with a tiny starting section near the part, then add hair a little at a time as you braid down the side. Keep the first inch especially neat. That smooth beginning is what gives the style its polished, stitched-together look. If you rush the feed-in part, the braid gets bulky near the temple and loses the clean taper.
This is a good choice for long hair that needs a more protective feel. The scalp area stays tidy, and the braid lies close to the head instead of pulling outward. I also like it because it looks controlled without looking severe. That balance is hard to get. You can wear it to work or dress it up with cuffs and still keep the shape intact.
16. Stitch Braid Swept to One Side
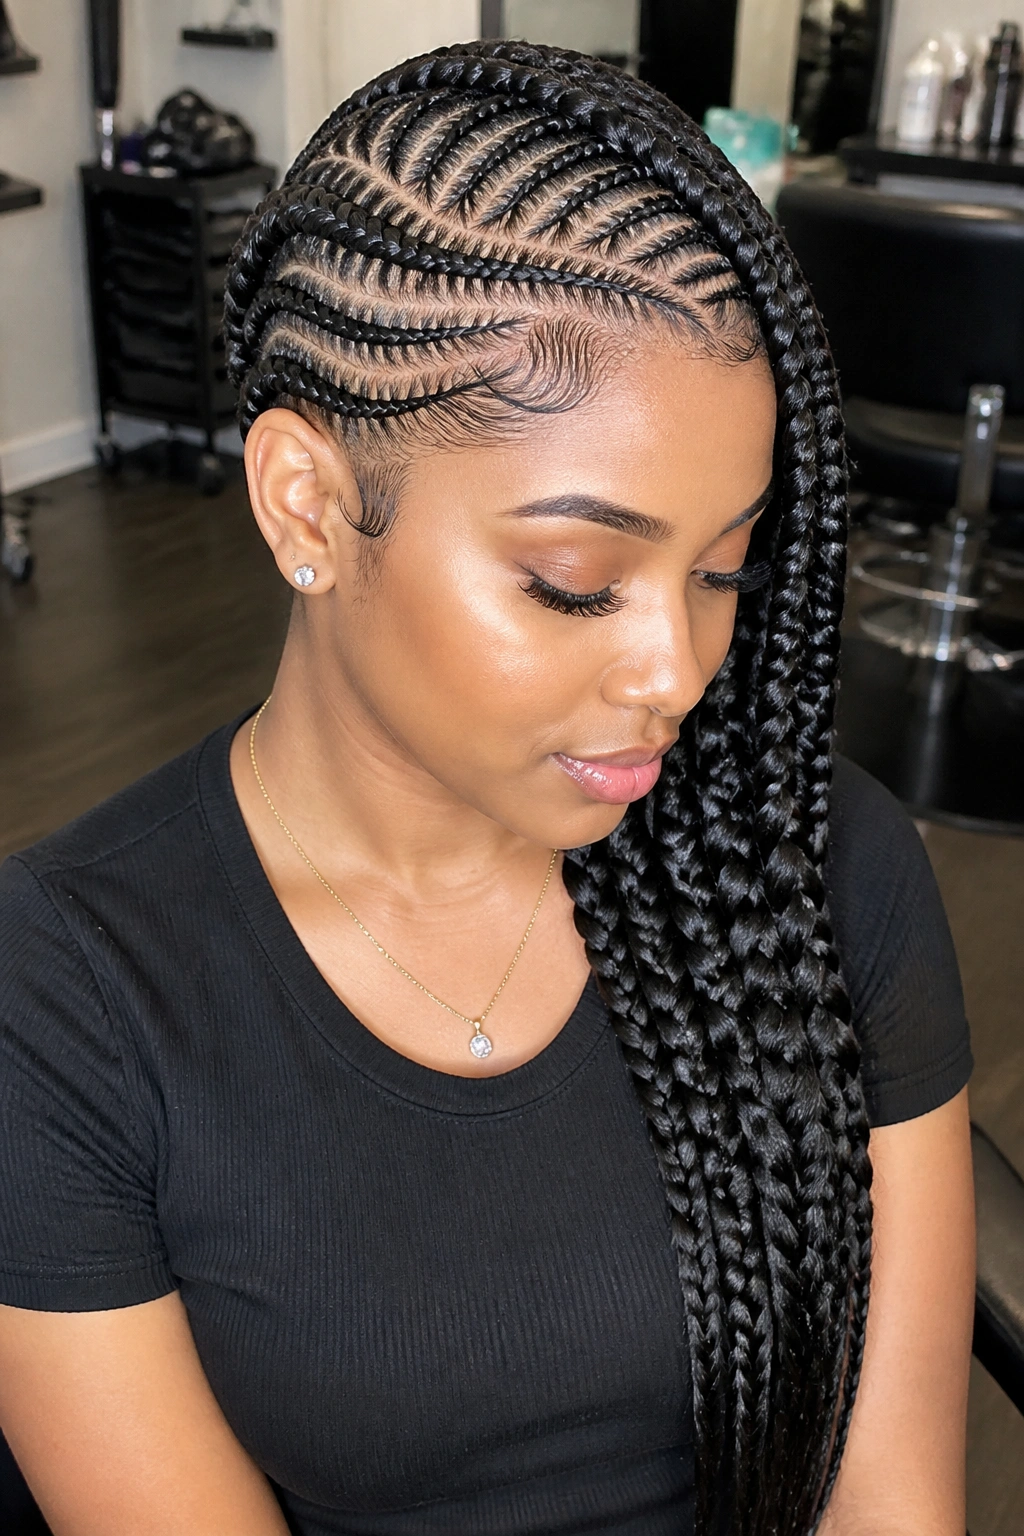
If you like neat part lines, a stitch braid is satisfying in a slightly obsessive way. The braid has those little horizontal “stitches” created by clean sectioning, and when it’s swept to one side, the whole look feels crisp from root to end.
The setup matters more here than in a loose braid. You need a tail comb, a bit of gel, and enough clips to keep the hair separated while you work. Each section should be clean and narrow, almost like you’re drawing on the scalp. The result has more structure than a soft French braid and more edge than a simple side plait.
- Best on hair that can hold a sharp part.
- Works well with extensions or added hair.
- Lasts longer when the roots are smoothed with gel before braiding.
This is not the braid you throw together while half-awake. It asks for a little focus. But the finish rewards that attention.
17. Half-Up Side Braid for Long Layers
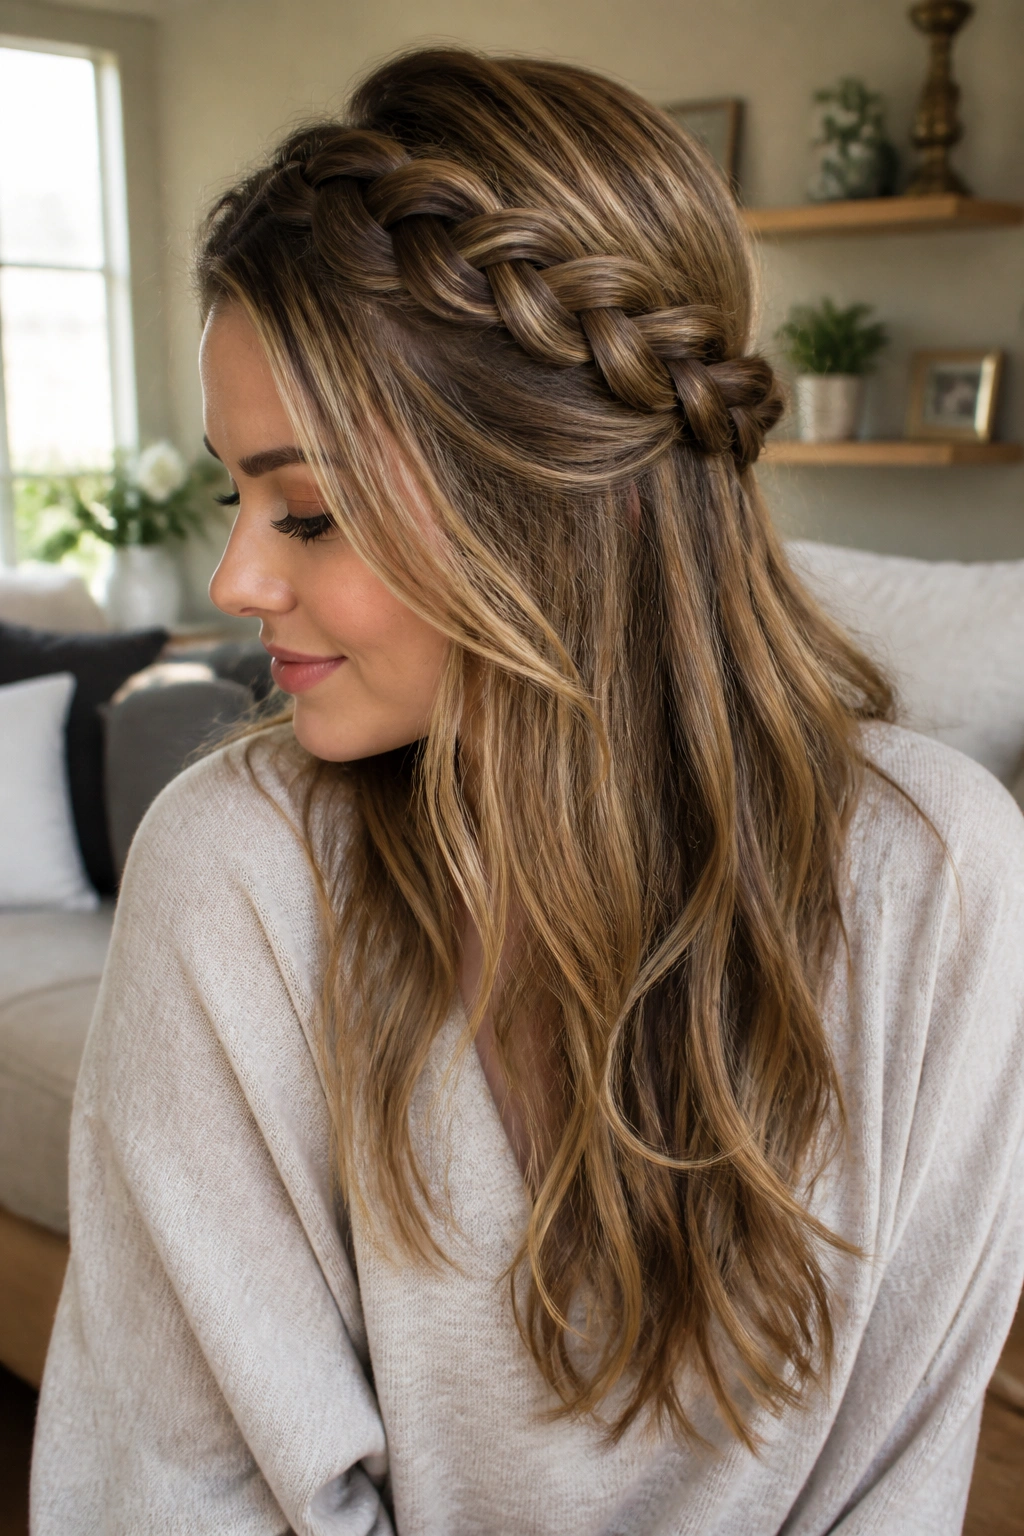
The half-up side braid is the quiet workhorse of the group. It keeps the top and front of the hair under control, but leaves the rest of the length down where it can move. That makes it especially useful for heavy hair, because it takes some weight off the crown without forcing the whole head into an updo.
I like this style on day-two waves and soft blowouts. The texture helps the braid grip, and the loose lengths below the braid keep the look from feeling too formal. Start at one temple, braid back toward the center or slightly lower to one side, then secure it and let the rest fall. You can tuck the end behind the ear or leave it sitting over the shoulder.
It also plays nicely with layers. Instead of fighting them, the half-up shape lets them do a little work. Shorter pieces near the front can fall free, and the braid still holds the top line together. That makes the style forgiving, which is rare. Some braids demand perfect hair. This one does not.
18. Asymmetrical Side Braid with a Clean Tail
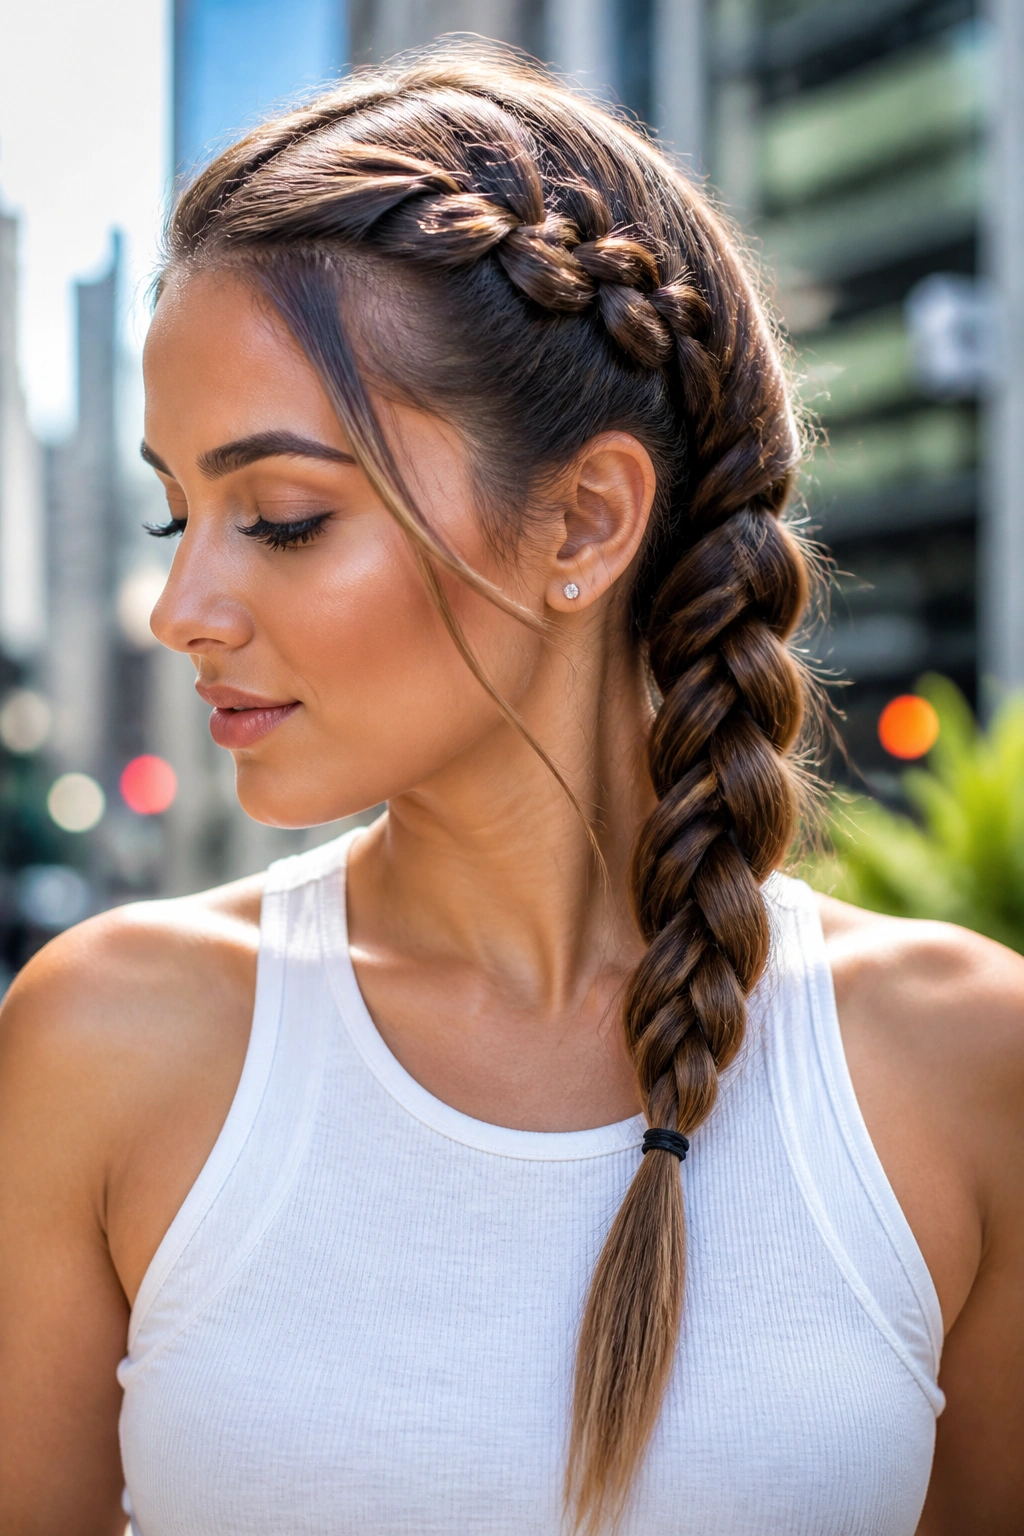
Unlike the wide, soft braids above, this one stays lean. The braid starts high on one side, runs diagonally across the back, and ends in a smooth tail that feels deliberate rather than romantic. I reach for it when I want a braid that looks sharp and slightly modern.
The clean tail is what makes it work. Keep the braid compact, then leave the final length sleek instead of puffed out. A tiny elastic and a little serum on the last few inches are enough. If you want, wrap a thin strand of hair around the base so the finish feels cleaner. Not fussy. Clean.
This is the one I’d save if I only wanted a single style from the whole list. It handles a commute, a meeting, and dinner without falling apart, and it doesn’t ask for much once it’s set. Long hair can sometimes feel like a lot. This braid trims the noise down and leaves the shape.
