



Curly updo hairstyles for volume work best when you stop trying to make curls behave like straight hair. The second you build the style around lift, spring, and a little controlled mess, the whole thing looks bigger and more alive.
The mistake I see most often is obvious: too much smoothing, too much pulling, too much fear of a stray curl. Flat roots kill the look. Fast. A few inches of height at the crown, a soft anchor at the nape, and a couple of curls left free around the face usually do more for volume than a mountain of hairspray ever will.
I’ve always liked updos that look as if they were shaped by hand, not lacquered into place. They feel easier to wear, and they photograph the same way they look in person — soft, full, and not glued to the scalp. A good pin placement can change everything. So can a 1-inch section of lift at the crown.
The styles that follow lean into that idea. They keep the texture visible, protect the shape of the curl, and give the hair room to stand up instead of lying down. Start with the crown, then build the rest around it.
1. High Curly Pineapple Puff
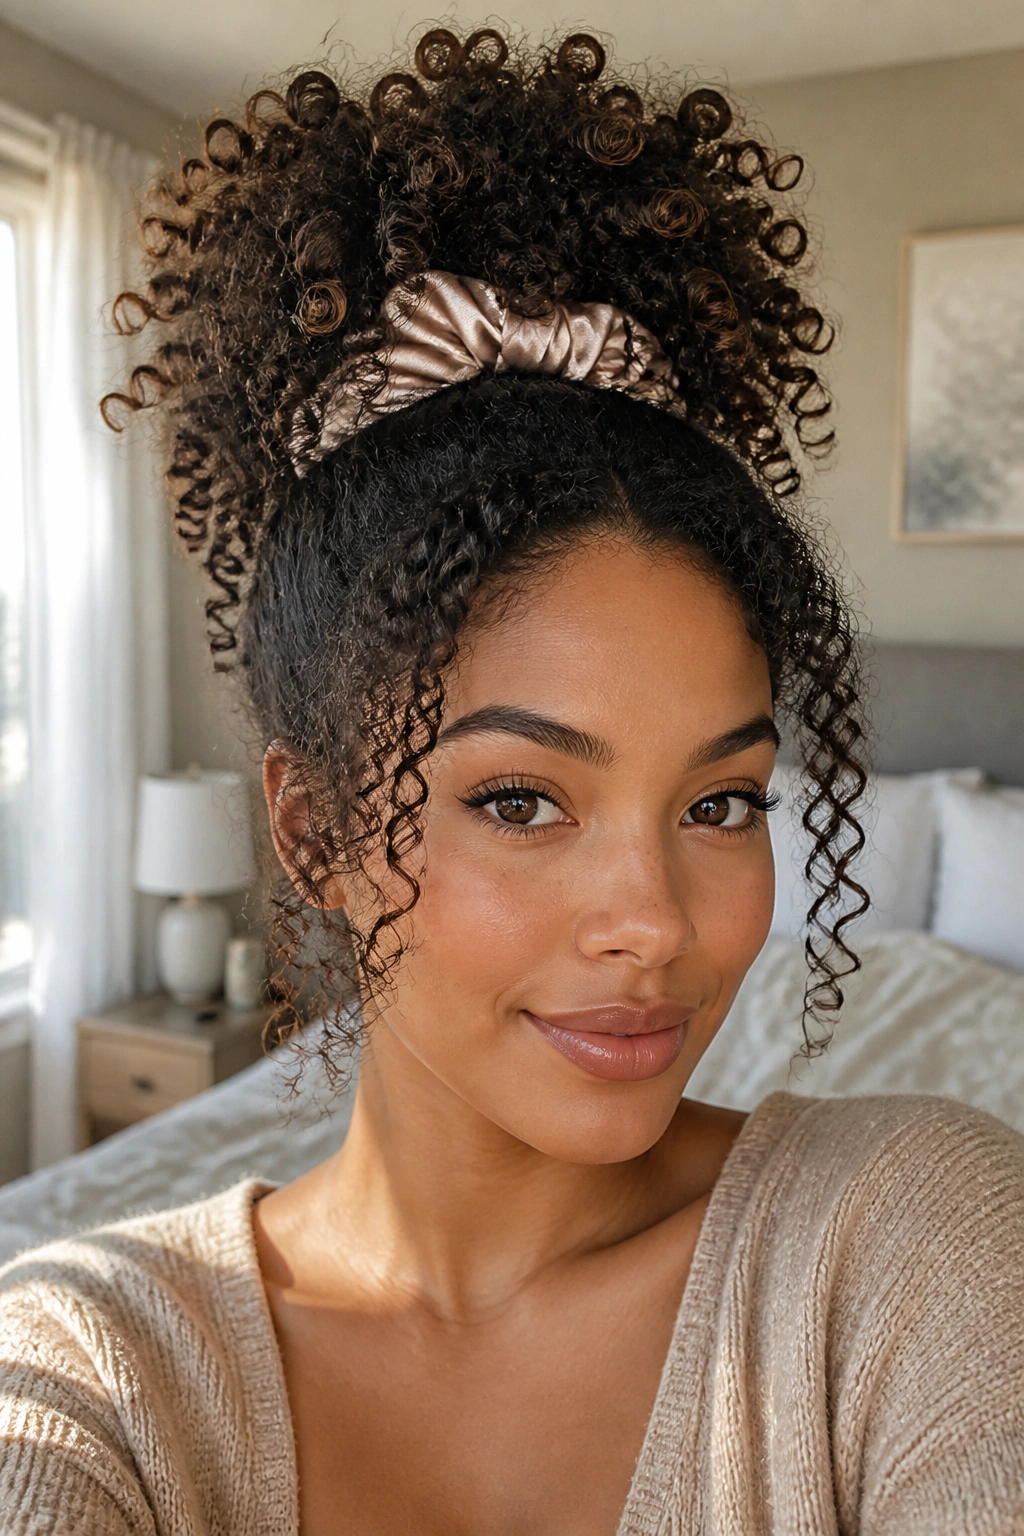
The high pineapple puff is one of those styles that looks casual until you realize how much shape it gives the head. It works because the curls are gathered at the highest point, which pushes the silhouette upward instead of outward. That little change makes a huge difference.
Why It Works at the Crown
Tilt your head forward and gather the hair at the very top, not the middle. The puff should sit where the skull starts to curve back, which gives the whole style a taller profile. Pulling it too low turns it into an ordinary ponytail. Too tight, and the curl pattern gets crushed.
A satin scrunchie is better than a thin elastic here. It holds without slicing into the curl clumps, and it leaves the ends soft and airy. If the front pieces are long, let them hang loose at the temples. That tiny bit of movement keeps the style from looking boxy.
Quick Details
- Best on second- or third-day curls, when the texture has a little grip.
- Use your fingers to gather the hair; a brush makes the roots too slick.
- Leave one or two curl clumps out near the hairline if you want more softness.
- Wrap the scrunchie twice only. More tension means less lift.
Tiny tip: Flip your head back up slowly after securing the puff. That helps the crown keep its height instead of settling flat.
2. Soft Curly Top Knot with Loose Face Pieces
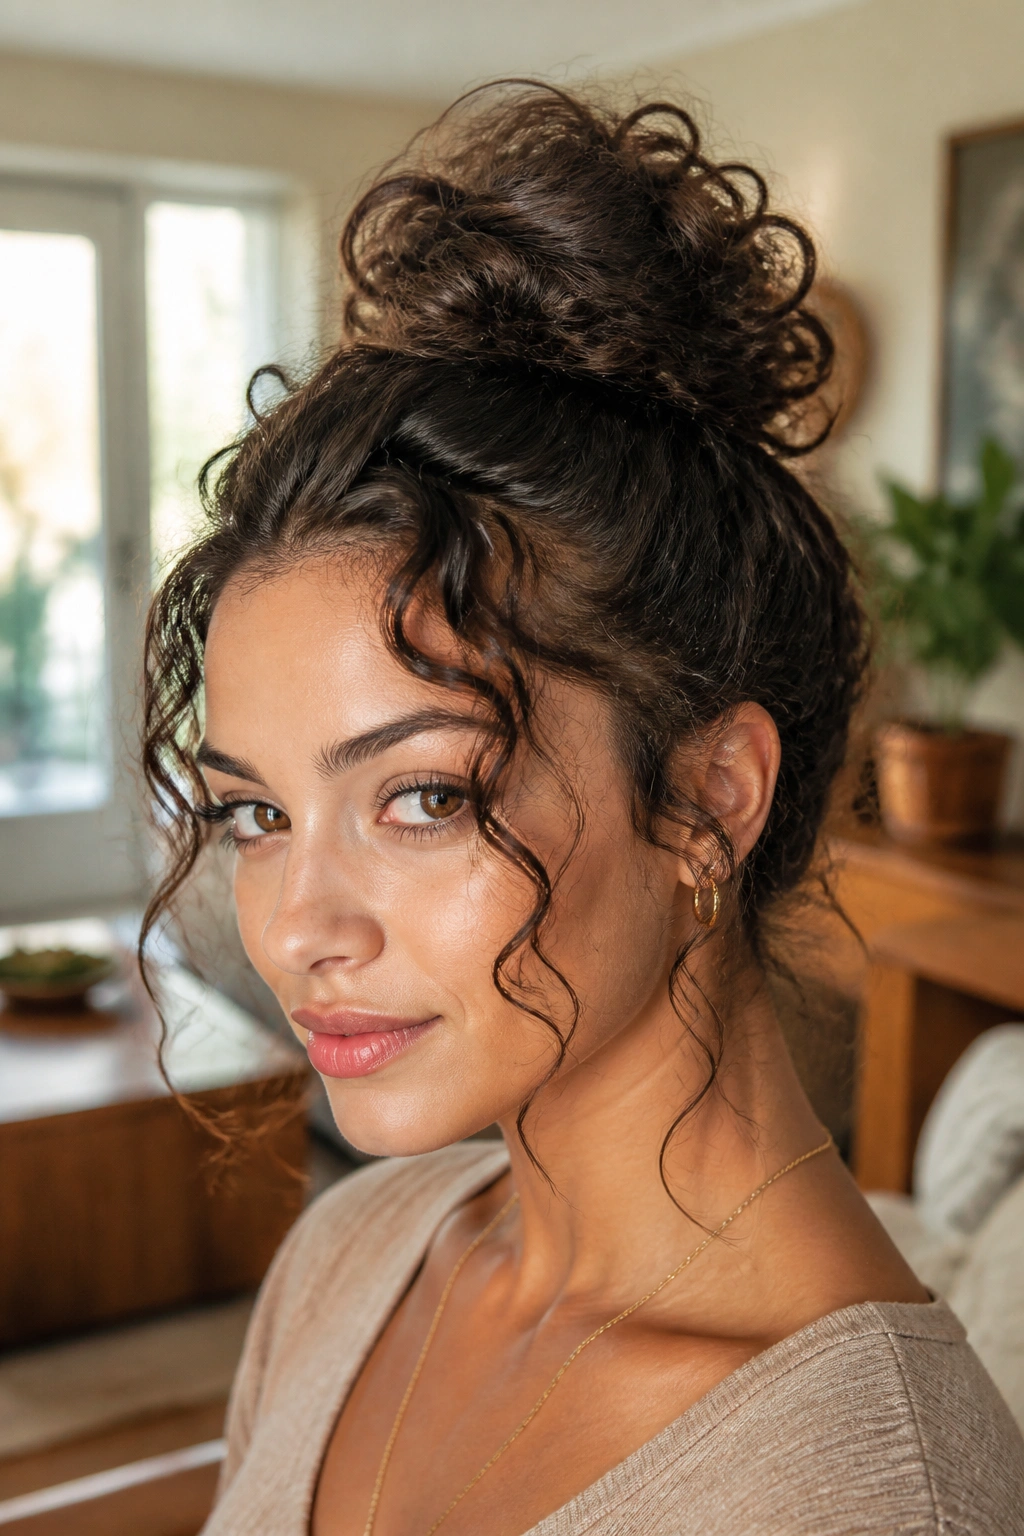
This is the easiest way to get height without looking stiff. The soft curly top knot gives you a clean shape up top, but it leaves enough texture around the edges to keep the style from feeling severe.
Gather only the top third of the hair, twist it once or twice, and pin the tail under itself so the knot sits high and loose. Don’t pull every strand in tight. That’s the trap. The minute the sides get scraped too hard, the whole thing loses its curve and starts looking narrow.
A couple of loose face pieces make the style feel intentional. I like leaving two curls about half an inch wide near the cheekbones, then nudging them forward with a fingertip so they curve instead of sticking straight down. It’s a small move, but it softens the line of the face and gives the knot more visual weight.
This one works especially well if your curls are medium to long and you want something that can go from daytime to dinner without a redo. It’s also forgiving on uneven layers, which is a nice bonus when you’ve got a haircut that refuses to sit still.
3. Crown-Lift French Twist for Coily Hair
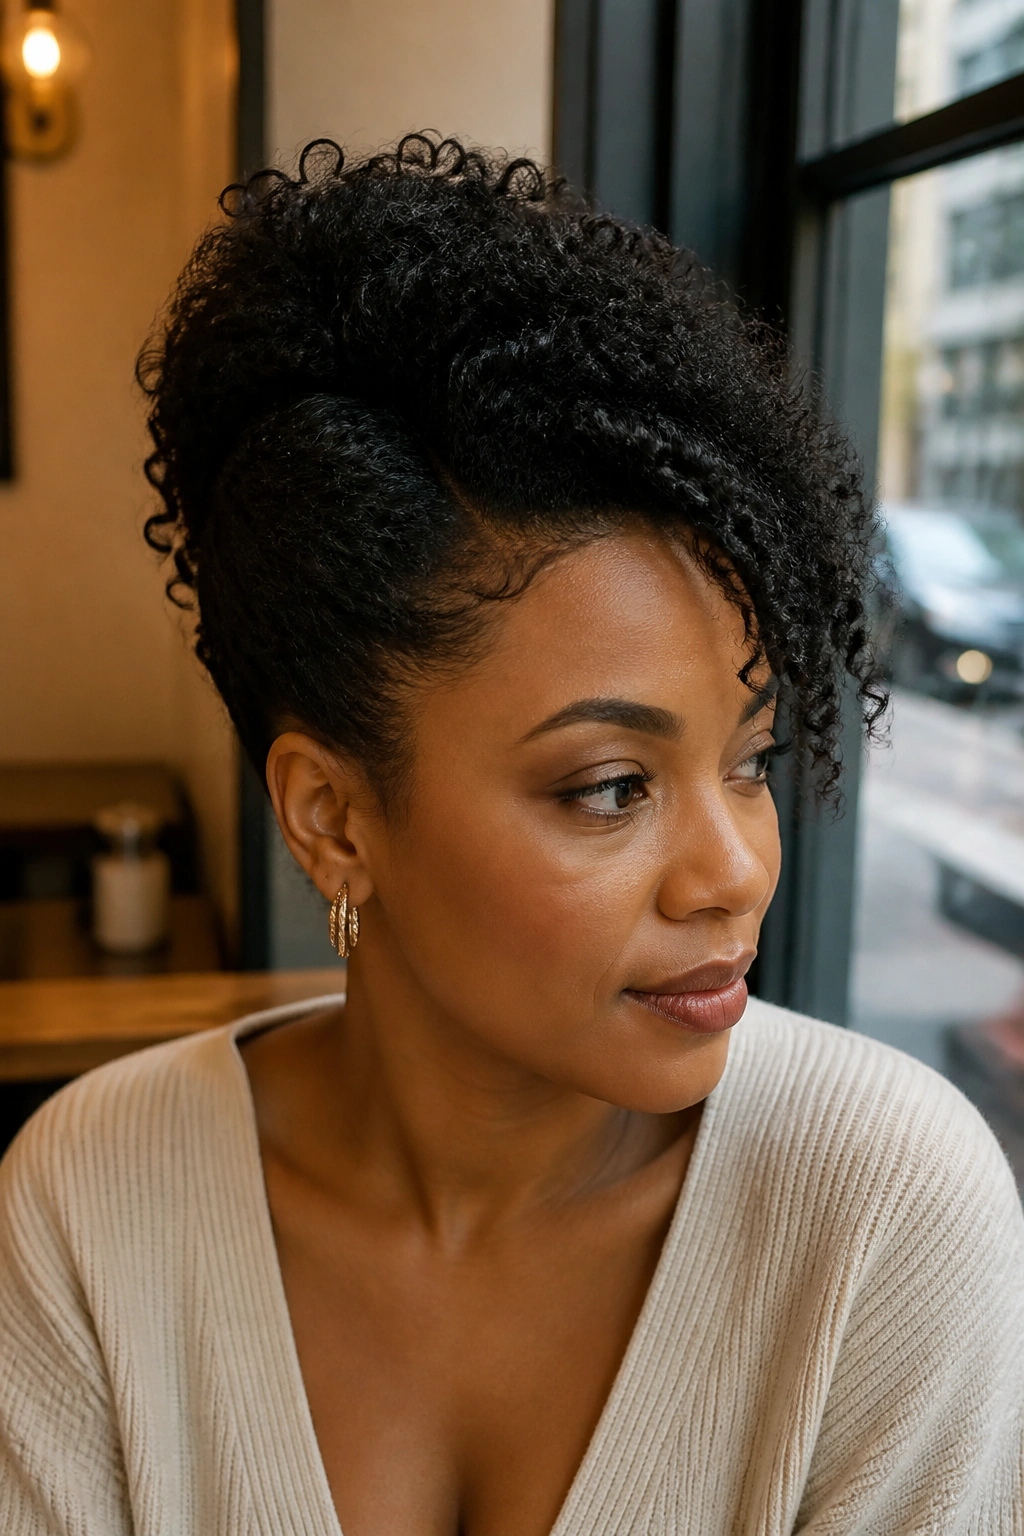
Can a French twist still feel full on curly hair? Yes — if the twist stays loose at the base and the top keeps some air in it. The trick is not to smooth the hair into a shiny shell. That usually kills the volume before the pins even go in.
Start by sectioning the hair from ear to ear and lifting the top section slightly away from the scalp. The twist should hold the hair in a vertical line, but it should not flatten the crown. I like to leave a small ridge at the top and tuck the ends in loosely so the style has shape, not just control.
How to Pin It Without Crushing the Curl
Use U-pins or long bobby pins, and slide them in along the seam of the twist rather than across the surface. That lets the hair hold without squeezing the curl pattern. If the hair is dense, place two pins in an X shape at the base. If it’s finer, one well-placed pin can be enough.
A side part makes this feel less formal and gives the twist a little more lift on one side. That asymmetry is doing real work here. It keeps the style from looking like a rigid tube.
4. Bouffant Bun with Sleek Sides
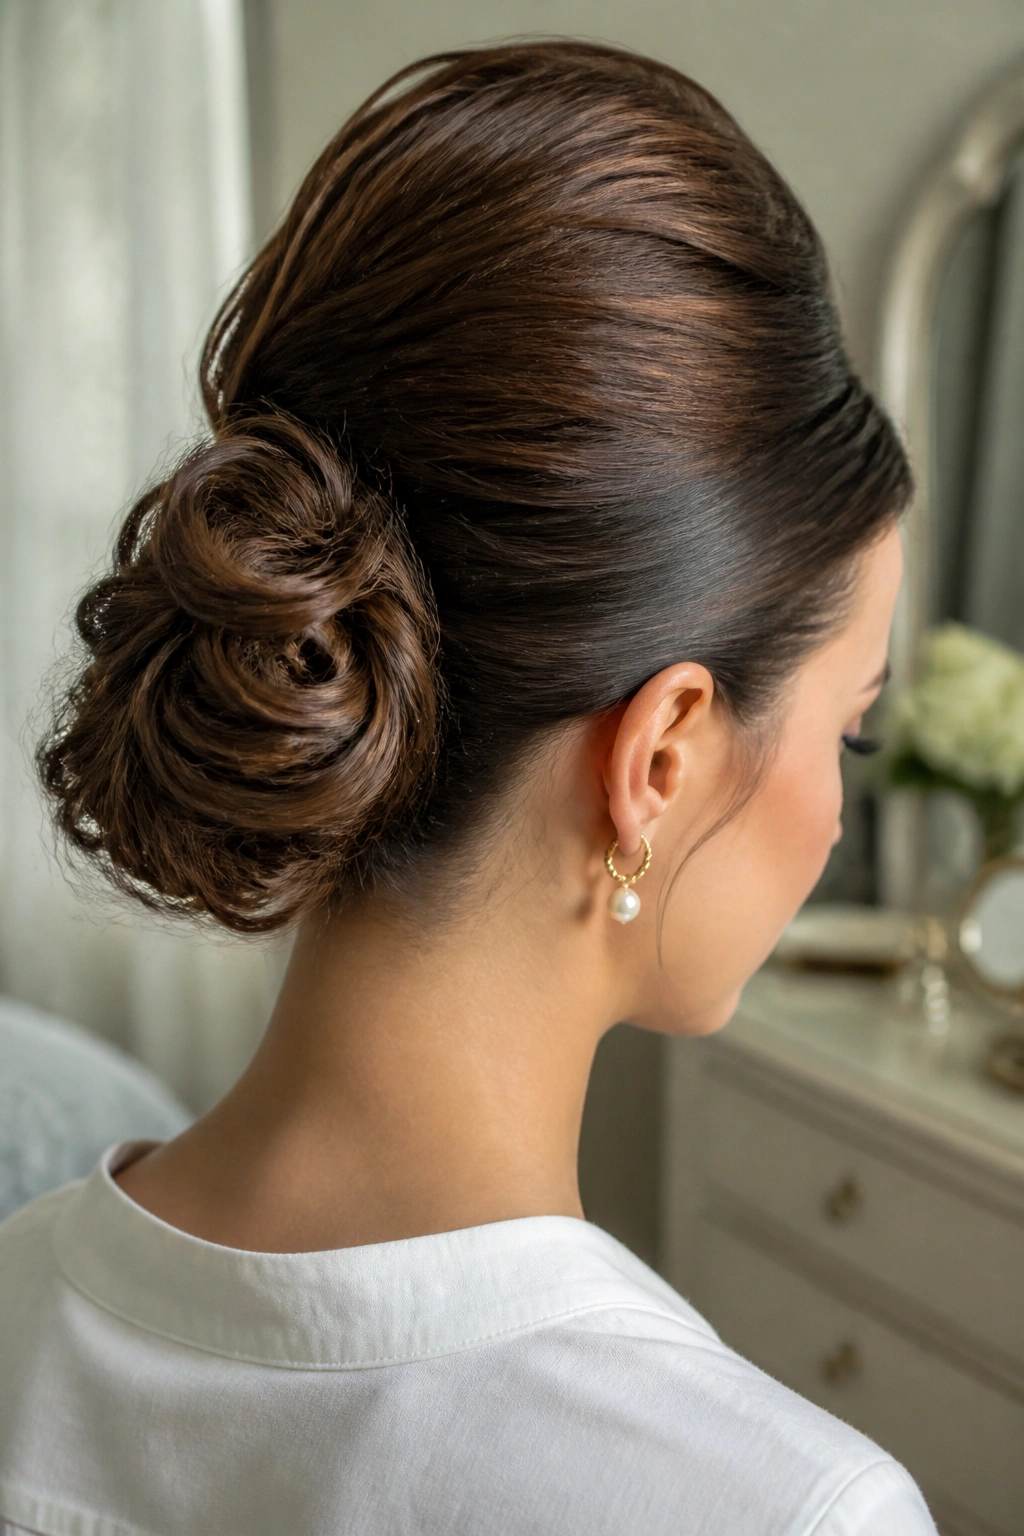
If your temples go flat first, this style fixes that problem in a clean way. The bouffant bun gives the crown a lifted shape, while the sleek sides keep the outline neat enough for a dressier setting.
The key is restraint. Tease only a 1-inch section at the crown, just enough to create a small cushion, then smooth the sides with a light gel or styling cream. You are not building a helmet. You’re making a soft arch that the eye reads as height.
Place the bun at the mid-back of the head rather than directly on top. That keeps the silhouette balanced. A bun that sits too high can make the front look empty. A bun that sits too low loses the drama. Mid-back is the sweet spot.
- Backcomb only the crown, not the whole head.
- Smooth the sides with your palms, not a dense brush.
- Use 6 to 8 pins to anchor the bun from underneath.
- Leave the bun airy so the curls can fan out a little.
Best move: keep the crown slightly lifted even after the bun is pinned. Once it collapses, the whole style goes with it.
5. Half-Up Curly Faux Hawk
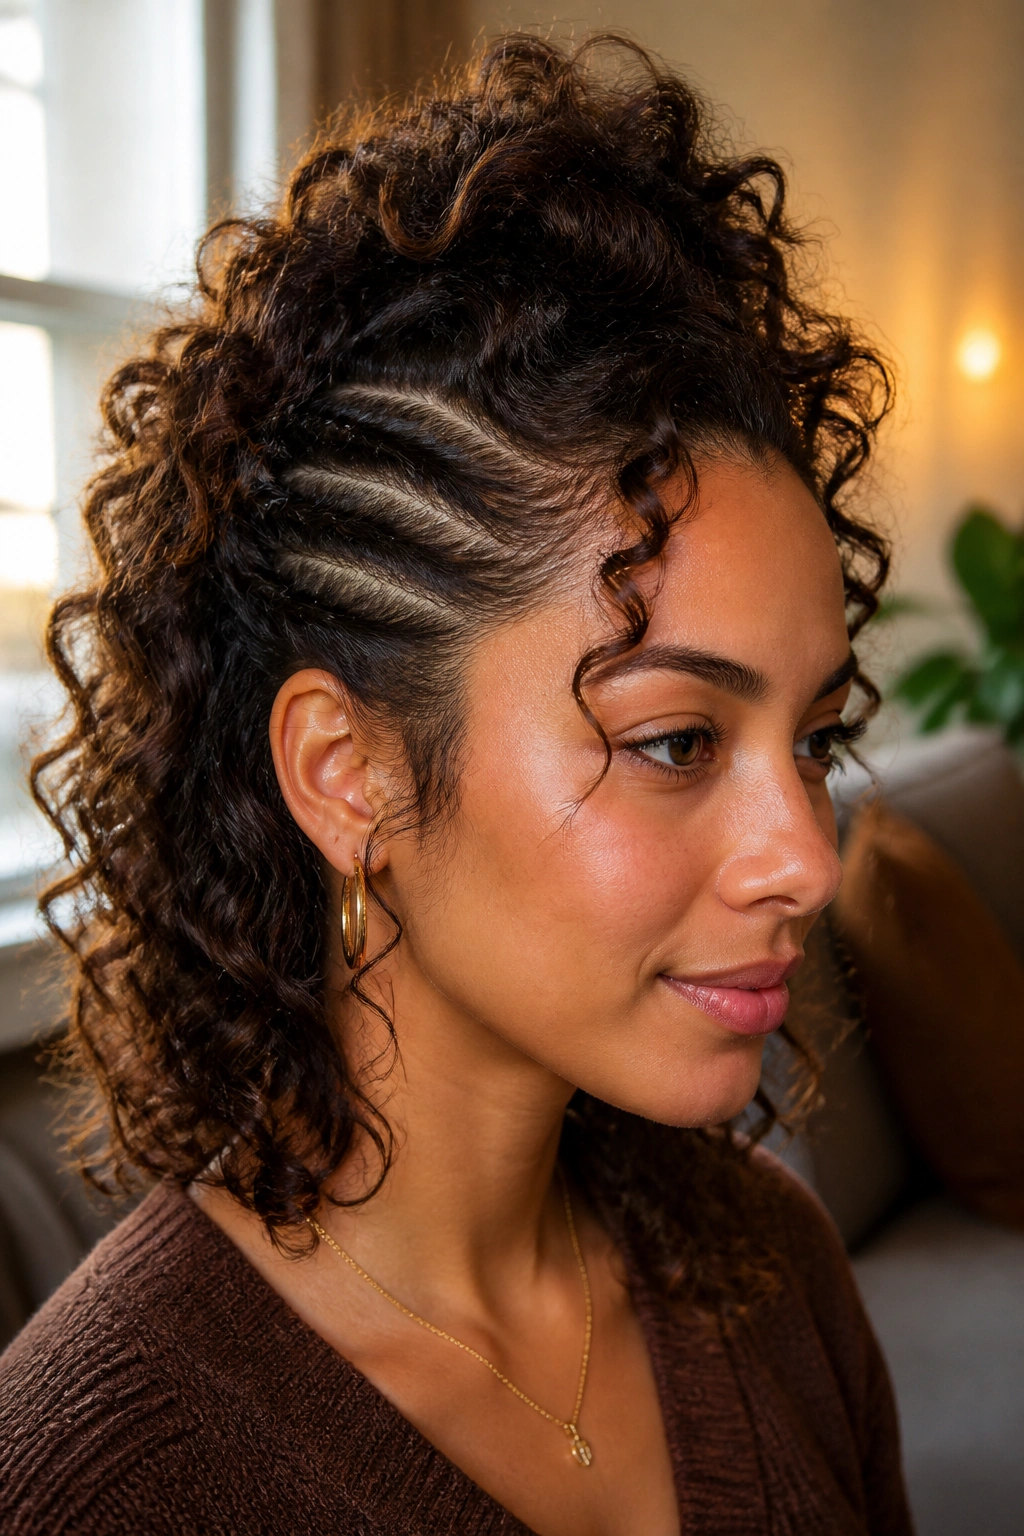
This style has attitude, and it knows it. The half-up curly faux hawk gives you height through the center of the head while letting the sides stay sleek enough to show off the shape.
Start by sectioning the hair from temple to temple and pinning the sides back in small sections, not one big sweep. That matters. When the side panels are secured in layers, the center ridge looks fuller and more sculpted. Leave the middle section loose and let the curls stack on top of each other naturally.
I like this one on shoulder-length curls because the shape stays visible even when the ends are shorter. Longer hair works too, though the extra length gives the style a deeper, more dramatic ridge. Either way, the volume comes from contrast: tight on the sides, lifted in the center, loose where the curls want to spring.
A light curl cream on the top section helps define the texture without weighing it down. Skip heavy oils near the roots. They make the style sink. The faux hawk is one of the few updos that can look a little wild and still feel polished enough for a night out.
6. Side-Swept Curly Chignon
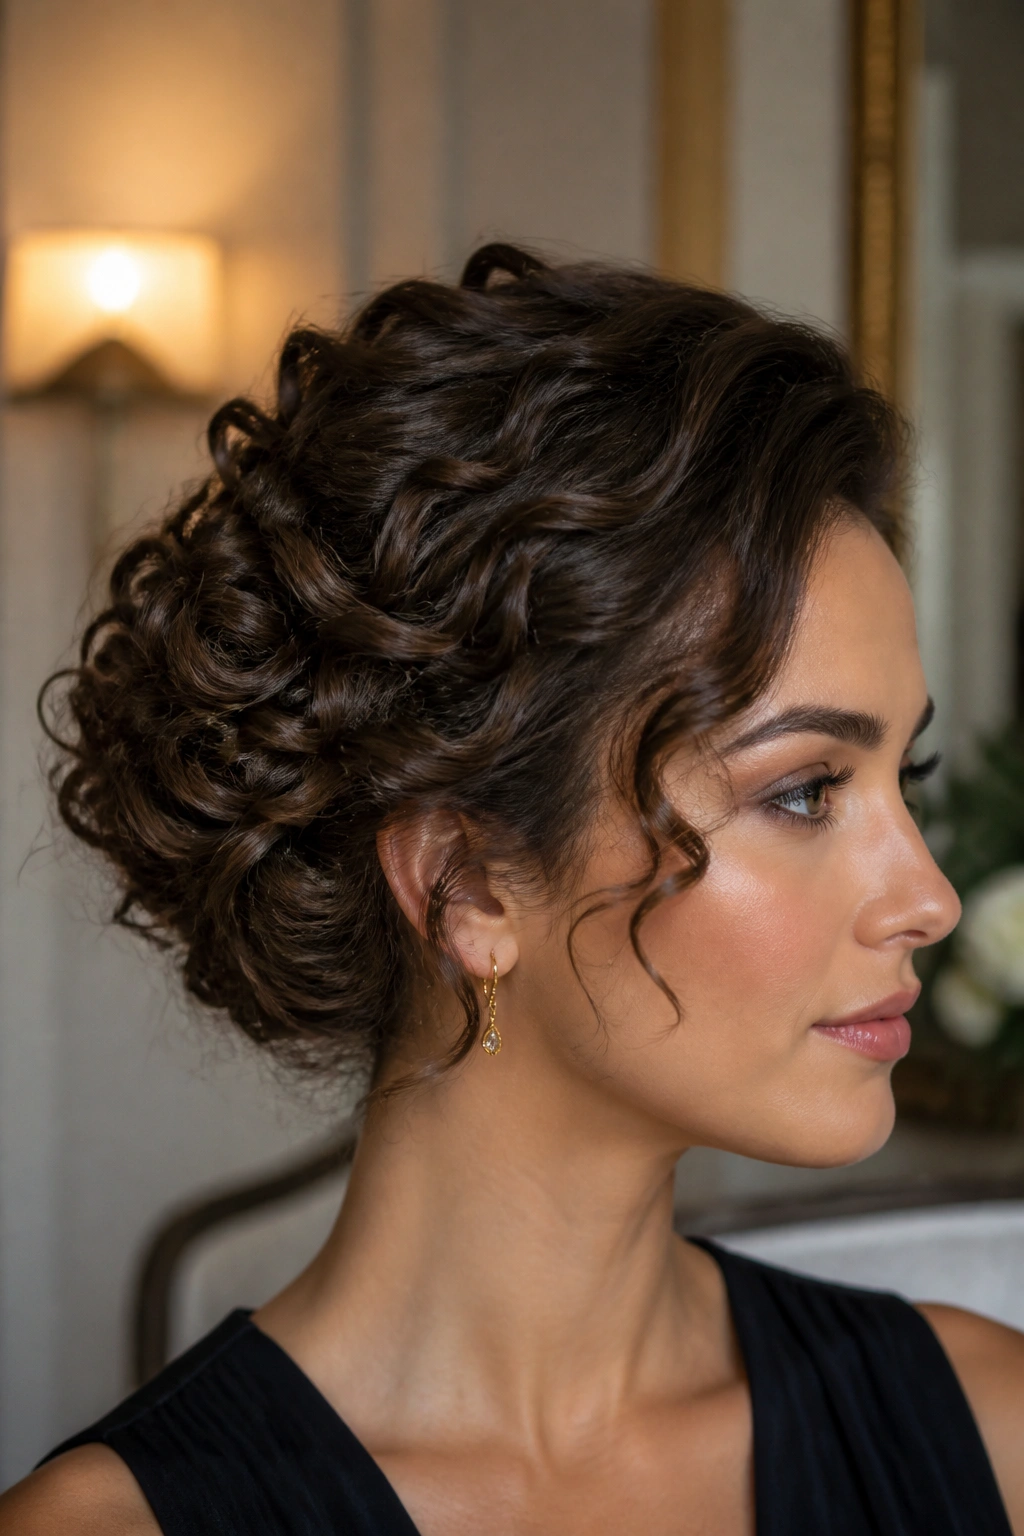
Unlike a centered low bun, a side-swept chignon lets the hair fall on a diagonal, which makes the whole style feel fuller right away. Diagonal lines are generous to curls. They give the texture a longer path to travel, so the shape reads bigger.
A deep side part is where this starts. Sweep the heavier side across the back of the head, then twist the lengths into a low chignon just behind one ear. The twist should sit low enough to stay elegant, but not so tight that it flattens the volume near the part. Let one or two curls rest above the ear. That little bit of asymmetry keeps the style from looking too planned.
This is the one I’d reach for if I wanted volume without a tall crown. It suits curls that are thick but not very long, and it also works well when the hair has a mix of tighter and looser pieces. The side sweep hides unevenness in a good way.
Recommendation: pin the chignon along the diagonal line rather than around the outside edge. It holds better, and the shape looks cleaner from the side.
7. Braided Base Curly Bun
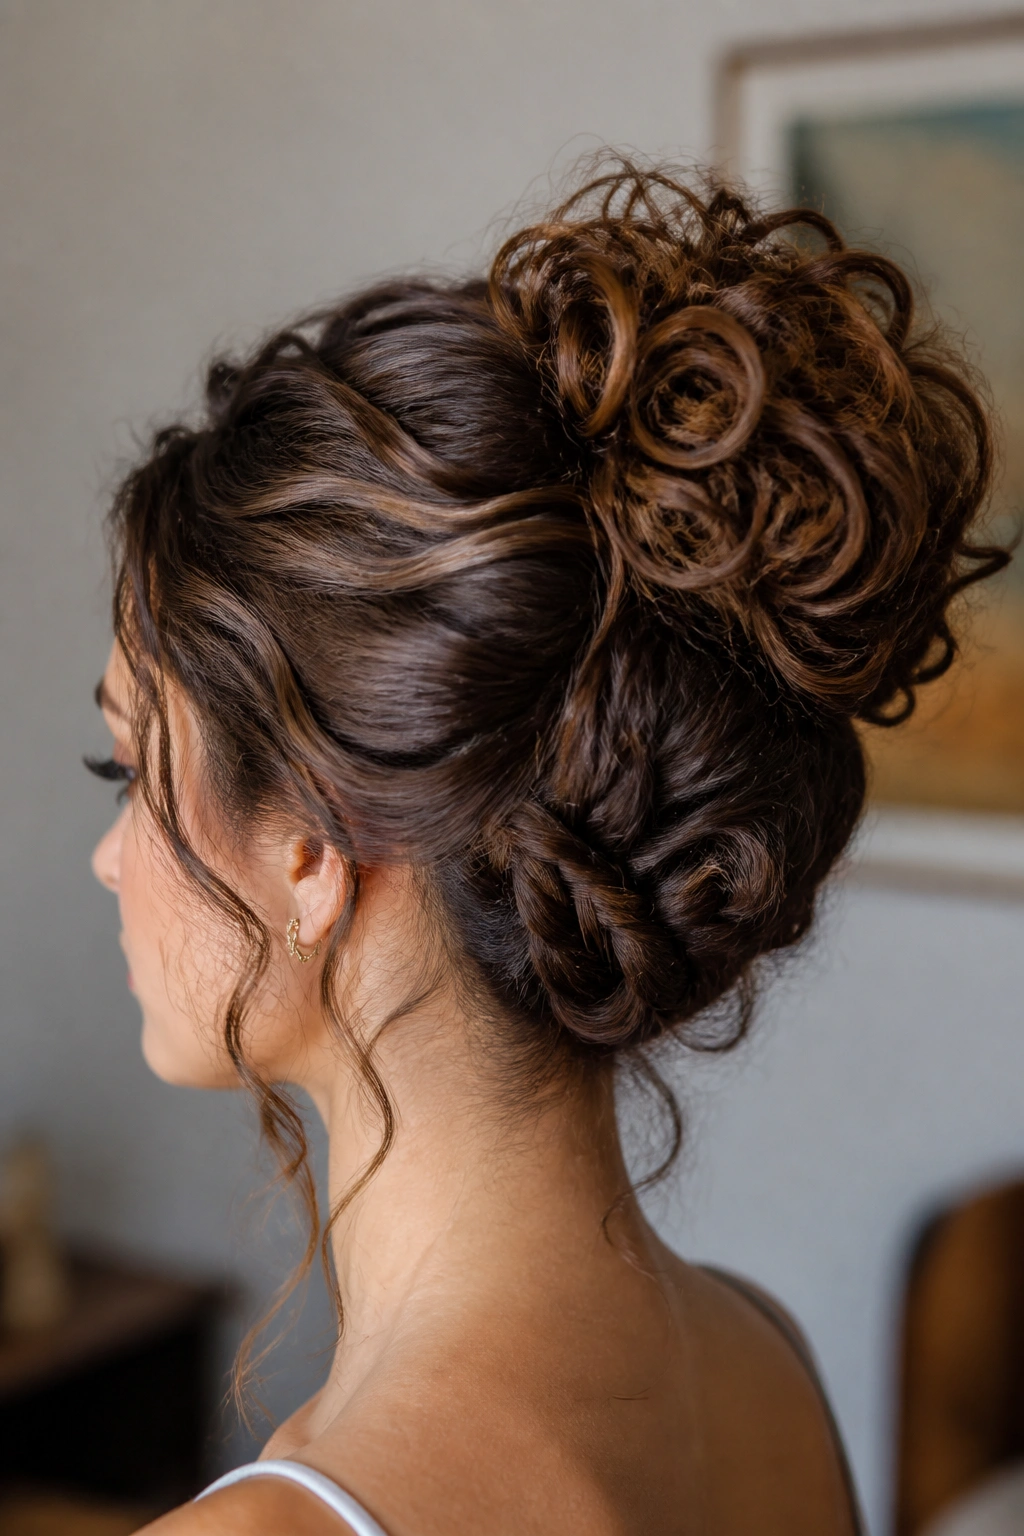
The Braid Makes the Bun Stay Put
A braided base gives the bun a spine. That’s the whole trick. Instead of gathering all the hair into a loose circle and hoping it stays full, you build a small braid at the nape and wrap the rest around it. The braid creates texture underneath, which helps the bun look thicker from the outside.
Keep the braid loose. Tight braids pull the curls flat and leave the bun looking smaller than it should. A braid about 2 inches wide at the base is enough for most medium-to-thick curls. Once it’s done, coil the remaining length around it and pin from the underside.
- Use 6 to 8 bobby pins, placed where the braid meets the bun.
- Let the braid puff a little before wrapping.
- Tuck the ends under, but do not crush them.
- Spray only the outer surface if you need hold.
Small detail, big payoff: if the braid is slightly off-center, the bun often looks fuller. Perfect symmetry can make curls look stiff. A tiny shift gives the style more life.
8. High Puff with Defined Ends
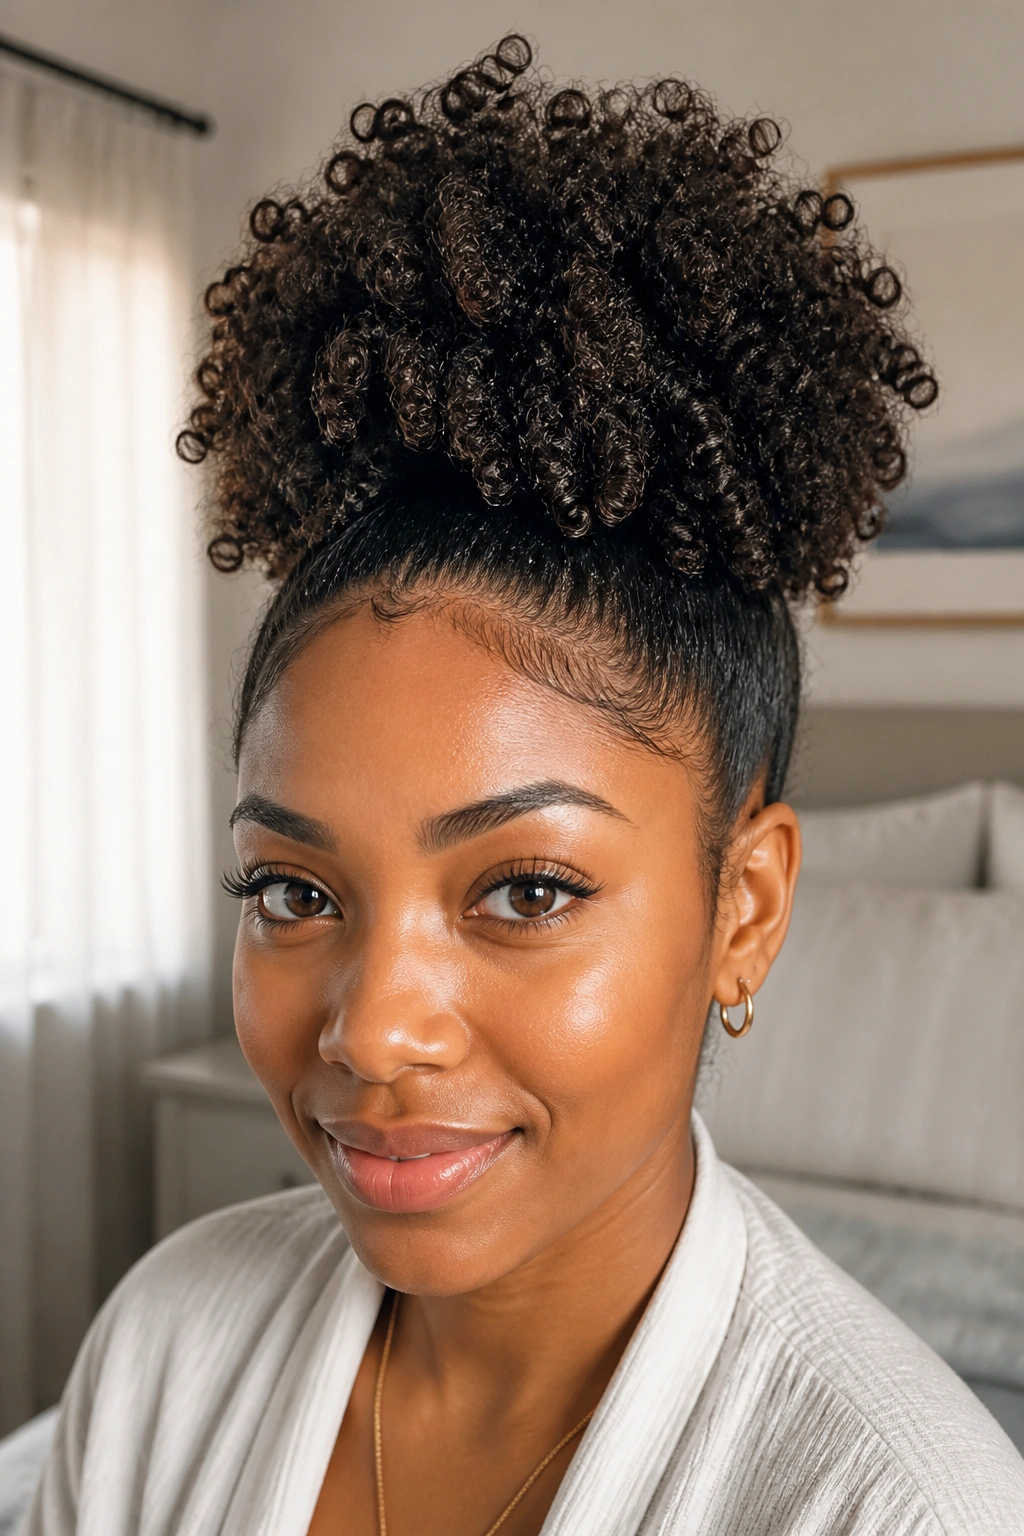
If you want lift without hiding the curl pattern, this is the one I keep coming back to. The high puff with defined ends gives you height at the root and a clean curl finish at the tail, so the style feels full from every angle.
The move here is to stretch the roots just enough to create lift, then leave the ends defined instead of brushing them out. A diffuser on low heat works well while the hair is about 70 percent dry. That gives the roots a little memory without making them frizzy. Once the puff is gathered high, shape the ends with curl cream between the fingers.
This looks especially good when the curls are uneven after a long day. The puff hides the rough spots, and the defined ends keep the whole thing from turning into a generic bun. It also works on hair that’s thick enough to hold its own shape but soft enough to move.
A medium-hold mousse at the roots is enough. Heavy gels tend to drag the crown down after a few hours. And that’s the opposite of what you want.
9. Curly Space Buns with Crown Lift
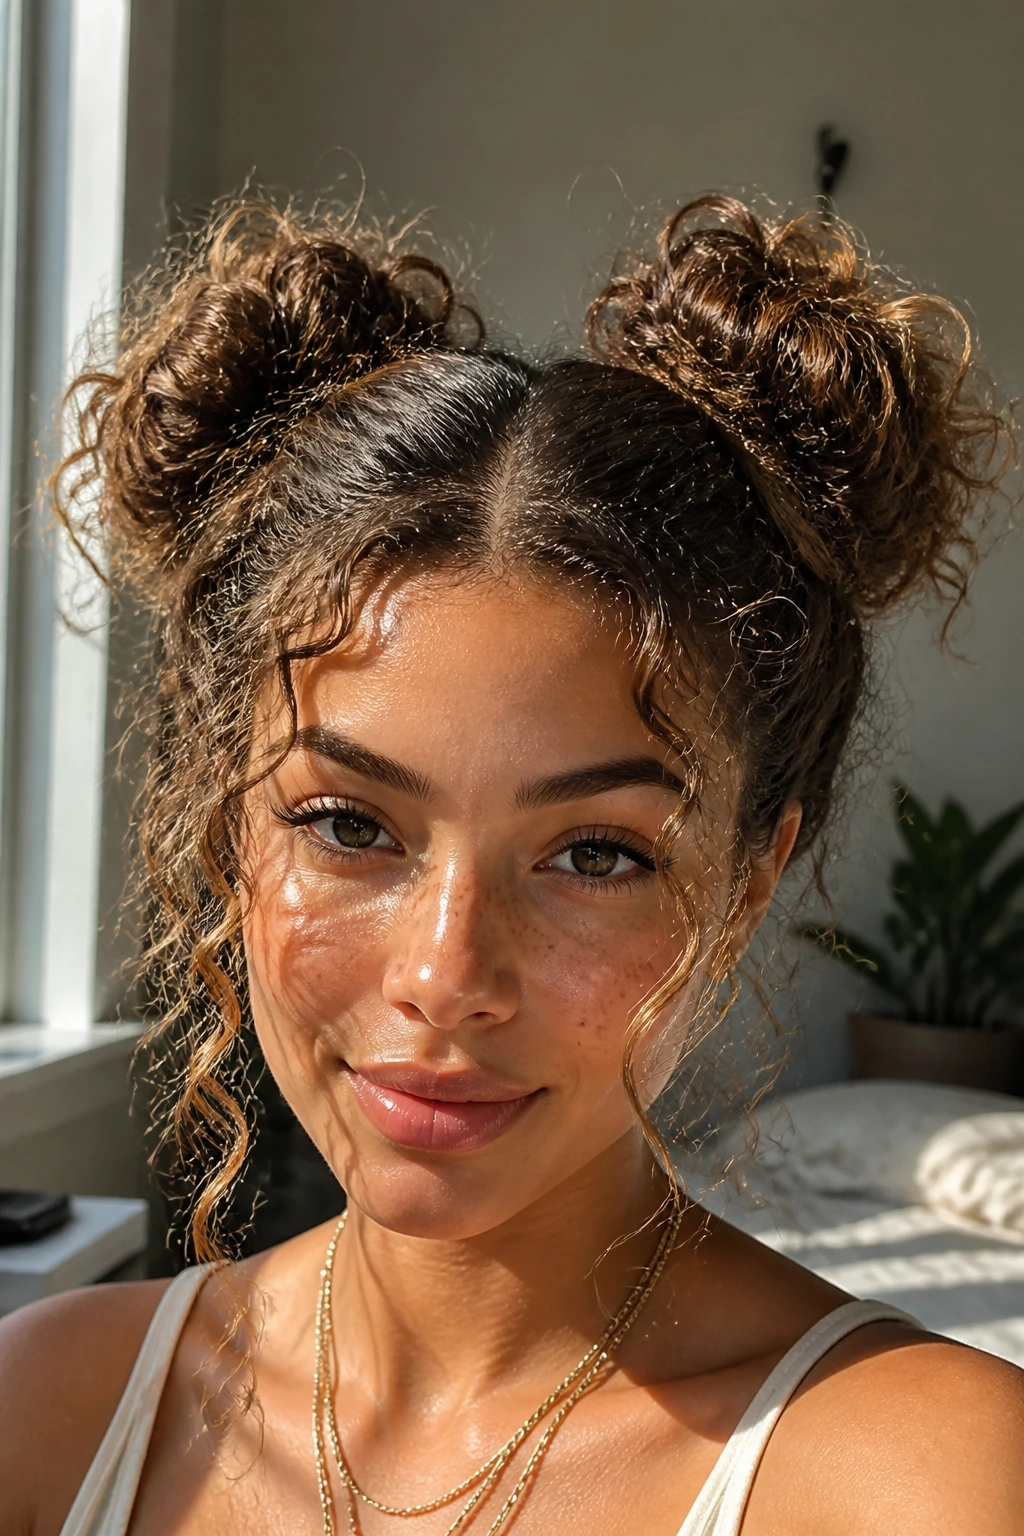
Can space buns look grown-up? Absolutely, if the crown stays high and the buns stay soft. The style gets its volume from the parting and the lift in the middle, not from making the buns tiny and cute.
Make a narrow center part, about 1 inch wide, then section the hair into two high halves. Keep the buns loose enough that the curls can fan outward a little. If you pull them into tight knots, they lose the shape that makes this style fun in the first place. I like to leave a few strands around the temples and just above the ears so the face frame doesn’t disappear.
How to Keep Them From Looking Flat
Pin each bun from underneath, not just around the outer edge. That gives the bun some height off the scalp. If the hair is long, wrap the ends once and let the tail stay a little messy. If it’s medium length, tuck the ends in but pull the outer ring apart with your fingers.
This style works best on hair that already has some natural spring. The more the curls want to bounce, the better the shape reads.
10. Low Nape Bun with Puffy Crown
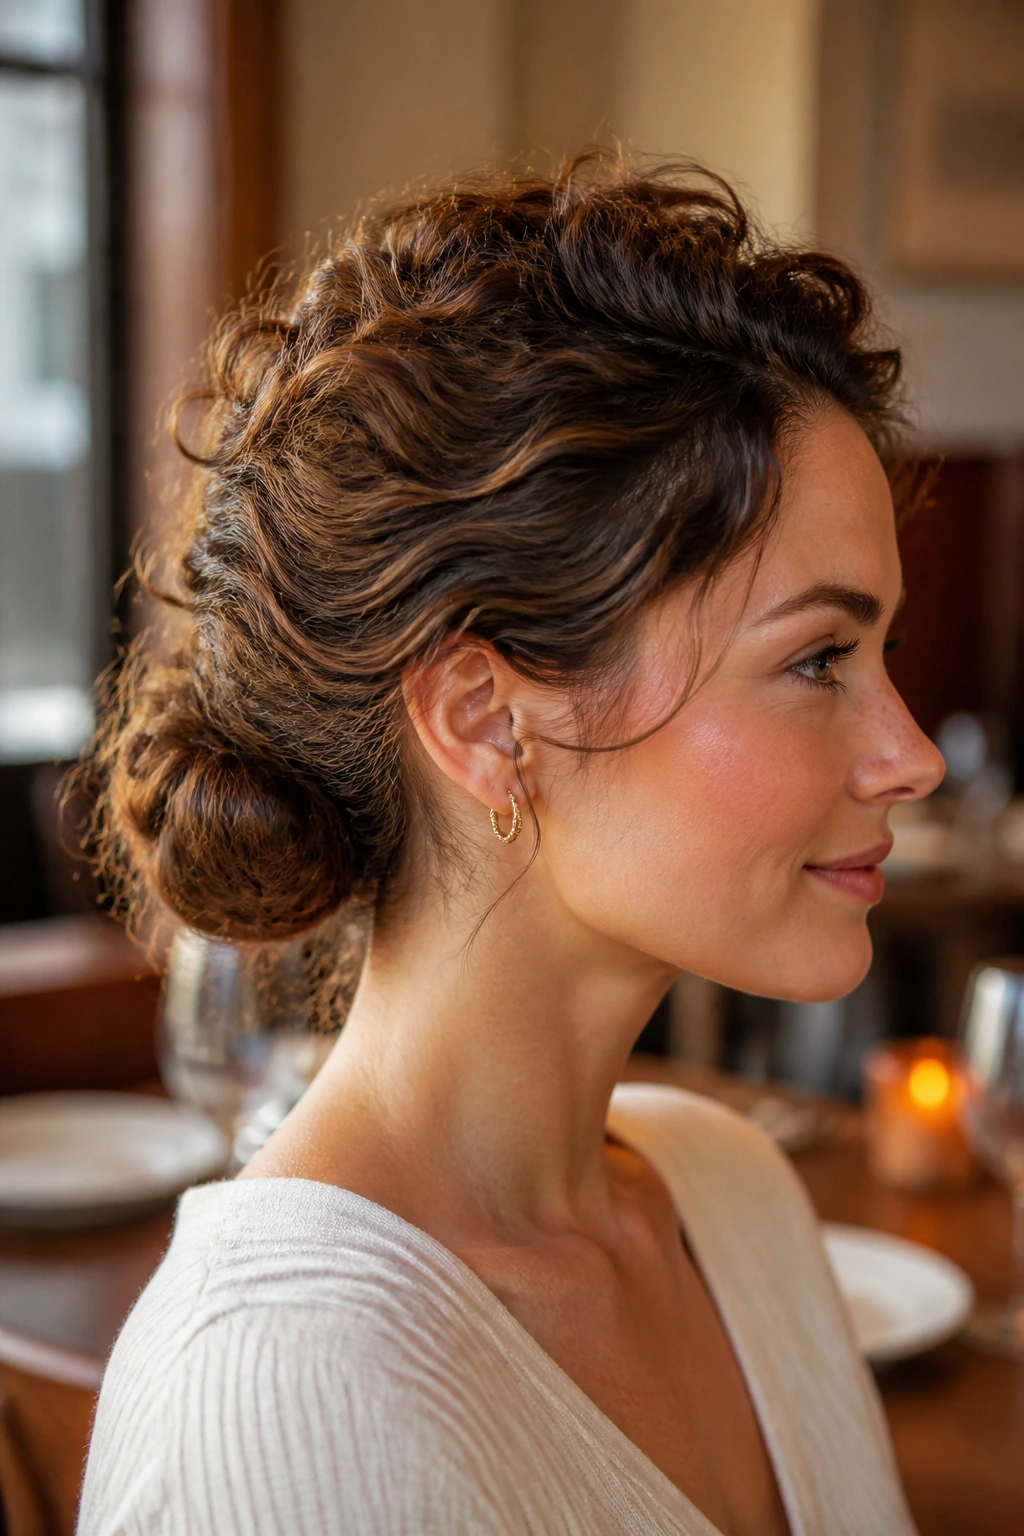
A low nape bun can still give serious volume if the crown is left alone. That’s the part people miss. They press the top flat, tuck the bun low, and then wonder why the style looks sleepy.
Start by lifting the crown with your fingertips and pinning a small hidden ridge just behind the top part. You only need a little support — two pins crosswise can do it. Then gather the lengths low at the nape and twist them into a soft bun. The bun itself stays compact, but the crown stays airy.
This is a good option when you want the front to look neat. It keeps the face open and still gives you shape at the back, which is useful for formal dinners or long workdays when you do not want curls falling everywhere. A middle part makes it more modern; a side part makes it softer.
- Lift the crown before the bun goes in.
- Use pins to support, not flatten.
- Keep the bun small and slightly loose.
- Finish with a light mist only on the bun, not the crown.
Best part: the puff at the top can last longer than you’d think if you resist touching it.
11. Twisted Halo Updo
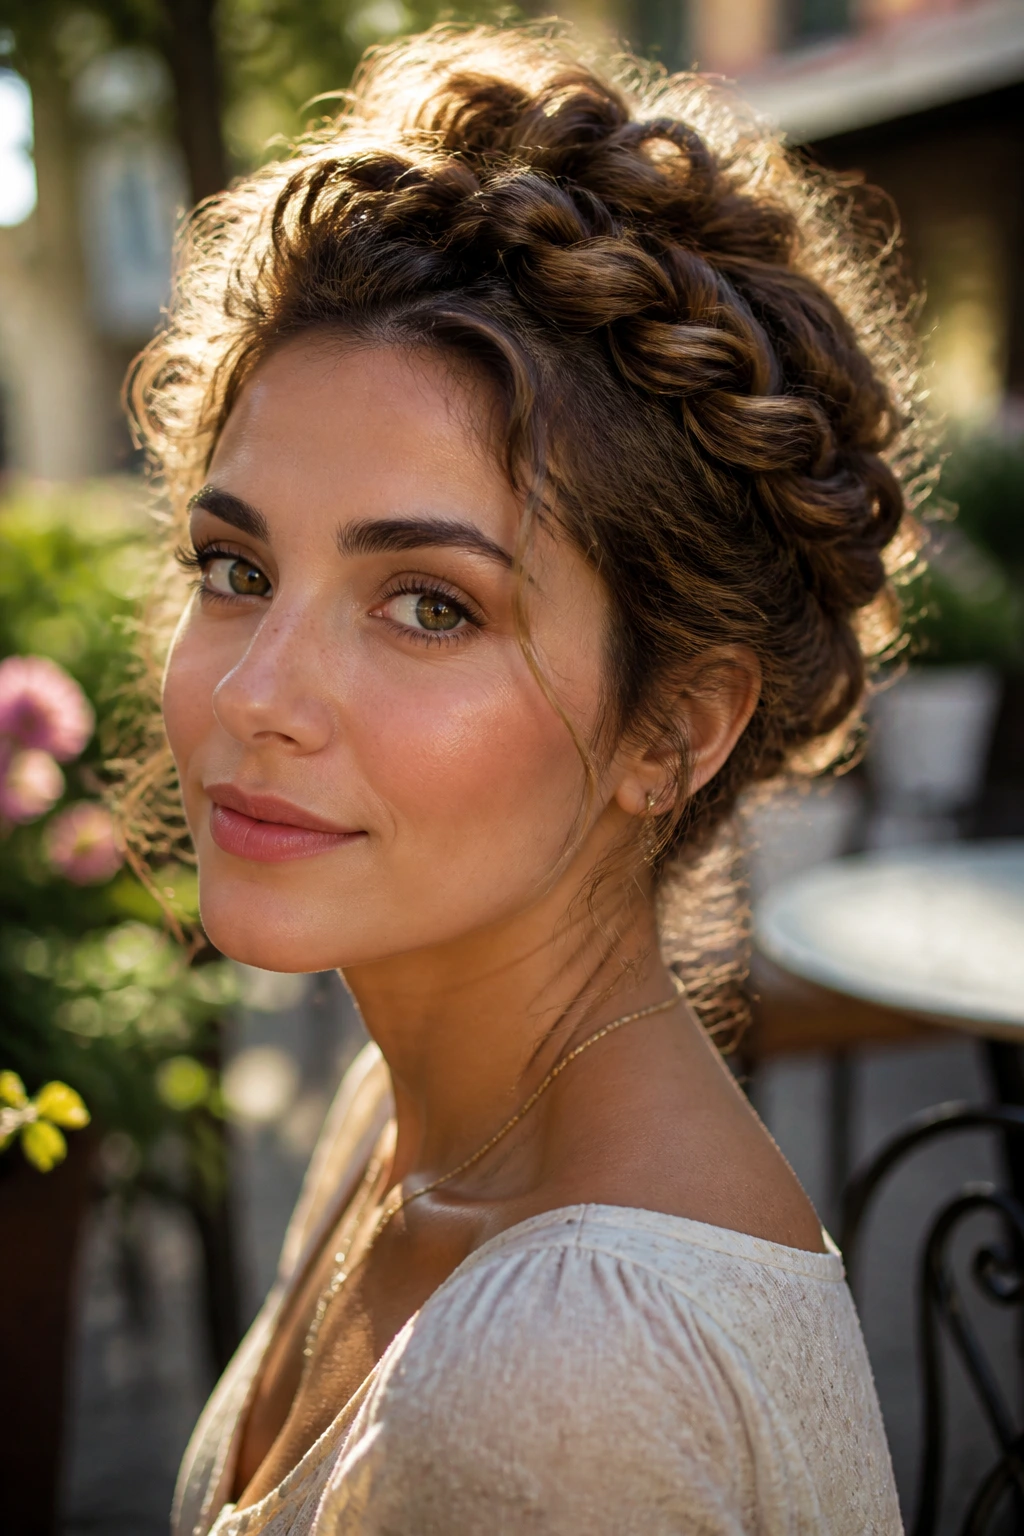
A twisted halo updo feels softer than it sounds. The twist wraps around the head like a loose band, but the curls keep the whole thing from looking too severe. The result is full, round, and a little romantic without being fussy.
Take two sections from the temples and rope-twist them back toward the nape, then pin them so they travel around the head. Keep the twists slightly raised off the scalp. If they hug the head too closely, the halo loses its shape and looks thin. The volume comes from the curve, not from stuffing the hair.
I like leaving a few curls loose near the ears. Just a few. That small break in the line keeps the halo from reading like a costume piece. If the hair is dense, the back can be tucked into a hidden low bun. If it’s finer, a few tucked coils are enough to create the illusion of fullness.
It’s one of those styles that looks more complicated than it is. Which, frankly, is part of the appeal.
12. Wrapped High Curly Ponytail
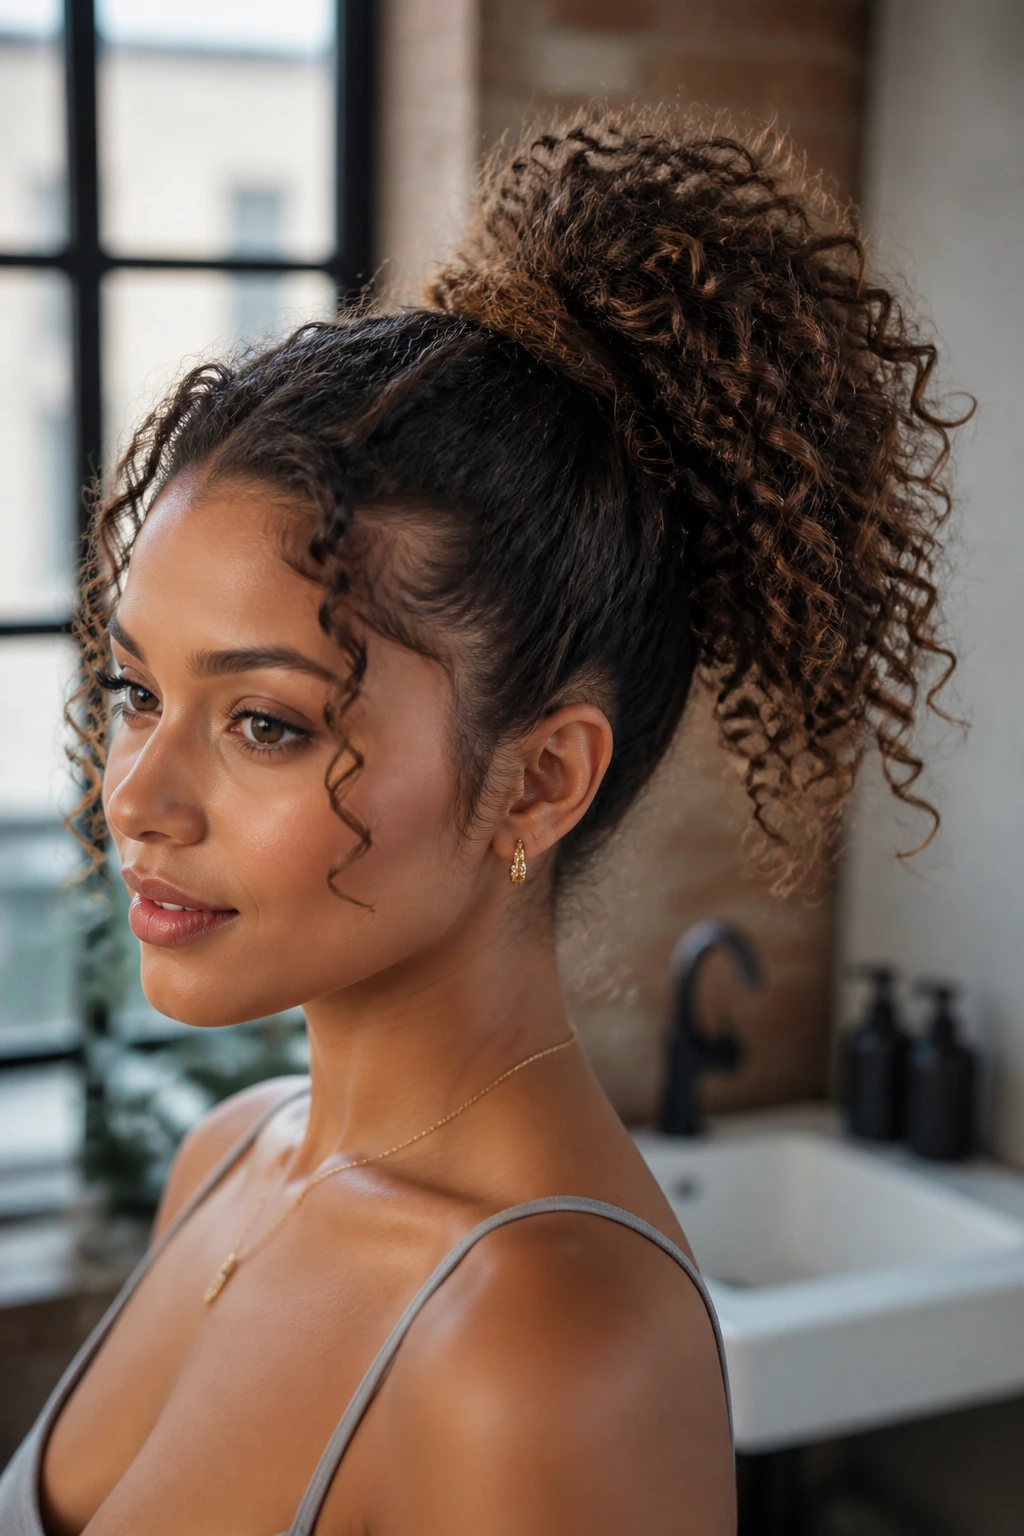
A flat ponytail throws away the one thing curls give you for free: body. The wrapped high curly ponytail keeps that body alive by placing the base high and leaving the tail full.
Pull the hair to the crown, secure it with a strong elastic, then wrap a small 1-inch curl section around the band to hide it. After that, split the tail into two or three sections and fluff each one lightly with your fingers. That extra separation makes the ponytail look bigger and keeps the style from becoming a single rope.
This works especially well when you want something that reads sporty but still polished. It also gives you a little lift at the front, since the crown is held up instead of pressed back. If the hair is long, the ponytail can be wrapped into itself with a few pins at the base and turn into a softer updo.
Who it suits: curls that are long enough to gather cleanly, but not so heavy that they drag the base down by noon. That’s the sweet spot.
13. Victory Roll-Inspired Curly Updo
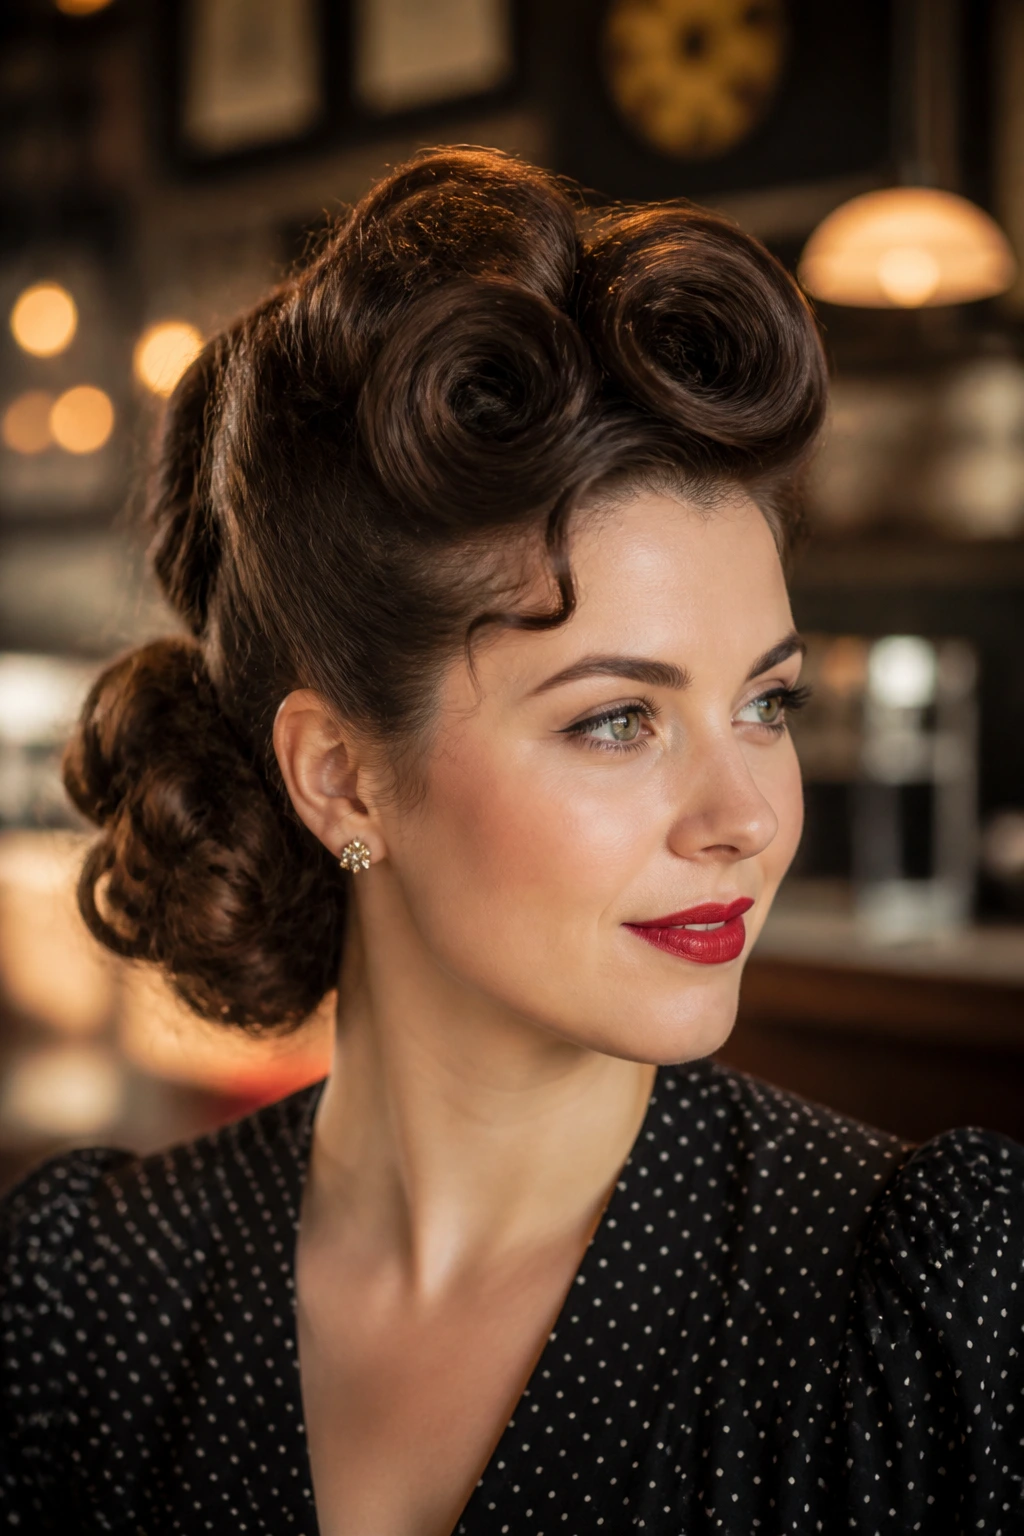
Where the Rolls Sit
A victory roll shape gives curly hair a nice bit of architecture. The front sections roll upward and back, which creates a curved ridge at the top without making the style look stiff. It’s vintage, yes, but not in a costume-y way when the texture stays visible.
Work with the front two sections first. Roll each one over two fingers, tuck the end under, and pin the roll close to the scalp. The rolls should sit high enough to show the curve from the front, but not so high that they lose the shell-like shape. The rest of the curls can be pinned into a low bun or left clustered at the back for more fullness.
- Keep each roll about 2 to 3 inches wide.
- Use 4 to 6 pins per roll, depending on thickness.
- Leave the back softer than the front.
- Finish with a light spray on the pinned areas only.
Little truth: this style looks better when one roll is a touch larger than the other. Tiny asymmetry keeps it human.
14. Knotted Curly Bun
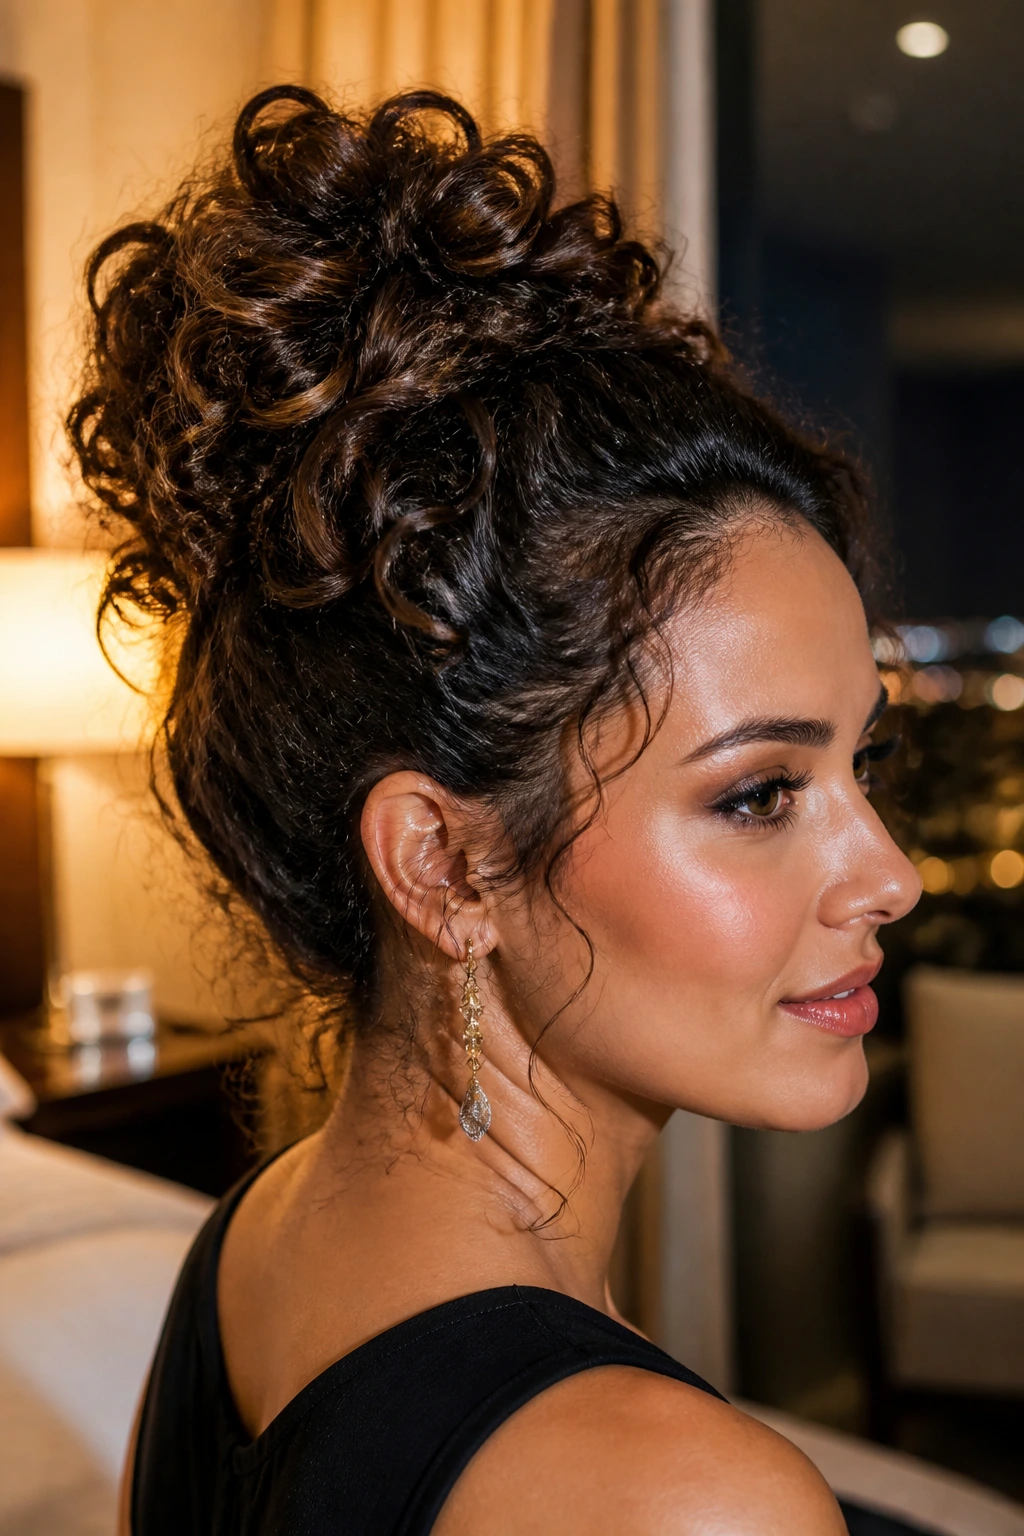
Knots create their own architecture. That’s why this bun works so well on curls that need lift but hate being forced into one smooth circle. Each knot builds a little pocket of air, and the finished bun ends up looking fuller than the amount of hair would suggest.
Take 2-inch sections, tie them loosely once, and pin the knot down where it naturally sits. Then move to the next section and repeat. You are not trying to make a perfect rope. You’re building texture layer by layer. The edges can stick out a little. That’s part of the charm.
This style is useful for thick hair because it spreads the weight around. A single heavy bun can sit flat and pull hard on the scalp. Knotted sections break the load into smaller pieces, which is easier to wear for a long evening. It also works on layered curls because the shorter pieces can disappear into the knots instead of fighting them.
If you want more fullness, pinch the outer loops gently after pinning. That gives the bun a rounder shape without loosening the whole thing.
15. Deep Side-Part Roll Tuck
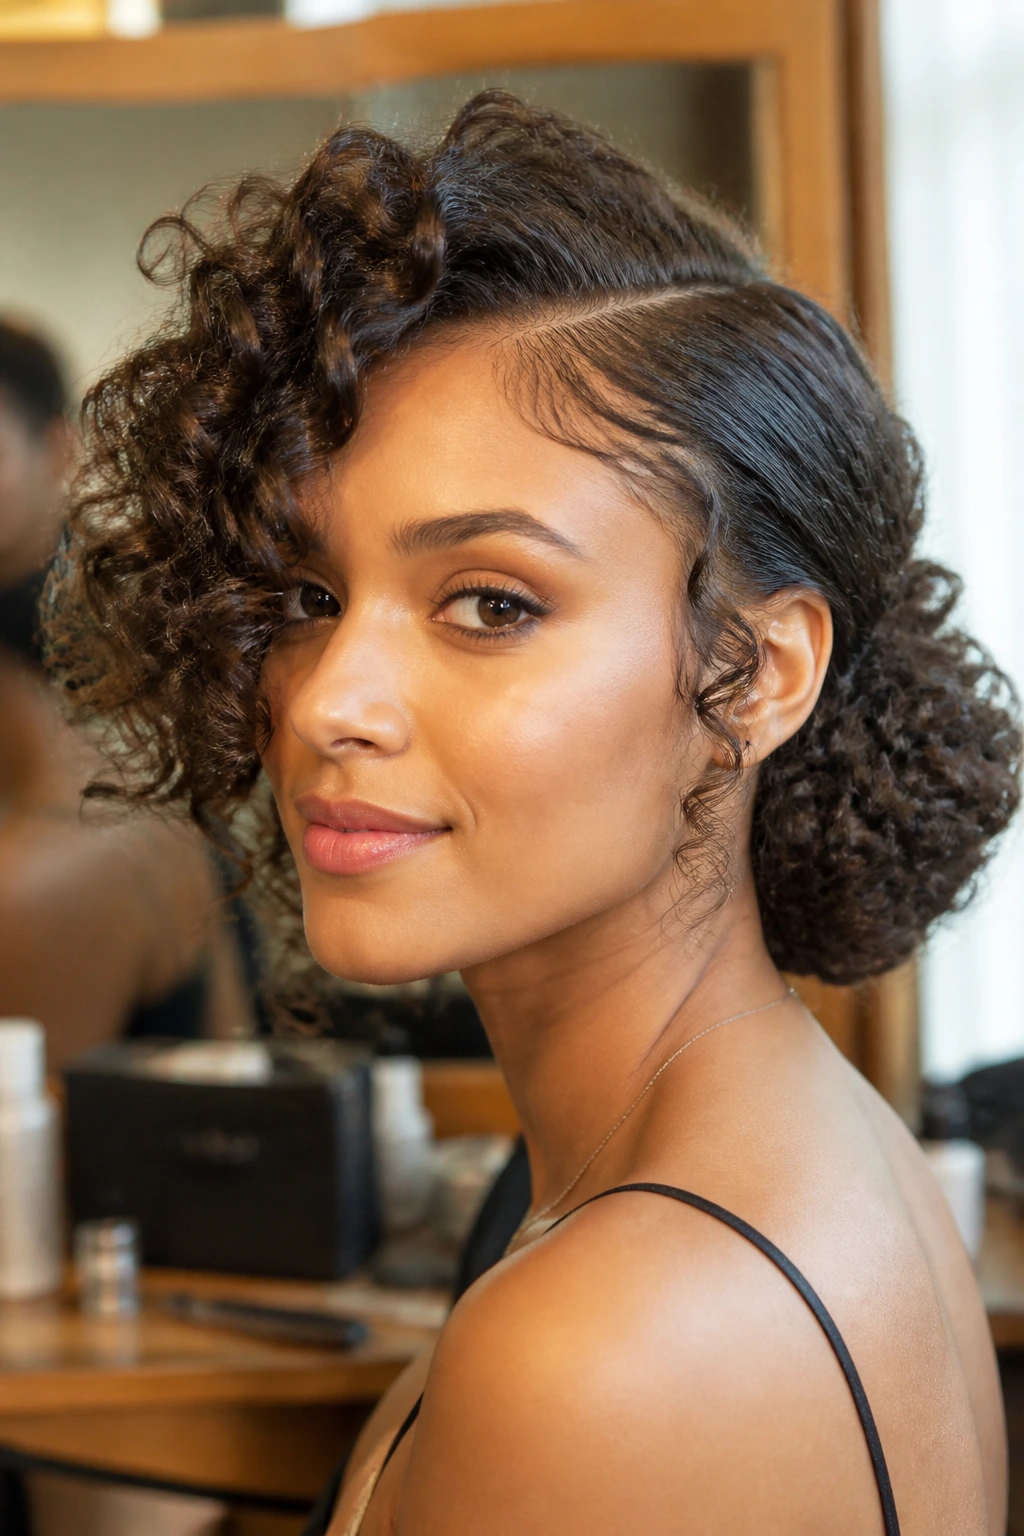
Can one side part really change an updo that much? Yes. A deep side-part roll tuck uses the visual weight of the part to make the hair look thicker on one side and more sculpted on the other, which gives the whole style extra shape.
Sweep the heavier side back first, then tuck the lengths into a rolled section at the nape. The opposite side stays smoother and can be pinned closer to the head. That contrast creates a strong outline. It also lets the curls on the heavier side sit higher, which reads as volume even when the bun itself is modest.
Where to Place the Pins
Slide pins along the curve of the roll instead of stacking them in one spot. That spreads the tension and keeps the style from pulling down. I like to hide one pin under the part line and another at the base of the tuck. The rest can go along the back seam.
This one suits curls that already have some bend at the ends. Straightened ends can work, but the style looks better when the hair still has memory.
16. Bubble Ponytail Updo for Curls
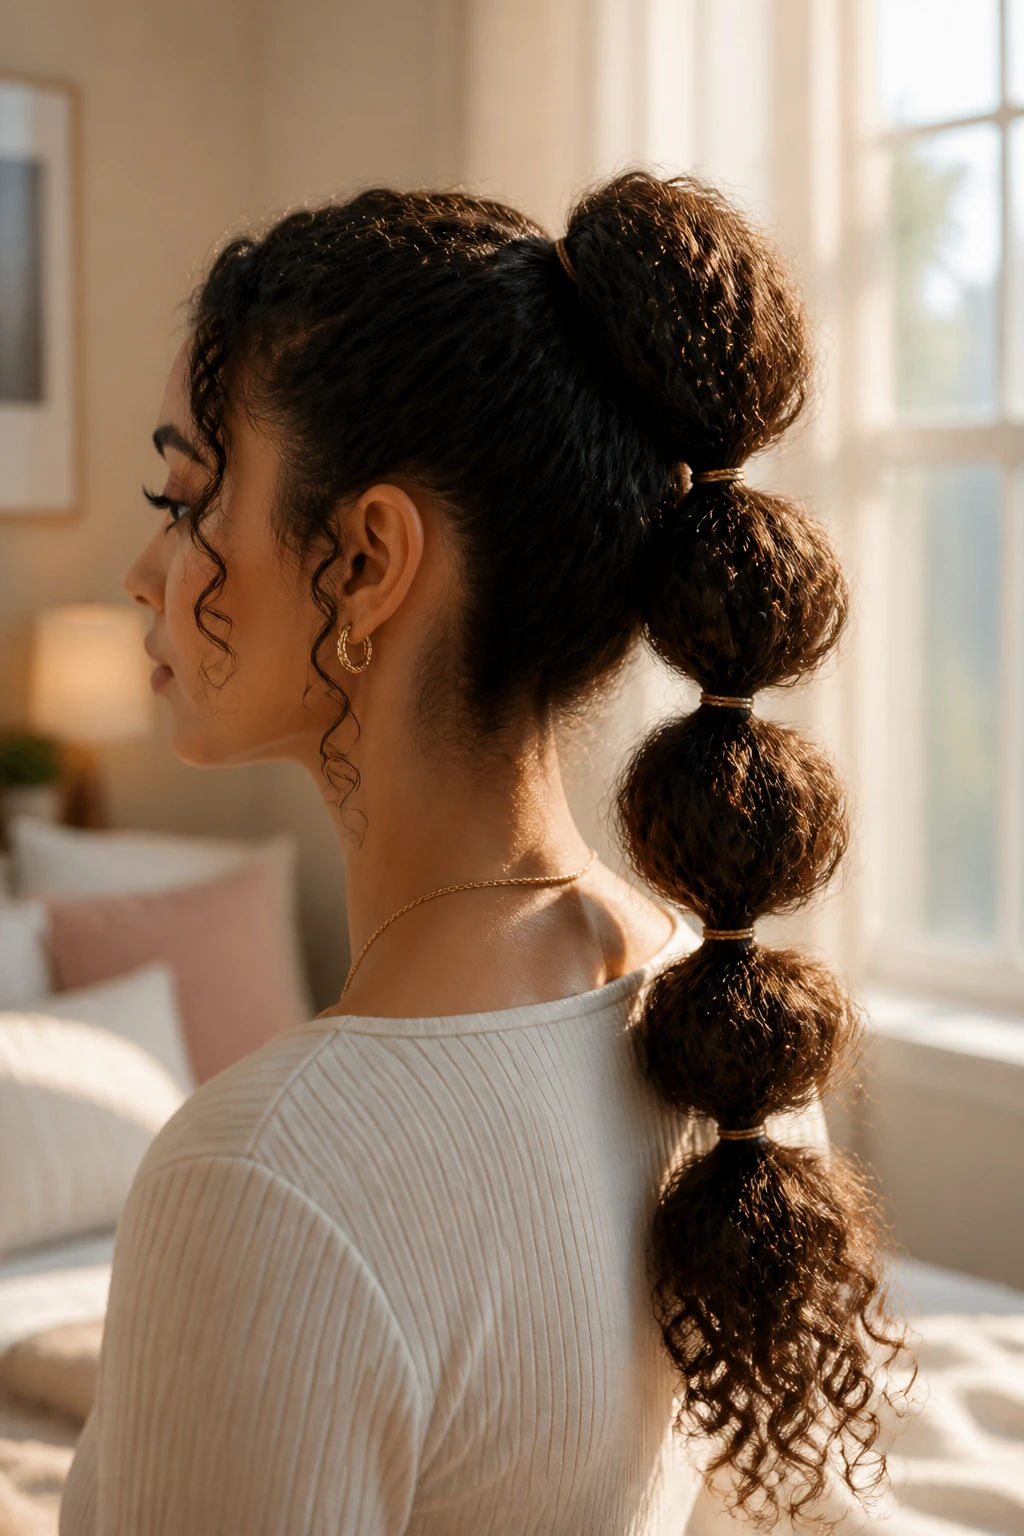
If your ponytail tends to shrink by lunch, the bubble version fixes that with shape instead of force. Each elastic creates a sectioned puff, so the length looks fuller and the whole style gets a stacked, rounded profile.
Start with a high or mid-high ponytail, then place small elastics every 3 to 4 inches down the length. After each elastic goes in, gently pull the section apart with your fingers so it forms a round bubble. Leave the ends curly if you can. That contrast between puffed sections and free ends gives the style its lift.
This works well on curls that are medium to long, especially if the length is uneven. The bubbles hide a lot of that unevenness. They also create the illusion of more hair because the eye reads each puff as a separate mass.
- Use clear elastics or ones that match your hair.
- Pull the bubbles evenly, not perfectly.
- Keep the crown lifted before you start sectioning.
- Leave the final ends soft and curly.
Best use: a day when you want movement and structure at the same time. It has both.
17. Pin-Cushion Curly Bun
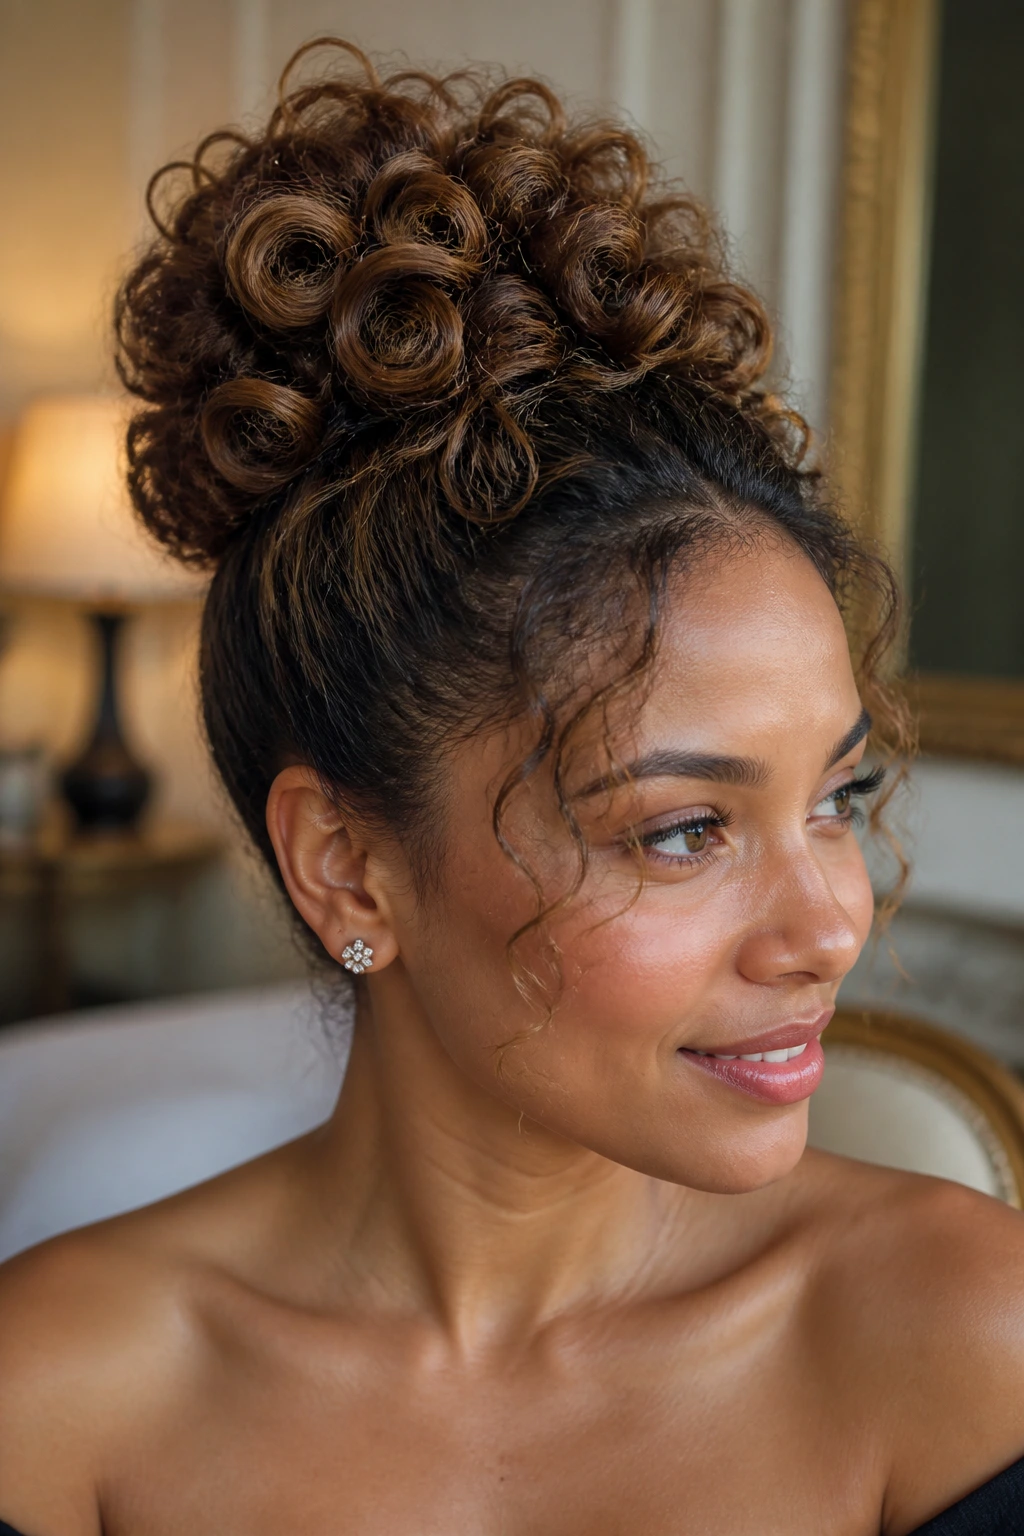
A pin-cushion bun looks dense from the outside, but it stays airy because the curls are arranged in small loops instead of one tight coil. That makes it a smart choice when you want the bun to read big without feeling heavy.
Work in small sections and pin each coil around the center of the bun so the curls stack like petals. The hair doesn’t need to be flawless. Slightly different curl sizes actually help. They fill the gaps and keep the bun from looking like a single rolled rope. If the hair is thick, this style distributes the weight nicely. If it’s fine, the layered loops create the illusion of more hair than you have.
I like this one for formal events because it stays interesting from the side and the back. The shape changes as you move, which is a lot more appealing than a plain tight bun. A few pins disappear under the curls, and that’s the point. The bun should look assembled, not pinned to death.
Use about 10 to 14 pins, depending on density. Fewer if the hair is coarse and sticky. More if it’s soft and slippery.
18. Braided Mohawk Updo
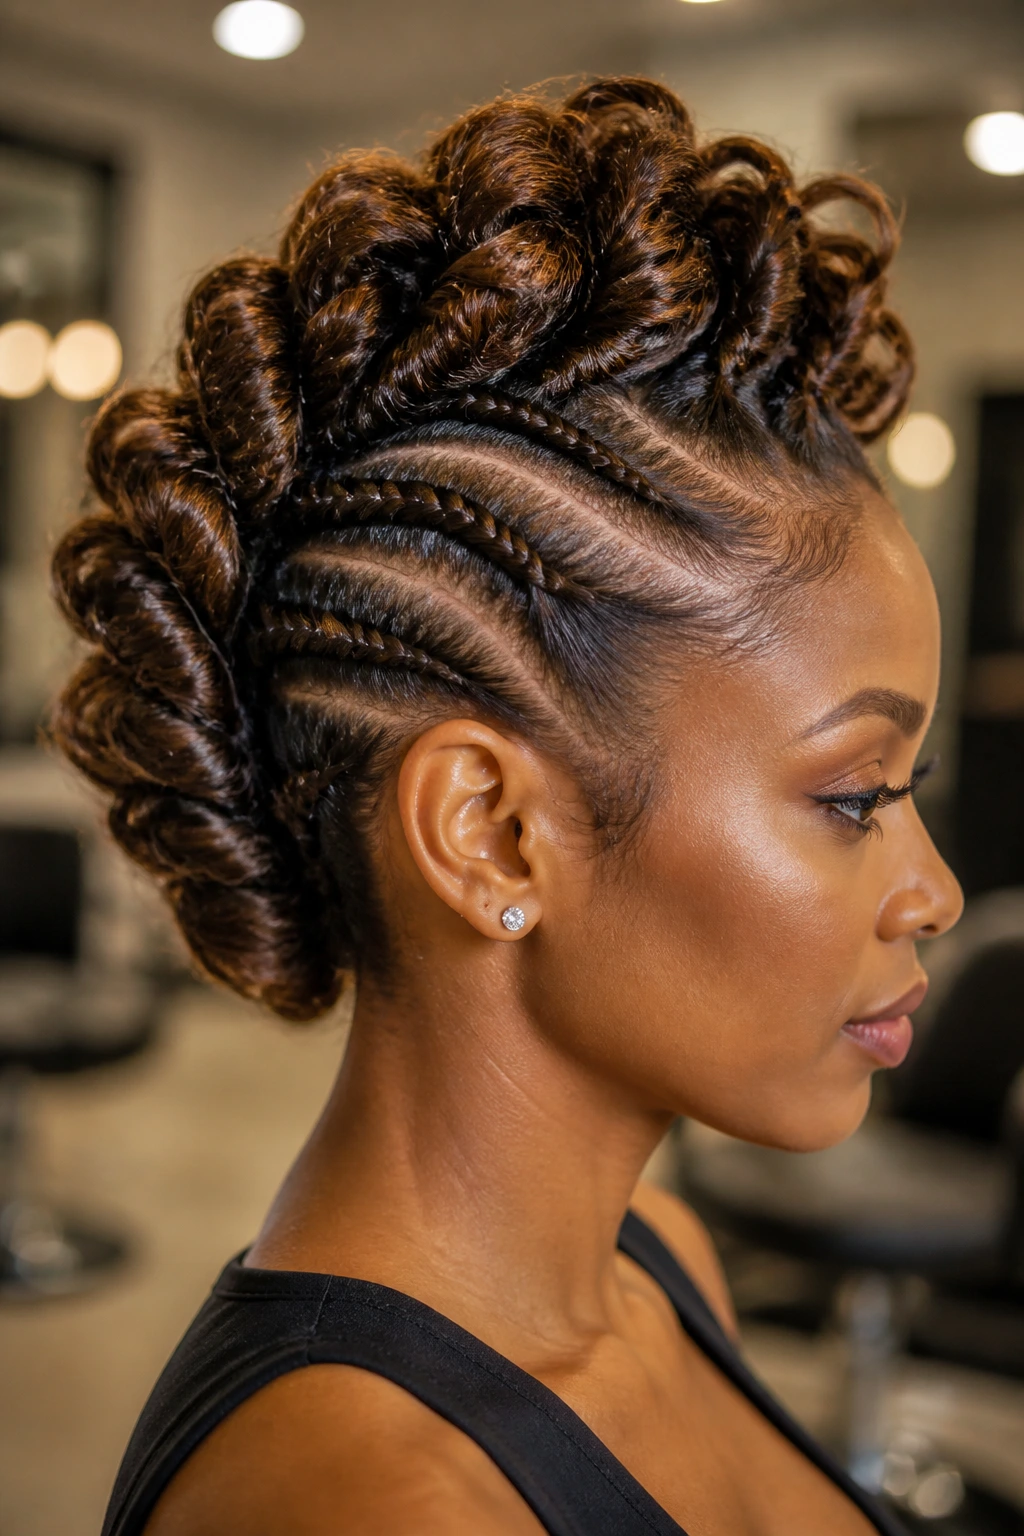
Unlike a single centered braid, this style leaves the middle ridge free to hold the drama. The braided mohawk updo uses tight side braids or flat twists to clean up the edges, while the center stays high, textured, and full.
Start by parting the hair into a center strip and two side panels. Braid or twist the sides back toward the crown, then pin them close to the head. The center section can be puffed, curled, or loosely pinned into shape, depending on how much height you want. That middle band is where the volume lives. Keep it fluffy.
This style is excellent for thick curls that need a bit of control around the hairline. It also stays put better than a loose mohawk-shaped puff because the side braids act like rails. If you want a sharper finish, a tiny bit of edge control along the hairline is enough. No need to plaster the whole front down.
It’s a bold look, but not a difficult one. That combination is why I keep recommending it.
19. Rolled Nape Updo
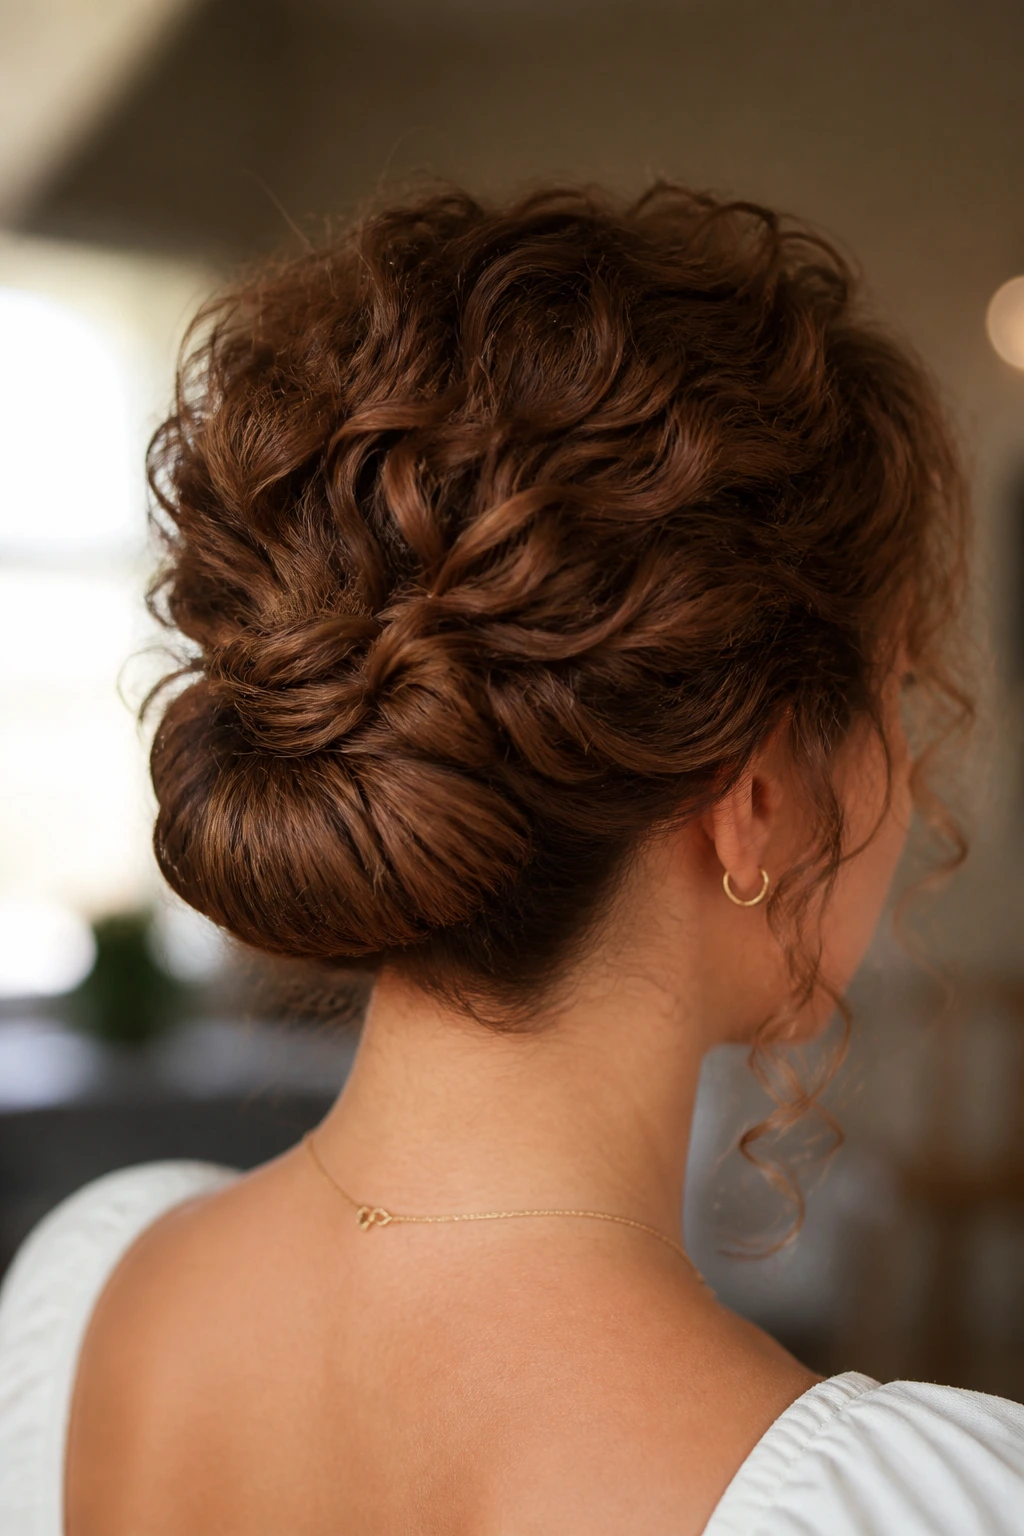
A rolled nape updo is the quiet one in the group, but it still gives real height if you build the top correctly. The roll sits low, and the crown stays loose, which makes the silhouette feel taller than a standard low bun.
The Roll That Creates Lift
Lift the top section first and pin a small hidden cushion at the crown. That cushion is doing more work than people think. It keeps the head from looking flat once the hair is rolled up from the nape. Then roll the back section upward in one smooth curve and pin it where the roll meets the cushion.
- Leave the top section slightly loose before rolling.
- Use 5 or 6 pins to hold the roll in place.
- Let the ends disappear under the curve.
- Keep a few face-framing curls free if you want softness.
This is a strong choice for shoulder-length curls, which can be awkward in bigger buns. The roll gives them a shape that feels finished without needing extra length. It’s clean, compact, and surprisingly full when you step back from the mirror.
20. Sculpted Curly Crown Bun
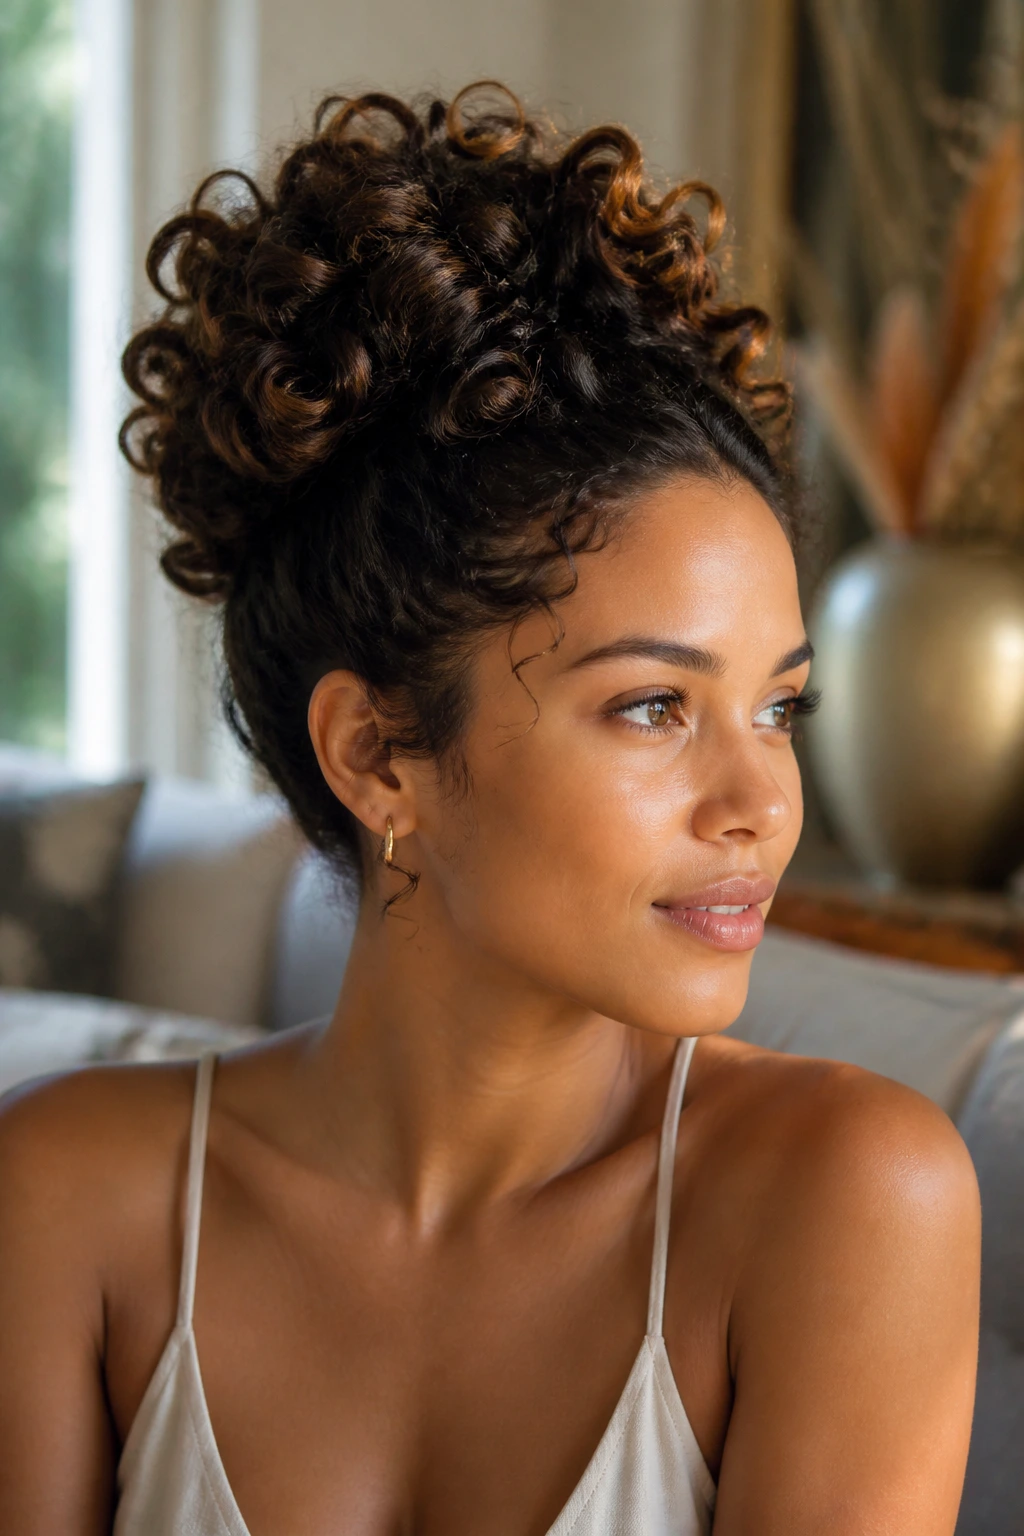
If you want the most polished version of volume, this is it. The sculpted curly crown bun keeps the shape round and lifted, but it never turns the curls into a hard shell. It looks deliberate, which is helpful when you want the style to feel finished rather than merely pinned up.
Build the bun in a circle around the crown, not as one flat knot. Alternate between defined curl sections and softer loops so the surface has movement. That mix is what gives the bun depth. If every piece is smoothed down, the shape goes dead. If every piece is loose, the bun loses its edge. The balance matters here.
I like this style for dressier events because it holds its outline from every angle. The top stays high, the back stays full, and the sides can be tucked just enough to keep the face open. A few airy pieces near the hairline stop the bun from feeling severe — a small but useful break in the line.
Check the silhouette from the side before you leave the mirror. That’s where the lift lives, and that’s where volume can quietly disappear if the pins sit too low.
If there’s one thing these styles have in common, it’s this: volume comes from shape first, product second. A curl-friendly updo does not need to be overloaded to look full. It needs the right anchor, a little breathing room, and the nerve to leave some texture alone.
