



Long hair changes the braid game. A Dutch braid sits on top of the hair instead of sinking into it, so the pattern stays visible even when the strands are heavy, layered, or a little slippery. That’s a big reason Dutch braid hairstyles for long hair keep showing up again and again — they give you shape, not just control.
Long hair can be kind to braids and rude to them at the same time. It gives you length, volume, and that satisfying rope-like finish, but it also adds weight at the crown and pulls loose sections down if you rush the sectioning. A rat-tail comb, a few clear elastics, and a small amount of texturizing spray do more work here than fancy tools ever will.
The best part is the range. You can go polished, sporty, romantic, sharp, or a little playful without changing the basic braid technique. That’s the appeal: one braid language, many moods.
And yes, the part matters.
1. Classic Center-Part Double Dutch Braids for Long Hair
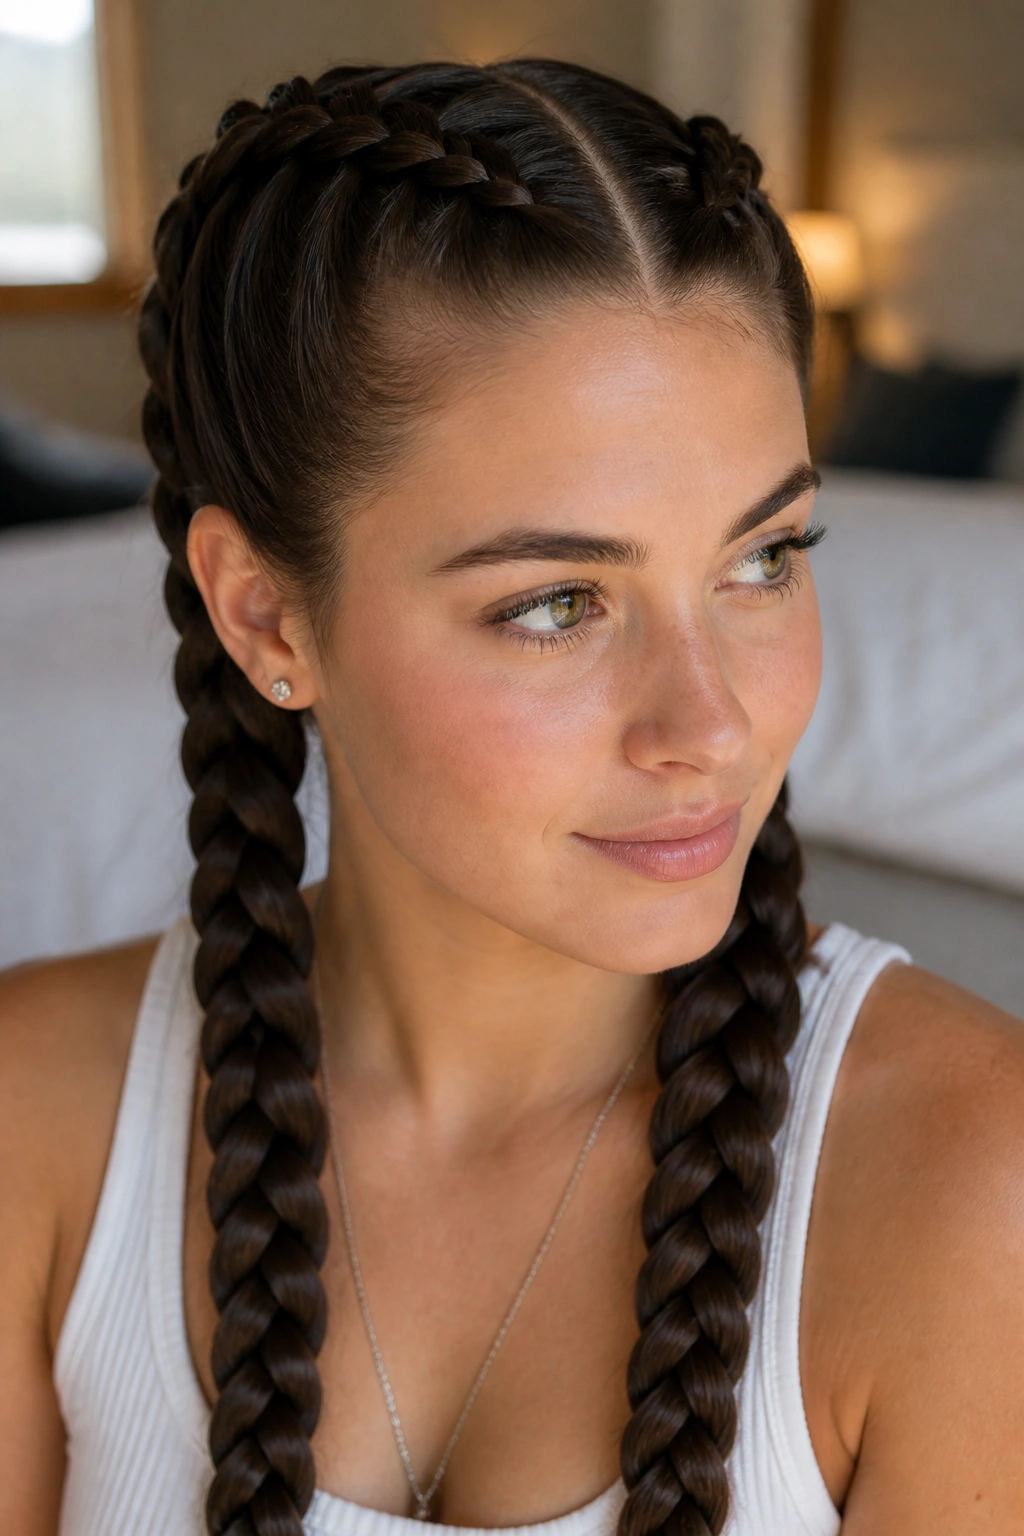
Start with a dead-straight center part. That one move gives this style its clean, balanced look, and on long hair it keeps the braid from drifting to one side as the day goes on. If you’ve ever had one braid feel tighter than the other, you know why that matters.
This is the version I’d hand to anyone who wants a reliable style that can survive errands, a workout, or a full day outside. The braid sits high on the scalp, the weight gets split into two sections, and the ends stay tucked out of the way instead of hanging around and tangling. Simple. Smart. Hard to mess up once the part is clean.
Why It Works on Long Hair
Long hair gives these braids a thick, ropey finish that shorter hair just can’t fake. The braid looks full without needing a ton of teasing, and the low stress on each side makes it more comfortable than one giant braid pulled tight across the crown.
A little product helps, but don’t drown the roots. A light mist of dry shampoo or a pea-size amount of styling cream near the hairline is enough. Too much slickness makes the braid slide; too much grip makes it hard to keep the sections even.
- Best for straight, wavy, or slightly coarse hair
- Great when you want both sides to feel balanced
- Easier to keep neat if you part first, then clip one side away
- Looks best when the braids start close to the hairline and stay consistent
Tip: Pull the outer loops apart a little at the end. Not much. Just enough to make the braid look fuller without turning it frizzy.
2. Sleek Single Dutch Braid Down the Back

One braid is calmer than two. It feels less sporty, more deliberate, and it shows off the length of your hair in a way double braids never can. If your long hair falls past your shoulder blades, this style lets that length do some of the talking.
The trick is tension at the crown, not at the ends. People often braid the top too loosely and then yank the lower half harder to “fix” it. That usually creates a puffy crown and a skinny tail. Keep the first four or five passes close to the scalp, then ease up as you move down the back so the braid stays neat without looking stiff.
Long layers can make this style a little slippery. If your hair sheds pieces every time you move, prep the lengths with a light spray wax or a fine mist of texturizing spray before you braid. It makes the hair grab just enough to stay put.
A single Dutch braid down the back is one of those styles that looks more expensive than it is. Clean, low-fuss, and strangely elegant.
3. Dutch Braid Ponytail with a Wrapped Base
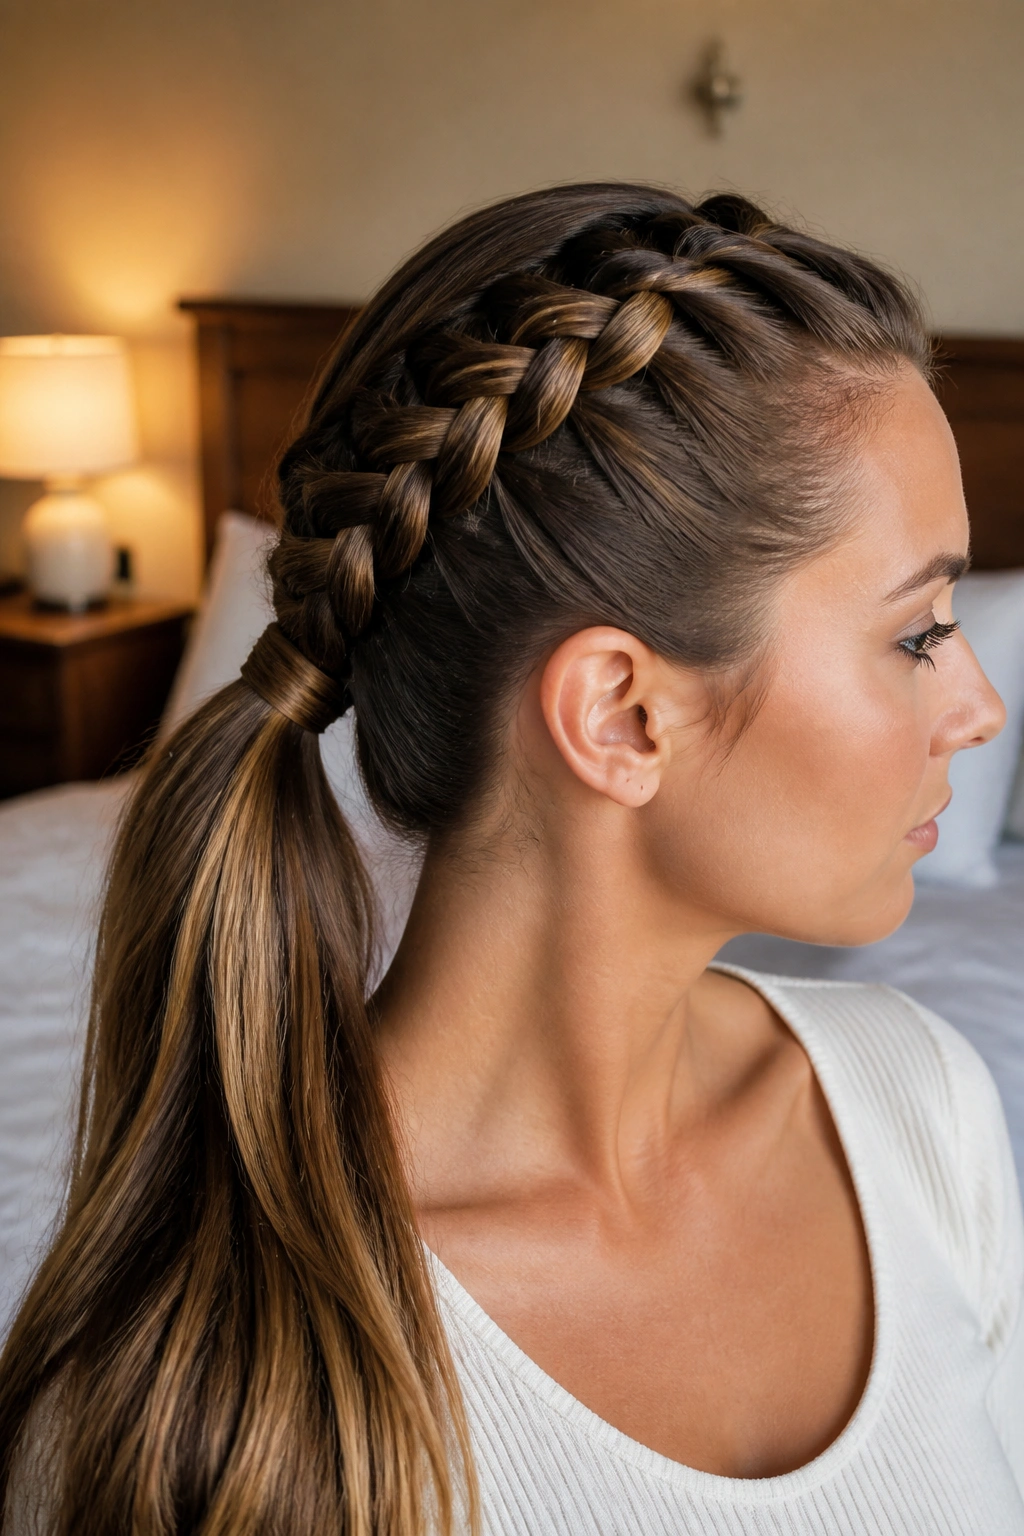
A ponytail base is where this style gets smart. You get the structure of a braid at the top and the swing of a ponytail at the bottom, which is a very good trade if your hair is long enough to feel heavy by midday.
I like this one when a plain ponytail feels too bare but a full braid feels like too much work. Start the Dutch braid at the front hairline, feed it back to the crown, then gather the remaining hair into a ponytail and wrap a small strand around the elastic. That wrapped strand is a tiny detail, but it changes the whole finish. Suddenly it looks styled instead of tied up.
Small Details That Matter
- Use a strong elastic under the ponytail if your hair is dense or reaches below the shoulders
- Keep the braid section tight enough to anchor the style, then loosen the ponytail itself for movement
- Wrap the elastic with a 1/2-inch strand of hair and pin the end underneath
- If your hair is very silky, rough up the crown with a touch of dry shampoo before you begin
This is a good choice for days when you want your hair off your neck but still want a visible braid pattern. It also works better than a plain ponytail on second-day hair, which tends to hold the braid base more easily.
4. Half-Up Dutch Braid Crown
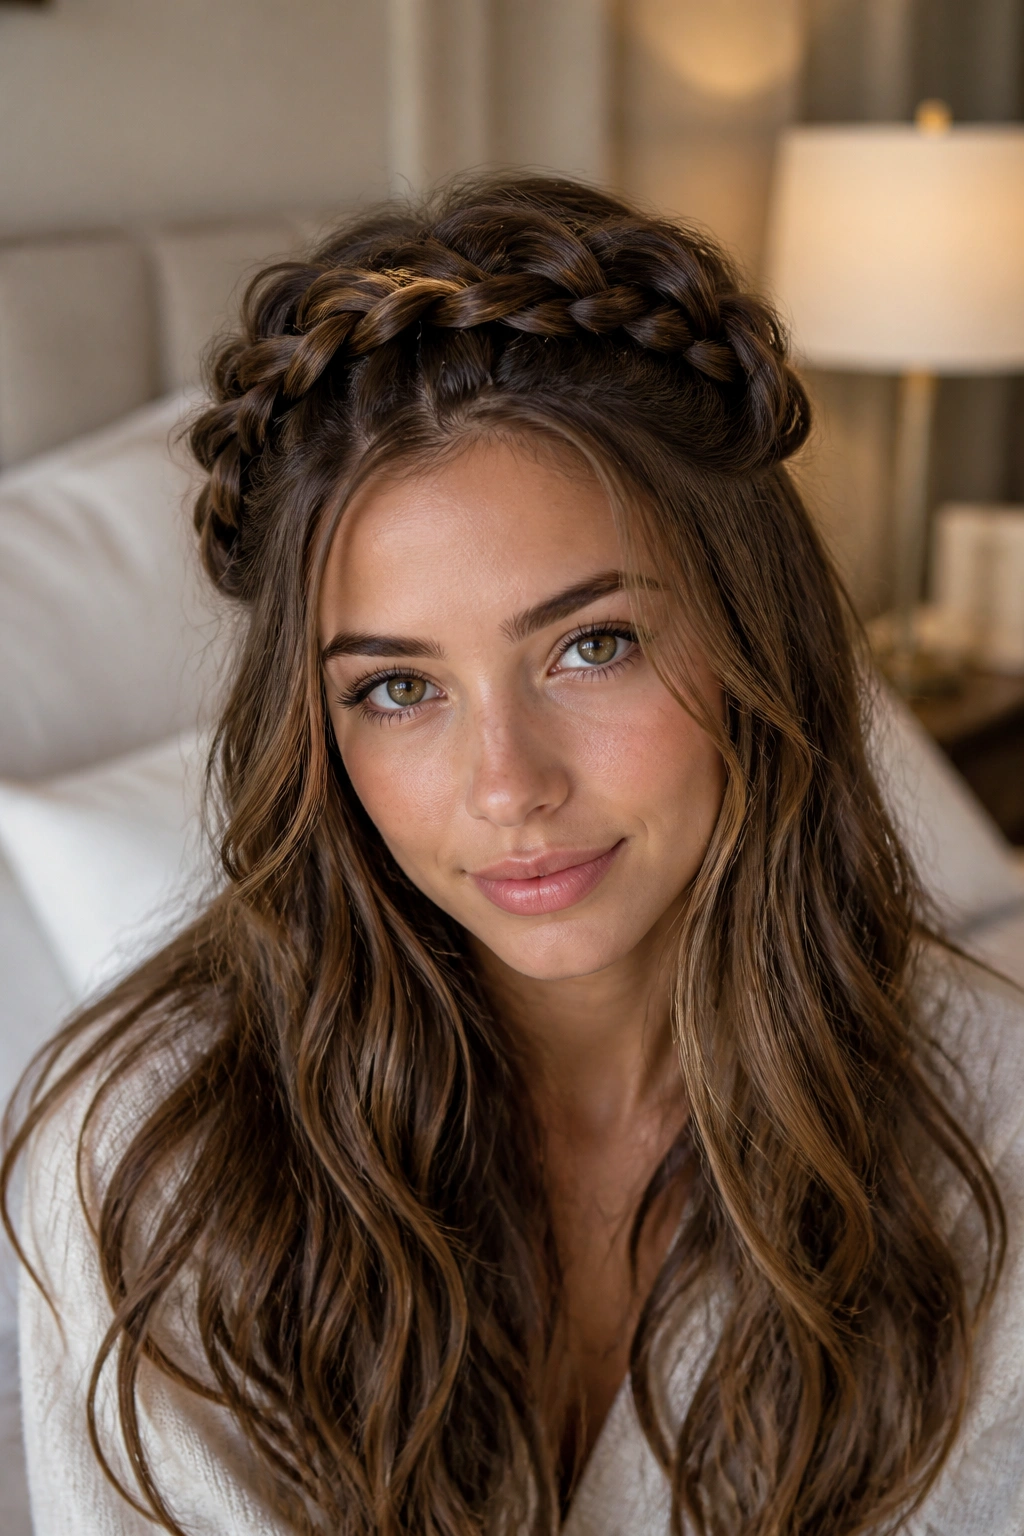
Why let the front pieces hang loose when they can frame the face on purpose? A half-up Dutch braid crown keeps the top section controlled and leaves the length free, which is a nice compromise when you want shape without committing to a full updo.
On long hair, this style has room to breathe. The braid can travel from temple to temple, or you can split it into two small braids that meet at the back. Either way, the long lengths underneath keep the look soft instead of severe. That’s the whole point. You get control at the top and movement below.
Keep the Crown Smooth
The crown area deserves more care than people give it. If you’re rough with the first section, the braid lifts in strange places and the whole style starts looking patchy.
- Part the hair from ear to ear before you braid
- Clip the loose bottom section away so it does not get tangled in your hands
- Keep the face-framing pieces a little looser if you want a softer finish
- Pin the braid flat at the back with two crossed bobby pins, not one
This one is especially good for long layers because it lets the top look polished while the lengths keep their natural movement. And if the ends are curled, even lightly, the contrast reads well from a distance.
5. Dutch Fishtail Hybrid Braid
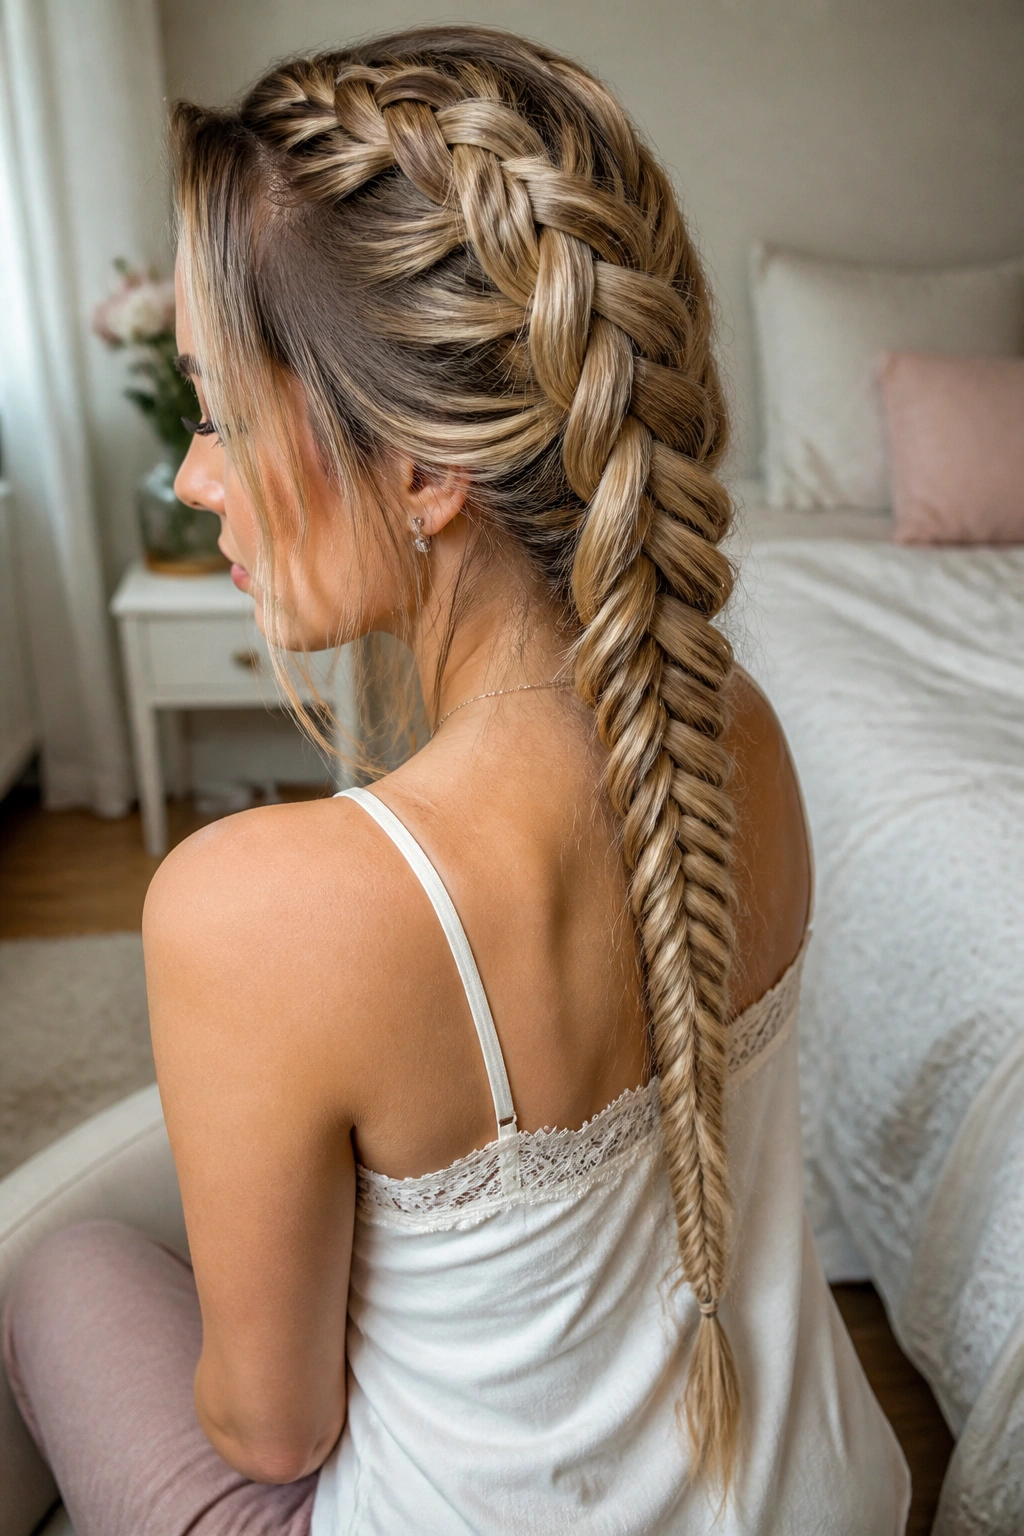
The fishtail hybrid looks fancier than it is. That’s part of the charm. You start with a Dutch braid near the crown, then shift into a fishtail pattern once the braid has enough body to hold its shape. The texture changes halfway down, and that change is what makes the style feel rich instead of flat.
On very long hair, this braid can look almost carved. The top section stays dense and raised, while the lower fishtail portion gets narrower and more detailed. It’s a nice choice if your hair has a lot of length but not much natural volume, because the braid itself creates the illusion of thickness.
The only catch: don’t rush the transition. If you switch from three strands to two strands too early, the braid loses its clean line. Hold the Dutch section for a few inches, secure the hand position, and then move into the fishtail once the braid feels stable in your fingers.
This is one of those styles that looks best when it’s not too neat. A little pull-apart at the fishtail section gives it that lived-in texture people always try to fake with too much product.
6. Side-Swept Dutch Braid for Thick Lengths
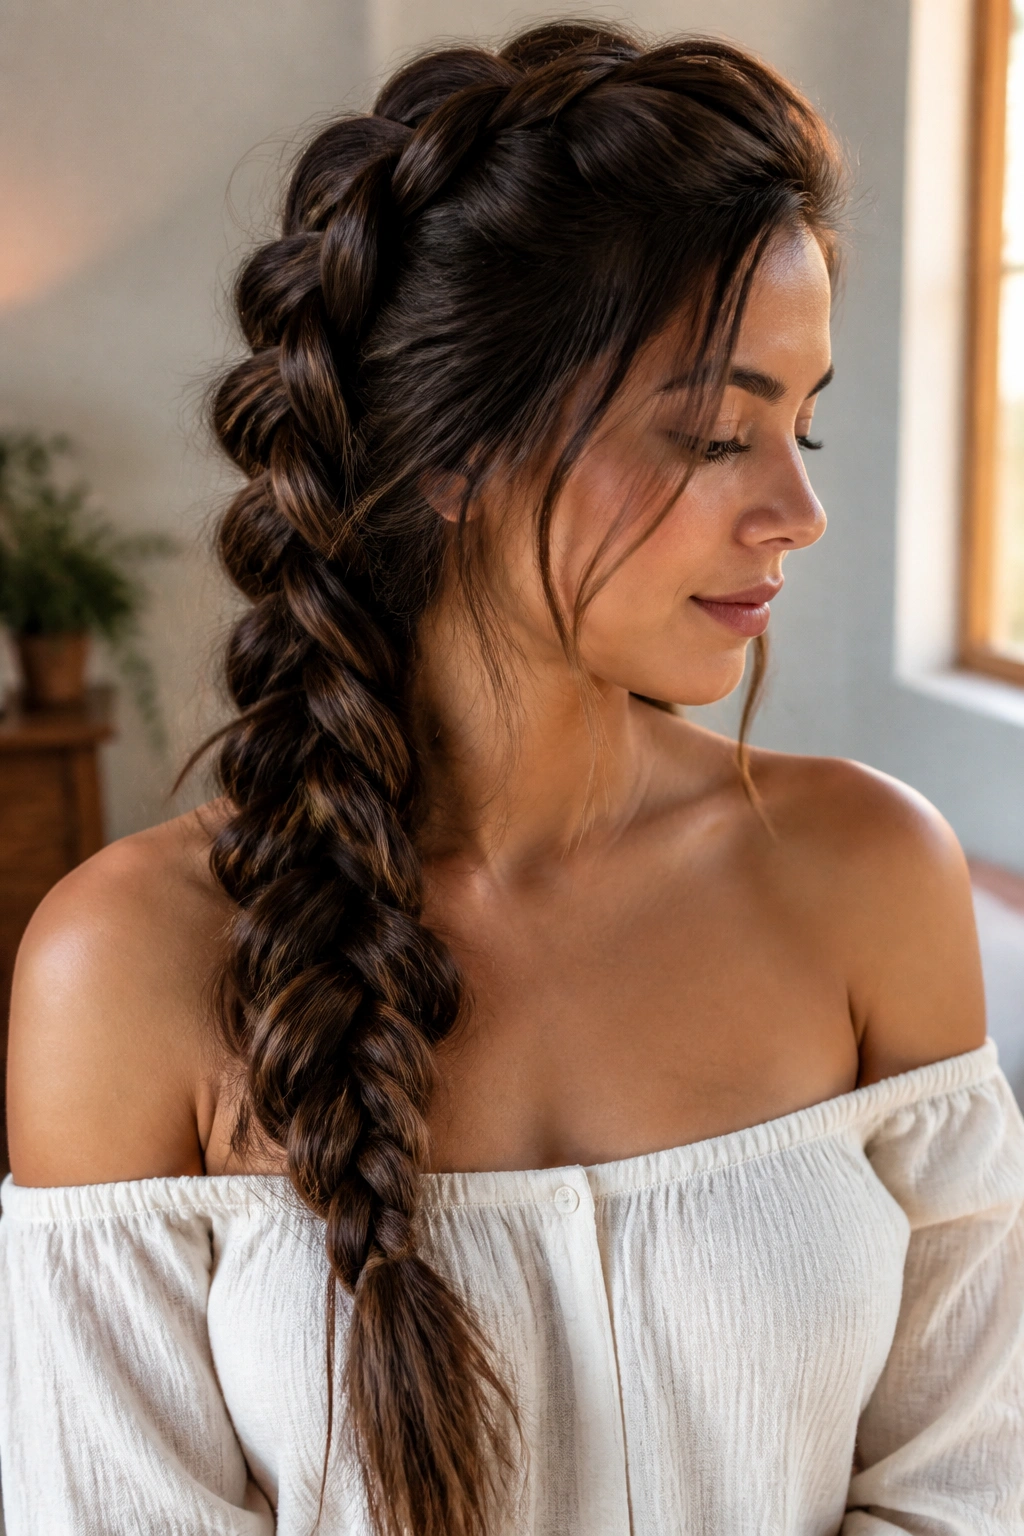
Side-swept braids are not a backup plan. On thick, long hair, they’re often the easiest way to make the hair feel controlled without turning the style into a helmet. Sweeping the braid over one shoulder also makes the length visible from the front, which is underrated.
The side placement changes the whole weight distribution. Instead of pulling straight down the back, the braid rests across one shoulder and lets the long tail drape. That matters if your hair is heavy enough to flatten your scalp before lunch. Start the braid slightly behind one ear and direct it across the back, then finish it over the shoulder where it can sit without tugging.
What to Watch For
- Keep the nape section snug so the braid does not twist awkwardly
- Feed in hair evenly from both sides, or the braid will lean
- Stop widening the braid once it reaches the shoulder; too much pulling makes it frizzy
- If your hair is fine, use a touch of mousse at the roots for hold
I reach for this style when I want the braid to feel relaxed, not precious. It works especially well with long hair that has natural wave, because the side sweep lets the movement show instead of fighting it.
7. Four-Strand Dutch Braid Ponytail
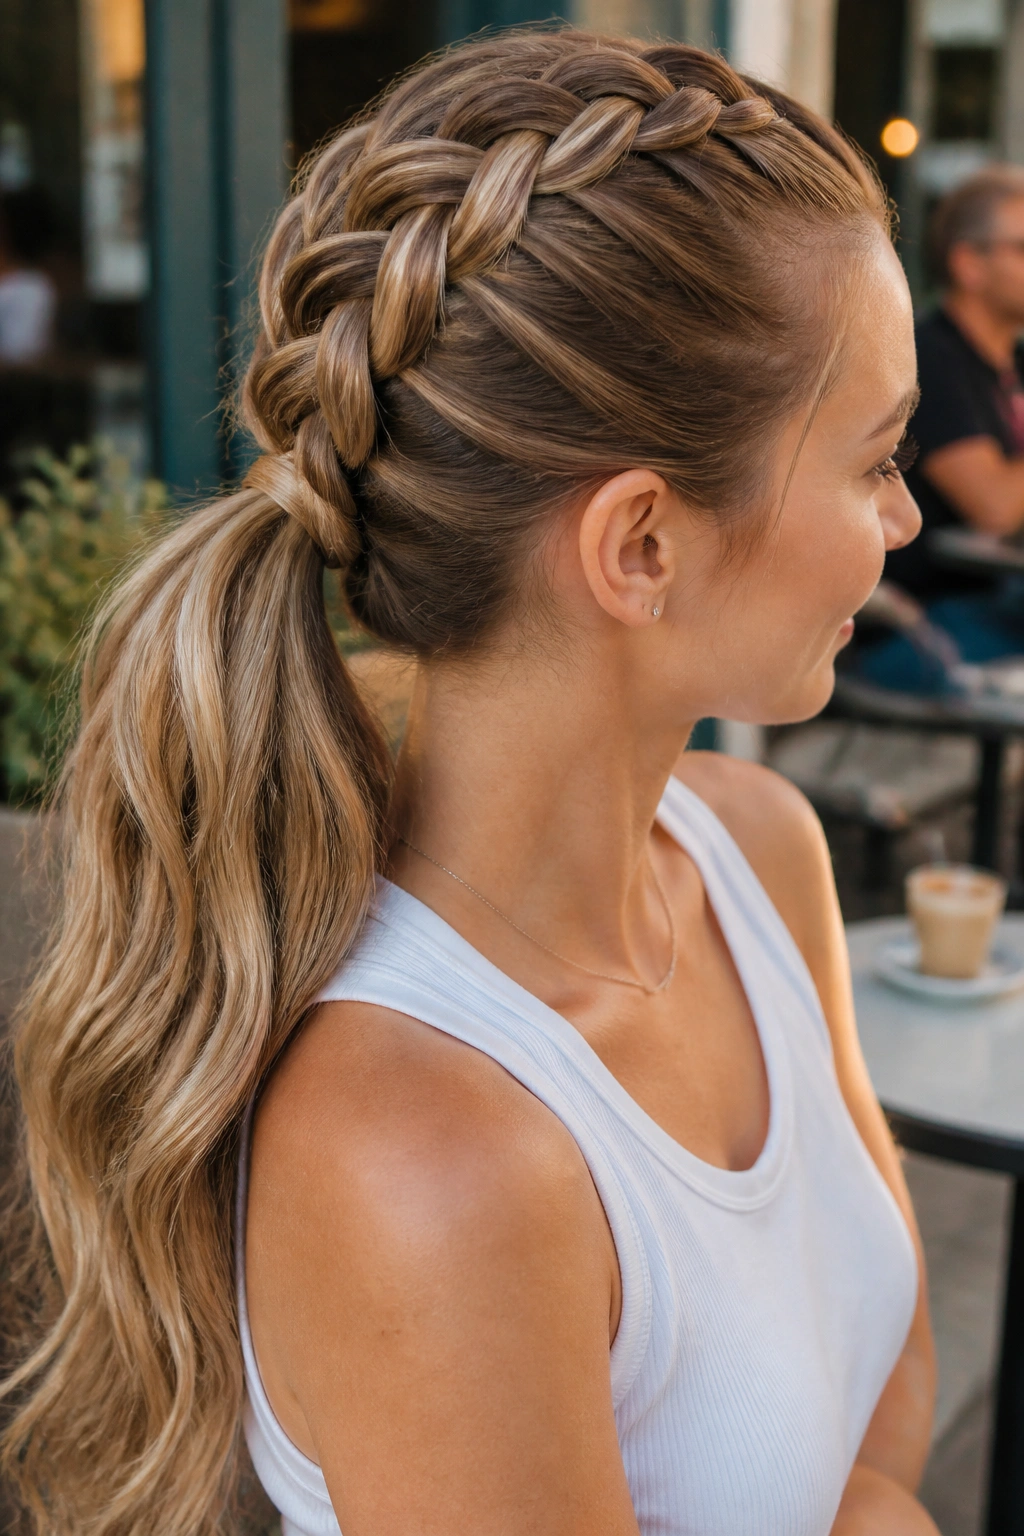
Four strands change the whole mood. The braid looks denser, a little more graphic, and less predictable than the standard three-strand version. On long hair, that extra strand pays off because there’s enough length for the pattern to actually show.
This is the style to choose when a regular braid feels too familiar. Start the Dutch base at the crown, then split the lower section into four strands once you’ve established the braid line. It takes a bit of finger memory, and the first try may look looser than you want. Fine. The braid usually settles after a few passes.
How to Keep the Strands Even
- Use clips to separate the four sections before you begin
- Keep each strand close in size; one oversized strand throws the whole braid off
- Braid on slightly damp or lightly product-coated hair so the sections stay tidy
- Stop and reset if the braid starts twisting instead of stacking
The ponytail finish makes this one practical. You get the visual detail of the four-strand pattern at the top and the movement of loose lengths at the bottom. It’s a nice middle ground between elaborate and wearable.
8. Dutch Braid Into Low Bun
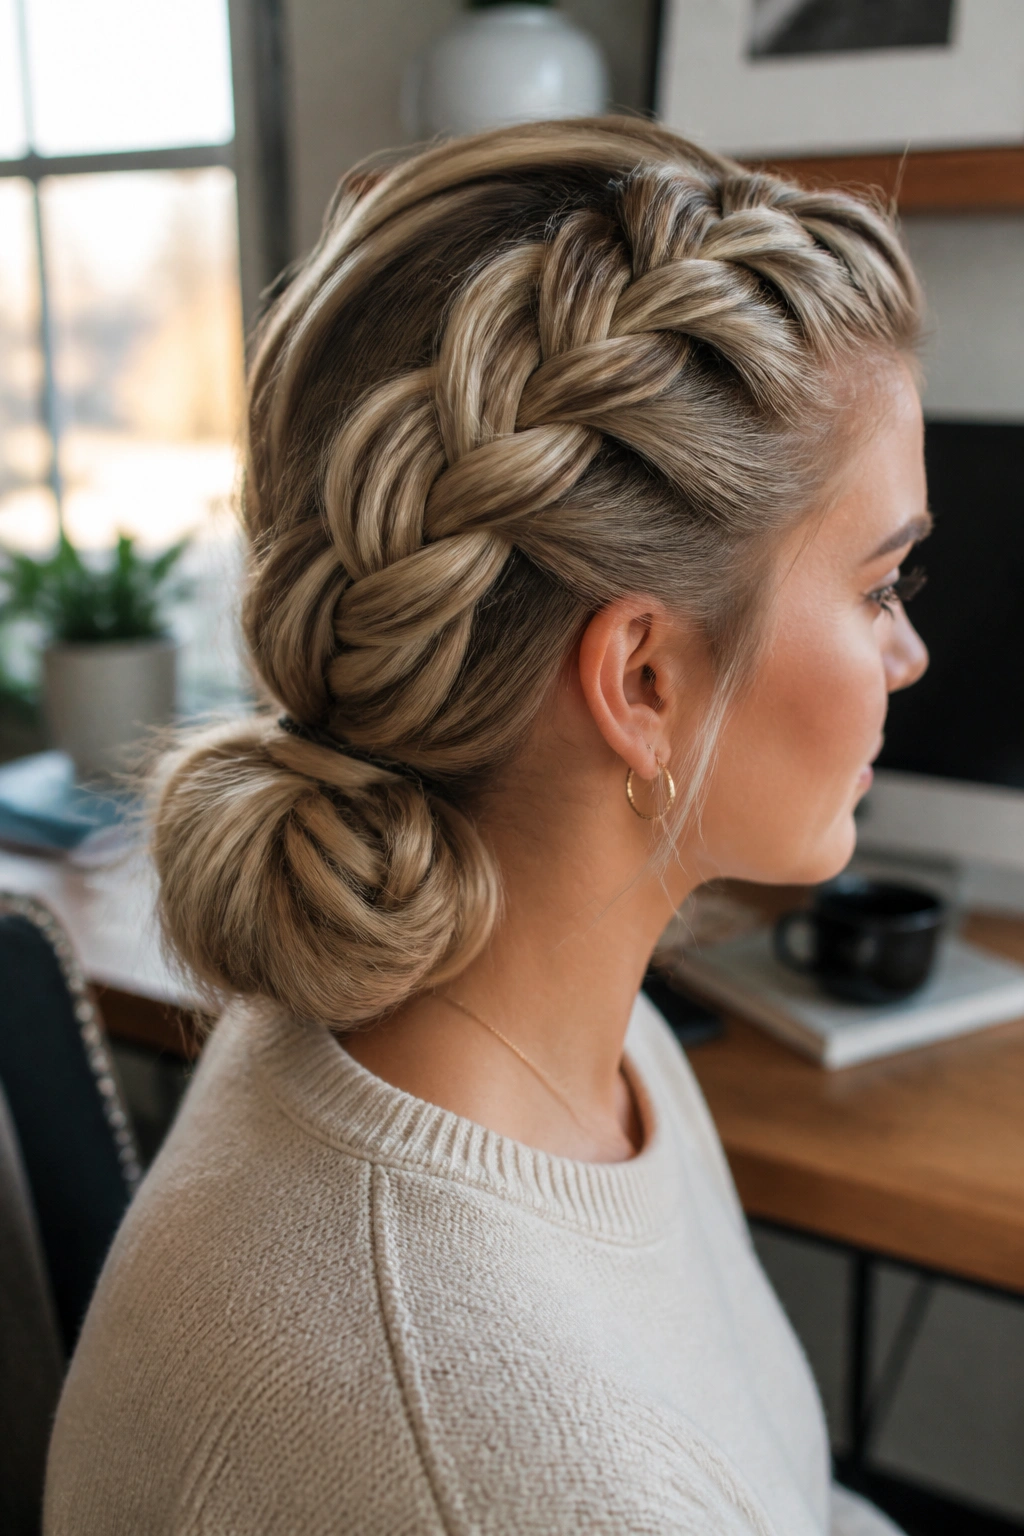
Want the braid off your neck? This is the answer. A Dutch braid that feeds into a low bun gives you the clean front line of a braid and the tucked-up finish of a bun, which is useful when your hair is long enough to start feeling hot or heavy.
The braid can run straight down the middle or angle slightly from the side, depending on how formal you want the shape to feel. Once the braid reaches the nape, twist the remaining length into a bun and pin it in place with bobby pins arranged in an X. That crossing pattern holds better than a single straight pin, especially on long hair that likes to loosen as you move.
This style holds up well on second-day hair because a little natural grit helps the braid grip. If your hair is freshly washed and slippery, use a small amount of volumizing mousse before you start. The bun should feel tucked, not smashed. That’s a subtle difference, but you can see it.
A braid-bun combo like this is one of the few styles that can look neat without looking severe. It has a little polish, a little softness, and enough structure to stay put.
9. Waterfall Dutch Braid on Long Layers
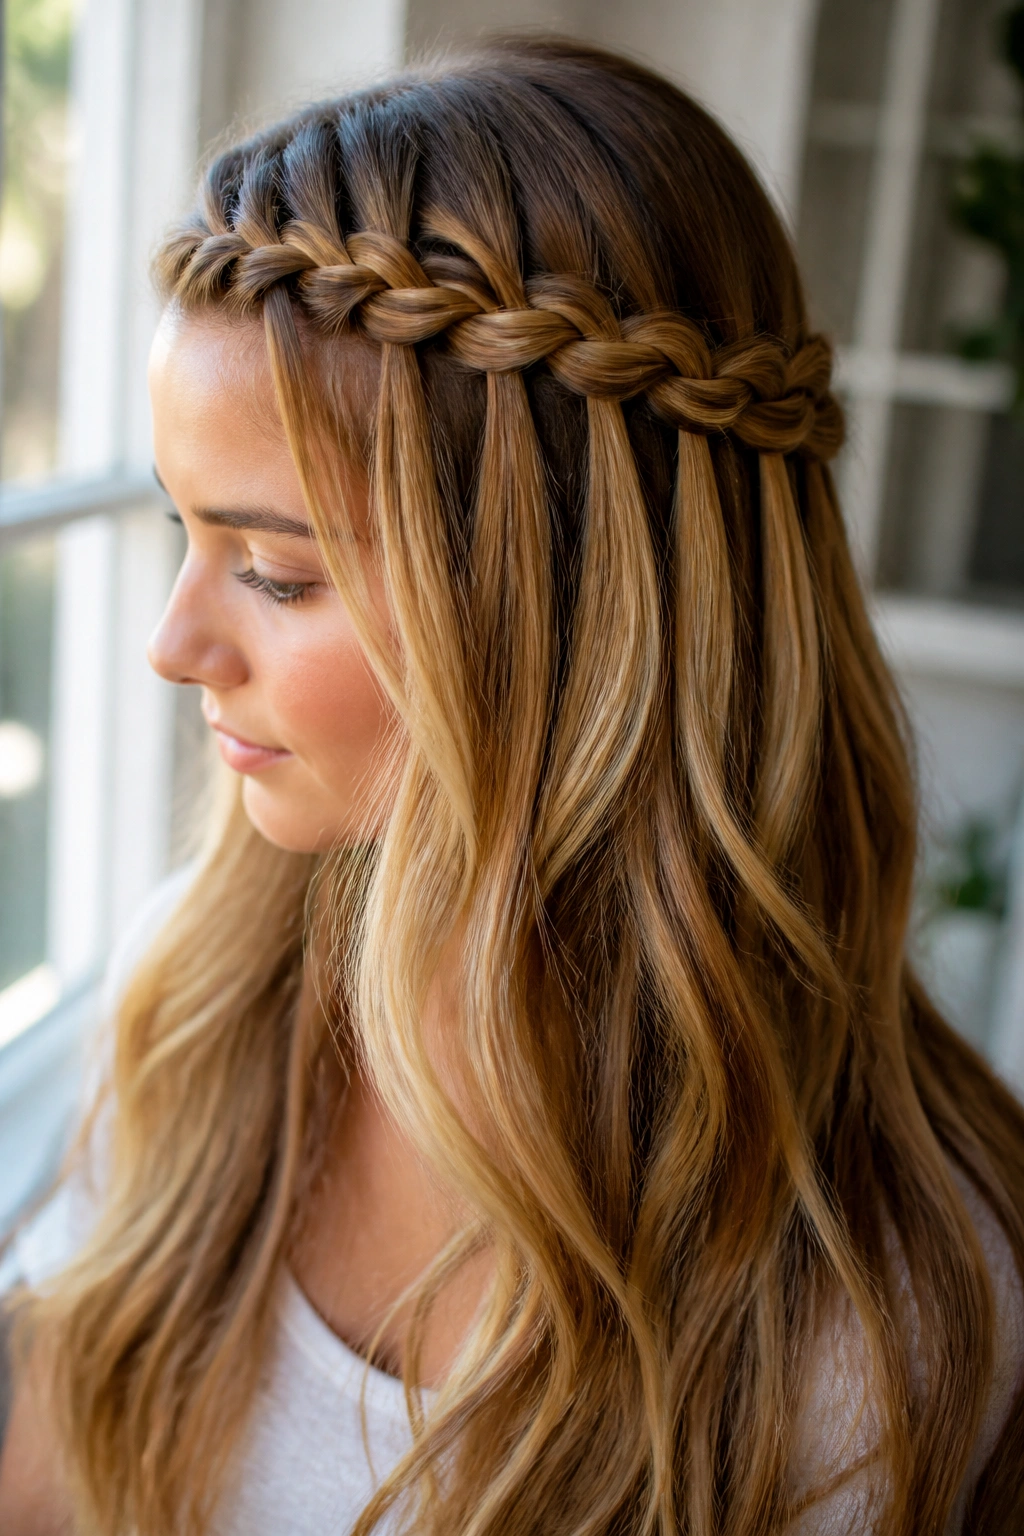
Waterfall braids are a little needy. I say that with affection. They take more patience than a plain Dutch braid, but long layers make them worth the trouble because the dropped pieces create movement that shorter hair can’t really match.
The braid works by feeding one strand through while letting another fall free, which creates those little cascading gaps. On long hair, those gaps show off waves, curls, or even straight ends with a bit of shine. It’s decorative, not rugged. Don’t choose it if you want a braid that can survive a hard workout.
Where the Drama Comes From
- Best on long layers, soft waves, or hair with a bit of bend
- Looks strongest when the loose pieces are curled lightly at the ends
- Needs gentle tension around the crown so the braid line stays visible
- Works well with a side part if you want the look to feel romantic rather than formal
The danger is making it too tight. When the braid hugs the head too hard, the waterfall effect disappears and you’re left with a fussy braid that doesn’t flatter the hair. Keep it loose enough to move, and the whole style reads better.
10. Dutch Halo Braid for Long Hair
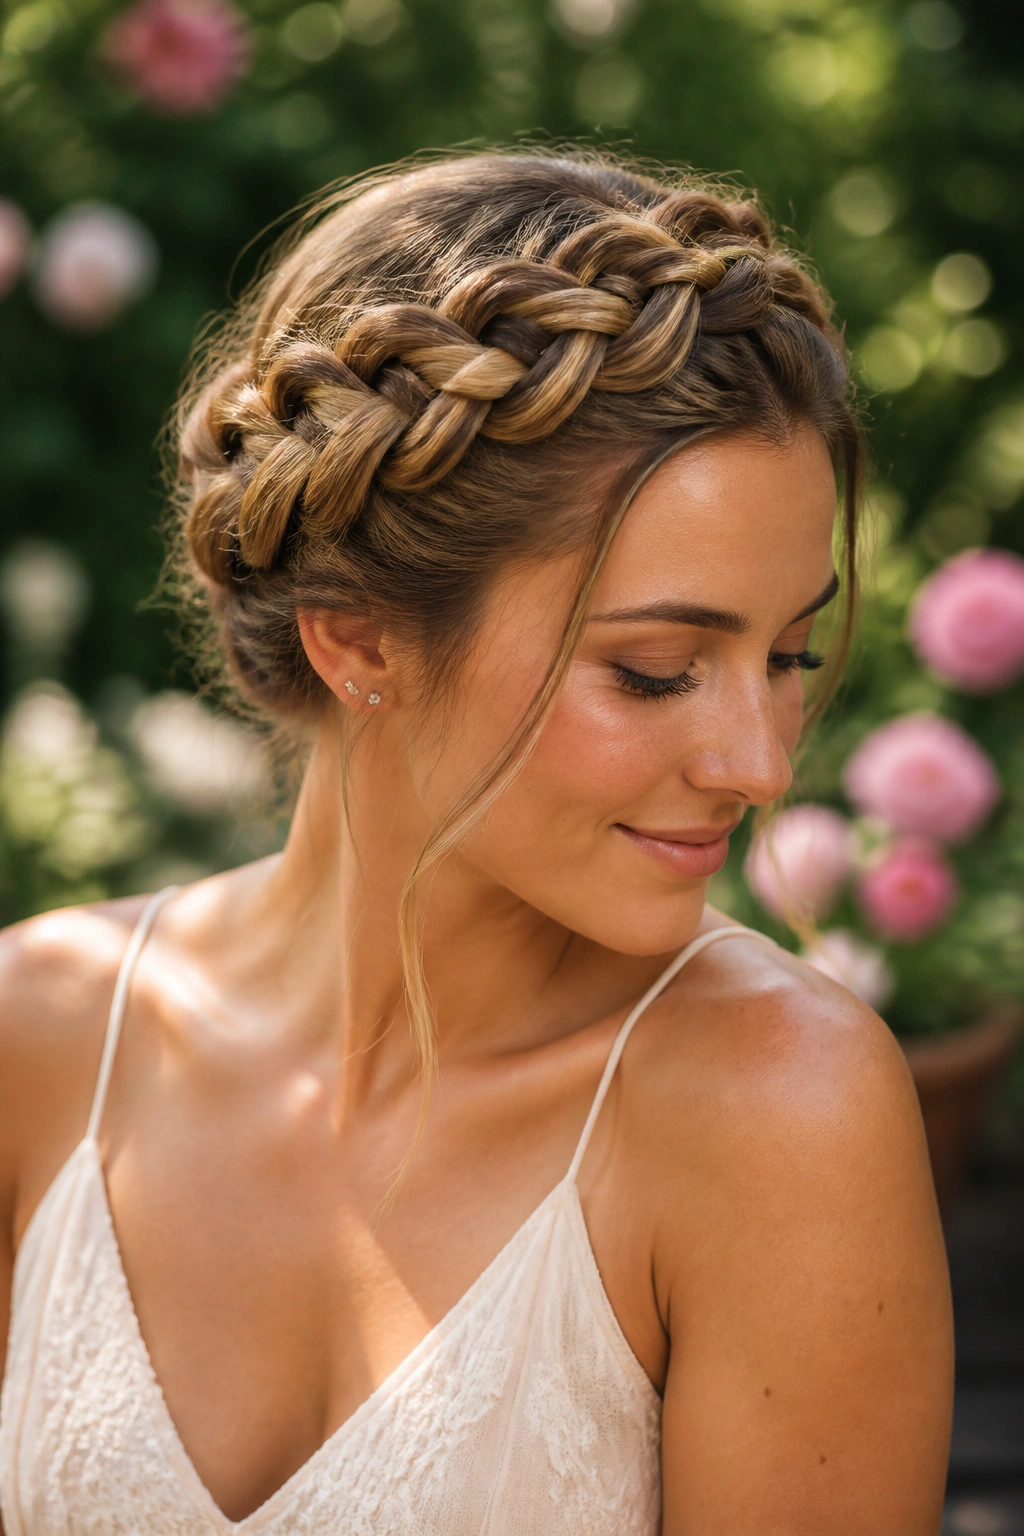
Halo braids make long hair look formal without turning it stiff. They wrap the braid around the head like a crown, which is why they show up so often for dressier events, but they can also work for a normal day if you like your hair fully contained.
The easiest way to build one is to braid from one temple across the back of the head and around to the other side, then tuck the remaining length underneath the braid path. On long hair, the tail has enough length to disappear cleanly, which is a blessing. Shorter hair often needs extra pins and a little prayer.
This style lives or dies by the line around the ears. If that part gets lumpy, the whole halo looks improvised. Use a mirror at the side and another behind you if you’re doing it yourself. The first braid pass should feel firm, almost anchored, because the braid has to support itself all the way around the head.
This one takes patience, but the payoff is real. It looks composed from every angle, and the long lengths tucked inside make the finished shape look fuller than it has any right to.
11. Pull-Through Faux Dutch Braid

I recommend this style to the person who says, “I can’t braid.” That’s usually code for “my fingers get confused after the third pass,” and fair enough. A pull-through braid gives you the look of a Dutch braid without demanding the same handwork.
You build it with small elastics, stacking ponytail sections one over another and then splitting the loops apart to mimic braid volume. On long hair, the result can be huge in the best way. The sections have room to puff out, so the braid looks thick even if your natural hair is fine.
Why It Helps Beginners
- The sections are easier to see than in a traditional braid
- Mistakes are easier to fix because each elastic creates a new anchor point
- Long hair gives you enough length to build several stacked sections
- The shape can be widened by gently tugging each loop after it’s secured
Keep the elastics evenly spaced, usually about 1 to 2 inches apart, so the style doesn’t collapse in the middle. If you want it to look more like a true Dutch braid, wrap a tiny strand of hair around the elastic at the crown. That little cover-up makes a surprising difference.
12. Accent Dutch Braids with Loose Waves

Two skinny Dutch braids can carry more style than one thick one. That sounds counterintuitive until you see how they frame the face and break up long waves without taking over the whole head. The result feels casual, but not lazy.
This is the style I’d call the easiest confidence move in the group. Part off two small sections near the temples, braid each one straight back in a Dutch pattern, then let the rest of the hair fall loose in waves or a soft blowout. You get structure near the front and movement everywhere else, which is a very nice balance for long hair.
The braids should stay slim. If they get too wide, they stop feeling like accents and start competing with the rest of the hair. That’s the mistake. Keep them narrow enough that the loose lengths still read as the main event.
A little shine spray on the ends helps tie the look together. Not a heavy oil. Just enough to keep the waves from looking dry next to the braids.
13. Dutch Braid Pigtails with Ribbon

Ribbon changes the whole thing. A Dutch braid becomes softer, more playful, and a little less expected the moment you thread in satin or grosgrain. On long hair, the ribbon can trail down the braid like a second strand of color, which is a nice way to make the style feel intentional.
I like this look when the outfit needs a touch of contrast. A dark ribbon against light hair, or a bright ribbon against a neutral shirt, does a lot of work without asking the braid to become more complicated. Start the braid at the crown or just behind the temple, weave the ribbon into the outer strands, and tie it off at the end so it stays visible all the way down.
- Satin ribbon gives a smoother, dressier finish
- Grosgrain ribbon holds shape better and slips less
- Keep the ribbon flat as you braid so it does not twist awkwardly
- Tie the end under a small clear elastic if you want the finish to stay tidy
This style is especially good on long hair because the ribbon has enough length to trail naturally. On shorter hair, it can look like an afterthought. Here, it looks like a feature.
14. Zigzag Part Dutch Braids
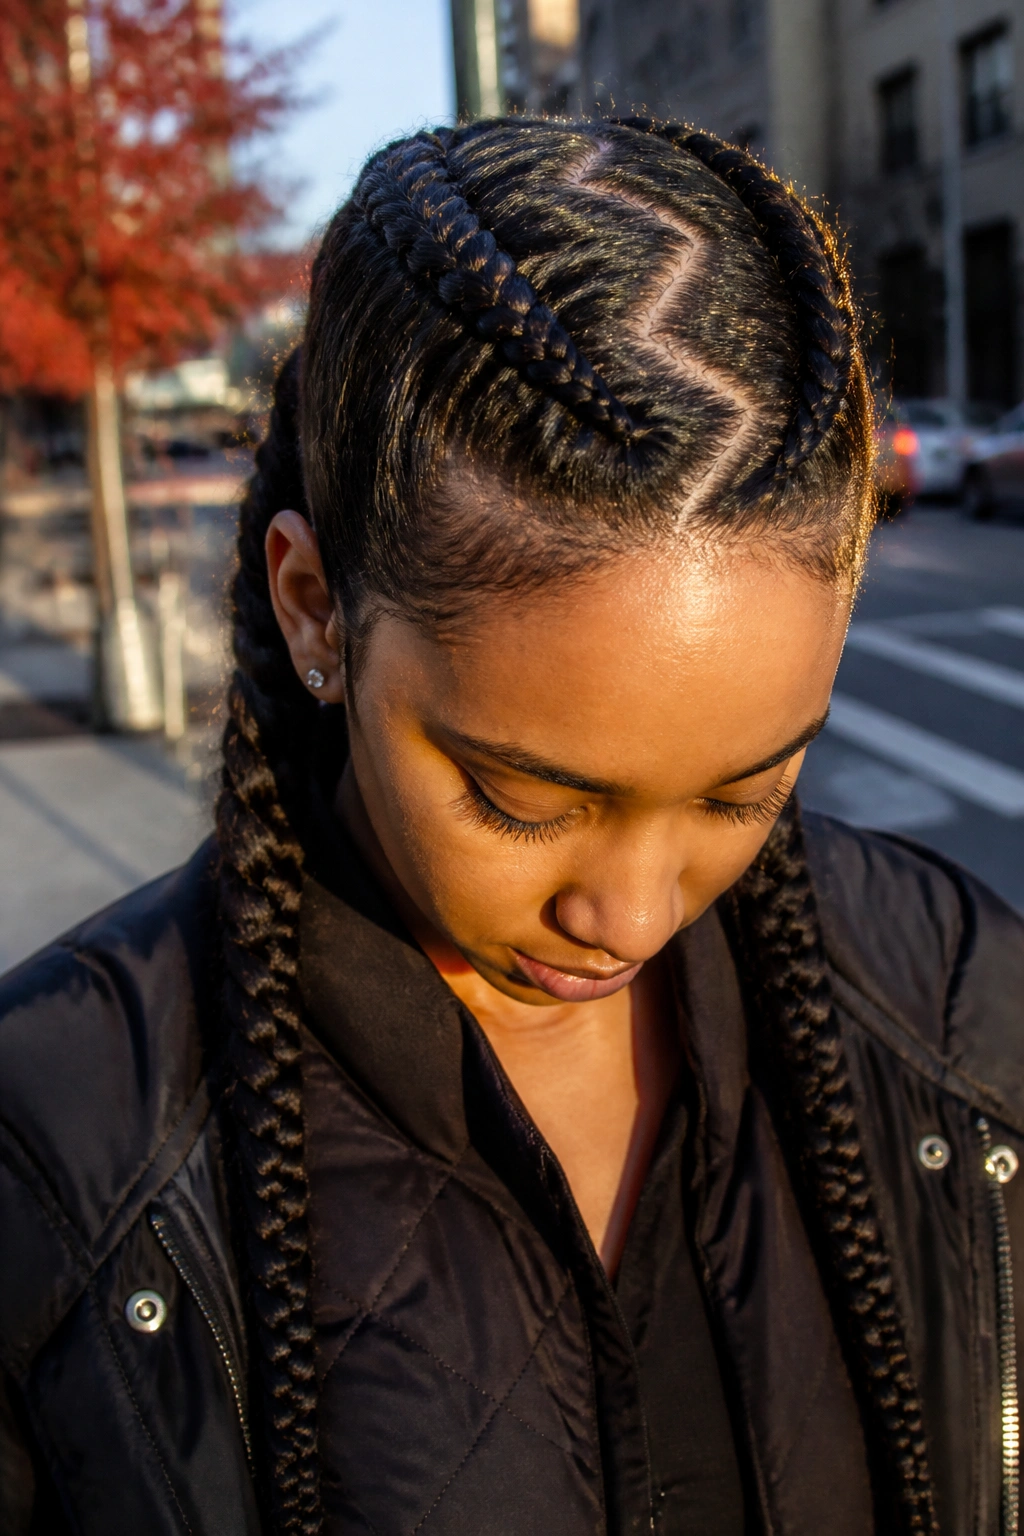
A zigzag part is small drama, and I mean that kindly. It changes the top of the style before the braiding even starts, which is useful when you want long hair to feel playful without piling on extra accessories.
The parting is the whole point. Use a rat-tail comb to carve the line in angled sections instead of one straight center part, then braid each side in a Dutch pattern. The result looks more textured right from the scalp. It also helps break up the heaviness that can happen when long hair falls flat across a straight part.
Parting and Placement
- Work on dry hair so the part lines stay visible
- Use the tip of the comb, not the corner of a brush
- Keep the angles shallow if you want the zigzag to read cleanly
- Secure each braid low enough that the pattern on top stays visible
This style tends to suit people who like a little edge but do not want a full statement braid. It’s also a smart choice for kids, teens, or anyone who gets bored fast with straight-line parts. The braid itself stays familiar; the part does the talking.
15. Dutch Braided Mohawk
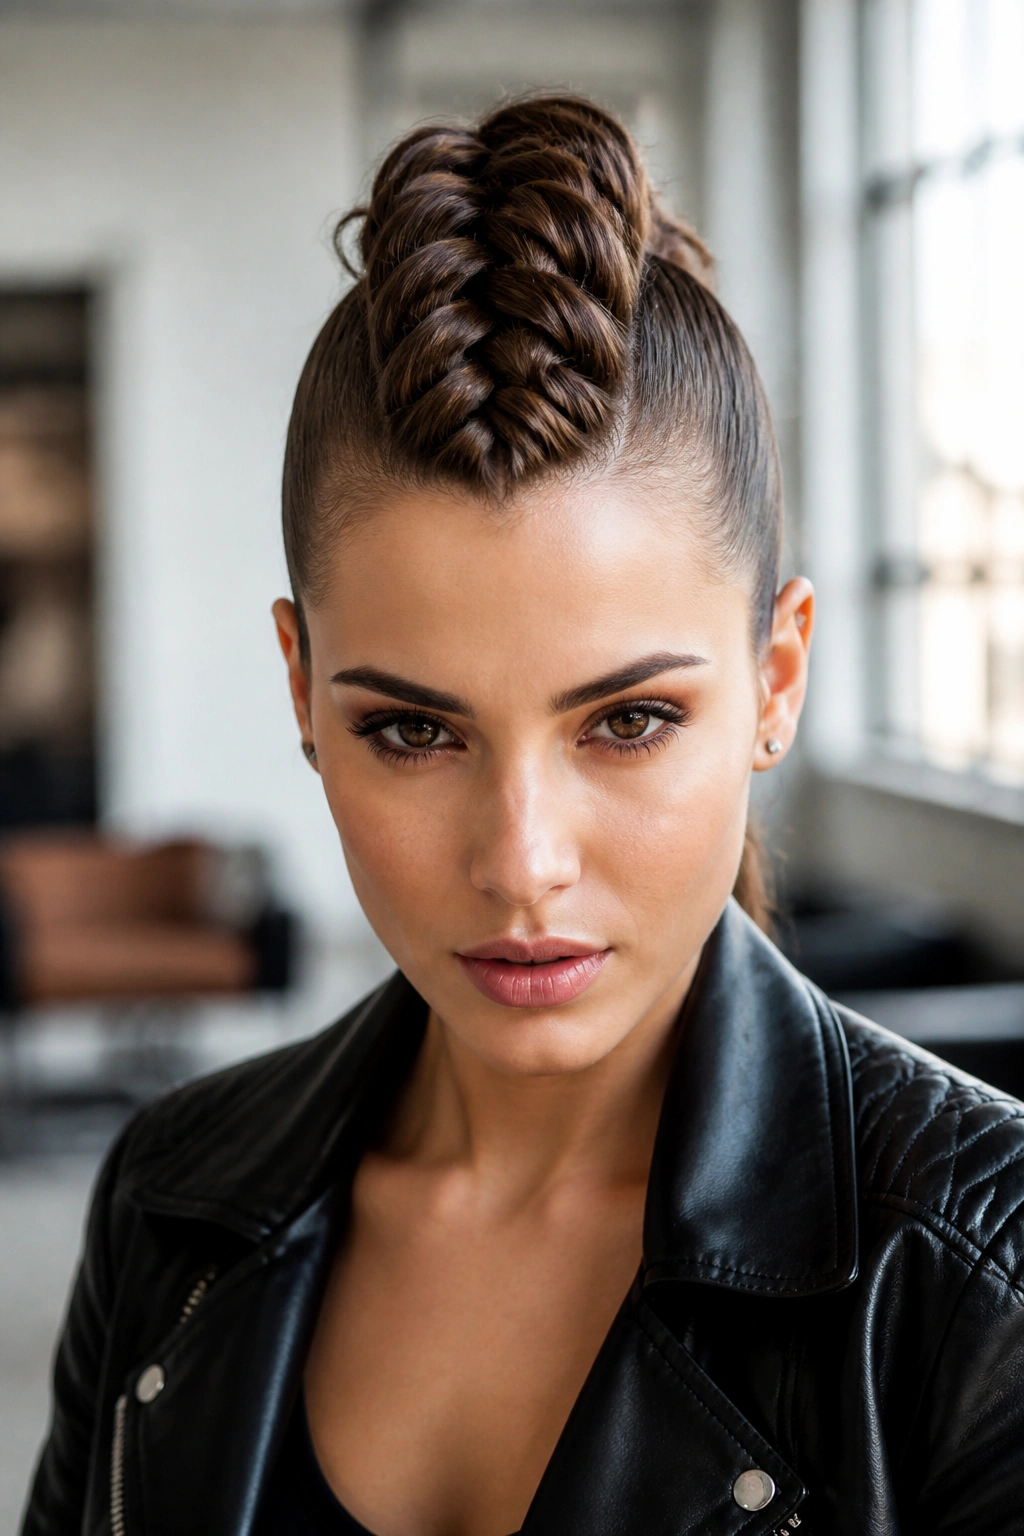
Dutch braid mohawks are loud in the best way. They pull the sides tight and leave the center braid raised, which gives long hair a strong shape and a little attitude. If you want subtle, skip it. If you want people to notice the braid before they notice anything else, this is the one.
The top braid should sit high and clean, almost like a ridge down the scalp. The sides can be slicked with gel or smoothed back with a soft brush, depending on how sharp you want the finish. Long hair helps here because the center braid has enough length to look dramatic instead of narrow.
This style looks best when the crown has height. A tiny bit of volume at the roots stops the braid from flattening into the head, which can make the mohawk shape disappear. Dry shampoo at the roots and a light lift at the front do the job without making the hair feel gritty.
It’s not a quiet style, and that’s the point. Long hair gives it scale, and scale is what makes it work.
16. Rope-Twisted Dutch Braid Combo
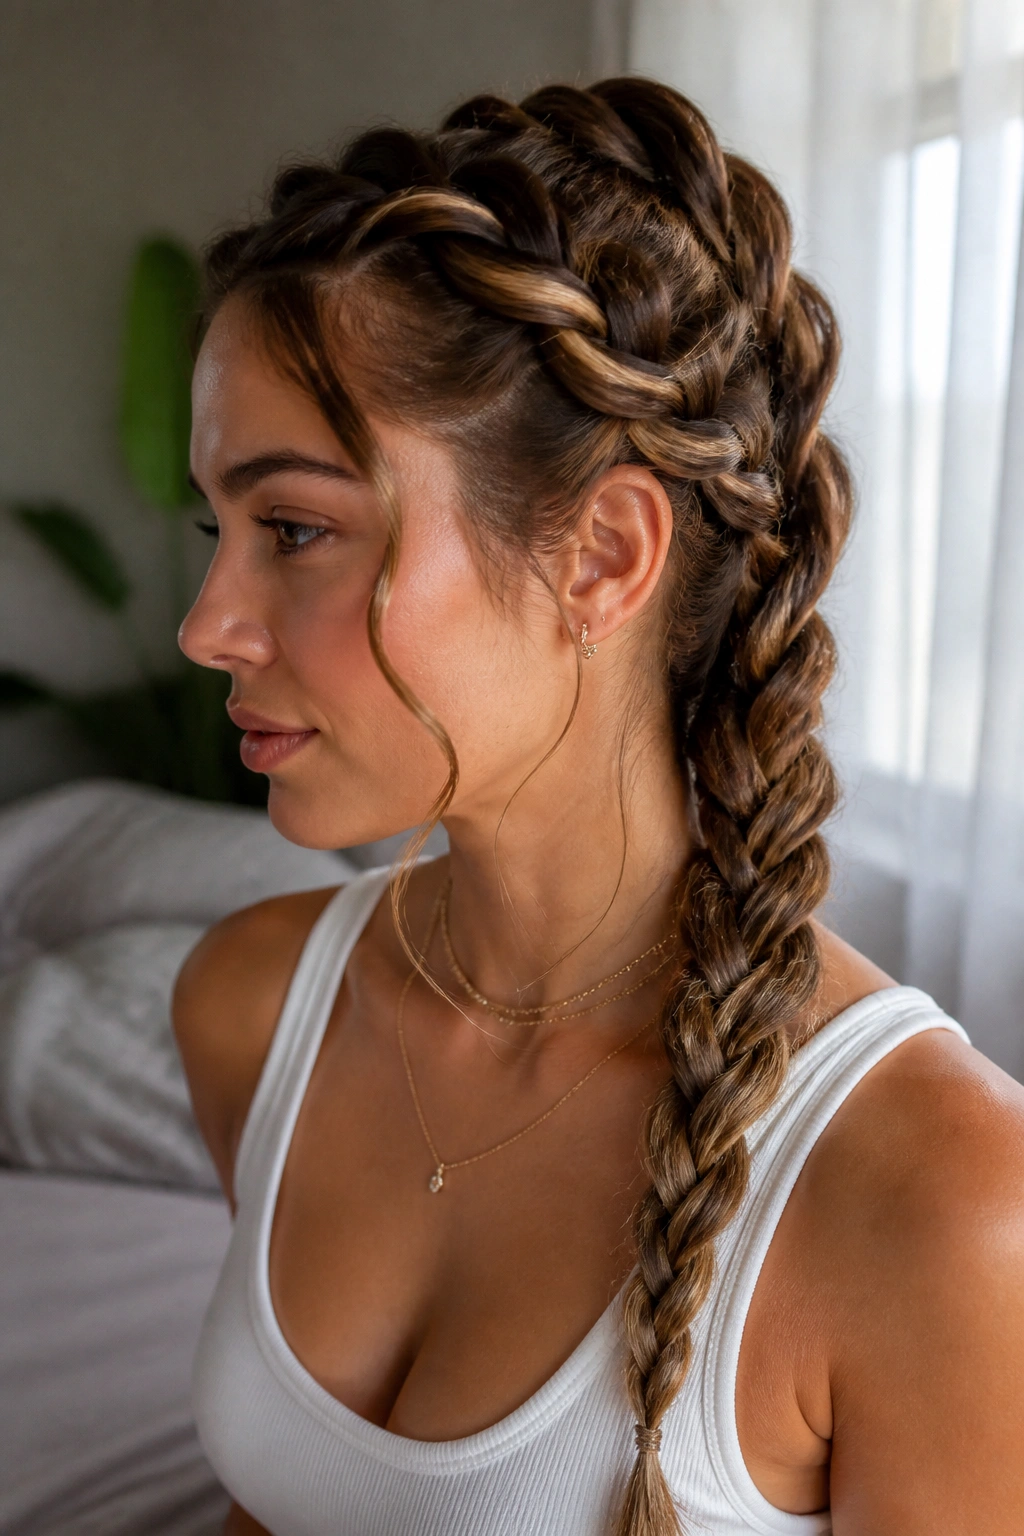
Rope twists add a different kind of grip. They don’t look like a standard braid, so when you mix them into a Dutch braid, the texture changes in a way that feels deliberate rather than busy. That’s the sweet spot.
You can use rope twists near the front and switch to a Dutch braid through the back, or braid first and finish with twisted sections at the ends. Either way, long hair gives you enough length to show both textures clearly. The braid reads as structured; the twist reads as looser and more reflective. Together, they keep the style from going flat.
Twist-to-Braid Balance
- Twist each section tightly at first, then ease off once the pattern is set
- Keep the braid section slightly tighter than the twist so the style doesn’t collapse
- Use a small amount of smoothing cream on frizzy ends, but stay away from the roots
- Pin the transition point well, because that’s where mixed textures tend to loosen
This works best when you want long hair to look styled without looking too formal. It has a little movement, a little grip, and a bit of surprise at the ends.
17. Bubble Ponytail with Dutch Braid Base
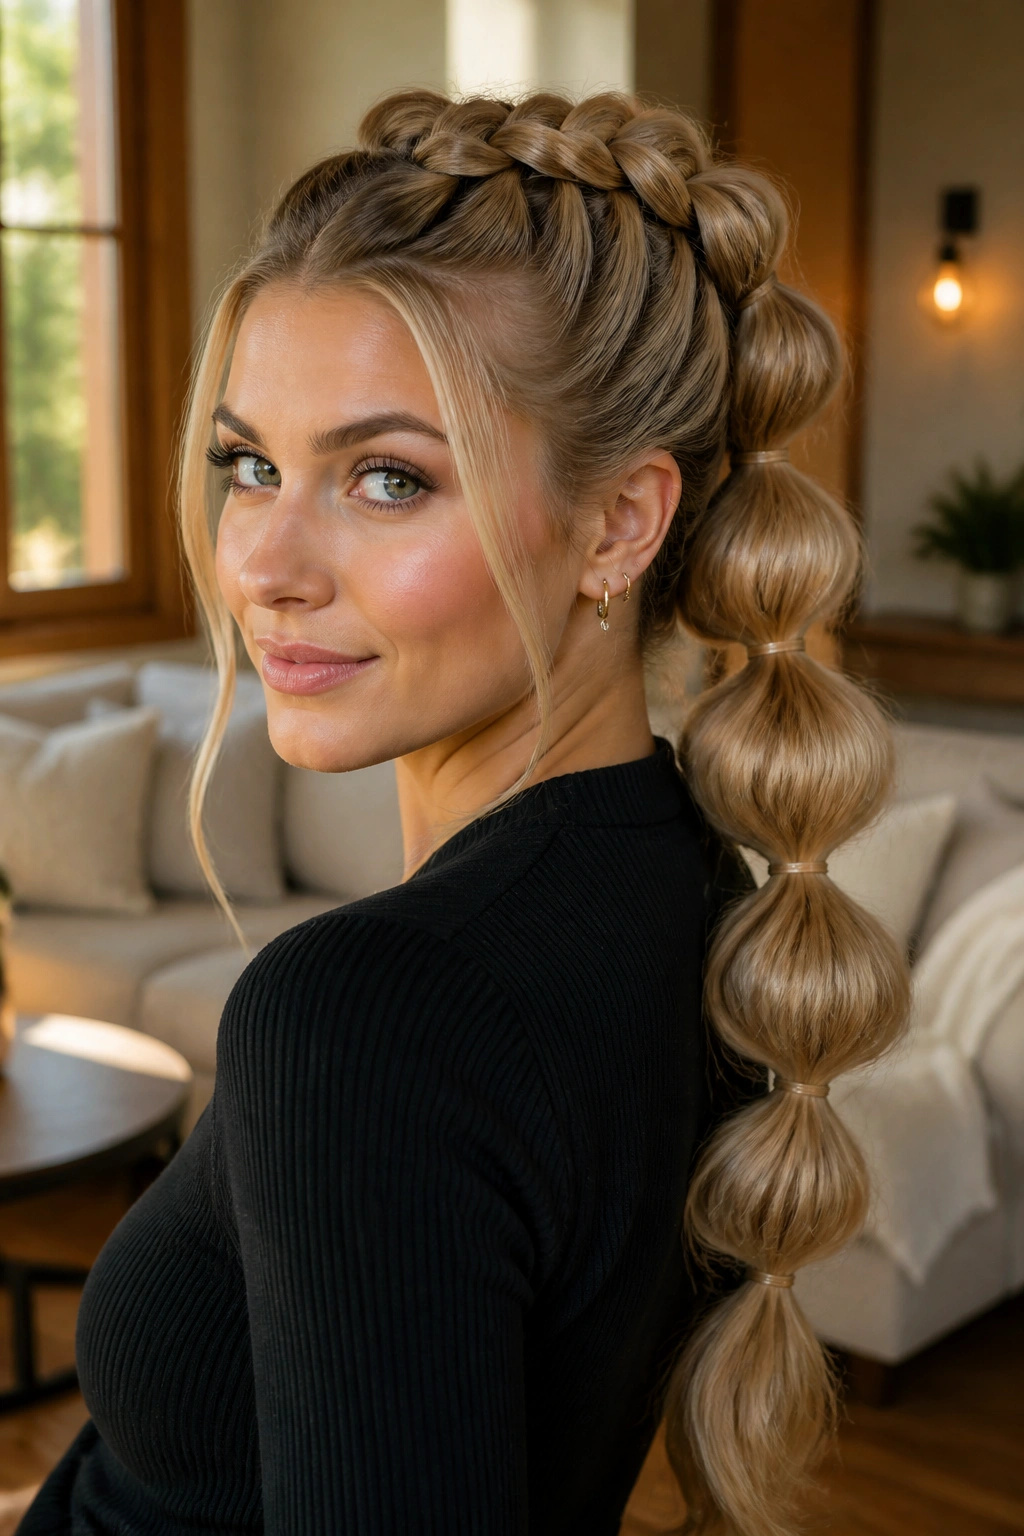
Bubble braids are happiest on very long hair. You need length for the sections to puff out properly, and long hair gives you enough room to build several bubbles without the ponytail feeling cramped.
The Dutch braid base matters because it anchors the style and keeps the front from slipping. Once the braid reaches the crown or the nape, tie the rest into a ponytail, then add clear elastics every 2 to 3 inches down the length. Gently tug each section outward to form the bubble. Not too hard. You want roundness, not a mess.
Spacing the Bubbles
- Start the first elastic about 2 inches below the ponytail holder
- Keep the spacing even so the bubbles look balanced
- Use small clear elastics for a cleaner finish
- Pull each bubble outward with two fingers, not your whole hand
This is a fun style for long hair because the length becomes visible in a way it doesn’t in a standard braid. It feels playful, but the Dutch braid top keeps it from looking too childish.
18. Oversized Pancaked Dutch Braid for Long Hair
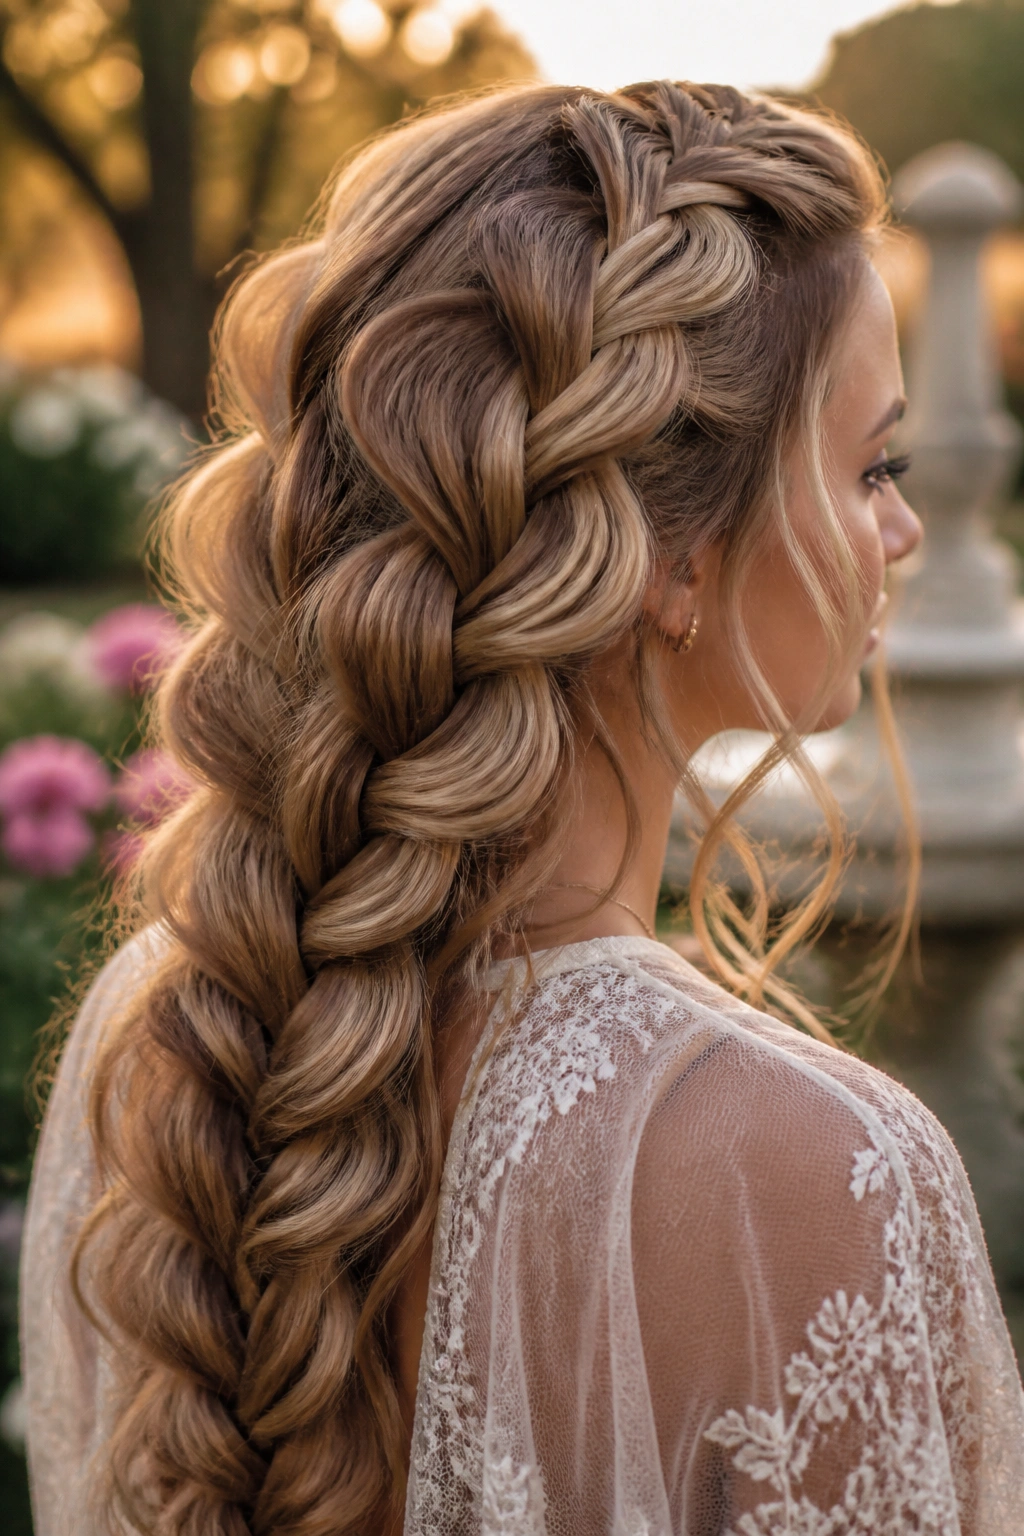
A pancaked Dutch braid is the one I reach for when I want width, not fuss. You braid normally, secure the end, then gently pull the outer edges of each loop apart so the braid spreads wider across the back. On long hair, that expansion looks especially good because the braid has enough length to fan out without falling apart.
The trick is restraint. Pull too hard and the braid loses shape. Pull a little, pause, check the mirror, then pull again if you need more width. That slow approach gives you control over the finish, which is the difference between a chunky braid and a frizzy one.
This style is a good choice when your hair is long but maybe a little too fine to look full in a standard braid. The pancaking creates visual weight, and the long tail lets the shape taper slowly instead of stopping abruptly. If you want, wrap a tiny strand around the elastic at the end and pin it under the braid. Clean finish. No loose bit waving around.
It’s the kind of braid that looks like it took more work than it did, and I mean that as a compliment.
Final Thoughts
Long hair gives Dutch braids room to do what they do best: show shape, show length, and hold texture in a way that shorter hair often can’t. The styles that stand out most are the ones that respect the weight of the hair instead of fighting it.
My own shortlist would be the classic double braids, the single braid down the back, and the halo braid when the day calls for something more polished. They all solve different problems, and none of them need a full drawer of products to work.
A clean part, a steady hand, and a little patience at the crown matter more than any clever trick. Get those pieces right, and Dutch braid hairstyles for long hair stop being “just braids” and start doing real work for you.
