



Updo hairstyles for medium hair work best when you stop treating medium length like a problem and start treating it like a shape with its own rules. Hair that lands around the collarbone, shoulder blade, or just below the shoulders can hold a twist, a braid, or a bun without the heaviness that long hair brings. It can also slip out faster than you’d like if you build the style the wrong way.
Medium hair is enough length for structure, but not enough length to be lazy. That is the sweet spot. You usually need cleaner sectioning, a few more pins than you expect, and a little texture at the roots so the style has something to grip.
The good news is that medium-length hair gives you range. A sleek bun can look sharp, a loose chignon can look soft, and a braided crown can hide shorter layers without making the whole thing feel stiff. A 1-inch curling iron, a tail comb, dry shampoo, flexible hairspray, and 8 to 12 bobby pins solve most of the usual headaches.
Some of these looks take five minutes. Some need a mirror, a few extra pins, and a steady hand. All of them are doable on medium hair, and the best ones don’t try to hide your length — they use it.
1. Low Twisted Chignon
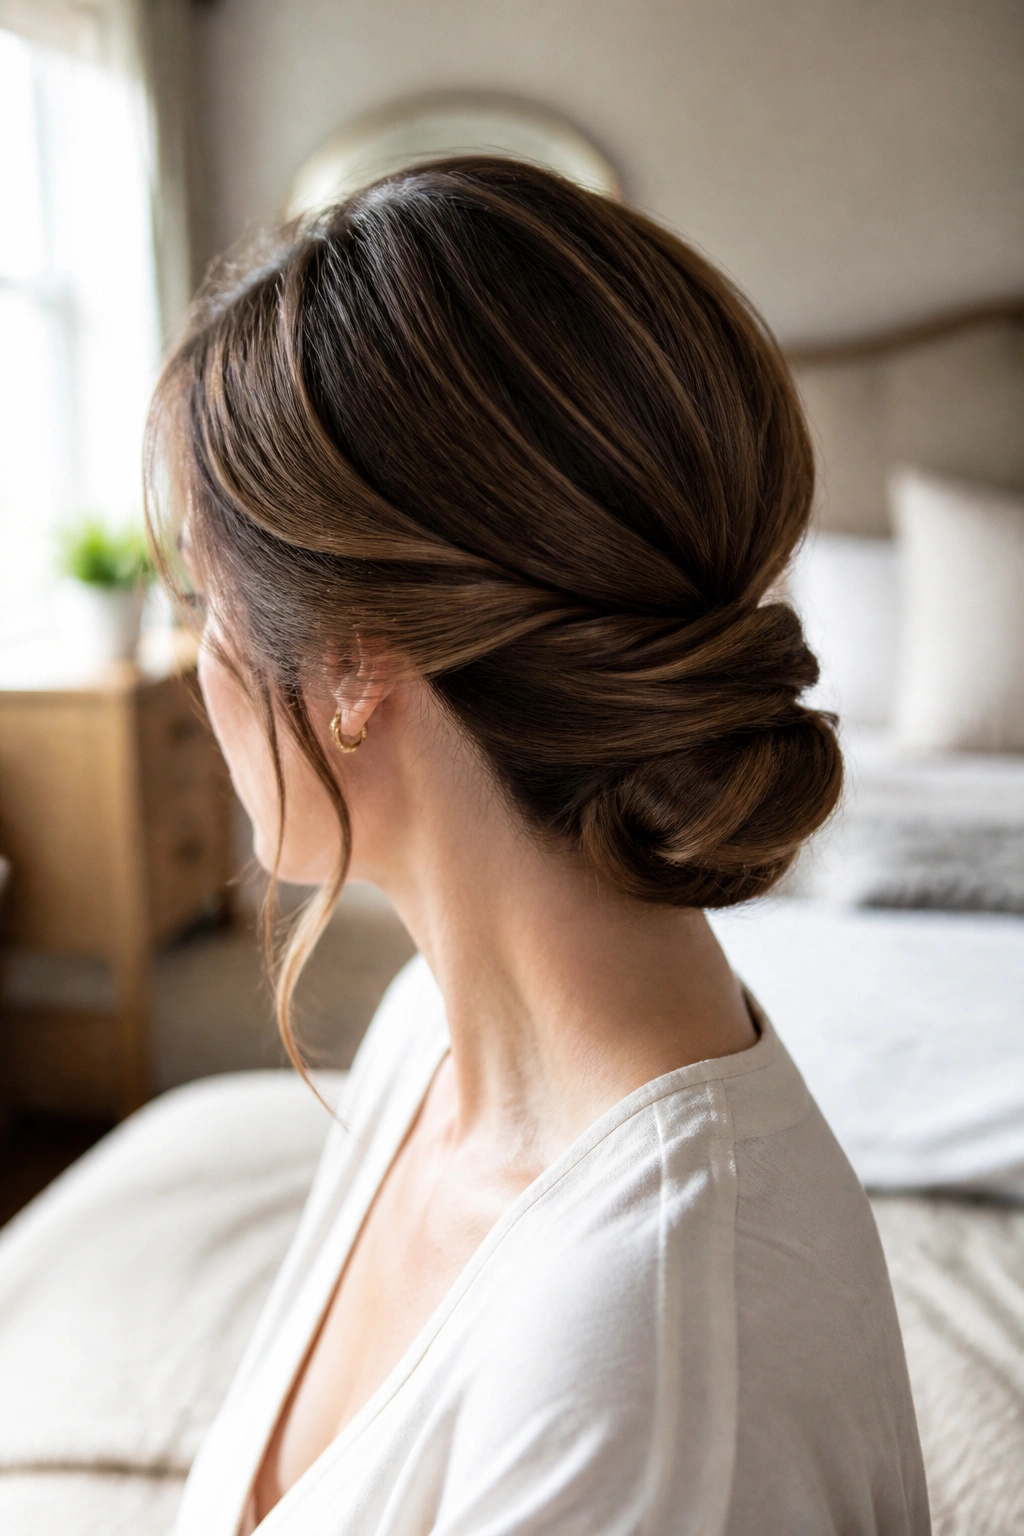
A low twisted chignon is the style I’d hand to anyone who wants neat without looking severe. It sits low at the nape, gathers the hair into a soft coil, and gives medium hair enough room to tuck in without bulging at the base. The result is calm, polished, and far less fussy than it looks.
Why it suits medium hair
Medium hair has just enough length to twist cleanly once or twice before tucking, which is exactly why this style works so well. Very short hair fights the roll; very long hair can get bulky. Medium hair lands in the middle and behaves.
A side part makes it softer. A center part makes it cleaner. Either one works.
How to style it
- Smooth the hair with a light mist of texturizing spray, not a heavy oil.
- Gather it at the nape and split it into two sections.
- Twist each section inward, then wrap them together into a low coil.
- Pin the coil flat against the head with 6 to 8 bobby pins, crossing the pins in an X shape where you can.
- Leave a few thin pieces around the face if you want the style to feel less strict.
Best move: leave the ends tucked but not crushed. If the bun looks too perfect, it starts to feel stiff; if it looks too loose, it falls apart by lunch.
2. Braided Crown Bun
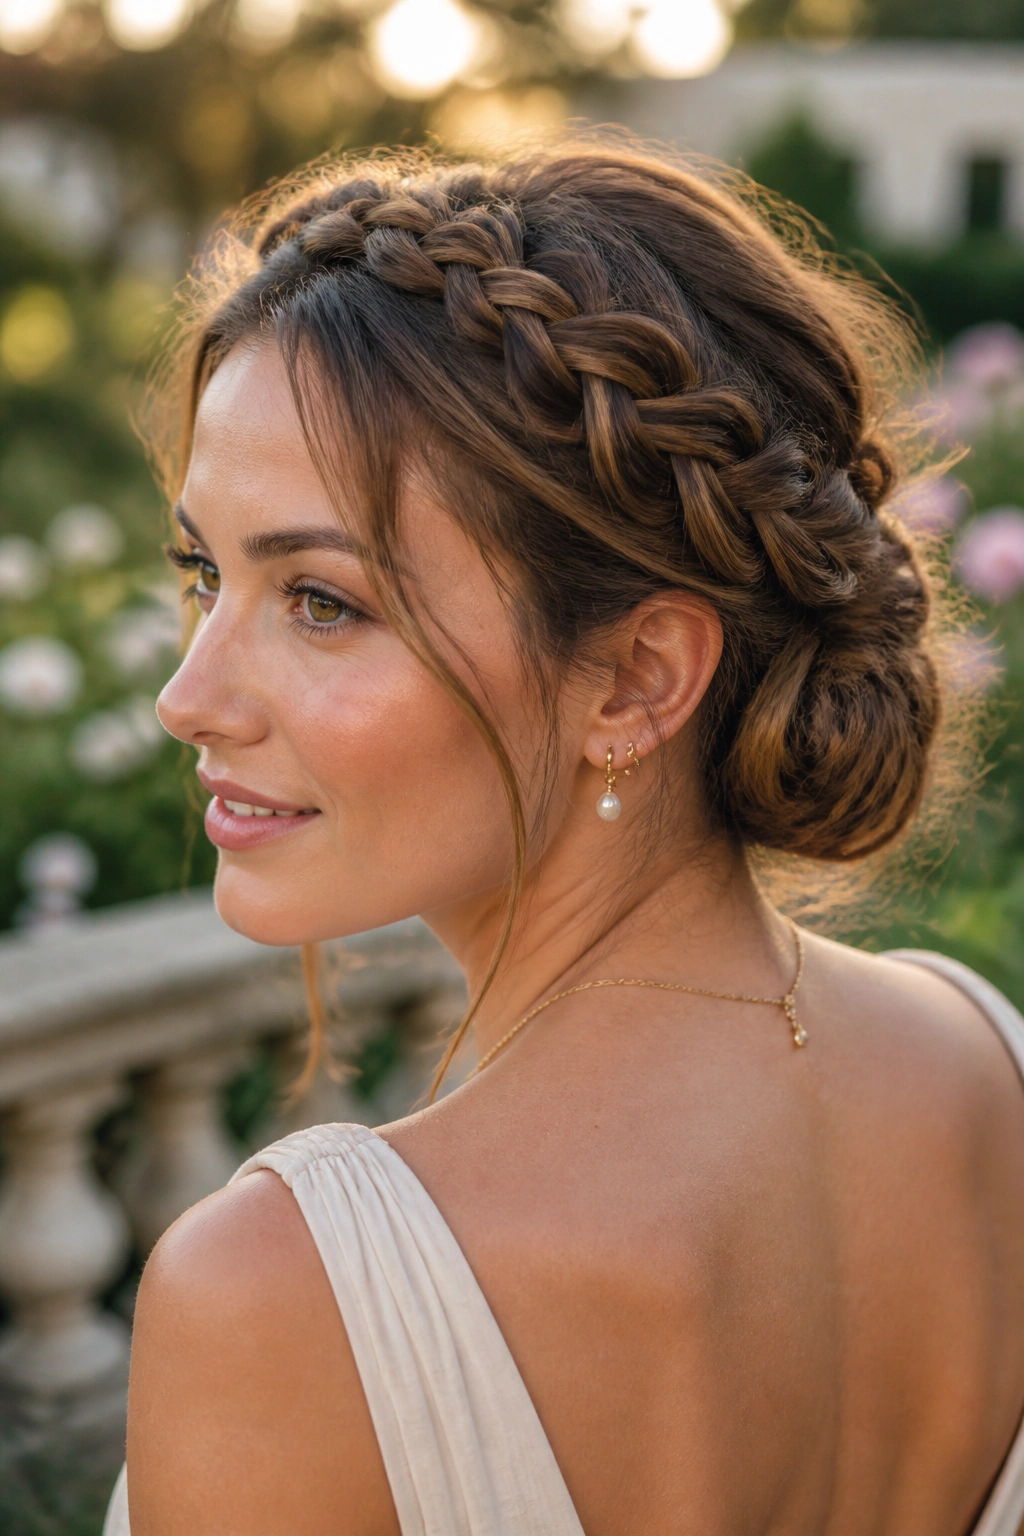
Why does a braided crown bun hold so well on medium hair? Because the braid does half the work for you. The woven section adds grip, and the bun gives the shorter length somewhere to disappear. That matters a lot when your hair is too long for a crop but not long enough for a big wrapped bun.
The braid can start at one temple and travel across the crown, or it can be split into two braids that meet at the back. Either way, the look has a little more structure than a plain bun and a little more softness than a full formal updo.
What makes it work
Medium hair tends to have layers that pop loose at the crown. The braid hides that. It also keeps the top from collapsing, which is a common problem with shoulder-length hair that’s been smoothed too flat.
I like this one for garden weddings, parties, and dinners where you want your hair up but still alive around the edges. It looks better when the braid isn’t pulled tight. Tight braids can make the style feel rigid and expose every shorter layer.
How to use it
- Curl the ends with a 1-inch iron if the hair is very straight.
- Braid along the crown, keeping it loose enough to pancake slightly.
- Gather the remaining hair into a low bun and pin it underneath the braid line.
- Pull a few tiny strands at the hairline if you want a softer face shape.
The braid should feel secure, not helmet-like. That’s the whole trick.
3. Sleek Ballet Bun
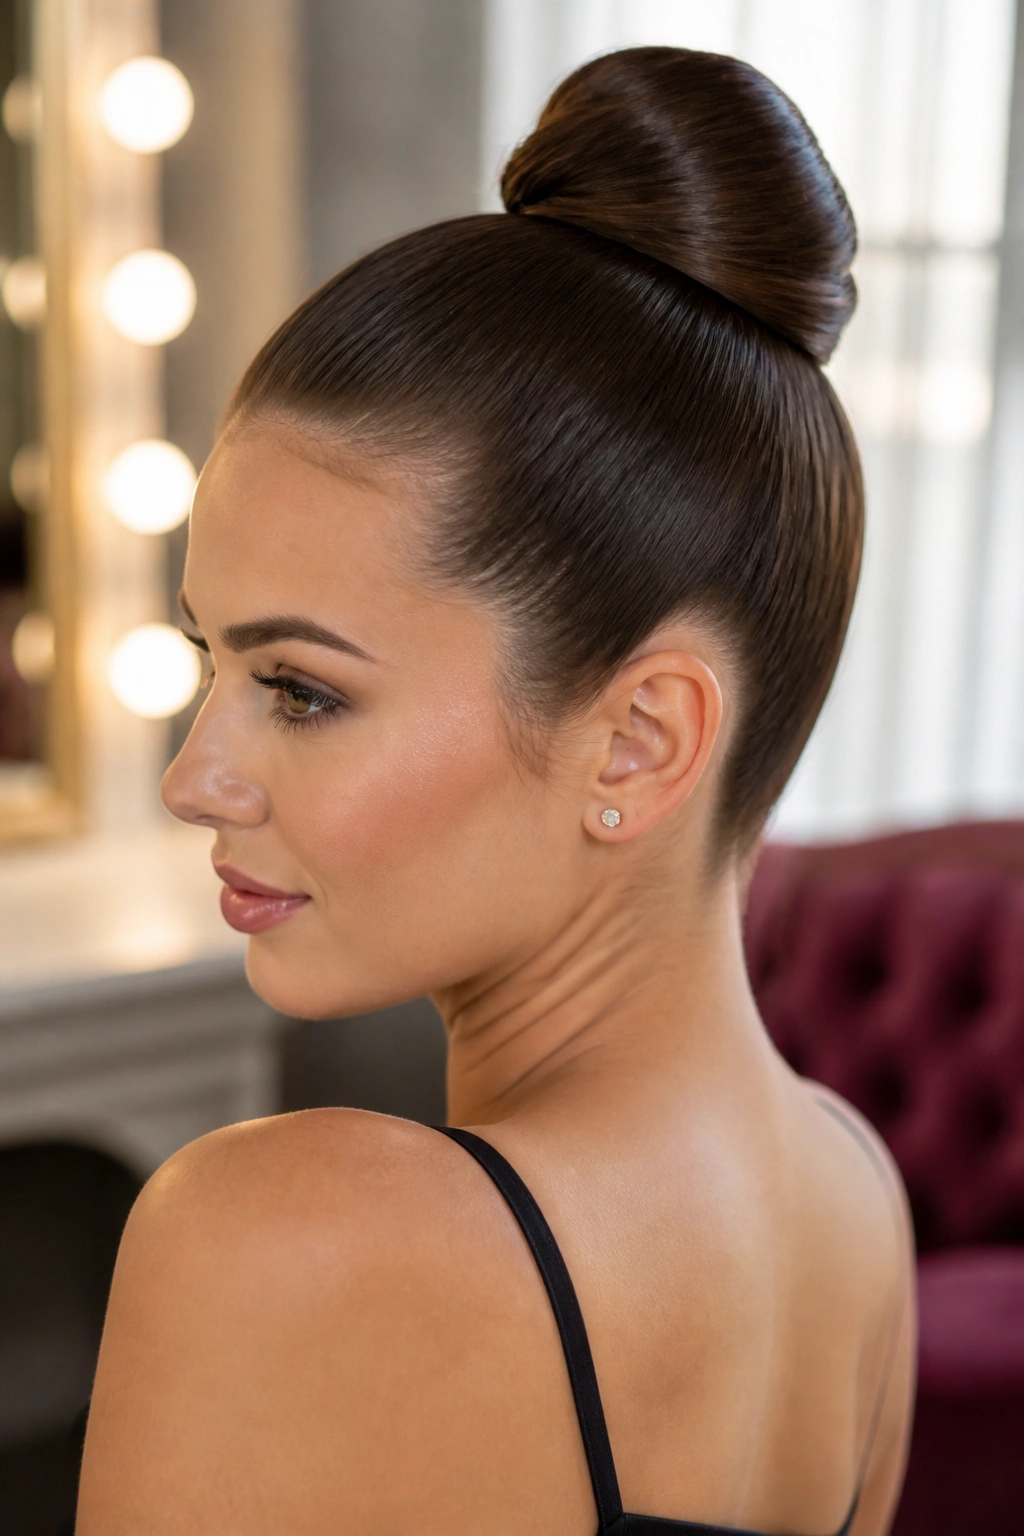
Medium hair can do a sleek ballet bun without looking thin, and I wish more people would stop assuming it can’t. The style only looks simple when it’s done well. If the surface is smooth, the bun sits cleanly; if the roots are fuzzy or the base is weak, it looks unfinished in a hurry.
This is the updo I’d pick for a formal event, an interview, or any day when you want your hair to behave. It draws attention to the face and the neckline, which is part of why it feels so sharp.
The best version starts with a strong brush and a little gel or styling cream at the hairline. Work the product through the top section, then gather the hair tight at the crown or just below it. Wrap the length into a compact coil and pin the edges down with small pins that match your hair color if you have them.
One detail matters more than people think: the bun should look dense, not flat. Medium hair can easily spread too thin if you stretch it too much before wrapping. Keep the coil close to itself. If the ends stick out, tuck them under with the tail of a comb and pin again.
A polished bun is boring in the best way. It lets everything else do the talking.
4. Messy French Twist
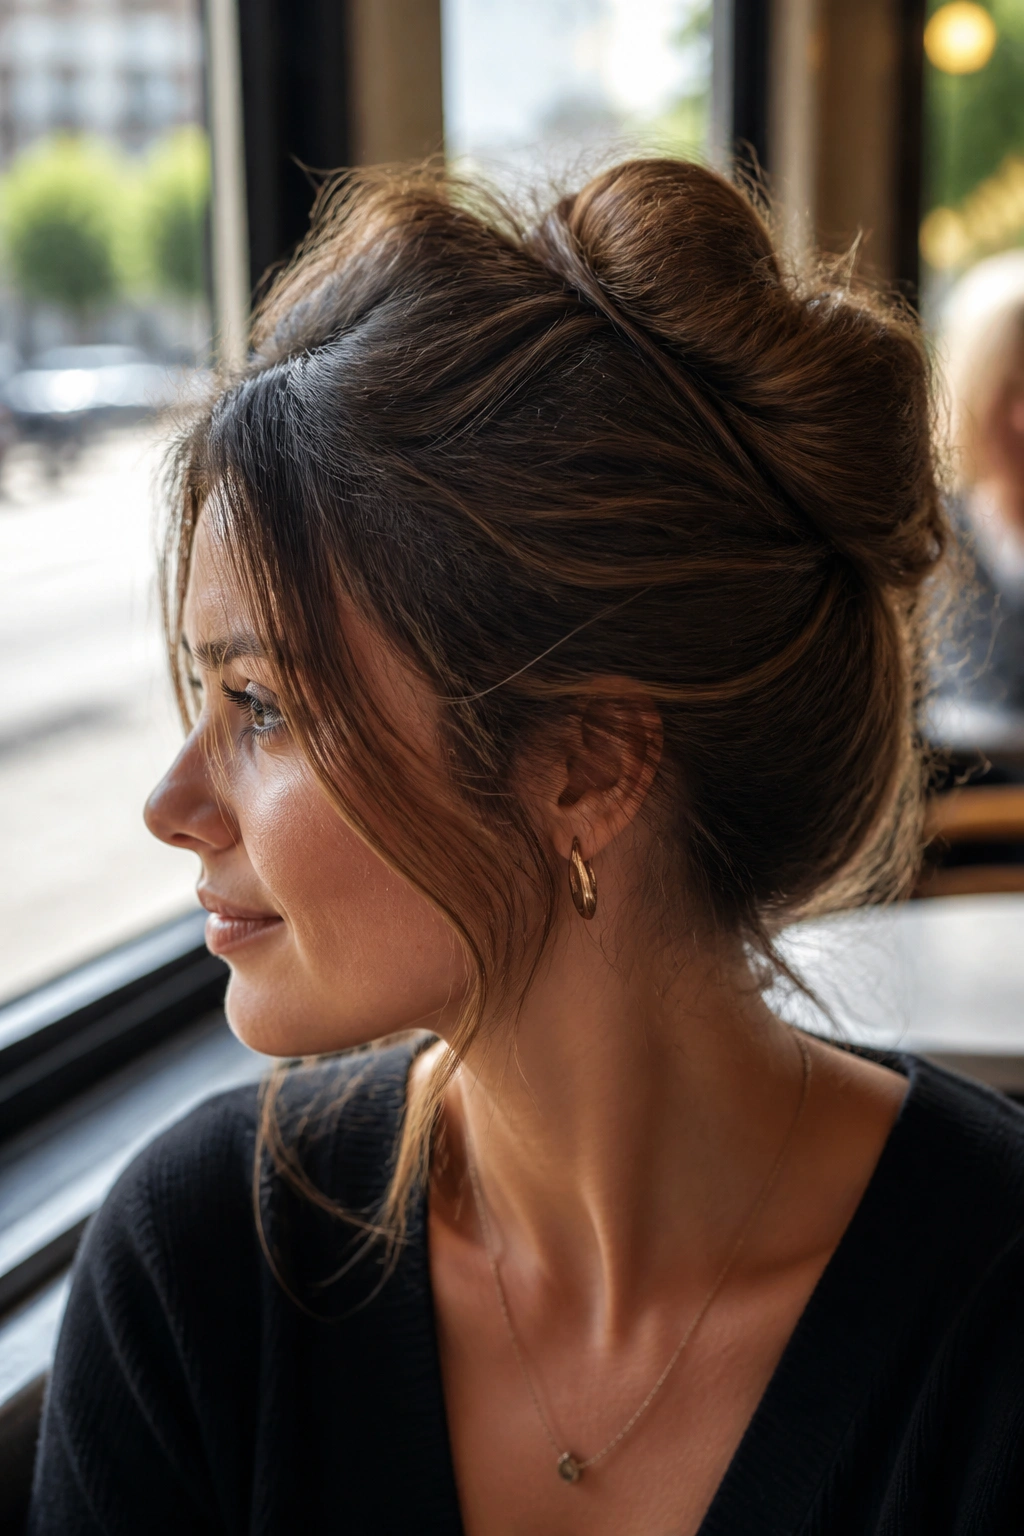
You know that moment when you have ten minutes, a dress that needs something nicer than a ponytail, and no interest in spending an hour on your hair? That is where the messy French twist earns its place.
The French twist has a reputation for being formal, almost fussy, but the relaxed version is easier than it looks. Medium hair is actually a nice fit for it because the length is enough to fold upward without creating a huge roll down the back. The softer pieces around the twist also keep it from looking too severe.
What to watch for
- Tease the crown lightly if the hair is fine.
- Sweep the length to one side before folding it upward.
- Pin vertically along the seam so the twist stays hidden.
- Leave the ends a little loose at the top or bottom if you want a softer finish.
The shape should look tucked, not packed. That part matters. If you press the twist too flat, it loses the easy, lived-in feel that makes it good.
A little unevenness is part of the charm here. A perfectly smooth French twist can look costume-like on medium hair. A slightly loose one feels more modern, and it takes less time to fix if one side slips. That alone is reason enough to prefer it.
5. Knotted Low Bun
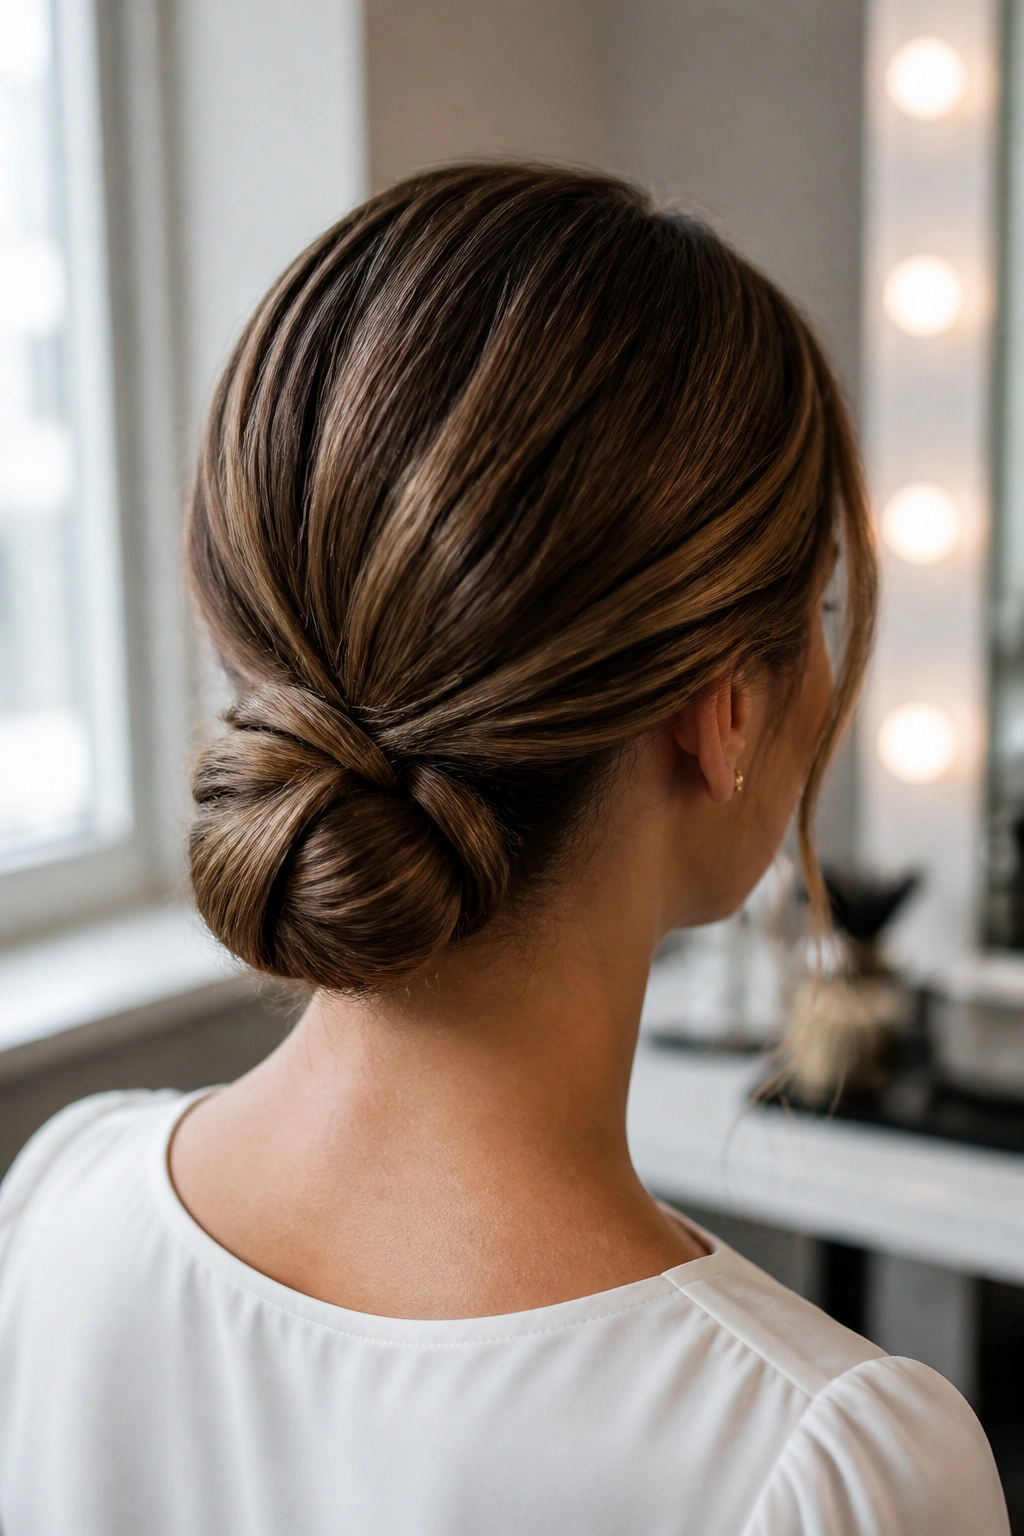
A knotted low bun is what happens when you want something tidy but you do not want to fuss with braids or rolls. It feels modern, uses the natural length of medium hair well, and looks like you spent more time on it than you really did.
Unlike a high knot, this one sits lower and feels calmer. Unlike a plain bun, it has visible shape in the middle, so it doesn’t disappear into the back of the head. That makes it a strong pick for medium hair that needs a little visual interest without extra steps.
The best version starts with two sections tied into a single knot at the nape. Then you tuck the ends under and pin them flat. If your layers are slippery, a quick mist of dry shampoo gives them something to hold onto. Fine hair especially benefits from that.
This style is best for people who like clean lines but not severe ones. It works for workdays, casual events, and even weddings if you dress it up with a pearl pin or a narrow metal clip. A center part makes it feel sharper. A side part softens the whole thing.
My advice: keep the knot low and small. A giant knot can look clumsy on medium hair. A compact one looks deliberate.
6. Bubble Ponytail Updo
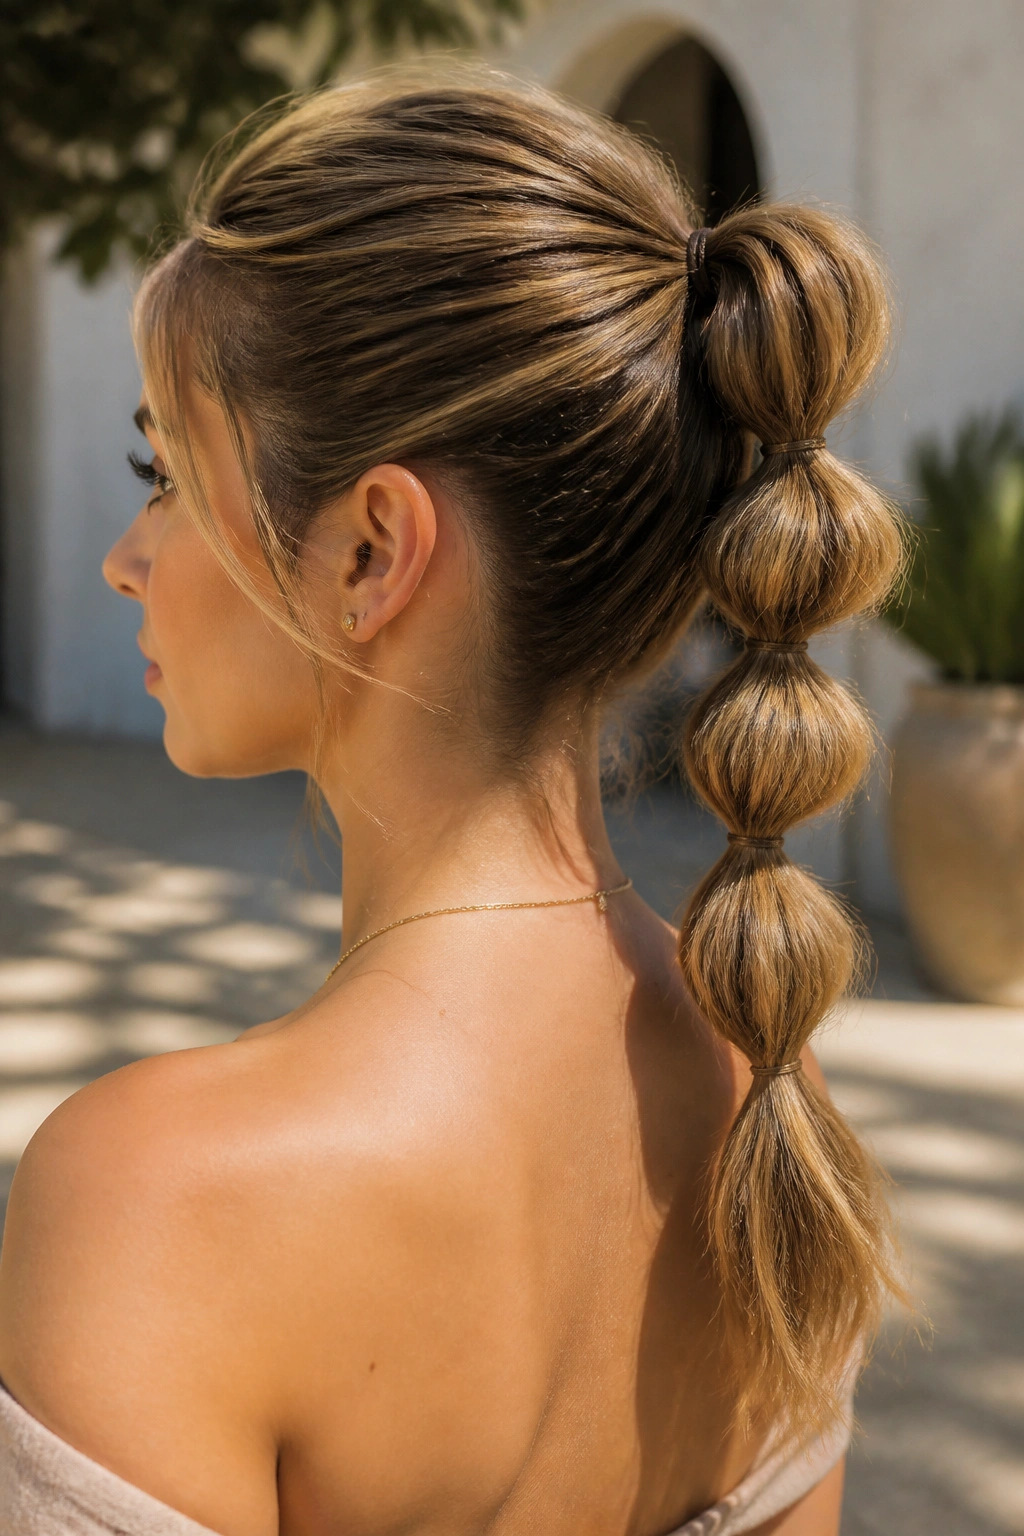
A bubble ponytail updo sits in that lovely middle ground between playful and put-together. It’s not a traditional bun, and that’s part of the appeal. Medium hair has enough length to make the bubbles visible without turning the whole style into a heavy column.
I like this one on hair that is a little layered or a little frizzy at the ends, because the sectioning distracts from the parts of the cut that would otherwise stick out. You start with a ponytail — low or mid-height — then add small elastics every 2 to 3 inches. After each band, gently pull the hair between the elastics outward so each section rounds into a bubble. From there, the tail can be tucked under and pinned into a compact shape at the base, or left in a soft loop if your hair is shorter.
It looks especially good when the bubbles are not perfectly even. A slightly larger bubble near the crown and a smaller one near the nape gives the style movement. If every section is identical, the whole thing feels stiff.
This is one of those styles that improves with a little texture. Second-day hair, a bit of dry shampoo, even a touch of sea salt spray — all of it helps. Clean, slippery hair tends to collapse and slide.
7. Gibson Tuck
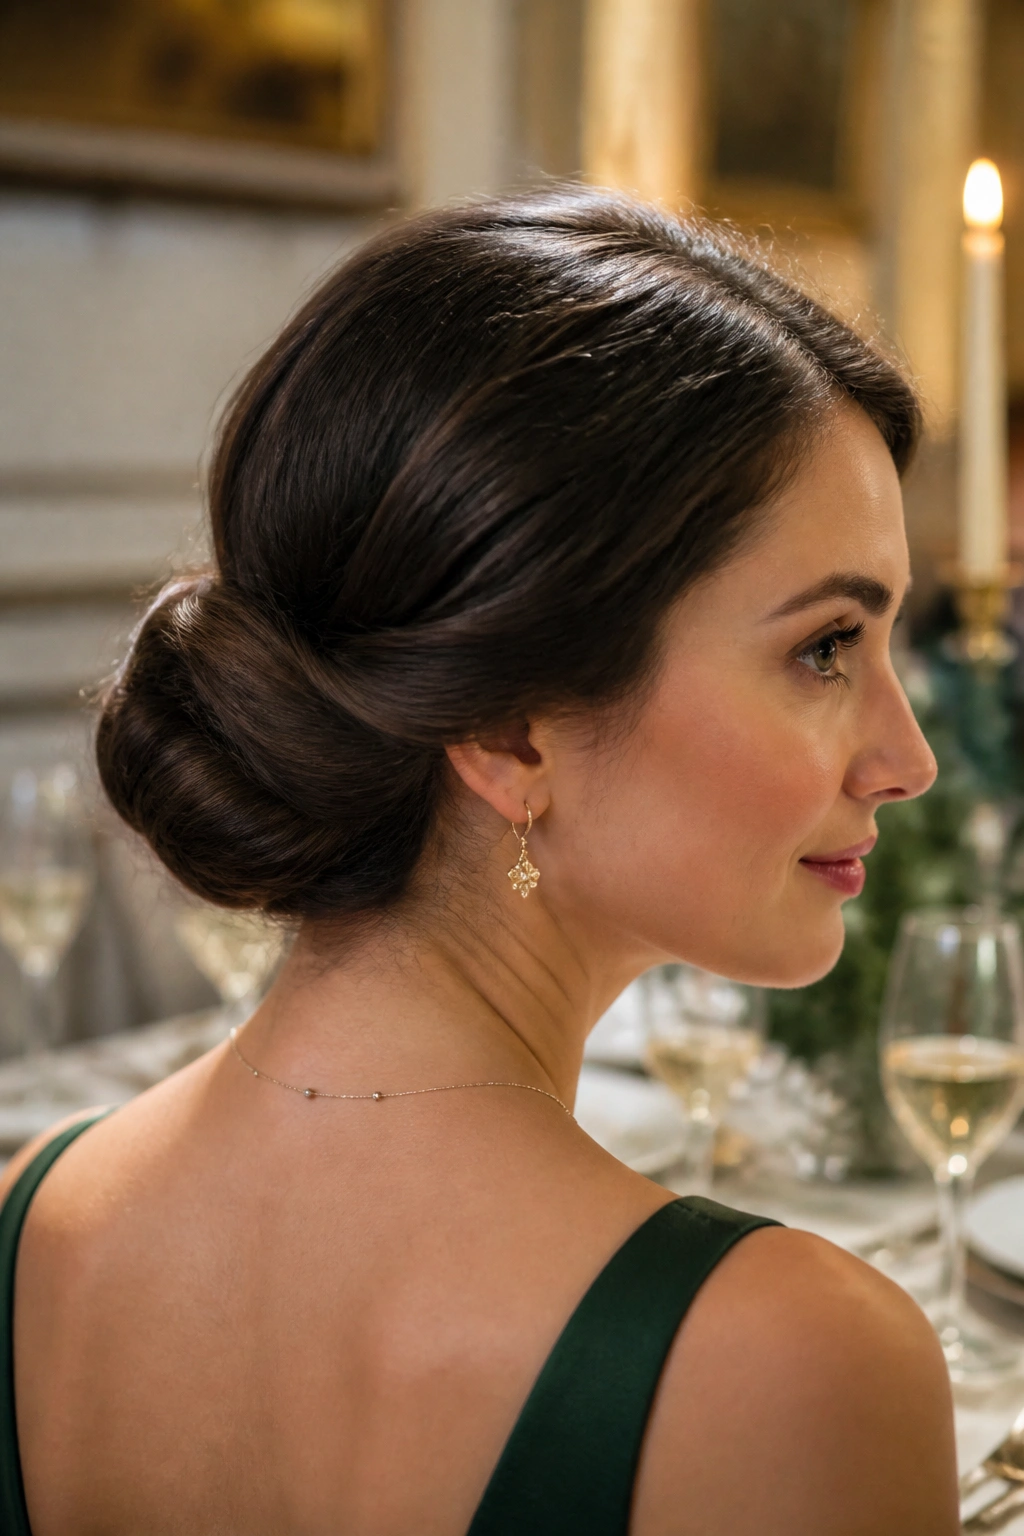
The Gibson tuck is proof that medium hair can do vintage without looking costume-y. It is soft, rolled under, and much easier to manage than a complicated pin-up roll. If your hair reaches the shoulders or just below, you’re in a good zone for it.
What I like most is the shape. The tuck creates a smooth fold at the back of the head and leaves the top clean, so the style has a neat line without feeling severe. It also hides ends beautifully, which is one of the biggest wins for medium-length hair. Shorter layers can be tucked in; longer layers can be folded under and pinned.
A clear elastic at the nape helps. Create a low ponytail, split the hair above the elastic, and flip the tail upward through the gap. Then tuck the length into the roll and pin the sides down. If the roll feels too loose, add a few U-shaped pins along the seam.
This one is especially good when you want a dressy style that doesn’t scream for attention. Think dinner, a rehearsal, a cocktail party, something like that. It also pairs well with a side part and soft waves at the front.
One small warning: if you make the roll too tight, the style loses that graceful curve. Keep it soft. It’s prettier that way.
8. Side-Swept Pinned Updo
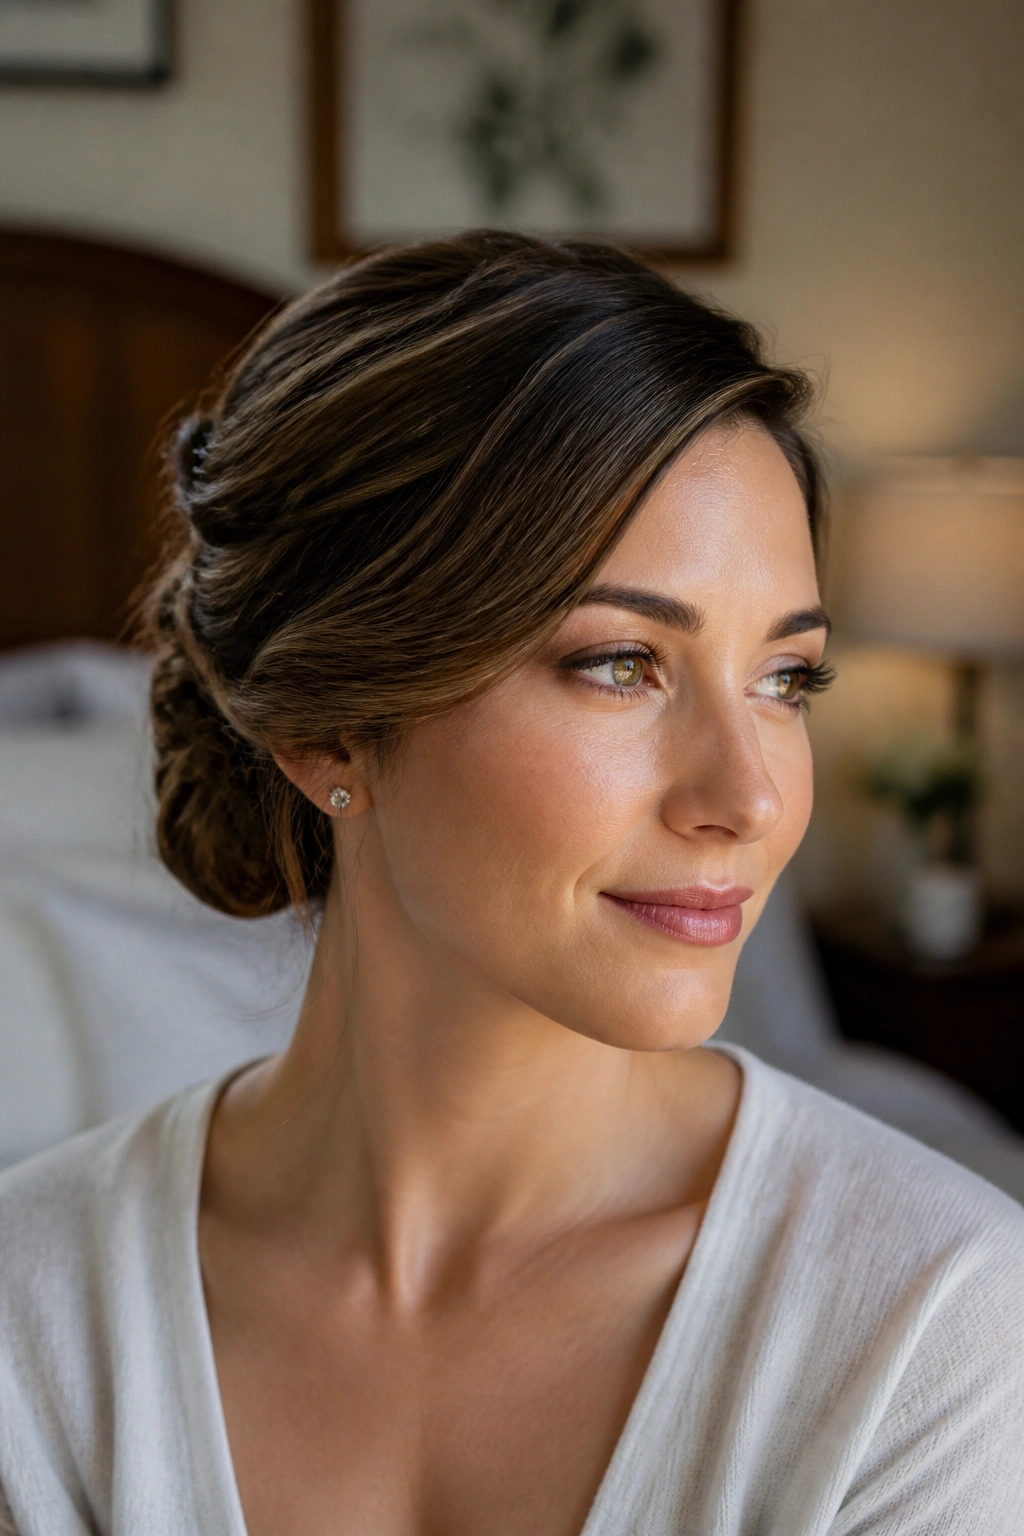
Need something that looks soft around the face but still stays up all night? A side-swept pinned updo solves that problem better than most people expect. It gives medium hair a diagonal line across the head, which is flattering because it breaks up the width at the sides and keeps the crown from going flat.
The basic shape is simple. Sweep the hair to one side, twist or roll it lightly, and pin it along the back in a low, gathered shape. The front can stay smooth or carry a little bend. The side with less hair often looks best when it’s tucked cleanly behind the ear so the whole style doesn’t drift into chaos.
Small details that matter
- A deep side part makes the style feel more intentional.
- A few bent ends at the nape add texture.
- One decorative pin is enough; too many start to look busy.
- If you have layered hair, pin the shortest pieces first, then cover them with the longer lengths.
This is one of the few updos that can feel romantic without needing curls everywhere. A flat iron bend at the ends is enough. So is a soft wave brushed out with your fingers.
The asymmetry is the point. Don’t fight it.
9. Curly Pinned Halo Bun
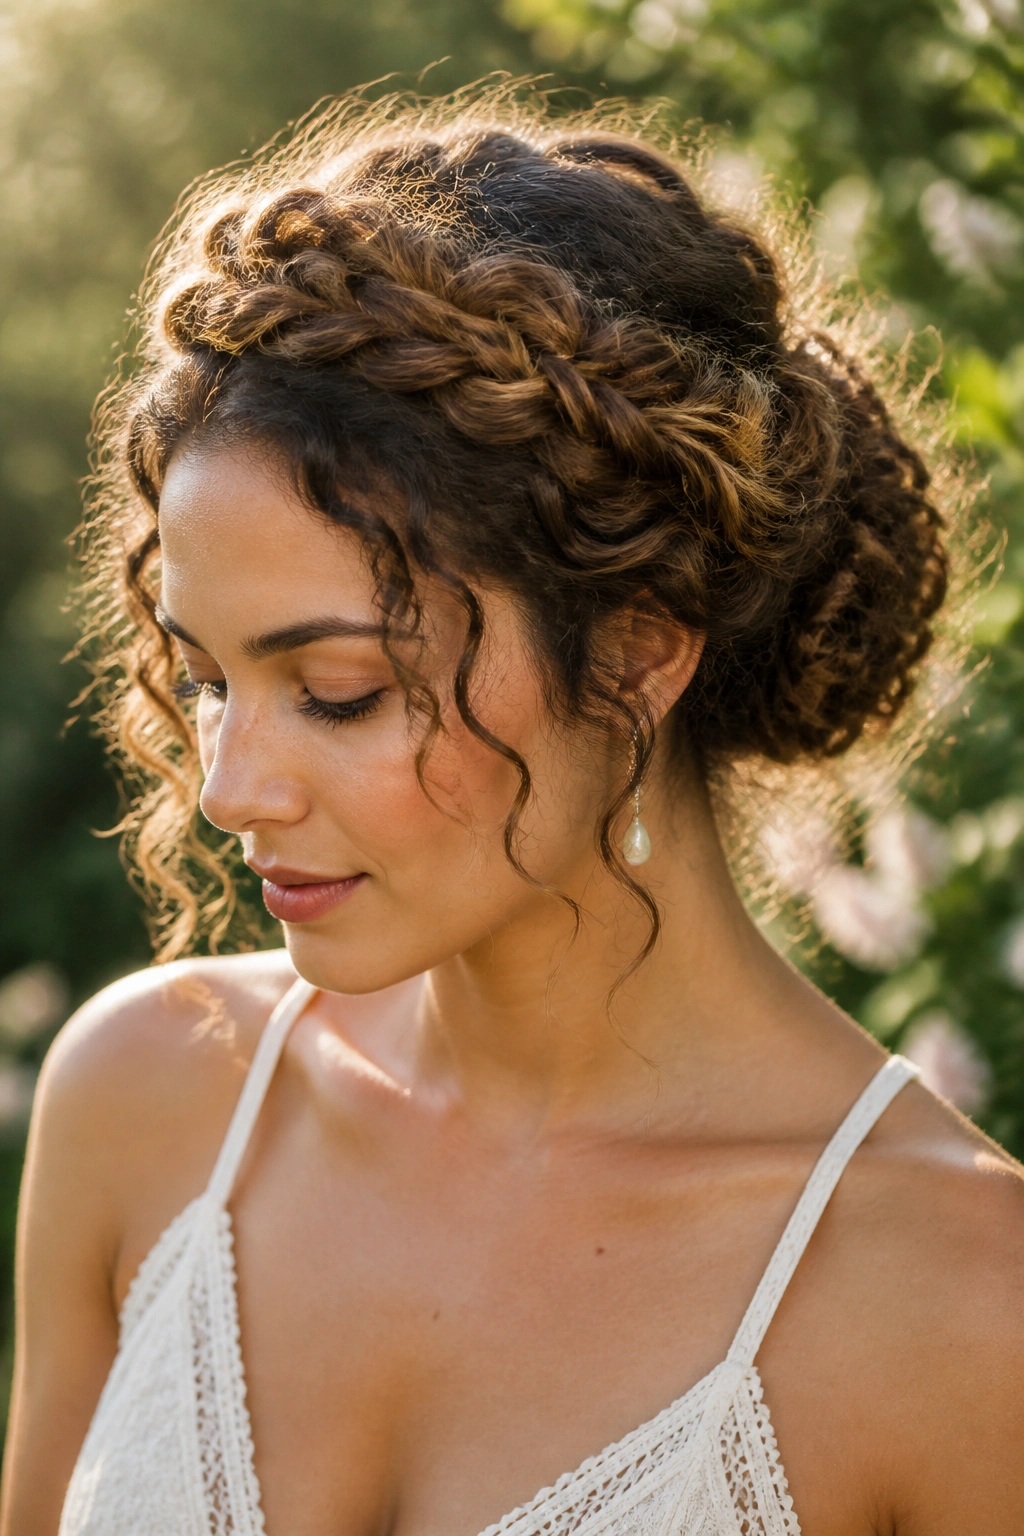
What if your hair already has curl, wave, or bend and you do not want to flatten it into submission? Then this is the one to keep close. A curly pinned halo bun lets the texture stay visible, which is half the reason it looks good in the first place.
Instead of brushing everything tight, you work with sections. Gather the hair loosely around the head, pin the curls into a halo or circular shape, and let the ends coil into the back or side of the bun. The goal is not sleekness. The goal is shape. Medium hair often has enough natural volume to make this style feel full without extra padding.
A curl cream or lightweight leave-in helps before styling. So does a diffuser if you want the curl pattern to stay defined. Once the hair is dry, use your fingers, not a brush, to place the curls where you want them. Brushes can puff the shape too much or turn the whole thing fuzzy.
How to keep the texture
- Pin each curl cluster where it naturally wants to sit.
- Use coated bobby pins so they don’t snag.
- Leave the front pieces a little freer than the back.
- Mist with flexible hairspray, not hard shell spray.
This is a forgiving style. If one curl pops loose, it usually adds charm instead of ruining the look.
10. Rope-Braid Halo Bun
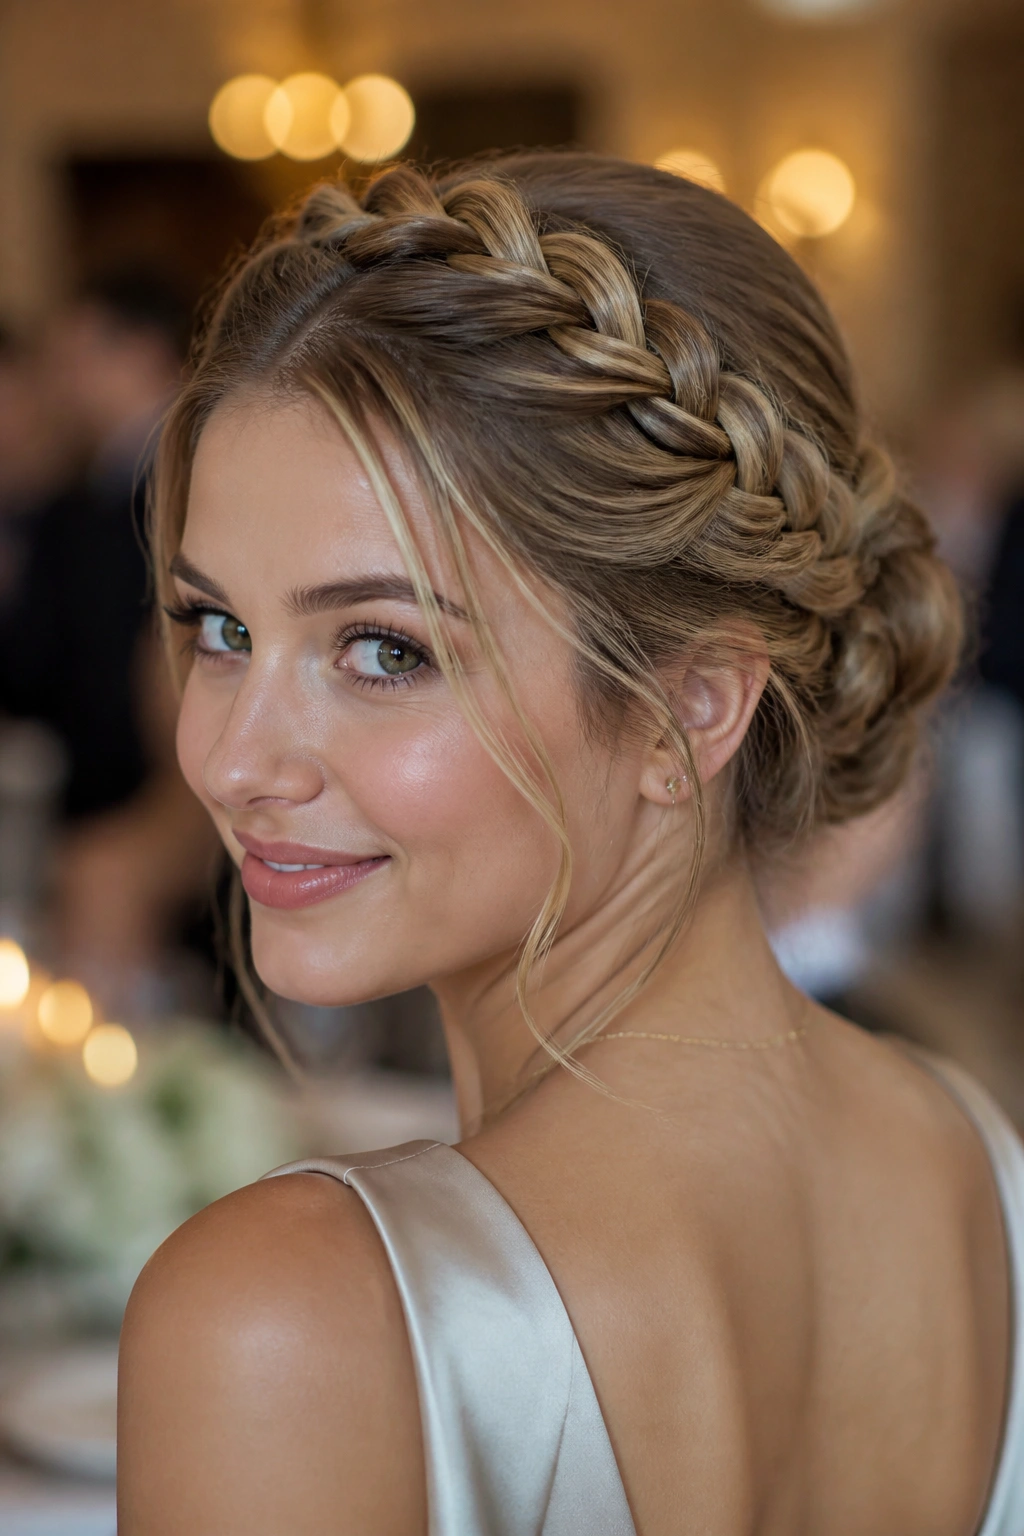
A rope-braid halo bun feels a little more polished than a loose crown braid, and a little easier to control on medium hair. That difference matters. Rope braids use two twisted sections instead of a three-strand braid, which gives the style a sleeker line and keeps shorter layers tucked in better.
The halo part wraps the head like a band, then meets the bun at the back. It works well when you want something that looks detailed without needing five separate techniques. Medium hair is often long enough for the rope twist to hold but not so long that the braid gets heavy or droopy.
Compared with a regular braid crown, this one reads cleaner. The twists create a corded look, which is nice if your outfit already has a lot going on. It also suits straight or slightly wavy hair, because the rope braid shows off shine without making the surface too busy.
I’d choose this for a formal event or a dinner where you want the hair to feel finished but not too stiff. It does need a fair amount of pinning at the temple and the back, so don’t skimp there. Four pins per side is not unusual.
If your hair slips easily, prep the roots with dry shampoo first. That extra grit makes a bigger difference than most people realize.
11. Double Knot Bun
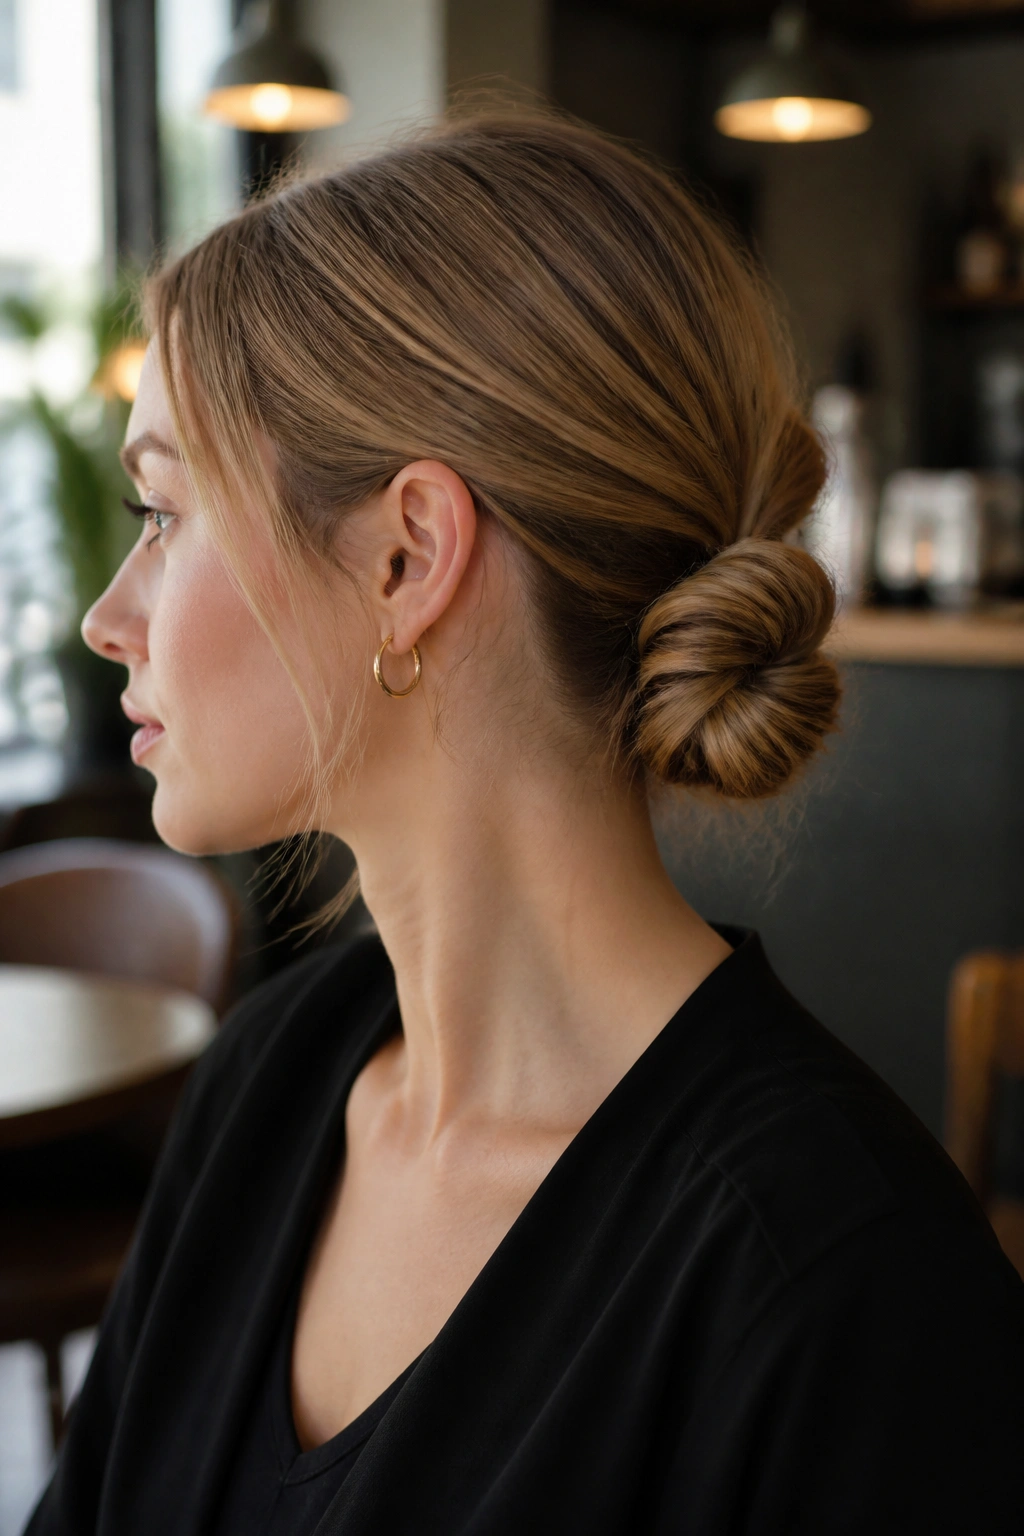
One knot can look casual. Two knots look intentional. That is the appeal of a double knot bun on medium hair.
The idea is simple: split the hair into two sections, tie them once, then tuck the ends into a compact bun or second knot at the nape. Because medium hair usually has enough length for one clean knot and one tuck, the style stays small and controlled. It doesn’t balloon out the way it can on very long hair.
What makes it different
The visual center is the knot itself, so the style has a built-in focal point. That means you don’t need a braid, a twist, or a lot of volume to make it look finished. It also means layers are less of a problem. Shorter pieces can disappear inside the knot if you smooth them first.
A little texture spray helps, but don’t overdo it. Too much product makes the knot look chunky. And if you want a dressier finish, slide a narrow barrette right under the knot so the metal sits flush against the head.
This is a good pick for medium hair that tends to collapse when it’s pinned too tightly. The knots create their own shape, so the style can hold without being overbuilt. I would reach for it on a day when you want tidy hair and do not want to think too hard.
12. Teased High Bun
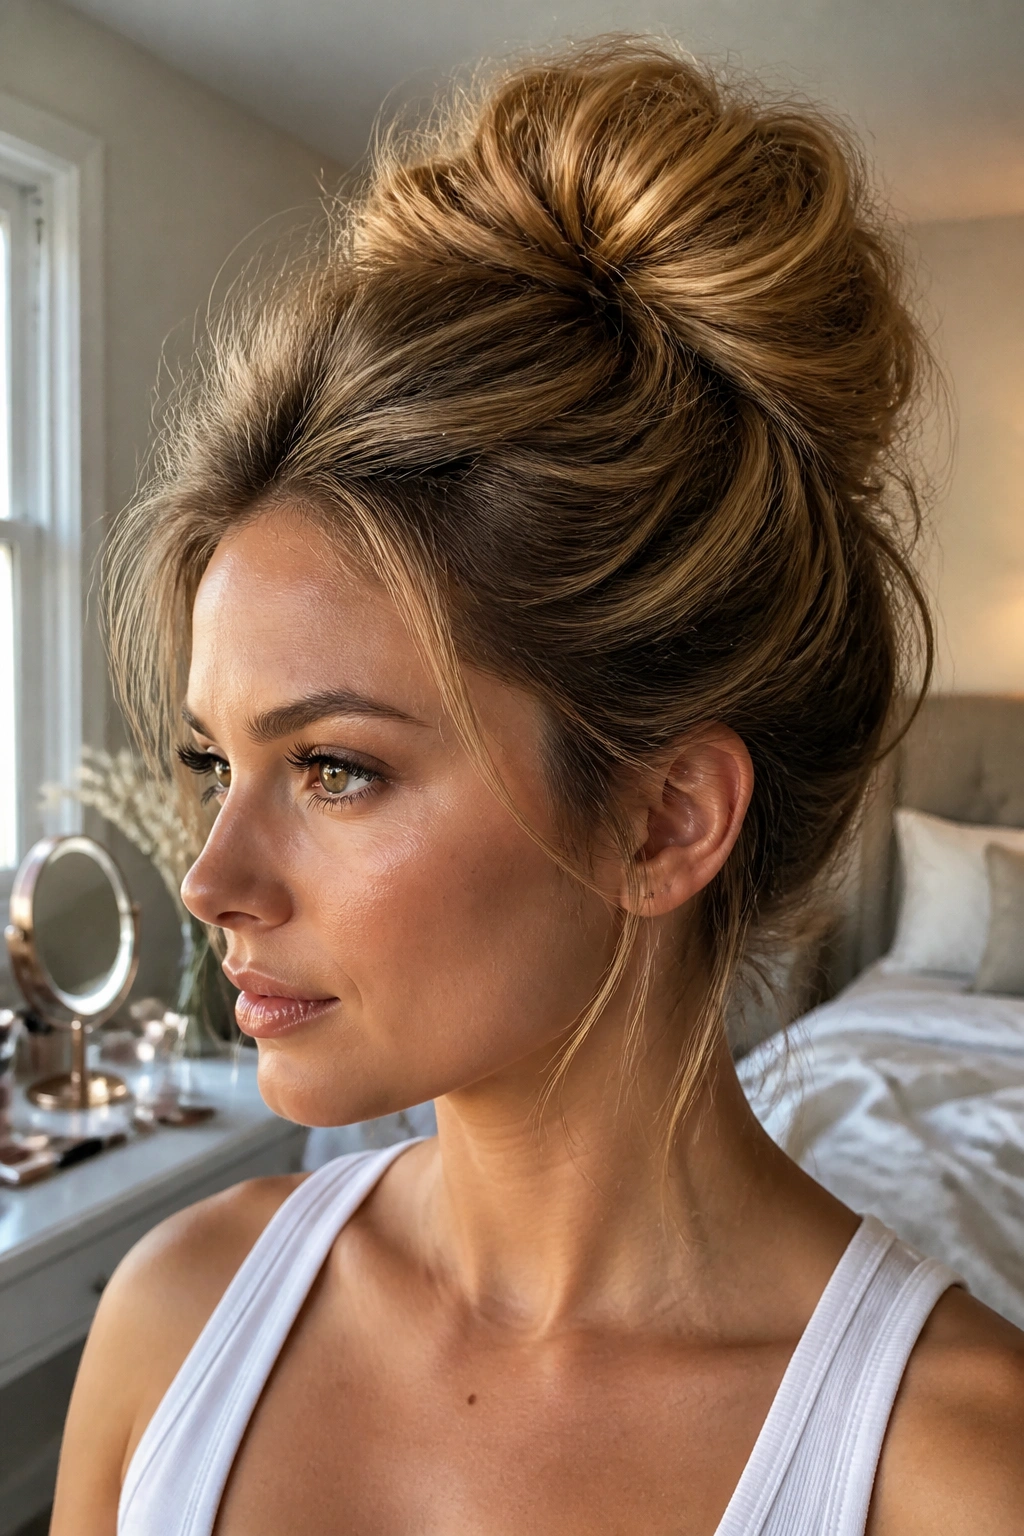
Medium hair can do height without a hair donut, and I will happily argue that with anyone who says otherwise. The trick is not to pile the hair straight up. You build softness at the crown first, then shape the bun around that lift.
Start by teasing the top section lightly at the roots or misting it with a root-lifting spray before blow-drying. Pull the hair into a high ponytail, but do not yank it flat against the scalp. Leave a little cushion at the crown. Then twist the tail loosely and wrap it around the base. The bun should feel airy, not tight.
This one is especially useful for fine medium hair, because the teased crown gives the illusion of thickness. Thick hair can wear it too, though the bun may need a few extra pins to keep the shape from sagging. Either way, the bun should sit high enough to open the face without climbing so high that it starts to feel childish.
A few face-framing strands make the style easier to wear. A clean center part can look sharp, while a slight side part softens it. Either works.
Do not crush the bun into the head. That is the fastest way to make it look small and tired.
13. Crown Twist Low Bun
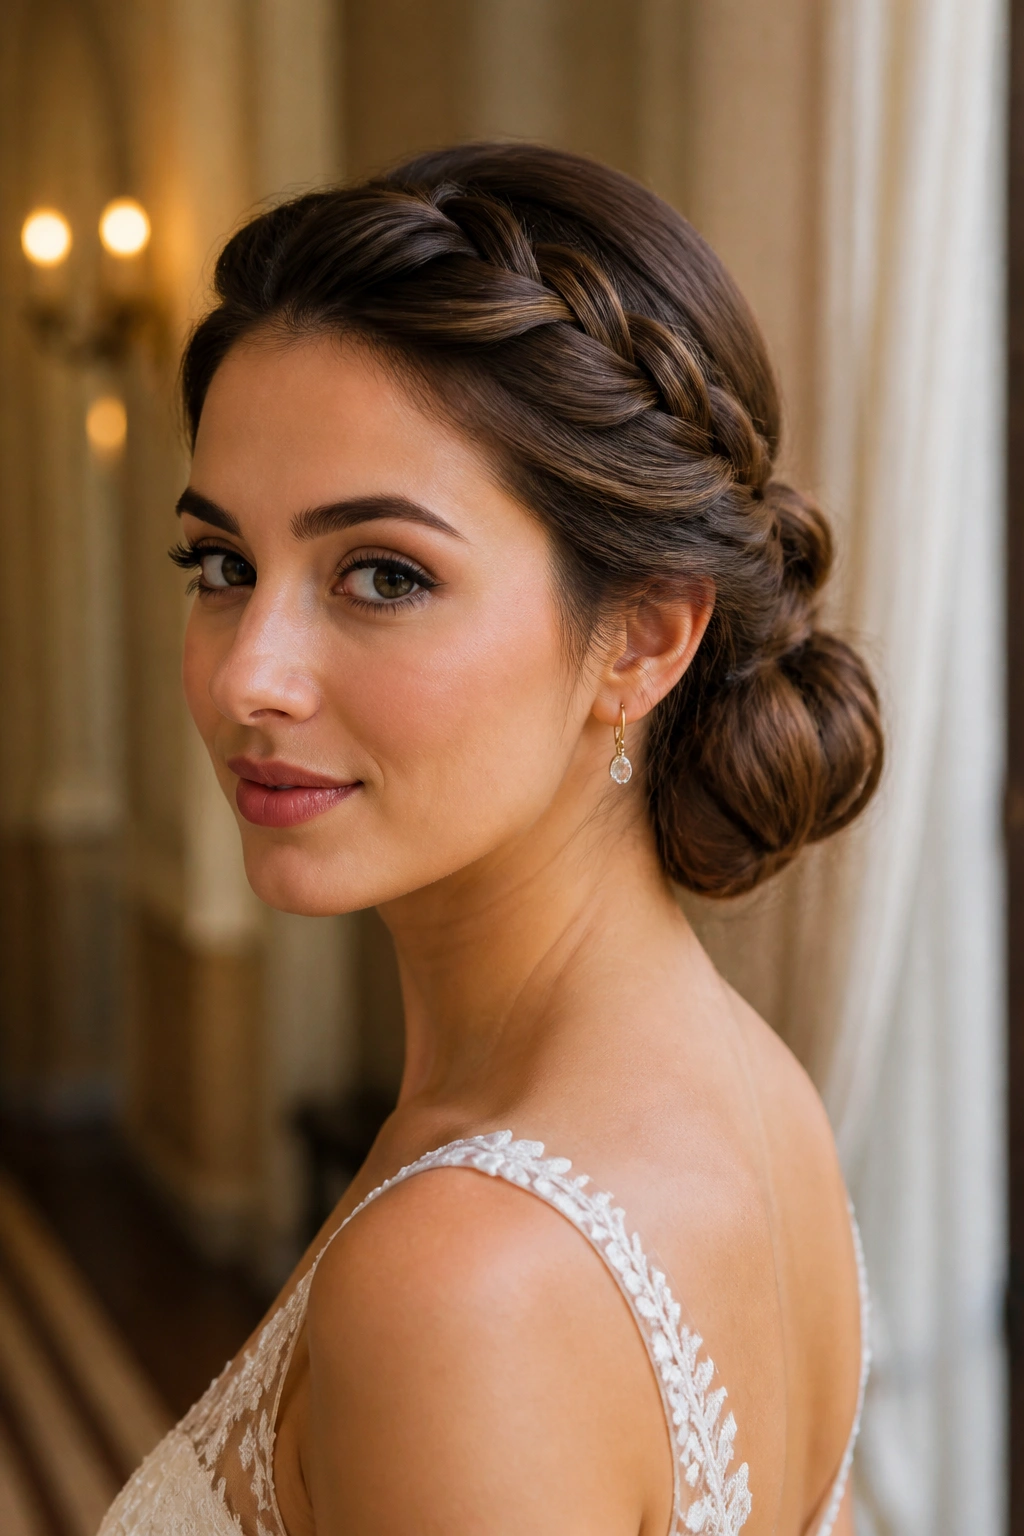
Need something bridal-looking without a braid marathon? A crown twist low bun gets you there fast. It uses two twisted sections from the front or temples, crosses them at the back, and folds the remaining length into a low bun. The shape is elegant, but the technique stays manageable on medium hair.
Unlike a braided crown, the twist line is smoother and a bit less busy. That gives the style a cleaner finish, which is useful if your dress has lace, beading, or a strong neckline. It also helps shorter layers stay tucked in because the twist can trap them more easily than a loose braid.
A little curl through the ends makes the bun look fuller. A flat iron bend works too. What matters most is the direction of the twist: keep it snug at the sides, then soften the bun itself so the look doesn’t turn severe.
This style is one of my favorites for medium hair at formal events because it has that quiet, careful shape without pretending to be overcomplicated. Add a pearl pin, a small comb, or nothing at all. It already has enough going on.
And if one temple twist feels thinner than the other, leave it. Symmetry is overrated in hair. Balance matters more.
14. Pinned Roll with Barrette
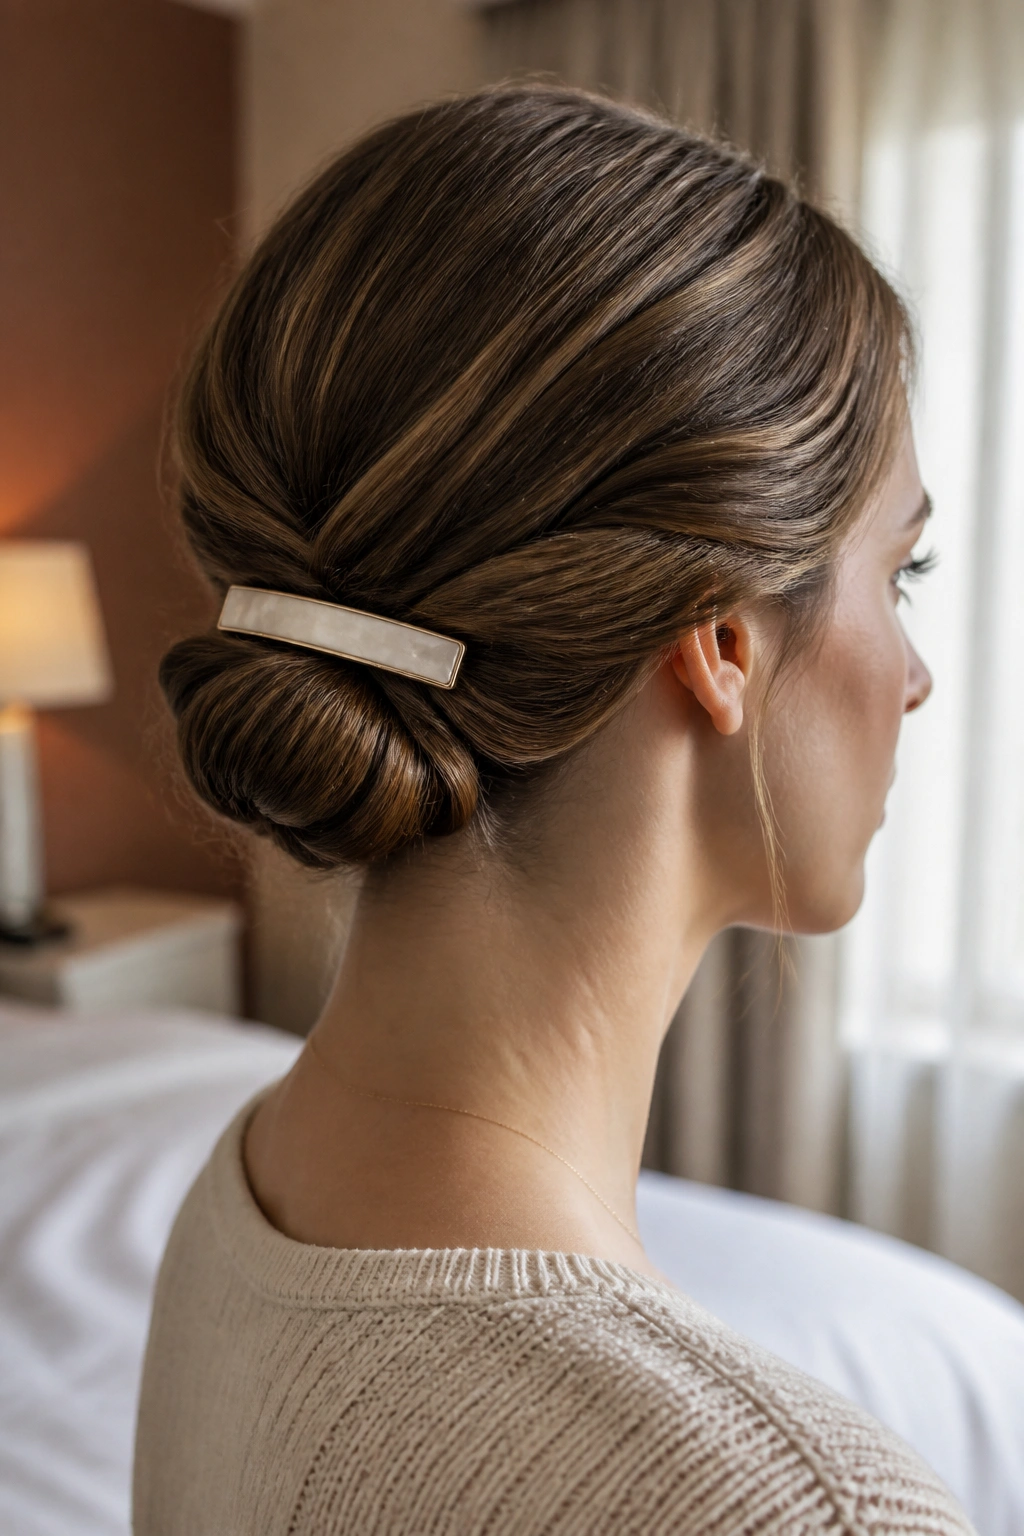
Sometimes one strong clip does more work than a dozen bobby pins. A pinned roll with a barrette is built around that idea, and medium hair suits it well because the length is usually enough to roll once and still leave room for a secure clasp.
The look starts with a smooth nape. Roll the hair upward or inward, depending on the angle you want, and hold the roll in place with two or three pins before adding the barrette. The accessory sits over the anchor point and gives the style a finished edge. If the clip is pretty, even better. If it’s plain, that works too.
This style is especially useful when you want the hair up and off the neck but do not want a dense bun. It can feel lighter than a chignon and less formal than a French twist. That makes it a smart choice for daytime events, work functions, or dinners when you need something neat that won’t overstate itself.
The roll should look smooth at the surface and tucked underneath. If the ends poke out, slide them under with the tail of a comb before clipping. A medium-hold hairspray helps, but don’t coat the whole thing until it feels stiff. You still want the hair to move a little.
15. Double Space Bun Updo
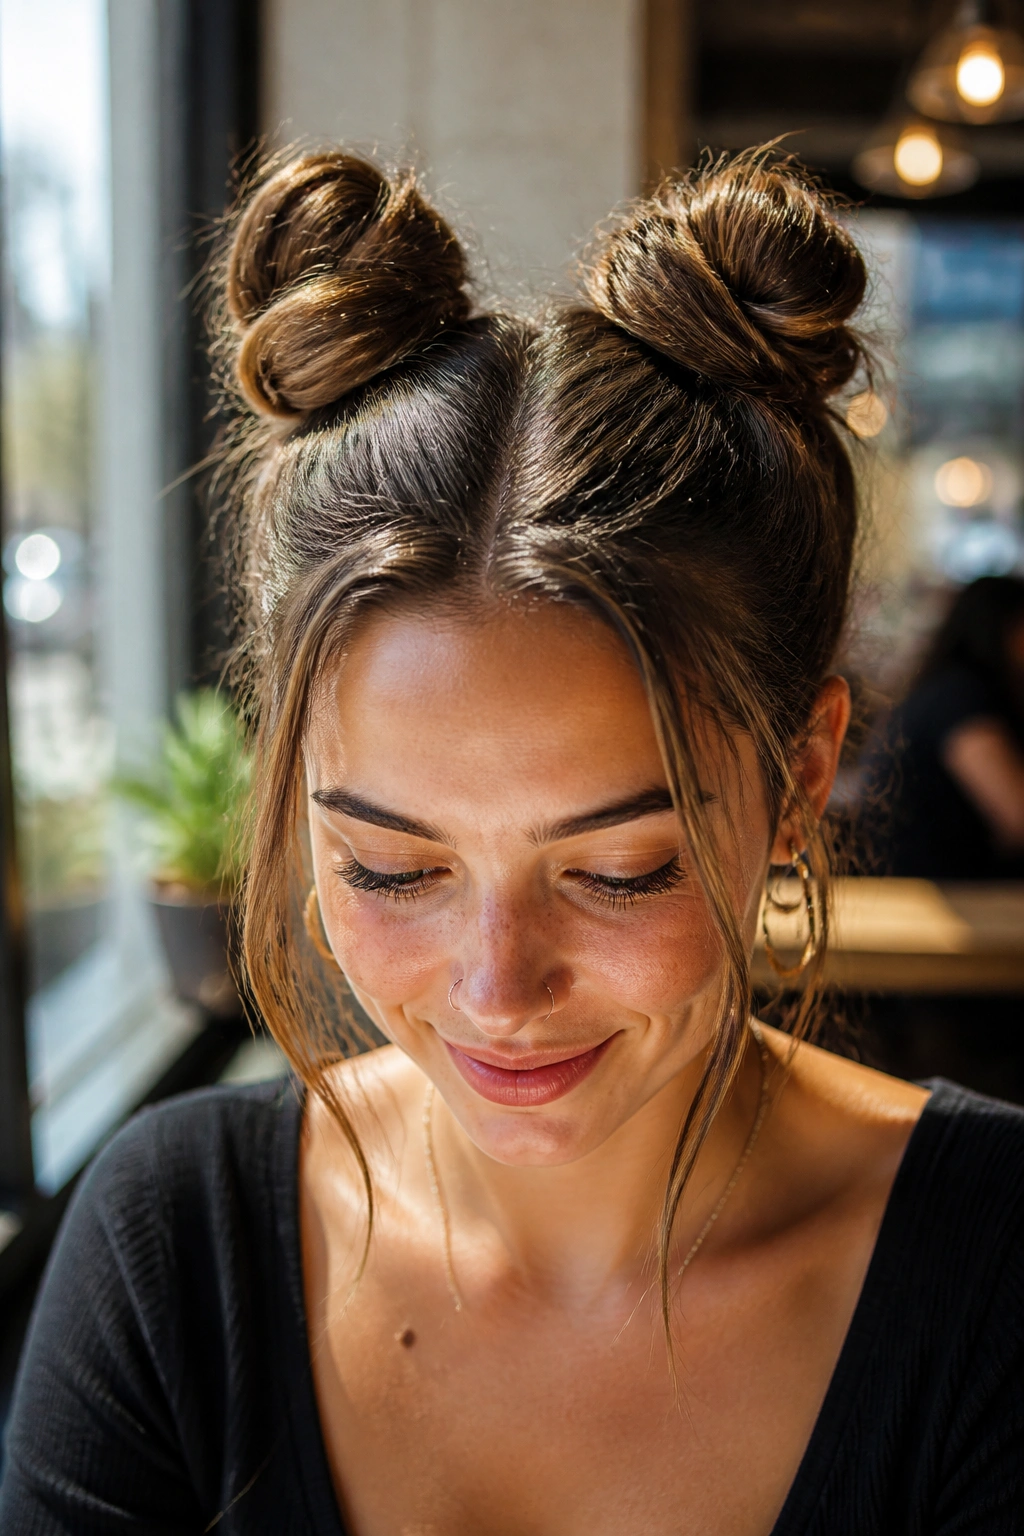
Space buns are not only for festivals, and medium hair proves that pretty quickly. Kept small, neat, and a little elevated, they can read playful without looking like a costume. They also solve a real problem: medium-length hair often has enough body for two buns, but not enough length to make either one huge.
The best version uses a clean center part and two compact buns placed high or mid-height on the head. Each side can be twisted into a small knot, wrapped, and pinned flat. If you want a softer feel, leave two thin front pieces out near the temples. If you want a sharper look, smooth everything back and keep the buns tight.
This style works best when the buns are not identical in a painfully perfect way. A tiny size difference makes them feel human. A little texture at the roots helps too, especially if the hair is very silky. Fine hair benefits from dry shampoo here because it gives the buns more grip and a little lift.
I like this one for concerts, casual parties, and days when a regular bun feels too plain. It’s cheeky without being silly. That is a narrower lane than people think, and medium hair handles it well.
Final Thoughts
The best updo hairstyles for medium hair do not fight the length. They use it. That means twists that tuck cleanly, braids that hold their own, and buns that stay compact instead of sprawling into the back of your head.
If your hair is layered or slippery, prep matters more than people admit. A little dry shampoo at the roots, a few bends with a curling iron, and a strong hand with the pins can change the whole result. Tiny changes. Big payoff.
Start with the style that matches your day, not the one that looks hardest. A low chignon for calm, a braided crown for hold, a French twist when you want polish, or a space bun when you want something lighter on its feet. Medium hair can do more than enough.
