



Long hair can look polished in a twist ponytail, but the style lives or dies on the base. A loose twist with a sliding elastic looks tired by lunchtime; a neat one keeps its line, holds the ends in place, and feels calm at the scalp.
That’s why twist ponytail styles for long hair are worth learning properly. They can be sleek and office-ready, soft enough for dinner, or practical enough to keep thick hair off your neck without feeling like a helmet. The trick is not the twist alone. It’s the tension, the parting, the anchor point, and the tiny finishing details that most people skip.
I’ve always thought long hair makes this category more interesting, not less. A little extra length gives the twist somewhere to travel, more room for movement, and a better payoff when you wrap, braid, or cross the sections. It also means the style can get heavy fast, which is why some ponytails look graceful on one head and feel like a headache on another.
The styles below move from smooth to playful, from low-effort to event-ready, and each one solves a different problem. If your ponytail has been looking flat, sagging, or oddly unfinished, there’s probably a better version waiting a few headings down.
1. Sleek Two-Strand Twist Ponytail for Long Hair

A clean two-strand twist ponytail is the one I reach for when I want long hair to look controlled without looking stiff. It has that tidy, slightly glossy finish that works with straight, stretched, or blown-out hair, and it keeps the shape simple enough that the length can do the talking.
The reason it looks so good is plain enough: two equal sections twist more cleanly than a loose handful of hair. If one side is thicker than the other, the twist starts to wobble and the whole ponytail loses that smooth rope-like line. On long hair, that imbalance shows fast.
Why the Base Matters
The base is the whole story here. A neat middle part or a deep side part, a little gel at the hairline, and a firm elastic at the crown or mid-back of the head make the style look deliberate instead of thrown together.
- Best on hair that has been lightly stretched or blow-dried.
- Use a pea-sized amount of gel near the hairline, not all over the head.
- Keep the two twist sections the same width from root to end.
- Secure the ponytail with a second elastic if your hair is thick or heavy.
- Finish with a small wrap of hair around the elastic if you want the cleanest look.
My take: skip the heavy grease. It makes the twist slide apart and turns the finish dull before the day is over.
2. High Crown Twist Ponytail
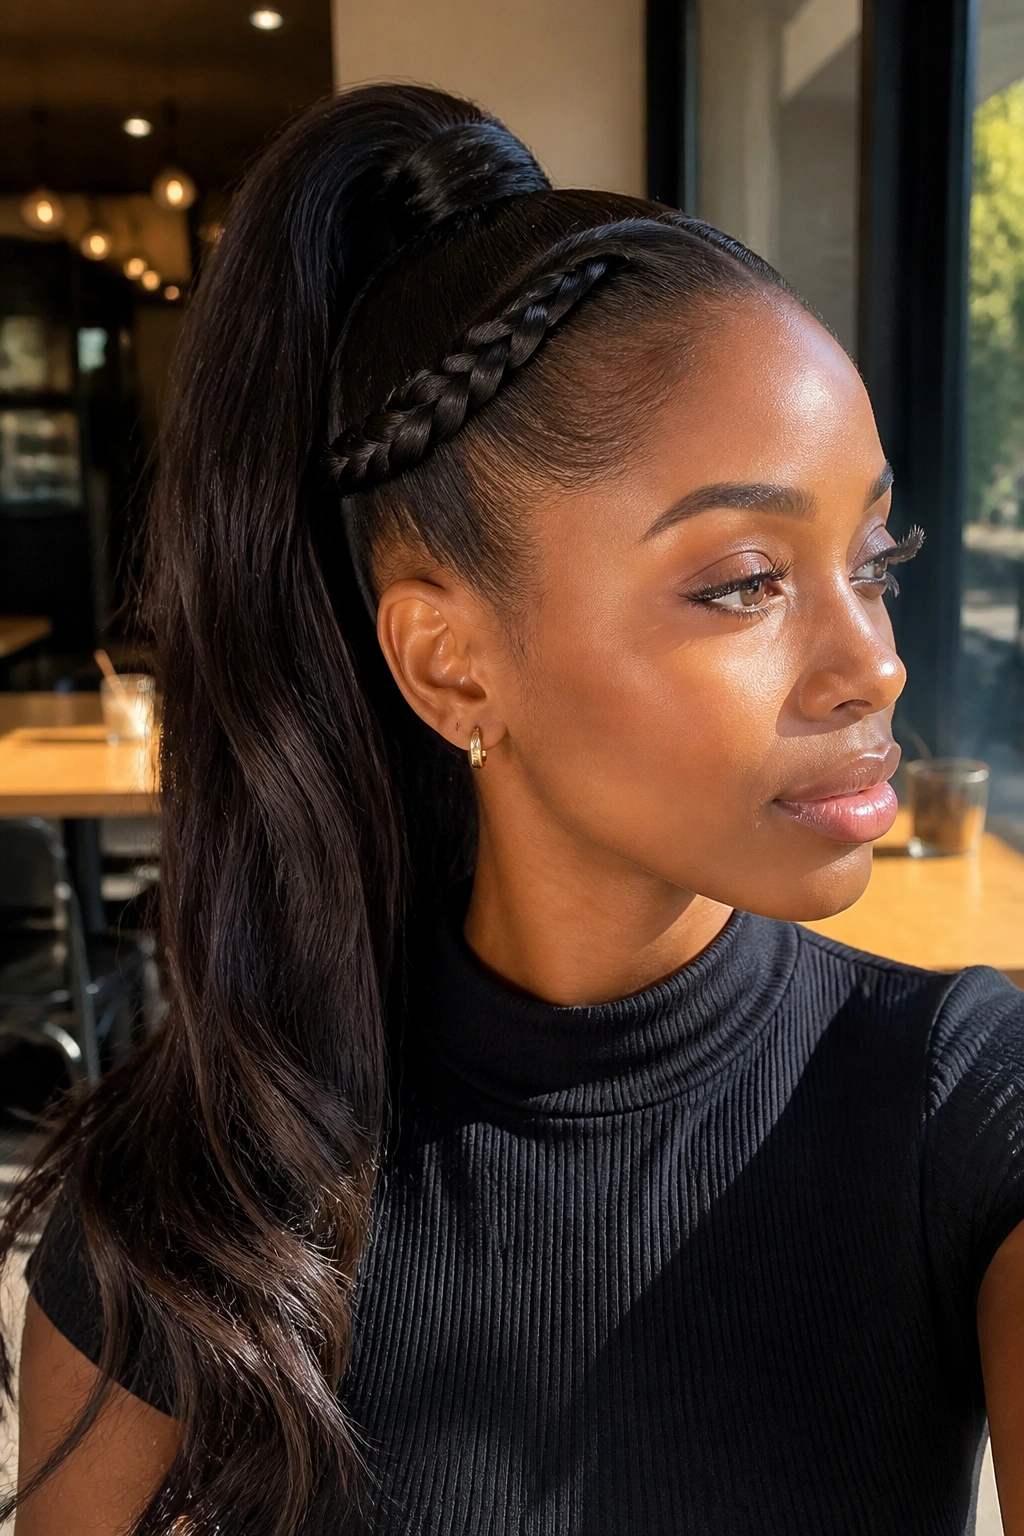
Want a ponytail that gives the face a little lift without teasing the crown into a puffball? A high crown twist does that job well. The placement sits just high enough to open the face and show off the length, but it still feels more polished than a basic high ponytail.
This style works best when the twist starts from the temples or just above the ears and feeds into a high anchor point. On long hair, that high placement matters because the ponytail has weight; if the base is too loose, the whole style starts dropping by the second hour.
A lot of people make the mistake of pulling the front too tight. Don’t. The style should feel firm, not sharp. If your scalp already feels tender after a week of protective styling, this is the version to soften a little by using larger sections and a wider elastic.
I like this one for days when the rest of the look is plain and the hair needs to carry a little more shape. It also sits nicely with hoops, sunglasses, or a high-neck top. Small detail. Big difference.
3. Low Side Twist Ponytail

A low side twist ponytail has a softer mood than the high versions, and that’s the charm. It pulls long hair over one shoulder, keeps the front under control, and gives you a shape that feels intentional without screaming for attention.
If your hair naturally falls to one side anyway, lean into it. A side part with a twist that starts near the temple and drifts into a ponytail behind the ear looks better than fighting the way your hair already wants to sit. That small concession makes the style look easier, and easier usually looks better.
Where the Part Should Land
The part does not need to be dead straight. It only needs to be clean enough that the twist has a clear direction.
- Place the part about 1 to 2 inches off center if you want a soft asymmetrical look.
- Keep the twist low, near the nape and behind one ear.
- Use a narrow section at the front so the side sweep doesn’t get bulky.
- Pin the top layer flat if your hair is layered or prone to frizz.
- Let the ponytail fall over one shoulder for the cleanest line.
This is one of those styles that works when you want your hair controlled but not severe. It’s a little quieter than a center-part version, and I like that.
4. Bubble Twist Ponytail

Bubble styles are not childish when the spacing is right. On long hair, a bubble twist ponytail turns length into shape instead of letting it hang in one heavy curtain, and that can be a relief if your ends tend to look thin or stringy.
The trick is to use elastics as structure, then pull the sections between them until they puff into rounded bubbles. With long hair, I’d keep the gaps around 1½ to 2 inches apart. Too wide and the bubbles droop. Too tight and the style looks pinched.
There’s also a nice side effect here: the style feels easier to maintain through the day because each bubble gives the ponytail a little built-in support. If one section loosens, the whole style does not collapse at once. That’s useful on thick hair, gym days, or any day when you do not want to keep fussing with your mirror.
A few clear rules help:
- Use small clear elastics or slim snag-free bands.
- Start with a smooth base before adding the first elastic.
- Pull each bubble outward evenly on both sides.
- Stop short of over-stretching the section, or it will look flat instead of full.
- Hide the first elastic under a wrapped strand if you want a cleaner finish.
It’s playful, yes, but also practical. That combination is hard to beat.
5. Feed-In Twist Ponytail for Long Hair
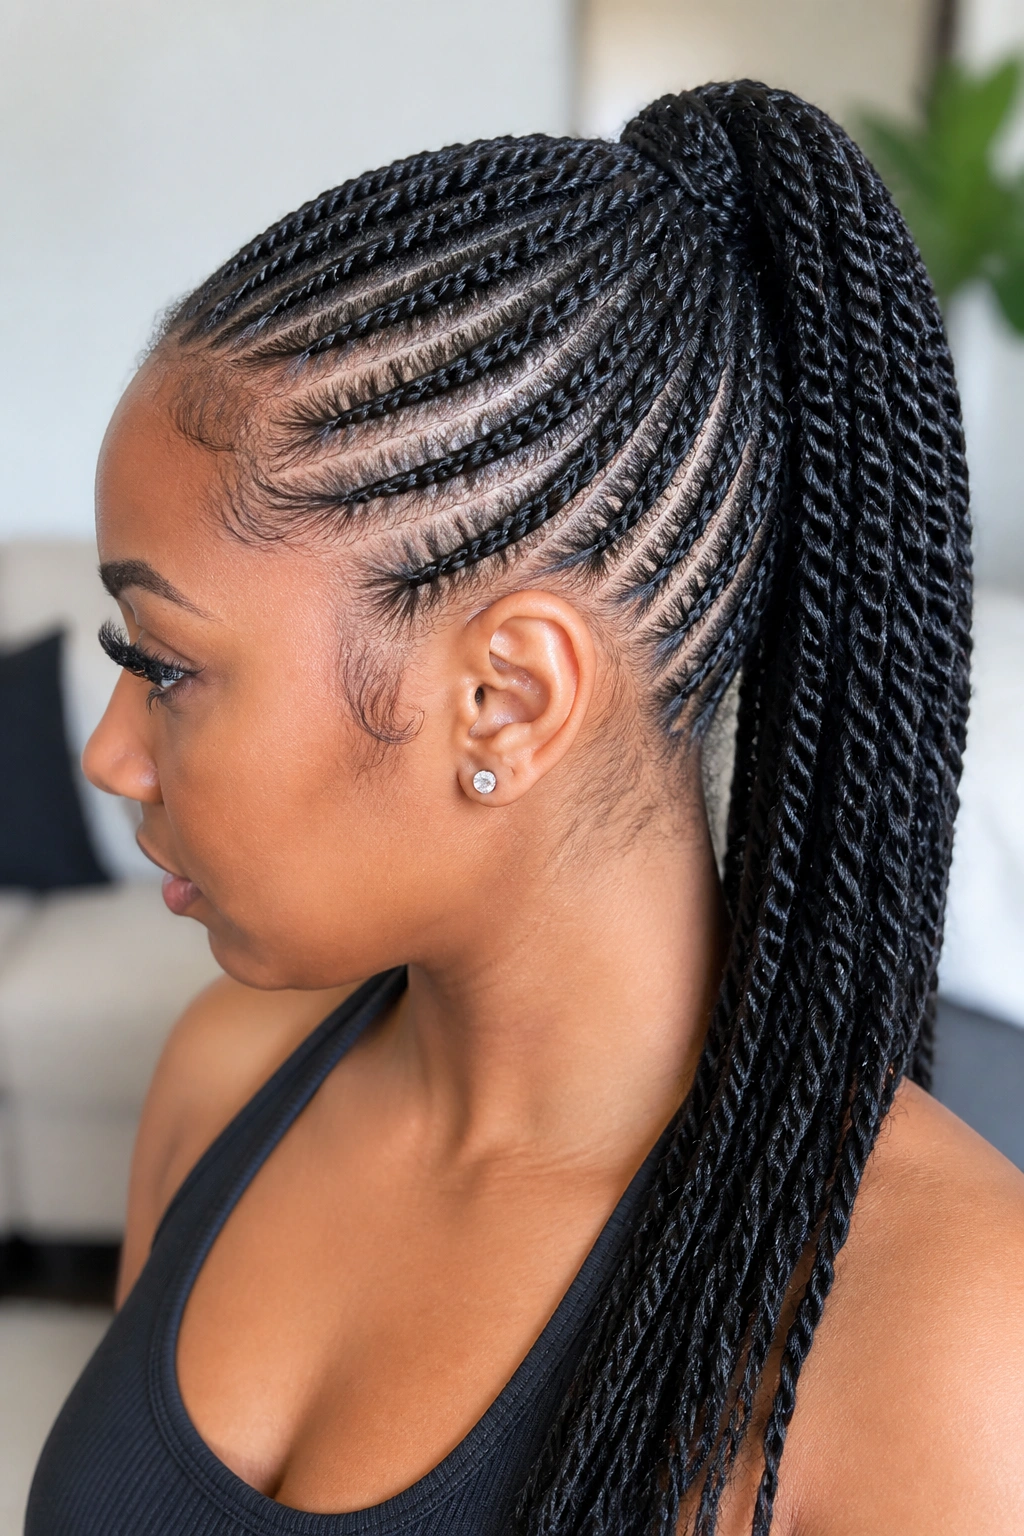
Feed-in twists are the neatest way to keep the front flat while still building a ponytail with real shape. Instead of grabbing a big chunk of hair all at once, you add small pieces gradually so the base stays tidy and the twist sits closer to the scalp.
That gradual build changes everything. It spreads tension more evenly, which helps the style feel less bulky at the root and look less lumpy at the start of the twist. On long hair, where every extra ounce of hair adds weight, that matters more than people think.
What Feed-In Actually Changes
You can see the difference within the first few inches. A feed-in twist starts slim, lies flatter, and usually looks more seamless where it meets the hairline.
How to Keep the Line Clean
- Start with a section no wider than ½ inch at the front.
- Add hair in small amounts, roughly ¼ inch at a time.
- Keep your hands close to the scalp so the twist does not puff up.
- Use a firm styling gel or braid gel near the roots.
- Secure the finished ponytail with an elastic before the length gets too heavy.
If you wear your hair up often, this is one of the smarter long hair protective styles because it keeps the front orderly without demanding tiny sections everywhere. It takes patience. Worth it.
6. Half-Up Twist Ponytail

Why fight all of your length when half of it can stay down? A half-up twist ponytail gives you the clean front of a pulled-back style while leaving the rest of the hair free, and that balance is exactly why it works so well on long hair.
This version is useful when you want movement at the ends but do not want hair falling in your face. It also feels lighter on the head than a full ponytail, which is a real advantage if your hair is dense or if you hate the tug of a high, heavy style.
I like this one most when the ends are in good shape. If your length is dry at the bottom, the half-up twist keeps the healthier top section looking polished while the rest can stay loose, curled, or stretched. The hair does not have to do everything at once.
A clean half-up style usually starts from the temples and gathers the top third or top half of the hair. You can twist both sides toward the back, or twist one side and leave the other smoother for a less formal look. A satin scrunchie works well here because it grips without leaving a hard crease.
It’s the easiest style in this list to dress up or down. That’s probably why it survives in real life.
7. Wrapped Base Twist Ponytail

The difference between plain and polished is often a strip of hair wrapped around the elastic. A wrapped base twist ponytail looks finished because it hides the obvious tie and turns the anchor into part of the design instead of a leftover detail.
On long hair, the wrap adds structure without adding much bulk. You only need a small section of hair, usually about ½ inch wide, to cover the elastic neatly. Anything thicker starts looking lumpy, especially if the wrap has to sit over a twist.
How to Wrap Without Bulk
- Smooth the wrapping strand with a little cream or light gel before you start.
- Pull it tight enough to cover the elastic, but not so tight that it snaps.
- Pin the end underneath the ponytail with a bobby pin.
- Aim the pin diagonally for better hold.
- Keep the wrapped section flat against the base so it does not puff.
This style is the one I’d pick for a dinner, a meeting, or any day when I want the hair to look cared for without piling on extras. It is a small move, but it changes the whole read of the ponytail. Very little effort. Noticeably better result.
8. Rope Twist Ponytail

Rope twists are underrated because they do not need perfect parting. They also work well on silky long hair, the kind that slides out of braids before lunch. A rope twist grabs the hair in a different way, and that different grip can be the thing that keeps the style in place.
The method is simple: divide the hair into two strands, twist each one in the same direction, then wrap them around each other in the opposite direction. That opposite motion locks the rope shape. If you twist both strands the wrong way, the whole thing starts to unwind on you.
It’s a tidy look, but not a fussy one. That’s the appeal. The rope pattern shows off shine, makes long hair look thicker at the mid-lengths, and still feels easy enough for a weekday. If your ends are layered, a little smoothing cream at the bottom helps the tail stay together instead of fraying out.
A few things make it hold better:
- Keep both strands equal in size.
- Twist them firmly before crossing.
- Use a light cream, not a heavy butter.
- Secure the end with a slim elastic before it starts to loosen.
- Wrap the base if you want the finished ponytail to look cleaner.
It’s a simple style, but a clean simple style has its own kind of polish.
9. Jumbo Flat Twist Ponytail

If your hair is dense, go bigger. A jumbo flat twist ponytail can handle long hair better than a bunch of tiny sections because it reduces clutter at the scalp and lets the style breathe instead of packing everything into a tight knot of twists.
Flat twists work especially well at the front or along the crown, where small sections can start to look busy. Two or three broad twists usually look calmer than six tiny ones, and they are much easier on the hands when you are styling your own hair.
Where the Volume Goes
The point here is not to flatten the whole head. It’s to keep the roots neat and let the ponytail length do the heavy lifting.
- Use broad sections at the front, about 1 to 1½ inches wide.
- Keep the twist close to the scalp for the first few inches.
- Let the ponytail itself stay full and loose.
- Secure the base with a strong elastic before the length is added.
- Smooth the edges with a brush rather than stacking on too much product.
This style has a practical side that gets overlooked. Fewer sections mean less time, less finger fatigue, and less scalp tension. That matters if you wear protective styles often and want something you can repeat without irritating your hairline.
10. Braided-Front Twist Ponytail

Some mornings the front section refuses to stay put. That’s when a braided-front twist ponytail makes sense. A small braid or two at the hairline gives you control where you need it, then the twist ponytail takes over for the rest of the length.
This hybrid works because it solves two problems at once: flyaways around the face and bulk in the ponytail itself. On long hair, the front pieces are often the first to come loose, especially if the hair is layered or fine near the temples. Braiding those pieces in first gives the whole style a stronger frame.
I like this one for active days because the front stays tidy longer than a simple twist. You can keep the braids narrow and neat, then feed them into a mid-height ponytail or a low one, depending on how formal you want the finish to look.
A rat-tail comb helps here. So does a medium-hold gel, applied only where the braids begin. Too much product turns the front hard and shiny in a way that can feel dated. A cleaner line, less shellacked finish, usually looks better.
It’s a smart style when your hair needs discipline at the edges but still deserves some movement in the back.
11. Curly-Ended Twist Ponytail

Why lock the twist all the way to the ends when the last few inches can do the pretty work? A curly-ended twist ponytail keeps the base controlled, then leaves the tail soft, bent, or spiraled so the style has motion at the bottom.
This works especially well on long hair because the ends are visible. If the tail hangs straight and thin, the whole ponytail can look a little severe. Curling or rod-setting the ends changes that fast. The tail gets fuller, the shape reads softer, and the style moves when you walk.
How to Set the Ends
- Leave the last 2 to 4 inches of hair free, depending on length.
- Use flexi rods, perm rods, or a curling wand on the ends only.
- Apply heat protectant if you use heat.
- Let the ends cool fully before touching them.
- Separate the curls lightly with oiled fingertips if you want a softer finish.
This is one of the better options when you want a twist ponytail for an event but do not want the look to go rigid. It has enough structure to stay neat, and enough movement to keep the style from feeling boxed in.
12. Crisscross Twist Ponytail

This one looks more complicated than it is. A crisscross twist ponytail uses two twisted sections that cross over each other before they meet the ponytail, which creates a woven effect across the back or crown.
The crossed shape gives the style a little more visual movement, and long hair makes that movement easy to see. If your hair is thick, the cross pattern can help break up the bulk. If your hair is fine, it can make the base look fuller than a single straight twist.
I usually think of this style as a good middle ground between a simple ponytail and a full updo. It feels styled, but it does not demand the time or pinning of something far more structured. A few U-pins hidden under the cross keep the sections from sliding apart.
A practical setup looks like this:
- Twist the left and right sections separately.
- Cross them once or twice above the ponytail base.
- Pin each crossing point underneath.
- Gather the remaining hair into a ponytail with an elastic.
- Smooth the top with a light brush, not a heavy one.
It suits weddings, dinners, and the sort of day when a basic ponytail would feel underdressed.
13. Twisted Ponytail with Scarf

A silk scarf changes the feel of the whole style. It adds color, but it also changes texture, which matters more than people admit. When long hair has been twisted into a ponytail, a scarf can soften the base, hide an elastic, and keep the look from feeling too plain.
The best part is the flexibility. You can tie the scarf around the base, wrap it down the length, or use it as a band that leads into the twist. A slim scarf gives a cleaner finish. A wider square makes more of a statement. Either way, the fabric should sit flat, not bunch up in thick knots.
Best Scarf Choices
- Choose silk or satin if your hair tangles easily.
- Use a scarf about 2 to 3 inches wide for a subtle wrap.
- Fold a larger square into a narrow band if you want more coverage.
- Tie the knot underneath the ponytail so the front stays smooth.
- Press the fabric flat before tying so it does not wrinkle at the base.
This style is useful when your ponytail needs a little personality but you do not want to add clips, beads, or extra pins. The scarf does the work on its own. Quietly. Then the hair follows it.
14. Beaded Twist Ponytail

Beads are not only decoration; they change how the ends hang. A beaded twist ponytail adds weight at the bottom, which can help long twists fall straighter and keep their shape instead of drifting apart into wisps.
The trick is restraint. Too many beads turn the style clunky fast, especially on long hair where the tail already has length to manage. A small cluster at the ends, or one row of smooth beads, usually looks better than a crowded stack. Rounded beads are easier on clothing and less likely to snag than sharp-edged ones.
This style works well when you want movement and a little sound. The beads shift as you walk, and the tail picks up a different rhythm than it would with a bare elastic finish. It also gives a twist ponytail a stronger finish line, which is handy if the ends tend to fray or puff up.
A few practical points matter here:
- Secure the hair first with a small elastic before adding beads.
- Use smooth beads with wide enough openings for the hair thickness.
- Keep the bead count modest so the ponytail does not get top-heavy.
- Make sure the beads do not rub the collar if the ponytail sits low.
- Match the bead color to the outfit or keep it neutral for more wear.
It’s a small detail, but on long hair, small details carry a lot of weight.
15. Low Nape Twist Ponytail for Long Hair
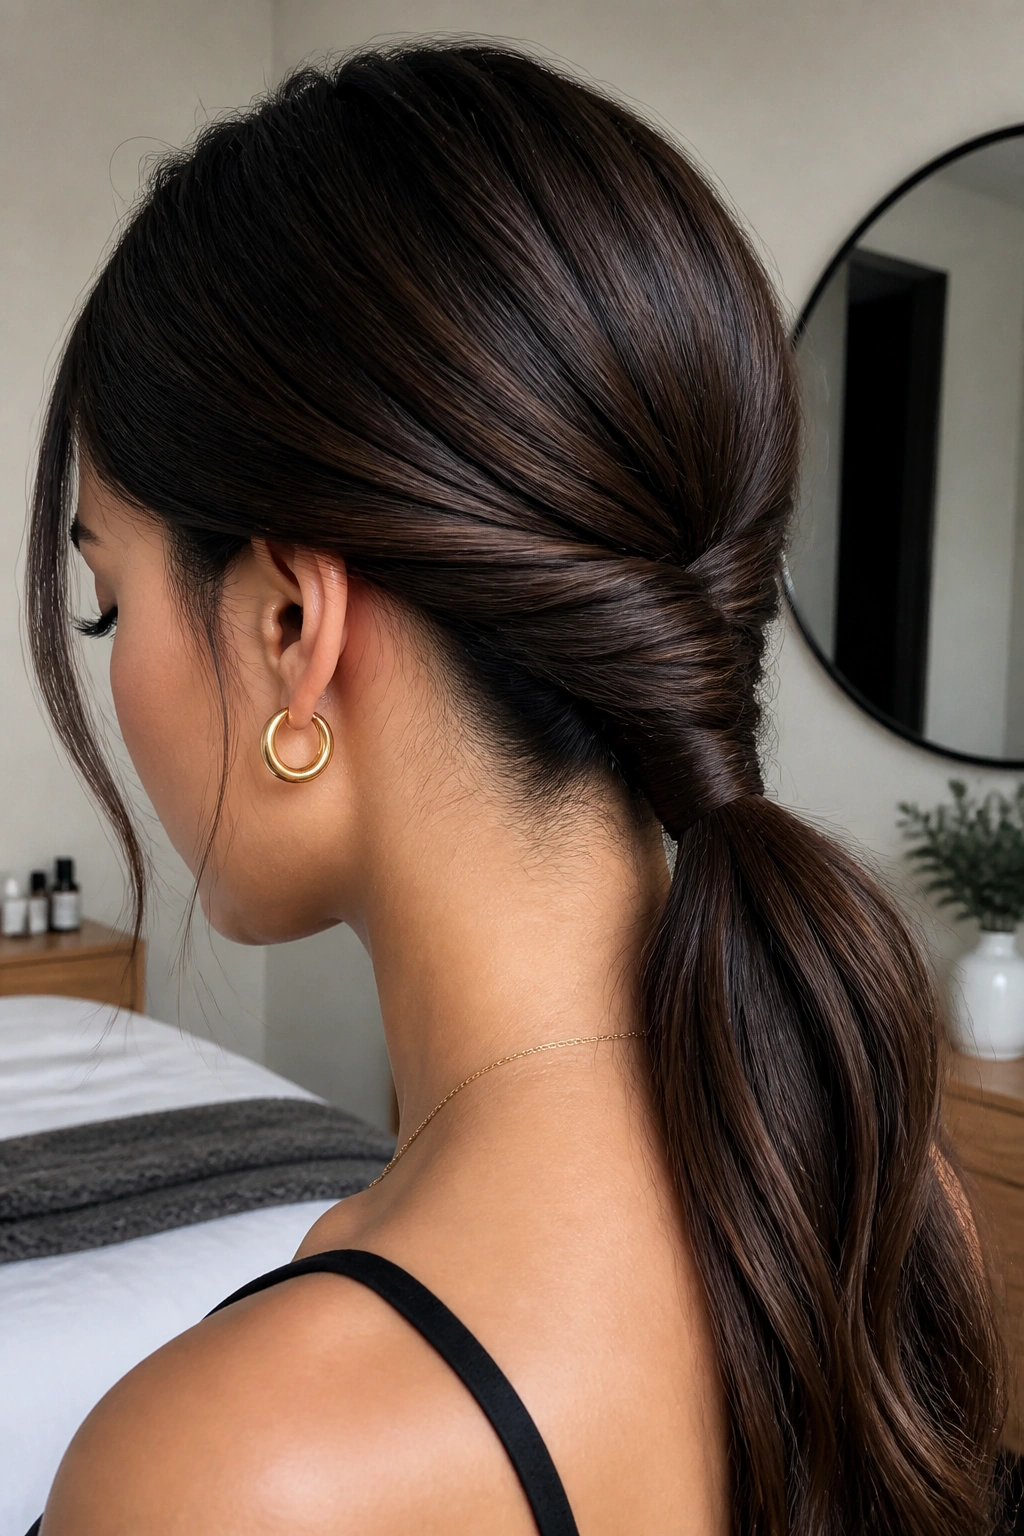
If I had to pick one twist ponytail for a long day, it would be this one. A low nape twist ponytail sits quietly at the base of the head, holds the length in a calmer place, and keeps the weight from riding up into the crown.
That low placement is easier on the scalp than higher versions, which makes it a smart choice when your hair is heavy or your edges need a break. It also tends to stay neat longer because gravity is working with the style instead of against it. The ponytail can hang straight, curl at the ends, or tuck into a wrapped finish depending on how much polish you want.
I like this version because it doesn’t try too hard. The twist can start near the ears or a little above them, then flow down into a ponytail right at the nape. That shape feels stable, and on long hair stability counts. You spend less time fixing it and more time forgetting about it, which is the real compliment.
A few finishing touches help:
- Keep the base low and centered, not too close to one side.
- Use a soft elastic if your hair is thick and needs more give.
- Smooth the top with a light brush so the twist line stays visible.
- Add a wrapped strand if you want the base to look cleaner.
- Leave the tail straight, curled, or lightly bent, depending on the mood.
It is the kind of style that earns repeat wear. Not flashy. Reliable. And sometimes that is exactly the point.
