



Side braids on long hair can look polished fast, but only if the braid matches the texture in your hands. A Dutch braid that hugs the head, a loose fishtail over one shoulder, and a ribbon-woven plait all solve different problems, and that matters more than most people admit. One style stays put through a long workday. Another survives dinner and a windy walk home.
Side braid hairstyles for long hair work best when the hair has a little grip. Freshly washed strands are slippery, especially if your hair is fine or silky, while day-old hair, a dusting of dry shampoo, or a touch of mousse gives the braid something to hold onto. That tiny bit of texture is the difference between a braid that looks deliberate and one that starts sagging near the nape.
Long hair gives you room to play. You can wear a braid tight and sleek, then soften it with eased-out loops; or you can build in detail with a fishtail, four-strand plait, or pull-through braid that shows off the length instead of hiding it. Protective styling matters here too, because tight braiding at the hairline can tug in ways that feel fine for an hour and annoying by the end of the day.
The styles below cover everyday wear, dressier looks, and a few practical fixes for when your ends are dry or your layers are acting up. Start with the one that suits your hair texture, not the one that looks hardest on a screen.
1. Low Side Dutch Braid for Long Hair
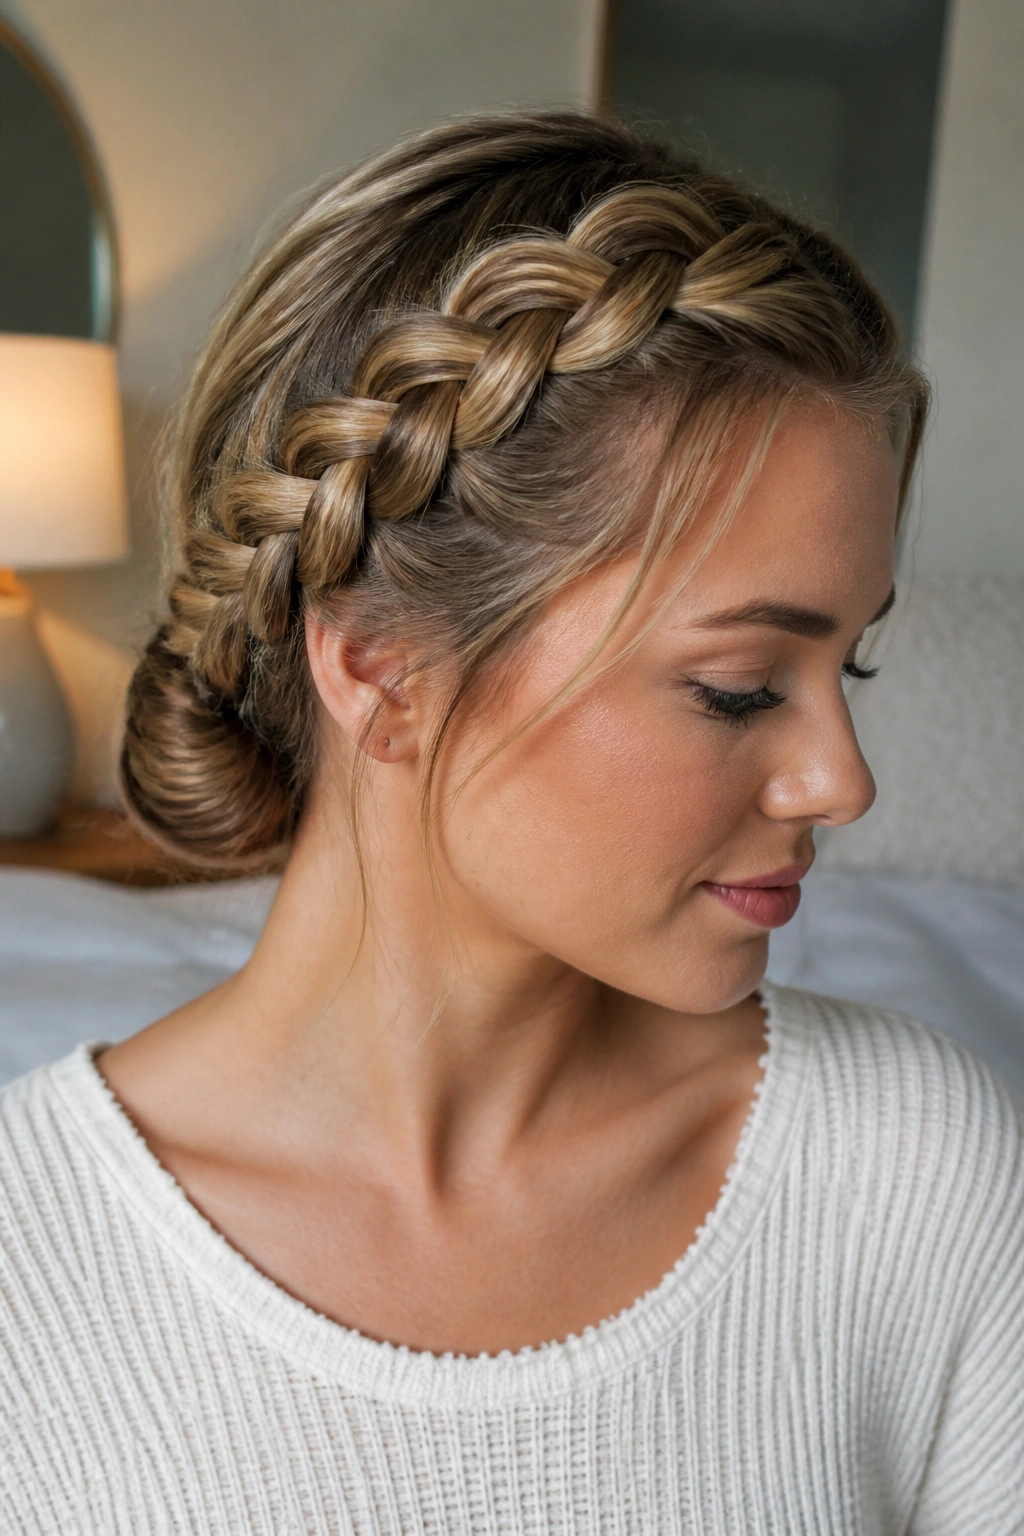
If one side braid earns a permanent spot in a long-hair routine, it’s the low Dutch braid. It sits close to the head, so the shape stays visible, and the braid has enough grip that it doesn’t collapse the moment you move your shoulder.
Why It Holds So Well
A Dutch braid is built by crossing strands under the middle section, which makes the braid pop up instead of sinking into the hair. That raised shape matters on long hair, because all that length can pull a softer braid flat. With a side placement, the braid also gets a little support from the shoulder, which helps keep the finished look from sliding around.
I like this style for thick hair, but it works for fine hair too if you add a bit of texture first. Start with a deep side part, then braid from the temple down toward the opposite nape in small, even pieces. Keep the first inch or two snug, then relax your hands once the braid is anchored. That small adjustment keeps it neat without looking stiff.
- Best on wavy, thick, or layered hair
- Use a fine-tooth comb and a light texture spray
- Keep each feed-in section about 1/2 inch wide
- Finish with a clear elastic and tuck the tail under if it’s very long
Small trick: leave the braid a touch tighter near the scalp and softer through the tail. That contrast gives long hair a cleaner shape.
2. Soft Side French Braid with a Face Sweep
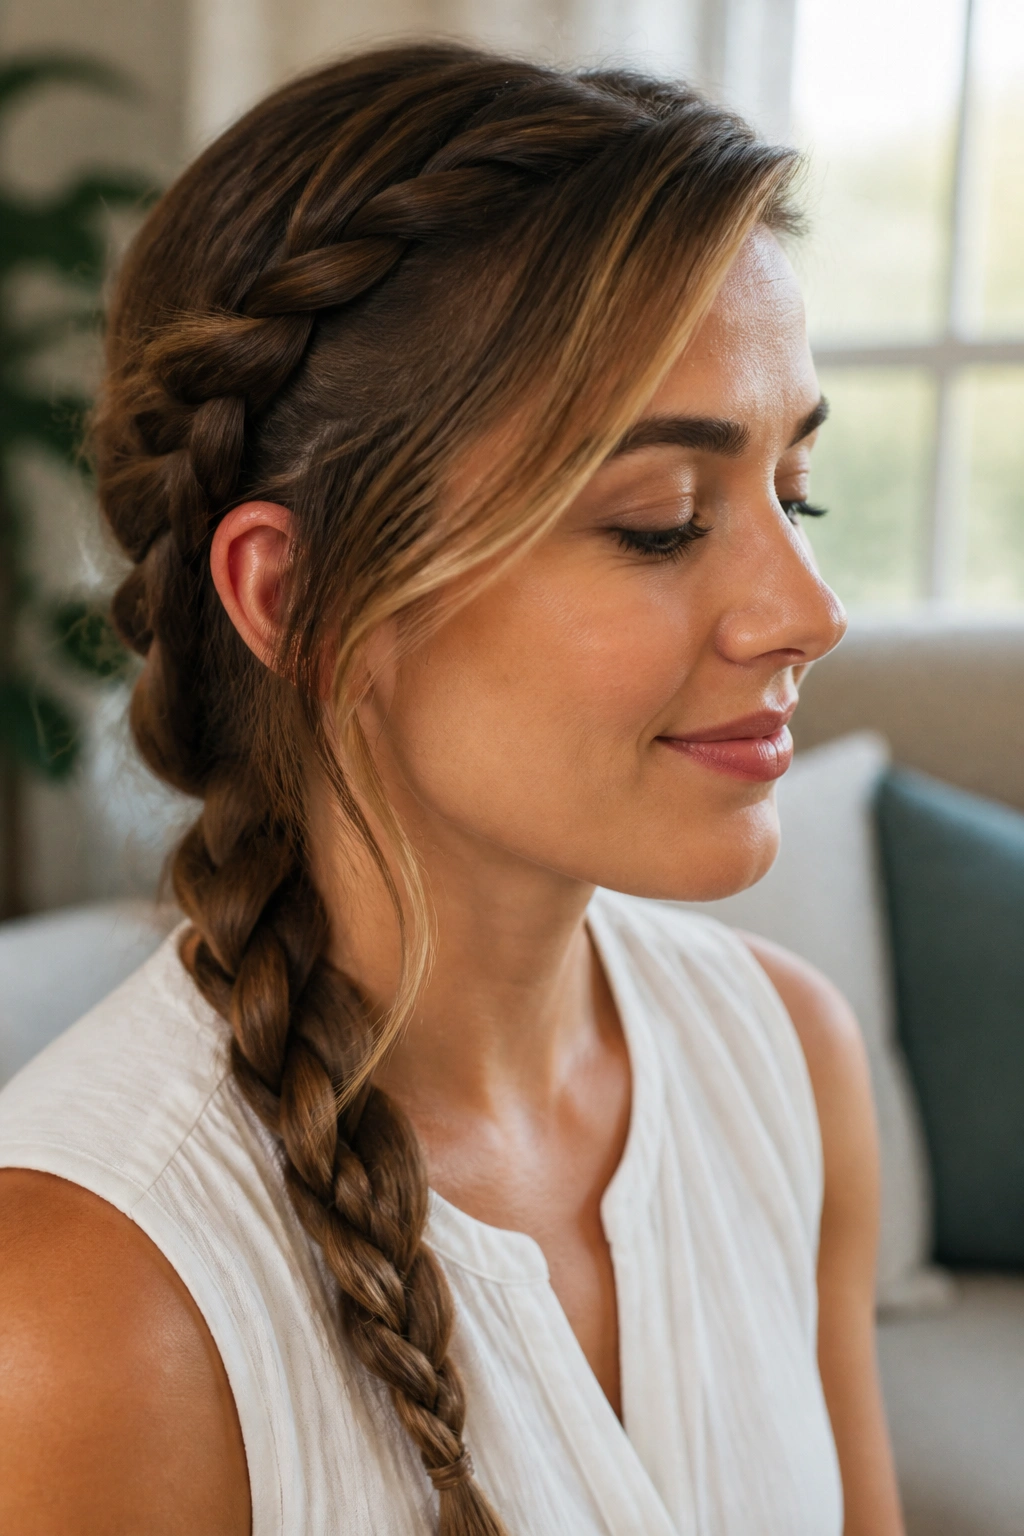
Want something softer than a Dutch braid, but still neat? A side French braid gives you that middle ground. It lies flatter against the head, which makes it a nice choice when you want the braid to blend into the rest of the hair instead of sitting on top of it.
French braids are fed by crossing strands over the middle, so the finish feels smoother and a little less chunky. On long hair, that creates a nice sweep from the front hairline to one shoulder, which is a flattering line if you wear glasses or like a deep side part. The braid is especially good for office days, polished casual looks, and anything that needs to stay tidy without looking formal.
Keep the first section near the part small and controlled. If you grab too much hair at once, the braid turns bulky at the top and the rest of the length looks thin by comparison. A small amount of smoothing cream near the hairline helps if you get frizz at the front, but don’t coat the whole head. That’s where the braid starts slipping.
This one looks best when the front sweep is clean and the tail stays smooth. A quick pass with your hands over the finished braid usually does more than a second of over-brushing ever will.
3. Fishtail Side Braid Over One Shoulder
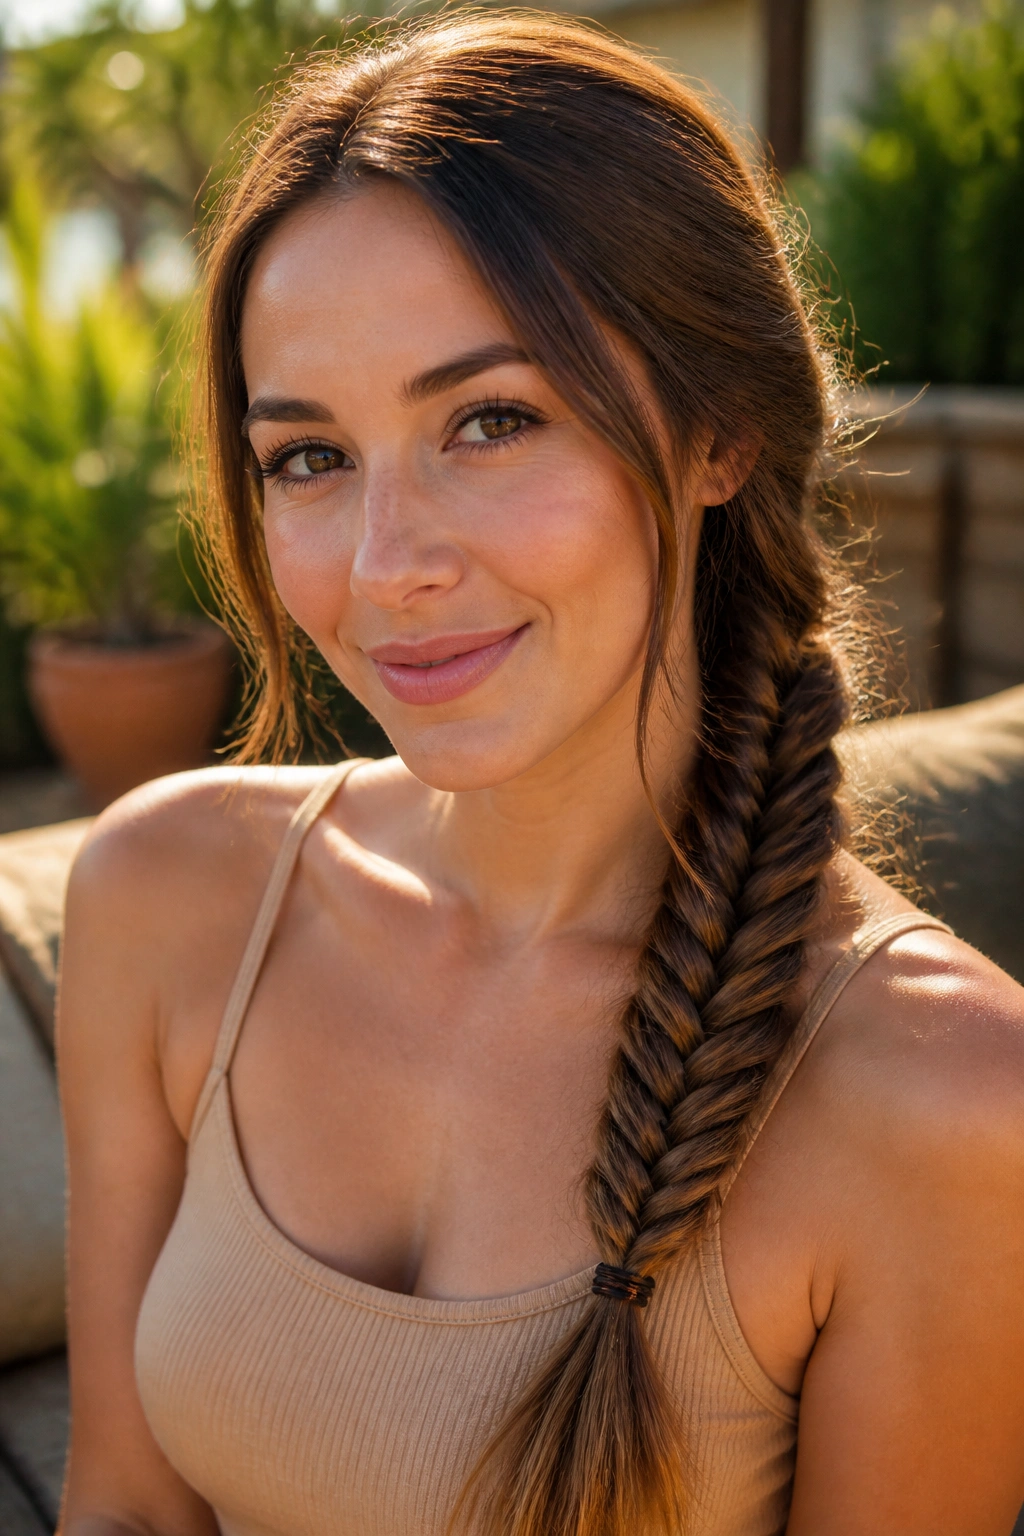
A fishtail braid on long hair has a kind of visible patience to it. The plait looks detailed even when the actual motion is simple, and that’s why it shows up so often in bridal hair, date-night looks, and softer dressed-up styles.
How the Pattern Stays Crisp
The trick is to keep the pieces small. If you grab chunky sections, the braid turns into a loose knot pattern rather than a fishtail. Take two large sections, then pull tiny bits—about the width of a pencil—from the outer edge of one side to the other. Repeat. The smaller the pieces, the cleaner the weave.
Long hair gives a fishtail more personality because the pattern keeps going for a while before it reaches the ends. If your hair has lots of layers, mist the mids and ends with a light texturizing spray first. That stops shorter pieces from sliding out and makes the braid look a little fuller. Straight hair can take a fishtail too, but it tends to look sleeker than romantic unless you loosen the finished braid with your fingers.
Where It Works Best
- Long, blunt ends show the pattern best
- Slightly gritty hair grips the weave better
- A side sweep helps the braid feel intentional, not accidental
I’d reach for this one when the rest of the outfit is simple and the hair needs to do some work.
4. Rope Twist Side Braid for Busy Mornings
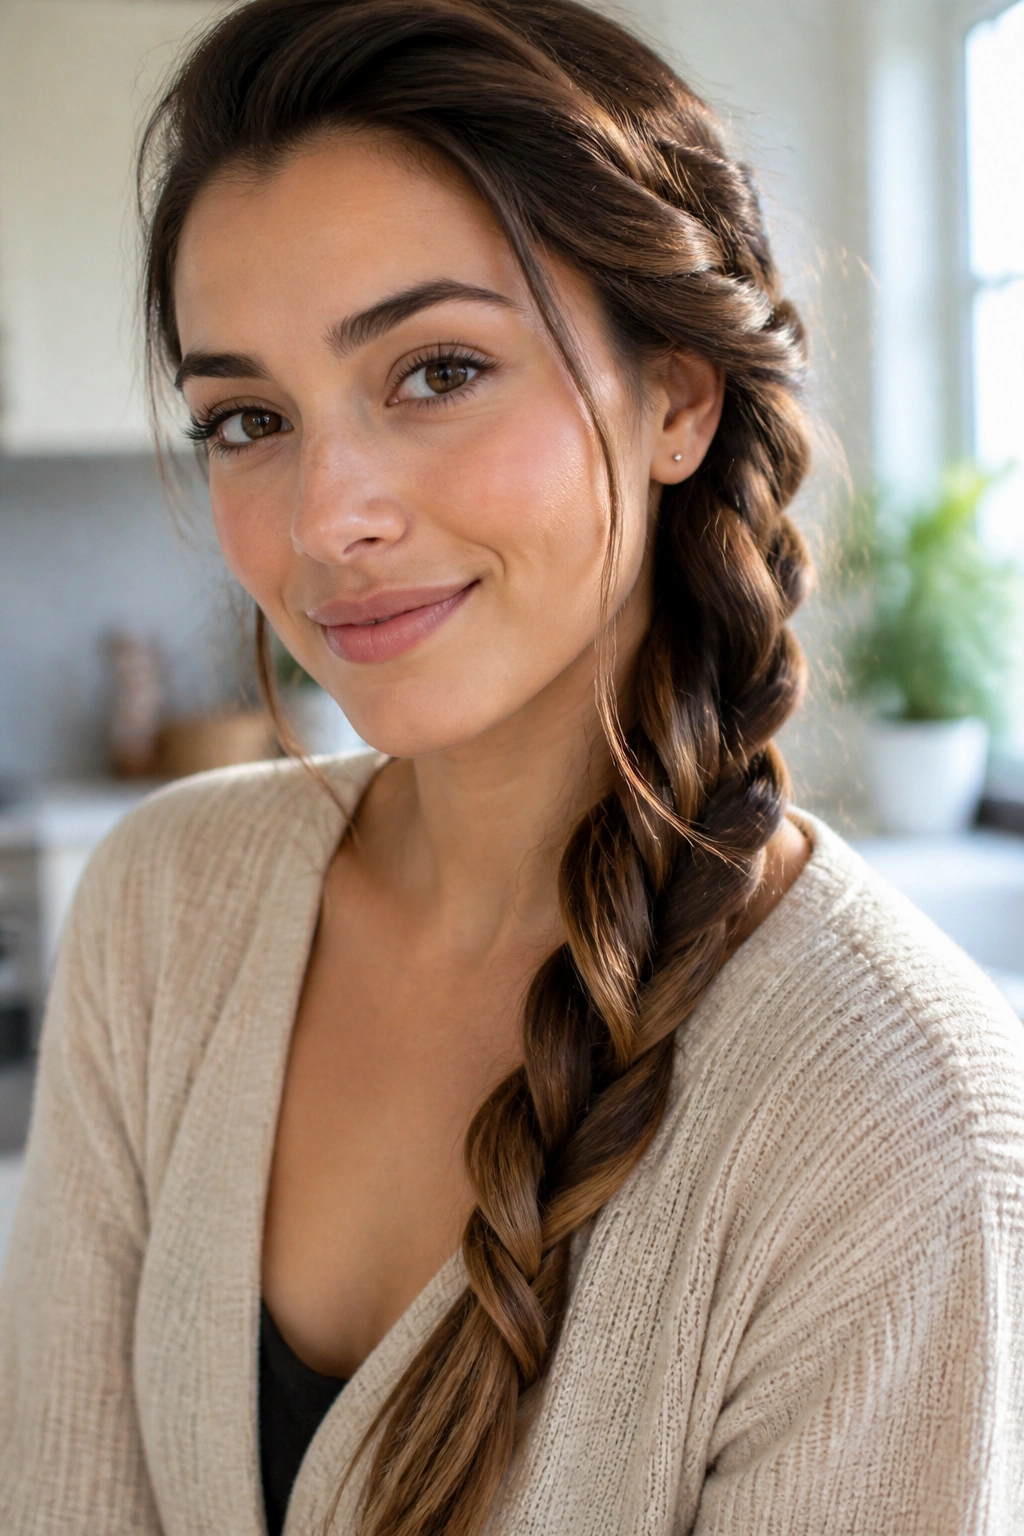
Some mornings call for speed, not finesse. Rope twists are the answer.
This style isn’t a braid in the strictest sense, but it wears like one and takes less finger coordination. Split the hair into two sections, twist each section in the same direction, then wrap them around each other in the opposite direction. That opposite twist is what locks the shape in place. On long hair, the rope effect reads clean and tidy, especially when the twist rests over one shoulder.
It’s a good choice for coarse hair, dense hair, and any hair that likes to puff up when it’s braided too tightly. A rope twist keeps the surface smooth, which can be a relief if your hair frays at the ends. Use a small elastic at the base, then another one near the tail if the length is heavy and wants to unwind.
- Use when you want a 10-minute style
- Works well with second-day hair
- Add a ribbon if you want the twist to look softer
- Keep the sections even, or the rope starts leaning sideways
One small warning: if the hair is very slippery, the twist can loosen fast. A little mousse at the roots fixes that better than more pins.
5. Boho Side Braid with Soft Face-Framing Pieces
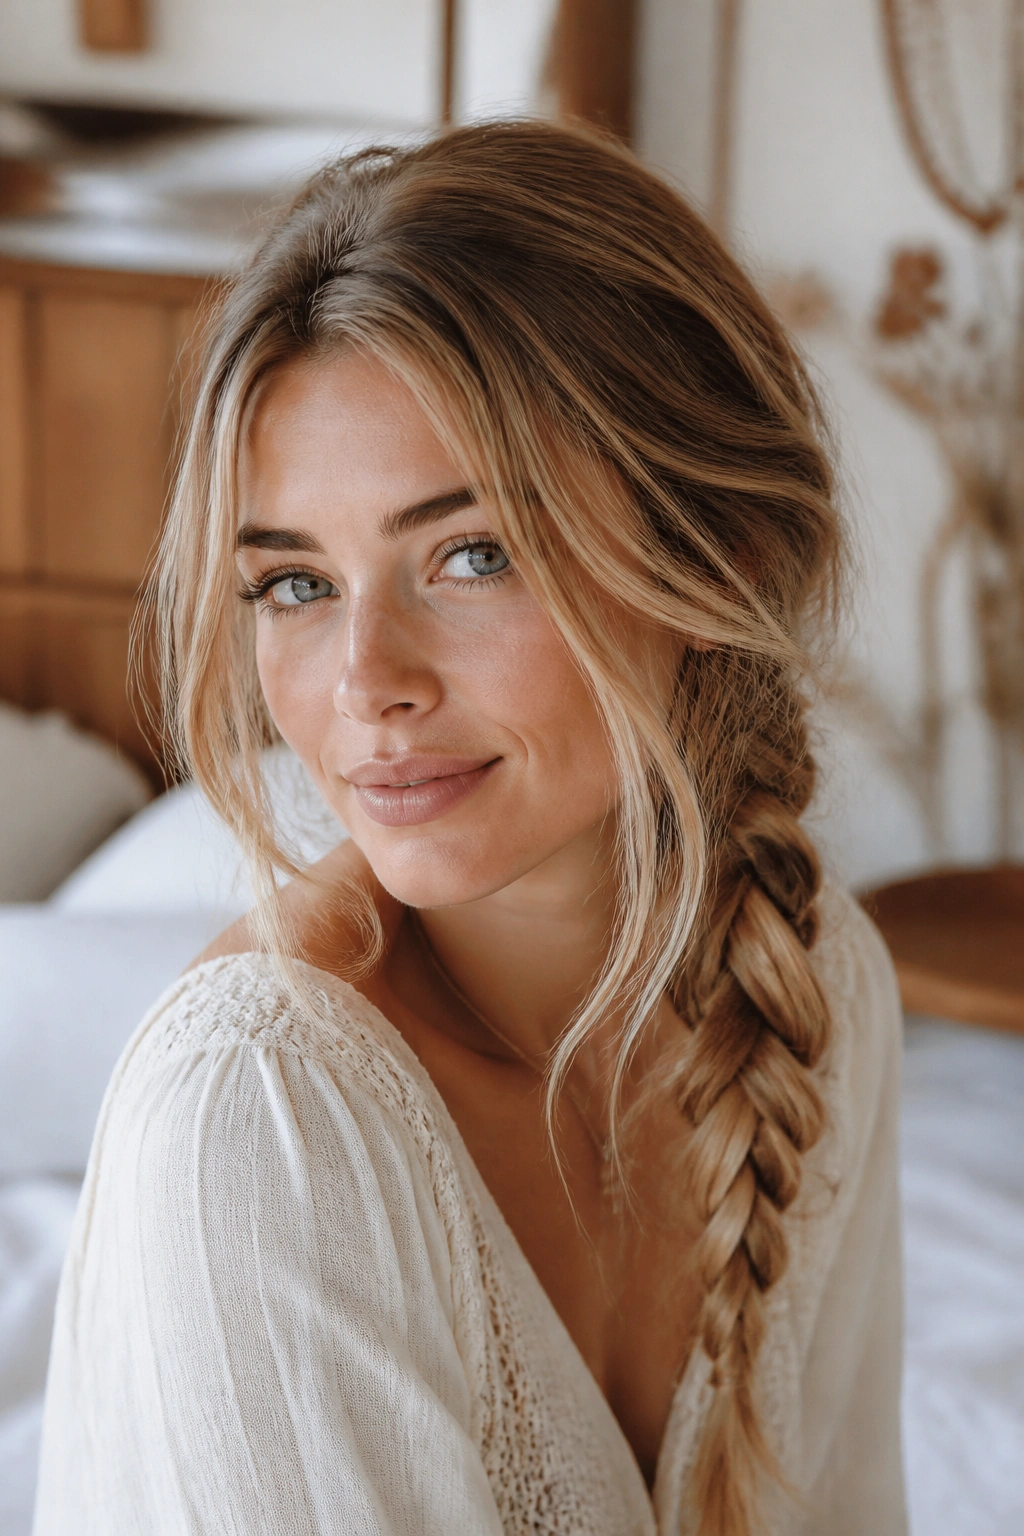
Loose does not mean lazy.
A boho side braid has a deliberate softness that depends on the front pieces, the part, and the amount of tension you use. Leave out a slim section on each side of the face—about 1 to 2 inches wide—then braid the rest of the hair to one side with a relaxed hand. Those loose strands soften the braid and keep the look from feeling too formal or too severe.
I reach for this style when the hair has a natural wave or a bend from the day before. It does not need to be perfectly smooth. In fact, a bit of uneven texture gives it more life. If the front pieces fall flat, wrap them around a 1-inch curling iron for 5 to 7 seconds each, then let them cool before you touch them again. That small pause helps the bend hold.
The braid itself can be a simple three-strand plait or a Dutch braid if you want more shape. Either way, stop the braid around shoulder level and secure it with a small elastic. Then gently tug the outer loops with your fingertips so the braid looks full and lived-in, not tight and narrow.
One note: if your hair is fine, add a little dry shampoo at the roots before you start. It gives the whole style a little more grip and stops the braid from sliding down toward the back.
6. Side Waterfall Braid for Loose Length
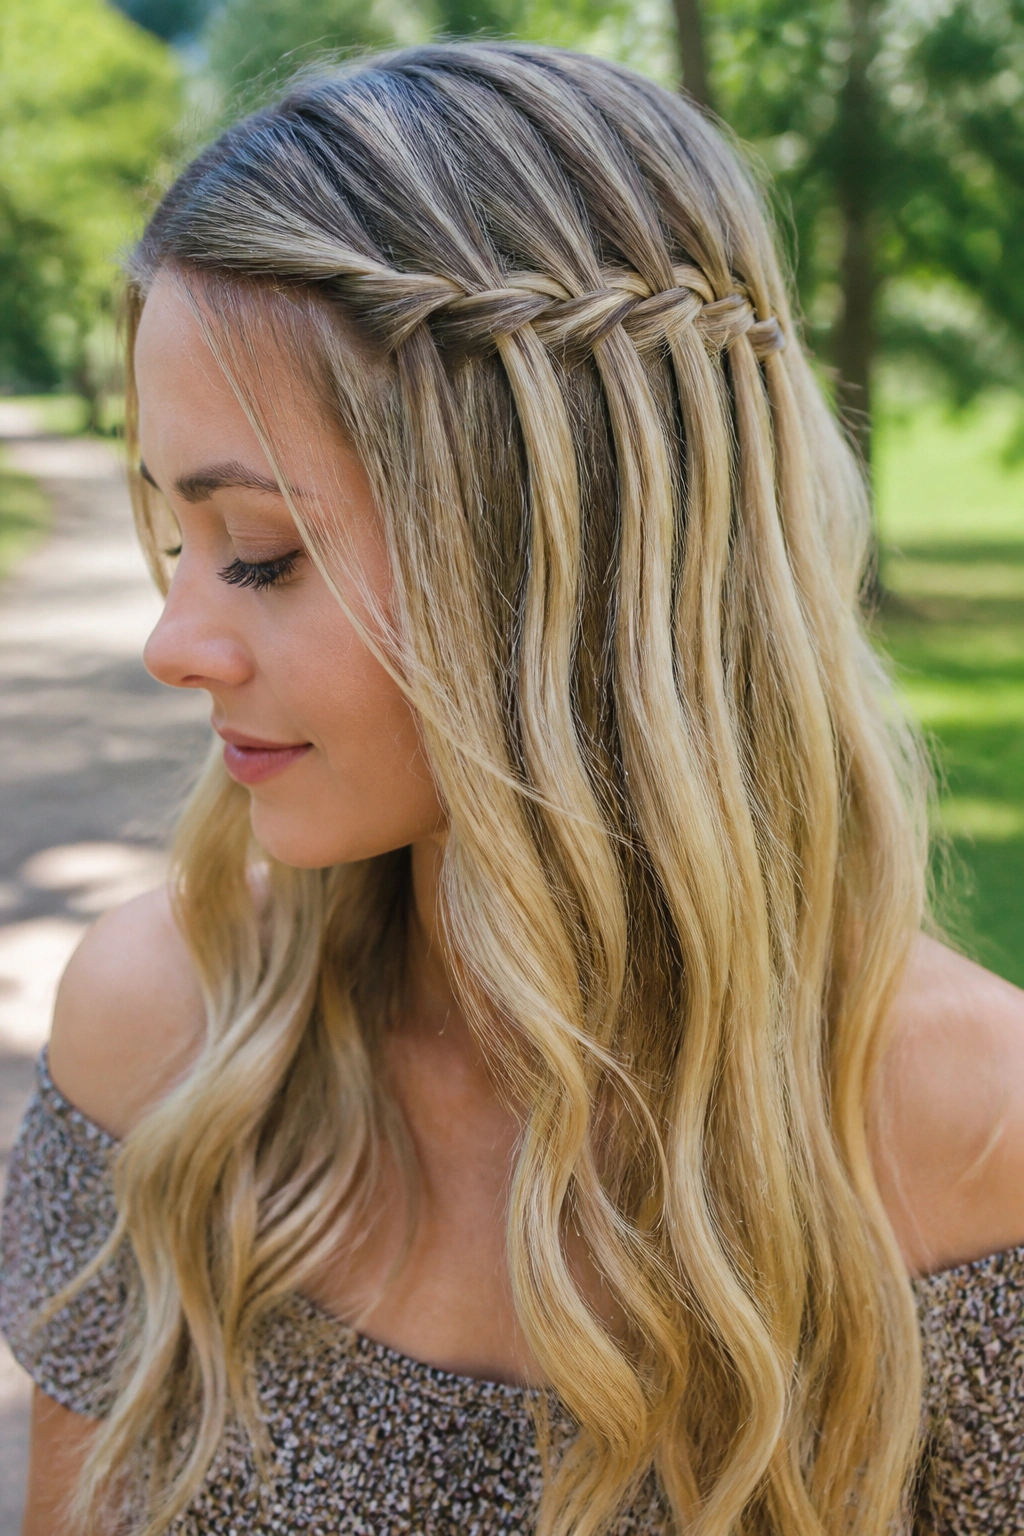
Why do waterfall braids look so good on long hair? Because the pattern gives you movement without hiding the length. The braid creates a line across the head, then lets pieces fall through like little gaps in a curtain.
The result is part braid, part loose style, and that balance is the whole point. A waterfall braid works especially well when you want the top section controlled but still want the lower half of the hair to hang freely. It’s a smart choice for medium-to-long layers too, since the dropped strands blend into the rest of the hair instead of fighting it.
The Strand-Dropping Rhythm
The braid moves one section over, drops the bottom piece, and picks up a fresh strand from underneath. That rhythm matters. If you drop strands randomly, the braid turns messy in a way that looks accidental, not relaxed.
A side waterfall braid usually starts near the temple and curves back toward the crown before it sweeps into loose hair or a soft side pony. If your hair is very curly, stretch the top a little first so the pattern stays visible. Straight or wavy hair shows the drop pattern most clearly, especially with a light mist of shine spray on the mids.
This is more detail braid than hold braid. If you need something for a long day, pin the finished braid at two spots instead of one and use a mist of flexible hairspray.
7. Bubble Side Braid on a Side Ponytail
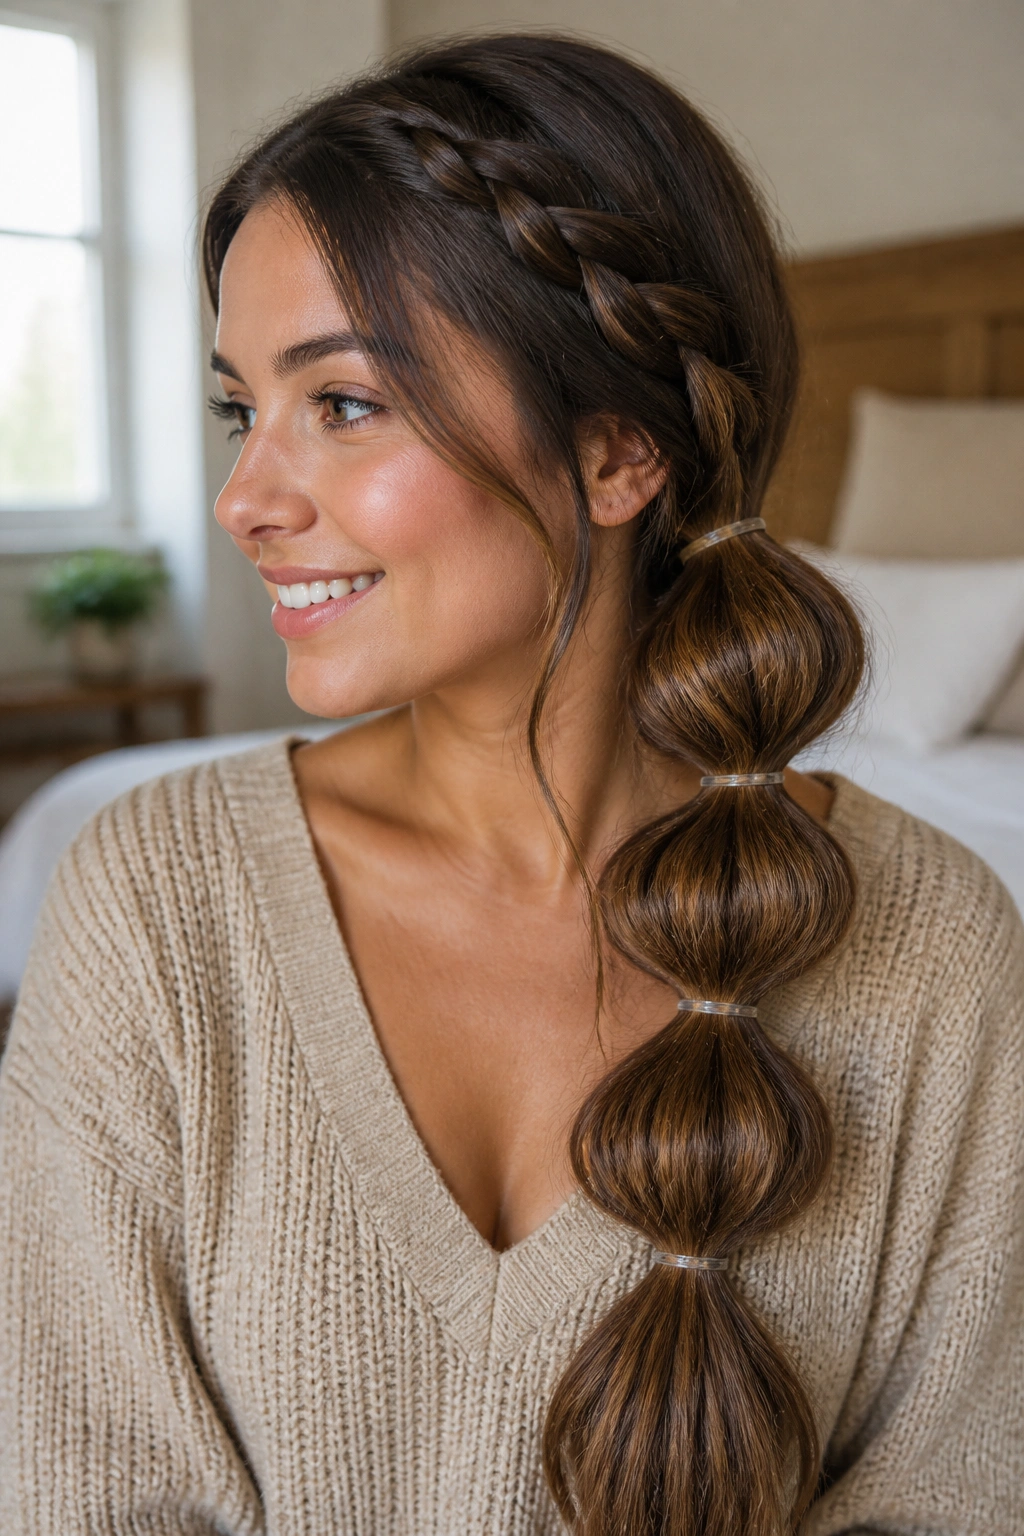
I reach for a bubble side braid when I want something playful that still feels orderly. It looks more styled than a plain side ponytail, and it’s forgiving if your braiding hands get tired halfway through.
Start with a low side ponytail, then place small elastics every 1.5 to 2 inches down the length. After each elastic is in place, gently puff the section between bands by pulling at the sides with your fingertips. That’s where the “bubble” comes from. Long hair makes this style easy because there’s enough length for several rounded sections before you hit the ends.
This one is especially useful when the hair is clean and smooth at the crown but a little heavy at the bottom. A bubble braid gives shape without needing perfect layering. It also works when your ends are blunt, because the elastics hide the last inch or two.
- Use clear elastics or ones that match your hair color
- Keep the bubble spacing even, or the shape gets lopsided
- Start with a smooth side part if you want a neater finish
- Pull the bubbles open after the elastics are secure, not before
The style can look sporty or polished depending on the rest of the hair. That’s a useful trick to have around.
8. Pull-Through Side Braid with Big Volume
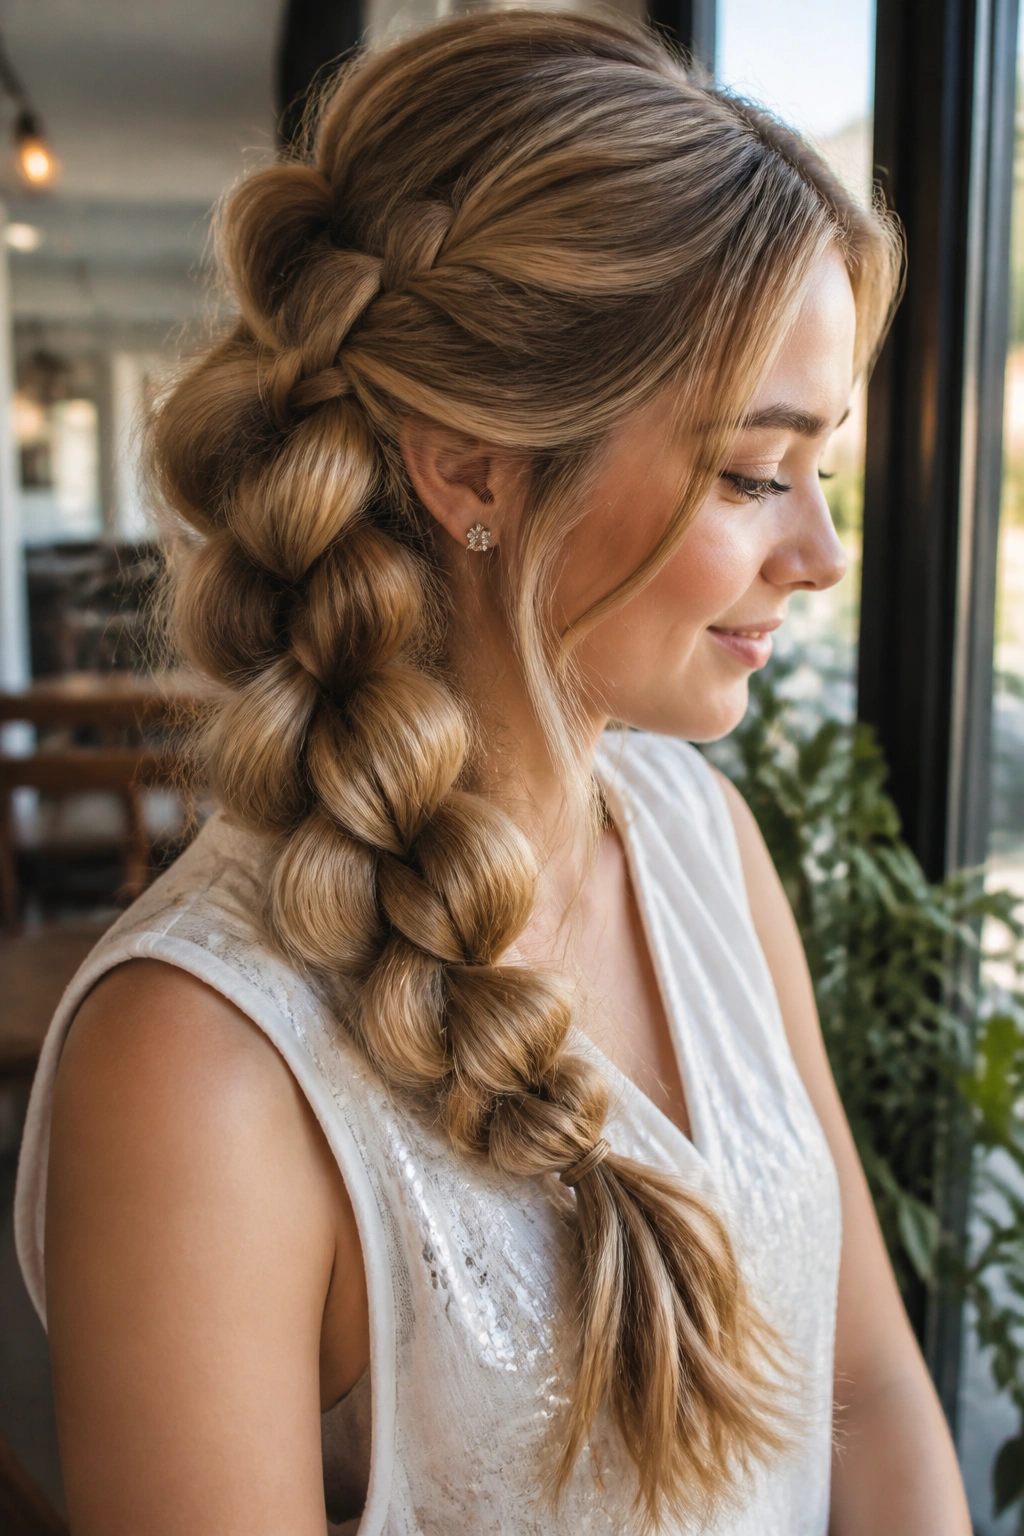
If regular braids make your fingers twist into knots, the pull-through braid is a smarter choice. It gives you the same braided look with a little more structure and, honestly, less frustration.
The style is built from a stack of ponytails rather than a classic braid pattern. Each section gets split, and the tail from the next section gets pulled through the gap. On long hair, that creates a thick, full plait that looks almost too lush to be real. Almost.
Where the Extra Volume Comes From
The volume isn’t magic. It comes from the way the loops stack on top of each other. Every new elastic adds another layer, and the braid gets wider as it goes. That makes it a strong choice for very long hair, extensions, or thick hair that feels too heavy in a traditional braid.
Start with a side ponytail near the nape or behind one ear. Add a second elastic about 2 inches below the first section, then keep repeating down the length. If you want more control, lightly tease each section before you split it. That gives the braid extra body and helps the layers stay lifted.
I like this style for events where you want the hair to look full from every angle. It also photographs well from the side because the bubbles and loops create depth. If your hands get clumsy with a four-strand or fishtail, this is the easier route.
One caveat: use smaller elastics if your hair is fine. Big bands can make the sections look chunkier than you want.
9. Side Braid Ponytail for Active Days
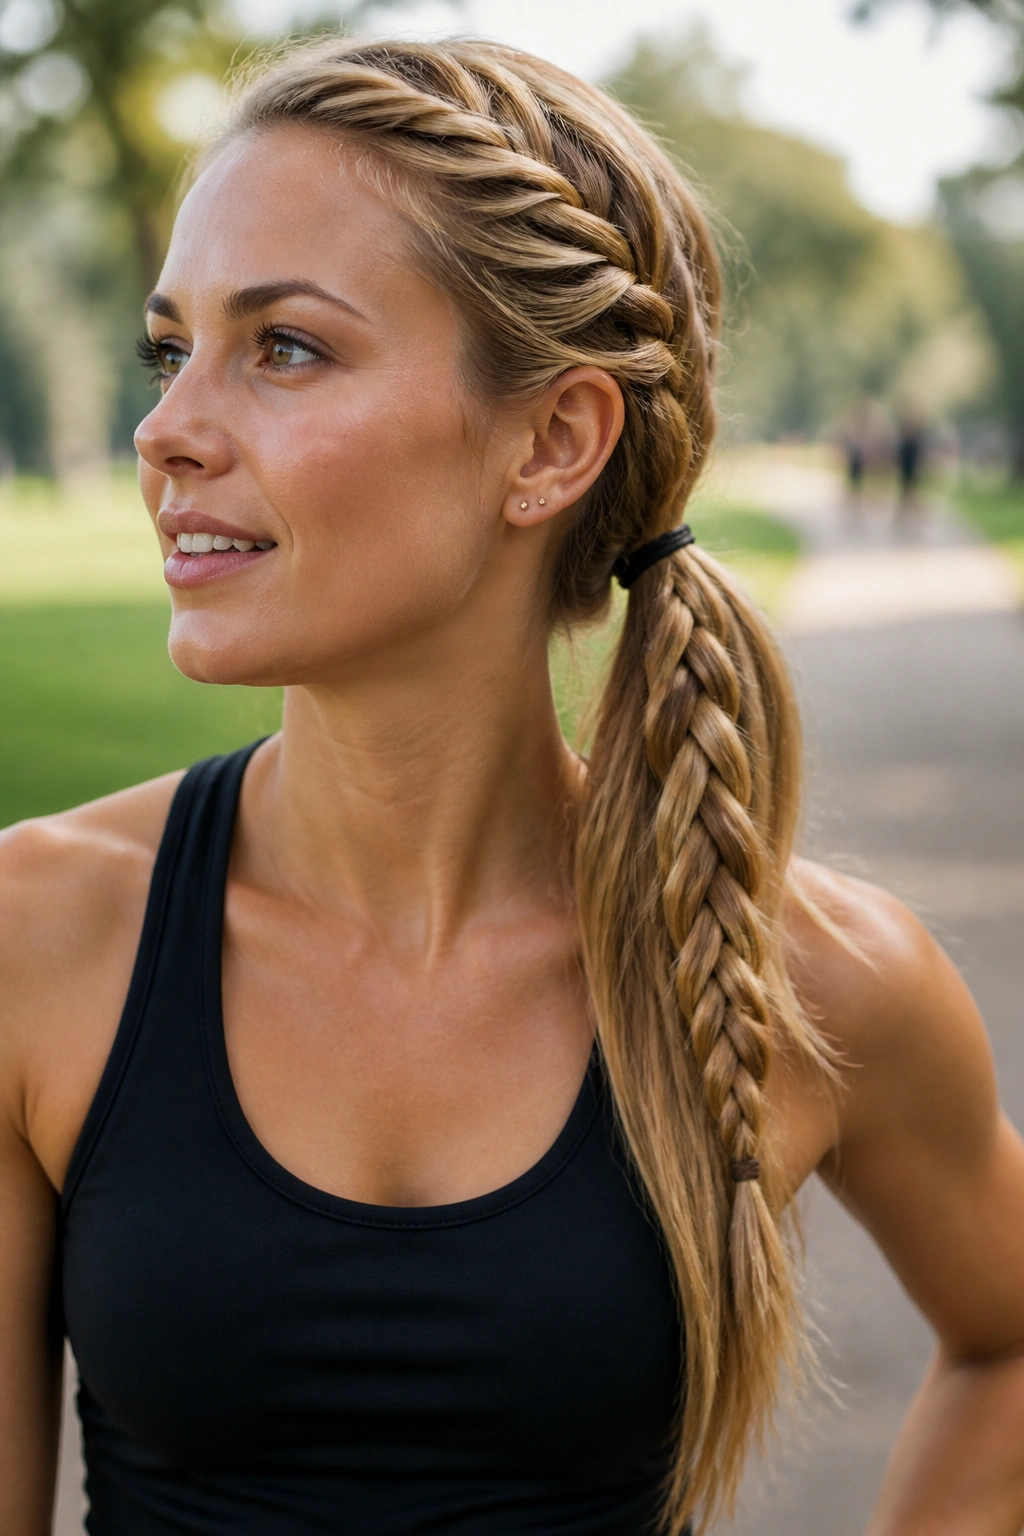
Ten minutes, one brush, one elastic. That’s enough for a side braid ponytail.
This hybrid style solves a very ordinary problem: you want the hair off your face, but a plain ponytail feels too plain and a full braid takes too long. Start by gathering the front section into a deep side sweep, braid it partway down, then merge it into a low ponytail or continue braiding the tail, depending on how much length you want to show. Either way, the braid gives the ponytail a cleaner line.
The side placement matters. When the ponytail sits just behind one ear or a few inches below it, the style feels softer and less gym-only. Wrap a small strand of hair around the elastic if you want to hide the band. That tiny step changes the finish more than people expect.
This style works well for travel, errands, long walks, and days when your hair needs to stay under control without looking pinned down. It also handles thick hair better than a tight braid because the ponytail section can take some of the weight. If you’re prone to headaches from heavy braids, this is a kinder option.
It works.
10. Side Crown Braid That Follows the Hairline
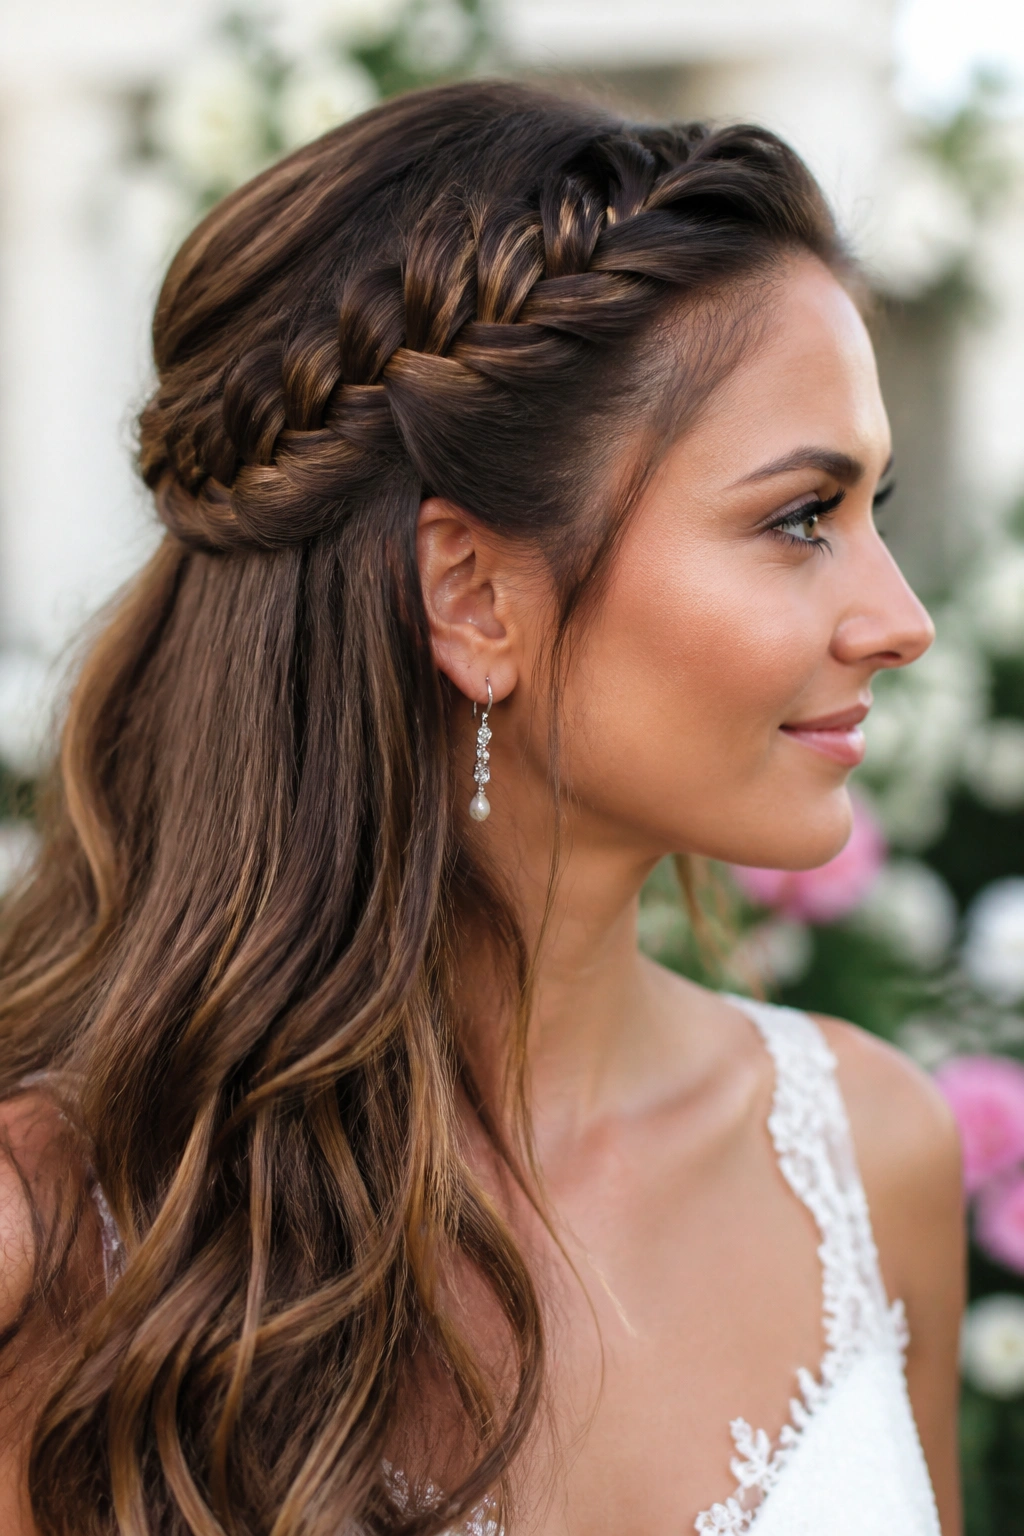
A side crown braid can change the whole shape of long hair. Instead of hanging straight down, the braid arcs around the head and gives the style a lifted, wrapped feel that looks intentional from the front and the side.
The braid usually begins above one temple, follows the hairline across the top, and settles toward the opposite ear before it trails down over one shoulder. On long hair, that arc has room to breathe. Shorter hair can still do it, but the line feels tighter and less dramatic. Long hair lets the braid travel.
Pinning Without a Helmet Look
The easiest mistake is pinning the braid too flat. That can make the crown look pressed down, which is not the goal. Leave a little height at the top, then secure the braid with pins placed every 2 to 3 inches along the curve. Use matte pins if the hair is dark and glossy pins if you want them to disappear less.
This braid shines at weddings, dinners, or any event where you want the hair off the face and still want movement. It also works on hair that frizzes at the temples, because the braid hides those rough edges. If your roots are very flat, lift the first inch at the crown with a comb before you start. A little height there helps the whole shape.
For me, the sweet spot is a braid that looks tucked in, not glued down. That keeps it soft.
11. Pancaked Side Braid with Extra Width
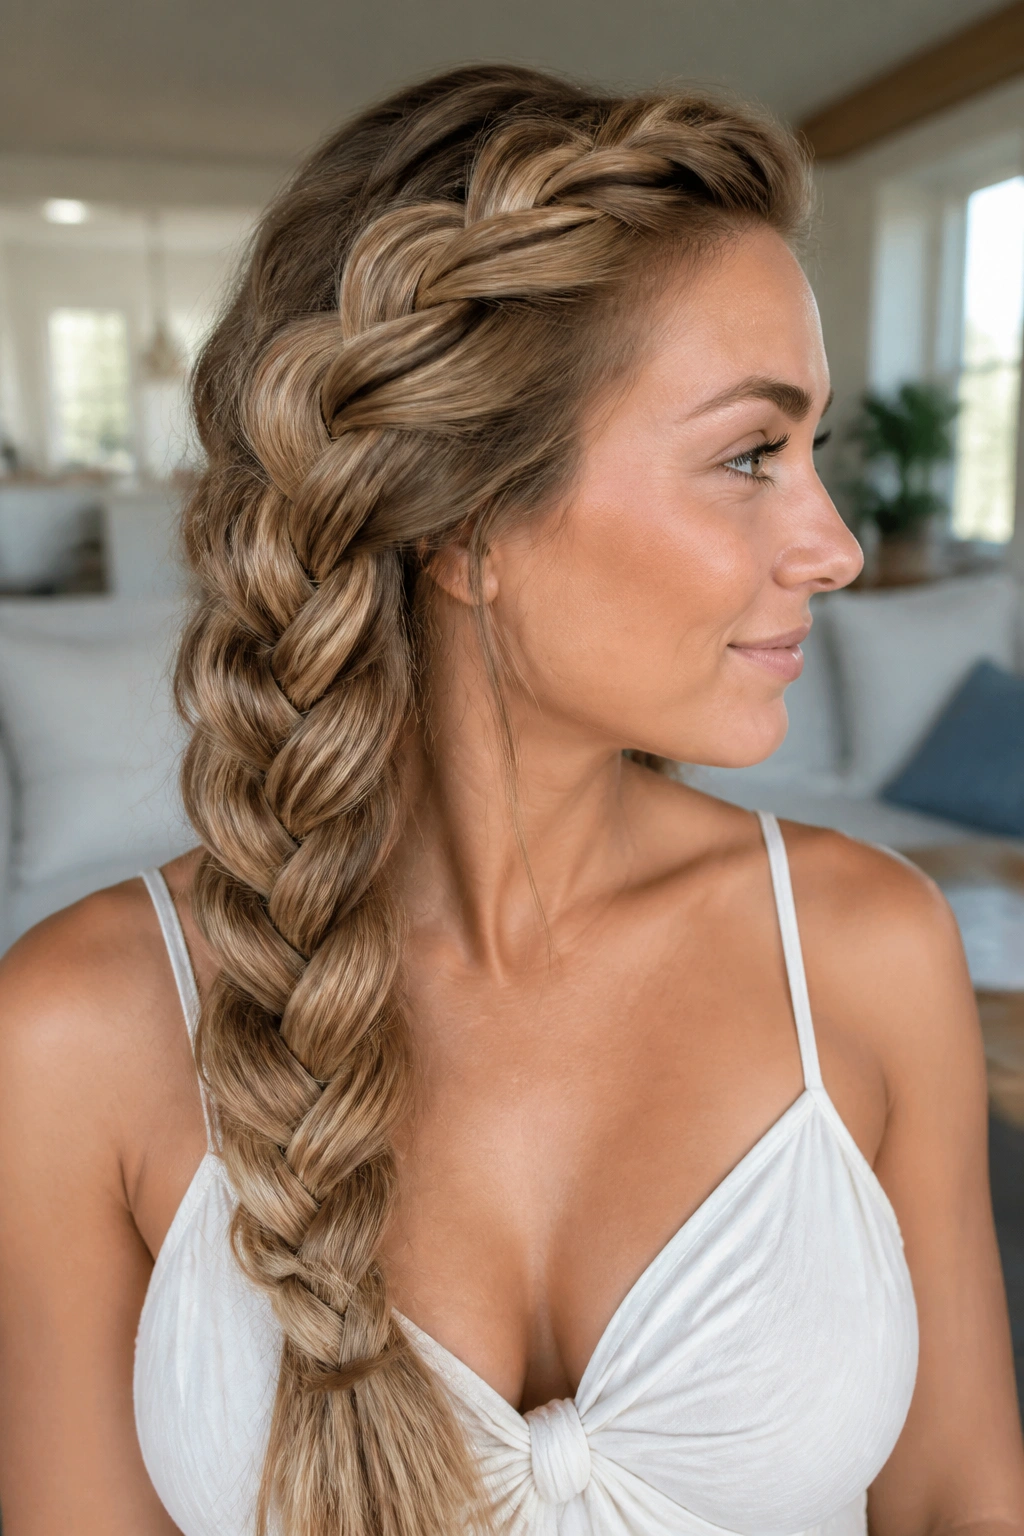
A braid can look thin on long hair if you leave it untouched. Pancaking fixes that fast.
The idea is simple: after the braid is finished, gently pull the outer edges of each section outward so the braid widens. You are not tearing it apart. You’re easing the shape open. On a side braid, that extra width gives the whole style a softer, fuller profile, especially if the hair itself is thick or has a lot of length.
Where to Start Pulling
Start near the bottom and work upward. That keeps the braid from turning loose at the scalp, which is a look I’d skip unless you’re going for something deliberately messy. Use your thumb and index finger to pinch one outer loop at a time. If the braid is a fishtail or Dutch braid, the effect can be dramatic. If it’s a plain three-strand braid, the change is subtler but still worth it.
- Pull only the outer edges, not the middle
- Stop before the braid becomes flat and fuzzy
- Use a light mist of hairspray after loosening
- Pancake more on thick hair, less on fine hair
This style is a good fix when the braid looks too small for the amount of hair you have. It’s also a nice way to make a simple side braid feel dressed up without adding accessories.
12. Messy Side Braid Bun at the Shoulder
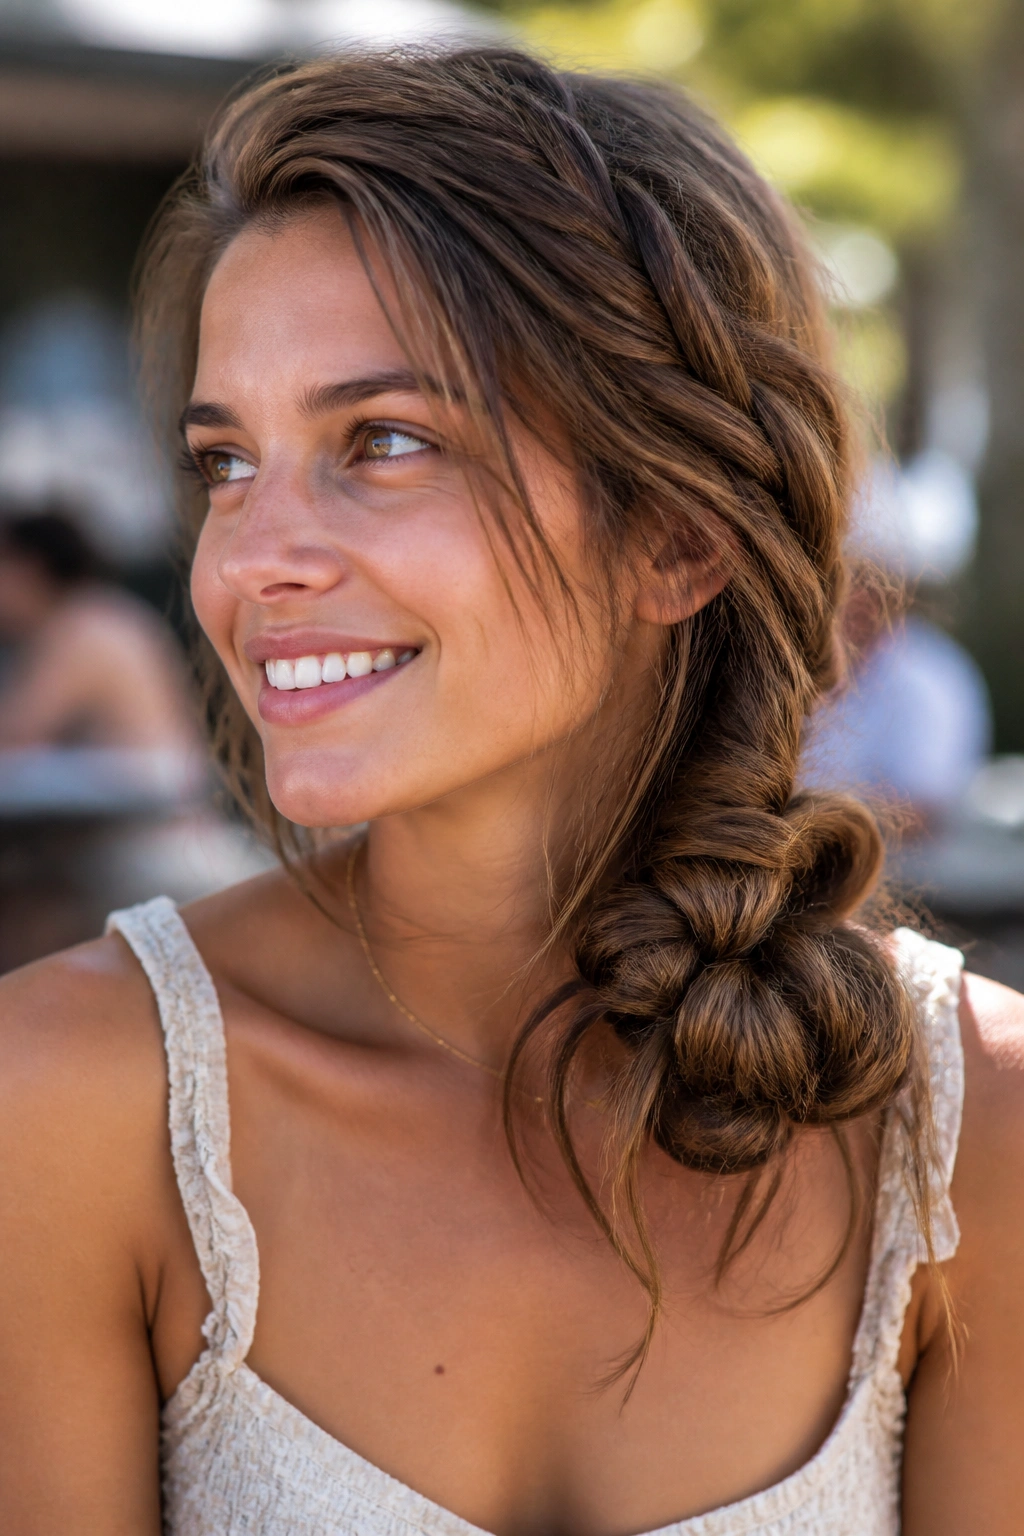
What do you do when the ends are a little rough but you still want the braid to matter? Turn the braid into a bun.
This style starts like a side braid, then the finished length gets wrapped into a low bun that sits near one shoulder. It’s practical, but not boring. The braid gives the bun some shape, and the bun keeps the ends tucked away when they’re dry, frizzy, or overdue for a trim.
The best version starts with a loose braid rather than a tight one. Braid the hair down the side of the head, stop when you reach the collarbone, then coil the tail into a small bun and pin it with bobby pins in an X pattern. If your hair is very long, you may need three or four pins instead of two. Use the pins where the bun feels springy, not where it already sits flat.
Leave a few wisps around the ear if you like, but keep them intentional. Too many stray pieces can make the style look unfinished. A little softness reads better than a lot of flyaways.
This is a useful one for second-day hair, travel, and those in-between days when your hair is not cooperating but you still want it to look styled.
13. Half-Up Side Braid with the Rest Left Down
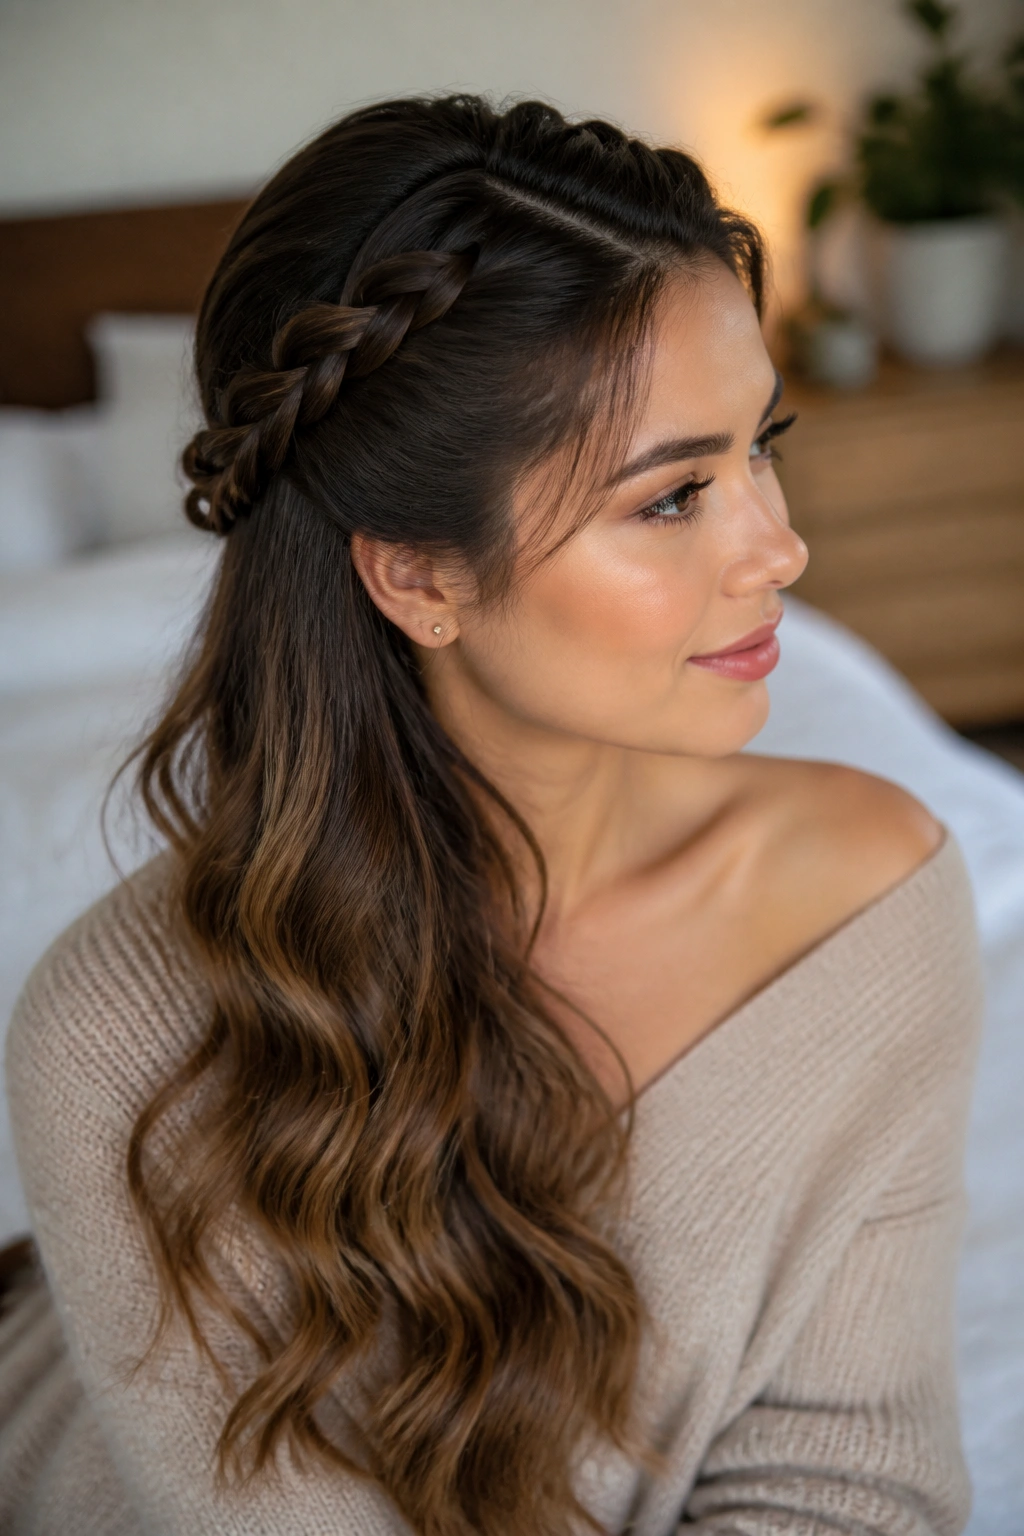
This is the easiest way to wear a side braid and keep most of your hair down. That’s the whole appeal. You get the detail at the top and the movement below.
Gather the hair from one side of the temple across to the crown, then braid that top section down toward the opposite side. Secure it behind the ear or let it blend into the loose lengths, depending on how much braid you want to show. The lower half of the hair stays free, which makes this style feel lighter than a full braid and easier to wear for a long stretch.
Best When the Crown Needs Control
If the top of your hair puffs up or falls flat, this style solves both problems. It controls the front without pulling all the way back, so you still get volume around the face. On long hair, that balance is useful because too much control can make the length look heavy.
I like this version with waves, but straight hair works too. A 1-inch curling iron on the bottom layers gives the loose hair some bend, while the braid above keeps the style from feeling too simple. If you want a cleaner finish, smooth the top with a light cream before braiding.
This is one of those styles that looks like you tried harder than you did. Not a bad thing.
14. Four-Strand Side Braid with a Ribbon-Like Finish
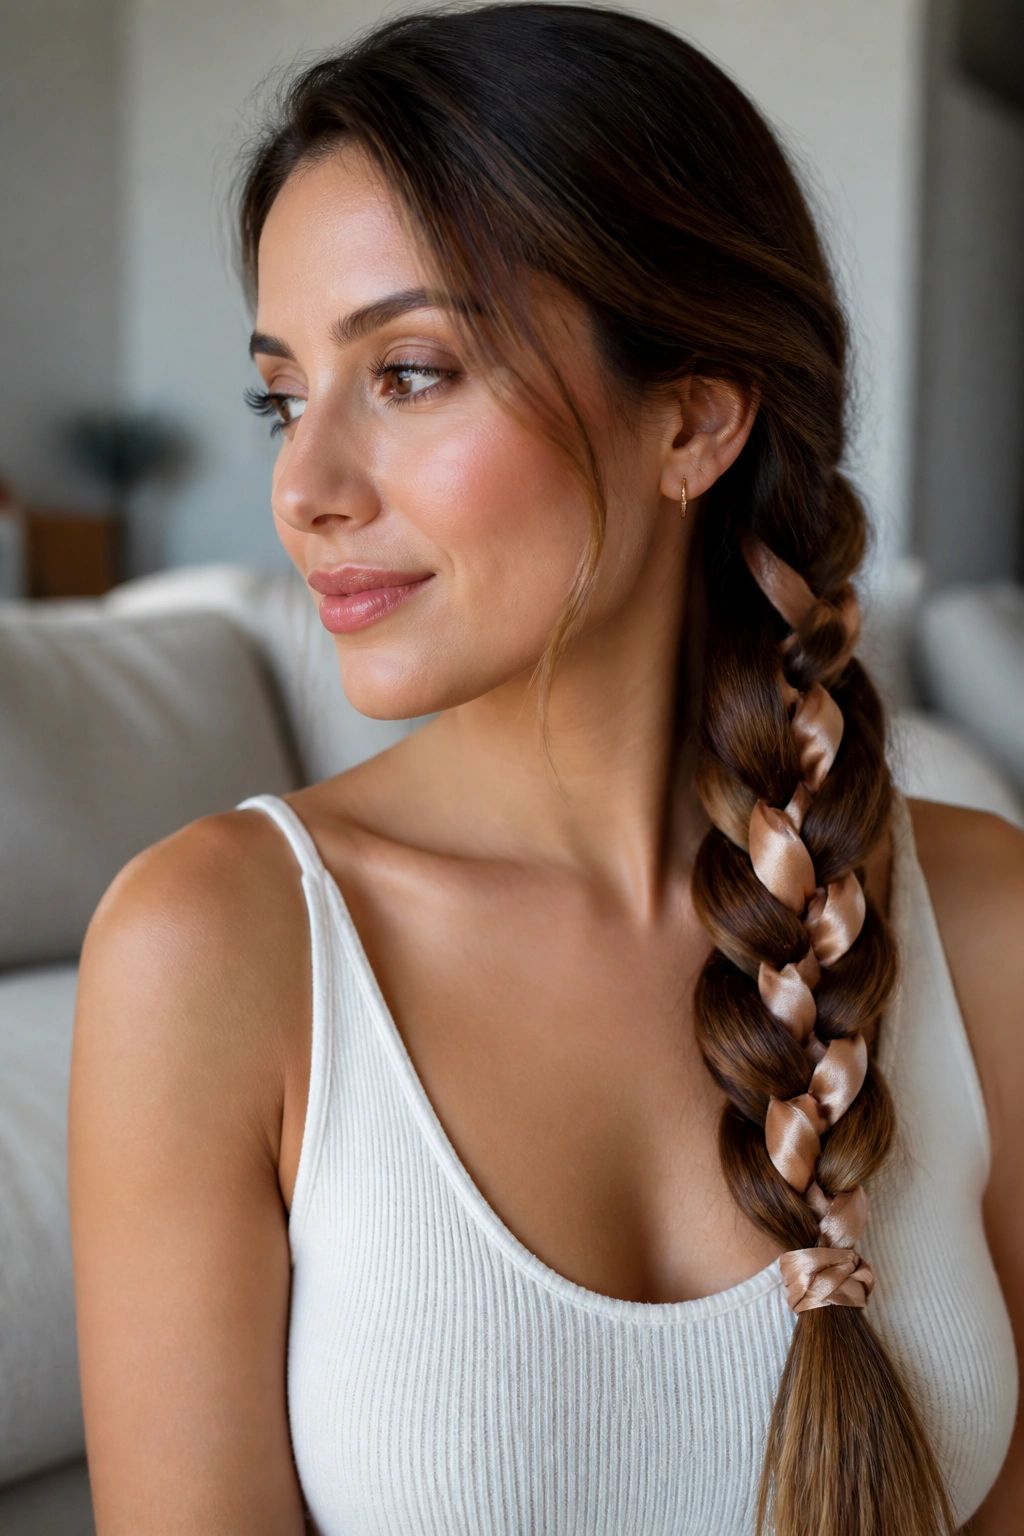
Unlike a three-strand braid, a four-strand side braid gives you a flatter, ribbon-like pattern that shows off long length. The visual is a little more detailed, and the braid has a nice sense of movement when it rests over one shoulder.
The biggest difference is the extra section. Instead of managing three strands, you split the hair into four equal parts and cross the outer pieces through the middle in a set pattern. It takes a few tries to stop your hands from overthinking it, but once the rhythm clicks, it becomes much easier. If the braid starts looking uneven, the sections are probably not the same size.
Why It Works So Well on Long Hair
Long hair gives this braid room to show off the pattern. Shorter lengths can still do it, but the weave ends too quickly to really notice the structure. With long hair, each pass builds on the last one and the braid looks almost woven rather than merely twisted.
I’d start this style as a low side ponytail so the sections stay tidy. That little anchor makes the braid easier to control, especially if your hair is thick or layered. If the ends slip, secure them with a tiny clear elastic before tucking them under the tail. The braid stays neater that way.
This is the style I’d save for a day when I have a bit more time and want the hair to do something interesting up close.
15. Ribbon-Woven Side Braid for Long Hair
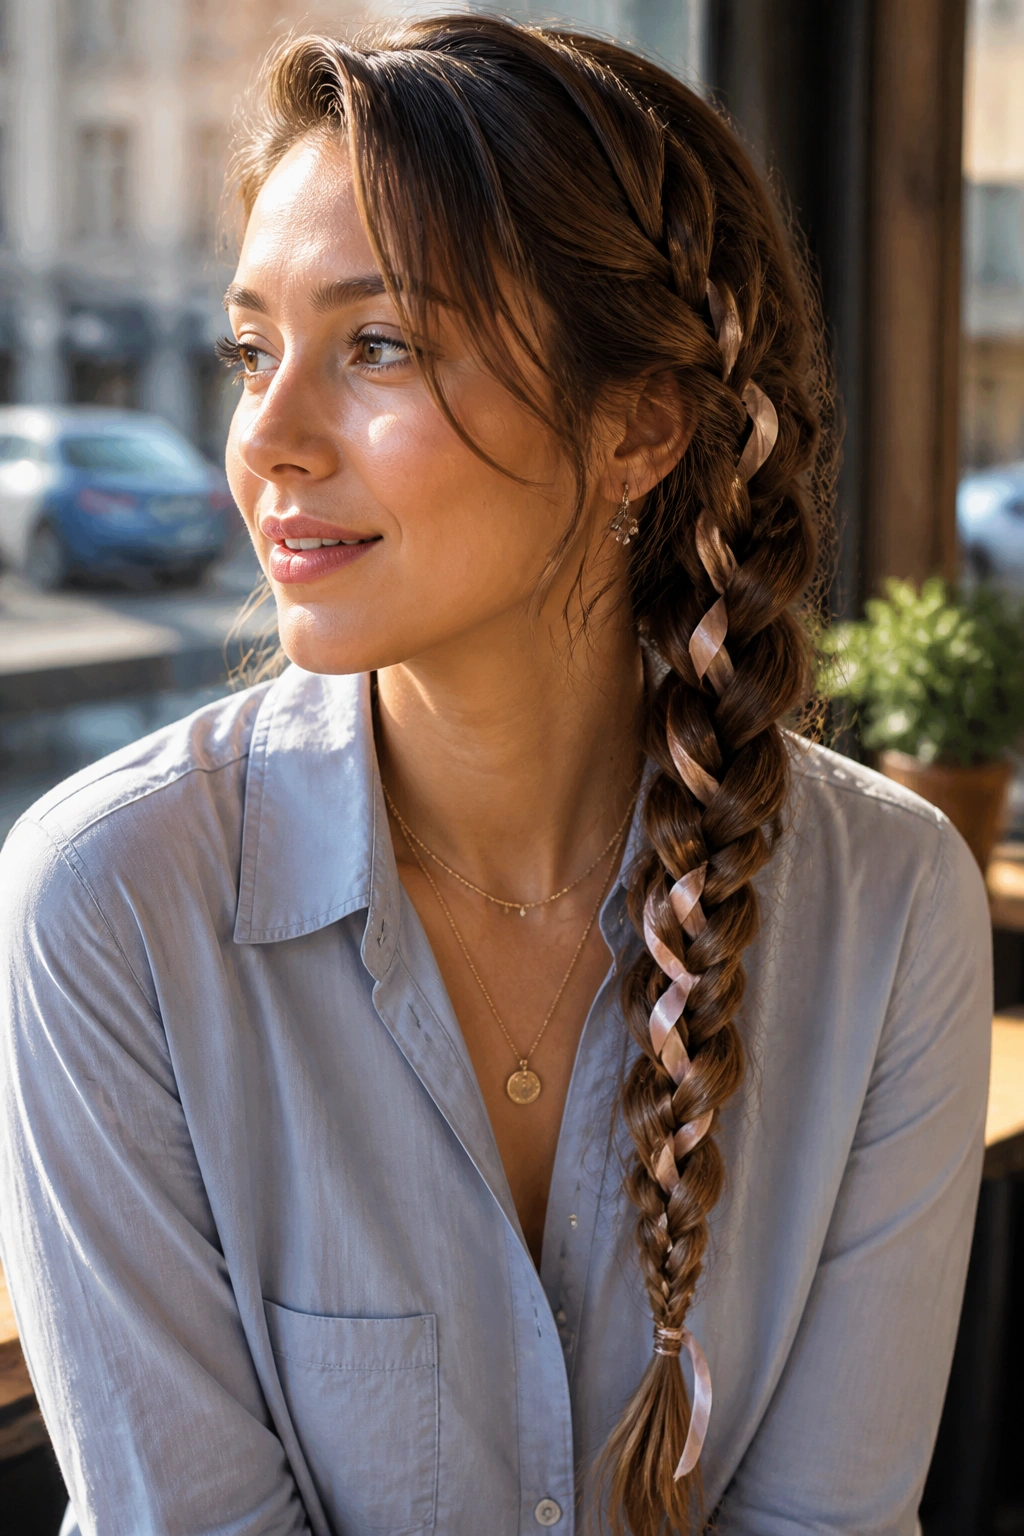
Accessories are not cheating. They solve a problem.
A ribbon-woven side braid gives you color, texture, and a little extra length to play with. You can thread the ribbon through a regular three-strand braid, tie it into a side plait at the base, or let it trail from the tail like a soft accent. On long hair, the ribbon has enough space to show, which is why this style feels more finished than it does fussy.
Use a ribbon that’s about 1/2 inch to 1 inch wide if you want it to stand out without taking over the braid. Satin looks polished. Cotton feels more casual. A smooth fabric is the smart pick if your hair tangles easily, because rough ribbon edges can catch on the strands. That’s the sort of thing nobody notices in a photo, but you feel it when you take the braid down.
How to Keep the Ribbon From Slipping
Tie the ribbon into the base of the braid first, then fold one end into each side of the plait. If the ribbon is slippery, knot it once at the start so it doesn’t slide higher and higher as you braid. Keep the tension steady, but don’t yank; that can twist the fabric and make the braid lumpy.
This style works for school, events, and even a plain T-shirt if you want the hair to do a little more. It’s also one of the easier ways to make a simple side braid feel special without changing the braid pattern itself.
Final Thoughts
Long hair gives side braids room to breathe, and that’s the whole advantage. A low Dutch braid holds, a fishtail shows detail, a pull-through braid brings volume, and a ribbon or scarf can shift the mood in seconds.
The smart move is to match the braid to the hair you have that day. Fine hair needs grip. Thick hair can handle structure. Layers usually do better with softer styles like boho braids, waterfall braids, or a half-up side braid that does not fight the cut.
One small habit makes every version better: stop and check the braid from the side before you leave the mirror. That angle tells the truth.
