



Cold air does strange things to hair. It dries the outer layer, turns a neat style into a nest of flyaways, and makes every scarf, collar, and knit hat feel like a tiny piece of sandpaper. That’s why winter hairstyles need a little more planning than the usual grab-and-go routine.
Loose hair can look fine for an hour. Then a wool coat rubs the ends, the crown goes flat, and the side pieces start sticking out at weird angles. The styles that hold up best in cold months are usually the ones that keep the hairline calm, tuck the ends away, and don’t fight the weather all day long.
I’ve always thought the smartest cold-weather looks are the ones that work on second-day hair. Freshly washed strands can be slippery, static-prone, and impossible under a beanie. A little texture helps. So does a style that doesn’t need perfect weather to behave.
Start with the one that survives hats, scarves, and long commutes better than most: a low bun that stays neat without looking stiff.
1. Sleek Low Bun for Winter Hairstyles
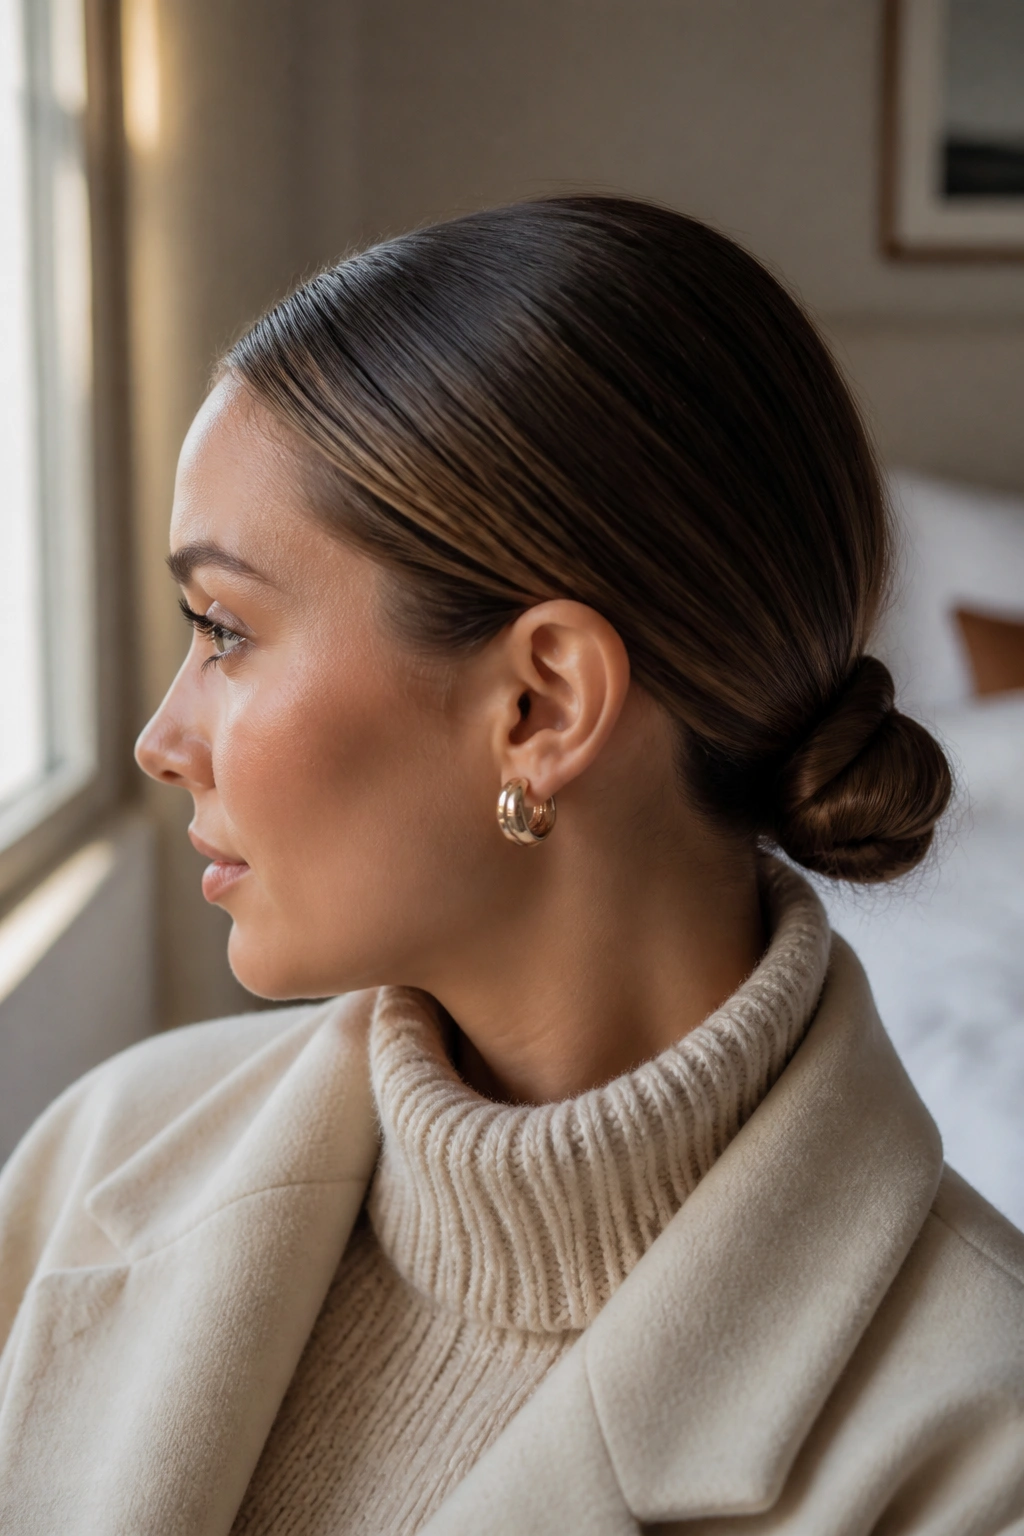
A sleek low bun is the style I reach for when I want my hair to disappear in the smartest way possible. It keeps the ends tucked away, so they’re not rubbing against coat collars or getting caught in scarf loops. That alone makes it one of the most practical winter hairstyles around.
The trick is to keep it smooth at the crown and soft at the edges. A pea-sized amount of leave-in cream on damp or dry hair is usually enough; too much product makes the roots look greasy fast, especially under a hat. Brush everything to the nape, twist once, and pin the bun low and flat so it sits under your collar instead of fighting it.
A one-sentence rule helps here: low and snug beats high and perfect.
If your hair is layered, leave the tiniest face-framing pieces out only if they’ll stay put. Otherwise, commit to the clean shape. This style looks especially good with a turtleneck, a long coat, or any outfit that already has a lot going on up top.
2. Low Ponytail with a Wrapped Base

A low ponytail sounds plain until you wrap the elastic and smooth the top. Then it looks intentional, which matters when the weather is doing its best to make everything feel messy. This style sits right at the nape, so it stays out of the way of high collars and scarf edges.
Why It Works With Coats
The ponytail doesn’t have to be pin-straight to look polished. A little bend through the lengths makes it feel softer, and the wrapped base hides the fact that you probably threw it together in two minutes. I like this one on medium to long hair because it gives movement without creating a big surface for static to grab.
- Brush the hair back with a soft brush or comb.
- Secure it at the nape with a snag-free elastic.
- Take a thin 1/2-inch strand from underneath.
- Wrap that strand around the elastic once or twice.
- Pin the tail under the pony with one bobby pin.
Tip: place the ponytail just above collar level, not too low. If it sits directly on thick wool, it flattens fast.
3. Bubble Ponytail
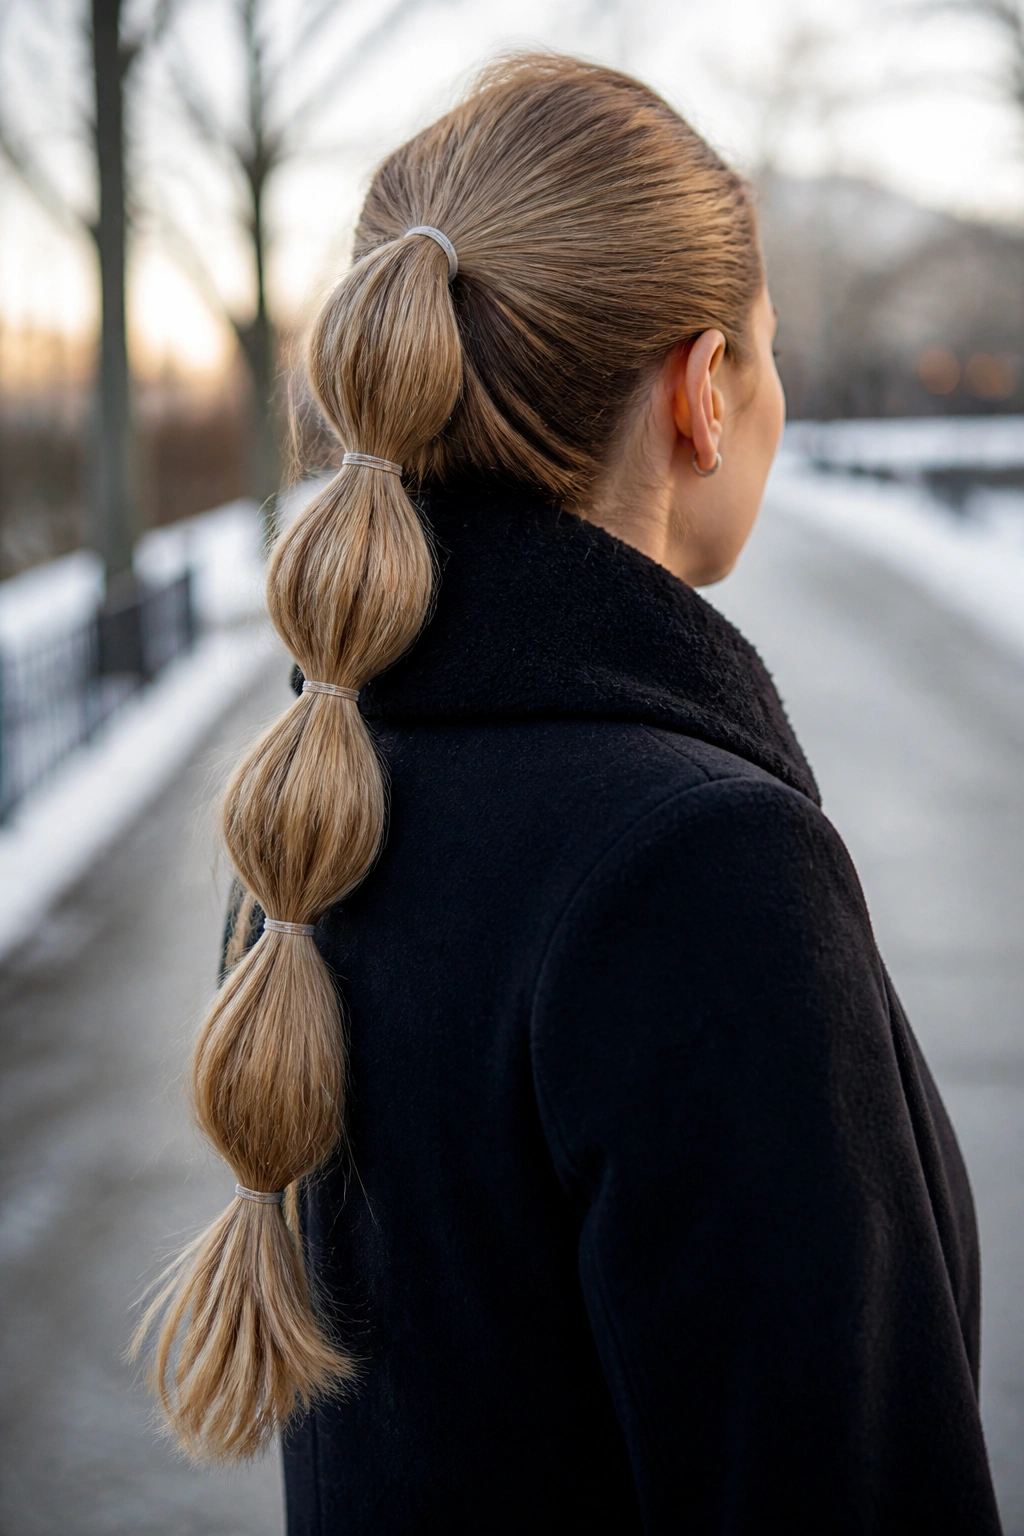
A bubble ponytail is one of those styles that looks more styled than it is. That’s why it works so well in cold months. Even if the top gets a little crushed under a knit hat, the bubbles still give the ponytail shape and keep it from looking limp.
The setup is simple. Tie your hair into a low or mid ponytail, then add small clear elastics every 2 to 3 inches down the length. Gently pull each section outward until it puffs into a round shape. Don’t tug so hard that the elastics slide. That’s how the whole thing turns into a sad, droopy rope.
It’s especially good for thicker hair, but fine hair can use it too if you tease each bubble lightly before you puff it out. A dab of dry shampoo at the roots helps when the crown needs a little lift. Cute is nice. So is a style that still looks awake after a windy walk.
4. Loose French Braid
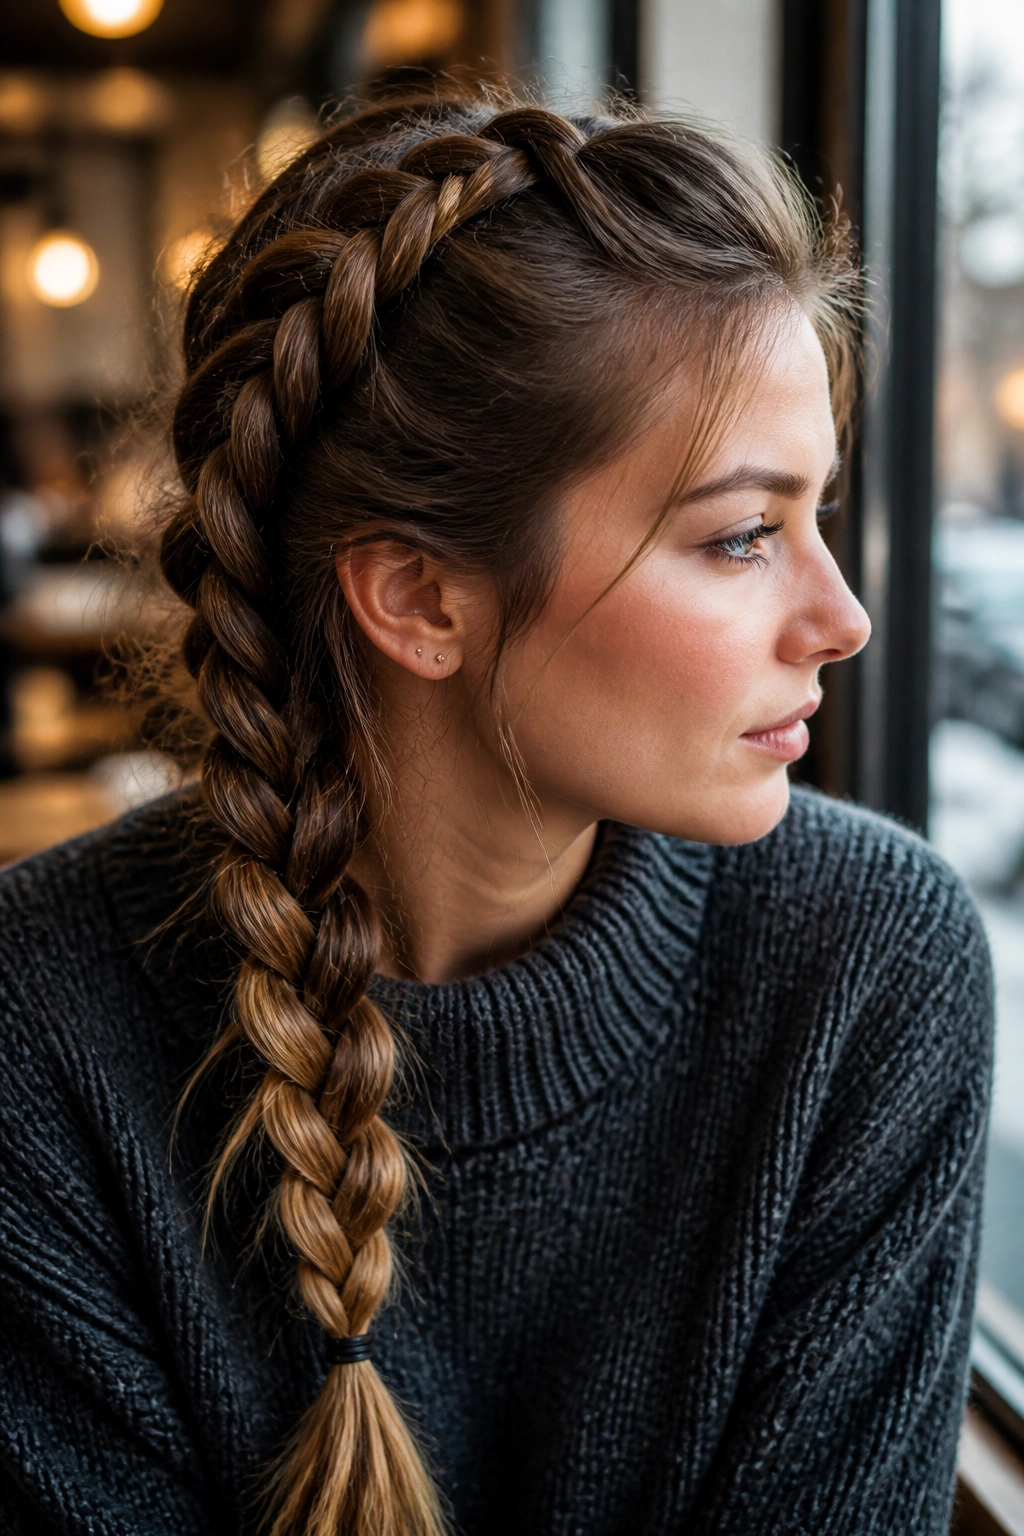
A loose French braid has a very old-school charm, and I mean that in the best way. It stays close to the head, which keeps it from getting tangled in scarves, but it still has enough softness to feel easy rather than строг? No — easy, plain and simple. It’s a good one for days when you want your hair out of the way without looking too polished.
The key is tension. If you braid too tightly, the style can pull on a dry hairline and leave it feeling sore by the afternoon. If you braid too loosely, the pieces slip and the braid falls apart under friction. The sweet spot is a braid that feels secure at the scalp and a little softer through the ends.
I like this on hair that’s one day past wash day, because the braid grabs better and the texture looks more natural. A tiny bit of smoothing cream along the part helps tame flyaways, but don’t overdo it. The braid should feel touchable, not shellacked.
5. Dutch Braids
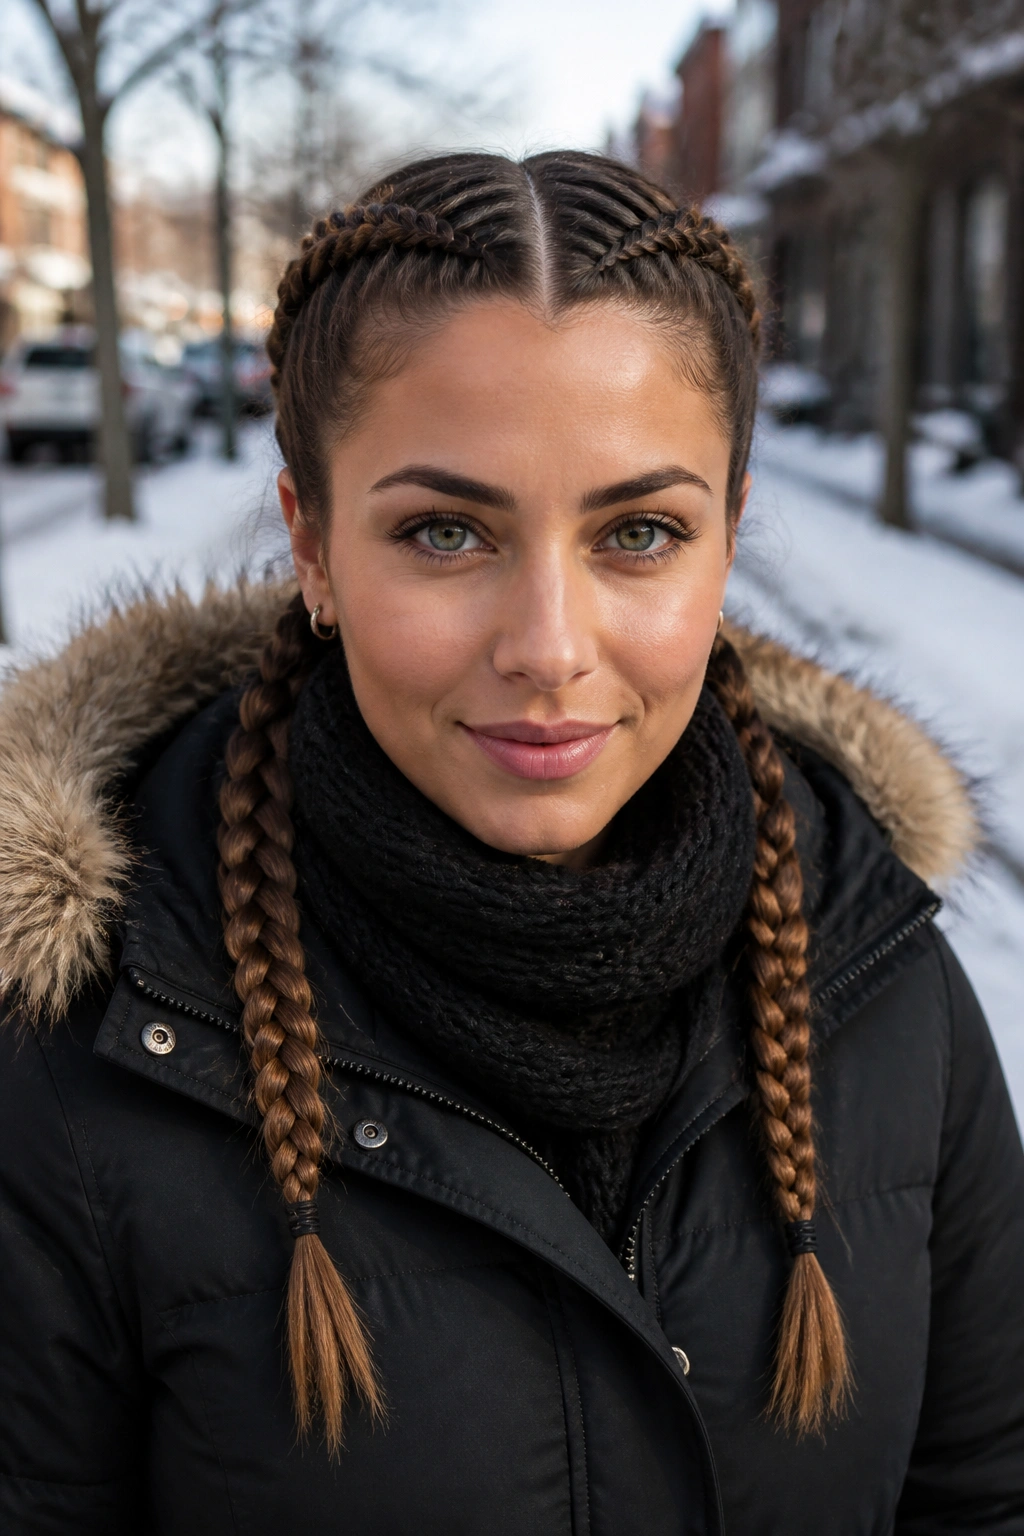
Dutch braids are the better choice when you want the braid to stay visible and stay put. Unlike a French braid, which lies flatter against the head, a Dutch braid sits on top a bit more, so the pattern reads clearly even after a coat hood or a scarf has had its way with your hair.
That extra definition is the whole point. It gives the style more structure, which makes it a strong pick for winter walks, long days out, or hair that tends to puff up at the first sign of dry air. If your hair gets fuzzy around the temples, a little gel or pomade on the part line keeps the top clean.
Best use? Medium to long hair, especially if you want a style that can end in one braid, two braids, or a low pinned finish. I’d choose Dutch braids over a loose ponytail on any day when I know I’ll be moving around a lot. They’re not delicate. That’s the appeal.
6. Crown Braid
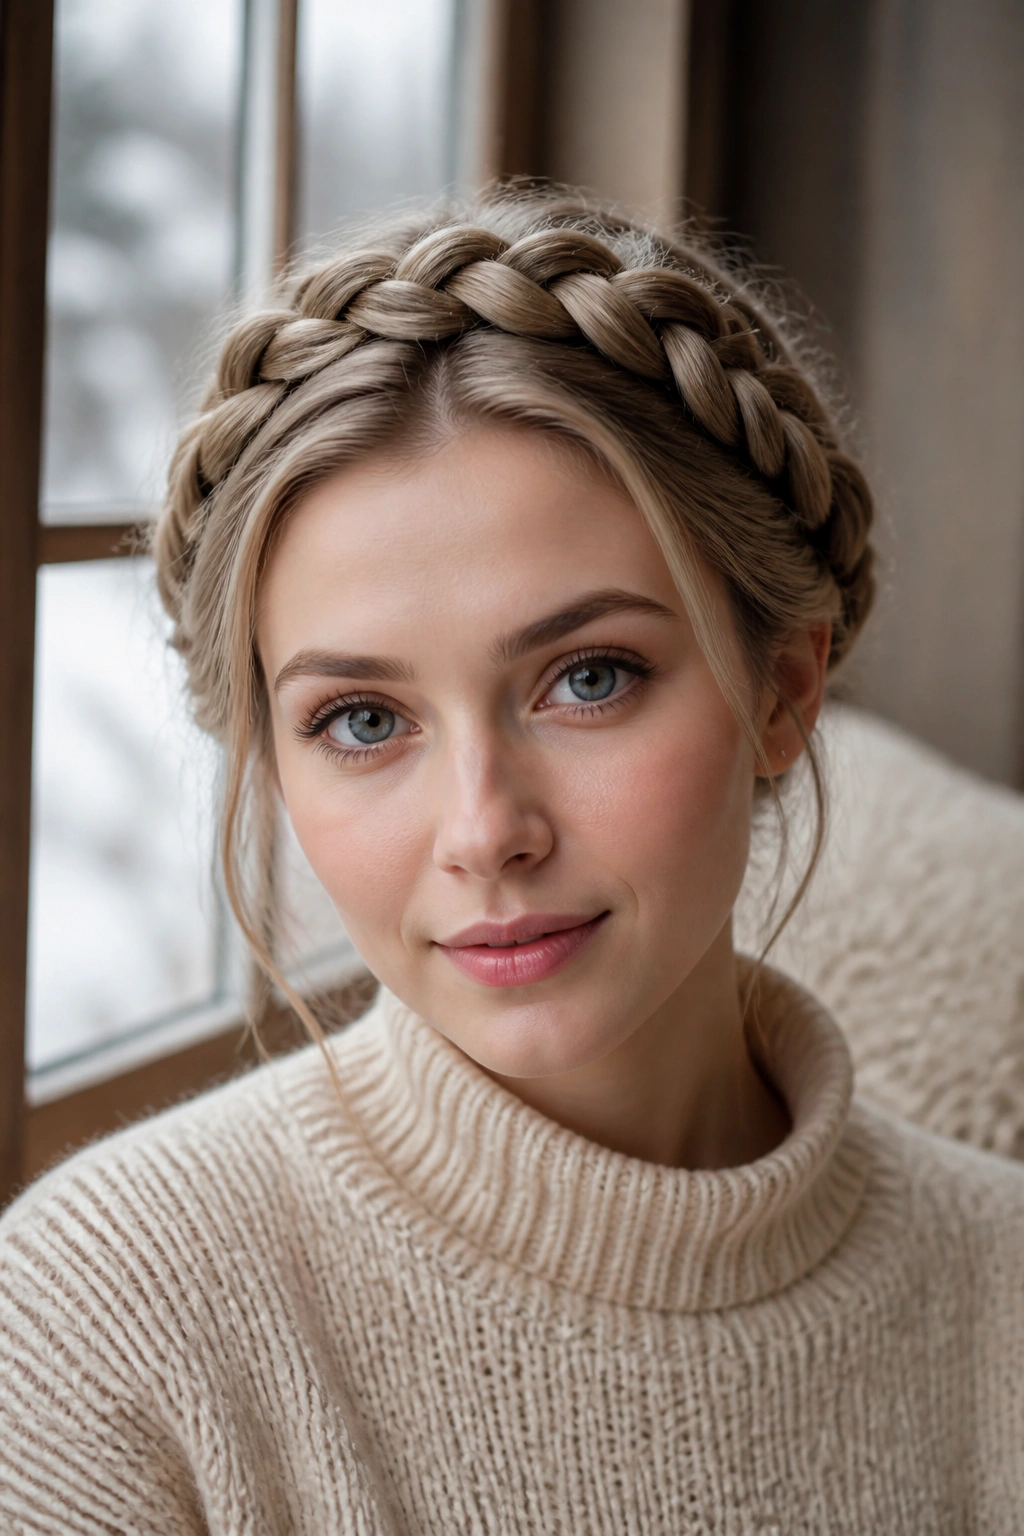
Why does a crown braid stay so satisfying, even after a long day? Because it keeps the front and sides under control while turning the whole head into a finished shape. It also works well with winter layers, since the braid sits above scarves instead of rubbing against them.
The braid itself doesn’t have to be huge. A medium-width braid around the hairline is enough to do the job, especially on second-day hair that has a little grip. Once it’s pinned in a circle or partial circle, the style holds the front pieces off the face and gives you room for hats without flattening the whole look.
How To Pin It So It Stays Put
Use 6 to 8 bobby pins if your hair is long or thick, and cross-pin them whenever you can. That X shape keeps the braid from slipping in a way one pin can’t. A few hidden pins near the nape help more than one dramatic pin at the top.
This is one of those styles that looks fancy without asking for much. I’m a fan.
7. Half-Up Twist
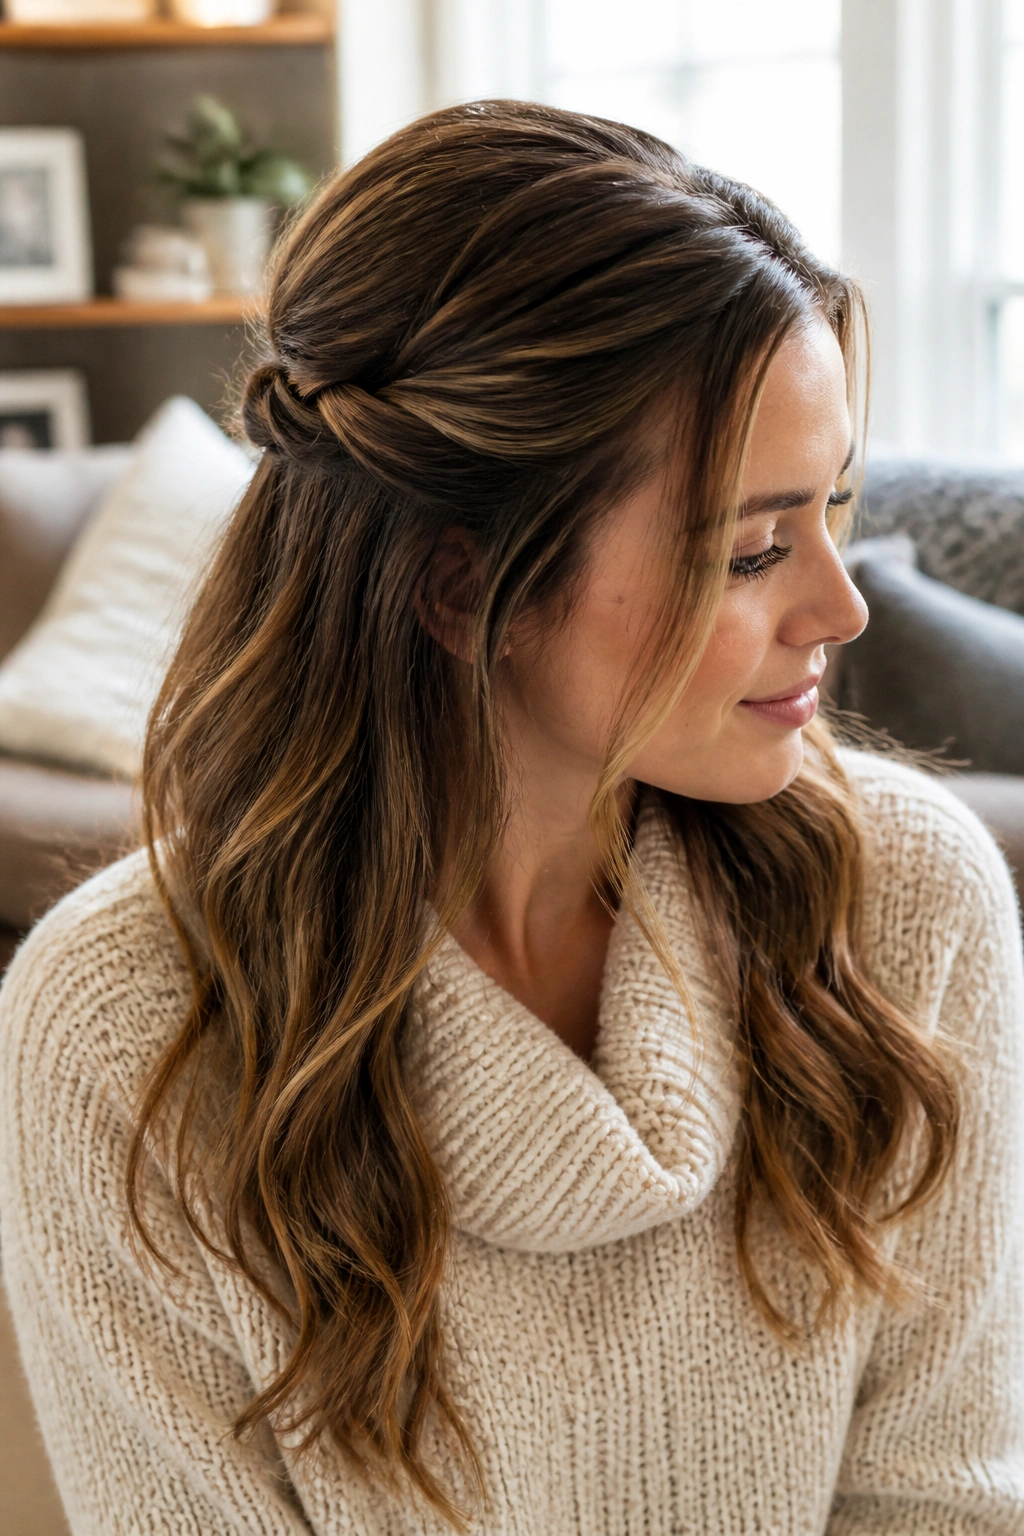
A half-up twist is the answer for days when you want your hair down but not in your face. It keeps the front sections off your cheeks, which matters when you’re wearing a scarf, a high-neck sweater, or anything that would otherwise rub the sides loose.
A Few Small Habits Stop It From Slipping
Take a section from each temple — about 1 inch wide on each side — and twist them away from the face. Bring the twists together at the back of the head and secure them with a small elastic or two crossed pins. If you want it to look cleaner, wrap a tiny strand around the elastic once.
- Use slightly gritty hair, not slippery fresh-washed hair.
- Keep the twist low enough to hide under a hood.
- Leave the bottom section loose for movement.
- Pin the twists slightly higher if you want a more lifted shape.
Best for: medium hair, layered cuts, and anyone who gets annoyed by pieces falling into their eyes.
8. Half-Up Top Knot for Winter Hairstyles
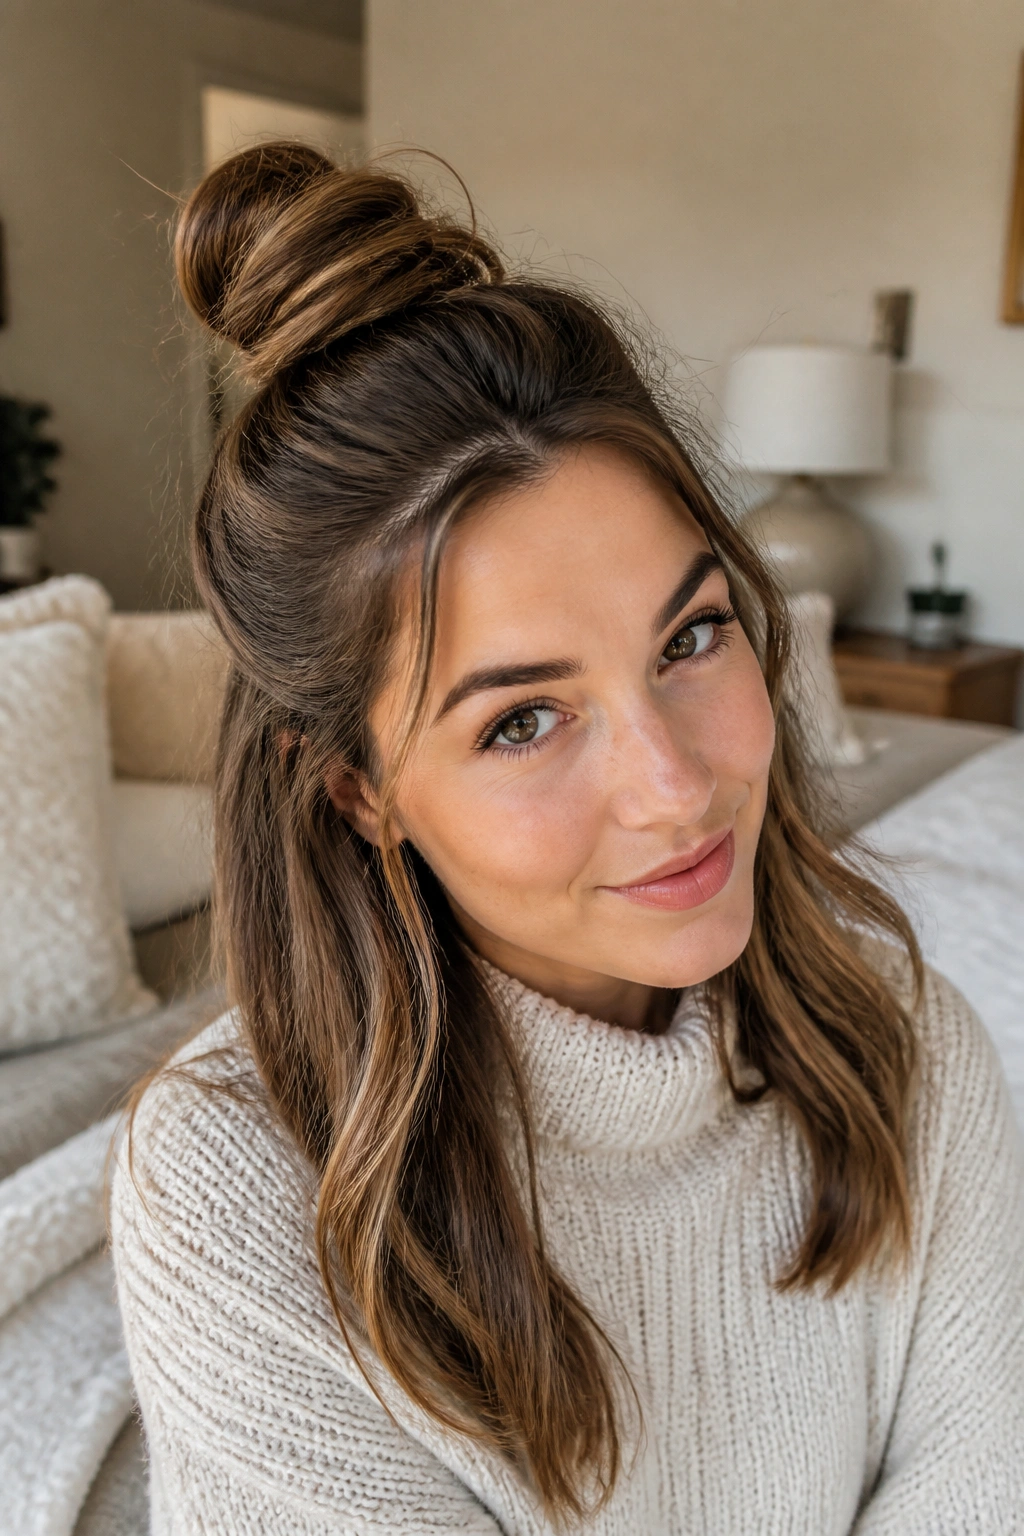
If volume disappears under a beanie, a half-up top knot brings it back fast. It lifts the crown, keeps the top section tidy, and leaves the rest of the hair free so the style doesn’t feel too severe. That balance is why this is one of my favorite winter hairstyles for everyday wear.
The knot does not have to be giant. In fact, a smaller top knot often looks better in cold weather because it sits neatly under coat hoods and doesn’t get crushed as badly. Gather the top half from temple to temple, twist it loosely, and secure it high on the crown with an elastic or two pins. Leave the lower layers smooth, wavy, or softly curled.
It works especially well on fine hair that needs a lift, but thick hair can wear it too. If your hair is very straight, a little dry shampoo at the roots helps the knot stay in place. If it’s curly, keep the twist loose so you don’t stretch the pattern out. Easy. Done.
9. Claw Clip French Twist
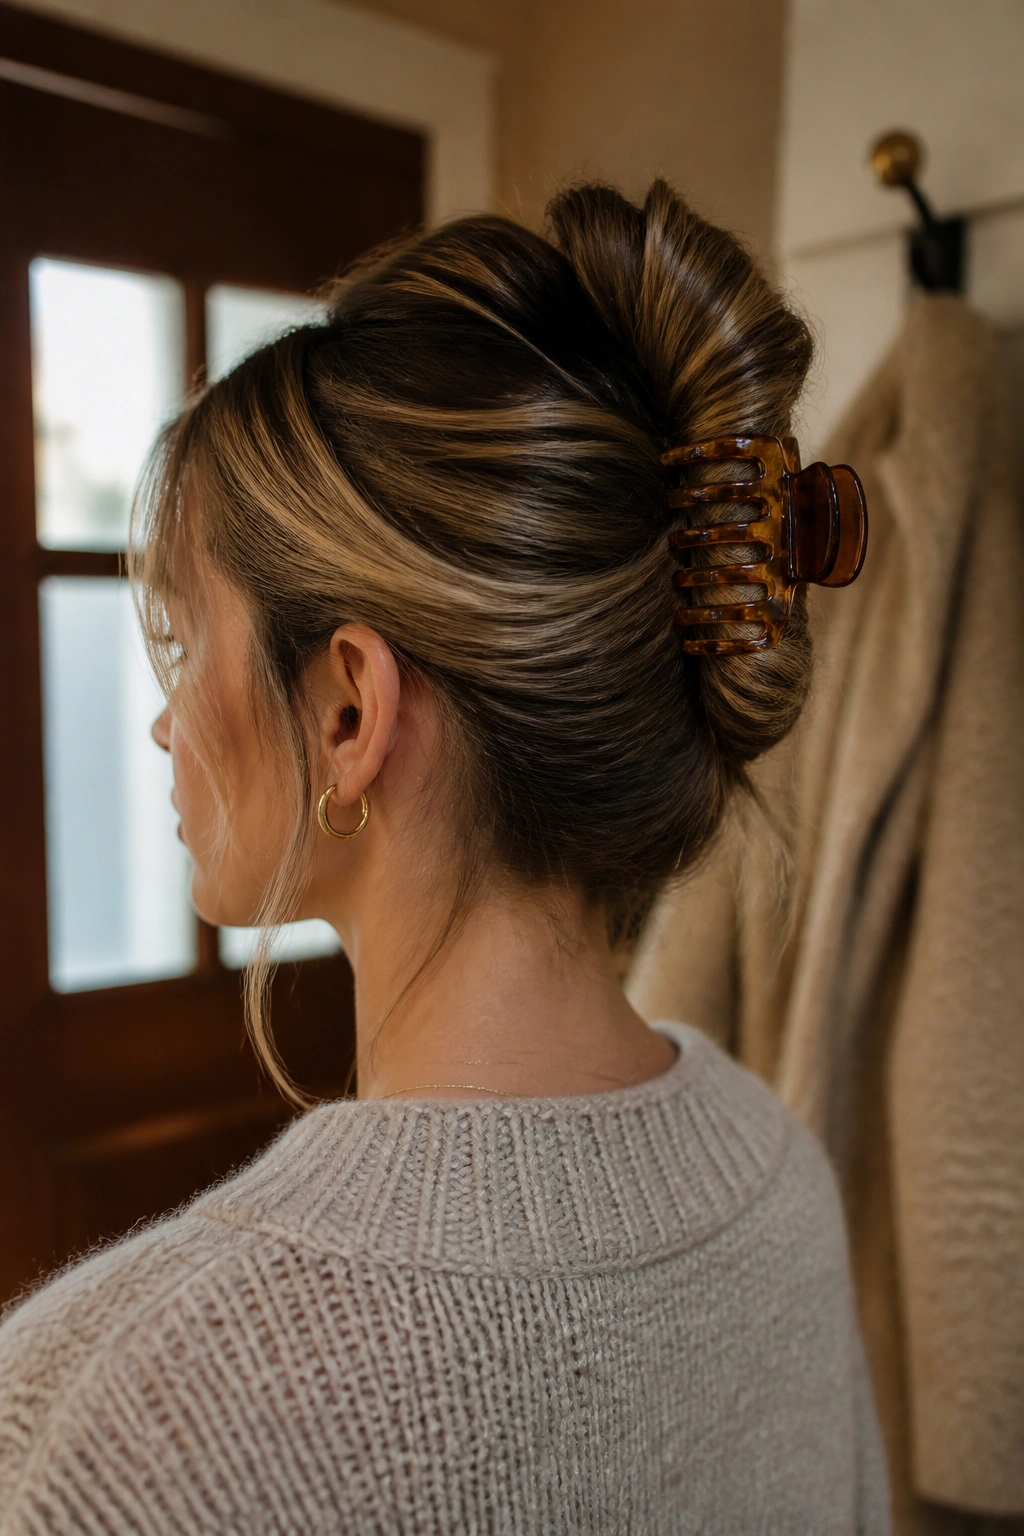
A claw clip is the lazy-looking accessory that is actually doing a lot of work. A French twist with a clip keeps the hair off the neck, avoids the flat dent a tight elastic can leave, and still looks intentional when you pull off your coat. That’s a win on busy days.
The shape matters. Twist the hair upward, tuck the ends in, and clip vertically so the teeth grab a solid section of hair near the middle of the twist. If the clip is too small, the style collapses by lunch. If it’s too big, the whole thing looks loose and slides. Medium-sized clips usually hit the sweet spot.
- Use a clip with teeth that feel grippy, not slick.
- Twist the hair once before folding it upward.
- Leave a few short pieces loose if your layers are stubborn.
- Tuck the twist high enough to miss your collar.
This is the style I’d call low-effort, but not careless.
10. Messy Chignon
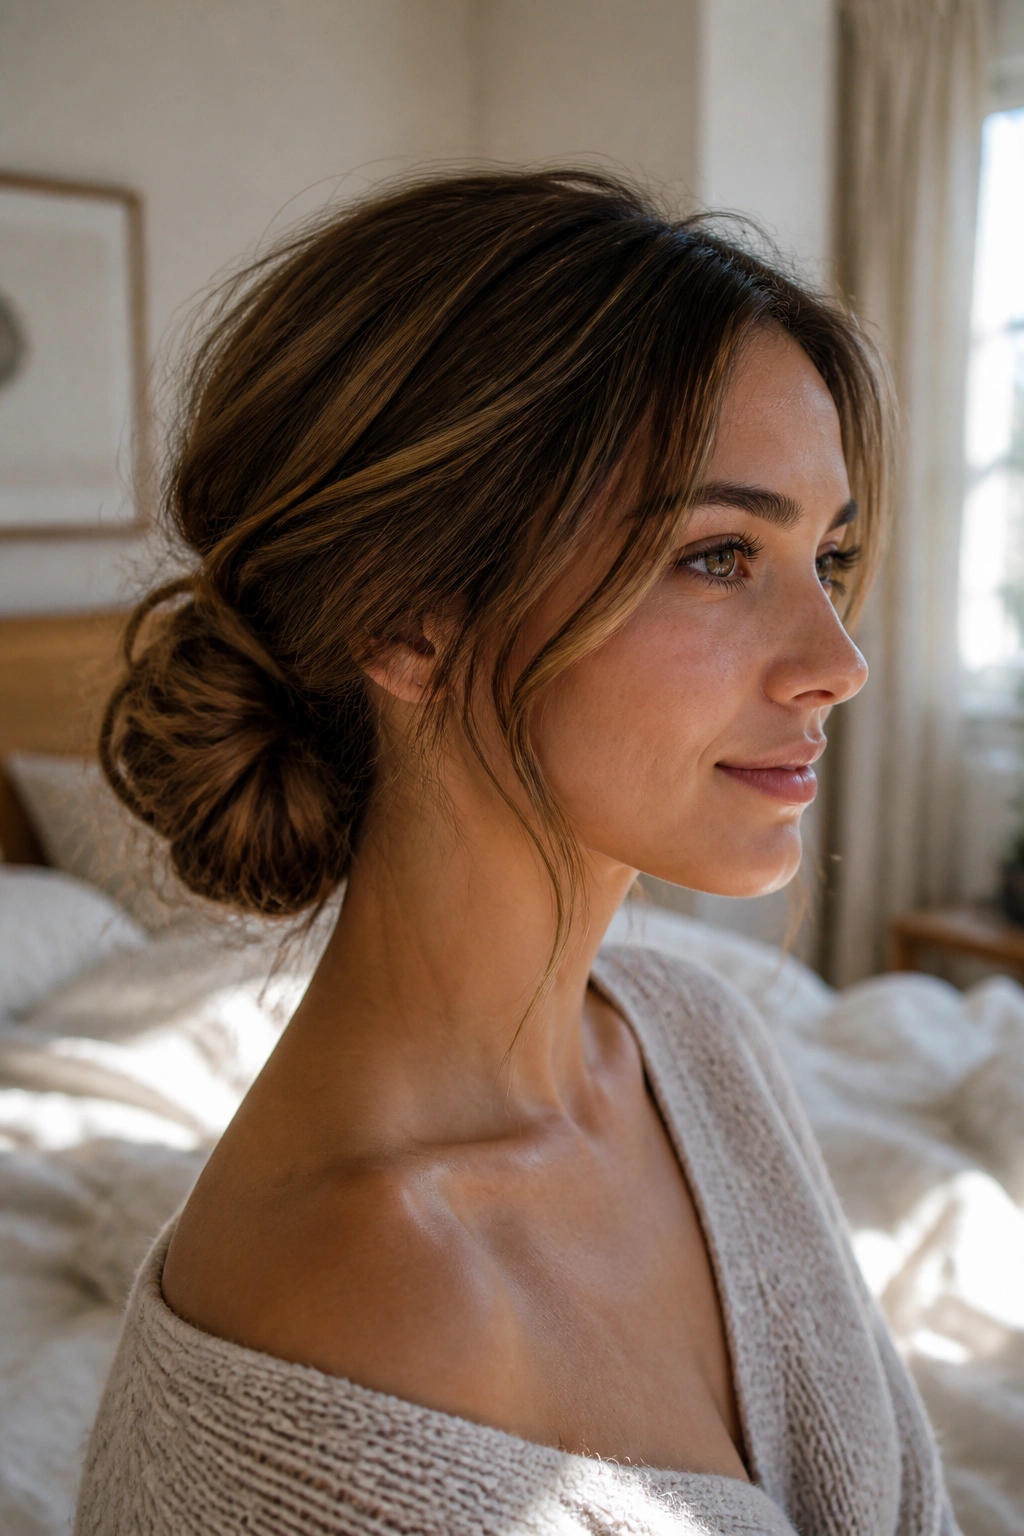
Messy can be strategic. A soft chignon at the nape works well in cold months because it’s forgiving, it’s fast, and it doesn’t mind if the air makes your hair a little rough around the edges. That roughness actually helps, because the pins have something to hold onto.
The easiest version starts with a low ponytail, twisted loosely into a coil, then pinned into a soft knot. I like to leave two small face pieces out if the hairline feels too tight. Not a lot. Just enough to make the shape feel less formal. A mist of dry shampoo on clean hair helps the bun grip, and a little smoothing cream on the ends keeps them from fraying.
Too polished feels fussy. Too loose falls apart. The middle ground is where this one lives, and that’s why it’s such a good cold-weather fallback.
11. Side-Swept Waves
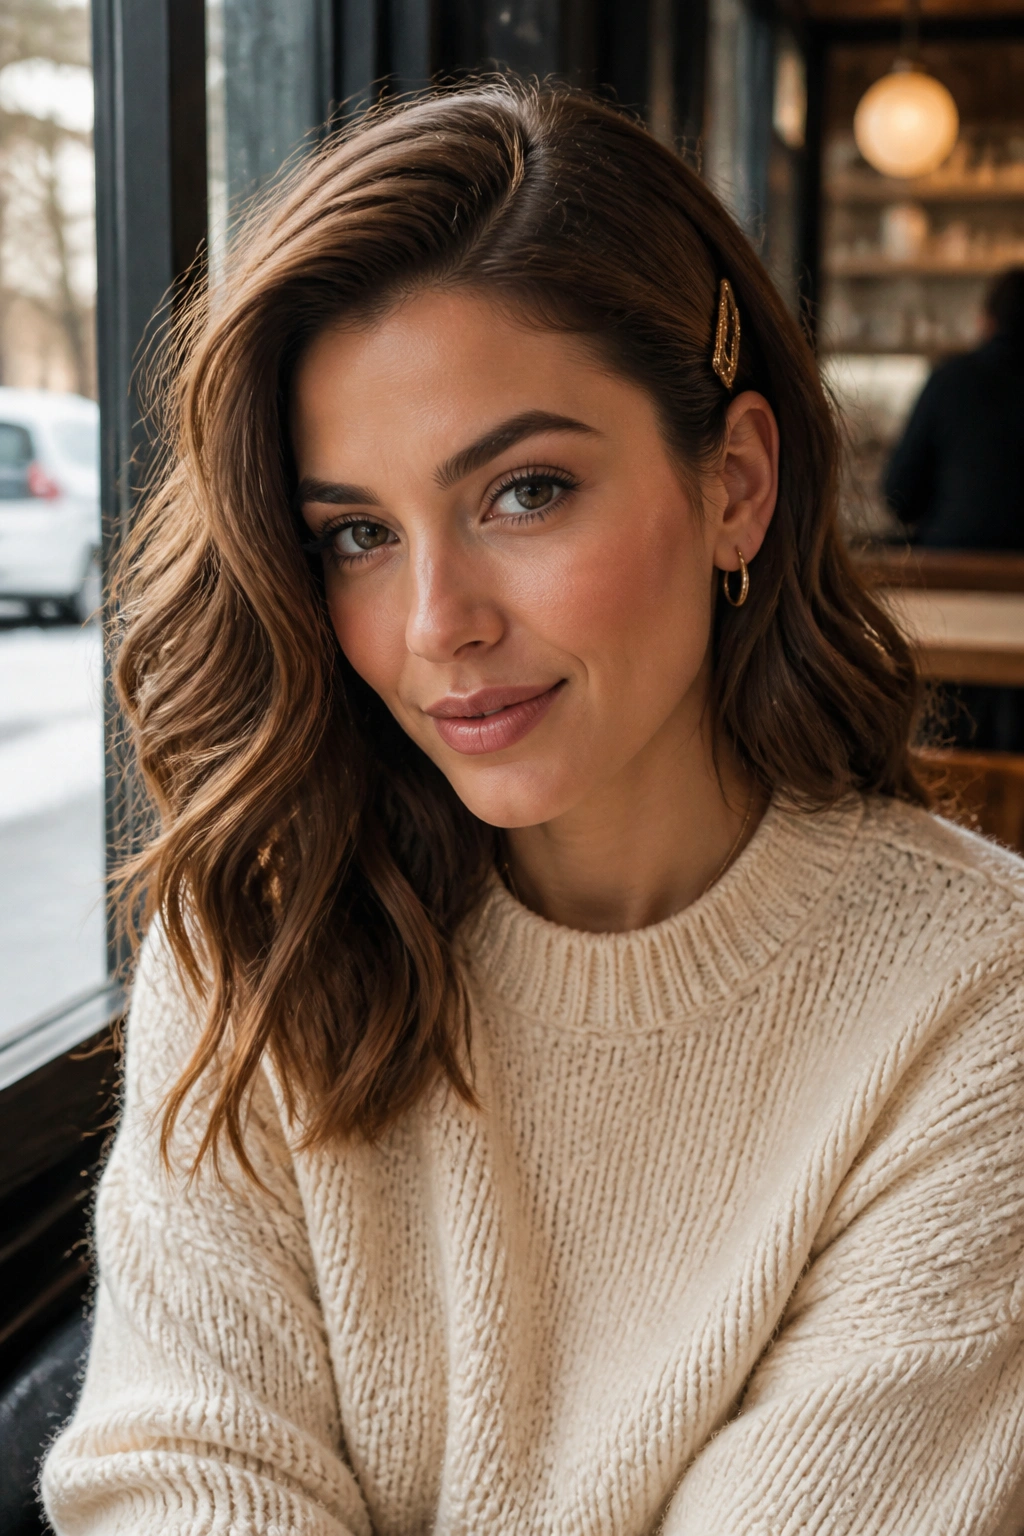
Side-swept waves do one useful thing better than most looks: they keep one side of the hair under control while still leaving movement through the rest. That matters when a scarf keeps rubbing the same spot, because the style already has a built-in sense of direction.
Compared with a center part, a deep side part softens the face and gives longer waves somewhere to fall. I like it on layered cuts, shoulder-length hair, and thicker hair that tends to puff out when the air gets dry. A 1.25-inch curling iron or a heatless bend overnight both work; the exact method matters less than the shape.
Tuck the heavier side behind one ear and secure it with a flat clip if it needs help staying there. That little move keeps the front from collapsing into your face. It’s also one of those styles that looks better once it has moved around a bit, which is handy when you’re on the go all day.
12. Heatless Overnight Waves

Can winter hair look polished without a hot tool? Yes, and that’s half the reason heatless overnight waves make sense in cold months. Dry air already does enough damage. Skipping a hot iron once in a while gives the ends a break, and the finished wave often looks softer than heat-set curls anyway.
How To Set It
Start with hair that’s fully dry or almost fully dry. Braid it into two loose braids, a single low braid, or wrap it around a soft robe tie if you want a flatter bend. Sleep on a silk or satin pillowcase if you can. Cotton roughs up the surface and can make the waves frizz faster.
In the morning, separate the waves with your fingers, not a brush. A brush can stretch the pattern out and leave the ends fuzzy. If the roots look flat, flip your head over and shake them loose first.
This style is best on medium to long hair, and it’s especially kind to ends that already feel dry. A little serum on the bottom 2 inches is enough. Don’t drown it.
13. Blowout with Face-Framing Layers
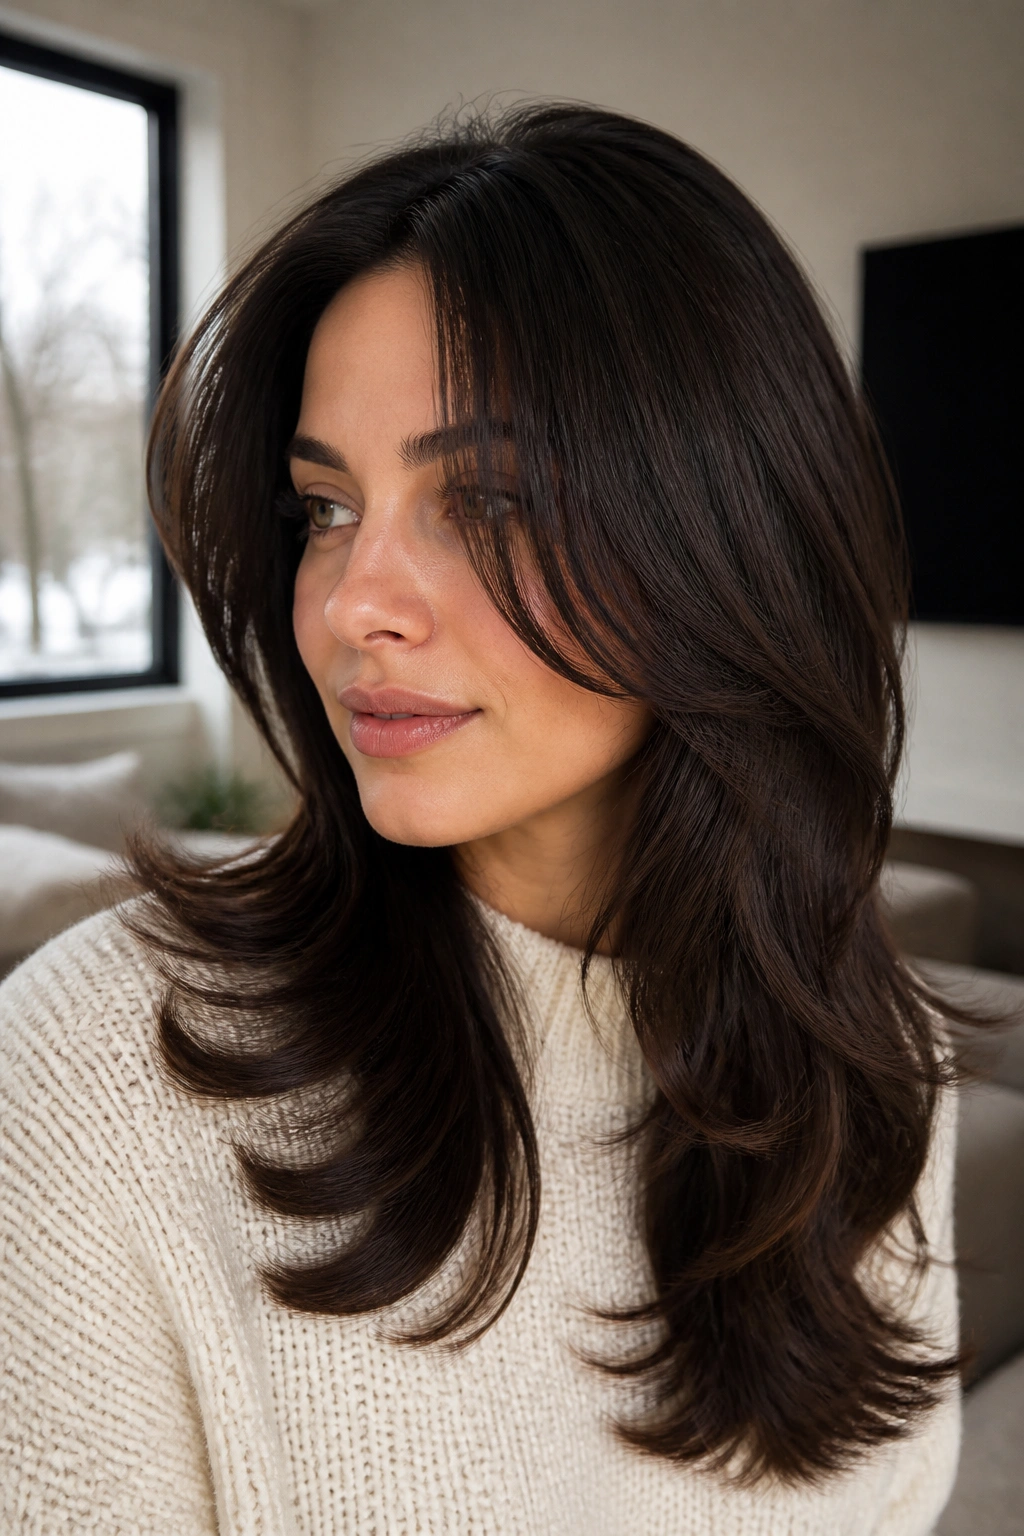
A winter blowout should be soft, not inflated. Face-framing layers give the whole style movement, and they stop the ends from looking heavy when coats and scarves squash everything else. If the cut has a bit of shape around the cheekbones, the blowout keeps that shape visible.
- Rough-dry the hair until it’s about 80 percent dry.
- Use a round brush on the front sections, pulling them away from the face.
- Roll each piece for 10 to 15 seconds before releasing.
- Hit the roots with the cool shot so the bend sets.
- Finish with a light serum on the ends only.
I prefer this on shoulder-length hair or longer, because the front pieces can really frame the face instead of disappearing. The blowout doesn’t need to be huge. It just needs enough curve to keep the style from looking flat under winter layers. A little lift at the root, a little bend at the ends, and you’re done.
14. Sleek Middle-Part Straight Hair
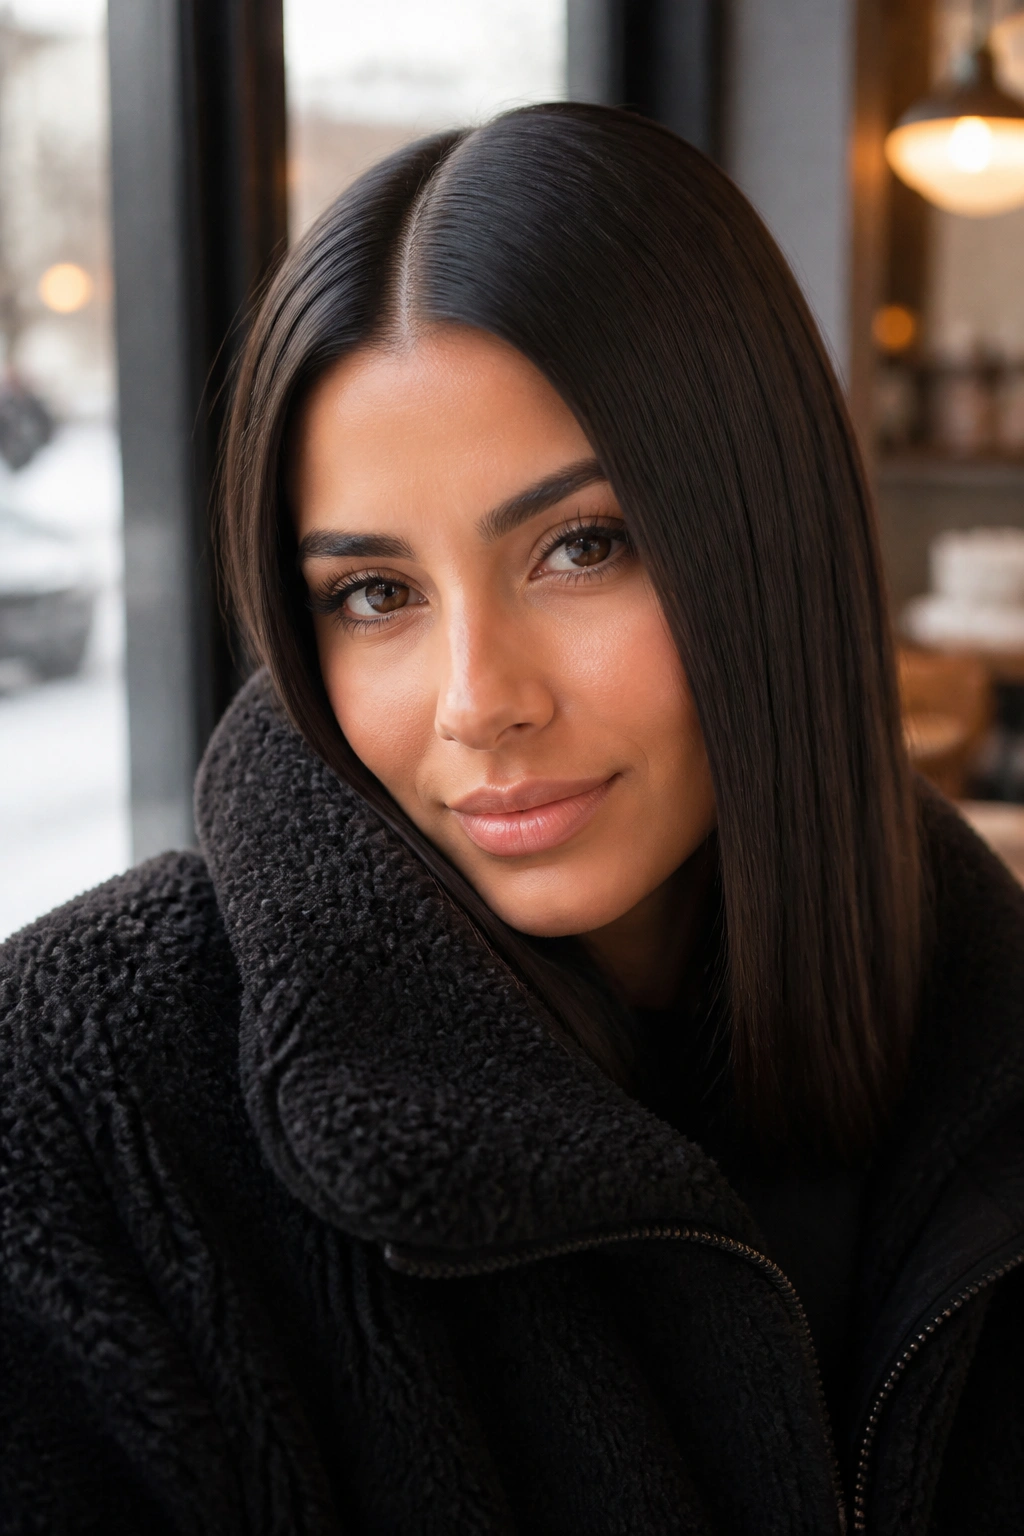
Straight hair in cold weather only works if you keep the finish clean. A middle part gives the style a sharp line, and the straight lengths sit neatly under coats without tangling into everything around them. Done well, it looks calm and deliberate.
The mistake people make is piling on too much oil. That can turn the roots limp and make the style collapse faster once a hat goes on. A heat protectant before flat-ironing, one smooth pass through each section, and a tiny bit of serum just on the last inch or two is usually enough. Anything more starts to get heavy.
This look suits medium to long hair best, though a blunt bob can wear it well too. It’s not the most playful style on the list, but it has its place. On days when your outfit is already busy, straight hair keeps the whole look from feeling crowded.
15. Soft Flip Blowout for Winter Hairstyles

A soft flip at the ends is one of those little details that changes the whole mood of winter hair. The bend keeps the lengths from lying flat against sweaters, and it gives a blowout some motion when the air is dry and the coat is doing its best to crush volume.
The easiest way to get it is with a medium or large round brush and a dryer set to warm, not scorching. Pull each section outward at the ends, then curl the brush away from the face for a few seconds before letting it drop. A cool shot helps lock the flip in place, and clipping the crown while the rest sets keeps the top from going flat.
What To Ask The Hair To Do
Ask for movement, not stiffness. That’s the difference between a soft flip and a hard curl. The flip should sit at the last 1 to 2 inches of hair, not halfway up the shaft. Too much bend looks dated fast. A slight turn at the bottom looks fresh and survives a scarf better.
16. Braided Headband
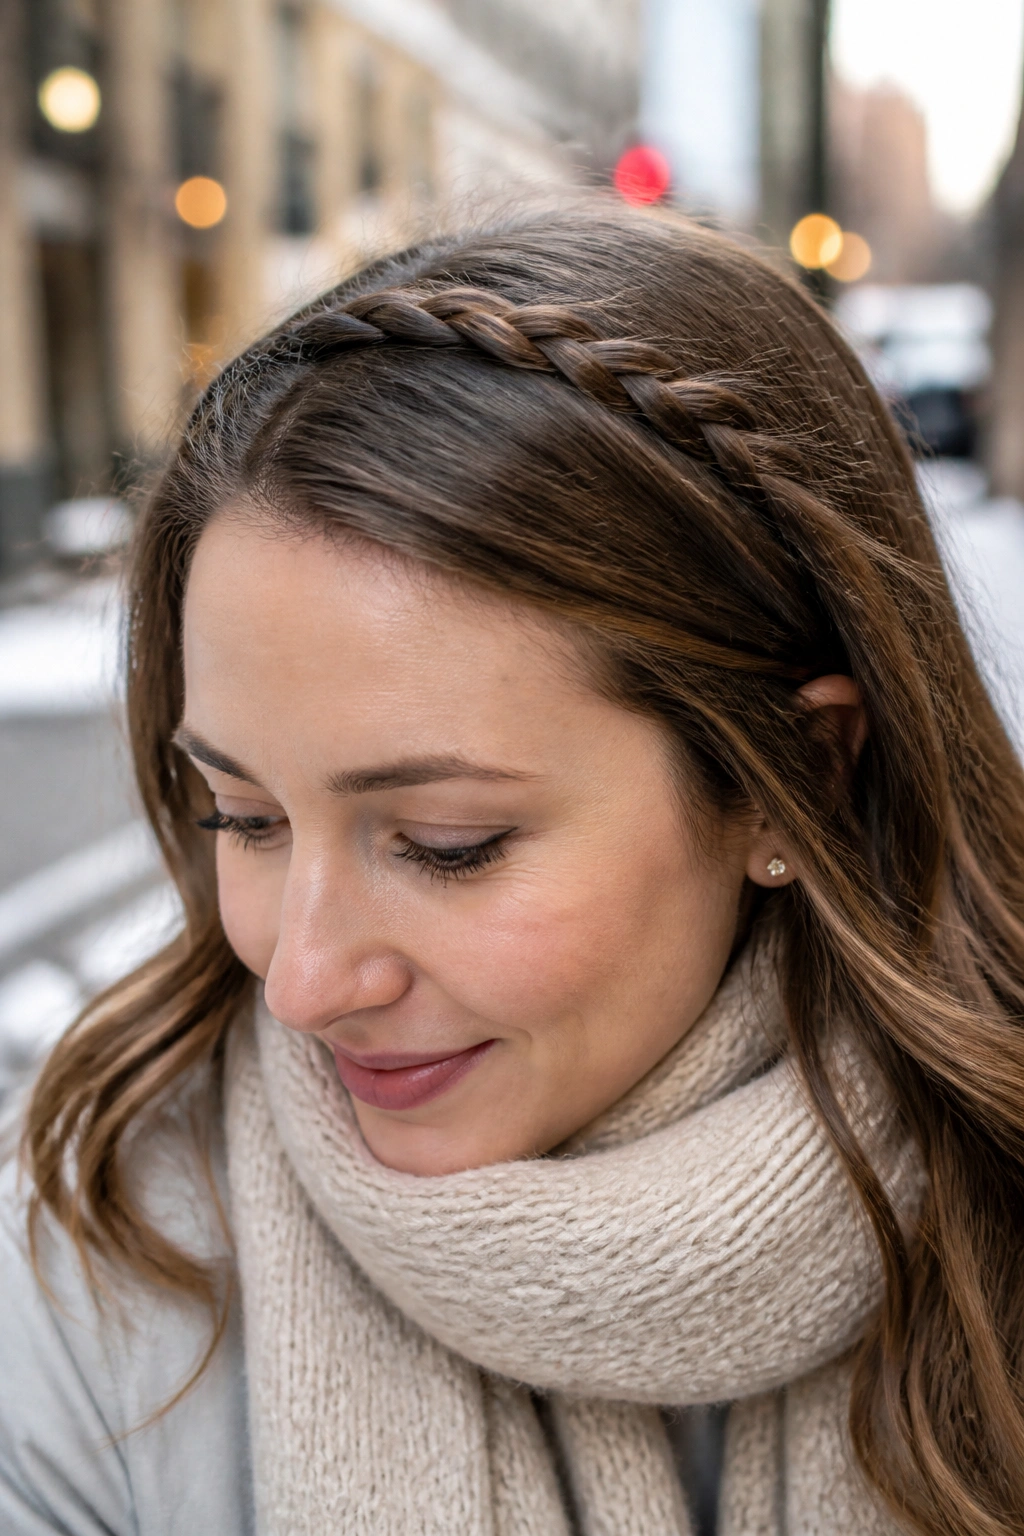
A braided headband is a smart fix for grown-out bangs, short front layers, or any fringe that keeps trying to fall into your eyes. It takes one thin braid from near the hairline and sweeps it across the top like a band, which keeps the front tidy without pulling the rest of the hair back.
The beauty of it is that it works on more than one texture. Straight hair gives it a clean line. Wavy hair makes it softer. Either way, the braid stays close to the head, so it doesn’t get wrecked by scarf friction the way loose front pieces do. Two bobby pins crossed behind the ear usually hold it well enough.
I like this style on bob-length hair and longer cuts with short layers around the face. It’s one of those quiet little fixes that changes the whole look without taking over. Nice side effect: your coat collar won’t keep battling the front pieces all day.
17. Pinned-Back Curls
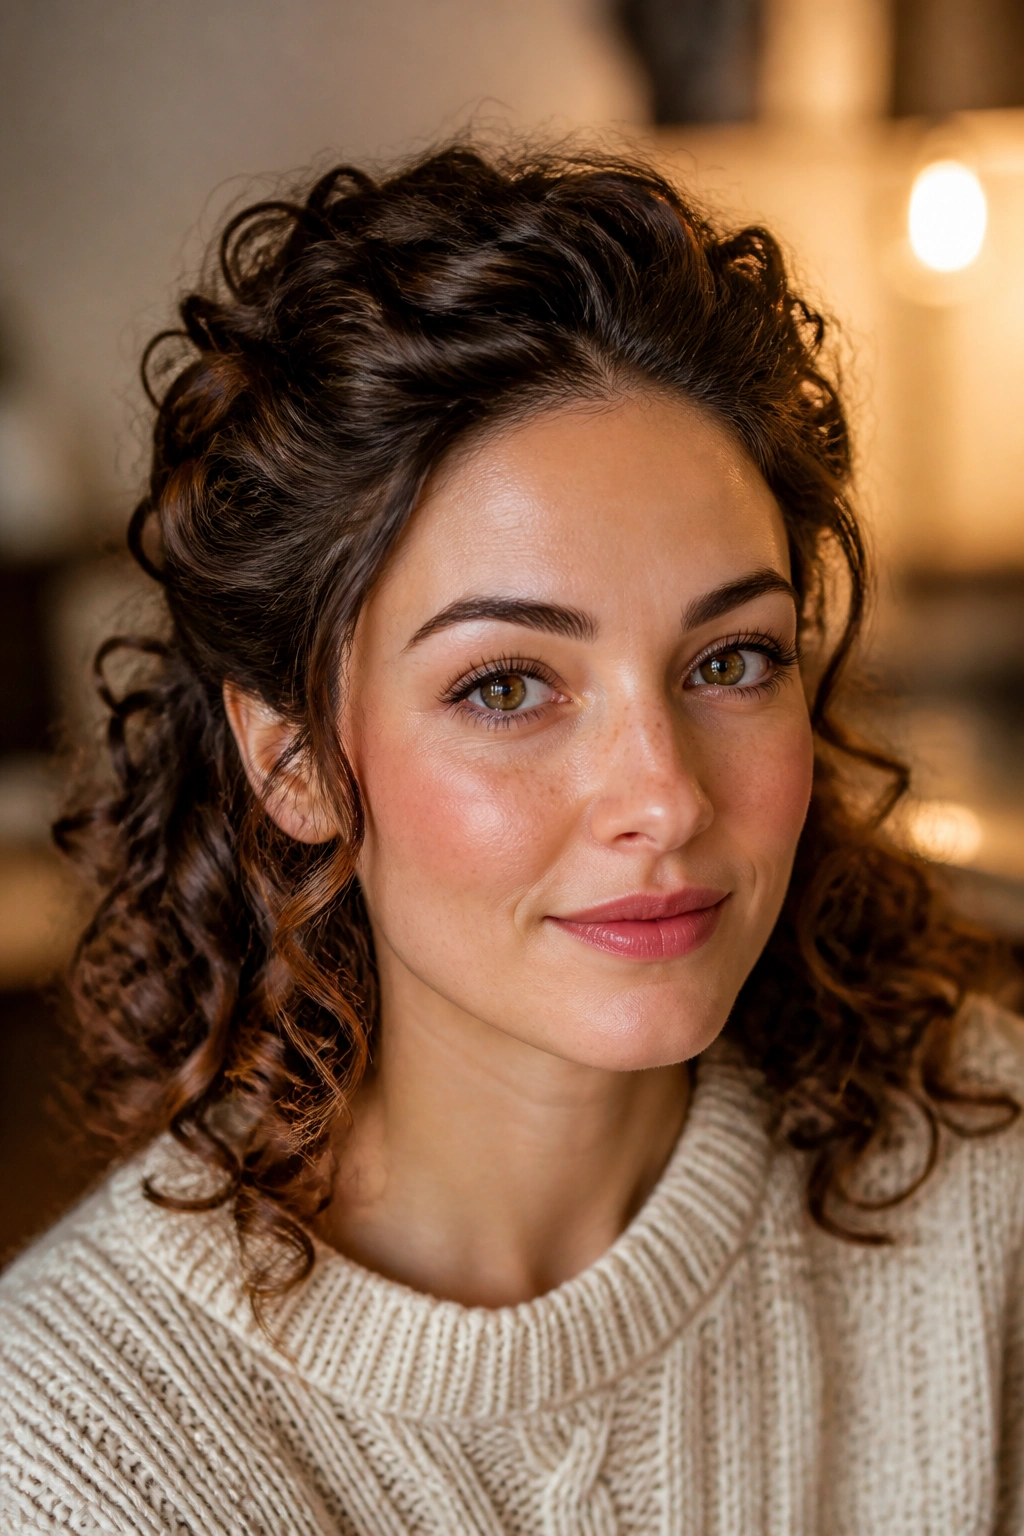
Pinned-back curls are the better choice when you want to keep the volume of your curls but need the front out of the way. Unlike a ponytail, which can flatten the whole shape, this style lets the back stay full while the sides feel controlled.
That matters in cold months because curly hair hates being crushed and then pulled apart again. If you gather only the temple sections, twist them back softly, and pin them near the ears, the curls still move. A light mist of spray before pinning gives the clips something to grab, but heavy product can make curls feel sticky and stiff.
This works especially well for natural curls, set waves, or even a brushed-out curl pattern. Leave the rest loose. Let it look like hair, not a project. The whole point is to keep the good volume where it belongs and tame the part that keeps blowing into your lip gloss.
18. Low Braided Bun
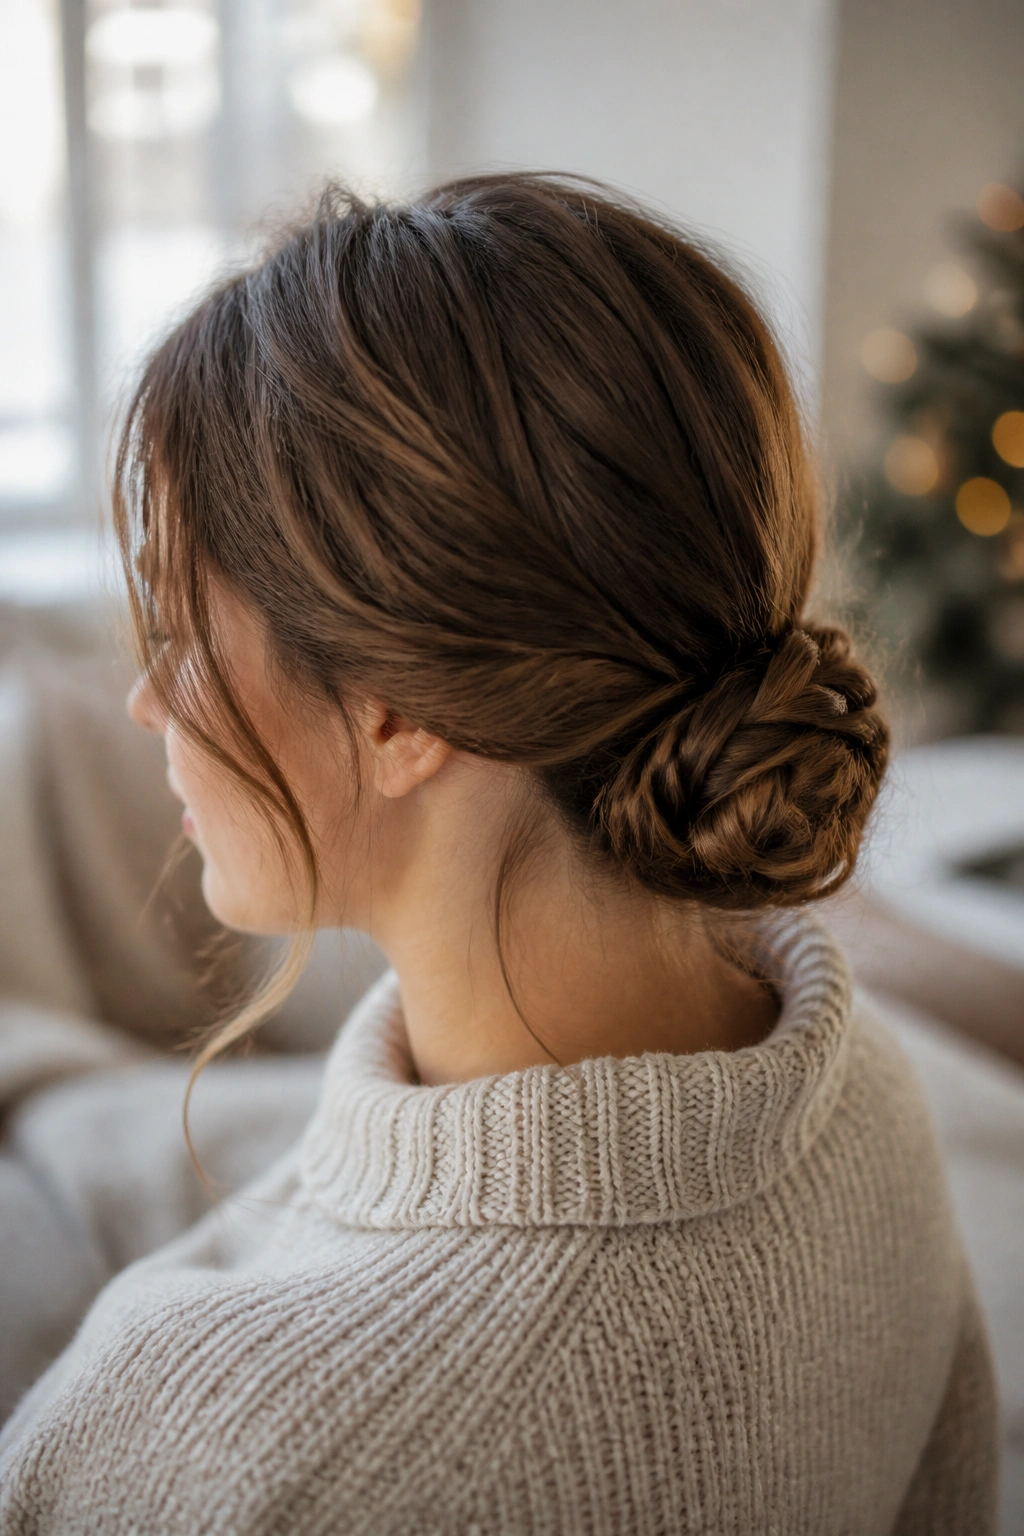
Want one style that can survive a long day and still look finished? A low braided bun does that job without asking for much. The braid gives the bun texture and grip, which means it tends to hold better than a plain twist when the air is dry.
Start with a low ponytail, braid the length, then coil the braid into a bun and pin it flat at the nape. That braid texture is the part that saves the style. It keeps the bun from slipping into a smooth, sad loop by midafternoon. A few hidden pins around the edge do more work than one oversized clip.
Why The Braid Matters
A braided base gives you two things at once: structure and a little visual interest. The bun reads as intentional because the braid is visible, even if the rest of the style gets nudged by a scarf or coat. On thick hair, it helps distribute weight. On fine hair, it creates enough grip to keep the bun from sagging.
19. Double Twists into a Low Ponytail
Double twists into a low ponytail are a good answer when you want something quicker than braids but cleaner than loose hair. The twists at the front control the face-framing pieces, and the ponytail at the back keeps everything compact enough for cold-weather wear.
- Split the front into two sections, one on each side of the part.
- Twist each section back toward the nape.
- Join both twists into a low ponytail with a small elastic.
- Wrap a tiny strand around the elastic if you want a cleaner finish.
- Pin the twists under the pony if they start to slip.
This one shines on medium hair and layered cuts because the twists grab the shorter pieces without a fight. A little matte spray at the roots helps if the hair is slippery. The style feels casual, but not sloppy, which is a better place to be when the weather has already done half the styling for you.
20. Scarf-Wrapped Ponytail
A scarf can do more for a ponytail than another layer of hairspray ever will. Wrap a silk or satin scarf around the base, and the whole style suddenly looks finished. It also helps hide an elastic, which is useful when the hair itself is pretty plain and the outfit needs a little lift.
The other benefit is practical. Softer fabrics are gentler on the ends, and they cut down on the rough friction that makes cold-weather hair look frayed. Keep the scarf narrow enough that it doesn’t bulk up under a coat collar. A wide knot at the nape can look nice in a mirror and feel awful under outerwear.
I like this one on second-day ponytails, low braids, and even bubble ponytails. It’s a small detail, but small details matter a lot in winter. That’s usually where the style is won or lost anyway.
21. Short Hair Tucked With Barrettes
Short hair gets overlooked in winter hairstyle lists, and that’s a miss. Bobs, lobs, and pixies can look sharp with a simple tuck and a few barrettes. The goal is to keep the front pieces from poking out under hats while still letting the cut keep its shape.
A side tuck is the easiest version. Smooth one side behind the ear and place 2 barrettes above the temple to hold the front in place. If the hair is especially fine, a tiny bit of texturizing spray at the roots helps the clips stay put. For a bob, a flat snap clip works better than a heavy claw clip, which can overwhelm the cut.
- Put the first barrette about 1 inch above the ear.
- Use a second one slightly behind it if the hair is slippery.
- Keep the other side loose for balance.
- Add a dab of cream to the ends only.
Short hair can absolutely do winter. It just needs the right hardware.
22. Curly Puff with Satin Scrunchie for Winter Hairstyles
A curly puff is one of the simplest ways to keep coils and curls happy when the air gets dry. It lifts the hair off the neck, keeps the ends from rubbing against collars, and preserves volume instead of crushing it under layers of fabric. That makes it one of the strongest winter hairstyles for textured hair.
The satin scrunchie matters here. Regular elastics can tug too hard and leave a dent, especially if the hair is dry. A satin-covered band gives a gentler hold and helps the puff keep its shape. Smooth the front with your hands or a soft brush, gather the hair high or mid-level, and let the puff sit where it naturally wants to sit. No need to force it into a shape it doesn’t like.
For tighter curls and coils, this style also works as a winter-friendly pineapple at night, then a daytime puff after a quick fluff. A little leave-in on the ends keeps them from feeling crispy. That’s the detail people skip, and it shows.
Final Thoughts
Cold-weather hair usually goes wrong for one of three reasons: too much friction, too much product, or too little structure. The hairstyles that last are the ones that solve at least two of those problems at once. Tucked ends, low tension, and a little texture go a long way.
I’d pick your style based on the thing that annoys you most. Hate hat hair? Go low and close to the nape. Hate flyaways? Choose a braid or twist. Want volume without a fight? A half-up style or a soft blowout makes more sense than forcing sleek hair to stay perfect in dry air.
Keep a tiny winter hair kit in your bag — a couple of elastics, two bobby pins, one clip, and a small anti-frizz serum. That’s usually enough to rescue most styles when the weather starts acting up.
