



The best tousled wave hairstyles never look like they were rehearsed. They look touched, bent, and slightly imperfect — the kind of hair that falls into place after a quick pass with a wand and a dab of texture spray.
That’s the appeal, really. Tousled waves can make fine hair look fuller, heavy hair look lighter, and a basic cut look like you spent far more time on it than you did. Polished curls are not the assignment here. A little unevenness at the ends, a softer root, a piece that falls a bit differently from the rest — that’s the good stuff.
And if you’ve ever stood in front of a mirror trying to make your waves look “effortless” while they somehow looked stiff instead, you’re not alone. The shape matters more than people admit. A blunt bob, a layered lob, a shaggy cut, long hair with face-framing pieces — each one changes how easy the waves are to wear.
The smartest version of this style always starts with the cut. After that, it’s mostly about choosing a wave pattern that works with your length, your face shape, and how much heat you actually feel like using on a normal morning.
1. Chin-Length Tousled Bob

A chin-length bob with soft, broken-up waves has a lazy kind of confidence to it. It doesn’t try to be polished, which is exactly why it works so well. The shorter length gives the movement a little bounce, and the ends never drag the whole look down.
This cut is especially good if your hair gets weighed down fast. A 1-inch curling iron or a small wand bends the hair just enough to create that lived-in shape, and the bob keeps the result from feeling fussy. Leave the ends slightly straighter than the rest; that small detail keeps it from tipping into old-fashioned ringlets.
Why It Looks So Easy
The bob does a lot of the visual work on its own. You are not fighting with extra length, and that means the wave pattern can stay loose and quick. A few pieces can be tucked behind the ear, and suddenly the whole style feels intentional.
Use a light mousse at the roots, rough-dry the hair, then wrap random sections away from the face. Keep the sections uneven. Tiny bits of symmetry can make a bob feel too neat, and neat is not the goal here.
Best for: fine to medium hair, straight hair that holds shape, and anyone who wants movement without too much volume.
Skip if: you hate touching up the back of your hair every couple of days. Shorter waves lose their shape faster than long ones.
2. Collarbone Lob With Broken-Up Ends

Why does a collarbone lob work so well with tousled waves? Because the length sits in that sweet spot where hair still moves, but it has enough weight to fall in a flattering way. It skims the collarbone, bends at the ends, and never feels too precious.
The broken-up ends are what make this look feel modern. Instead of curling every piece the same way, alternate the direction of the wrap and leave the last inch out on some sections. That creates the sort of soft messiness people usually spend way too long trying to fake.
What Makes It Different
A lob gives you room to keep the root flat while the mid-lengths and ends carry the texture. That balance matters. Too much root volume and the style turns fluffy; too little and the hair looks flat against the face.
A salt spray or texture mist works well here, but don’t drench the hair. A few sprays through damp lengths is enough. Then twist two-inch sections around your fingers as the hair dries, or use a wand and rake the waves apart with your hands once they cool.
- Best on hair that falls just above or below the shoulders
- Easy to tuck behind one ear for a cleaner finish
- Grows out well, which is a small blessing
- Looks good air-dried or heat-styled
One small trick: bend only the middle third of each section and let the ends stay loose. It keeps the lob from looking overdone.
3. Long Layers and Airy Texture
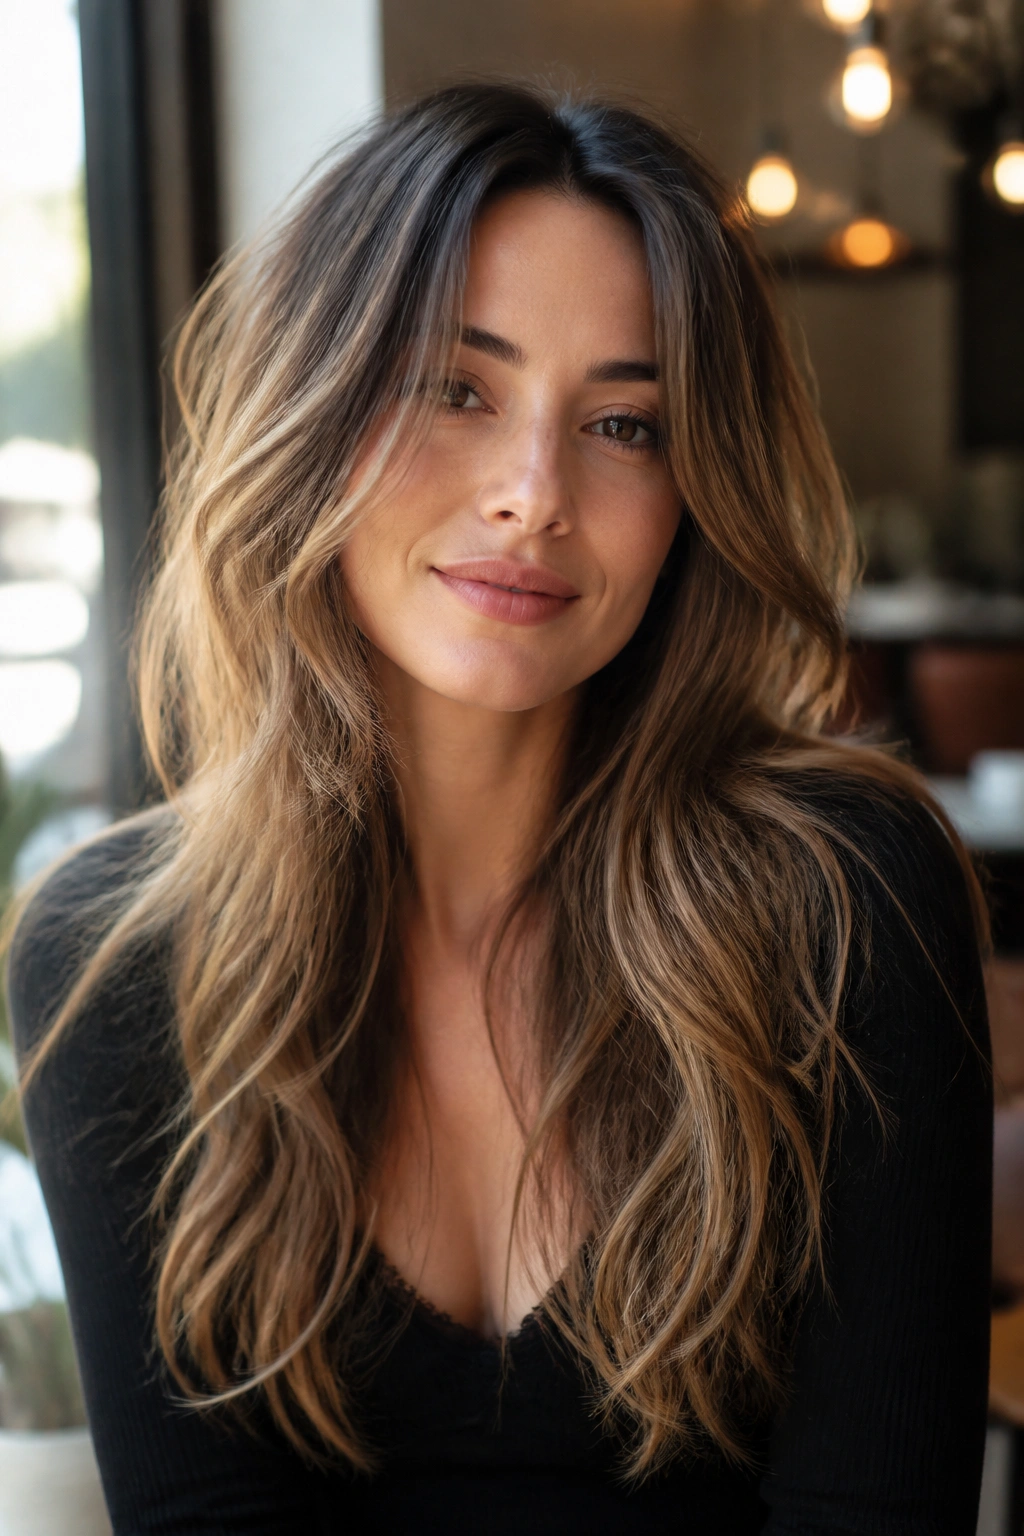
Long hair can swallow a wave pattern if the cut is too blunt. Long layers fix that fast. They let the waves bend around the face and shoulders instead of hanging there like a heavy curtain.
This is the style I reach for when someone wants movement but does not want to lose length. It’s soft, a little undone, and easier than people think. The key is keeping the layers light enough to show texture but not so choppy that the ends start to fray.
Air-drying works nicely here if your hair has any natural wave at all. Scrunch in a curl cream or lightweight leave-in, then twist random pieces as they dry. If you need heat, use a 1.25-inch wand and wrap larger sections so the bend stays loose.
Long layers also forgive a lot. Miss one section? Fine. Let a few pieces fall straighter than the rest? Even better. That kind of imperfection gives the style its shape.
4. Curtain Bangs With Soft Wave Bend

Curtain bangs and tousled waves are one of those pairings that looks like it took effort when it didn’t. The bangs frame the eyes, the waves soften the length, and the whole thing feels easy in a way that borders on unfair.
The trick is not to curl the bangs too much. Give them a bend with a round brush or a large-barrel brush while blow-drying, then let the rest of the hair fall into loose waves. If the bangs get too curly, they stop reading as soft and start reading as costume-y. No one wants that.
A Small Shape Detail That Matters
Keep the shortest part of the bang around the cheekbone, not the forehead. That length opens up the face and keeps the fringe from collapsing into the eyes. On heavier hair, a little root lift at the crown helps the bangs sit instead of hanging straight down.
A dry texture spray at the roots makes a difference here. So does not overcombing the waves. Use your fingers. A brush tends to smooth all the shape out, and then you’re right back where you started.
This look suits oval, heart, and longer face shapes especially well, but it can be adjusted for nearly anyone. The bangs just need the right length.
5. Deep Side Part With Lift at the Crown

A deep side part changes the whole mood of tousled waves. Suddenly the style has a little drama, a little asymmetry, and a lot more lift where the hair falls away from the face. It’s one of the fastest ways to make waves look deliberate without making them stiff.
What I like about this version is how little styling it actually needs. You can take day-two waves, shift the part, lift the roots at the crown with a clip while they cool, and call it done. That small adjustment can make tired hair look fresh again.
How to Keep It From Falling Flat
Clip the heavier side for a few minutes after styling so the root remembers the new direction. Then mist the roots with a flexible hairspray and press lightly with your fingertips. Don’t brush it all out. The point is lift, not helmet hair.
This style is especially good for fine hair that wants height or for rounder face shapes that benefit from a little lengthening effect at the top. It also plays well with bob lengths and collarbone cuts, which can sometimes feel too plain without a strong part.
A deep side part can also rescue waves that have gone a bit limp. That alone makes it worth knowing.
6. Half-Up Twist for Loose Waves
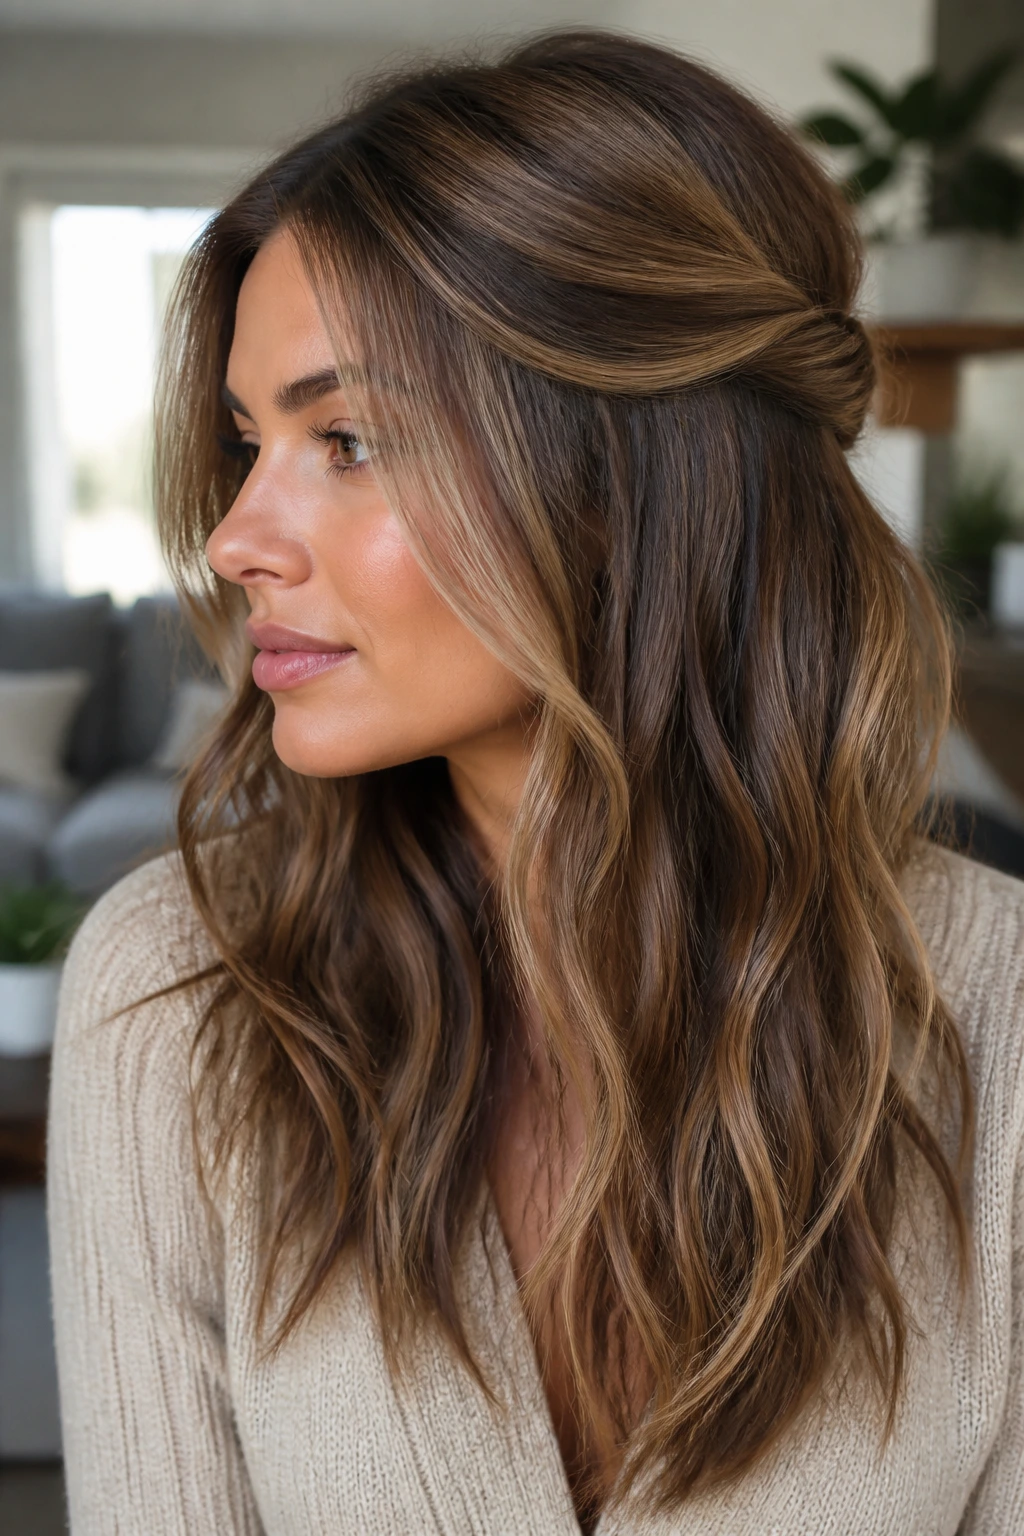
A half-up twist is one of those hairstyles that looks relaxed even when the rest of your day is not. You pull back just enough hair to keep it out of your face, leave the waves loose underneath, and the whole thing reads casual rather than styled within an inch of its life.
The best version uses texture that already has some bend. If your hair is straight, wave it first with a wand, then gather the top section loosely at the back of the head. Twist it once or twice before pinning, and pull a few soft pieces free around the temples.
The beauty of this style is that it hides a lot. Roots that need dry shampoo? Covered. A wave pattern that isn’t identical on both sides? Great. That unevenness helps.
Use two bobby pins crossed in an X shape if the section is slippery. That tiny detail keeps the twist from sliding down by lunch, which is more useful than any fancy styling trick I’ve seen.
7. Soft Shag With Feathered Fringe
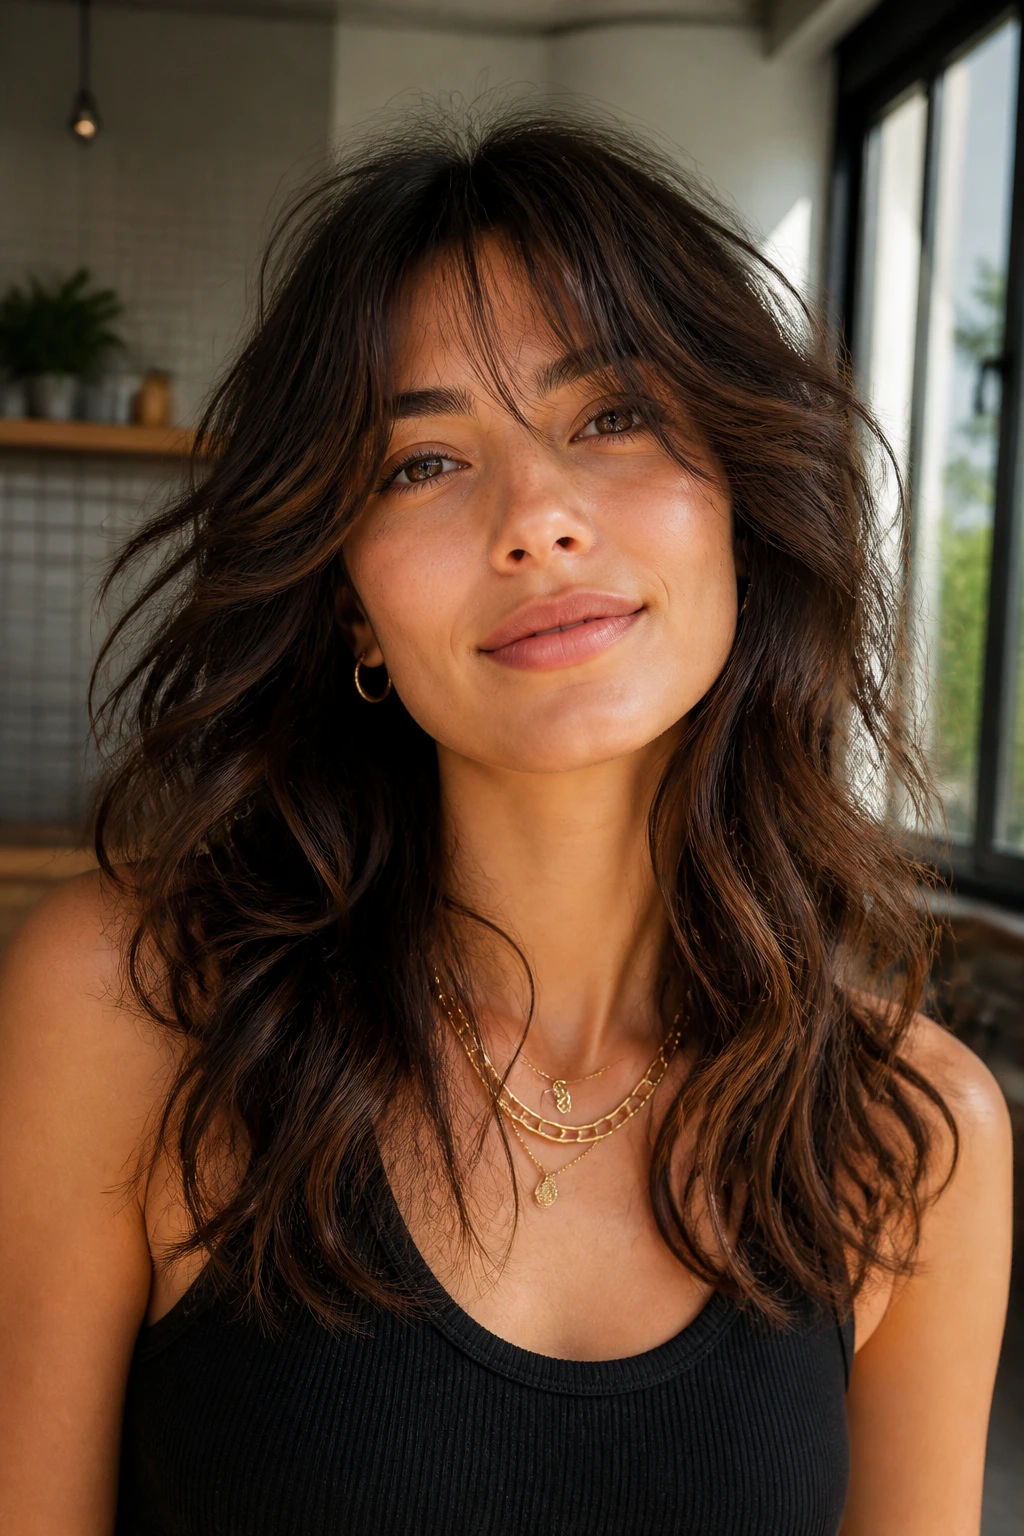
The shag is for people who like hair with a little attitude. Feathered layers, airy fringe, and messy waves all belong together here, and the cut does half the styling before you even pick up a tool.
It works because the shape is already built for movement. A soft shag doesn’t need every strand to cooperate. The uneven layers create lift, and the fringe breaks up the face in a way that feels easy rather than deliberate. If your hair has natural body, this can be one of the quickest styles to live in.
The Science Behind the Shape
Shorter layers around the crown create height. Longer pieces in the back keep the style from puffing out like a triangle. That push and pull is what makes the shag read as effortless instead of messy in a bad way.
A diffuser helps if your hair is wavy or curly, but even a rough blow-dry works if you scrunch in a bit of mousse first. The fringe needs a lighter touch than the rest. Too much product there, and it gets stringy fast.
This style is not for someone who wants sleekness. It is for someone who likes a little edge and doesn’t mind hair that looks best with movement.
8. Face-Framing Waves Around the Cheeks

A few well-placed waves around the face can change the whole haircut, even if the rest stays simple. This is the style that makes people think you had layers cut in, when really you just bent the front pieces the right way.
The goal is softness around the cheeks and jaw. Start the wave around eye level, not at the root, and let the ends stay a little straighter. That keeps the shape flattering and stops the front pieces from looking too bouncy. If you’ve got strong features, this kind of wave softens them in a nice way.
I’ve always thought this is one of the easiest tricks for people who feel their hair looks flat in photos. Pull the front pieces away from the face, bend them once or twice, and let the rest stay loose. That small change does more than a full head of curls sometimes.
- Works with ponytails, half-ups, and open hair
- Helps longer faces look a touch shorter
- Makes blunt cuts feel less severe
- Needs only 5 to 8 minutes of styling on the front section
The rest of the hair can stay simple. That’s the whole point.
9. Low Ponytail With Lived-In Waves

A low ponytail can look plain, or it can look like you meant it. Tousled waves give it the second personality. The texture keeps the pony from feeling gym-basic, and a few loose pieces around the ears stop the style from looking too neat.
The best approach is to wave the hair first, then gather it low at the nape without brushing out the body. Leave the top slightly loose so the crown doesn’t flatten. If the pony feels too tight, loosen it with your fingers after securing it. That tiny messiness matters.
What to Watch For
Use a soft elastic, not a stiff one. Tight ties can leave a hard line in the hair, and hard lines fight the softness of the waves. Wrap a small section of hair around the elastic if you want it to look cleaner, but don’t overdo it.
This is one of the few styles here that can move from casual to polished with almost no effort. Wear it with a sweatshirt and it looks relaxed. Wear it with earrings and a clean neckline, and it suddenly feels a little dressed up.
And yes, it’s practical. That counts.
10. Side-Swept Waves Pinned Back
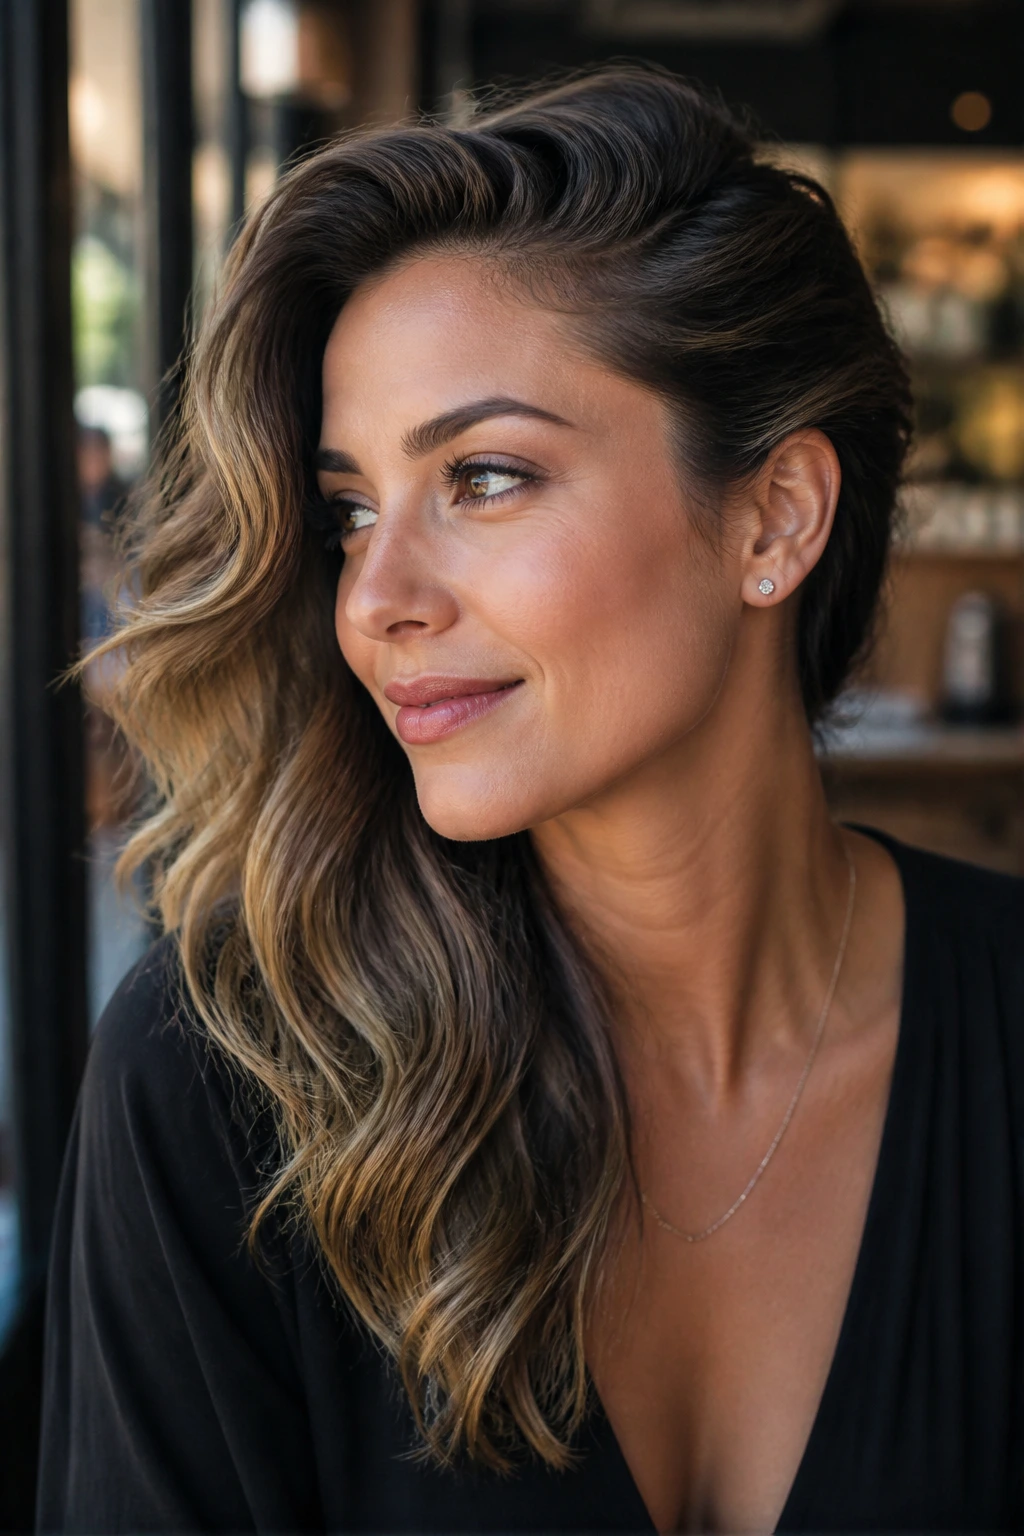
Could anything be easier than pinning back one side and letting the rest fall? Not much. Side-swept waves have that low-effort feel people chase, but the shape still looks thoughtful because the asymmetry gives the style a clear line.
This works best when the waves are soft and not too uniform. Sweep one side back just above the ear and secure it with two bobby pins hidden under a front section. Leave the other side loose and fuller. The contrast is what gives the style its charm.
The Fastest Way to Do It
Curl the front section away from the face, then let it cool before pinning. If you pin it while it’s still warm, the wave will drop too fast. A little texturizing spray at the roots helps the pinned side stay put without looking crunchy.
- Best for short, medium, or long lengths
- Helpful on second-day hair
- Good for showing off earrings or a collar detail
- Works when you want hair out of your face but do not want a full updo
It’s a small style. That’s part of why it looks good.
11. Braided Crown Detail on Loose Waves

A braided crown detail gives tousled waves a little extra shape without turning the whole thing into a formal style. The braid acts like a built-in accessory, but the loose lengths keep it from feeling too done.
The braid should stay soft and slightly imperfect. Pull it apart a bit after tying it off, and let the waves underneath stay loose. A braid that’s too tight can make the whole head look severe, which is the last thing you want with a soft texture look.
Unlike a full braided style, this one doesn’t demand precision. You only need enough braid to frame the head and create interest at the top. The rest is free to do what it wants.
This is a good choice for festivals, brunch, or any day you want your hair to look styled without looking formal. It also gives longer layers a reason to stay off the neck on warmer days, which is a practical bonus people forget to mention.
12. Scrunched Air-Dried Waves

Air-dried waves are the most honest version of this whole look. No curling iron. No perfect barrel pattern. Just product, hands, and a little patience.
Start with damp hair and work in a lightweight cream or foam, focusing on the mid-lengths and ends. Then scrunch upward toward the scalp and leave it alone. That’s the part many people ruin — they keep touching it. Don’t. Let the texture set before you decide if it needs more help.
How to Get the Most From It
If your hair dries puffy, try plopping it in a cotton T-shirt for 10 to 15 minutes before letting it air-dry the rest of the way. If it dries too flat, clip the roots up while it’s still damp. Small changes make a big difference here.
This style suits natural wave patterns better than straight hair, but even straight hair can pick up a loose bend if you twist a few sections while it dries. The result will never be identical to heat-styled waves, and that’s fine. It often looks softer.
There’s something refreshing about a style that doesn’t ask for much.
13. Glossy Waves With Smooth Ends
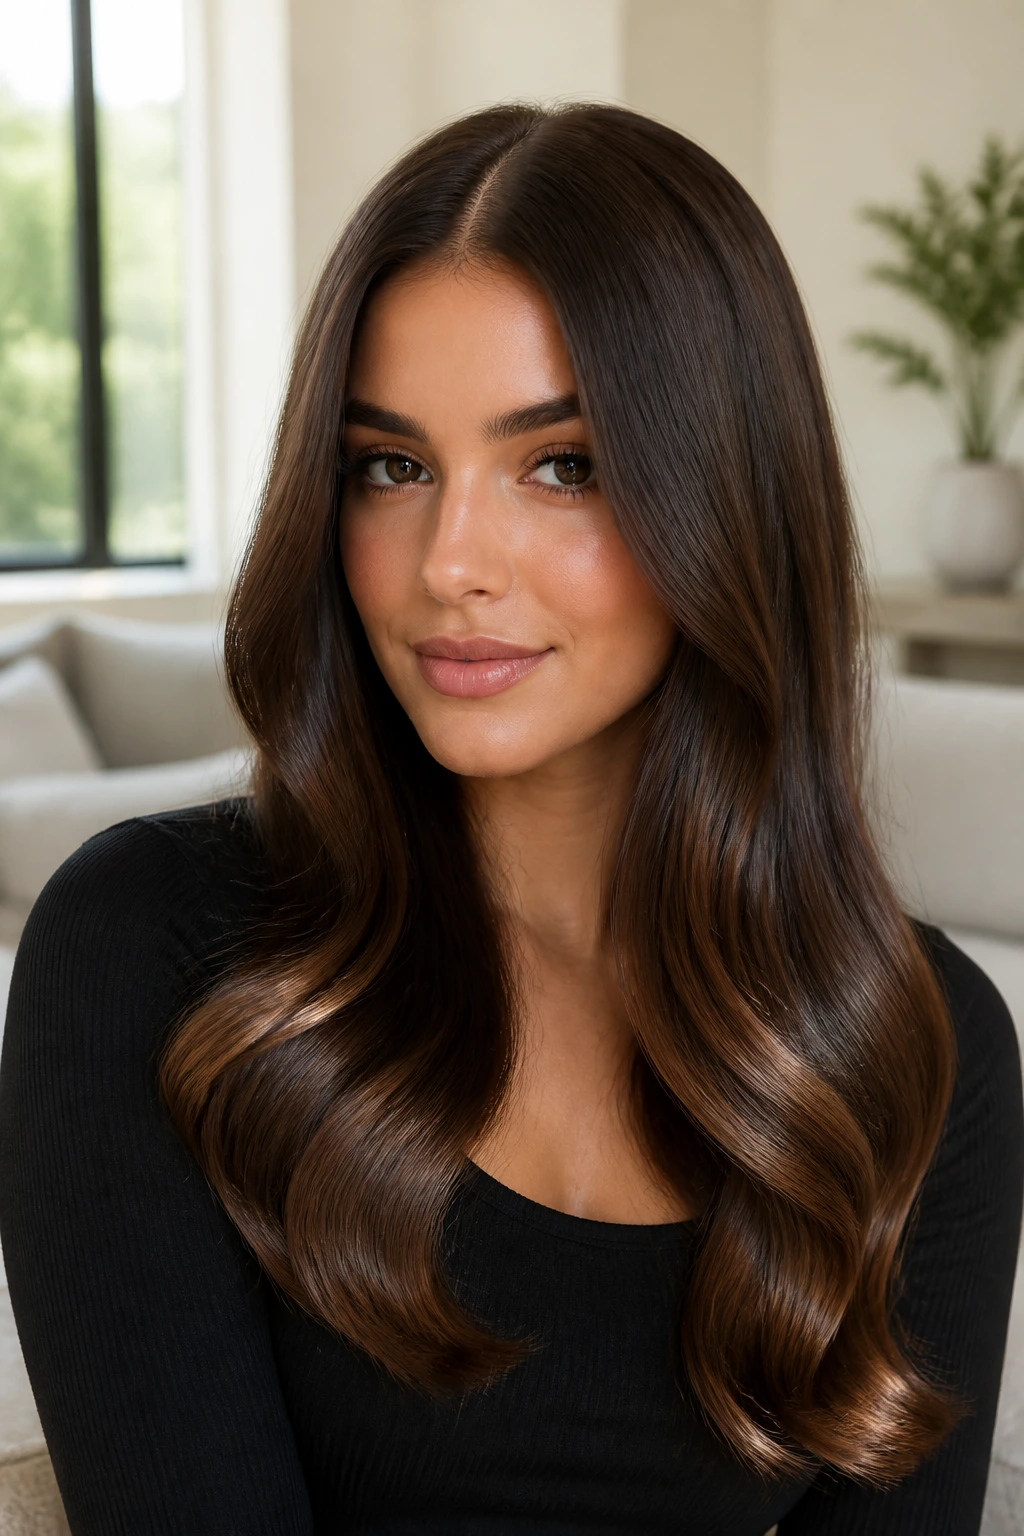
Not every tousled wave has to look shaggy. Glossy waves with smooth ends give you softness without sacrificing shine, and the result feels a little more refined than the usual beach texture.
The key is controlling the ends. Curl the mid-lengths, not the tips, and use a small amount of serum through the lower half only. If the ends get too textured, the style can look frayed. A smoother finish there keeps it balanced.
This look stands apart from looser, drier wave styles because it has shape without roughness. Think soft movement rather than gritty texture. It’s a good choice when you want waves that can pass for polished but still feel relaxed.
A middle part works well here, though a side part can make the gloss feel more dramatic. Either way, a wide-tooth comb is enough after styling. A brush tends to spread the shine around in a way that makes the hair look flat.
14. Messy Wave Bun With Loose Pieces
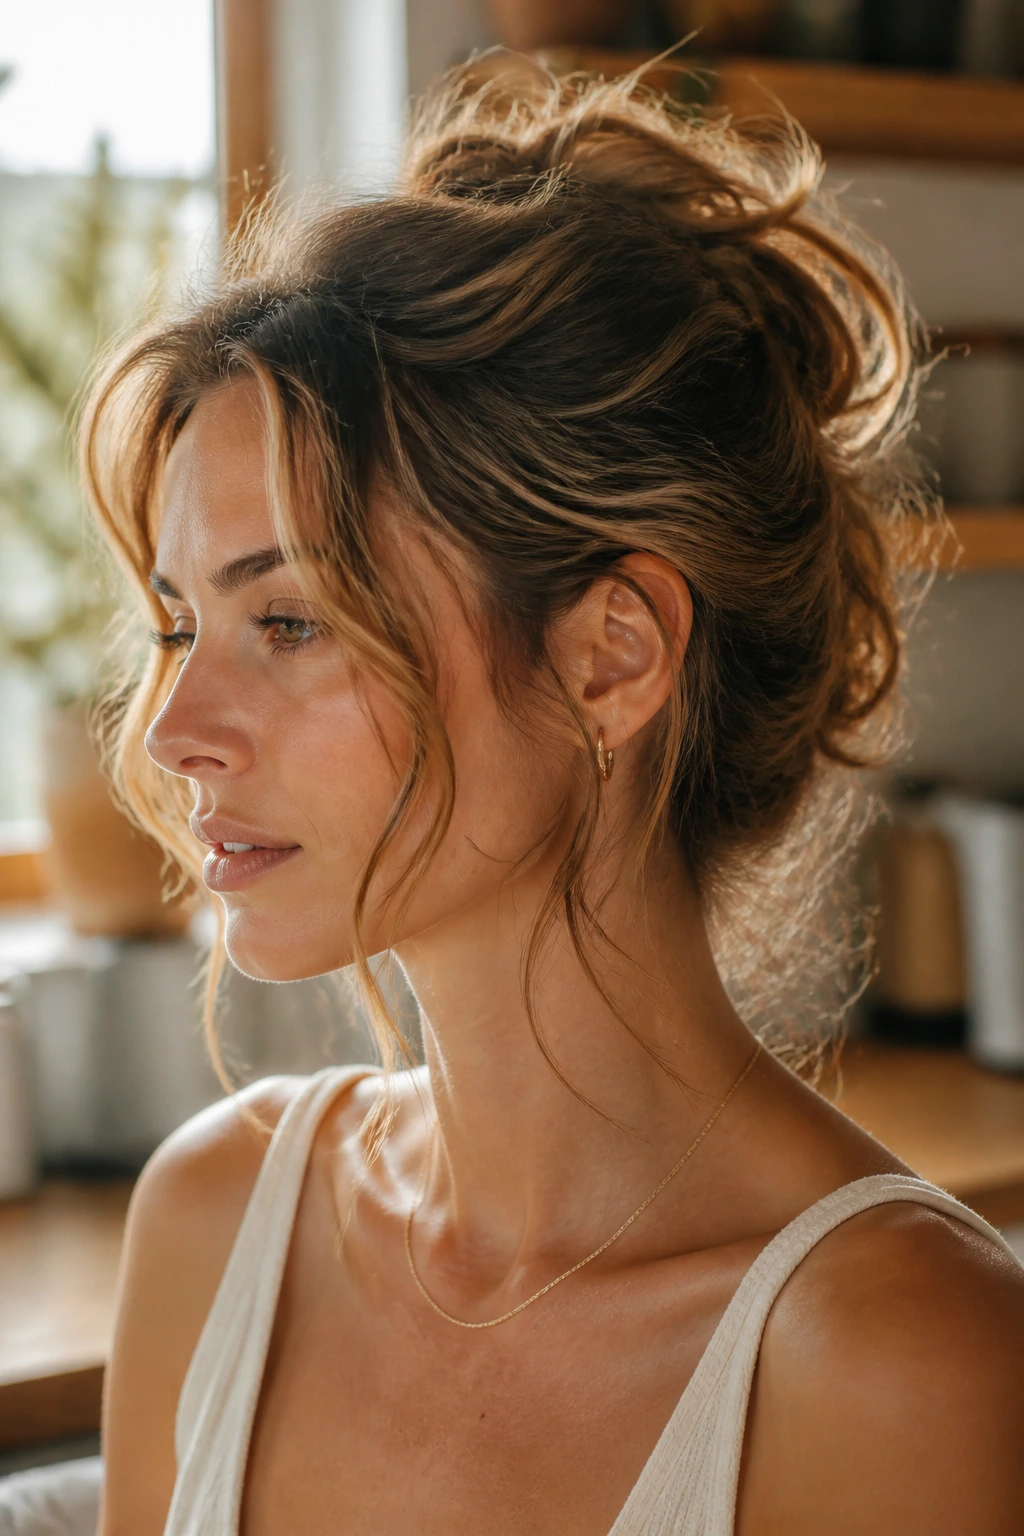
A messy bun with waves is one of those styles that looks accidental if you do it right. Pull the hair up loosely, twist it into a low or mid bun, and let the wavy pieces spill out around the nape and temples.
The trick is not to smooth everything first. Keep the texture. If the bun starts out too polished, it loses the relaxed feel that makes this style work. Leave the front soft and pull a couple of shorter pieces forward so the face isn’t fully exposed.
People often overthink buns. They don’t need to be tidy. They need shape. A few bobby pins and a coil of hair are usually enough, especially if the hair already has texture.
This style is good for days when your waves are halfway cooperating and halfway not. That’s most days, honestly. The bun gives the mess a place to go.
15. Textured Ends With a Slight Wet Look

A slight wet look on the ends can make tousled waves feel fresher and a little sharper. Not drenched. Not greasy. Just enough gloss at the ends to catch the eye while the roots stay soft and dry.
I like this on shoulder-length hair, where the shape needs a little edge to keep from disappearing. Apply a small amount of styling cream or gel to the last few inches, then scrunch lightly and leave the top pieces more natural. That contrast keeps the style from turning heavy.
Why It Works on Wavy Hair
Wavy hair already has movement, so a hint of shine at the ends makes the bend look intentional. The wet-look finish also helps the lower half of the hair clump in a nice way, which can be useful if the wave pattern tends to frizz out.
- Use a pea-sized amount of product first
- Focus on the bottom third of the hair
- Avoid the roots unless you want a sleeker finish
- Stop once the ends look glossy, not soaked
This is a style with a little edge. Not too much. Just enough.
16. Scarf-Tied Waves for a Casual Finish

A scarf can make simple waves look styled in seconds. Tie it low, wrap it around a ponytail, or use it as a headband over loose hair. The waves supply the texture; the scarf supplies the point of view.
The nice thing here is that the scarf does not need to match anything exactly. A silk scarf, a cotton one, even a narrow printed strip can work if the colors don’t fight the hair. Keep the waves loose and soft so the accessory doesn’t look like it’s competing with them.
How to Pin It
If you’re using the scarf as a headband, place it a half-inch back from the hairline and secure it under the hair at the nape with two pins. If it’s around a ponytail, tie the pony first, then knot the scarf so the fabric hangs a little unevenly.
This style works especially well with medium to long waves because the fabric adds movement without stealing the show. It’s a simple fix for hair that feels too ordinary.
And it saves a bad hair day fast.
17. Root-Lift Waves With Bigger Crown Volume

Root-lift waves are for people who like a little height and a little drama at the crown. The wave itself can stay soft and loose, but the lift up top gives the whole style more energy.
A root clip, a round brush, or even flipping the hair while it cools can help. What matters is letting the crown dry with space. If the roots are squashed flat from the start, no amount of curling will make the style feel airy later.
This is one of those looks that can turn flat hair into something much better. Not bigger for the sake of being big. Just more alive. The movement starts at the scalp, then falls into looser bends through the lengths.
A little dry shampoo at the roots can help hold the lift, especially on fine hair. Use it before things get too greasy, not after. That’s where it works best.
18. Flipped Side Part With Uneven Movement

A flipped side part gives tousled waves a slightly retro edge without locking them into a specific decade. One side lifts, the other falls, and the asymmetry gives the hair a bit of attitude.
This is a style I like when the waves themselves are soft but the haircut needs more personality. Flip the part, bend a few sections away from the face, and let the ends stay loose. The movement should feel a little uneven. Too much perfection makes the flip lose its charm.
What Makes It Different
Unlike a deep side part that aims for volume alone, the flipped version leans into shape. It draws attention to the front pieces and can make a simple cut feel sharper. A flat iron wave through the front sections can help if the hair refuses to cooperate with a rounder bend.
It’s especially useful on medium-length hair that needs some direction. Long hair can swallow the flip. Short hair can make it look too dramatic. Medium lengths are where it shines.
A quick finger-tousle after styling is usually enough. That’s the whole thing.
19. Wavy Pixie-Bob With Piecey Ends
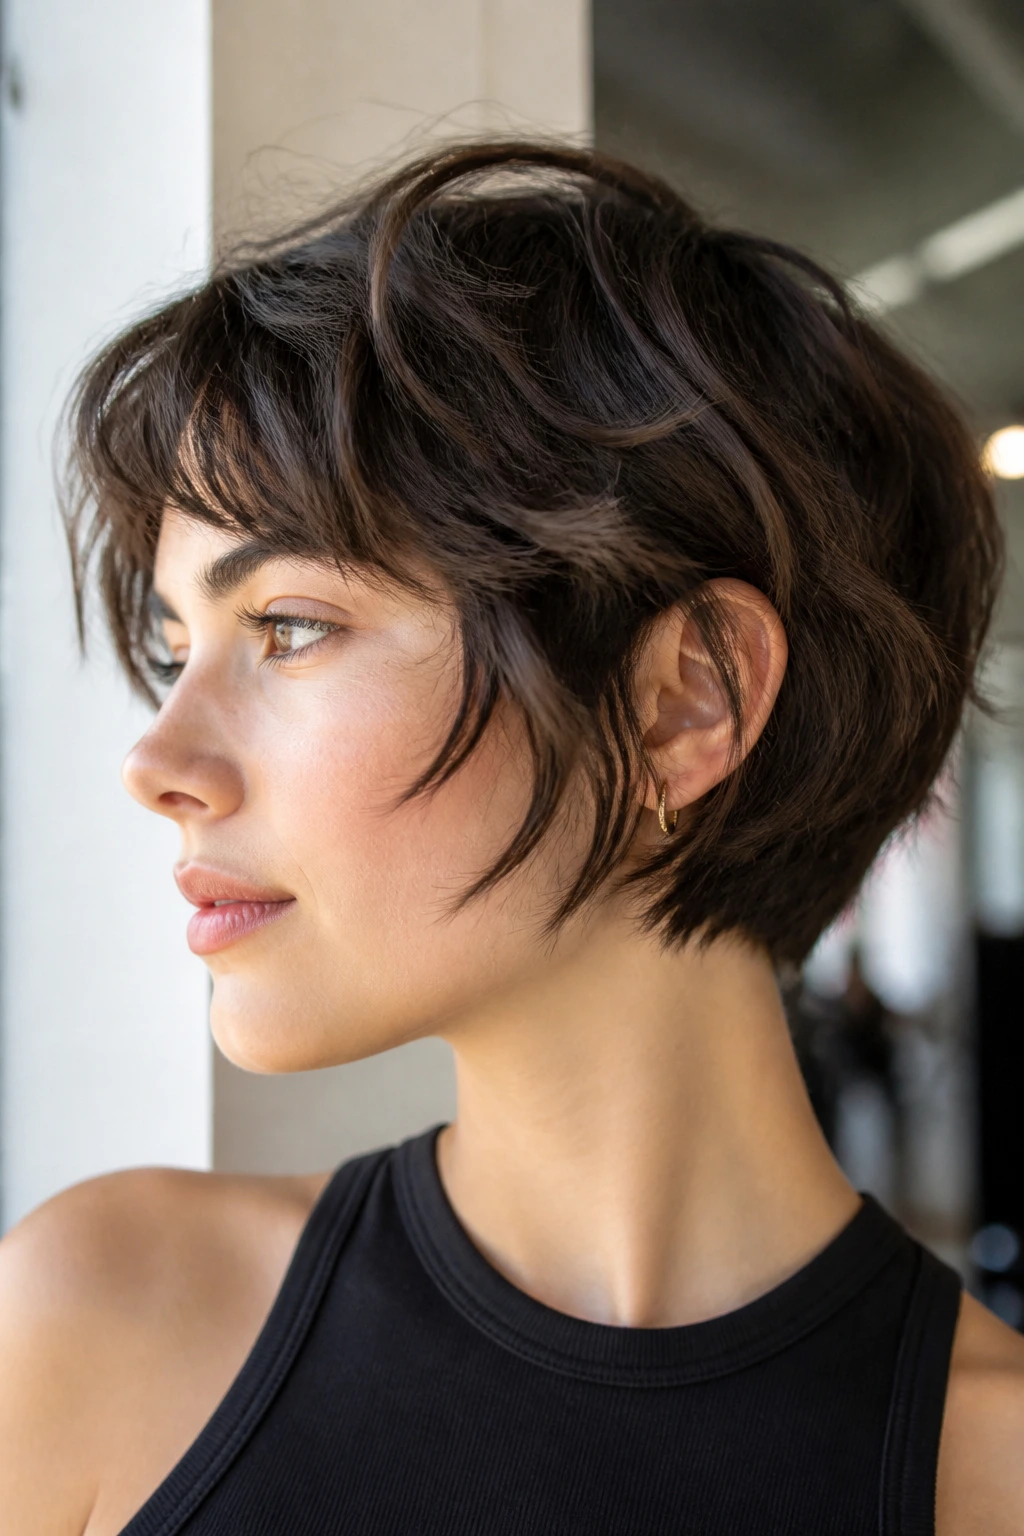
A pixie-bob with waves sits right between cropped and soft. It’s short enough to feel fresh, but long enough to keep movement around the face and ears. The piecey ends are the detail that keep it from looking helmet-like.
The style depends on separation. You want the strands to look distinct in places, not blended into one smooth mass. A dab of light wax or styling cream on the ends can help define the pieces. Use very little. Short hair punishes over-product faster than long hair does.
This cut suits people who want short hair without losing the softness waves provide. It’s also a good one for hair that naturally kicks out a little at the ends, because that shape can be used instead of fought.
And yes, it looks easy because it is. Shorter hair often needs less time, even if it takes a bit of trial and error the first few mornings.
20. Long Beachy Layers With Tucked Ends

Long beachy layers are the style most people picture when they hear tousled wave hairstyles, and for good reason. The layers keep the hair light, the waves keep it moving, and the tucked ends stop the whole thing from looking overly styled.
The tucked-ends part matters more than people think. If every strand is curled the same way all the way to the bottom, the look gets too neat. Leave the last inch or so straighter, or tuck the ends under slightly with the curling iron. That relaxed finish is what makes the hair look easy instead of staged.
A Practical Styling Habit
Work in large sections, not tiny ones. Big pieces create a softer bend, and softer bend is the entire point here. After styling, lean forward and shake the hair out with your fingers. It breaks up any obvious pattern before the waves cool into place.
This style is a crowd-pleaser because it works on so many lengths and textures. Thick hair gets movement. Fine hair gets the illusion of more body. Straight hair gets a little bend without going full curl.
If you want one tousled wave look that can carry you through a lot of situations, this is the one I’d keep near the top of the stack.
Final Thoughts
Tousled waves work best when they look a little imperfect on purpose. That usually means softer roots, uneven sectioning, and an end result that still moves when you turn your head.
The cut matters more than most styling tutorials admit. A good lob, a layered shag, or a face-framing shape can make the styling part twice as easy. That’s the quiet truth behind a lot of hair that “just falls that way.”
Pick the version that matches your length and your patience, not the one that looks most dramatic in a photo. The easy-looking wave is usually the one that leaves a few things unfinished on purpose.
