



A good front braid changes the whole mood of a hairstyle. It puts shape right where people look first, and it can make even a plain ponytail, loose wave, or bun feel finished instead of accidental.
Front braid hair ideas women are trying tend to work because they do one smart thing: they frame the face without taking over the whole head. That matters. Too much braid around the hairline can look stiff or feel tight by lunchtime, while the right amount gives you lift, polish, and a little personality. The difference is usually in the parting, the tension, and where the braid ends.
I keep coming back to that last part. Where the braid ends tells you whether the style feels soft or severe. A braid that vanishes into a bun reads differently from one that trails into curls, and a tiny braid tucked behind the ear does a completely different job from a bold cornrow running across the forehead.
1. Face-Framing Skinny Braids Over Soft Waves

A couple of skinny braids at the front can do more for loose waves than a full head of styling ever could. They give the hair a focal point, and they make the face look framed instead of covered.
Why this one works so well
The trick is keeping the braids narrow. Think pencil-thin, not chunky. A clean middle part or soft side part helps, but the braids themselves should look almost delicate next to the waves.
This style is especially nice if your hair already has bend or texture. The braid gives the eye a line to follow, while the loose lengths keep the whole thing from feeling too precious. It’s one of those looks that reads as styled even when the rest of the hair stays relaxed.
- Best on shoulder-length hair or longer
- Works with natural waves, curling wand waves, or heatless bends
- Looks cleaner when the front pieces are smoothed first
- Stays softer if you leave a little face-framing curl out near the temple
My favorite detail: start the braid about half an inch back from the hairline. That tiny gap keeps the front from looking too tight, and it is the difference between “pretty” and “why does my forehead feel pulled?”
2. A Deep Side Braid Swept Across the Forehead

A deep side braid can make a face look instantly softer, and I mean that in the best way. It moves the braid line diagonally, which always feels a little more flattering than a straight, rigid path down the center.
Start the braid above one temple and sweep it across the forehead before feeding it into the rest of the hair. You can keep it as a French braid, or switch to a Dutch braid if you want the braid to sit more visibly on top. Either version gives you that swept, curved line people notice right away.
It works especially well on layered cuts. Shorter front pieces blend into the braid more naturally, and longer layers can be tucked behind the ear once the braid is secured. I like this one on days when hair looks a little flat and needs direction. A side braid gives the whole head a shape.
If you want extra hold, mist the front section with a light styling spray before braiding. That helps the strands stay together without turning them stiff. Too much product is a mess, and you can see it in the braid instantly.
3. Two Front Braids Along the Part

Why do two slim front braids keep showing up in braid inspo? Because they solve the awkward part of loose hair styling: the front pieces. Instead of letting those pieces float around and frizz up by noon, you braid them into something that stays put and still looks light.
How to wear it
Part the hair down the middle, then take one small section from each side right at the front hairline. Braid each piece straight back and either stop at the crown or feed the braids into the rest of the hair. Keep the sections small; if they’re too wide, the style loses that neat, crisp line.
This works on straight hair, curls, coils, and protective styles. The only real rule is to match the braid size to the density of the hair. Fine hair usually looks better with tiny braids. Thick hair can handle slightly wider ones.
A little mousse before sectioning helps. So does a fine-tooth comb. Not a lot else is needed.
- Small braids keep the look clean
- A center part makes the style feel symmetrical
- A side part makes it softer
- Clear elastics or tucked ends keep the front from unraveling
Best move: braid both sides at the same tightness. If one side is tighter than the other, you’ll notice it every time you look in a mirror.
4. Cornrow Peekaboo Braids With a High Puff

This is the style for someone who wants structure at the front and freedom everywhere else. The front rows do the neat work, and the puff carries the rest. Clean in front, full at the crown. That contrast is the whole point.
Usually, two to four cornrows at the front are enough. More than that can start to feel busy unless the rows are very small and spaced well. Once the front is braided, the remaining hair can be gathered into a high puff, a high bun, or a curly ponytail. The front tells one story; the back tells another.
I like this look on coily hair because it respects texture instead of fighting it. The braids lay flat where they need to, and the puff gives volume without forcing the hair into a shape it does not want. There’s a reason this style sticks around.
A satin scarf at night helps keep the front rows from frizzing up. You can also smooth a tiny bit of gel along the part lines when styling, but don’t drown the scalp in product. Scalp buildup is not cute, and it makes the rows look dull fast.
5. Braided Bangs With Curled Ends

Braided bangs are one of those styles that look fussy in theory and surprisingly easy in real life. The braid acts like a fringe, only more controlled, and the curled ends keep it from feeling sharp.
This one works best when the braid starts near one eyebrow and crosses lightly across the front. Don’t drag it too low over the eyes. The sweet spot is high enough to show the shape of the face, but low enough to soften the forehead. Once the braid reaches the temple or side part, leave the ends out and curl them with a wand or small flexi rods.
It’s a nice choice for layered hair because layers make the braid blend instead of sitting like a separate piece. That blend matters. A braid that looks bolted on always feels a little off.
This style has polish without acting too serious. Wear it with a dress, wear it with a T-shirt, wear it with a blazer if you want to make a plain outfit feel less plain. It does not need much else.
6. Halo Braid That Starts at the Temple
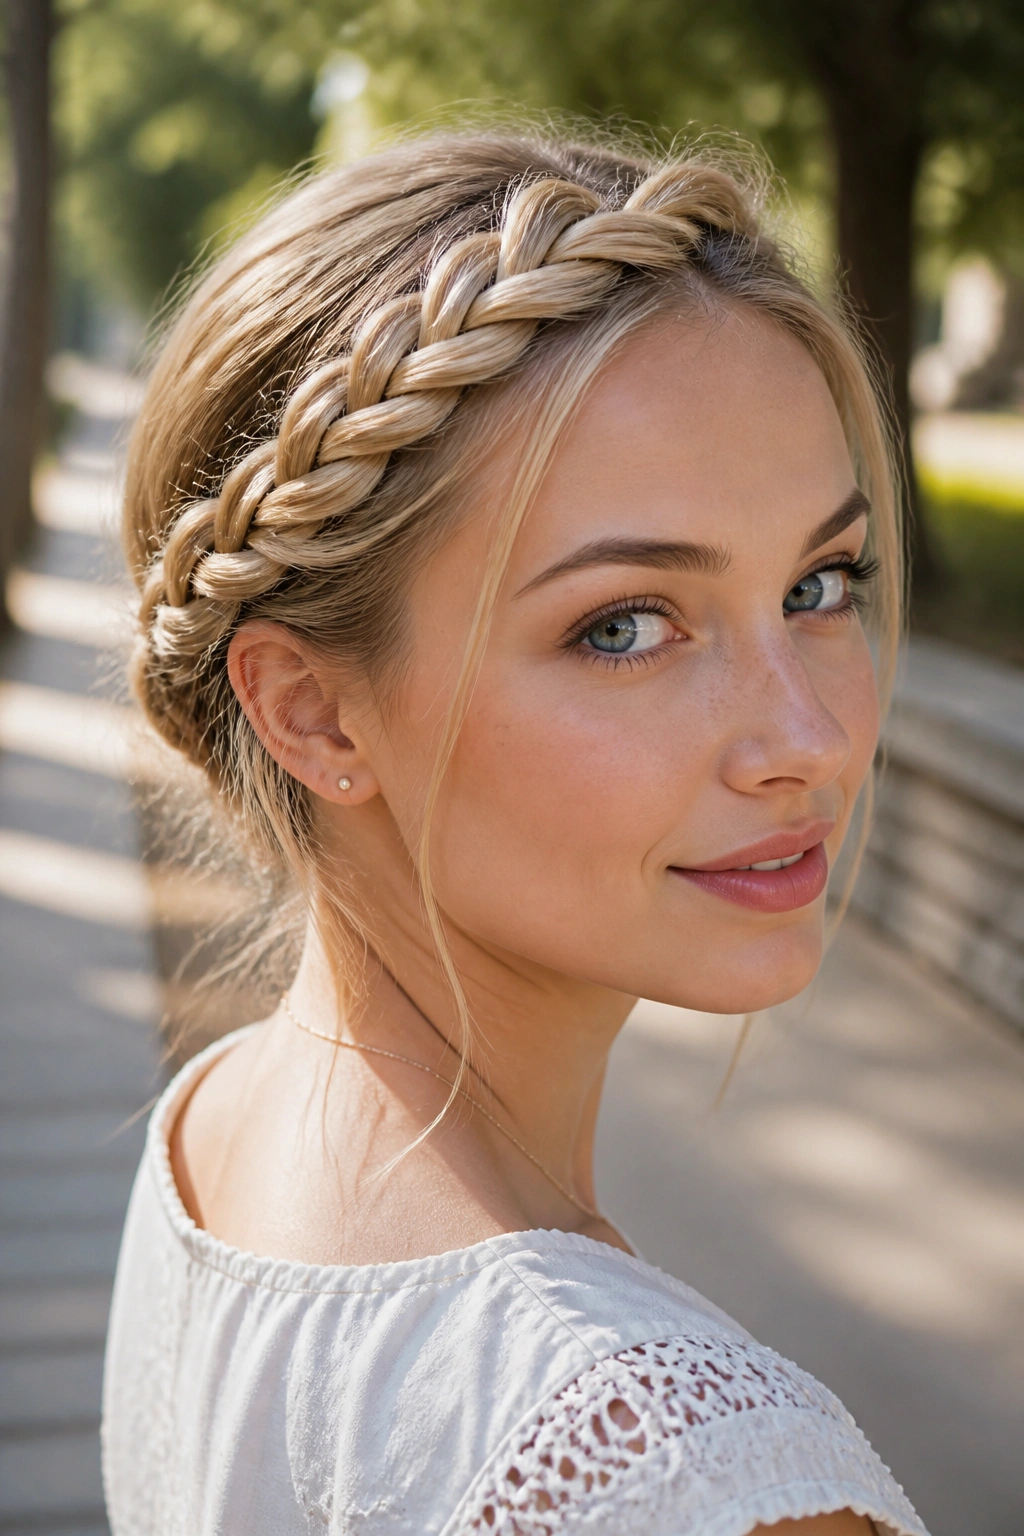
A halo braid starting at the temple feels lighter than a full crown braid, and that’s why I prefer it for everyday wear. A complete wrap can look heavy fast. This version keeps the front visible and lets the braid act like an accent rather than a helmet.
The braid usually begins near one temple, moves across the front hairline, and either stops at the opposite side or continues into a pinned loop. That open crown gives the style some air. You still get the pretty arc around the face, but the top doesn’t get crowded.
What makes it different
Unlike a full halo, this version leaves room for volume at the crown. That matters if your hair is fine or if you want the rest of the style to stay a little loose. It also works better when you’re not in the mood for a full pin-up look.
A few bobby pins placed under the braid every couple of inches help it stay put. Cross them in an X if your hair is slippery. Straight hair usually needs more pinning than textured hair, which has a little grip of its own.
My pick: use this style when you want braid detail but still want movement around the face. It has a softer edge than a full crown, and that softness is the reason it keeps getting copied.
7. Two Front Dutch Braids Into a Low Bun

If you want clean lines, this is the one. Two front Dutch braids give the face a sharp frame, then the low bun keeps the rest of the style calm and controlled. It looks intentional from every angle.
Dutch braids are braided under, which makes them sit on top of the hair instead of sinking into it. That raised look is what gives the front so much shape. Once the braids reach the nape, gather everything into a low bun and pin it close to the head. Loose buns can work, but a neat one usually suits the front braids better.
This is a solid protective-style choice when you need your ends tucked away. It’s also one of the few front braid looks that can pass easily from errands to dinner without needing a second round of styling. Clean, fast, done.
Keep the braid tension even from root to end. One side should not feel tighter just because your hands got tired halfway through. That mistake shows up right away in the mirror.
8. Tiny Accent Braids Mixed Into Natural Hair

Can a few tiny braids change the whole feel of natural hair? Absolutely. They add rhythm to curls and coils without stealing the show from the texture itself.
How to keep them from looking random
Place them where the eye naturally lands: near the part, close to the temple, or just beside the front curls. If you scatter them without a plan, the style gets messy in the wrong way. Three tiny braids usually look more polished than six.
A little bit of styling cream or water-based leave-in helps the sections stay smooth while you braid. You do not need heavy gel unless your hair is very slippery. Even then, a thin layer is enough. Too much product makes small braids sticky and hard to separate later.
This is a nice move if you like your hair mostly down but want one detail that feels intentional. Beads work. So do small cuffs. A bare braid works too, and honestly, that’s often my favorite version because it lets the texture do the talking.
- Best placed near the front or temple
- Easy to mix with twists or wash-and-go curls
- Good for short-to-medium lengths
- Looks strongest when the braids are all the same thickness
9. Fishtail Front Braid Across One Shoulder

A fishtail braid is one of those styles that looks complicated from a distance and almost casual once you get your hands into it. The tiny crossover pattern creates a dense, textured braid that feels a little more special than a standard three-strand version.
When you bring a fishtail across the front and let it fall over one shoulder, the shape becomes the point. It works especially well on hair with highlights, because the woven pattern shows off color shifts strand by strand. On plain dark hair, the braid still reads nicely, but dimension makes it even better.
This style likes hair that has a little grip. Freshly washed, very silky hair can slide apart while you’re braiding. Second-day hair, or hair with a bit of texture spray, usually behaves better. Not glamorous advice. True, though.
Pull the braid apart a little once it’s secured if you want a softer finish. Don’t overdo it. A fishtail can go from elegant to fuzzy in about ten seconds if you tug at every loop. Small adjustments are enough.
10. Rope Braid Headband With a Sleek Middle Part

A rope braid across the front acts like a built-in headband, and that’s exactly why it works. It keeps the front clean, smooths the hairline, and gives you one neat line instead of a pile of loose pieces.
The look starts with a middle part or slightly off-center part. Then you twist two sections together, rather than weaving three strands, and pin them across the front of the head from one side to the other. The twist sits close to the scalp and can disappear into the hair near the ears if you want a subtle finish.
I like this on shorter hair that does not quite have the length for a long braid, but still needs front detail. It also works on straight hair that slips out of standard braids. Twists often hold better than people expect. They just need a few pins in the right places.
A shine cream helps here more than a thick gel. You want the front to look smooth, not wet. The contrast between the sleek front and the rest of the hair can be really sharp in a good way.
11. Feed-In Front Braids Into a High Ponytail

A high ponytail with feed-in front braids gives you lift and braid detail at the same time. That balance is the appeal. You get structure near the hairline, then all the drama sits higher up where it belongs.
Feed-in braiding starts with a tiny section and adds hair gradually, which creates a clean, tapered base. That makes the front look smoother than a braid that begins thick right away. Once the braids reach the crown, gather the hair into a high ponytail and secure it with a strong elastic. Wrap a small piece of hair around the base if you want to hide the tie.
Why it stands out from a plain ponytail
Unlike a standard ponytail, this version gives the front a frame that lasts all day. The braids also help keep the hairline controlled, which is useful if your front layers tend to slip free the minute you move. It’s a sharper look, but not a rigid one.
Best for long hair or extensions. Shorter hair can still do it, but the ponytail will sit smaller and the front detail will carry most of the style. That is fine if you want the face-framing part to be the star.
12. Zig-Zag Part With Two Front Braids
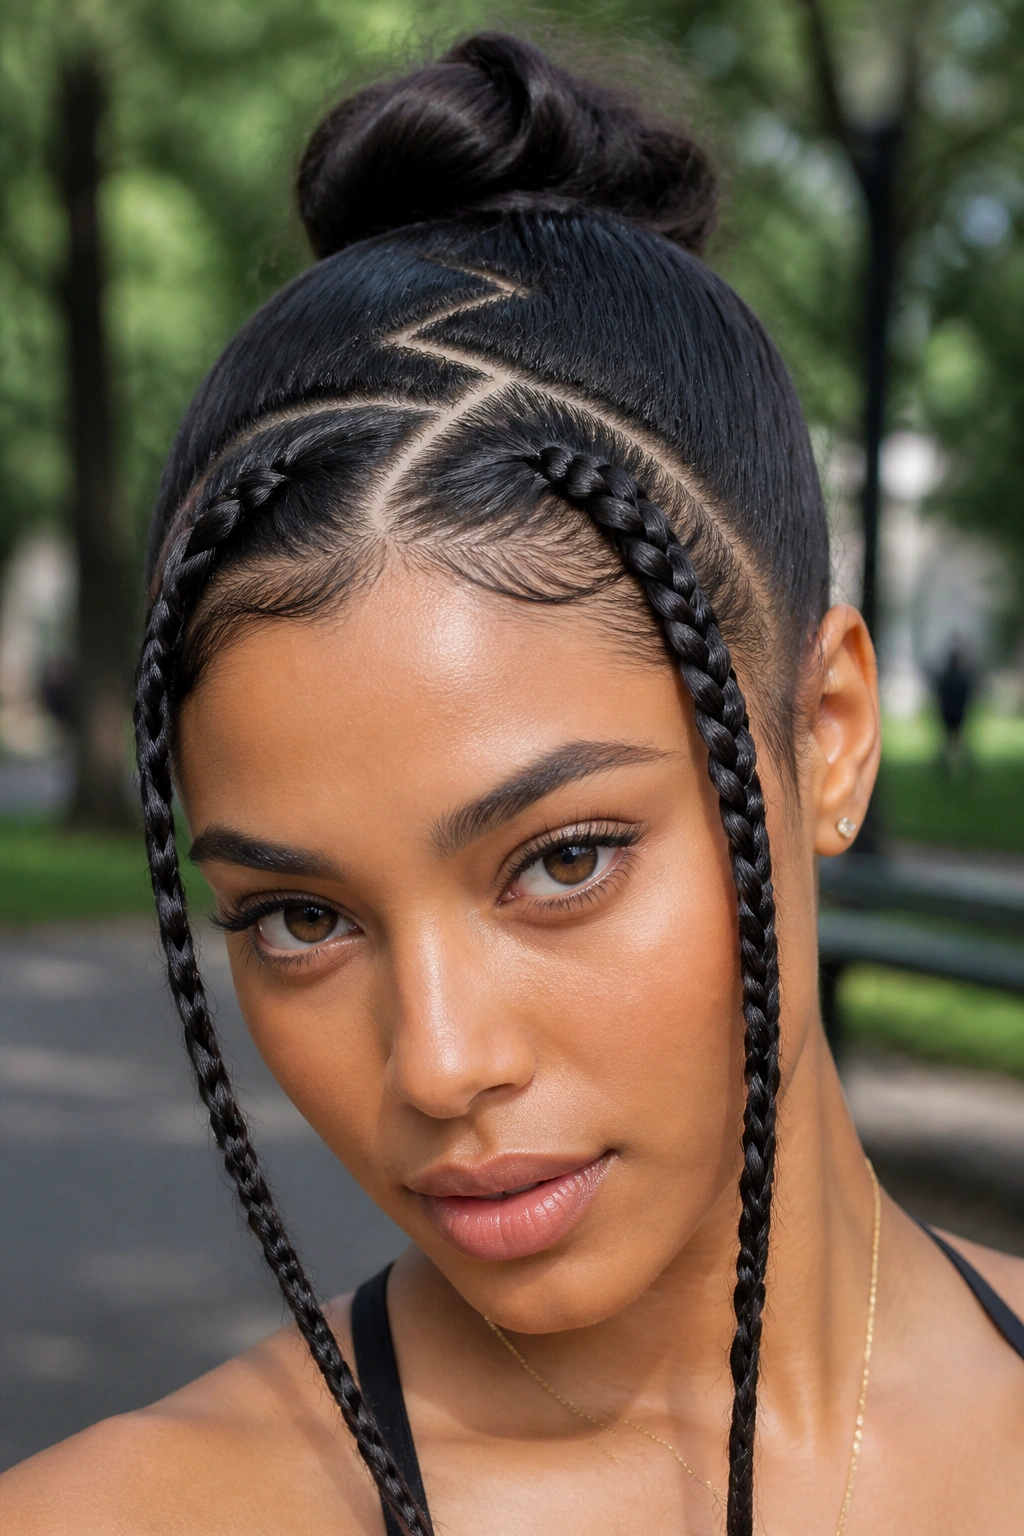
A zig-zag part does more than people expect. It turns the front of the style into a design element, and once the part lines are shaped right, even simple braids feel more deliberate.
Use a rat-tail comb to draw the part in small angles instead of one straight line. Then braid two front sections along the edges of that pattern. The result is sharp, graphic, and a little playful without becoming costume-y. That balance is rare.
This style asks for patience. You cannot rush the parting and expect it to look good. If the zig-zag is uneven, the whole front looks off. If it is clean, though, the effect is strong even before you finish the braids.
It works well with a sleek ponytail, a bun, or loose hair. I’d avoid this one if you want a style that disappears into the background. It will not. And that is the point.
- Use a fine rat-tail comb
- Spray the part lightly with water or setting foam
- Keep the angles small and even
- Pin the braids flat if you want the pattern to stand out
13. Braided Crown With Loose Curls Underneath

Why do crown braids keep hanging around? Because they do a very specific job: they lift the front hair away from the face while leaving the rest soft and touchable. That combination is hard to beat.
How to keep it soft
The braid should start at the temple and arc only across the front third of the head, not wrap so far back that it swallows the style. Leave the curls underneath loose and defined. If the curl pattern is too tight, the braid can look stiff next to it. A larger barrel curling iron or a set of flexi rods creates a gentler shape.
This one looks best when the braid is slightly loosened after it is pinned. Not flopped apart. Just eased a little. That small move makes the braid feel less formal and more lived-in.
I like it for hair that needs a bit of structure up top but still wants movement through the lengths. Too neat and it loses the charm. Too loose and it starts looking unfinished. The middle ground is where this style lives.
14. Side Cornrows That End in Beads or Cuffs

A side cornrow with beads is one of the easiest ways to make the front of a style feel finished. The braid line gives shape, and the ends turn into decoration. That is a better use of accessories than piling them everywhere just because they exist.
Usually, two to four cornrows on one side are enough. More can crowd the face unless the sections are tiny and very clean. Once the braids are in, add beads, cuffs, or small rings near the ends. Gold cuffs give a sharp finish. Clear beads feel lighter. Wooden beads bring warmth and texture.
This style is strongest on natural hair, but it also works with added length if the cornrows are neat. I like the look when one side stays braided and the other side is left loose or swept back. That uneven balance gives the style a little edge.
- Gold cuffs for a dressier finish
- Clear beads for a lighter look
- Wooden beads for texture and weight
- Small rings if you want something subtle
The only thing I would skip is overloading the ends. One or two accent pieces per braid is enough.
15. Messy Front Braid Into a Low Knot

If polished styles feel too stiff, this one relaxes the whole face. A loose front braid leading into a low knot has a softer, more undone feel, but it still keeps the front under control.
Start the braid at the front hairline or slightly to one side, then guide it back into a low knot at the nape. After the knot is secured, pull the braid open a little with your fingers. Not a lot. Just enough to break the hard edges. The result should look relaxed, not lazy.
This works when you want something that can live in real life. Office? Fine. Dinner? Fine. Running around with hair out of your face? Also fine. It has enough shape to look styled and enough looseness to avoid feeling overdone.
A few face-framing strands help, especially if the braid is very neat. Too many loose pieces can make the front look fuzzy, so keep the release controlled. That restraint is what makes the style feel good instead of accidental.
Final Thoughts
The best front braid styles do not shout. They frame, balance, and hold the face in place without making the whole head feel overworked.
If you are choosing between these ideas, start with the one that matches your hair texture and your tolerance for upkeep. A tiny braid can be as polished as a big one if the part is clean and the tension is even. A loose braid can look more expensive than a tight one if it sits in the right spot.
One practical test helps more than people admit: take a quick photo from straight on, then another from slightly above eye level. The braid should still be readable. If it disappears from the front, move it forward a touch. If it feels too heavy, pull it back a little. That small adjustment is usually where the style stops being “nice” and starts looking right.
