



Curly bridesmaid hairstyles work best when they’re allowed to keep a little personality. Pull curls too tight and they go flat. Load them up with too much heat and spray, and they lose the soft movement that makes curly hair look rich in the first place.
The sweet spot is somewhere in the middle: structured enough to last through photos, hugs, and dancing, but loose enough that the curls still look like curls. That matters in wedding hair more than people admit. A style that looks fine for the first twenty minutes and then droops at dinner is not a win. It’s just a temporary truce.
Different curl patterns need different handling, too. Loose ringlets, dense coils, and shoulder-length bends do not behave the same way, even if they’re all technically “curly.” A good bridesmaid style works with the texture on the head, not the texture you wish were there, and that little distinction changes everything.
1. Half-Up Twists for Curly Bridesmaid Hairstyles
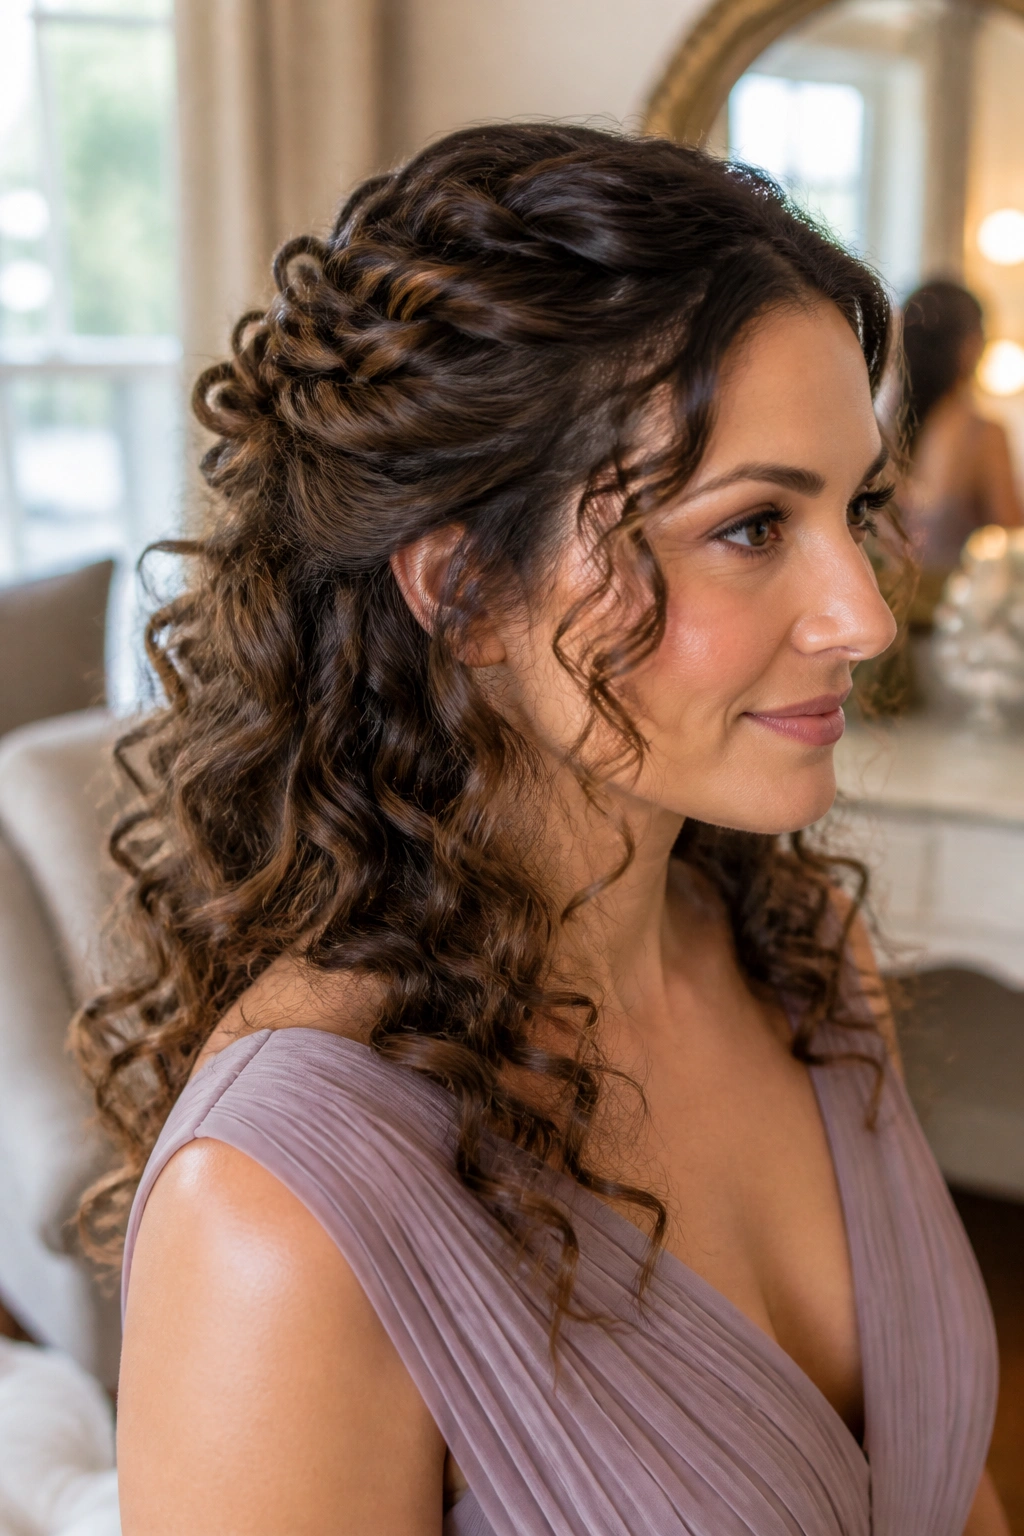
Half-up twists are the style I keep coming back to when a wedding calls for soft but polished hair. They hold shape, they flatter almost every face, and they let the length do its thing instead of stuffing it into a pin-heavy updo.
Why it works so well
The twist takes the weight off the front of the hair without hiding the curl pattern. That means you still get volume through the back, which matters in group photos because flat curly hair can disappear against a dress or jacket. If the bridesmaid dress has lace at the shoulders or a little detail at the neckline, this style shows it off instead of covering it.
The trick is to gather only the top third of the hair. Pulling too much back turns it into a half-bun that loses the whole point. Keep the twist loose, secure it with two crossed pins, and let a few curls fall naturally around the temples. Clean. Easy. Finished.
Best for: medium to long curls, outdoor ceremonies, and dresses with open backs or detailed shoulders.
Watch for: if the crown is too tightly smoothed, the style can look stiff. Leave a little lift at the roots.
2. Side-Swept Curls with a Crystal Clip
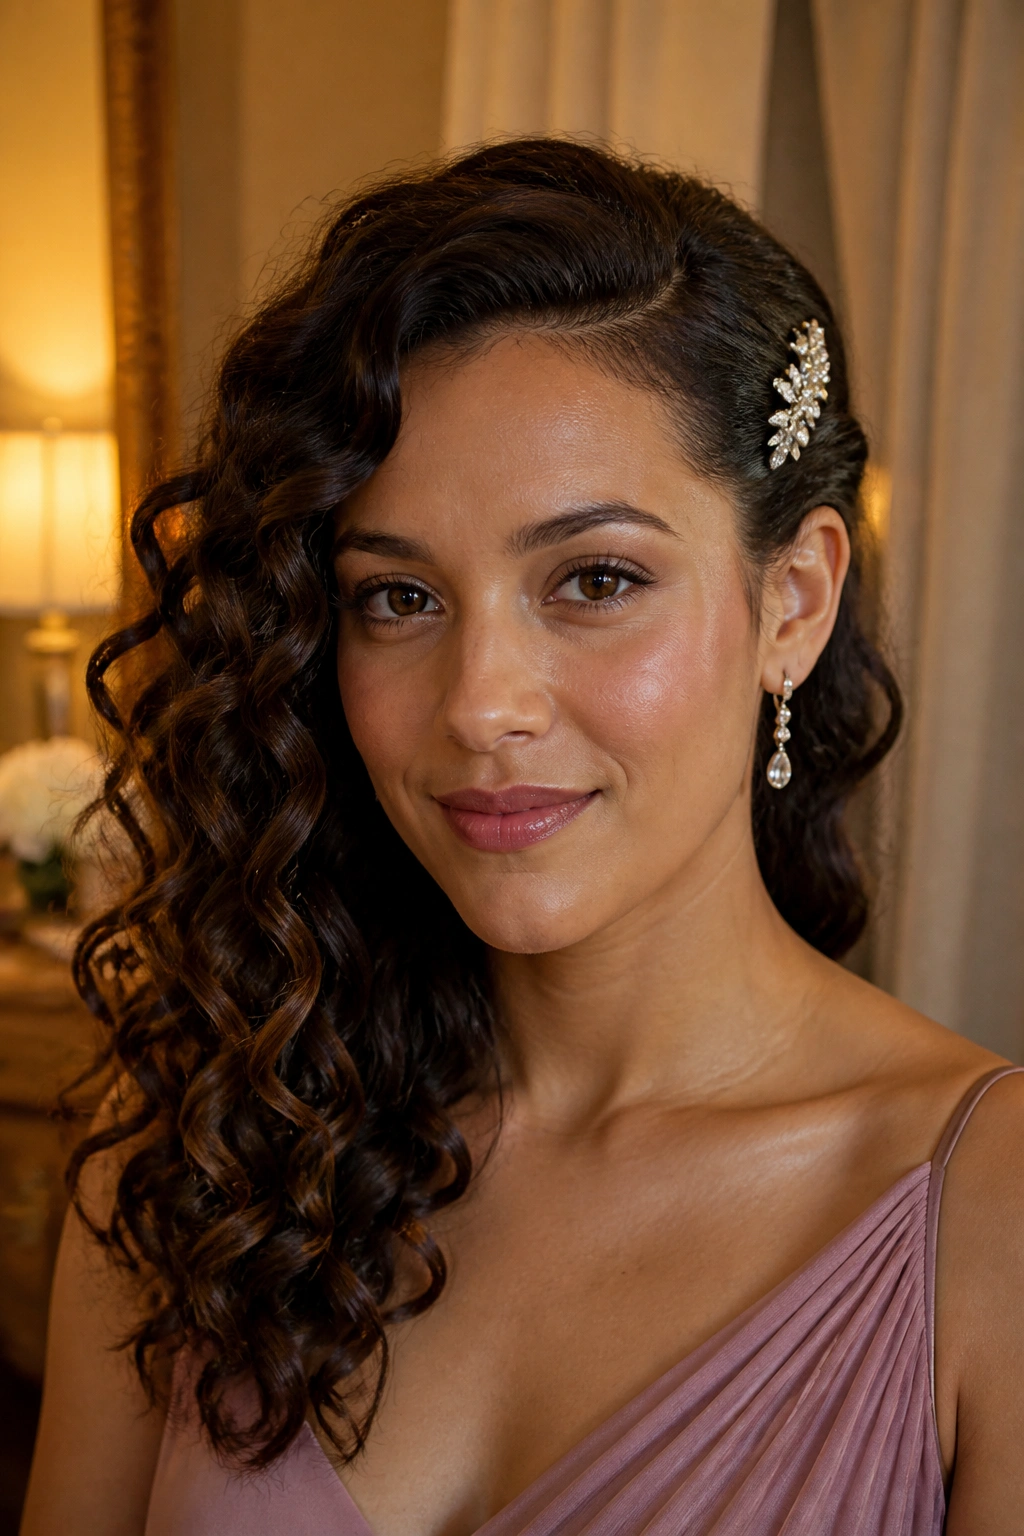
Need something dressy without turning the whole head into an updo? Side-swept curls solve that problem fast. They look especially good when one side of the dress has more detail than the other, because the hair can echo the shape instead of competing with it.
A deep side part gives the style its backbone. Sweep the heavier side back behind the ear and pin it low, then let the opposite side fall over the shoulder in soft waves or defined curls. A crystal clip works best when it sits about an inch above the ear, not tucked too far back where nobody can see it.
This is one of those styles that looks more expensive than it is. Not because it takes less effort — it does need good sectioning — but because the asymmetry feels deliberate. And bridesmaids love a style that holds up to movement. You can laugh, turn your head, and lean in for photos without the whole shape collapsing.
If the hair is fine, mist the roots lightly before sweeping it over. If it’s thick, pin the underside first and smooth the top last.
3. Low Curly Chignon with Face-Framing Tendrils
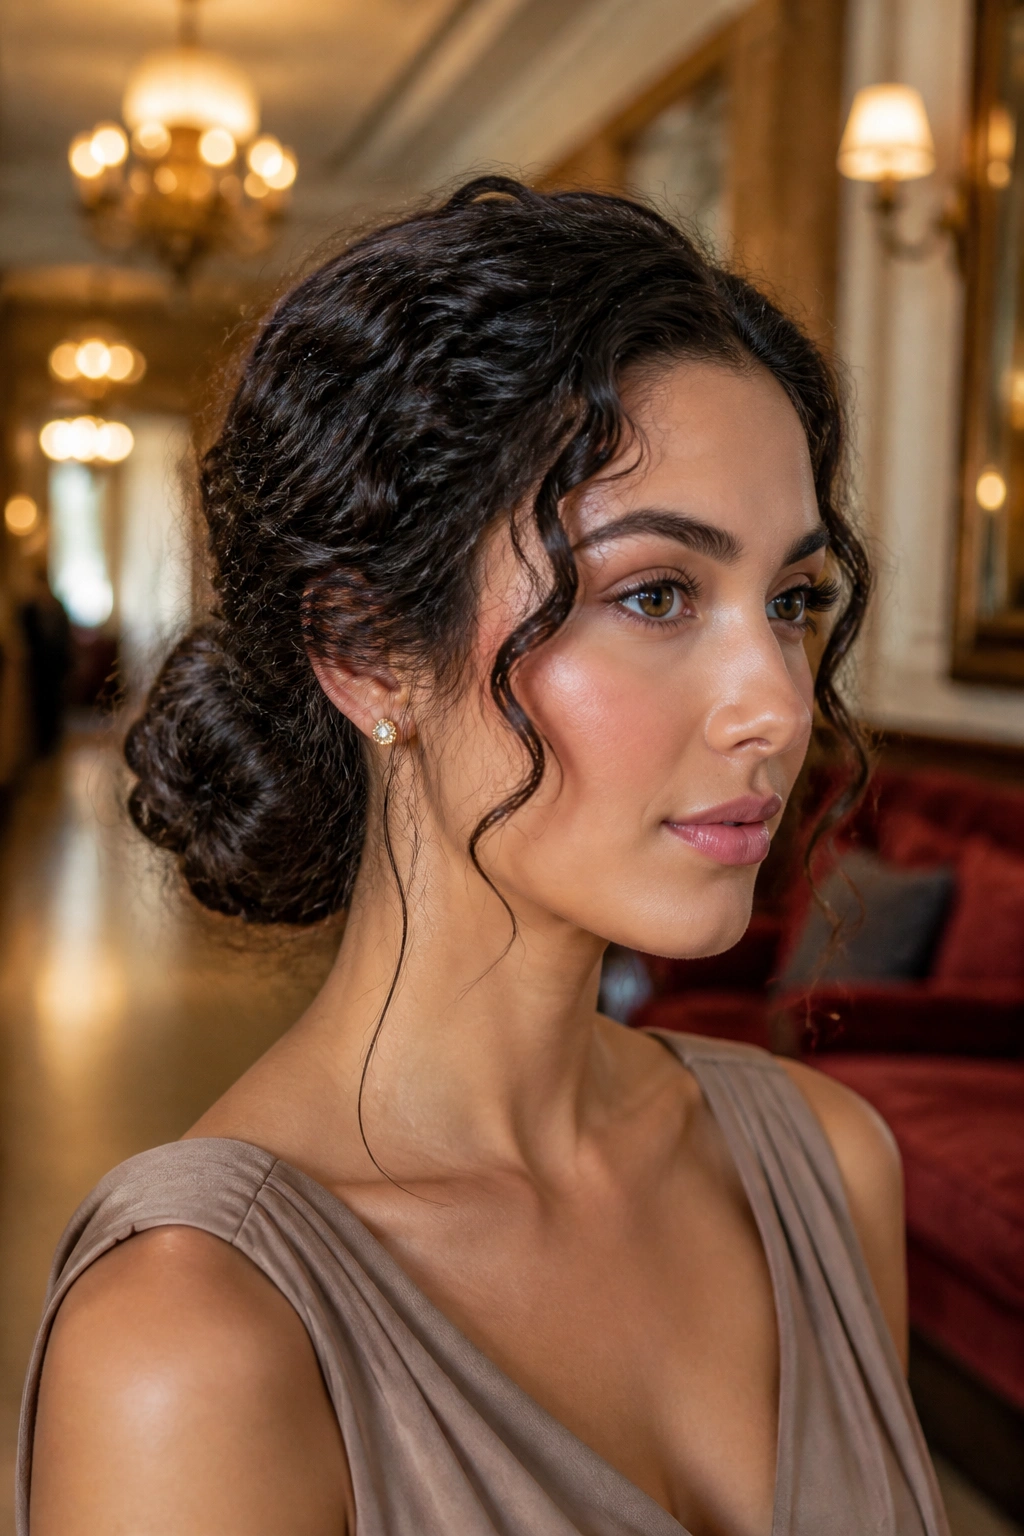
A low curly chignon is the style I’d pick for a formal evening wedding. It sits close to the nape, keeps the neck clear, and still leaves enough softness around the face that the whole thing doesn’t feel severe.
The best version isn’t scraped back into a hard knot. It has texture. It has a little lift at the crown and a few tendrils released near the temples. That small looseness matters. Without it, the chignon can look more like a dance recital bun than a wedding style.
What makes it stay put
The base should be anchored with hidden pins first, then wrapped with curl sections one at a time. That gives the bun structure without flattening the natural pattern. For thick curls, a stylist may need 8 to 12 bobby pins, depending on length and density. For looser curls, fewer pins usually work better because too many can make the shape bulky.
A good face-framing tendril is about the width of a pencil, maybe slightly thicker if the hair is dense. Anything larger starts to look unintentional. Anything smaller disappears.
This style plays nicely with pearl earrings, a high neckline, or a dress with a strong shoulder line.
4. Braided Crown with Loose Ringlets
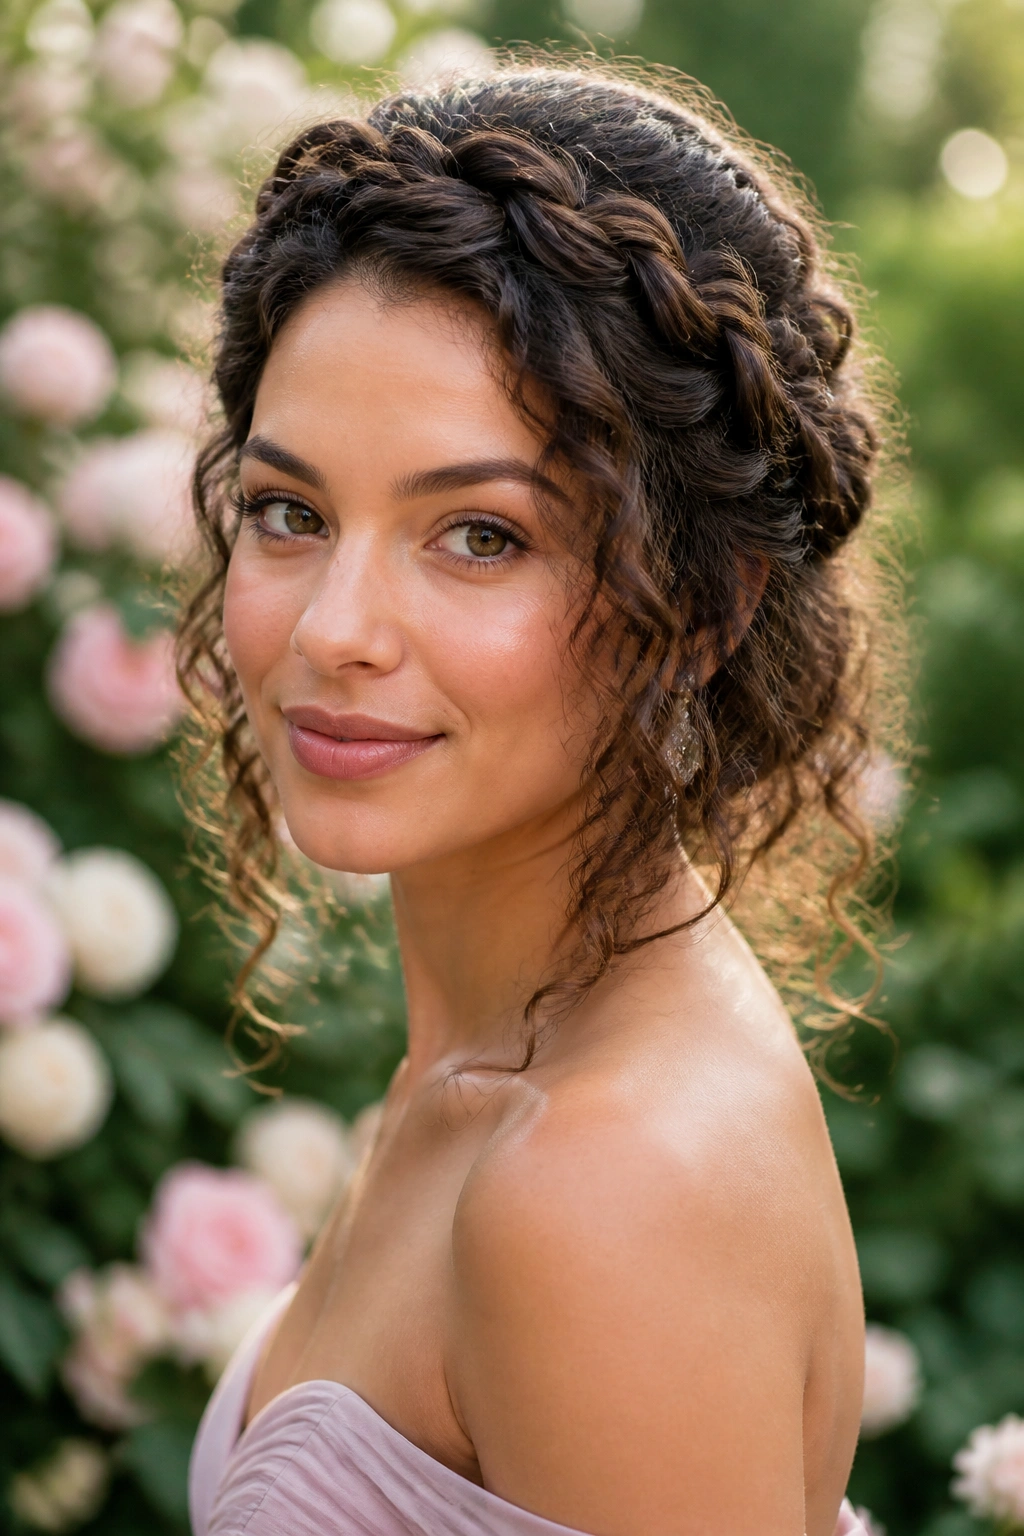
Braids do not have to make curly hair look strict. In fact, on bridesmaids, a braided crown can do the opposite: it gives the hair a frame and lets the curls stay soft everywhere else.
The braid can run from one temple across the top of the head to the other side, or it can wrap in two halves that meet at the back. Either way, the point is the same: create a little architecture without packing every strand into place. The curls that hang below should stay defined and free.
How to keep it soft
Start the braid a little below the hairline if the hair is layered. Starting too high makes short pieces stick out in a way that’s hard to control. A slightly relaxed braid is better than a tight one here, because tight braids can make the crown look flat and dated. Soft tension keeps the shape modern.
- Works well with medium-thick curls that need a secure top section.
- Keeps movement at the back instead of locking everything into place.
- Pairs nicely with small floral pins or a thin ribbon woven near the finish.
- Looks best when the braid is not pulled to the point of shine.
Pro tip: braid after the hair is fully dry. Wet curls stretch, then bounce differently once they dry, and that can change the whole shape.
5. Curly Ponytail with Polished Height
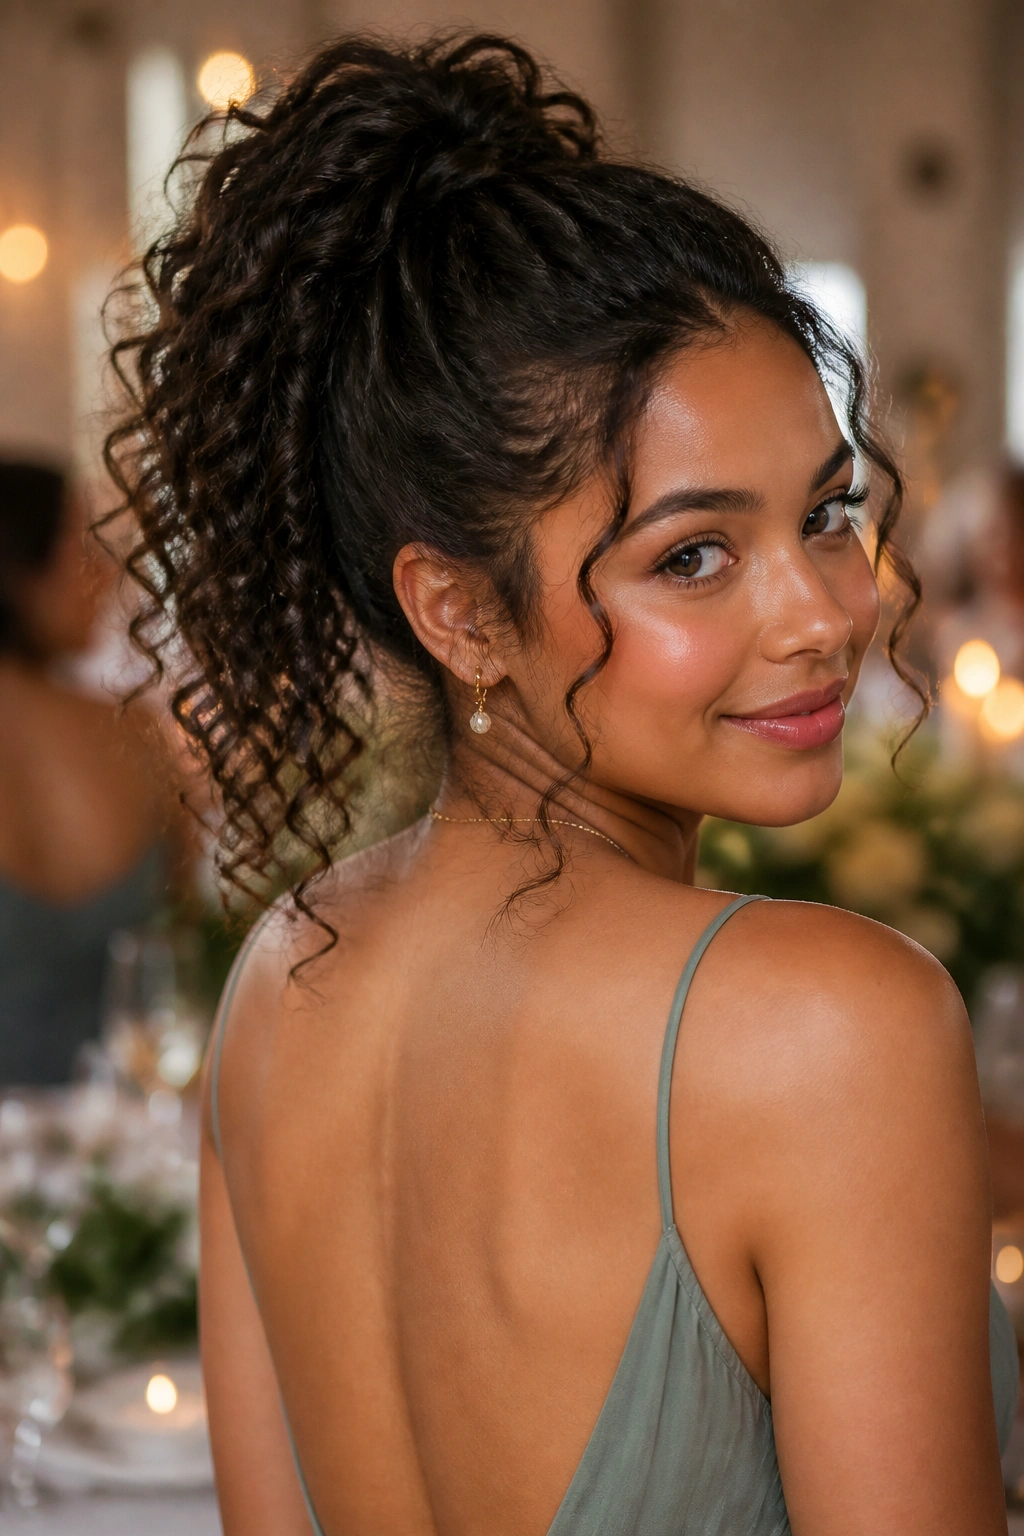
A lifted ponytail feels clean at the crown and springy through the ends. That combination is hard to beat at weddings, especially if the bridesmaid is wearing a dress with an open back or a high slit that deserves a little room to breathe.
The whole point is to keep the ponytail from looking like a gym style with a better outfit. It needs height at the crown, a tidy base, and curl definition through the length. Wrap a small section of hair around the elastic, pin it underneath, and let the curls fall in a loose cascade rather than a tight rope.
This one does especially well in warm venues because it keeps hair off the neck. It also gives earrings more space, which is one of those tiny details that changes the whole look in photos. If the curls are coarse or dense, a medium ponytail usually sits better than a high one. Too high and the weight starts to pull.
A polished ponytail still needs a little softness around the hairline. Skip the urge to smooth every baby hair away. A few wisps make the style feel human.
6. Old Hollywood Side Part with Polished Waves
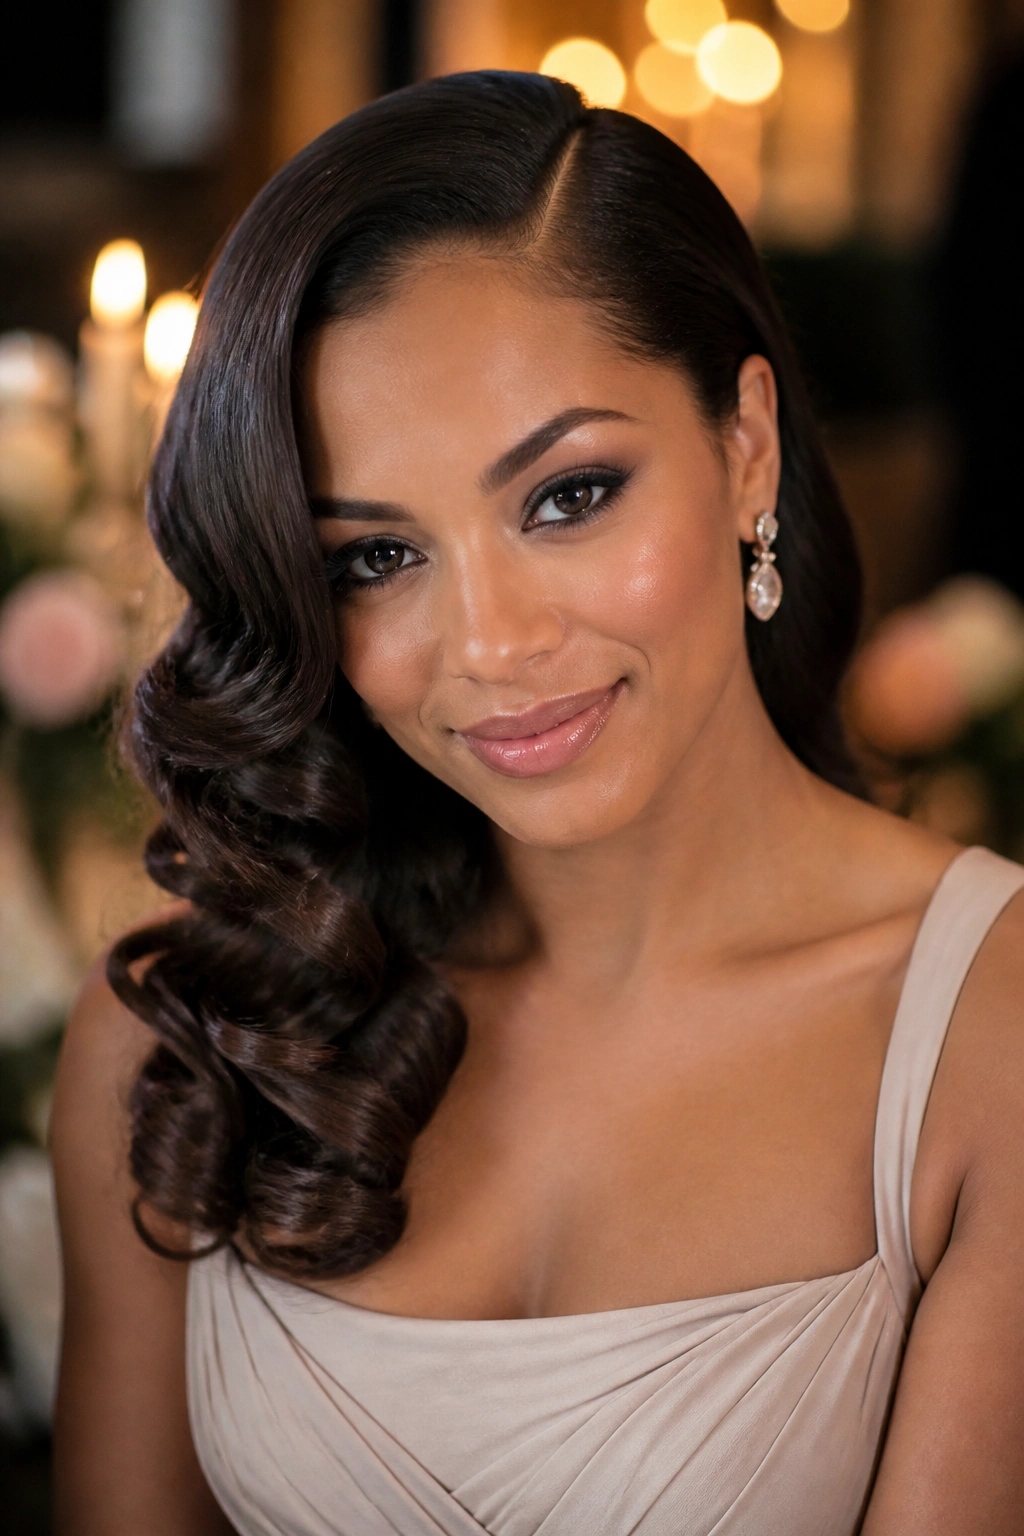
A side part with brushed-out waves has a certain old-school confidence to it. It looks especially good on bridesmaids wearing satin, velvet, or simple gowns that need a little hair drama to balance them out.
The style works because the wave pattern is controlled. Not stiff. Controlled. Curls are set, cooled, then brushed into smooth S-shapes that move together instead of separating into random loops. That’s the difference between “done” and “overdone.” The hair should still have body, just with cleaner lines.
This style asks for prep. A 1.25-inch curling iron or a set of hot rollers gives a better wave than trying to force naturally loose curls into submission. Once the hair cools, brush it lightly with a soft boar-bristle brush and shape the front over one shoulder. If you want shine, a tiny bit of serum on the ends is enough. A tiny bit. More than that and the waves collapse.
It’s not the best choice for very humid outdoor ceremonies unless the hair is pinned well underneath. Indoors, though, it reads beautifully in portraits and candlelight.
7. Twisted Halo with Floating Ends
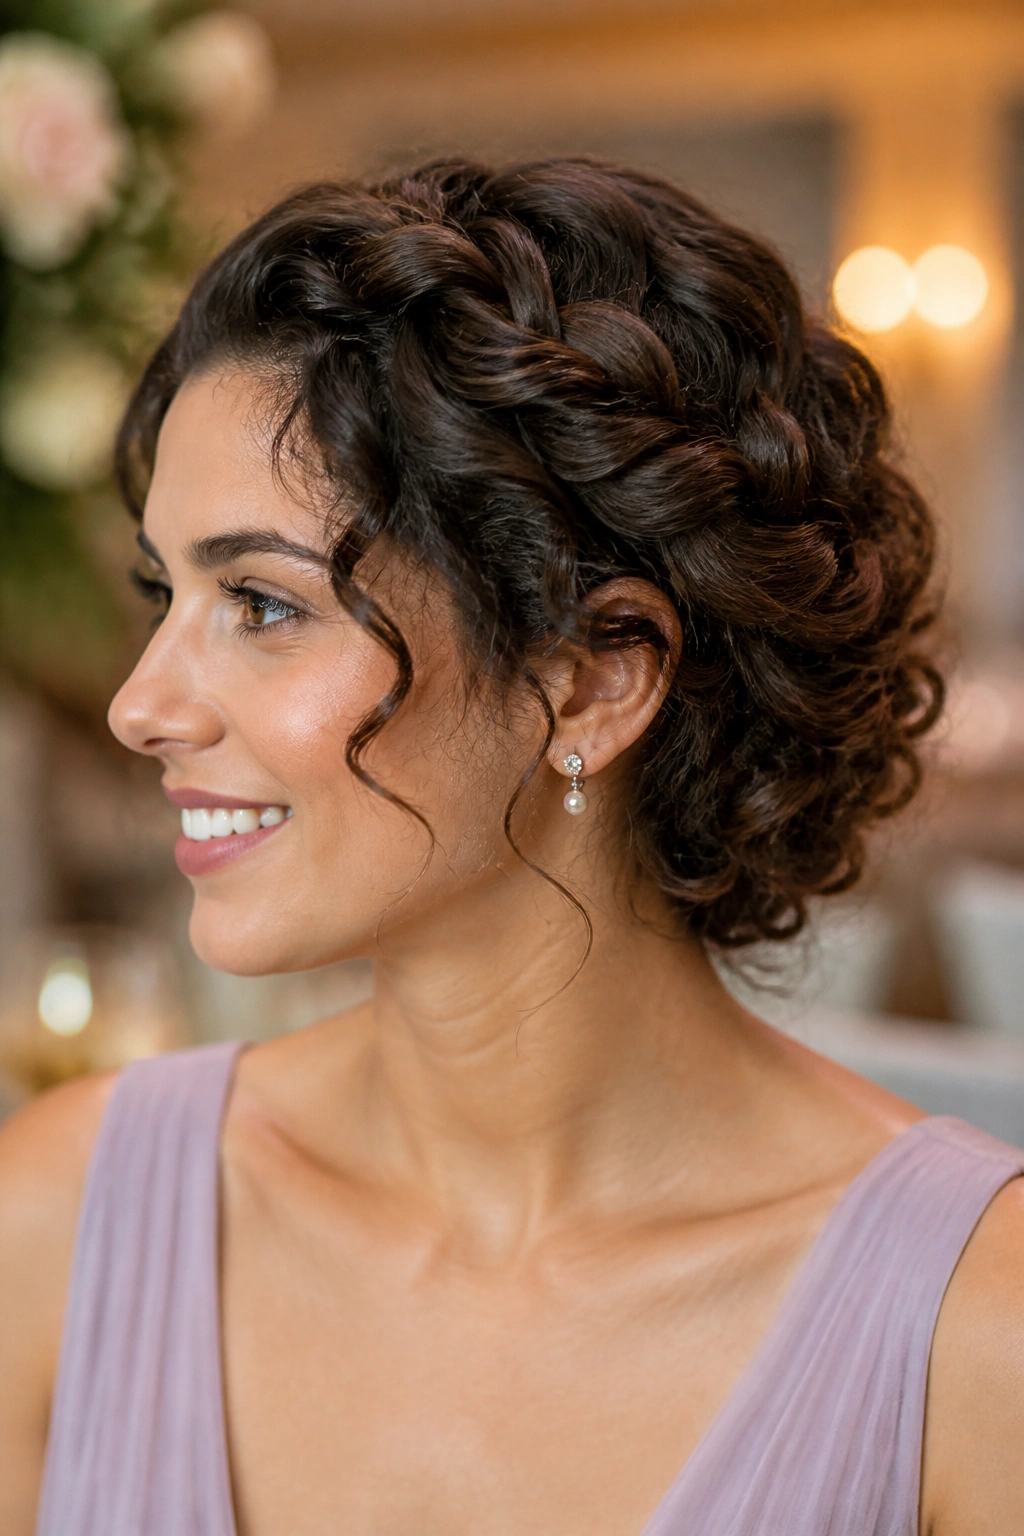
Want something romantic without building a heavy bun? The twisted halo is a smart answer. It frames the head, keeps the sides neat, and leaves enough curl at the back that the whole style still feels light.
The shape starts with two twisted sections from each side of the head. They meet near the back or slightly off-center, depending on the dress and face shape. The ends can be tucked under, pinned into a low knot, or left to drop in a soft swirl. I like the version that leaves a little movement in the ends because it avoids the helmet look that some halo styles get.
Key details that matter
- Keep the twists broad, not skinny, so they don’t disappear in thick curls.
- Pin into the base of the twist, not just the curl surface.
- Leave the crown slightly lifted for balance.
- Let two small pieces near the ears stay loose if the face needs softness.
This style works especially well for bridesmaids who want their hair off the face but not fully up. It also handles layered hair better than a lot of bun styles, because the twist can hide the shorter pieces.
8. Soft Curly Bun with Loose Tendrils
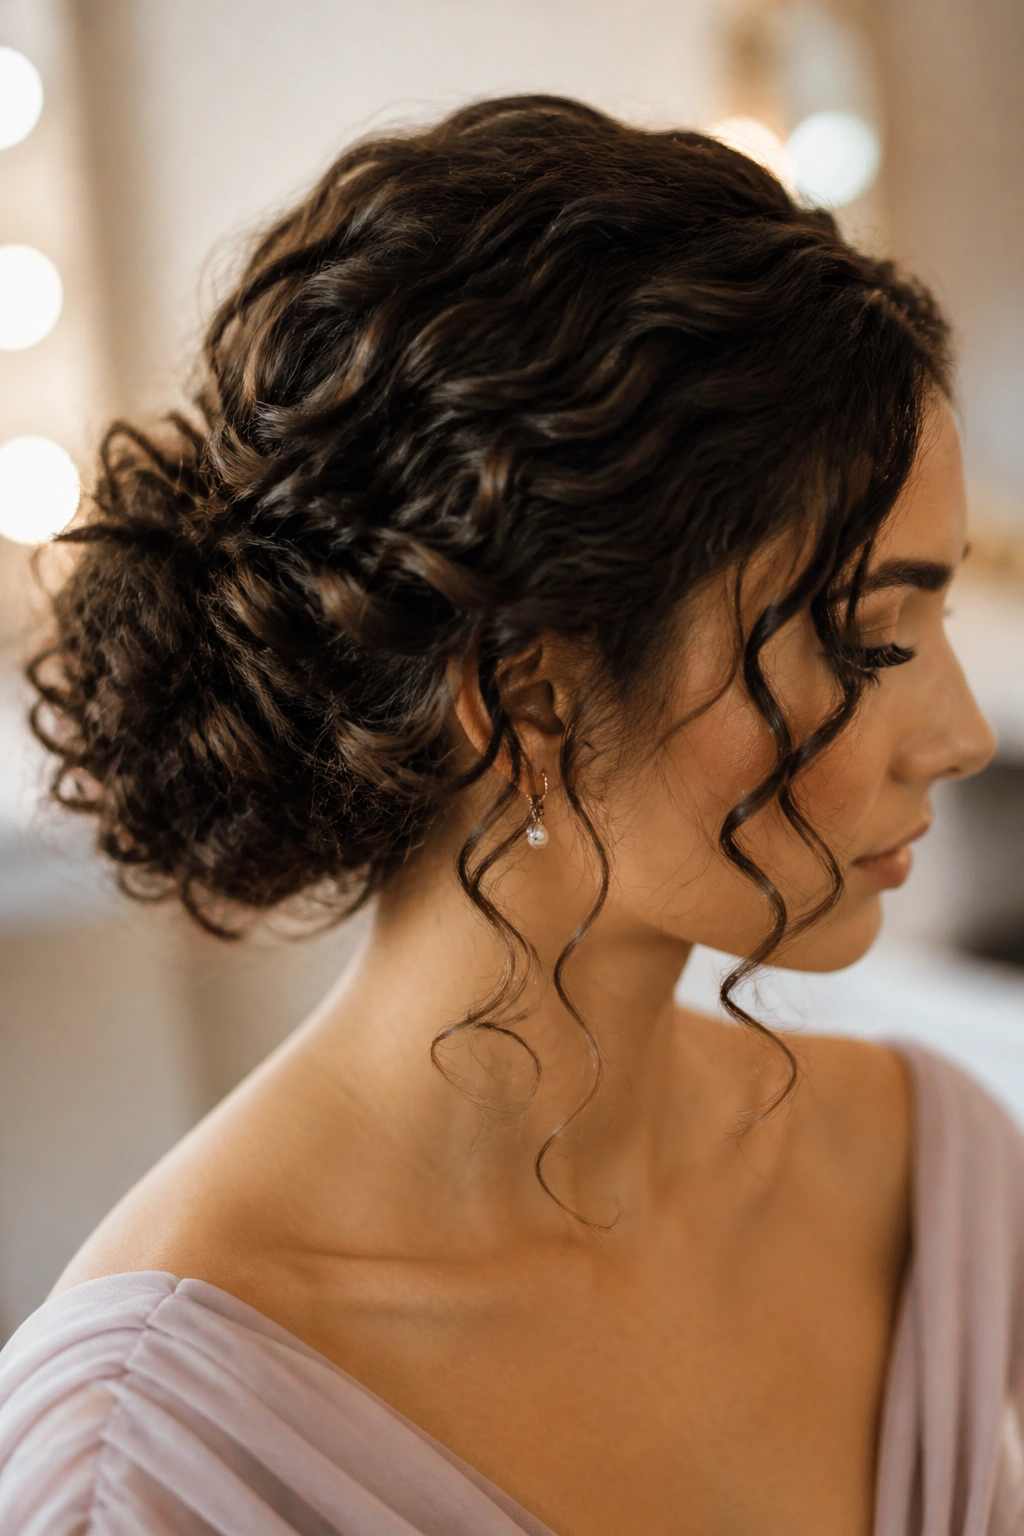
A messy bun can look polished if the base is clean. That’s the part people miss. If the bun is built from curls that were roughly pinned together with no shape, it looks like an afterthought. If it’s built with some intention, it becomes one of the easiest wedding styles to wear.
This version sits low or mid-height, depending on the neckline of the dress. The curls are gathered loosely, then pinned into a rounded shape that still shows texture. A few tendrils are left out around the jaw and nape, but not so many that the style starts to unravel visually. The bun should look soft, not fuzzy.
The best thing about this look is how forgiving it is. It can be a little fuller, a little smaller, a little more textured, and still work. That makes it useful for bridal parties where every head has a different curl pattern. One bridesmaid may need three pins; another may need ten. Same style. Different fix.
If the hair is freshly washed, use a light cream or mousse so the curl has some grip before pinning. Clean hair with no hold tends to slip.
9. Natural Coils Styled with Jewel Pins
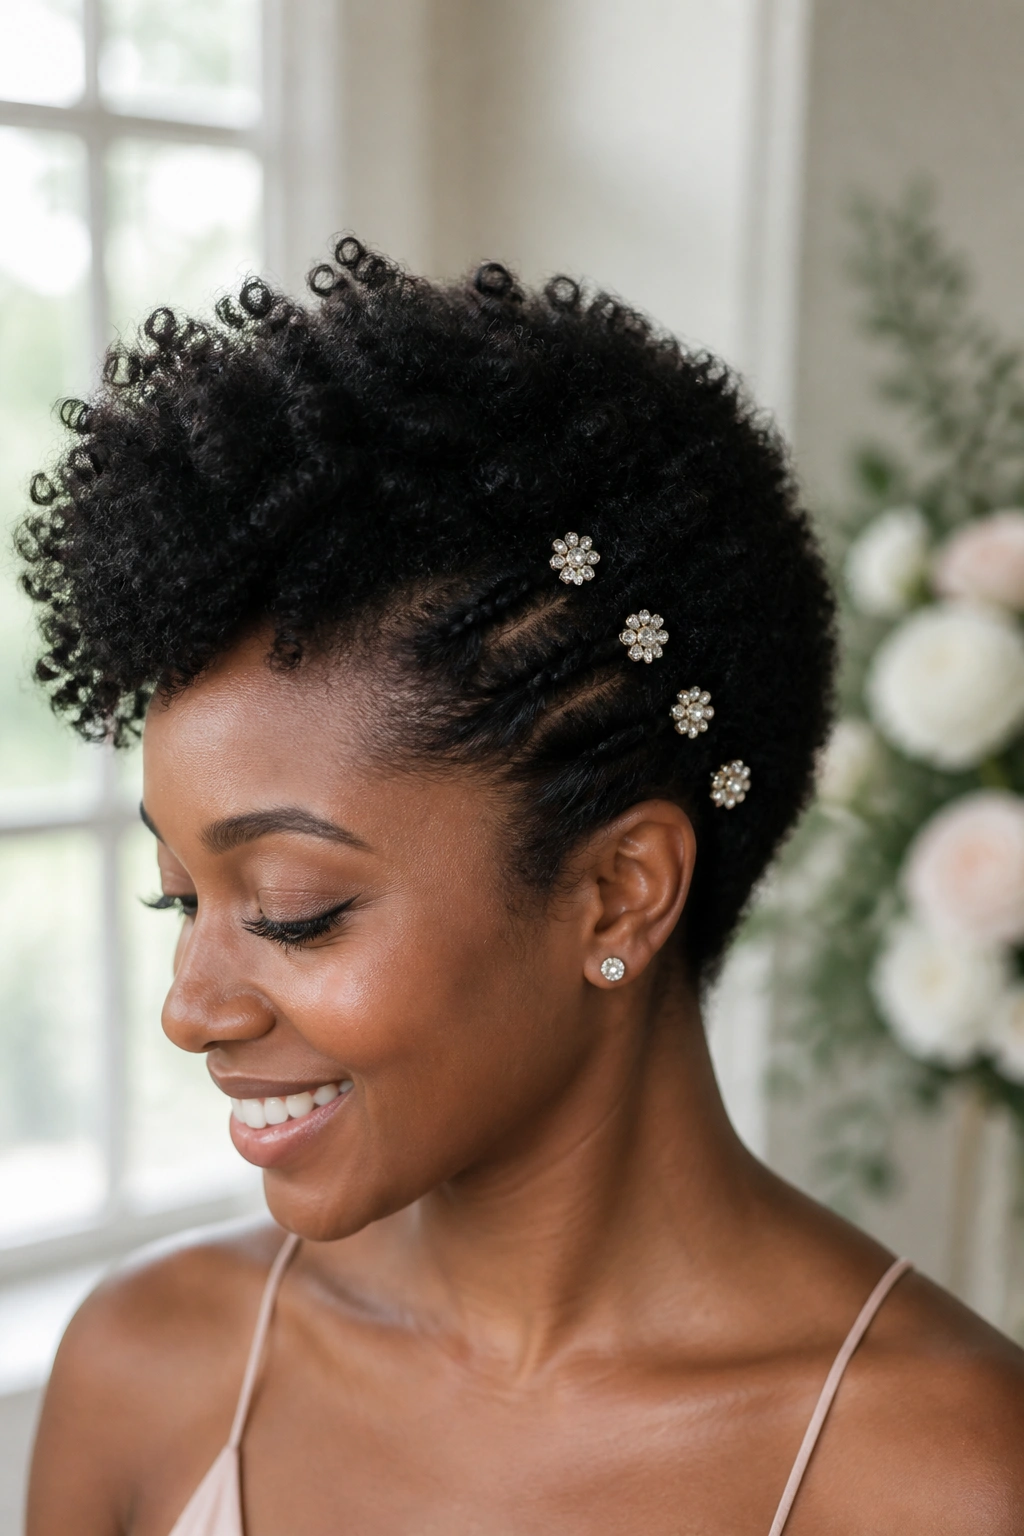
When the dress is simple, the hair can carry the detail. Natural coils styled with jewel pins are proof of that. The look is elegant in a way that never feels forced, and it lets the hair texture stay visible instead of pushing it into a shape it doesn’t want.
This is not about stretching coils into something else. It’s about arranging them with care. One side can be tucked back with three to five small jewel pins, while the rest of the coils stay full and rounded. Sometimes that’s enough. Sometimes the front gets shaped into a soft side part and the back stays loose. Either way, the texture remains the main feature.
A few placement rules help a lot:
- Put the pins where the hair naturally wants to separate.
- Use smaller pins if the hair is dense; they grip better and don’t fight the coil pattern.
- Keep the accessory color close to the dress hardware if the wedding has silver, gold, or pearl details.
- Let the crown keep some height so the style doesn’t flatten against the head.
This style is especially strong for bridesmaids with tight coils who want a formal look without losing shape. It also photographs cleanly from the side.
10. Waterfall Braid into Cascading Curls
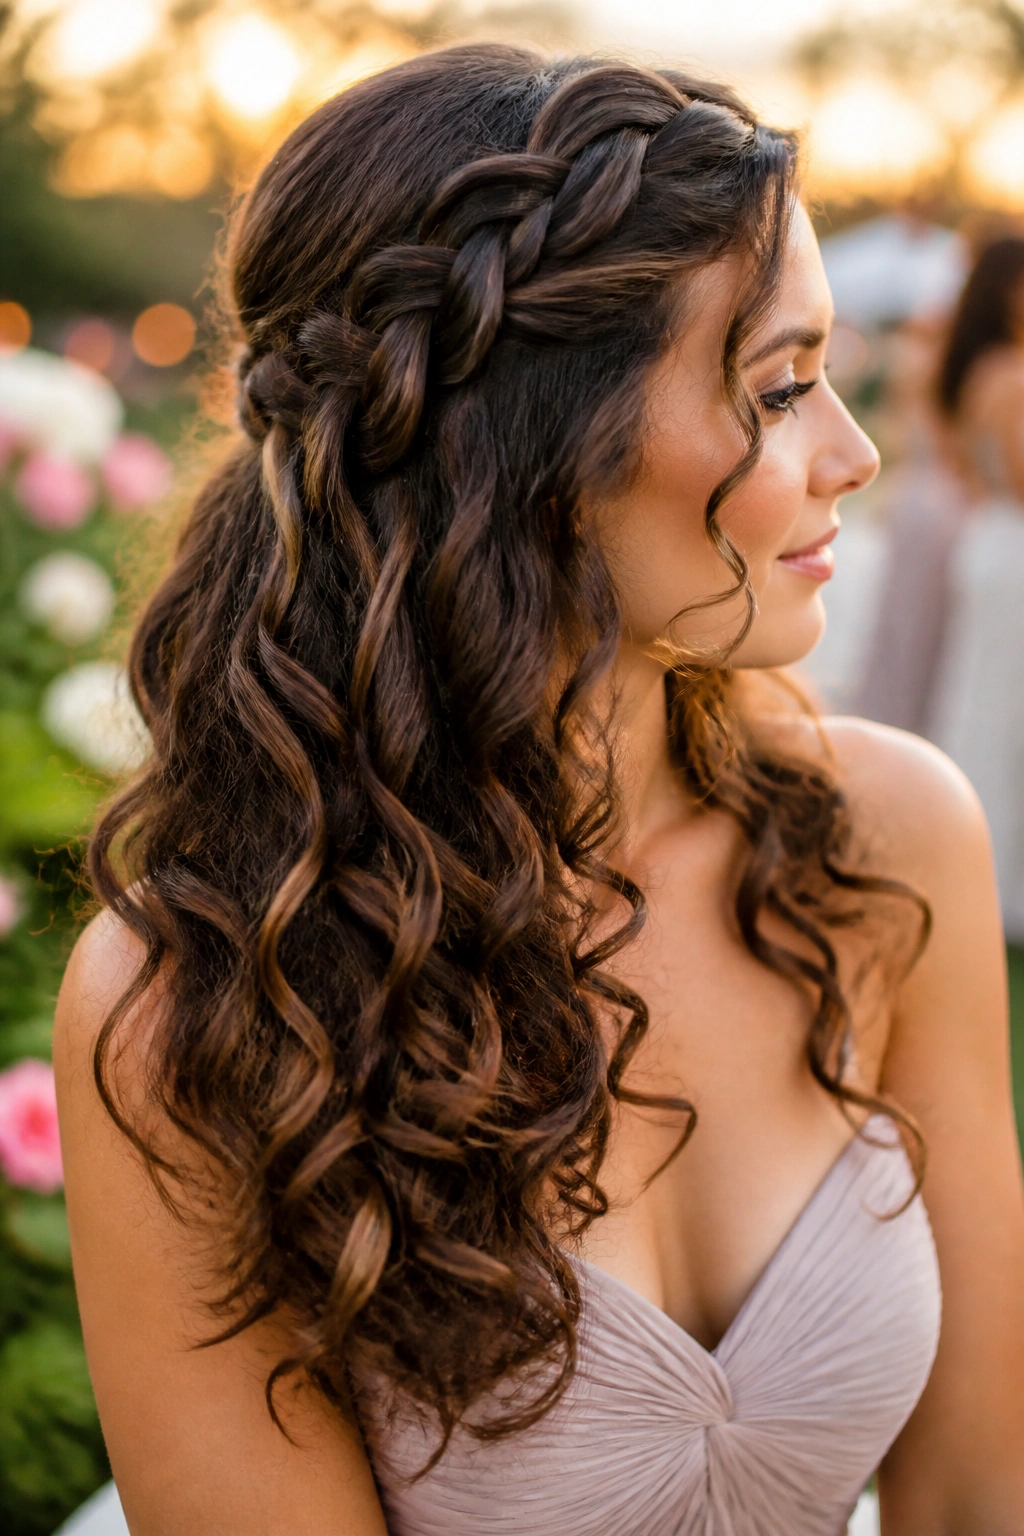
The braid is not the star here. The curls are. The waterfall braid just gives them a path to spill through, which is why this style works so well for long curly hair at weddings.
A waterfall braid starts near one temple and runs across the back or side, dropping sections as it goes so the rest of the hair falls through the gaps. That creates movement without locking the hair into a heavy woven panel. The effect is lighter than a full braid, and it lets the lower curls stay visible from every angle.
If the bridesmaid dress has a low back, this style is worth a close look. The braid draws the eye across the shoulders, then the curls keep the line soft instead of severe. It’s also a good choice for anyone who wants the feel of an updo without giving up length.
Keep the braid loose enough that the weave still shows. If it’s pulled too tight, the whole style loses that drifting, romantic shape. A little curl cream at the ends helps the lower sections stay defined through the ceremony and reception.
11. Bubble Ponytail on Curly Hair
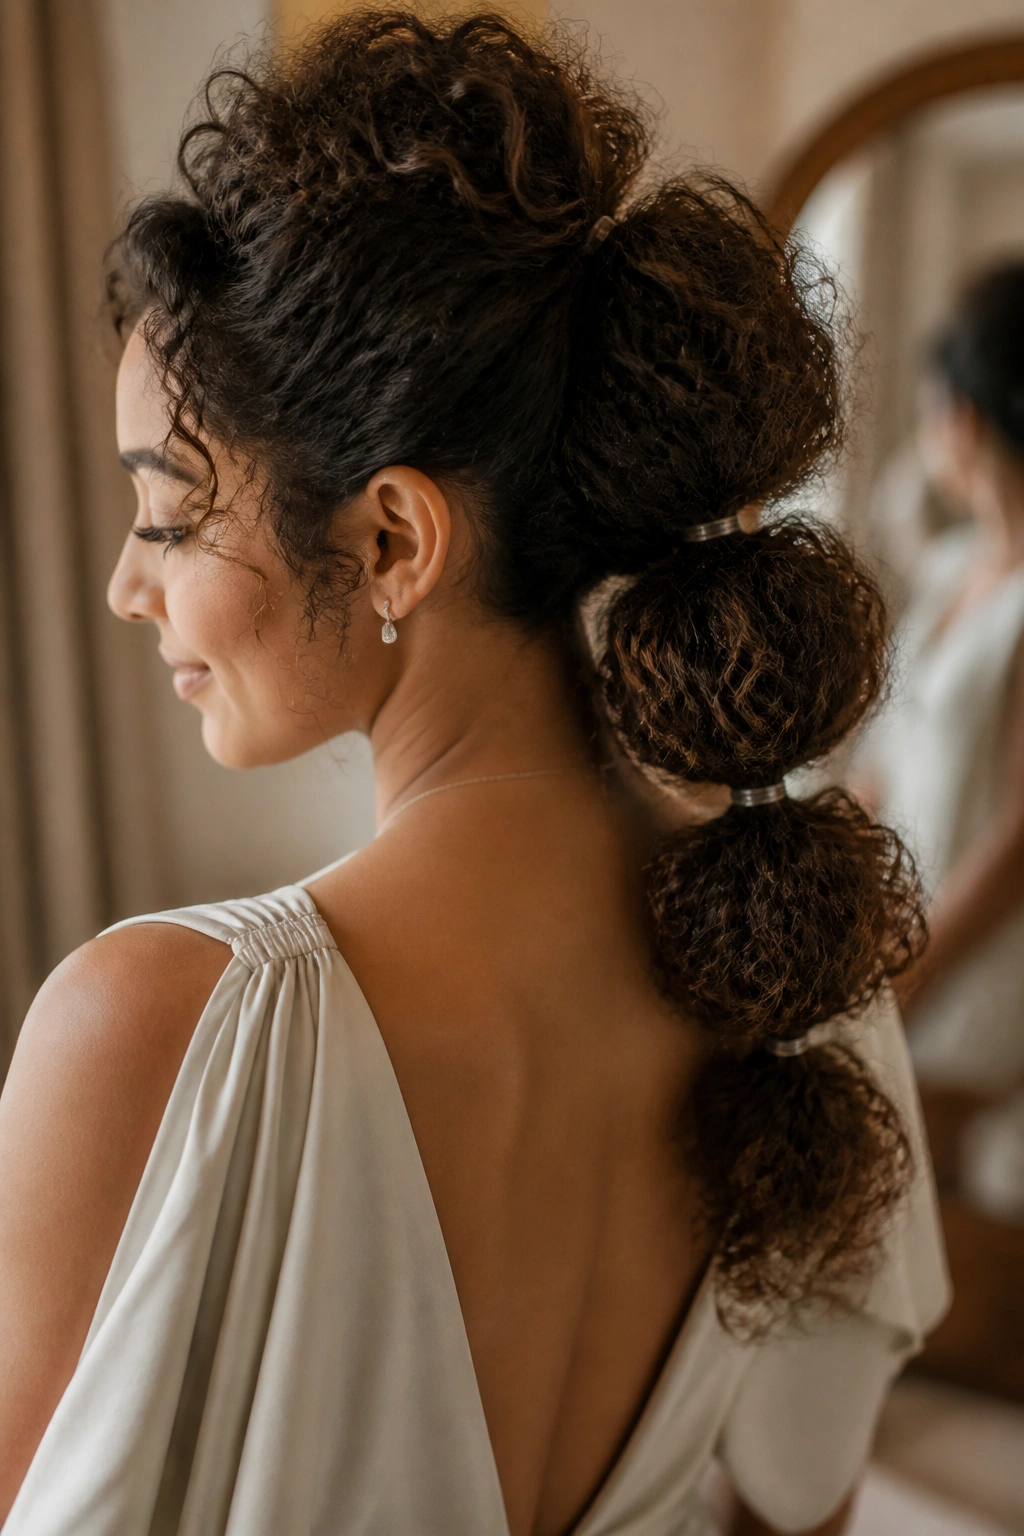
A bubble ponytail can look playful, but on curly hair it also looks tidy in a way that ordinary ponytails sometimes don’t. The sections give the style shape, and the curls fill each bubble with volume instead of lying flat.
The setup is simple: gather the hair into a ponytail, then add clear elastics every few inches down the length. Gently puff each section between the bands so it looks round. On curly hair, this works best when the ponytail is not over-brushed first. You want the curls to keep their body, because the whole point is texture inside the shape.
What I like about this style is that it gives bridesmaid hair a little structure without making it severe. It feels modern, but not cold. It’s also useful for someone with thick curls that are hard to pin into a bun. A bubble ponytail contains the length without fighting it.
A small wrap of hair around the first elastic helps the base look cleaner. After that, the rest can stay loose and springy. If a few curls escape between bands, leave them. That kind of imperfection looks better than forcing every strand into place.
12. Low Side Knot with Pearl Pins
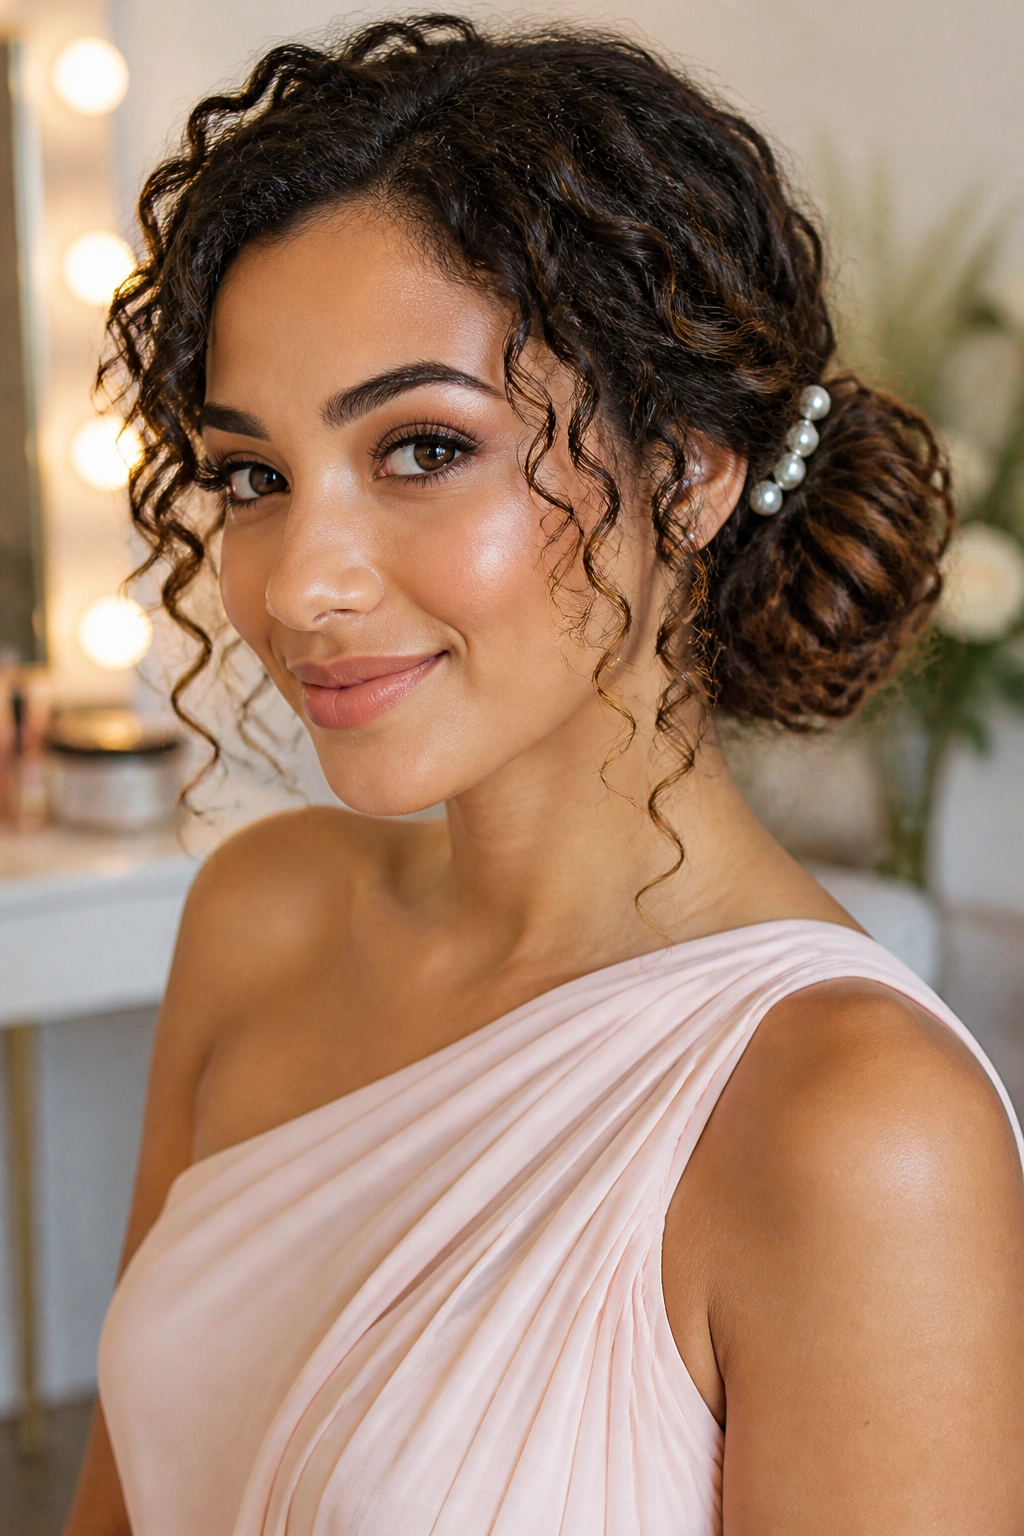
If the dress has one shoulder, this is the hair I reach for. A low side knot pulls the line of the hairstyle toward the open side of the neckline, which keeps the whole outfit from feeling lopsided.
The knot usually sits behind one ear or just below it, rather than dead center at the nape. That small shift matters. It gives the style some personality and leaves space for earrings on the opposite side. Pearl pins at the base finish the look without making it too sweet.
This is one of the quieter styles on the list, and I mean that in a good way. It does not shout for attention. It supports the dress and the face. If the hair is very curly, the knot can be built from a few larger sections instead of many tiny ones, which makes the finish smoother and easier to pin. If the hair is looser, use texture spray first so the knot doesn’t slide apart.
The best version still keeps one or two tendrils around the cheekbones. A fully sealed side knot can look a little stern. A softened one looks much better.
13. Pinned-Back Curly Bob for Shoulder-Length Hair
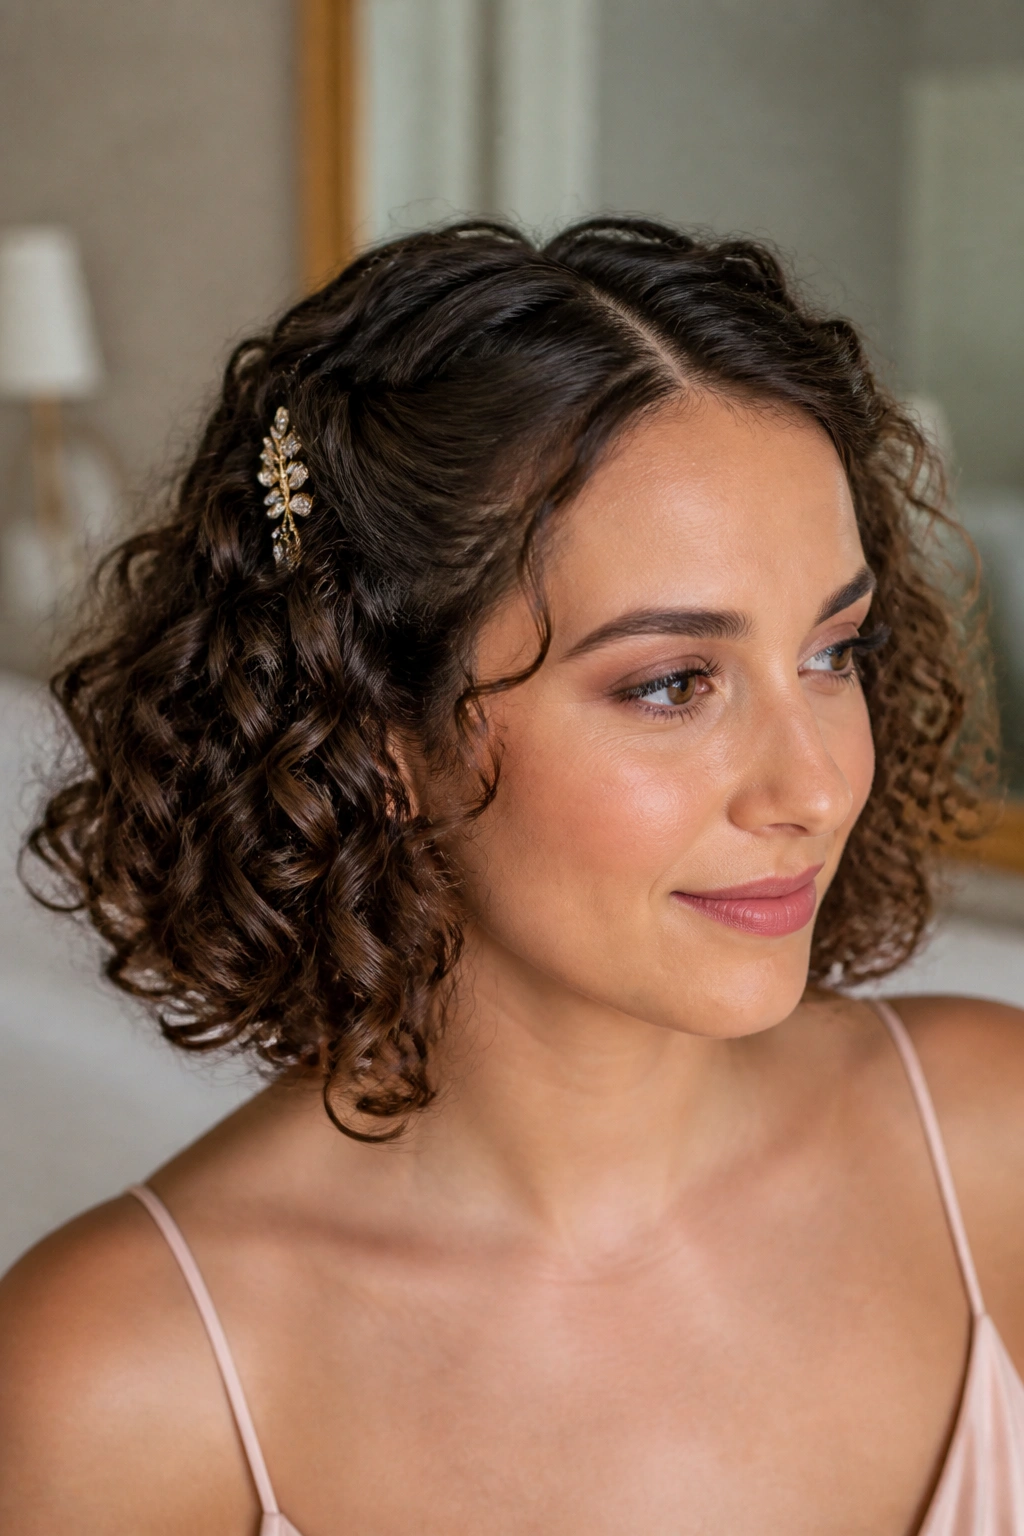
What if the hair is too short for a bun? Good. That is not a problem. Shoulder-length curly hair can look sharp at weddings when the front is pinned back and the rest keeps its shape.
The goal here is to clear the face without losing the bob’s bounce. Two small sections from the front are twisted or tucked back, then secured behind the ears with decorative clips or slim combs. The back stays loose and rounded, which keeps the hairstyle from feeling overworked. If the curls are tighter, leaving the ends free gives the whole shape more lift.
What to ask for
- A clean side part or a soft center part, depending on the dress neckline.
- Light pinning at the temples instead of heavy smoothing through the whole head.
- Accessories that sit flat, so they do not puff out the sides.
- A curl finish that keeps the ends separate instead of brushed into one shape.
This style is one of the easiest ways to make shorter curly hair feel formal without pretending it’s long. It’s honest about the length, and that honesty reads well. A bob that moves when the head turns can look better than a pinned-up style that keeps slipping loose.
14. Mini Twists Pinned Back into Open Curls
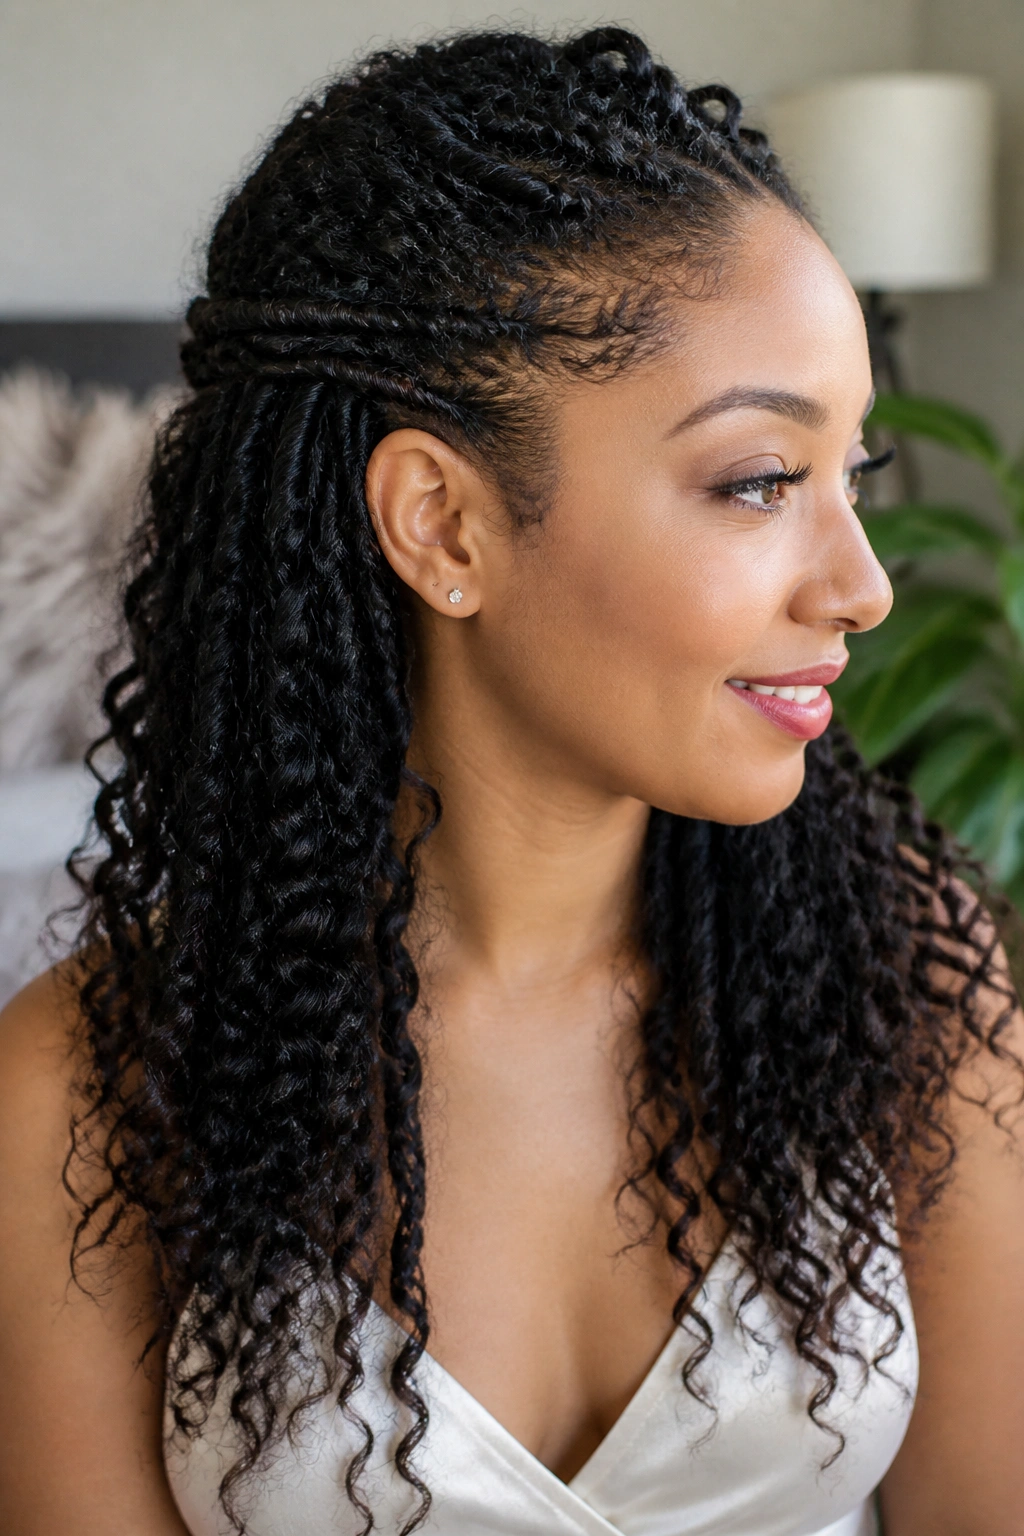
Small twists give structure without making the style feel hard. That’s why they work so well for bridesmaids who want their curls visible but need the front pieces controlled for the ceremony, the veil, or the face-framing photos.
The setup is simple: take one-inch sections from the hairline or temple area, twist them back, and pin them discreetly behind the ear or just under the crown. The rest of the hair stays open. That leaves the texture front and center, but the shape around the face looks neat. It’s a smart fix for layered curls, grown-out bangs, or hair that tends to fall into the eyes.
This style also plays nicely with mixed textures. A person with looser curls in the front and tighter curls underneath doesn’t have to force every section into the same pattern. The twists blend the difference. And because the style is only partly pinned, it stays comfortable for a long day. No helmet effect. No pulling.
A little shine spray on the top layer helps the twists look finished. Use it lightly. Heavy product on the front pieces can make them look stuck down, which is not the goal here.
15. High Top Knot with Soft Ringlets
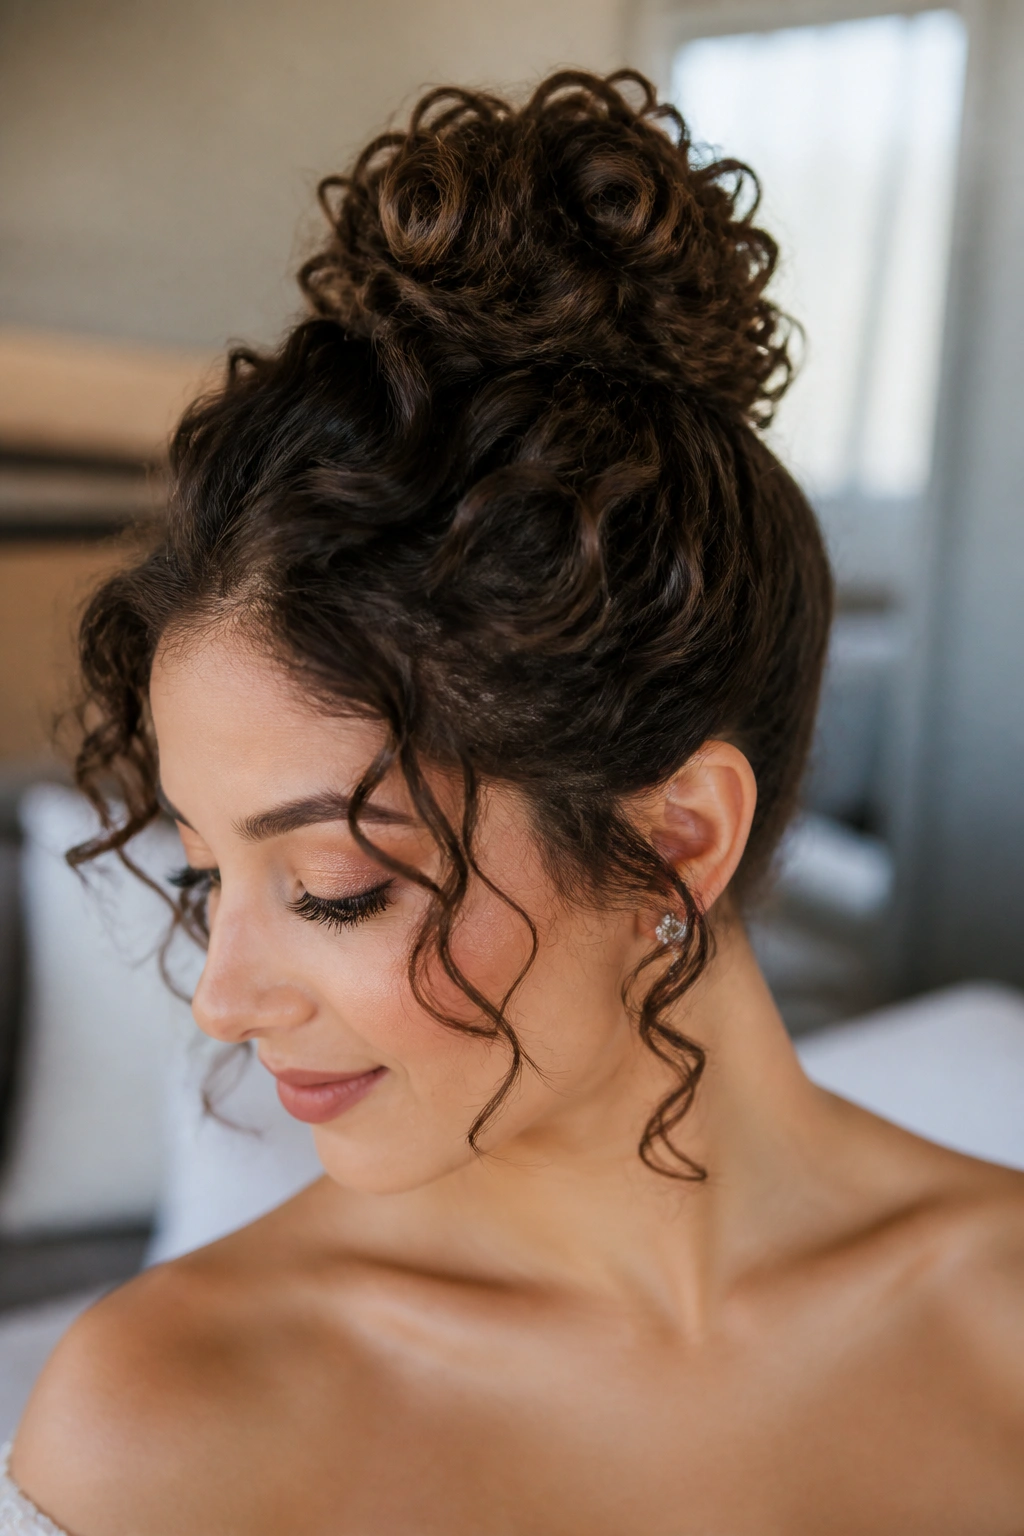
A high top knot keeps the neck clear and lets the curled ends do the pretty work. For bridesmaids, that’s a useful trade-off. The face stays open, the dress neckline stays visible, and the hair still feels festive instead of severe.
The knot should not be overly sleek. A little lift at the crown and a few soft ringlets around the face keep it from looking too formal in a rigid way. If the hair is long and curly, gather it high, twist it into a loose knot, and leave a few small sections to wrap around the base. If the texture is denser, pin the knot in layers so it doesn’t slump halfway through the reception.
This style works especially well with dresses that have strong shoulders, long earrings, or a dramatic back. It also photographs clearly from every angle because the shape sits above the shoulder line. That’s a small thing, but it matters.
I like this look for bridal parties that need hair off the neck but still want some softness near the face. Tight, slick top knots can feel harsh. A curly version has more movement. Better, honestly.
Final Thoughts
The smartest curly bridesmaid hairstyles do two things at once: they respect the curl pattern and they survive a long event. If a style needs constant fixing, it is the wrong style for a wedding day, no matter how pretty it looked in the mirror an hour earlier.
Neckline, dress shape, hair length, and curl density all matter. A side-swept wave can be better than a bun. A low chignon can be better than leaving everything down. The right answer is the one that keeps the hair looking like itself, only more finished.
One last practical move: have the bridesmaid step away from the mirror, look at the hair from six or eight feet out, and turn her head both ways. If the shape still reads cleanly from a distance, it will hold up in ceremony photos too.
