



Long hair can make the simplest plan feel complicated. One minute it looks glossy and full of possibilities, and the next it’s stuck on your coat, sliding out of a clip, or puffing at the crown because the weather decided to get involved. Easy hairstyles for long hair are the ones that work with the weight, not against it. They should take five to ten minutes, survive real movement, and still look intentional when you catch your reflection later.
The trick is not finding some magical style that fixes everything. The trick is knowing which styles need a clean part, which ones want a little grit at the roots, and which ones actually look better on hair that’s a day or two past wash day. Long hair gives you room to twist, wrap, braid, pin, and hide a few less-than-perfect bits. That’s the advantage. Use it.
Some styles below lean polished. Some are a little messy on purpose. A few are the kind you can do while half-watching the mirror and still end up looking like you made an effort. That mix matters, because a hairstyle is only useful if you’ll reach for it when you’re tired, late, or bored of wearing your hair the same way again.
Start with the one that fits your mood and your morning.
1. Sleek Low Ponytail

A sleek low ponytail is the kind of style that looks almost suspiciously simple until you try it on long hair and realize how much the length does for you. It sits low at the nape, keeps everything neat, and gives your face a clean frame without asking for heat tools or a fancy hand.
Brush the hair back with a boar-bristle brush or a smoothing brush, then gather it low and tight. If your hair is thick, hold the base with one hand while you brush the top layer with the other so you don’t get bumps you have to fight later. A small section wrapped around the elastic is the detail that makes it look finished. Hidden elastic, cleaner line. Easy win.
Best for: workdays, interviews, dinner plans, and any time you want your hair to look expensive without doing much.
One small thing that helps: put a dab of smoothing cream or a drop of serum on your palms first, then press it lightly over the top and sides. Don’t rake it through. That’s how you end up with frizz that comes back in an hour.
2. Claw Clip French Twist

Why does a claw clip work so well on long hair? Because it gives all that length somewhere to go. Instead of trying to flatten your hair into obedience, you twist it up and let the clip do the holding. That’s the whole appeal.
Start by gathering your hair at the back, as if you were making a low ponytail, then twist it upward against the head. Fold the ends under and tuck them in before the clip goes on. A medium-to-large claw clip usually works best for long hair; tiny clips can look cute for about five seconds and then give up. If your hair is very heavy, twist it a little tighter than you think you need.
How to Pin It
Hold the twist with one hand and open the clip with the other. Slide the clip in from the side or the top, catching both the twist and some hair at the scalp so it has something solid to grip.
It should feel secure, not painful. If the clip bites too hard, loosen the twist and try again.
3. Bubble Ponytail
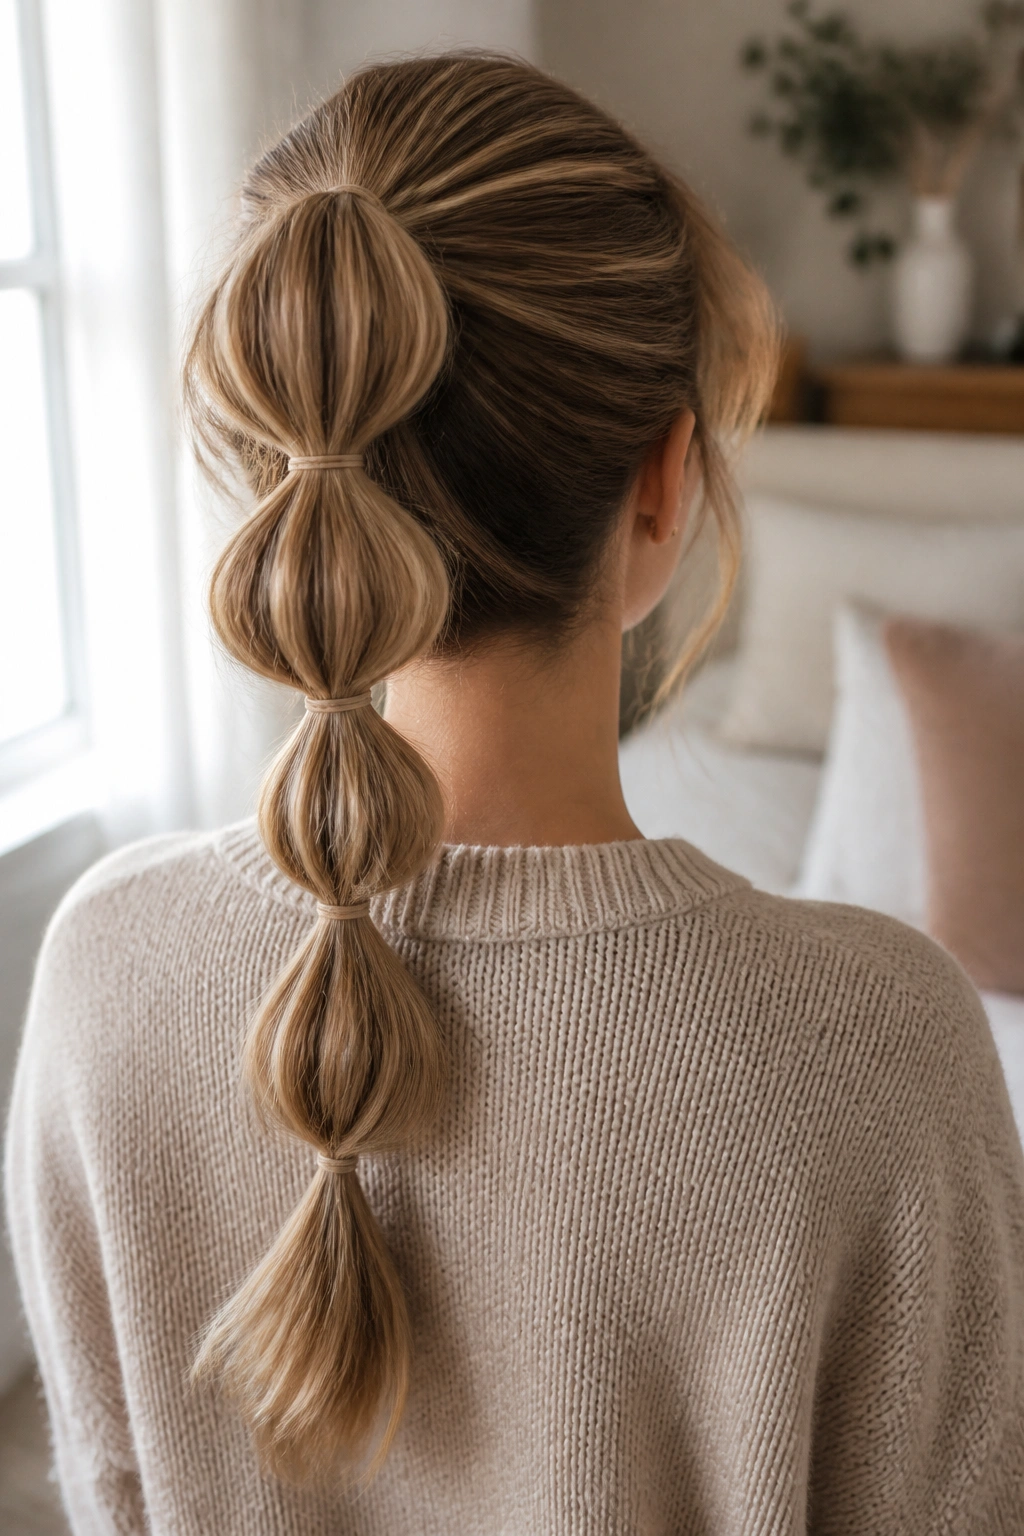
A bubble ponytail is one of those styles that looks playful on purpose, which is useful when you want long hair to feel fun instead of merely manageable. You’re basically making a regular ponytail and adding small elastics down the length so it turns into a row of rounded sections.
Tie the hair into a mid or low ponytail first. Then place clear elastics or thin snag-free ties every 2 to 3 inches down the tail. After each tie, gently pull at the hair between elastics to puff it out into a bubble. Use your fingers, not a brush. A brush will flatten the shape and make the whole thing look tighter than it should.
- Works well on straight, wavy, or slightly textured hair.
- Looks fuller if you gently tug each bubble outward after tying.
- Hides greasy ends nicely, which is not a small thing.
- Stays put better if you mist the tail lightly with texture spray first.
A bubble ponytail is especially handy when your hair feels too heavy for a braid but you still want some shape.
4. Half-Up Top Knot

A half-up top knot solves a very specific problem: you want your hair out of your face, but you also do not want the full commitment of a bun or ponytail. Long hair gives this style enough weight to sit nicely, which is why it often looks better on longer lengths than on shorter cuts.
Take the top section from temple to temple and gather it at the crown. Twist it once or twice, then coil it into a small bun and secure it with an elastic or two bobby pins. Leave the bottom half loose so the contrast feels deliberate. If you have layers, a few shorter pieces will escape. Fine. That softness helps. If your hair is thick, keep the knot compact so it doesn’t pull the whole style upward like a tiny hat.
How to Keep It from Looking Tiny
Use a little more hair than you think. A knot that’s too small can look like an afterthought.
Pull the knot apart slightly after pinning so it has some width. That’s usually enough.
5. Rope Braid Ponytail

A rope braid ponytail is easier than a regular braid once your hands learn the rhythm. Instead of three sections, you use two. Twist each section in the same direction, then wrap them around each other in the opposite direction. It sounds fussy. It isn’t.
Start with a low or mid ponytail. Divide the tail into two equal parts, twist each one away from your face, then cross them over each other. Keep the tension even so the braid doesn’t sag on one side. Secure the end with a small elastic. On long hair, the rope effect shows up beautifully because the length gives the twist room to repeat itself.
Unlike a standard braid, this one reads a little sleeker and a little cleaner, which is useful when you want something that looks styled without looking overworked. It also holds up well if your hair is fine and slides out of bigger braids.
Tip: a tiny touch of styling cream on the lengths before you twist can keep flyaways from poking out everywhere.
6. Messy Low Bun
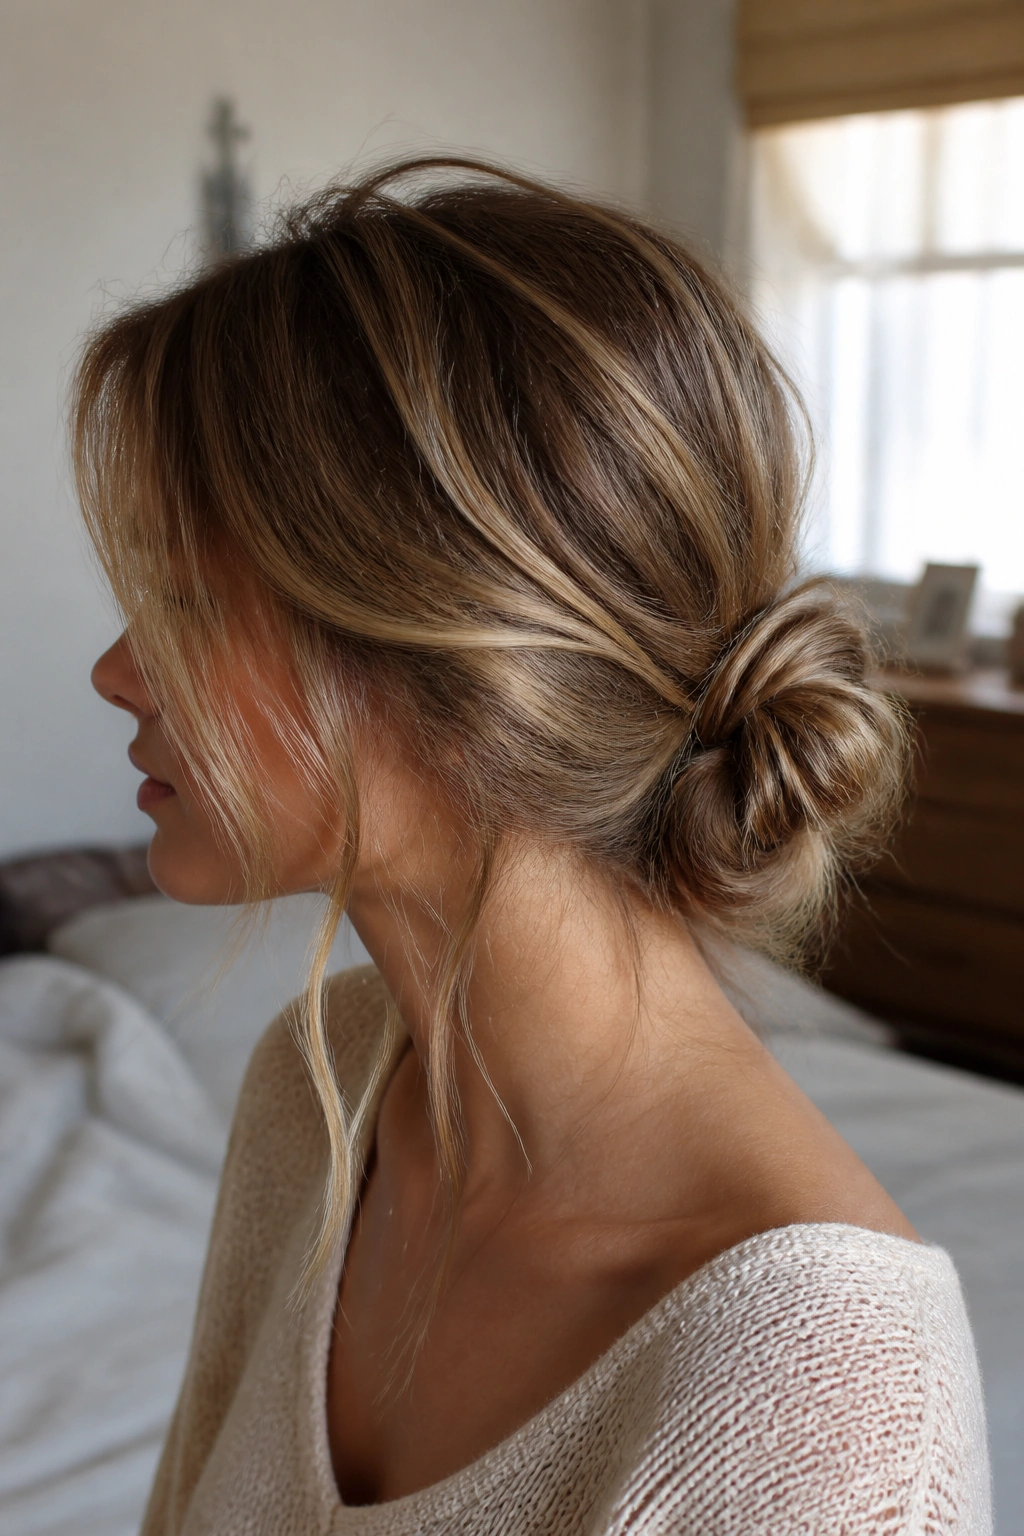
There’s a reason the messy low bun keeps coming back. It hides a bad hair day, but it also works when you’ve got good hair and want it to look a touch relaxed. Long hair helps here because there’s enough length to wrap, tuck, and pin without the bun falling apart after ten minutes.
Gather the hair loosely at the nape, twist it once, and coil it into a bun. Leave the ends a little uneven. That unevenness is the point. Pin the bun in a few spots with bobby pins, crossing two pins in an X where the bun feels loose. A few face-framing pieces can stay out if you like that softer look.
- Best when hair has a little texture.
- A second-day blowout usually gives the right grip.
- Too much pulling makes it stiff.
- A few loose pins can look better than one over-tight clip.
The bun should feel secure enough to forget about, not so tight that your scalp knows about it all afternoon.
7. Double Dutch Braids
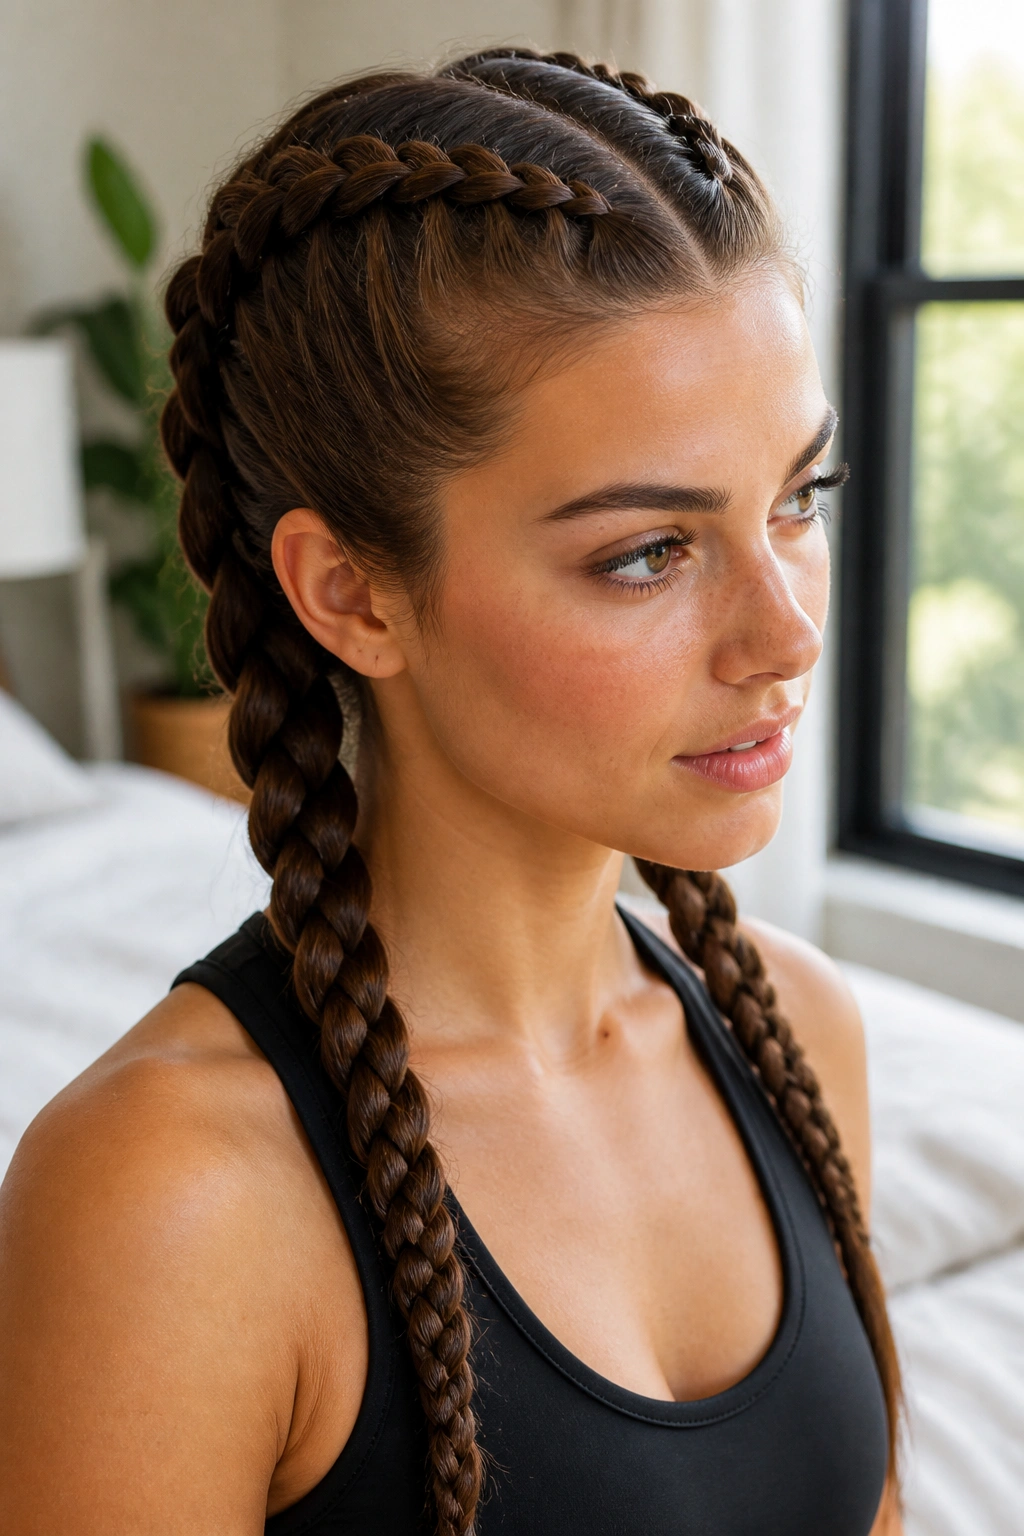
Double Dutch braids have a sporty look, but they’re useful far beyond the gym. They keep long hair controlled from root to end, which is why they’re one of the most practical easy hairstyles for long hair when you want everything off your neck and out of your way.
Part the hair down the middle and clip one side out of the way. Start at the hairline on the other side and braid under, not over, so the braid sits raised. Keep adding small sections as you work down toward the nape. The neatness at the part matters more than perfect symmetry down the braid. If the lines at the scalp are clean, the whole style looks sharper.
One braid can go a little soft and still look fine. Two braids need a bit more balance, so use a mirror if you’re new to doing them yourself. That said, they do not need to be exact twins. Sisters is enough.
When you finish, pull the edges of each braid a little wider if you want more fullness.
8. Side Braid Draped Forward

Why does a side braid feel so easy on long hair? Because you’re using the length where it already wants to fall. Instead of forcing the hair straight back, you sweep it over one shoulder and let the braid sit there. Less fighting. More control.
Make a deep side part or keep the part where it usually lives, then gather the hair low over one shoulder. Braid it loosely, keeping the sections even, and secure the end with a small elastic. A side braid works especially well when hair has a little wave or bend, because the texture keeps it from looking too stiff. If your hair is very smooth, a little texturizing spray at the roots helps.
Where It Works Best
This style is good for errands, long car rides, casual dinners, and any day when you want hair off your neck but don’t want the severe look of a tight braid.
A ribbon at the end can dress it up. So can a single pin near the part if you want a small detail without making a whole thing of it.
9. Half-Up Twisted Crown
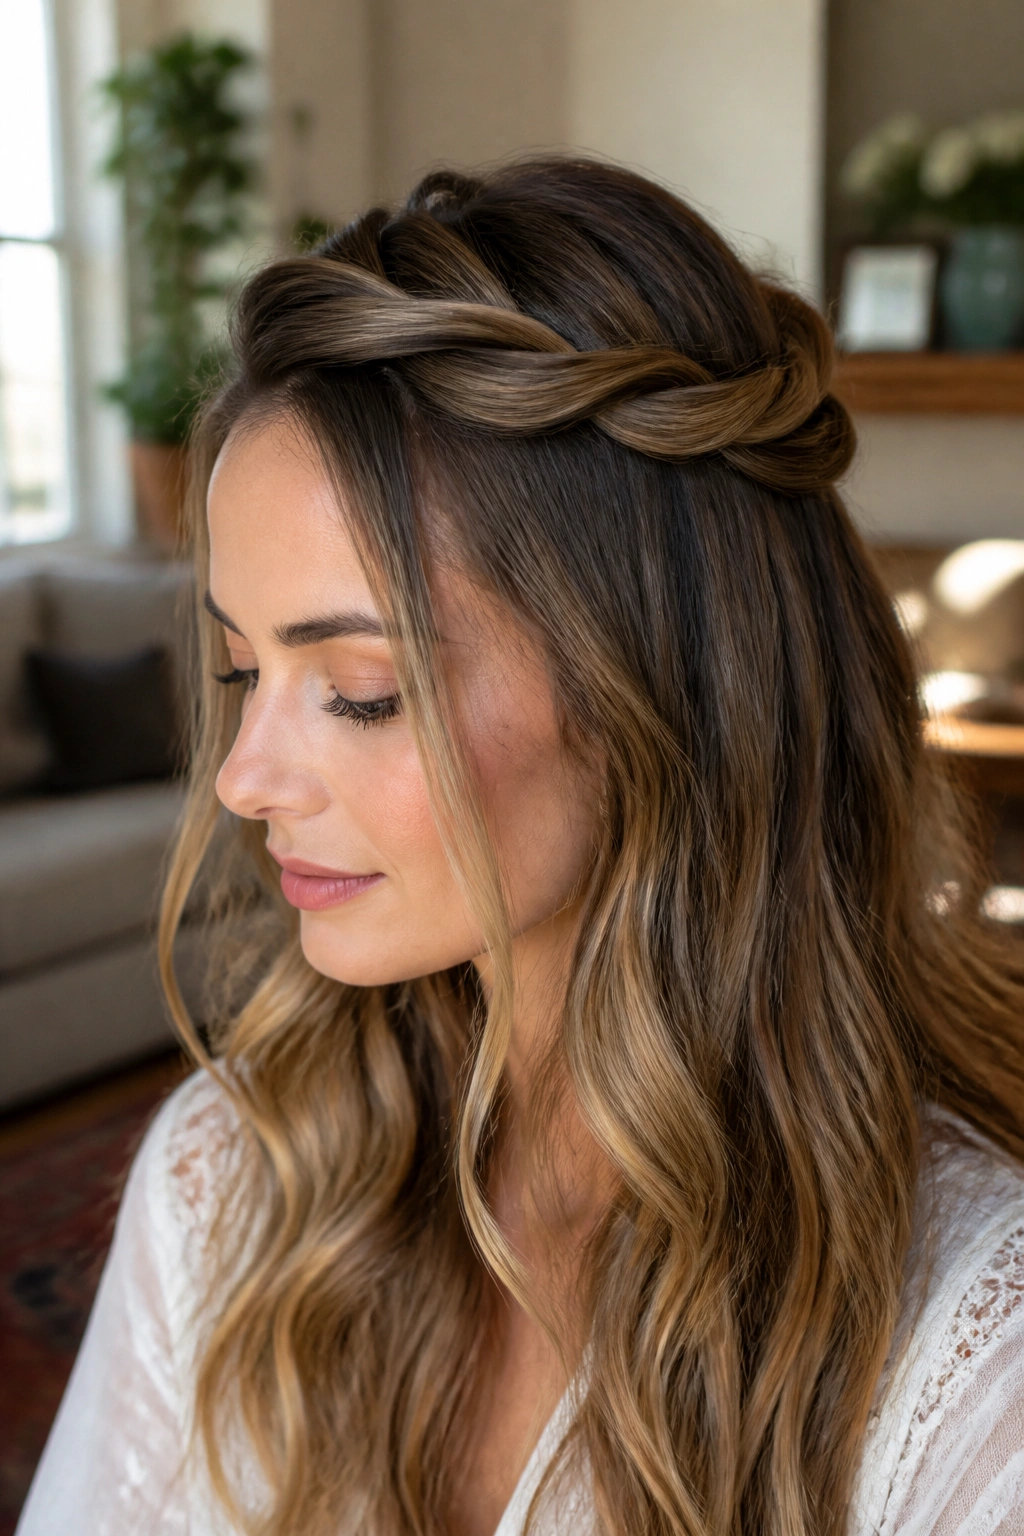
A half-up twisted crown gives long hair that pulled-back, soft-edges look without needing a braid. It’s one of the easiest ways to make hair seem more styled than it really was. Two twists. A couple of pins. Done.
Take a section from one temple, twist it back along the side of the head, and pin it near the center back. Repeat on the other side, then cross the ends or tuck them under the first twist. The shape should sit like a small crown, not a helmet. If it feels too high, lower it. If it looks too flat, pull the twists gently to widen them before pinning.
- Great for second-day hair.
- Works with straight, wavy, or curly textures.
- Uses fewer pins than a full braid crown.
- Looks best when the twists are a little soft, not wound tight.
A tiny claw clip can replace pins if your hair is thick enough. That little swap makes the style faster, which matters on mornings when patience is thin.
10. Sleek High Ponytail
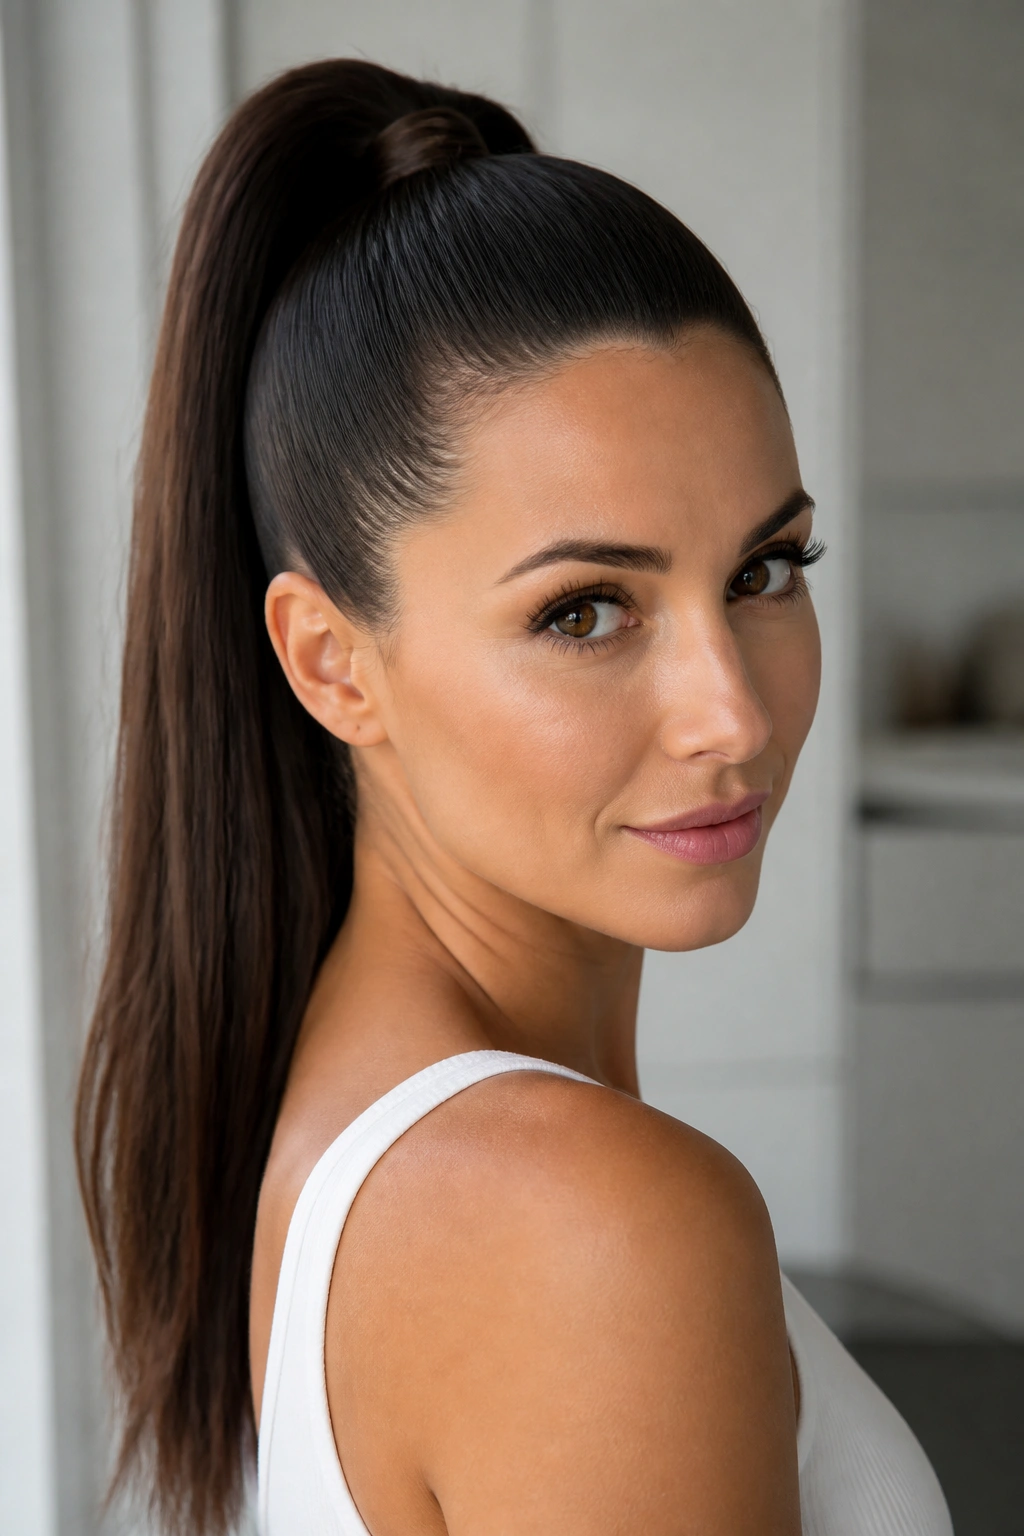
A sleek high ponytail is blunt, neat, and a little bossy in the best way. Long hair gives it a heavy tail that swings with a bit of drama, which is why the style feels different on long lengths than it does on shorter cuts.
Brush the hair up toward the crown, keeping the sides smooth as you go. Hold the ponytail high, not just mid-height, if you want the lifted effect. If the base feels loose, use a second elastic over the first one. Long hair can tug a single tie downward, and two elastics solve that better than one giant tie that stretches out by lunch.
The finish matters. A touch of gel or a smoothing stick along the hairline can tame the small flyaways that show up around the face. Don’t overload it. You want clean, not crunchy.
This style works on thick hair, fine hair, curly hair, and the days when you need your face completely clear. It’s direct. No fluff.
11. Space Buns

Space buns sound playful because they are, but they also happen to be useful. Long hair gives each bun enough material to look full instead of tiny, which is the whole game here. You can make them neat or loose, high or low, small or exaggerated.
Split the hair down the center. Make two high pigtails, then twist each one around itself and coil it into a bun. Pin or tie each bun in place. If you want a softer look, leave the ends a little visible. If you want something tighter, tuck them in more carefully. The style can sit high for a bold shape or lower and wider for a calmer version.
A Small Detail That Helps
Spritz the roots with dry shampoo before you start. It gives grip and stops the sections from slipping around.
Space buns are handy for concerts, casual days, and sweaty weather. They’re also one of the few styles that can look intentionally a little messy without crossing into “I gave up.”
12. Fishtail Braid
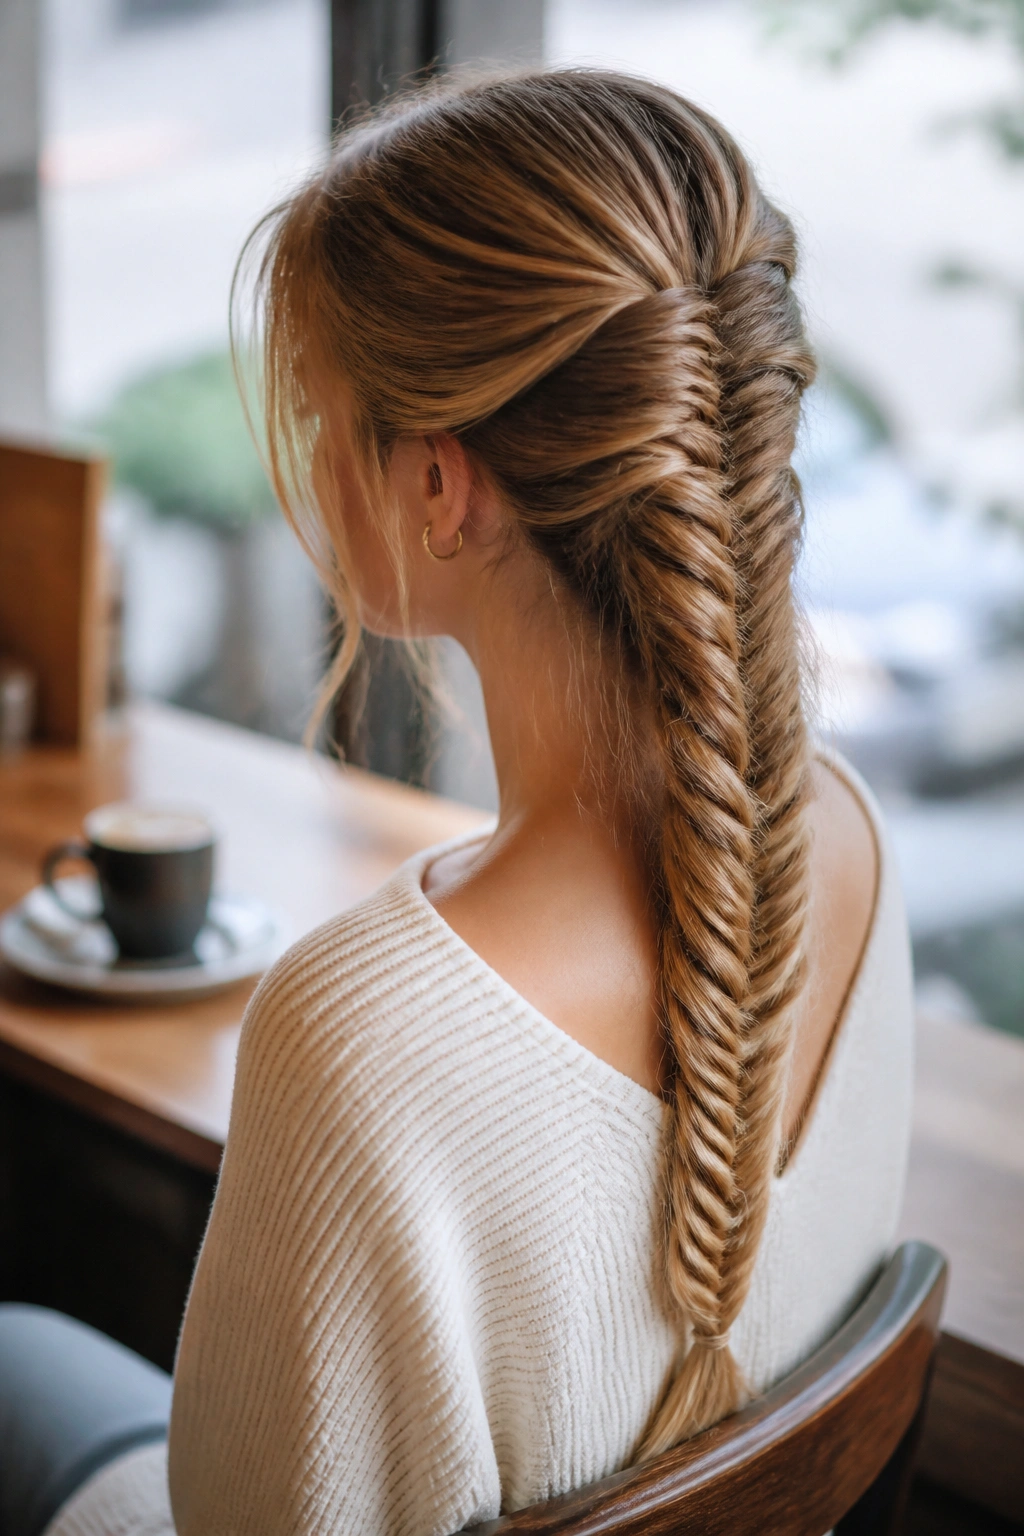
A fishtail braid looks harder than it is. That’s the honest truth. Once you understand the hand movement, it becomes one of the prettiest easy hairstyles for long hair because the length makes the pattern show off.
Split the hair into two sections. Take a small piece from the outside of the left section and cross it into the right section, then do the same from the right side to the left. Keep repeating. The smaller the pieces, the more detailed the braid looks; larger pieces give you a looser, chunkier braid. On long hair, I like the medium version because it shows the pattern without taking forever.
Unlike a basic three-strand braid, a fishtail can be pulled apart after tying to make it wider and softer. That is where the fullness comes from. It’s not magic. It’s a little tugging and a little patience.
If your hair is slippery, start with dry texture spray or a tiny bit of mousse through the lengths. That gives the braid something to hold.
13. Scarf-Wrapped Ponytail

A scarf-wrapped ponytail is one of the fastest ways to make plain hair look deliberate. You keep the ponytail simple, then let the scarf do the visual work. Long hair gives the wrap some length to play against, so the whole thing feels finished instead of childish.
Tie your hair into a low or mid ponytail. Fold a silk scarf into a narrow band and knot it around the base, letting the tails hang down with the ponytail. You can wrap the scarf around the elastic once or twice, or just tie it in a clean bow. A cotton scarf gives a more casual feel. Silk or satin looks smoother and stays a little sleeker.
- Choose a scarf that is long enough to tie securely.
- Keep the ponytail low if your hair is very thick.
- A printed scarf hides a slightly messy base better than a plain one.
- If the scarf slips, pin the knot underneath with one bobby pin.
This is the style I reach for when I want something simple that still looks like I had a plan.
14. Pull-Through Braid
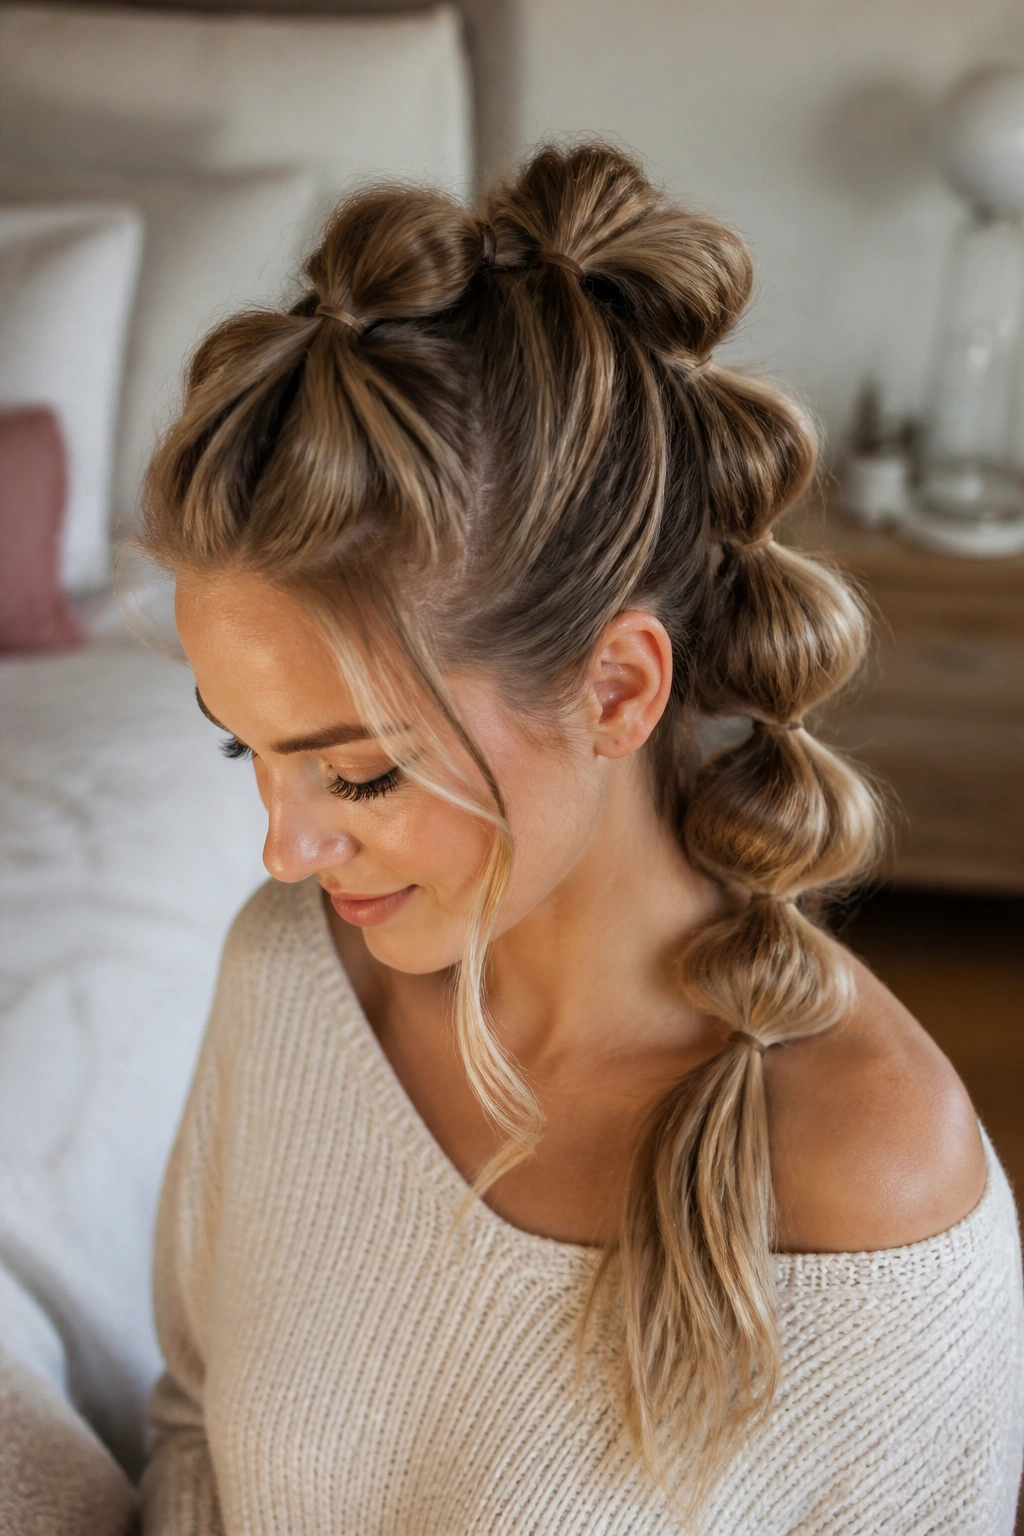
A pull-through braid looks like a thick, intricate braid, but it is built from ponytails and elastics. That’s why it works so well for long hair and why it’s one of the easiest styles to fake-looking-fancy without actually braiding for ten minutes straight.
Make a small ponytail at the crown, then another right beneath it. Split the top ponytail in two and pull the second ponytail through the middle, then clip or hold that first one out of the way. Add more hair below and repeat the process down the head. The result is a chunky, woven-looking braid with a lot of volume. Long hair makes the pieces hang well, so the braid feels full fast.
The Fake-Braid Trick
You’re not braiding. You’re stacking little ponytails and flipping them through.
That means the style is friendly to people whose fingers get tired halfway through a regular braid. It also gives you more control over volume, because each section can be puffed a little after it’s tied.
15. Low Chignon
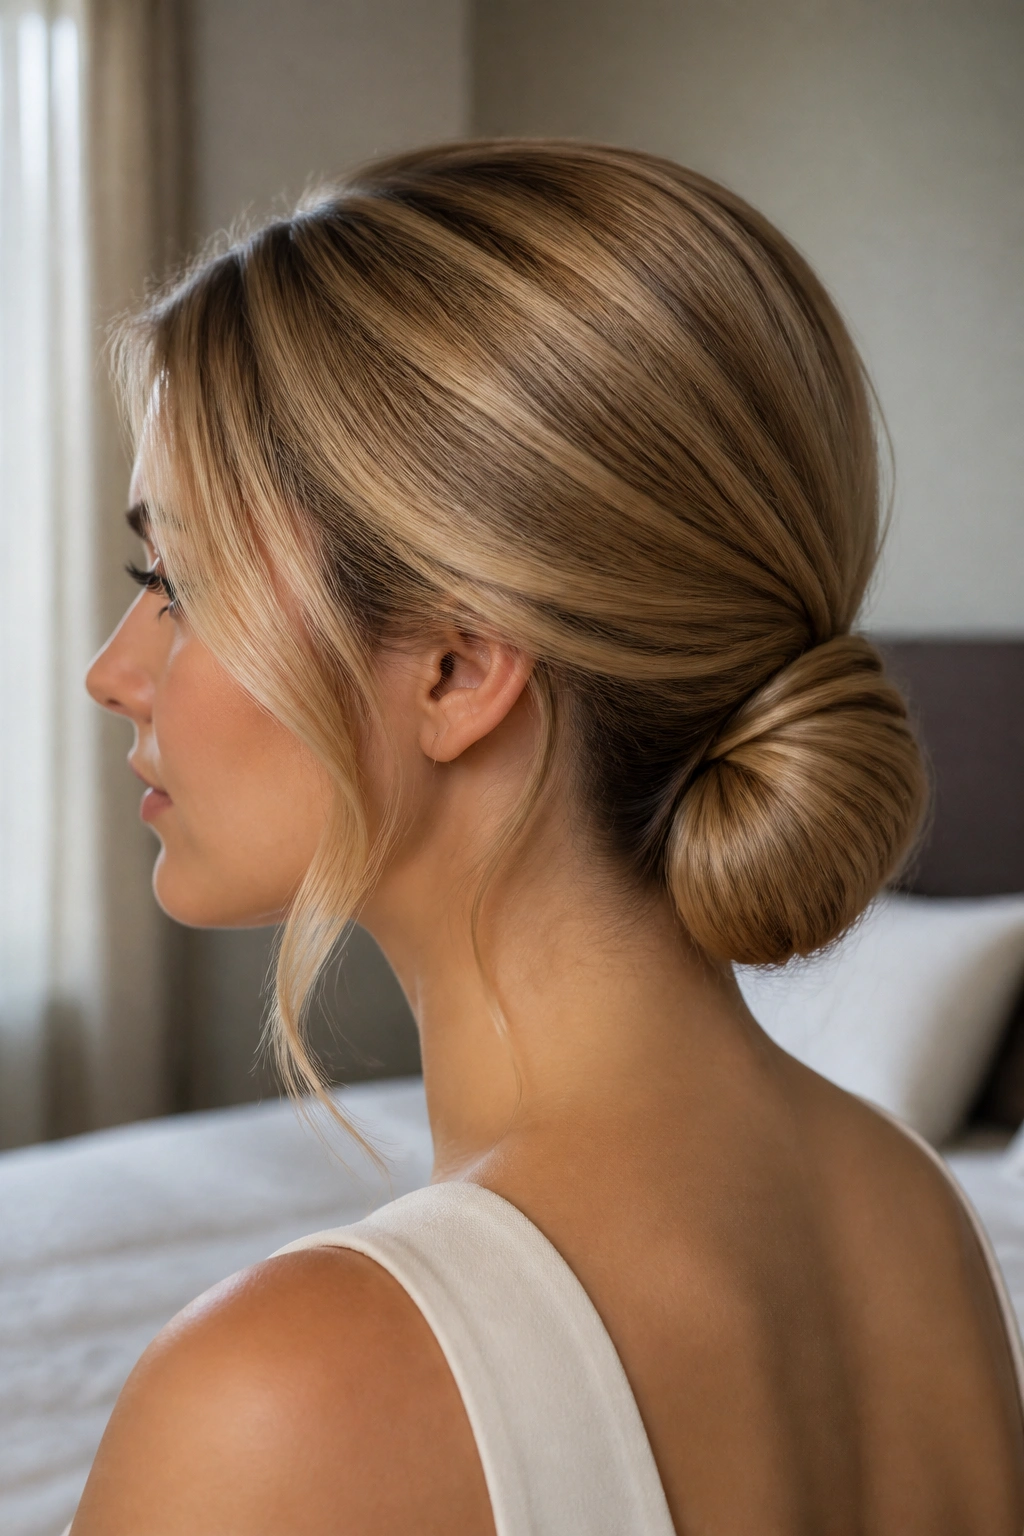
A low chignon is the quiet older cousin of the messy bun. Same family, different mood. It sits at the nape, stays close to the head, and looks polished without feeling stiff. Long hair gives you enough length to fold and tuck the ends neatly, which is half the battle.
Gather the hair low, twist it once, then wrap it into a small coil against the nape. Use pins to secure the base and any loose ends. If your hair is layered, a few shorter pieces may pop out. Pin those back gently instead of trying to force them flat. The shape should be smooth but not shellacked.
This one works beautifully for dressier days, but it also works for regular ones if you like a tidy finish. A side part gives it a softer line. A middle part makes it more crisp. Both are fine.
Skip heavy products if your hair is fine. Too much product can make the chignon slide. A light mist of hairspray is usually enough.
16. French Braid into Ponytail

A French braid into a ponytail solves the “I want the front secure but I still want length” problem. It starts neat at the scalp and then gives you a regular ponytail at the end, which means the style feels half controlled, half easy.
Begin at the front hairline and braid down the center or slightly to one side, adding hair as you go. Stop once you reach the crown or the back of the head, then tie the rest into a ponytail. That ponytail can stay loose, wavy, straight, or curled. The braid gives structure; the tail gives movement.
- Good for thick hair that gets in the way.
- Useful when you want to keep the hairline flat.
- Works with a low ponytail too, if you want a calmer look.
- A little tug on the braid edges gives it more width.
This style is especially nice when you want something that stays put for hours but still feels softer than a full braid. It has a built-in compromise, which is honestly why I like it.
17. Twisted Half-Up with Claw Clip

Do you hate elastics in your hair? Then this one is worth keeping around. A twisted half-up with a claw clip is fast, gentle, and very forgiving if your hair is long enough to give the twist some weight.
Take two sections from the front, twist them back toward the crown, and bring them together at the back. Twist the joined section once more and clip it in place. The rest of the hair stays down. If the clip feels loose, use a slightly larger one or gather a little more hair from the sides so the grip is stronger. Long hair usually helps here, because there’s enough length for the twist to anchor without falling apart.
A small clip can work for a slim half-up style. A larger clip is better if the hair is thick or layered. And yes, the clip can be plain. You do not need a giant decorative one unless you want it.
This style is one of the easiest ways to look a bit put together without touching heat tools.
18. Braided Headband
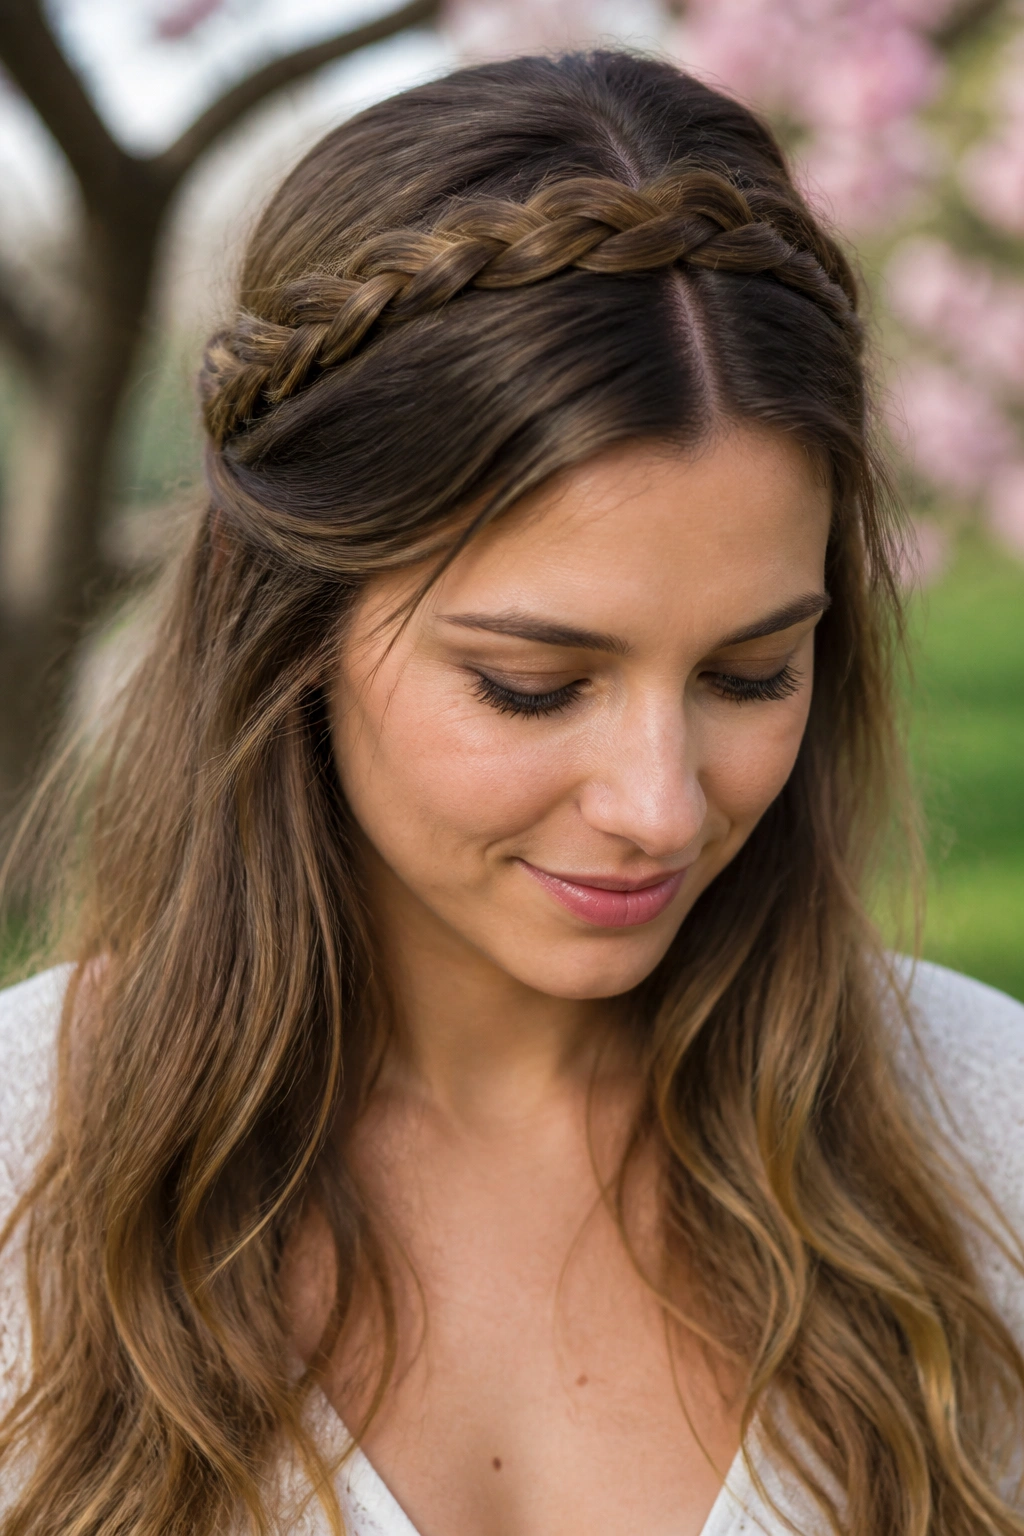
A braided headband works a bit like built-in jewelry. Instead of adding an accessory, you make the hair itself do the job. On long hair, the braid can travel across the crown and still have enough leftover length to pin out of sight behind the ear.
Take a section from just behind one ear or from the front side section, braid it, and sweep it across the top of the head like a headband. Pin the end behind the opposite ear. Leave the rest of the hair loose. A narrow braid looks delicate. A wider braid looks more relaxed and is easier to see from the front.
Unlike a full crown braid, this style takes less time and less patience. That matters. The point is to control the front pieces without committing the entire head to braiding.
A little texture spray helps the braid hold its shape, especially if your hair is freshly washed and slippery. If the braid keeps slipping forward, use two pins instead of one. That tiny fix often makes the difference.
19. Wrapped Bun with Hair Stick or Pencil
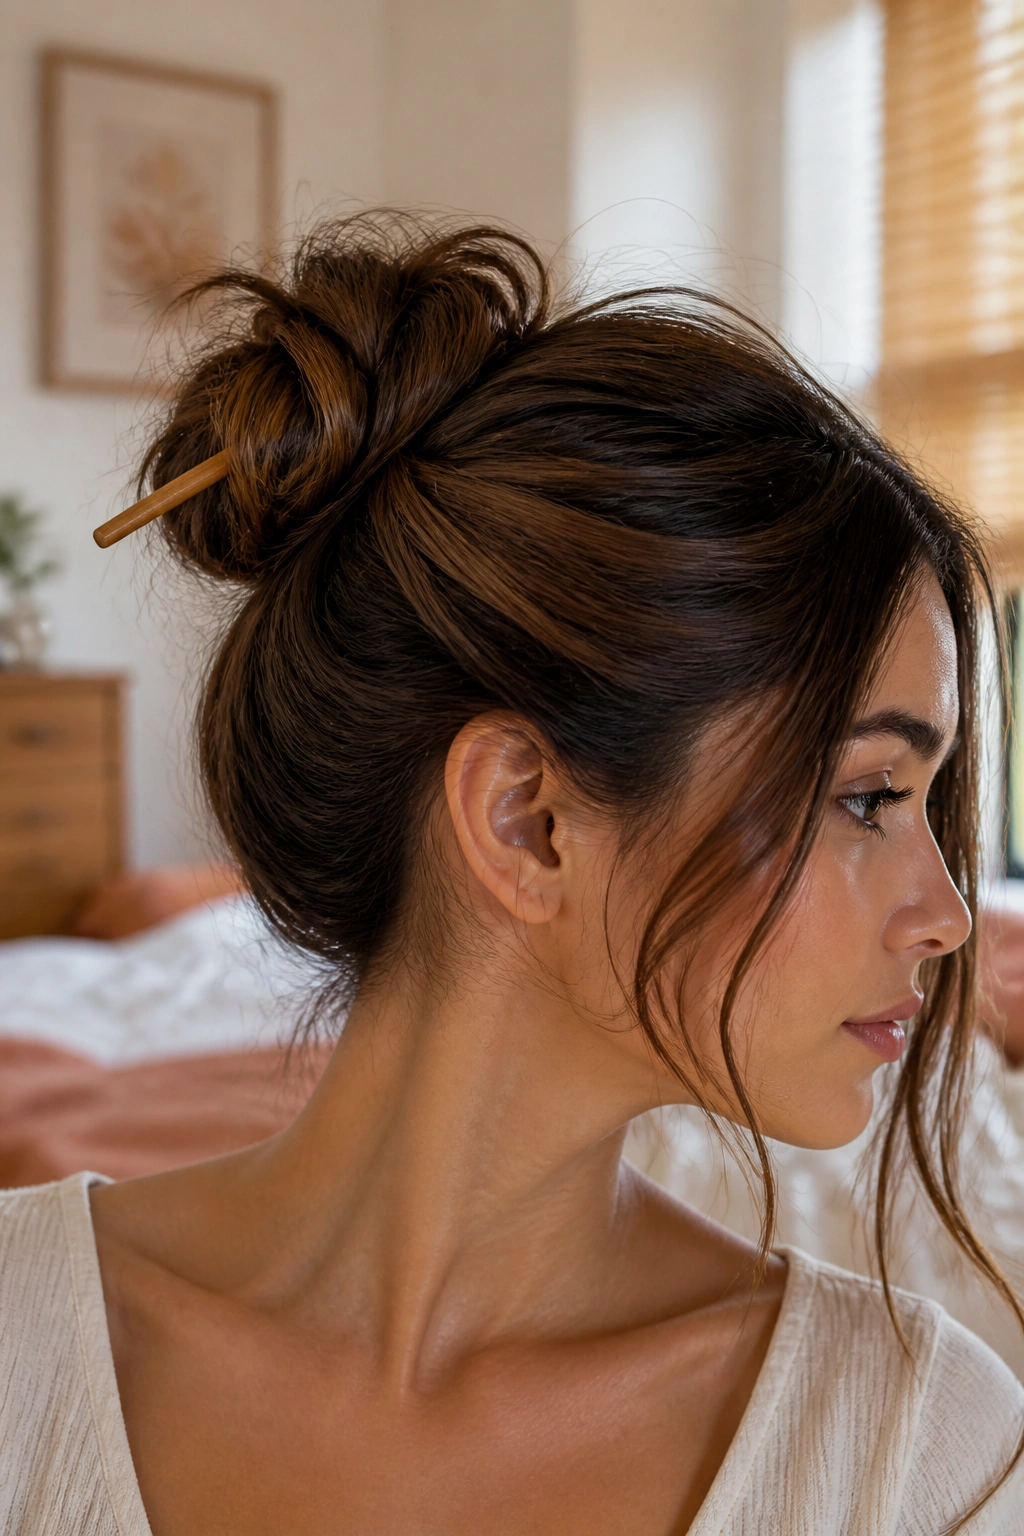
A wrapped bun with a hair stick looks like you tried harder than you did. That is the appeal. Long hair gives the bun enough material to loop around itself cleanly, and the stick holds it in place with a bit of shape.
Gather the hair low or mid-height, twist it into a coil, and wrap it around itself into a bun. Slide a hair stick, chopstick, or even a pencil through the center and catch some hair on the way in. If the bun feels unstable, add a second pin from the opposite side. A stick alone works best when the hair has some grip.
- Best on hair with a little texture.
- Easier to do after one day without washing.
- A stick gives a softer hold than a clip.
- Long layers may need a pin at the end to keep the bun neat.
This one has a calm, old-school look that I really like. It’s tidy, but not severe. If you want a smooth finish, brush the top before twisting. If you want a relaxed one, leave a few pieces loose around the ears.
20. Crisscross Half-Up

A crisscross half-up is one of those styles that seems tiny until you see it in the mirror and realize the shape does a lot of work. Two sections cross over each other at the back, which gives long hair a little lift without changing the whole style.
Take a section from each temple, pull them toward the back, cross the right over the left, and pin them where they meet. Then take a small bit from underneath each side and repeat if you want a fuller effect. The crisscross line makes the back look more intentional than a plain half-up, and long hair gives the lower half enough body to balance it out.
The trick is not pulling the sections too tight. If the sides are yanked flat, the whole look gets severe. A little softness around the temples helps a lot.
This style works for school, errands, casual events, and those days when you want your hair off your face but still loose around your shoulders. It’s small work for a decent payoff.
21. Loose Waves with Front Twists

Can waves count as an easy hairstyle? Absolutely, if you keep the process simple. Loose waves paired with two small front twists give long hair shape without demanding a full heat-styling session. The twists also stop the front pieces from wandering into your face every thirty seconds.
Start with either naturally wavy hair or hair that’s been lightly bent with a curling iron, braid, or overnight twist. Take a small section from each side, twist it back, and pin it behind the ears or at the back of the head. Leave the rest down. The front stays tidy, and the length still moves.
Where It’s Useful
This style works when you want the loose feel of wearing hair down, but you do not want the constant brushing back of front pieces.
If your hair is straight and flat, a little mousse or a quick wave at the ends helps the style hold shape. If your hair already has body, you barely need anything at all. That’s why I like it.
22. Tucked-In Ponytail
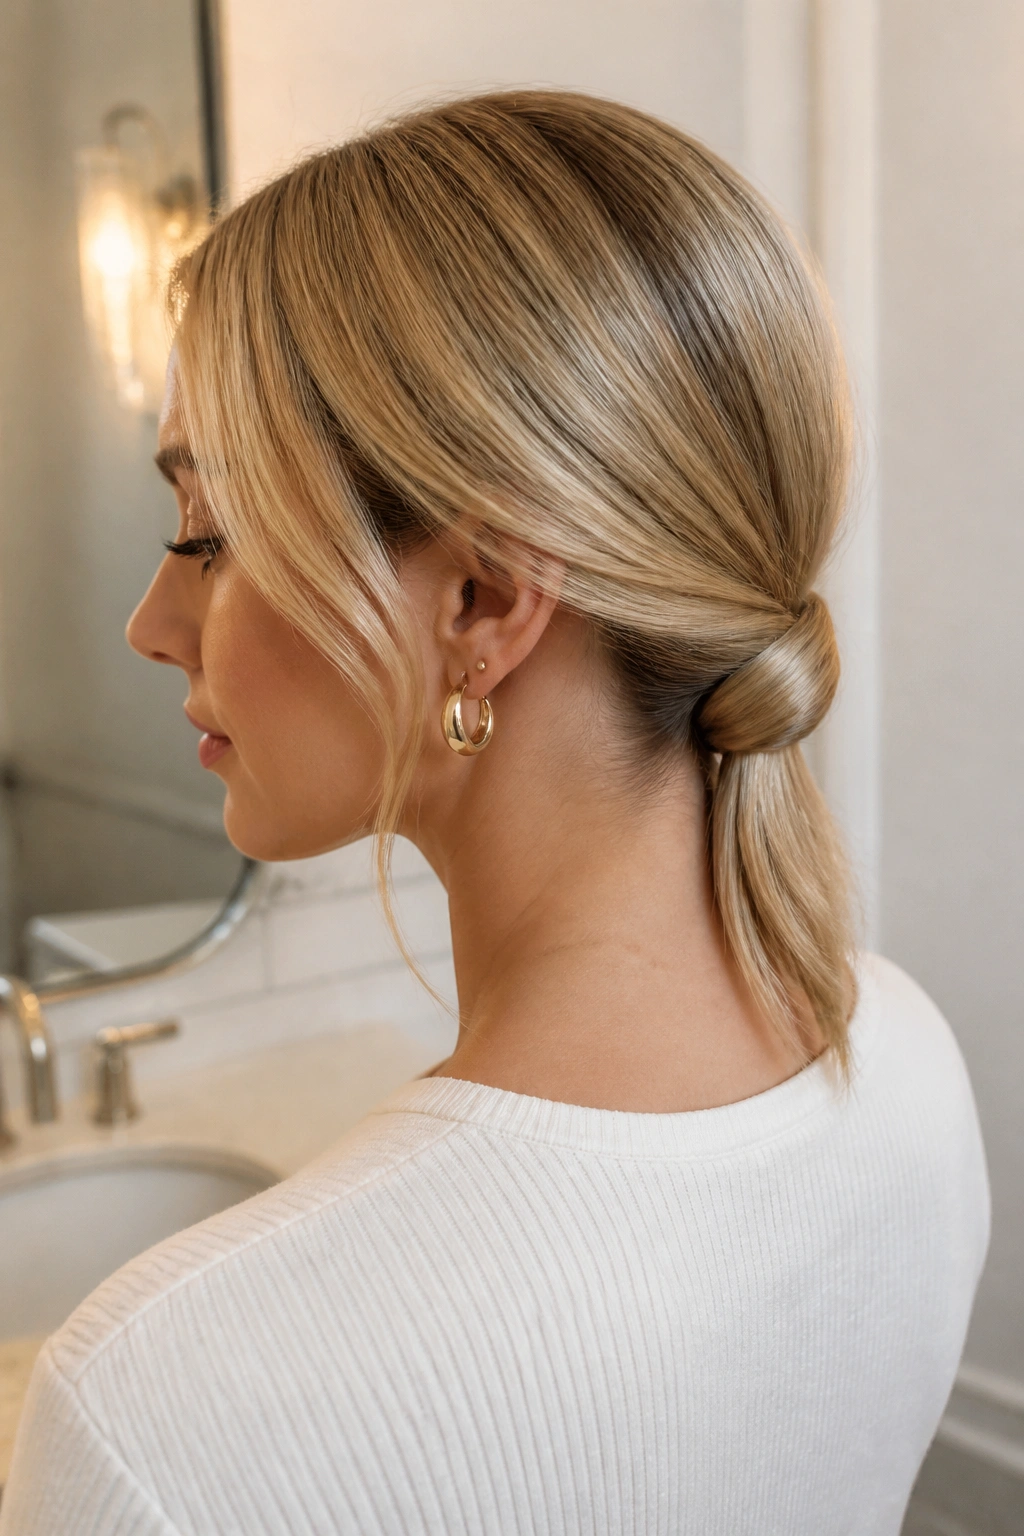
A tucked-in ponytail gives the illusion of a small, polished updo while still being one of the quickest things you can do with long hair. You tie it back, flip the tail through itself, and tuck the ends up so they disappear. Fast. Clean. No drama.
Make a low ponytail and secure it with an elastic. Split the hair just above the elastic and flip the tail up and through the gap, the same way you’d make a topsy tail on a small scale. Then tuck the ends into the opening or coil them under the ponytail and pin them in place. If the hair is long enough, the tucked section creates a neat fold that looks deliberate.
Does it need perfect symmetry? No. If one side sits a little higher, nobody notices unless they’re standing in your bathroom mirror. The whole point is a tidy shape that takes almost no time.
This style is especially good when you want something more refined than a regular ponytail but less fussy than a bun.
23. Milkmaid Braid
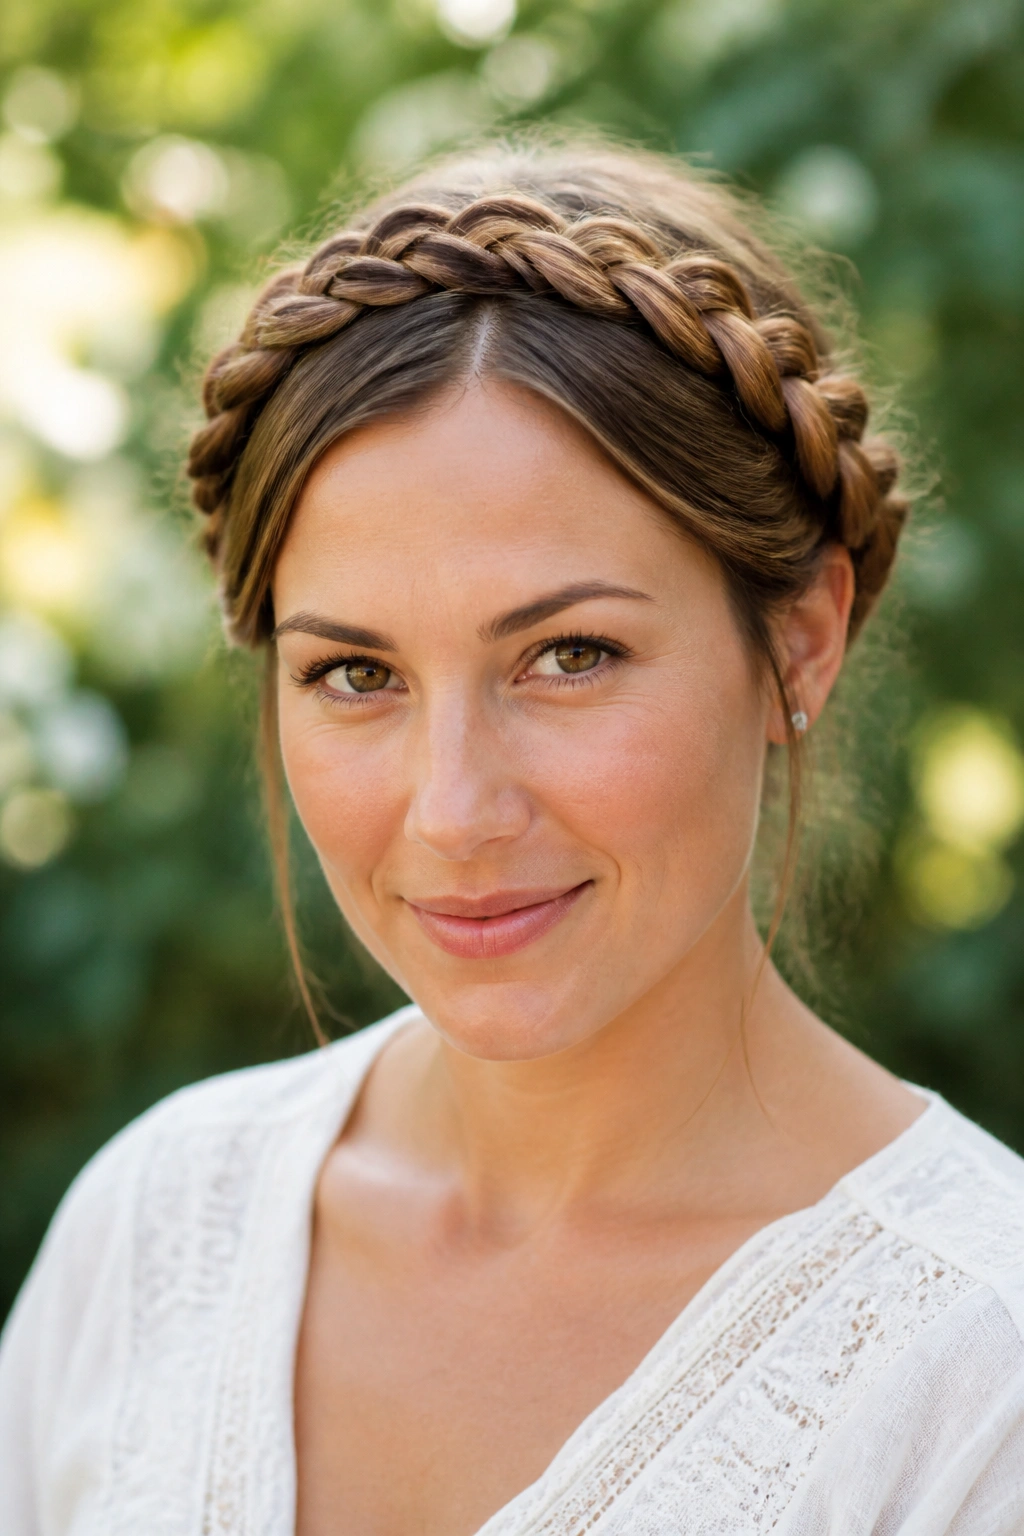
A milkmaid braid is a little old-fashioned in the best way. Long hair makes it easier because there’s enough length to bring the braids up and over the crown without them looking tiny or thin. The finished shape frames the head and keeps the neck clear.
Split the hair into two sections and braid each side separately, then cross one braid over the top of the head and pin it in place. Do the same with the other braid, tucking the ends under the first one. A few pins hidden behind the ears usually do the job. If your hair is thick, start the braids slightly looser so they can wrap comfortably.
Unlike a single crown braid, this style can be easier to manage because each braid is built on the side first. That gives your hands a simpler path.
A little texture helps, but too much product can make the braids stiff and hard to wrap. If you need grip, use dry shampoo or texturizing spray at the roots, not a heavy cream.
24. Braided Ponytail with Ribbon
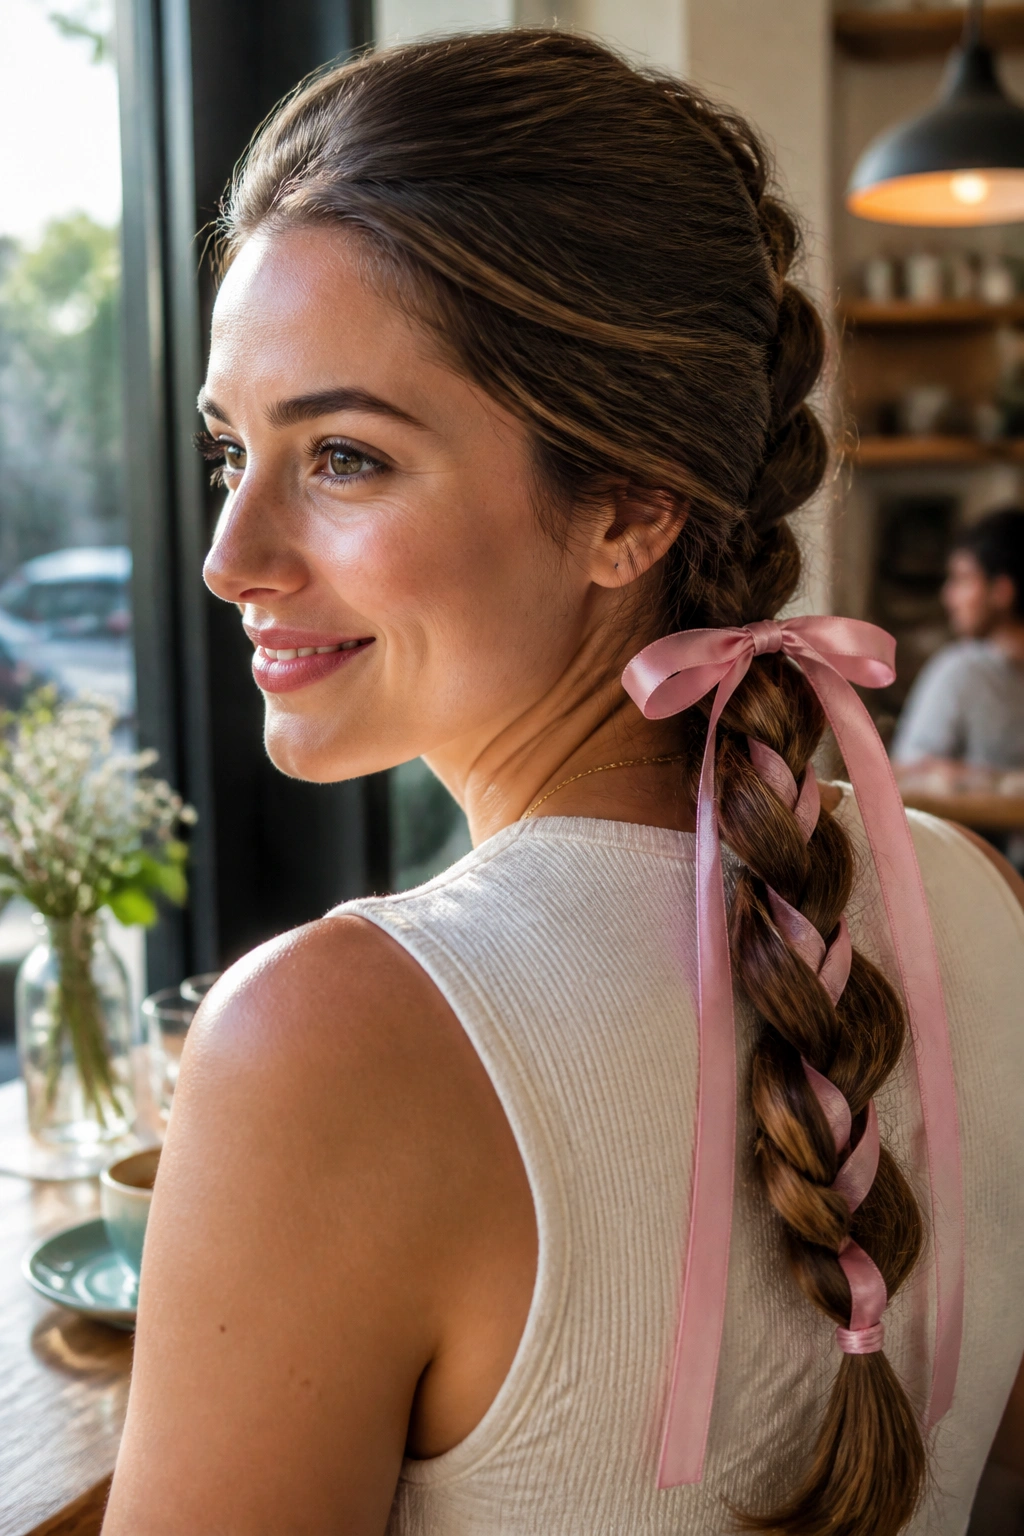
A braided ponytail with a ribbon is the easiest way to make a basic braid feel dressed up. The braid is still doing the heavy lifting; the ribbon just changes the mood. Long hair gives the ribbon a nice length to hang against, which makes the whole style look fuller.
Tie the hair into a ponytail first. Then braid the ponytail down and secure the end. You can thread a ribbon through the braid while you work, or simply tie it around the base and let the tails fall. A narrow velvet ribbon looks soft and neat. A satin ribbon looks smoother. Even a simple grosgrain ribbon can work if you want a more casual feel.
- Great for birthdays, brunch, or a day you want something a little prettier.
- Works best when the braid is snug but not tight.
- A ribbon in a matching color keeps the look quiet.
- A contrasting ribbon makes the braid stand out more.
If the ribbon slips, tie it around the base first and braid past it. That’s usually steadier than trying to weave it through a slippery tail.
25. Five-Minute Knot
A five-minute knot is the style you reach for when you need your hair handled, not perfected. It uses the length to make a simple knot or double twist at the back, and that’s enough. Long hair makes this possible because there’s enough mass to hold shape without falling limp.
Pull the hair into a low ponytail, twist it once, and loop it into a loose knot. Tuck the ends under and pin them. If you want more security, add an elastic first, then pin the knot around it. The style should look compact and a little soft at the edges. If the knot feels too strict, pull at the sides until it relaxes. One or two face pieces can stay out if you want a gentler frame.
This is the kind of hairstyle that earns its place because it respects your time. No curling. No sectioning. No argument with the mirror. Just enough structure to make long hair behave for the rest of the day.
Final Thoughts
Long hair is generous, but it can be stubborn. The styles that work best are usually the ones that keep the shape simple and hide the effort in the details — a wrapped elastic, a well-placed pin, a braid that starts clean at the scalp.
A small stash helps more than people admit. Clear elastics, a few sturdy bobby pins, a claw clip, and a light texturizing spray will get you through most of these looks without much fuss.
If one style falls apart on your hair, that does not mean the style is bad. It usually means your hair wants a different level of grip or a different parting. Try the next one. Long hair gives you room to keep experimenting, and that’s half the fun.
