



Fancy long hairstyles for special days have a strange little power: they can make a dress look more expensive, or make a gown feel unfinished. Long hair gives you room to play, but it also gives gravity more to work with. Heavy curls fall. Slick styles show every bump. Braids loosen around the temples if you pin them lazily and hope for the best.
That’s why the styles that hold up on a wedding floor, under ballroom lights, or through a long dinner are usually the ones with a smart shape first and a pretty finish second. A good formal style for long hair doesn’t just sit there and look nice from the front. It keeps its line from the side, survives hugs, and still looks intentional after an hour of moving around.
I’ve always thought the smartest special occasion hairstyles for long hair are the ones that match the mood of the outfit instead of fighting it. A dramatic neckline wants different hair than a high-neck gown. A simple satin dress can take more texture. And if your hair is very thick, the trick is often to remove bulk in the right places rather than pile on more pins.
Some of the looks below need curling iron work. Some need a few bobby pins and a steady hand. None of them needs salon magic if you know where the weak spots are.
1. Soft Low Chignon With Face-Framing Pieces
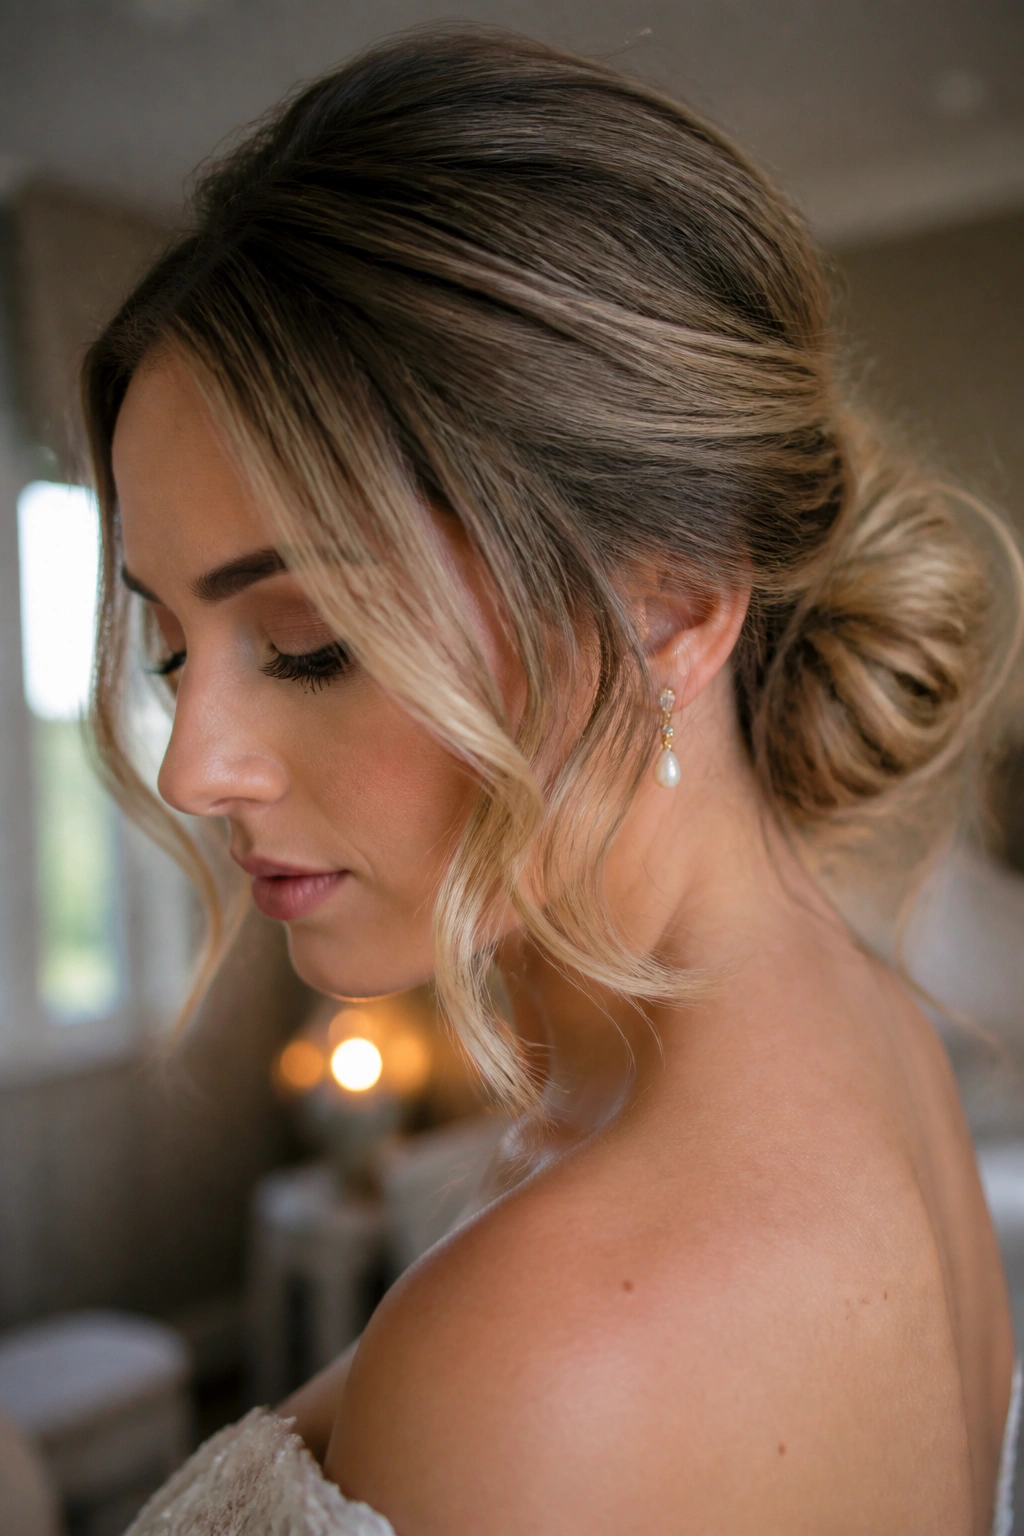
A soft low chignon is the hairstyle I reach for when the outfit already has enough personality. It sits low at the nape, feels calm, and still looks dressed up because the shape is clean. The face-framing pieces keep it from feeling too severe, which matters if you want long hair to look graceful instead of scraped-back and tired.
Why It Feels So Polished
The chignon works because the eye reads the low knot as controlled and the loose pieces as soft. That contrast does a lot of work. It’s also one of the easiest formal styles to keep in place for hours, because the weight of the hair stays low rather than pulling against the pins.
A neat trick: curl the front sections first with a 1-inch iron, then let them cool before pinning the bun. Cool hair remembers shape better. Warm hair slumps.
- Best for: weddings, black-tie dinners, and dresses with open backs
- Tools: tail comb, 6 to 10 bobby pins, one hair tie, light-hold spray
- Watch for: over-smoothing the crown, which can make the style look flat
Loose is the point. A chignon that feels a little soft at the edges usually looks better than one pulled so tight it loses all life.
2. Old Hollywood Waves Swept to One Side

Big, smooth waves swept over one shoulder never stopped looking dressy. They have that controlled shine people notice from across a room, and they flatter long hair because the length gets to stay visible. If you want one of the most reliable long hairstyles for special days, this is still near the top of the list.
Start with a deep side part. Then use a 1.25-inch curling iron and curl sections in the same direction, away from the face. Clip each curl while it cools. That cooling stage matters more than most people think; if you brush too soon, the wave pattern goes soft in the wrong way and loses the sculpted look.
Once the curls are cool, brush them gently with a boar bristle brush until they melt into one smooth wave. Pin one side behind the ear with two crossed bobby pins so the whole style slides over the shoulder without shifting.
This style loves a glossy finish. A pea-sized amount of serum at the ends is enough. More than that and the waves start to look greasy by dessert.
3. Braided Crown With Loose Ends
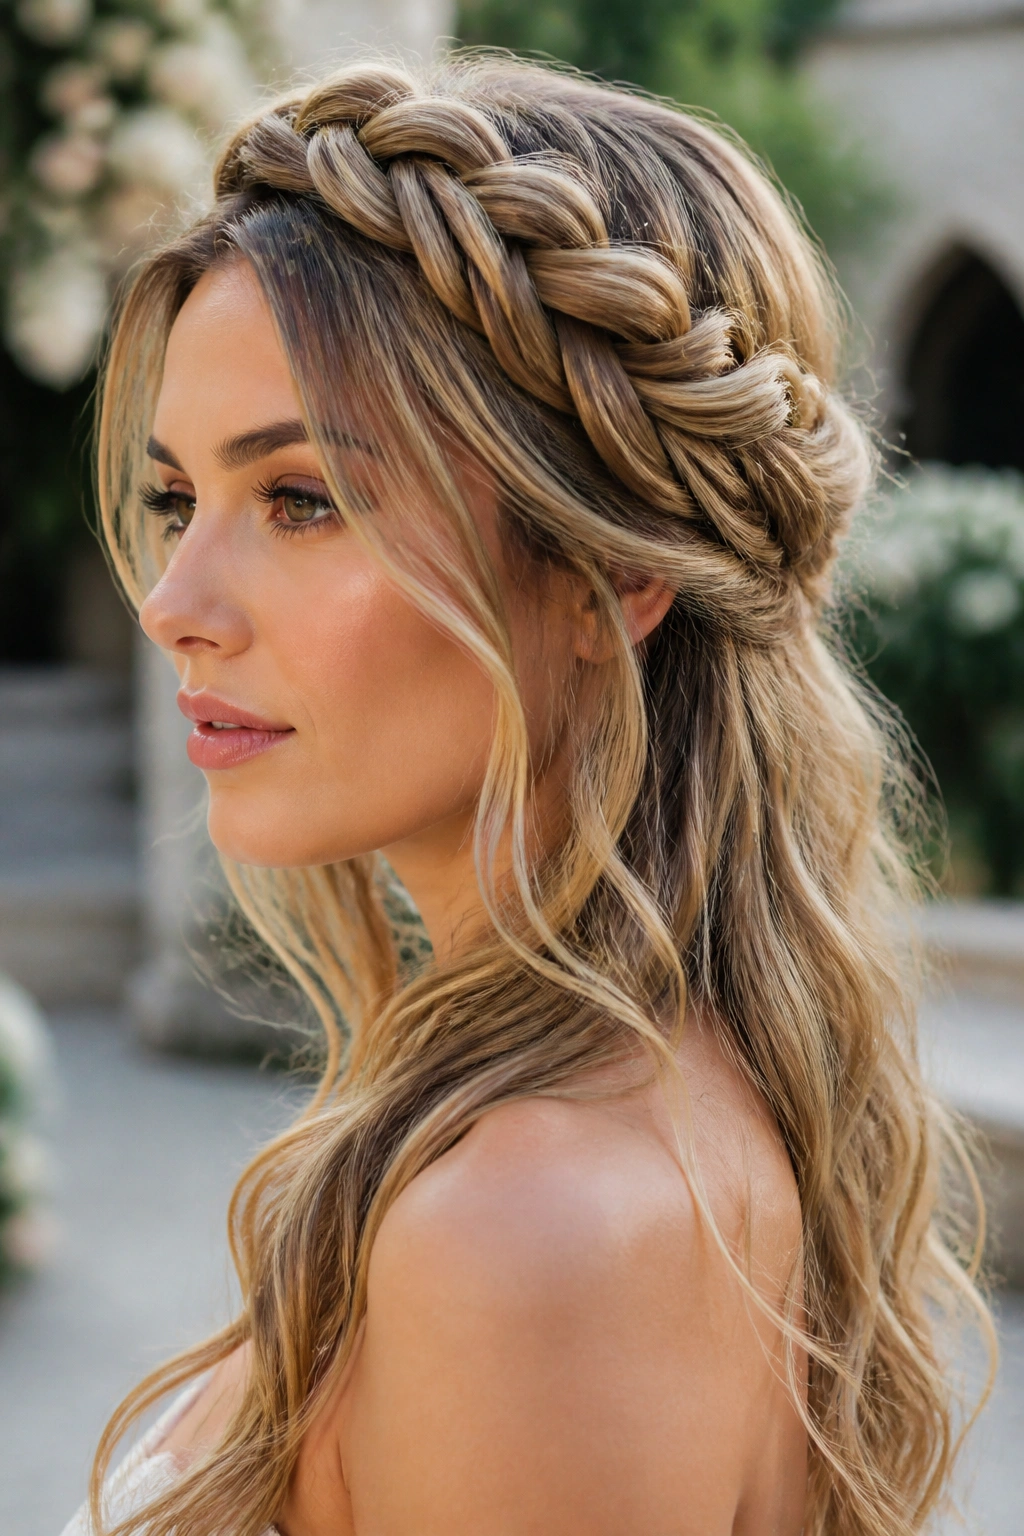
Why does a braided crown keep showing up at formal events? Because it gives you structure at the top and movement at the bottom, which is a rare combination. The braid acts like a built-in frame. The loose lengths keep the whole look from feeling stiff or too little-girl.
What Makes It Work
Braid from just above one ear across the top of the head, then stop at the opposite side and pin the end under a curtain of hair. Don’t pull the braid tight. A wider braid always reads better in photos than a skinny one that feels nervous.
If your hair slips out of braids, add a dusting of texturizing spray first. Not a lot. Just enough to give the strands a bit of grip. Fine hair needs that help more than thick hair does.
How to Keep It Soft
- Pancake the braid by tugging gently on the outer edges
- Curl the loose ends with a 1-inch iron for a softer finish
- Leave two thin pieces near the temples if you want a less formal feel
- Pin with matte bobby pins so the hardware disappears
This one is especially good for garden weddings and outdoor evenings where a fully pinned style can start to feel heavy.
4. Half-Up Twist With Lifted Crown
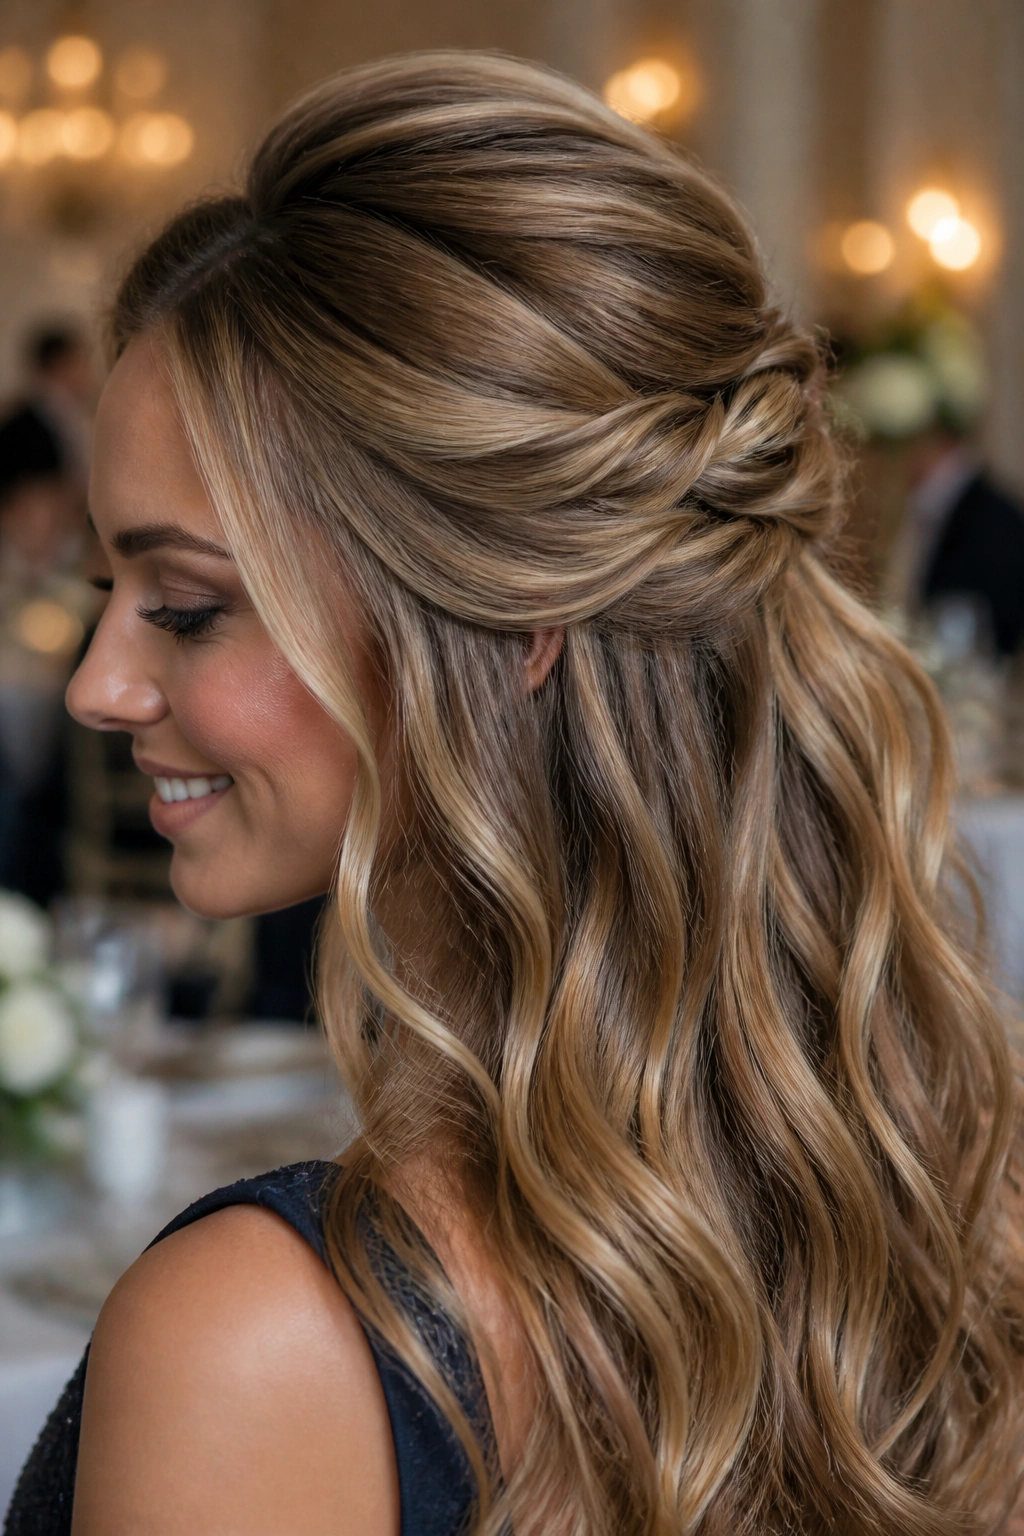
If you need your hair out of your face but refuse to go all the way into an updo, this is the smart middle ground. The half-up twist gives the crown some lift, keeps the front controlled, and leaves the length free. It’s the kind of style that feels easy in the best way.
I like it for events where you’ll be moving around a lot. Cocktail hours. Receptions. Graduation dinners. Anything where you don’t want to keep touching your hair every ten minutes.
Start by teasing a 2-inch section at the crown with a fine-tooth comb. Just enough to build a base. Then twist back one section from each side, pin them in the middle, and let the rest fall in waves or smooth lengths. Cross two pins in an X. That little trick makes the twist hold far better than a single pin placed straight across.
The style looks best when the crown has a little lift but no hard bump. If the top is too tall, it starts to feel dated. If it sits flat, it loses the whole point.
5. Sleek Glass-Hair Ponytail With a Wrapped Base
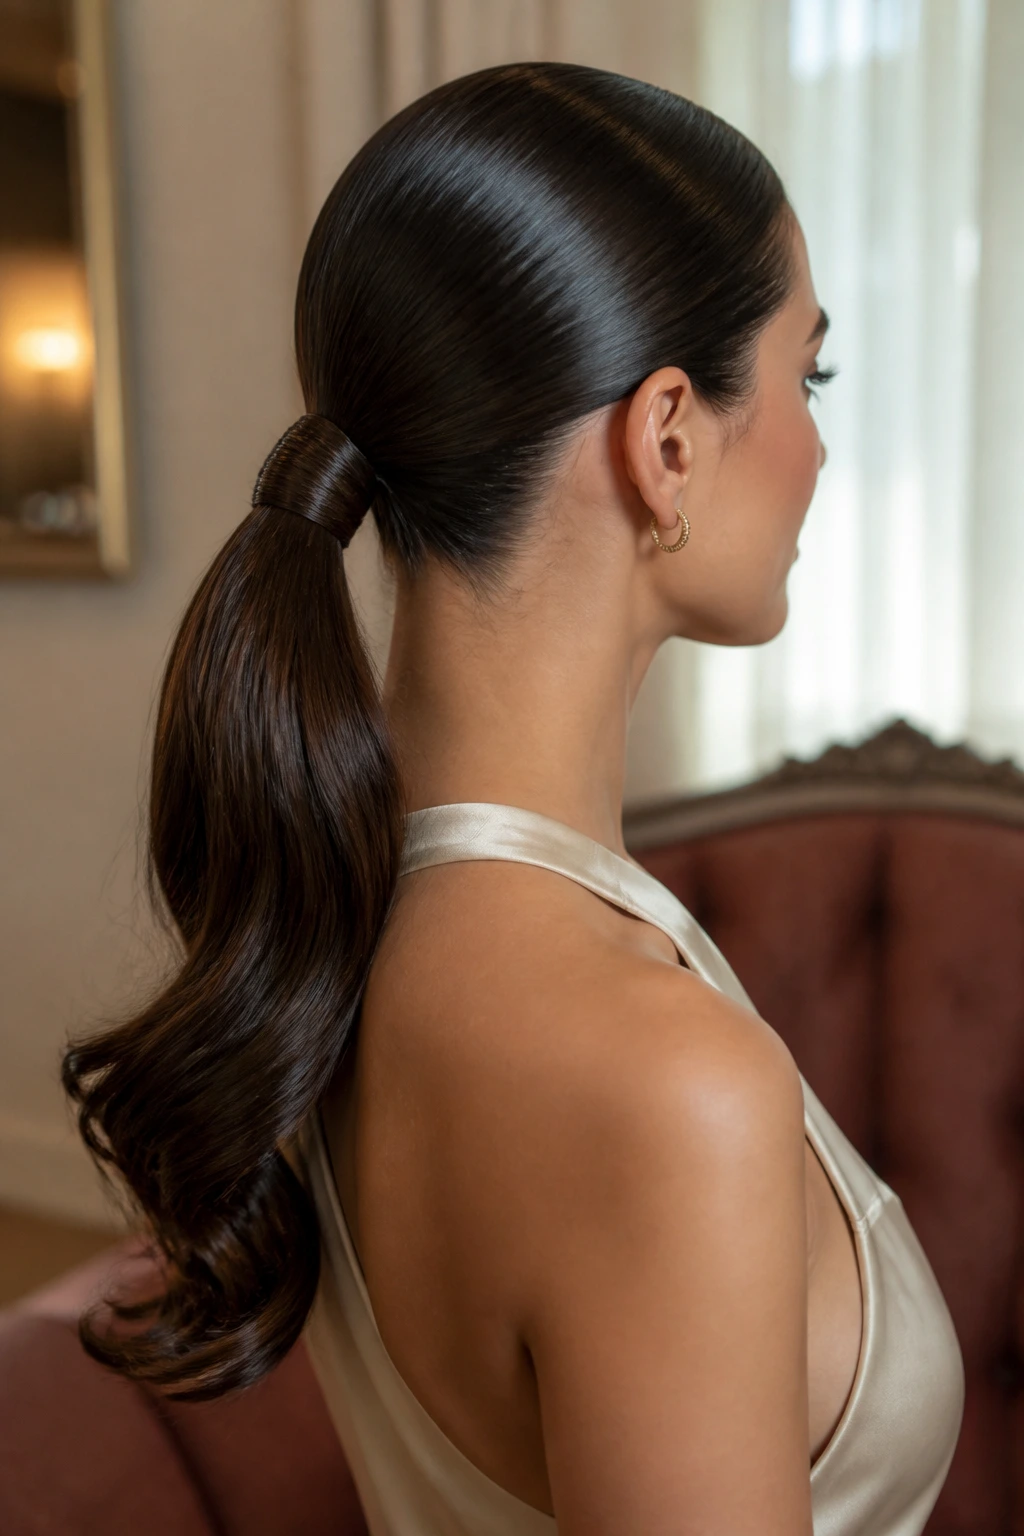
A sleek ponytail can be dressier than a loose curl set. People forget that. When the hair is smooth enough to reflect light and the base is wrapped cleanly, the whole style looks deliberate and expensive without trying too hard.
The key is prep. Blow-dry the roots in the direction you want them to sit. Then smooth the top with a flat brush and a touch of styling cream. A fine-tooth comb helps more than your fingers here. Fingers leave tiny ripples. Tiny ripples show under bright lights.
How to Build the Shape
Gather the hair at mid-low or low ponytail height, depending on the neckline. Secure it with a firm elastic. Take a small strand from underneath, wrap it around the base, and pin the end below the ponytail where no one will spot it.
What Makes It Dressy
- A straight, clean part
- No bumps at the crown
- Hair that’s polished from root to end
- One or two curled pieces at the tail if you want a softer finish
This style is especially good when the earrings are doing the talking. It gives them room. And honestly, that’s often the smarter move.
6. Waterfall Braid Into Loose Waves
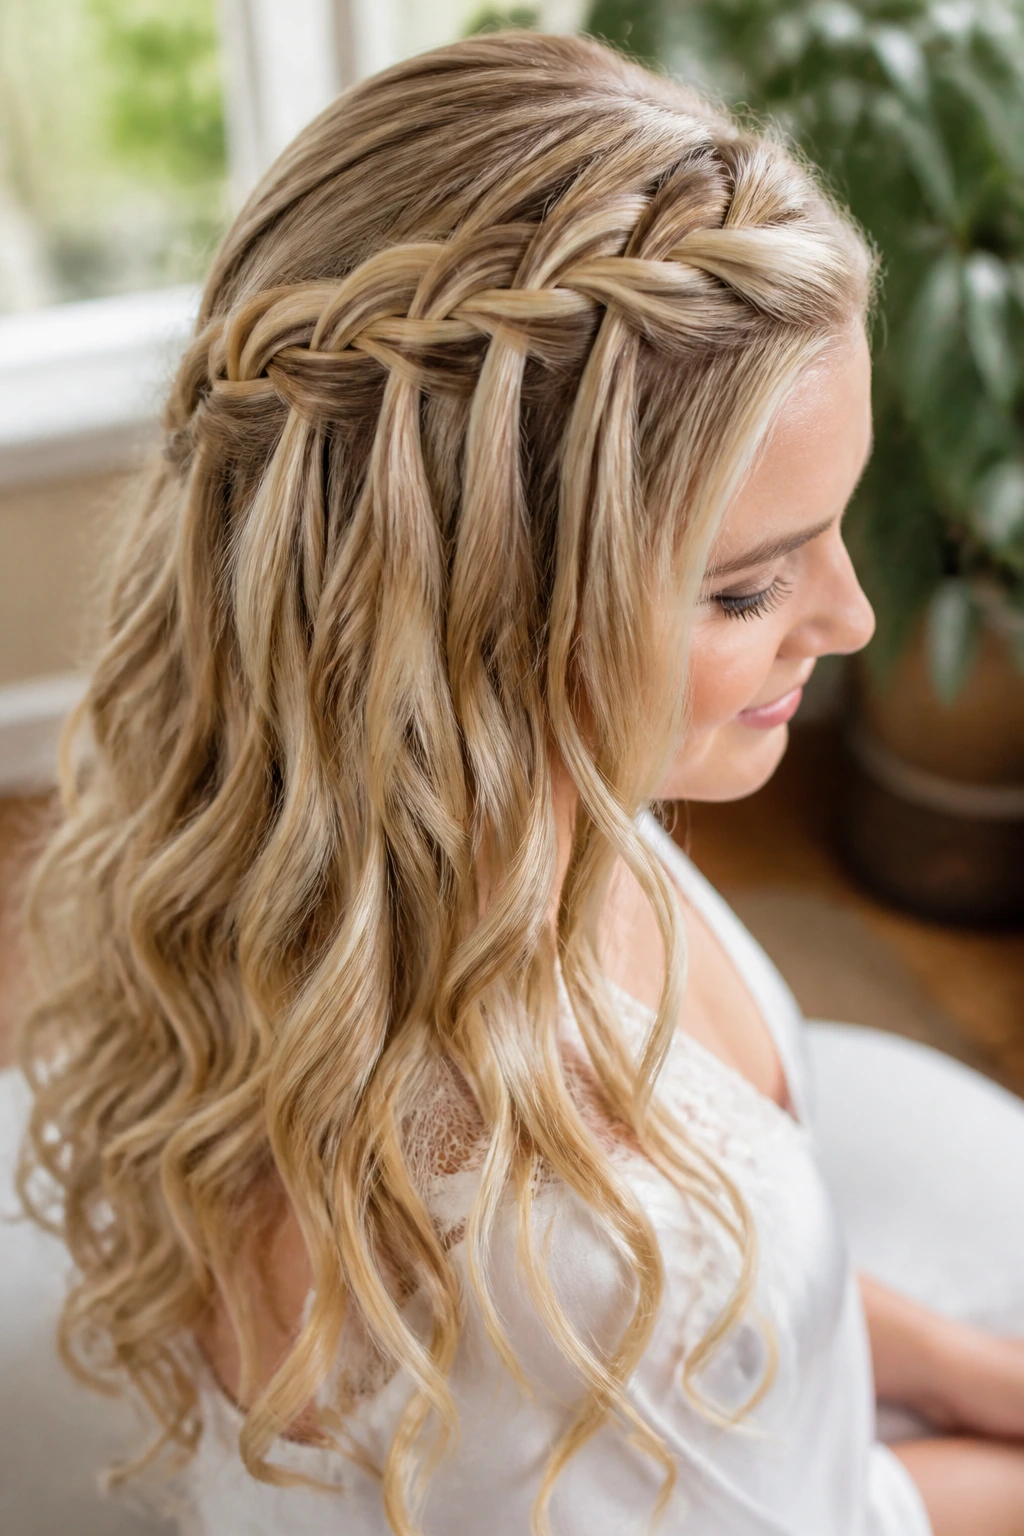
The waterfall braid has one job: make long hair look a little dreamy without turning it into a full braid helmet. It’s one of those styles that looks more complicated than it is, which is useful on a day when you want people to think you spent longer than you did.
Begin the braid high at the temple and let each dropped section fall into the rest of the hair. That falling strand is the whole point. It creates the open, cascading effect that gives the style its name. Below the braid, keep the lengths in loose waves so the braid doesn’t feel disconnected from the rest of the hair.
This style is strongest on medium to thick hair, or on hair that holds a curl for more than an hour. Very layered hair can be a little annoying here because shorter pieces keep escaping. Not a deal breaker. Just something to know before you start.
A light mist of flexible spray after the braid is done keeps the crown from frizzing. Use too much and the texture gets crunchy, which defeats the whole soft look.
7. Braided Low Bun With Tucked Ends

Unlike a plain chignon, a braided low bun shows texture before shape. That’s the appeal. You get the neatness of a bun, but the braid gives the style more detail, which matters on dresses that need a little visual interest around the back.
The Braid-to-Bun Trick
Braid the hair loosely first, either as one braid down the back or as two side braids that meet low at the nape. Then coil the braid into a bun and pin it all the way around the base. U-pins help here because they slide into dense hair better than a handful of short bobby pins.
What To Watch For
If your hair is very smooth, spray a little dry texturizer through the lengths before braiding. Otherwise the braid can unravel as you twist it into the bun. Thick hair can do the opposite problem and look bulky, so keep the braid loose enough that it still bends.
This style is a good choice for heavy earrings, high-neck dresses, and anyone who wants the back of the hair to feel finished without looking stiff. It also survives dancing better than most loose bun styles. That alone earns it a place on the list.
8. Bubble Ponytail With Satin Ties

When a regular ponytail feels too plain for a formal event, the bubble ponytail comes in with a little attitude. It is playful, sure, but with satin ties or small wrapped elastics it reads dressy fast. The trick is spacing and proportion. Too many bubbles and it looks costume-y. Too few and it just looks like a ponytail with opinions.
Pull the hair into a low or mid ponytail. Add another elastic about 2 to 3 inches down, then another, then another, depending on length. Gently tug each section outward so it rounds into a bubble. That gentle pull matters. Yank too hard and the shape gets lumpy instead of round.
This style works especially well on long hair with density, because the bubbles need enough fullness to keep their shape. Very fine hair can still do it, but you’ll want a bit of texture spray first. If the hair is pin-straight and slippery, the bubbles slide into each other.
A satin ribbon at the first elastic makes the whole style feel more finished. Small detail. Big payoff.
9. Deep Side-Part Curls Swept Over One Shoulder
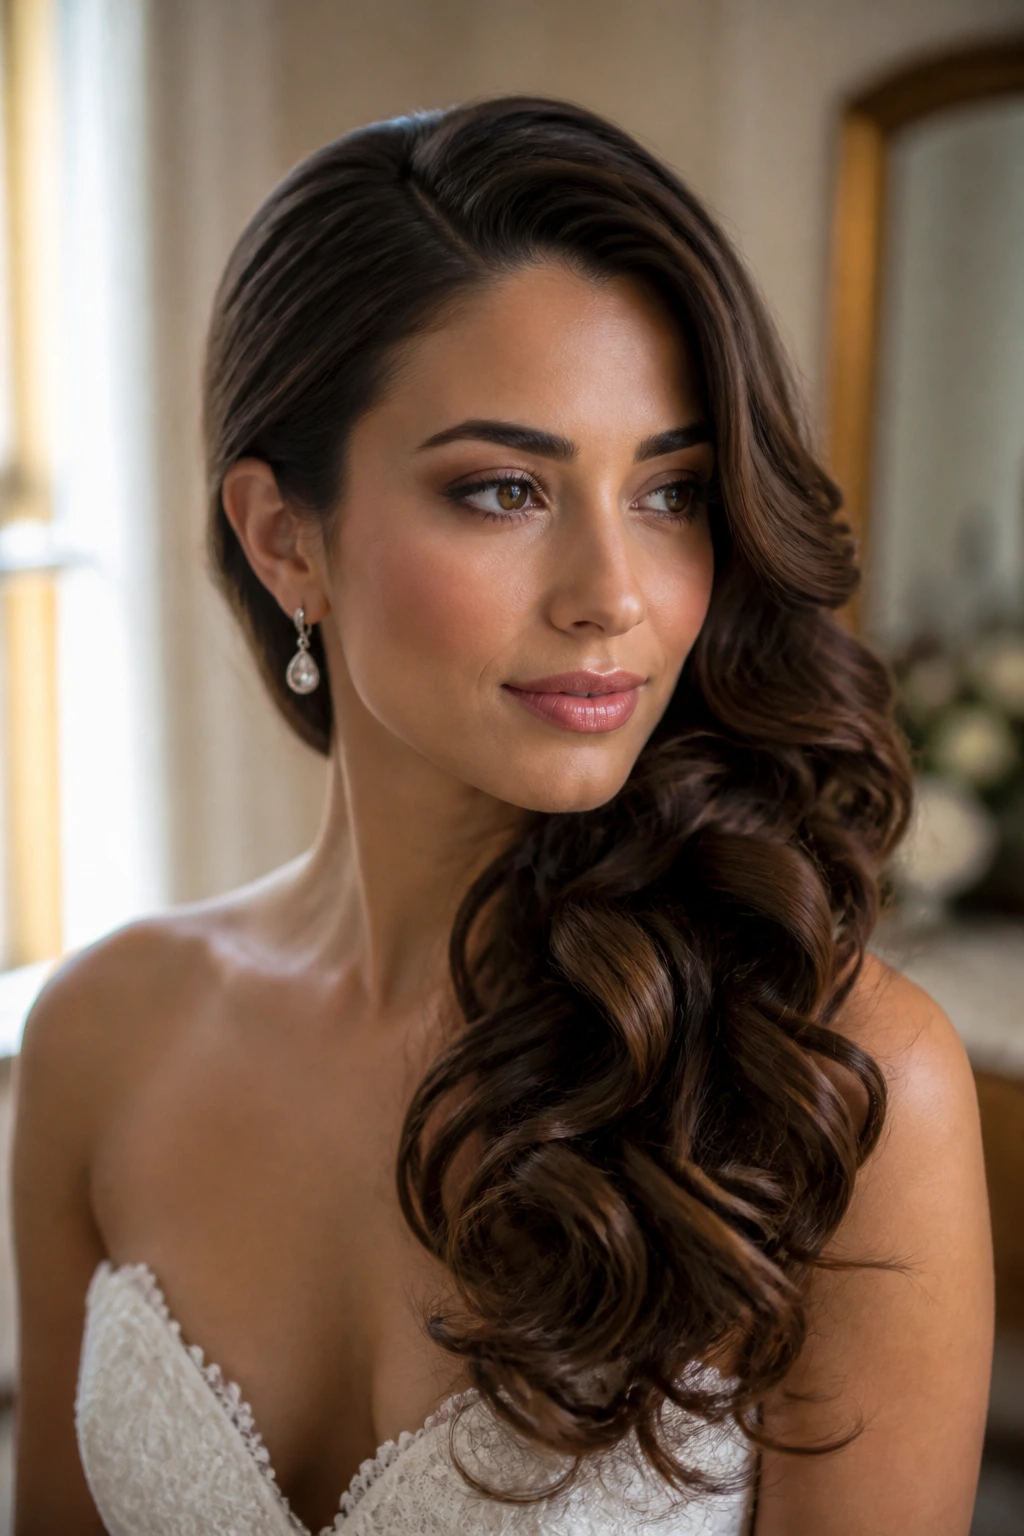
A deep side part changes everything. Same curls. Different mood. The whole look feels more formal because the weight shifts to one side and leaves the face with a cleaner line.
This is one of the easiest fancy long hairstyles for special days if you like wearing your hair down but still want it to feel intentional. Curl the lengths away from the face, then let the curls cool before finger-combing them into softer waves. Pin the heavier side behind the ear, or tuck it just enough that the shoulder line stays open.
The style works particularly well with dresses that have one strap, asymmetric necklines, or detailed bodices. It keeps the visual attention from competing with the dress. That sounds obvious, but a lot of people forget it and choose hair that fights the outfit.
Use a little shine spray on the mid-lengths, not the roots. Roots with too much product go limp fast. And if your curls tend to collapse at the back of the head, clip the sections while they cool instead of walking around and hoping for the best.
10. Long Blowout With Soft Bends and Shine
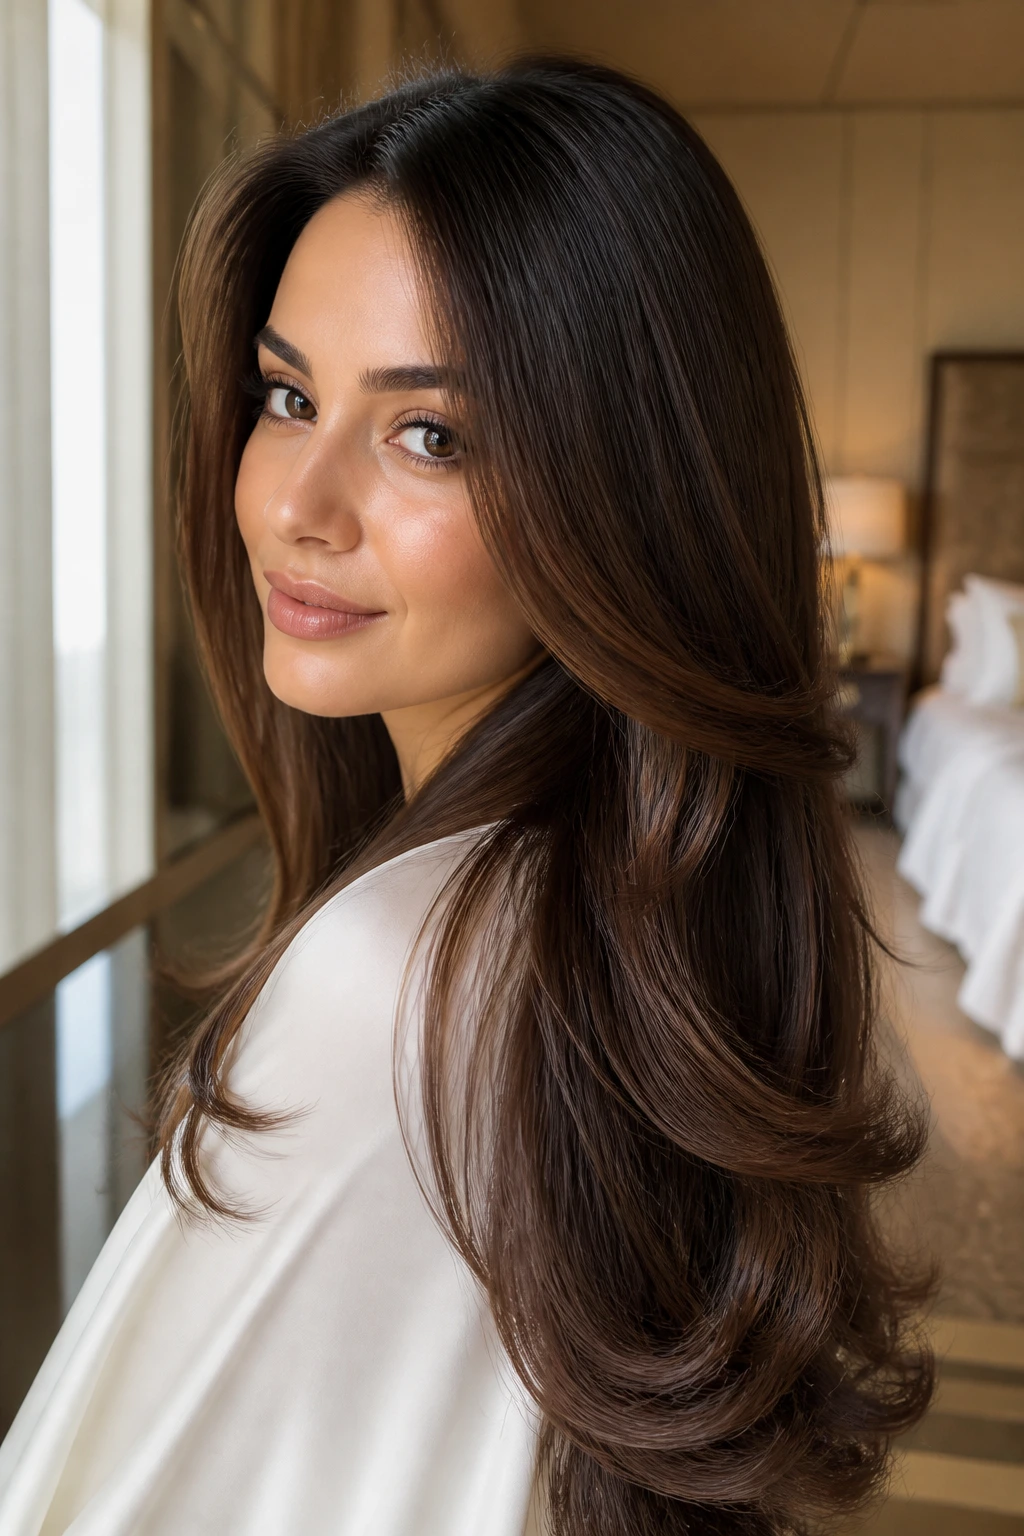
There’s something hard to beat about a fresh blowout on long hair. Not stiff. Not curled into shape like a pageant set. Just smooth, bouncy bends through the ends and a clean line from root to tip. It smells like heat protector, feels silky between your fingers, and moves in a way that makes the hair look expensive without shouting about it.
Use a round brush and dry the hair in 2-inch sections. Wrap the ends under slightly and give each section a cool shot before releasing it from the brush. That cooling step is what helps the bend stay. If you skip it, the ends go flat by the time you leave the driveway.
This style is the quiet workhorse for long formal hair. It does not need a pin. It does not need glitter. It just needs good tension while blow-drying and a touch of smoothing serum afterward.
Boring? Maybe. Reliable? Absolutely.
If you want the hair down but neat, this is a safer bet than most curl-heavy styles because it handles frizz better and still looks polished in motion.
11. French Twist With Length Left Flowing
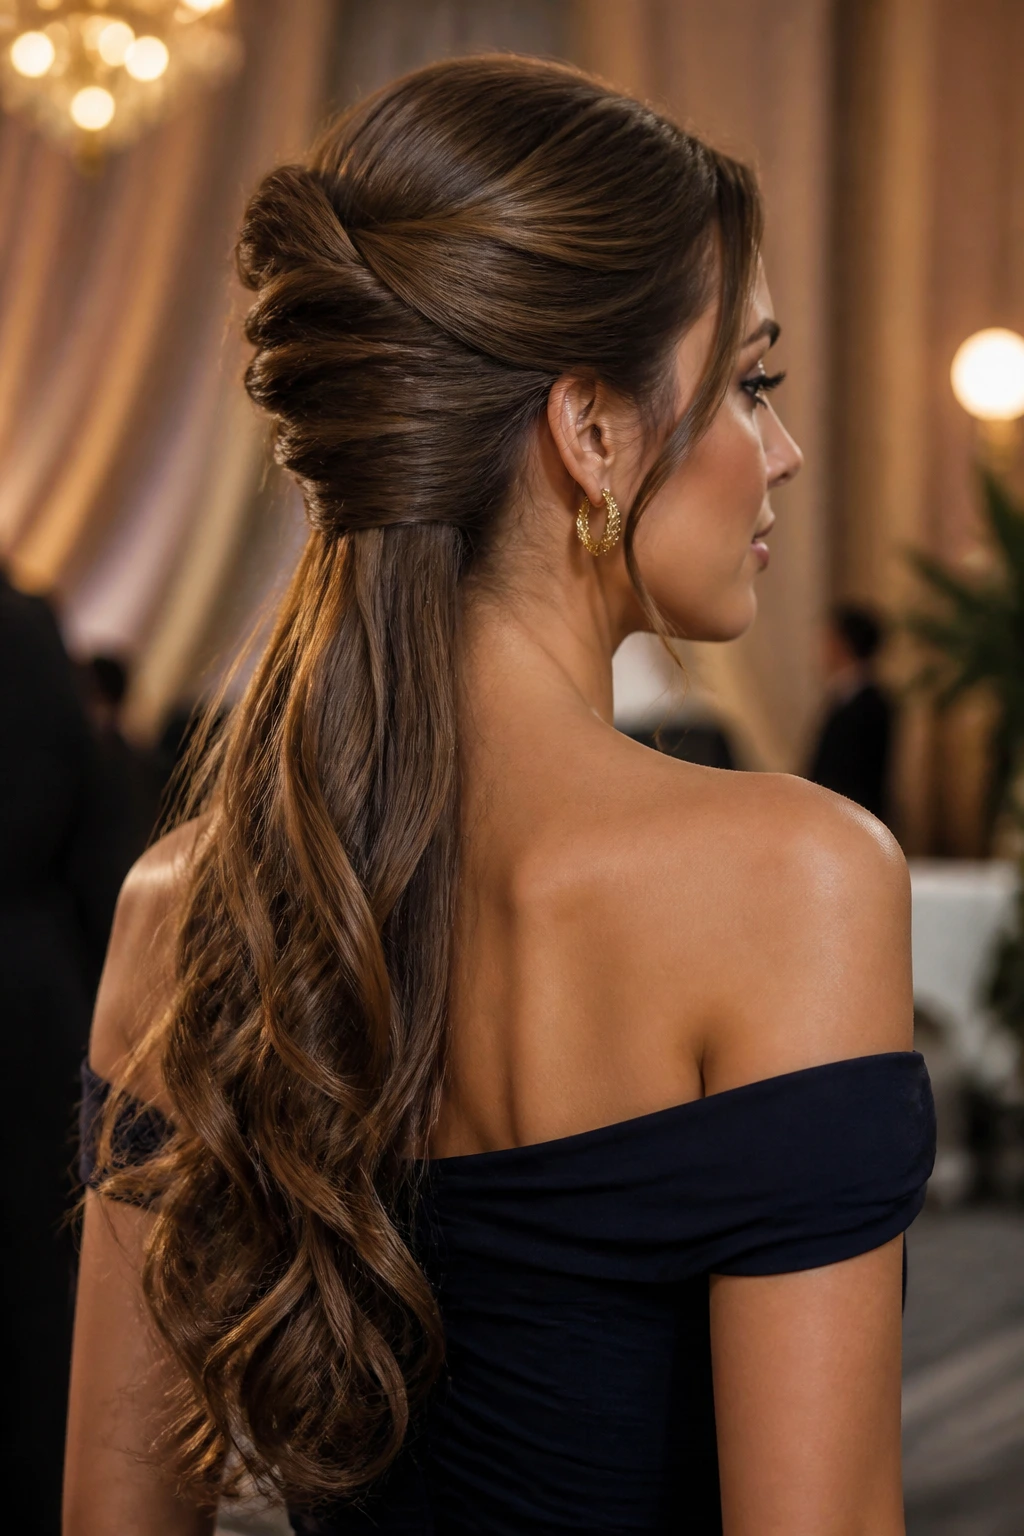
The French twist does not have to mean every strand goes all the way up and out of sight. A softer version keeps part of the length flowing down the back, which makes the style feel less severe and a little more modern. It’s a nice option when you want the refinement of an updo without hiding all your hair.
The Part That Matters
The twist itself should sit snugly at the back of the head, usually from the crown down to the nape. Leave the lower lengths out first, then either straighten them for a sleeker finish or curl them for more softness. A tucked twist with free hair below creates a nice contrast.
How to Make It Last
- Use a flexible comb or two sturdy pins to anchor the twist
- Smooth the top with a small brush before twisting
- Keep the twist close to the head, not floating away from it
- Spray the seam lightly so flyaways do not pop loose
This style is especially good for structured dresses and strong jewelry. It has backbone. If you want a look that feels grown-up without becoming severe, this is one of the cleanest choices.
12. Half-Up Braided Halo With Soft Waves
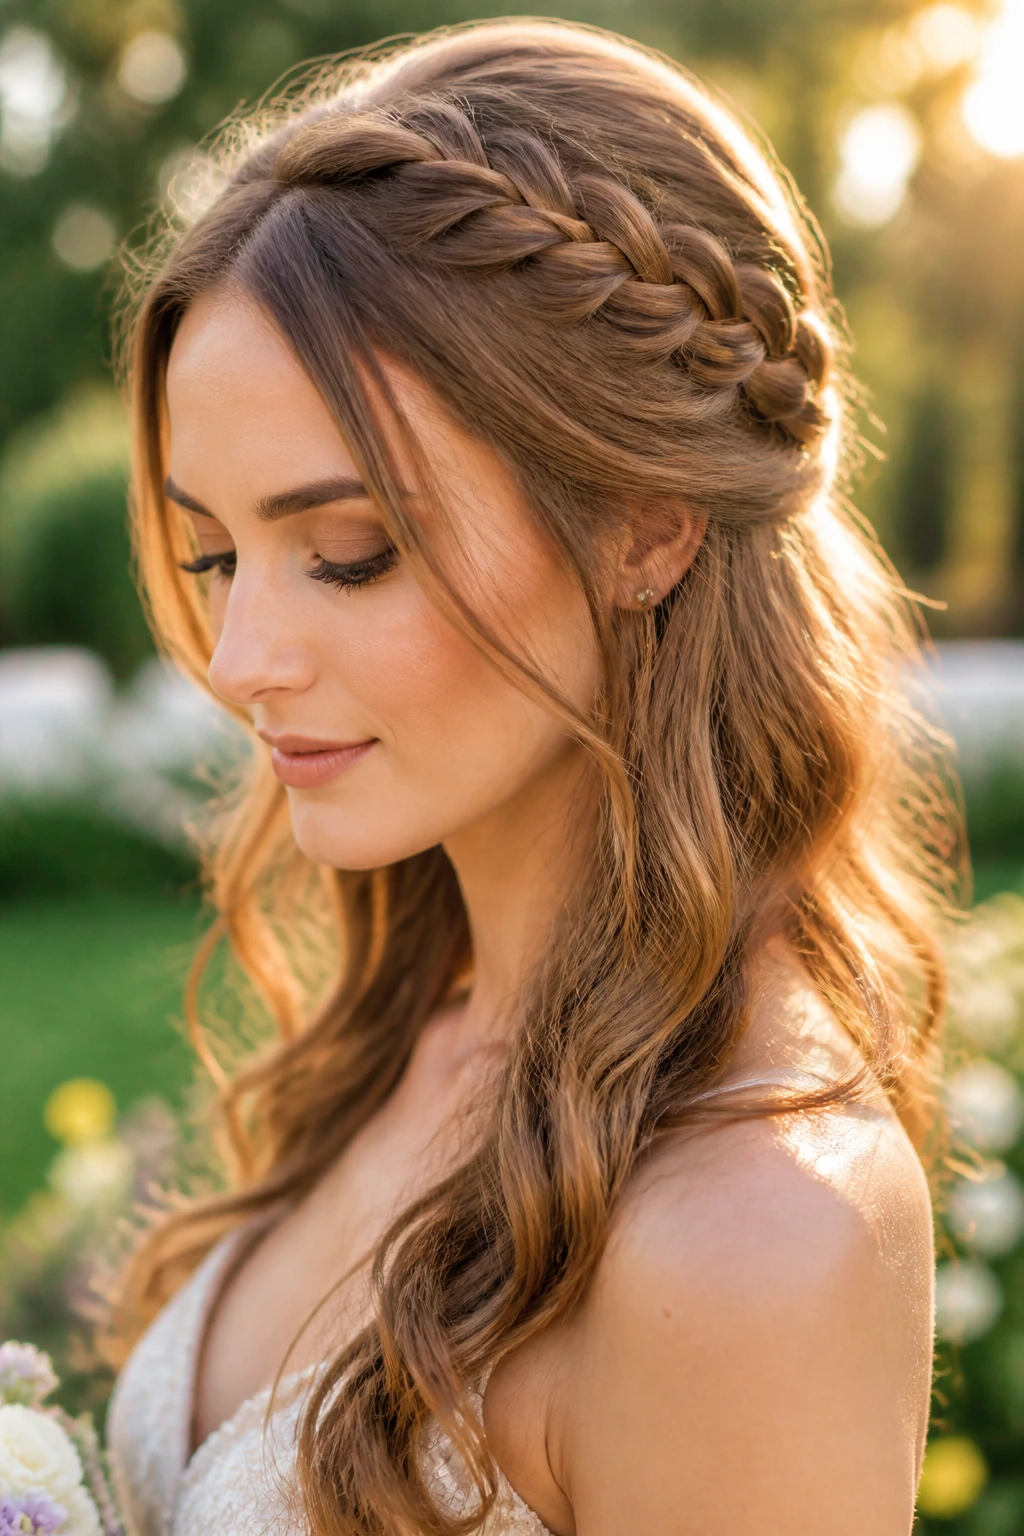
Some styles make long hair look bridal even when no one is walking down an aisle. The half-up braided halo is one of them. It frames the crown like a built-in accessory, then lets the rest of the hair fall in waves. It feels romantic, but not sugary.
I like this style for outdoor events and late-afternoon ceremonies because it holds onto its shape while still moving a little in the breeze. Start the braid just behind one temple, curve it across the head, and pin it on the other side under a veil of hair. Then curl the lower lengths in loose, even sections.
The main mistake here is making the braid too tight. A tight halo can pull the face upward and make the whole style feel hard. A softer braid gives you a more relaxed line, which reads better with long hair.
If you have a lot of layers, use a few hidden pins under the braid to keep shorter pieces from poking out. It’s a small annoyance. Worth handling before you leave the house.
13. Mermaid Waves With Side Clips
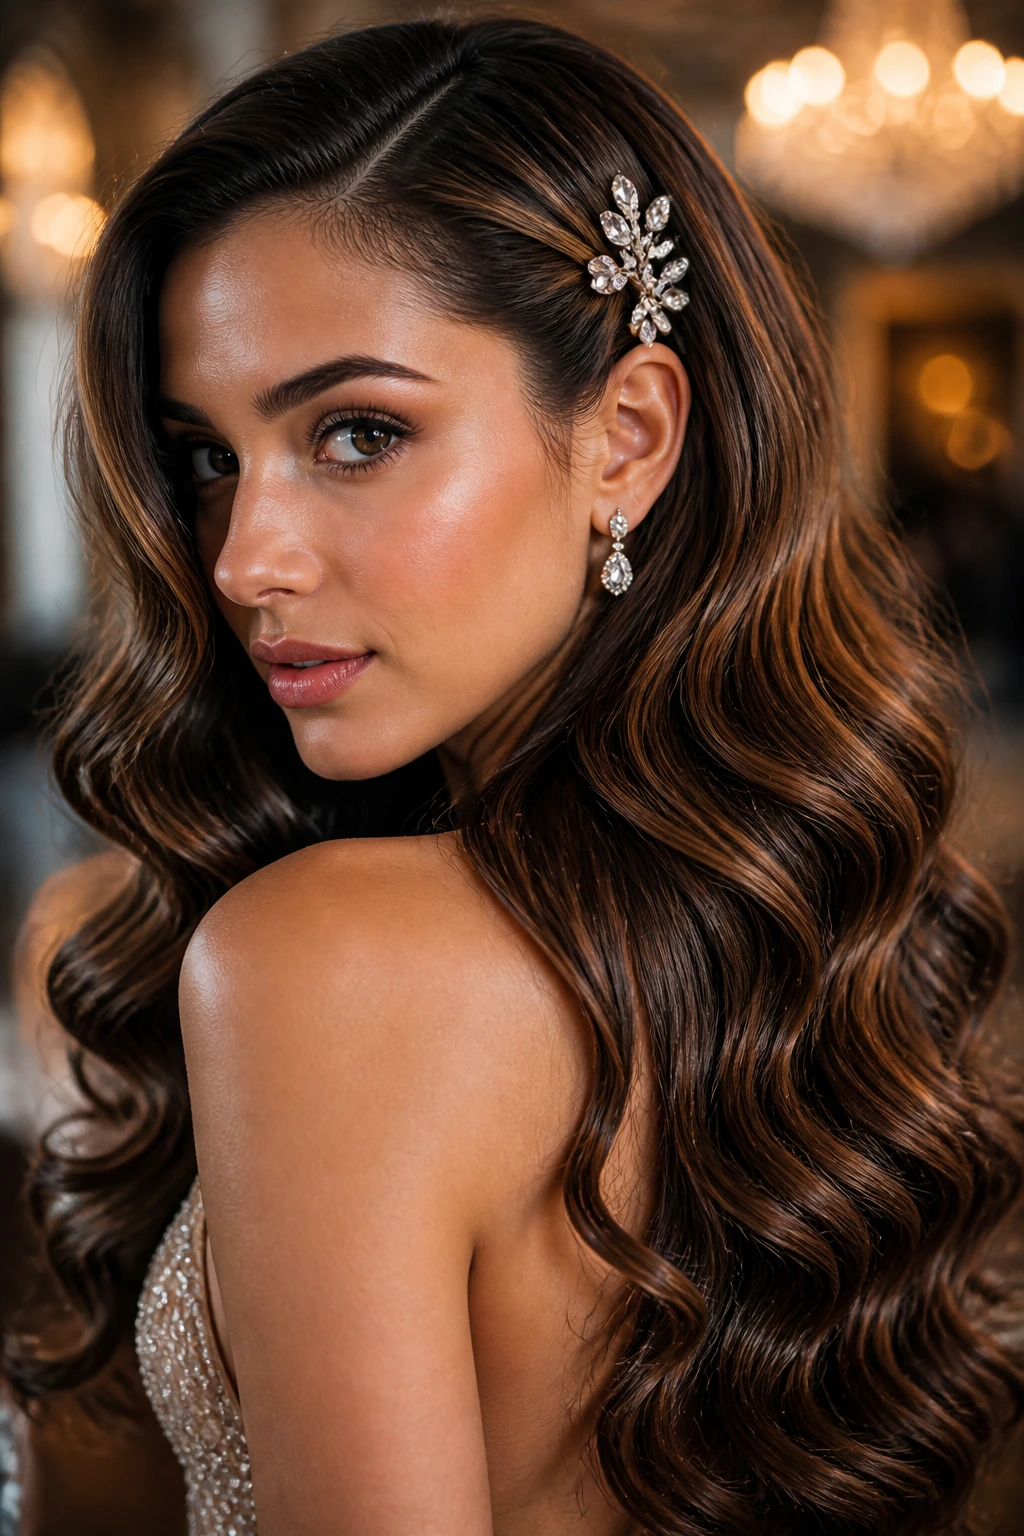
A bold hair accessory can carry a lot of the load when the waves are right. Mermaid waves are long, flowing, and a little glossy, with a bend pattern that looks softer than a curl and less casual than straight hair. Add one or two jeweled clips near the temple, and the style goes from pretty to event-ready fast.
The key is to build the waves in wide sections, not tight curls. Use a large-barrel iron or a waving tool if you like those tools. Then brush the waves out gently so they fall into one smooth pattern. If the hair is too curly, the clips can get lost. Soft waves leave room for the detail to stand out.
A clip placed just above the ear usually looks better than one sitting too high on the head. High placement tends to feel a little random. Lower placement follows the line of the face and looks more considered.
This style suits people who want one clear focal point. The hair should not fight the accessory. Let the clip do its job.
14. Rope Braid Bun Hybrid

A rope braid bun is a smart choice when you want texture without spending forever sectioning hair into tiny pieces. Two strands. Twist. Wrap. Pin. That’s the whole idea, and for long hair it can look surprisingly rich if the sections are even.
Why choose this over a regular braid? Because rope braids hold a little better in slippery hair and take less time to build. They also create a cleaner spiral when you wrap them into a bun, which gives the back of the style a nice shape.
If the hair is thick, split it into two large sections and twist each one clockwise before twisting them around each other the other way. That opposite-direction twist is what keeps the rope braid tight. If you twist both directions the same way, it loosens fast.
This style is good for formal dinners, performances, and weddings where you want the hair to stay tucked in place but not look rigid. A little shine spray on the finished braid brings out the twist pattern.
15. Ribbon-Tied Low Ponytail With Volume at the Crown

A ribbon-tied low ponytail sounds simple until you see it done well. Then it starts looking expensive in a very old-fashioned, pleasing way. The crown has a bit of lift, the ponytail sits low and smooth, and the ribbon changes the whole tone of the look.
What to Tell Your Stylist
Ask for gentle volume at the crown, not a teased tower. About 1 inch of lift is enough. Too much and the style starts to feel dated. A satin ribbon about 1 to 1.5 inches wide usually looks cleaner than a skinny one that disappears into the hair.
Why It Works
- The low placement keeps the neck line open
- The ribbon adds a finished touch without extra pins
- The crown lift gives the profile some shape
- The tail can be curled or left softly bent
This is one of the better formal hairstyles for long hair if your dress is simple and the shoes are already making a statement. It doesn’t compete. It just finishes the outfit.
Velvet works well in cooler months. Satin feels smoother and lighter. Either way, tie the ribbon with enough length that the ends hang slightly below the ponytail. Short ribbon tails look clipped and awkward.
16. Fishtail Braid Over One Shoulder
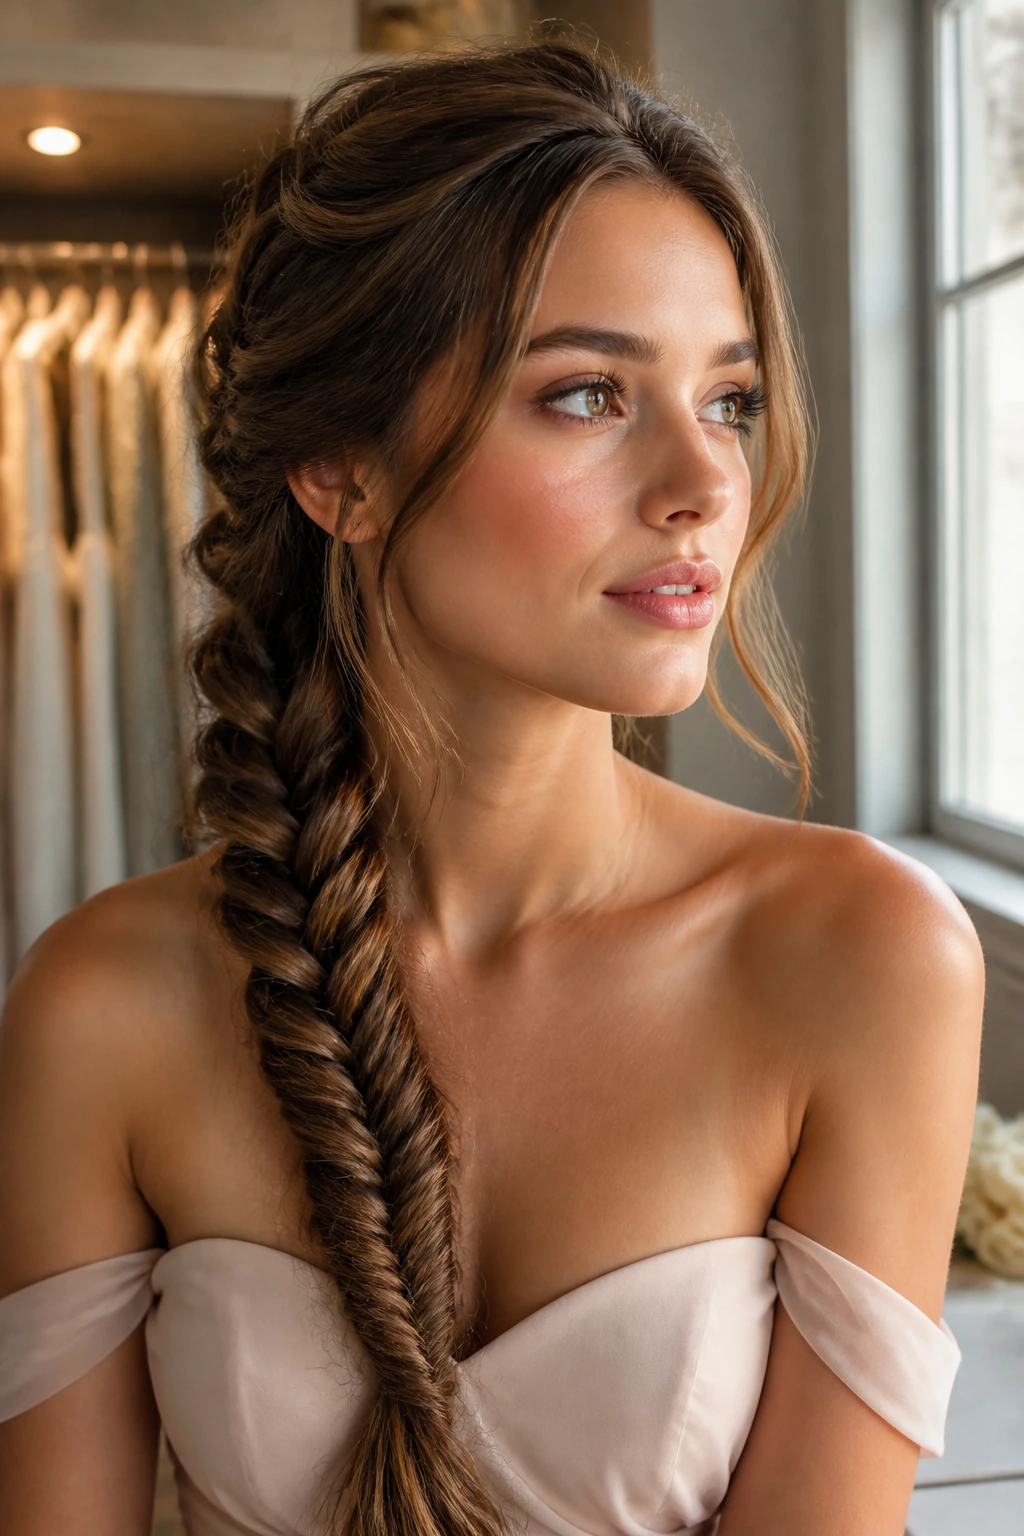
A fishtail braid has a different energy from a three-strand braid. It looks finer, more detailed, and a little more deliberate, even when the actual technique is simple once your fingers get used to it. Draped over one shoulder, it feels formal without becoming precious.
This is a good option when you want texture but don’t want a full updo. Start with hair that has some grip. Clean, silky hair can be slippery here, so a little dry shampoo or texturizing spray helps a lot. Divide the hair into two sections and pull tiny pieces from the outer edge of one side to the other. Keep the pieces small and even.
A fishtail always looks better after a gentle pull-apart. Not enough to ruin the braid. Just enough to widen it and let the pattern show. I think people often stop too soon there. They braid neatly, then forget the last shaping step.
This style is one of the best choices for dresses with bare shoulders. It frames the neckline without crowding it.
17. Voluminous Half-Up Bouffant
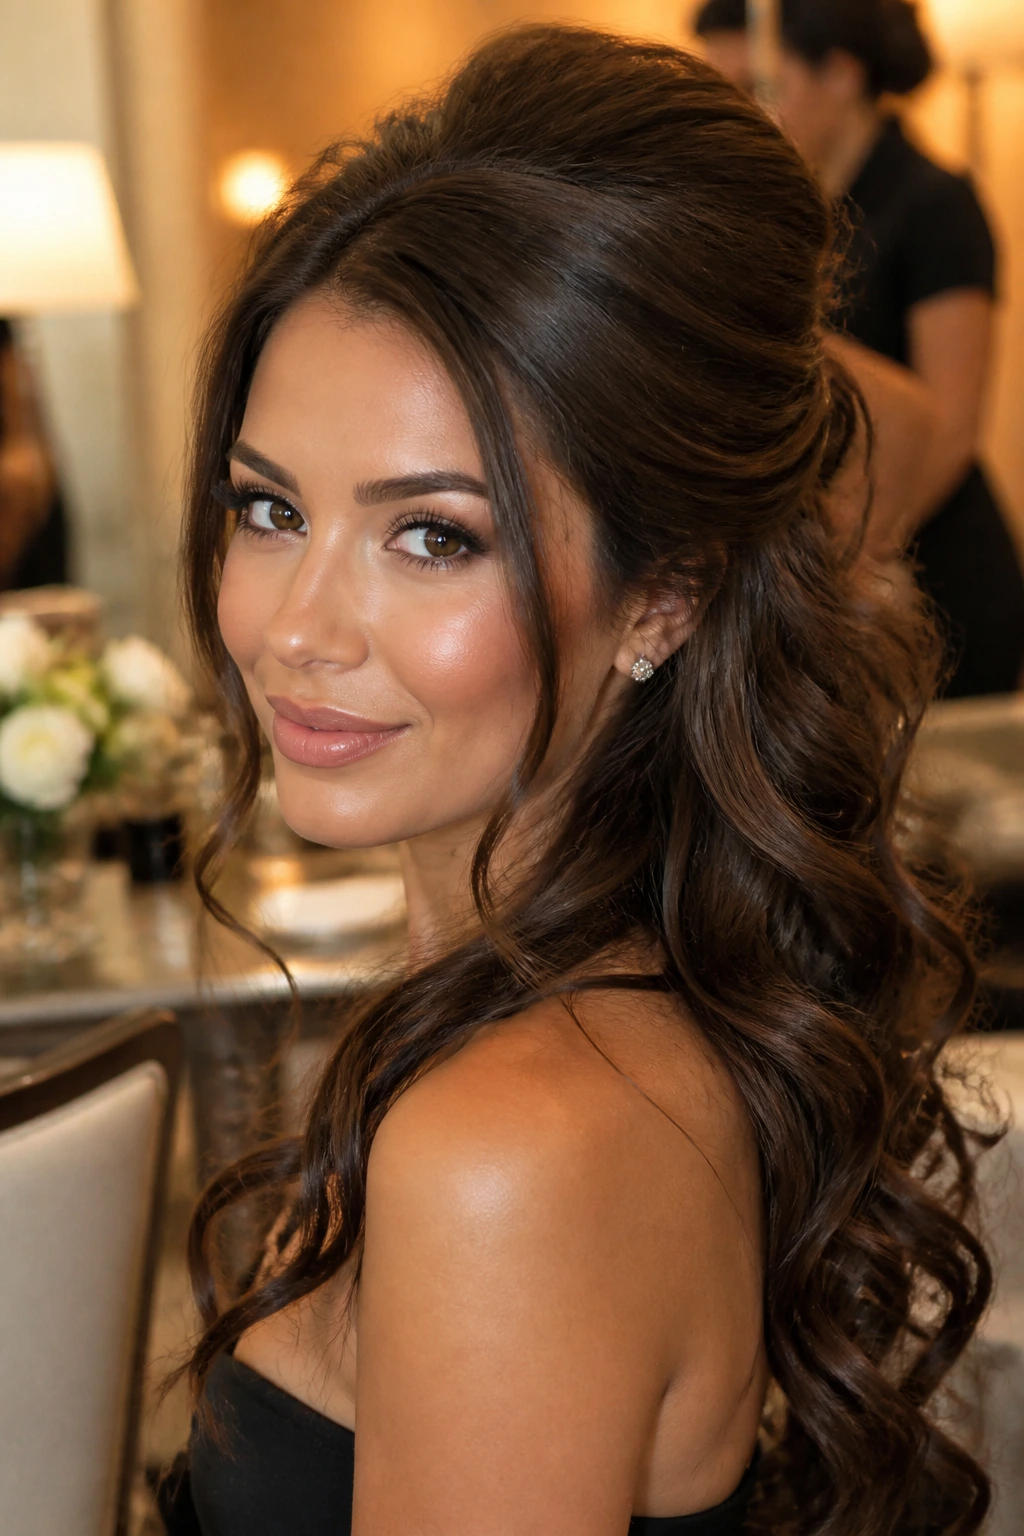
A half-up bouffant has a little drama, yes. That’s the point. It lifts the crown, keeps the sides smooth, and leaves the lower hair free, which means you get height without committing to a full pinned-up look. For some special days, that extra lift is exactly what the outfit needs.
Think of it as a more grown-up cousin to the party hair people wore for years. When it’s done well, it doesn’t look like a costume. It looks intentional and confident. The trick is to keep the bump at the crown smooth and shaped, not fluffy and loose.
Backcomb a narrow section at the crown, then cover it with a smooth top layer. Pull the side sections back and pin them just behind the crown. Leave the rest in curls or soft bends. A little hairspray on the underside helps the shape stay without turning the top crunchy.
Where It Works Best
- Dresses with simple necklines
- Events where you want height in photos
- Longer faces that benefit from crown volume
- Hair that needs a little support at the roots
This style has presence. Use it when you want the hair to make a statement without fully taking over the room.
18. Sleek Center-Part Lengths Tucked Behind the Ears

Straight hair can absolutely be formal. In fact, a sharp center part with long lengths tucked behind the ears can look cleaner and more modern than a lot of fussy styling. The danger is in the details. Every bend shows. Every frizz halo shows. That is why this style rewards careful prep.
Flat-iron the hair in thin sections and keep the pressure even from roots to ends. Then smooth the front with a touch of anti-frizz cream or light serum. Tucking the hair behind the ears opens the face and shows off earrings, which is a nice trade if your accessories are doing the heavy lifting.
I like this look with dresses that have strong structure: square necklines, tailored shoulders, sharp seams. The hair stays quiet, which lets the clothes take the lead. And when the hair is this sleek, the shine matters. Not oily shine. Healthy shine. There’s a difference, and you can spot it from across a room.
If your ends tend to flip out, run the flat iron through the last 2 inches once more and let them cool straight. That small move changes the whole line.
19. Twisted Halo Bun With Long Tendrils

A twisted halo bun gives you a soft frame around the head, then leaves a couple of tendrils free so the style never feels too locked down. It has a gentle, romantic shape that works on long hair because the twists show off the length before they get pinned away.
How the Face Framing Works
The tendrils should sit near the cheekbones or jaw, not in the middle of the face. Curl them lightly around a 3/4-inch iron so they bend instead of hanging straight. That makes the front feel softer and more finished.
Building the Halo
- Twist sections from each temple toward the back
- Pin them low so the halo follows the shape of the head
- Gather the remaining hair into a loose bun at the nape
- Leave the bun slightly airy so it does not look packed too tight
This style is useful when you want something feminine and formal, but not too polished. It also holds up nicely under a veil or hair accessory, which gives it extra mileage for wedding hair.
The whole point is softness with structure. Too much of either and the style loses its charm.
20. Soft Looped Ponytail With a Velvet Bow
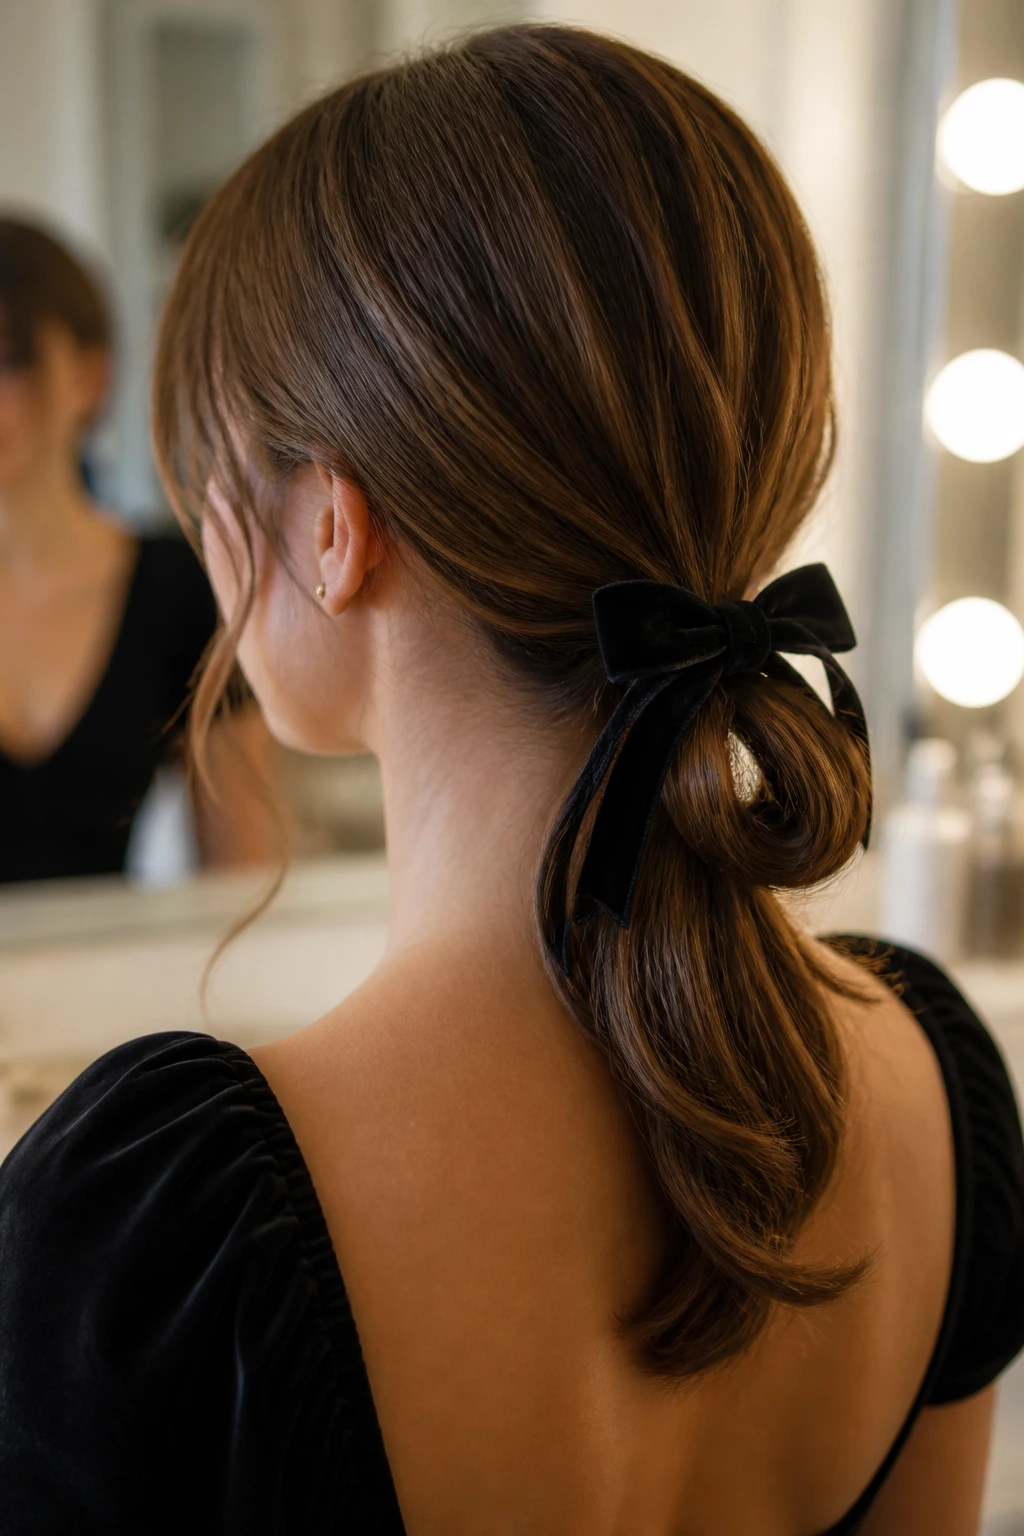
A looped ponytail is the kind of hairstyle that quietly wins because it knows when to stop. You keep the length, but the loop changes the silhouette enough to make it feel styled. Add a velvet bow and the whole look turns dressy without becoming stiff or fussy.
Pull the hair into a low ponytail, then loop the tail through the elastic one time so the ends peek out below the fold. Leave the loop a little loose. If you pull it too tight, the shape gets blunt. A soft loop moves better and looks friendlier from every angle.
A velvet bow works especially well when the outfit already has a bit of texture. Satin, lace, crepe, even simple wool tailoring in a cooler setting. It gives the hair a finished point without asking for more pins or more time. And that matters when you’re getting dressed in a hurry and still want the back of your hair to look cared for.
Check the style in a hand mirror before you leave. The back is where rushed hair tells on you.
