



Medium-length hair is the sweet spot for texture. It is long enough to bend, twist, and pin without looking fussed over, but short enough that the movement still feels light.
That is why tousled hairstyles for medium length hair work so well when you want something relaxed that still looks thought through. The shape can read soft and undone, or sharp and cool, or a little romantic, depending on where the bend starts and how much you leave alone.
There is a catch, though. Medium-length hair shows every choice. Start the wave too low and the ends hang limp. Overload the roots and the whole thing can puff up like you meant to do much more than you did. The good versions keep the crown soft, break up the mids, and let the ends stay a little imperfect.
That balance is the whole game. And it gives you room to play.
1. Air-Dried Bend with a Deep Side Part

This is the easiest way to get movement without making your hair look overworked. If your medium-length hair already has a little wave, a deep side part and a good scrunch can do more than a full curling session ever will.
Why It Works on Medium-Length Hair
A deep side part shifts weight to one side, which gives you lift at the roots without needing a ton of product. On collarbone-length hair, that matters. The shape stays soft, but it still has enough structure to frame the face instead of sitting flat.
A pea-size amount of leave-in plus a golf-ball-size scoop of light mousse is usually enough for shoulder-length hair. Work it through damp strands, then twist 2-inch sections away from the face and let them dry on their own. If the front pieces want to fall straight, clip them for 10 minutes while they set.
- Best for naturally wavy hair that frizzes when overhandled
- Works well on day-two hair with a quick mist of water
- Looks best when the ends stay soft, not crisp
Do not keep touching it while it dries. That is the fastest way to turn bend into puff.
2. Loose Beach Waves with Broken Ends
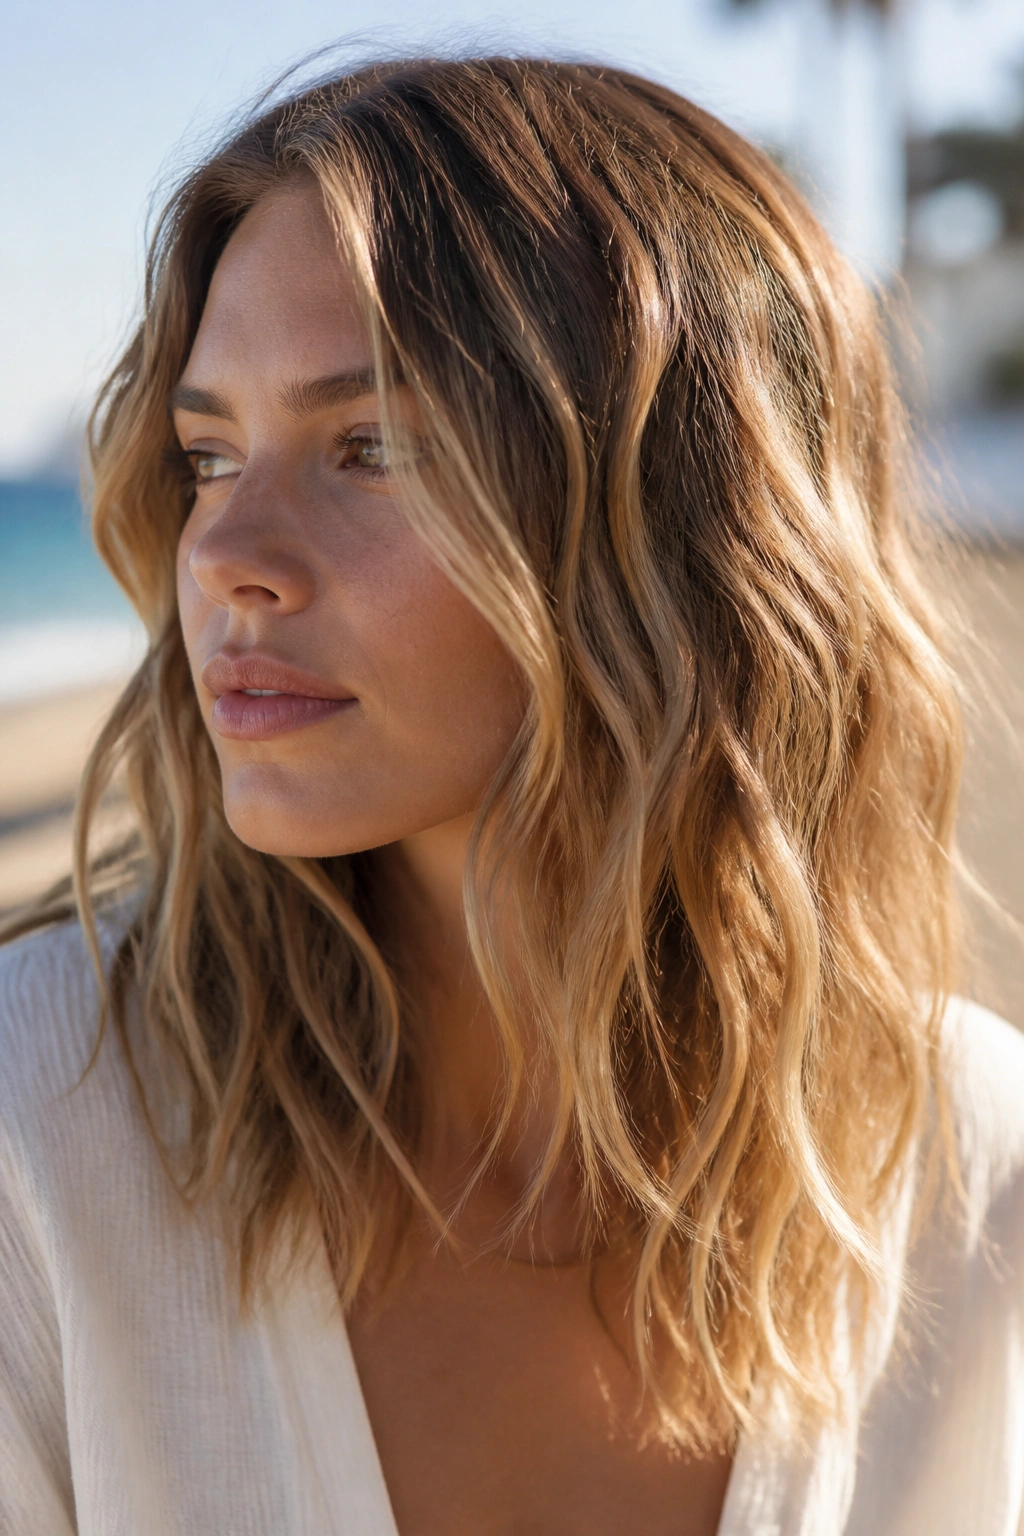
A 1-inch curling iron gives looser waves than most people expect, and that is exactly the point here. You want the hair to look touched by movement, not locked into a perfect curl pattern.
Wrap 1.5-inch sections around the barrel, but leave the last 1 to 2 inches out. That little unfinished end is what keeps medium-length hair from looking too polished. Alternate the direction of each section as you work around the head, then shake everything out with your fingers once it cools.
If your hair is thick, divide it into 8 sections and clip the top half out of the way first. Fine hair needs smaller sections and less heat, usually 6 quick passes total. Either way, let the waves cool completely before you separate them. Warm hair falls apart too fast.
Finish with a light texture spray from about 8 inches away. Not at the roots. Just midlengths and ends. That keeps the style airy instead of gritty.
3. Tousled Lob with Curtain Bangs

Can curtain bangs keep medium-length hair from looking heavy? Yes. They are one of the few fringe styles that actually make tousled texture look easier, not busier.
The trick is to keep the bangs soft at the roots and bend the face-framing pieces away from the cheekbones. If the front sits too flat, the whole cut can feel dense. If it is too curled, it starts to look like it wants attention. A tiny bend is enough.
How to Style It
Dry the bangs first, side to side with a small round brush, so they do not split awkwardly. Then take the two front pieces and wrap them once around a 1-inch iron, leaving the ends loose. That gives you the soft sweep that makes curtain bangs look lived-in instead of strict.
- Use a lightweight heat protectant before any hot tool
- Set the bangs with a cool shot from the dryer for 5 seconds
- Keep the crown flatter than the sides so the fringe stays the focus
- Trim the fringe every 4 to 6 weeks, or it loses its shape fast
This look is a good one if you want movement around the face without giving up the length. It feels relaxed, but it is not lazy. There’s a difference.
4. Half-Up Knot with Soft Volume
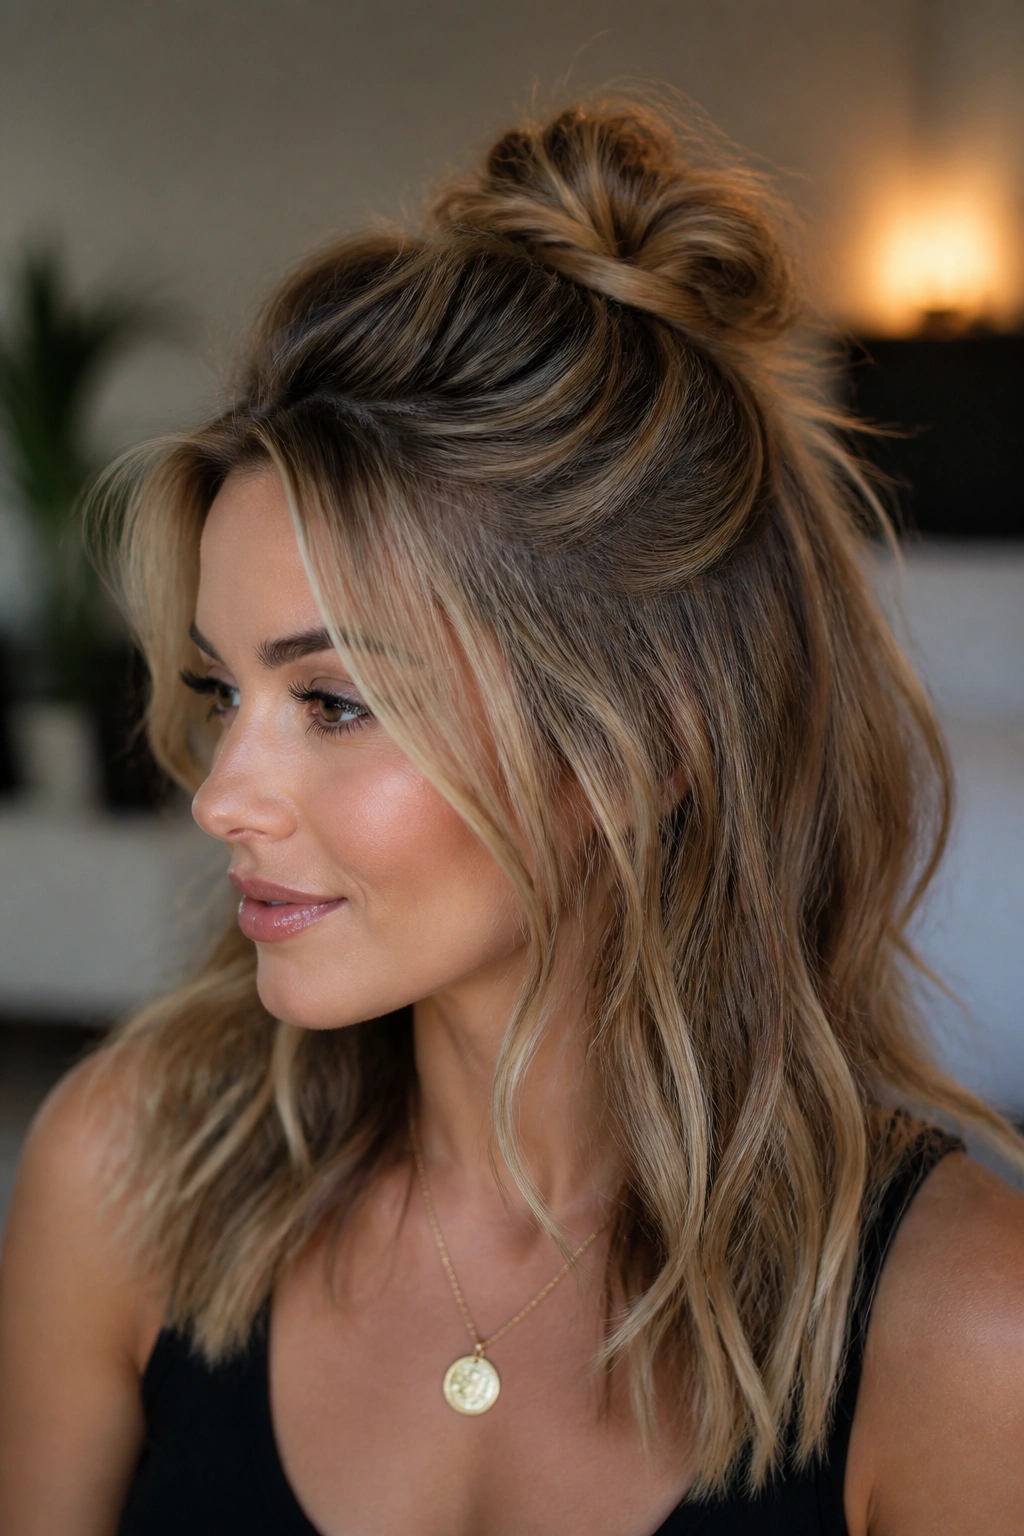
If your hair falls flat by lunch, a half-up knot is the quickest way to fake fresh volume. It also works better on medium-length hair than on longer lengths, because there is enough length to twist but not so much that the knot gets bulky.
Pull the top third of your hair back from temple to temple, twist it once, and coil it into a small knot at the crown. Secure it with a mini elastic or two bobby pins crossed into an X. Leave the bottom half loose and let the ends keep their own texture.
A little crown lift matters here. Tease only the underside of the top section with a fine-tooth comb — about a 1-inch strip is enough. Too much backcombing turns the style stiff, and that defeats the point.
- Best on second-day hair with natural grit
- Leave 1/2-inch face-framing pieces loose
- Pin the knot slightly off-center for a softer shape
- Use matte pins if you do not want the hardware to show
The best part? It looks intentional even when you only spent three minutes on it.
5. Feathered Shag for Wavy Hair

A shag is not too much for medium-length hair. That’s the misconception. In this length range, the layers have room to move without taking over the whole head, which is why the cut can look easy instead of wild.
The feathered version works especially well if your wave pattern already has some bend. Soft layers around the cheekbones and jaw remove weight, so the hair rises a little instead of hanging in one block. That makes the texture show up more clearly. It also means you spend less time forcing shape into it.
Air-dry with a curl cream or diffuse on low heat if your waves are stubborn. High heat can blow the layers apart and leave the top frizzy while the ends stay flat. Annoying. Also avoid too much brushing. A shag likes separation, not smoothing.
If your hair is thick, ask for longer internal layers so the cut does not go fluffy at the ends. If it is fine, keep the layers soft and spaced out. Too many short pieces can make the crown look thin fast.
6. Blunt Lob with S-Shape Waves

Unlike beach waves, S-shape waves feel cleaner and a little more tailored. The line of the cut stays blunt, but the styling gives it movement, which is a nice mix if you want texture without looking too undone.
The S comes from bending the hair in alternating directions with a flat iron or a 1-inch wand. Take 1.5-inch sections, clamp lightly in the middle, turn the iron half a rotation one way, then the other a few inches down. You are not curling. You are nudging the hair into a soft rhythm.
This works especially well if your medium-length hair is straight or only slightly wavy. A blunt lob gives the bends a tidy edge, and the shape holds up nicely through the day. If you have fine hair, this style can make the ends look fuller without needing heavy product.
Use a drop of shine serum on the lower half only. Keep it off the crown. A shiny root can make the style fall flat faster than you want.
7. Clipped-Back Tousle with Face-Framing Pieces
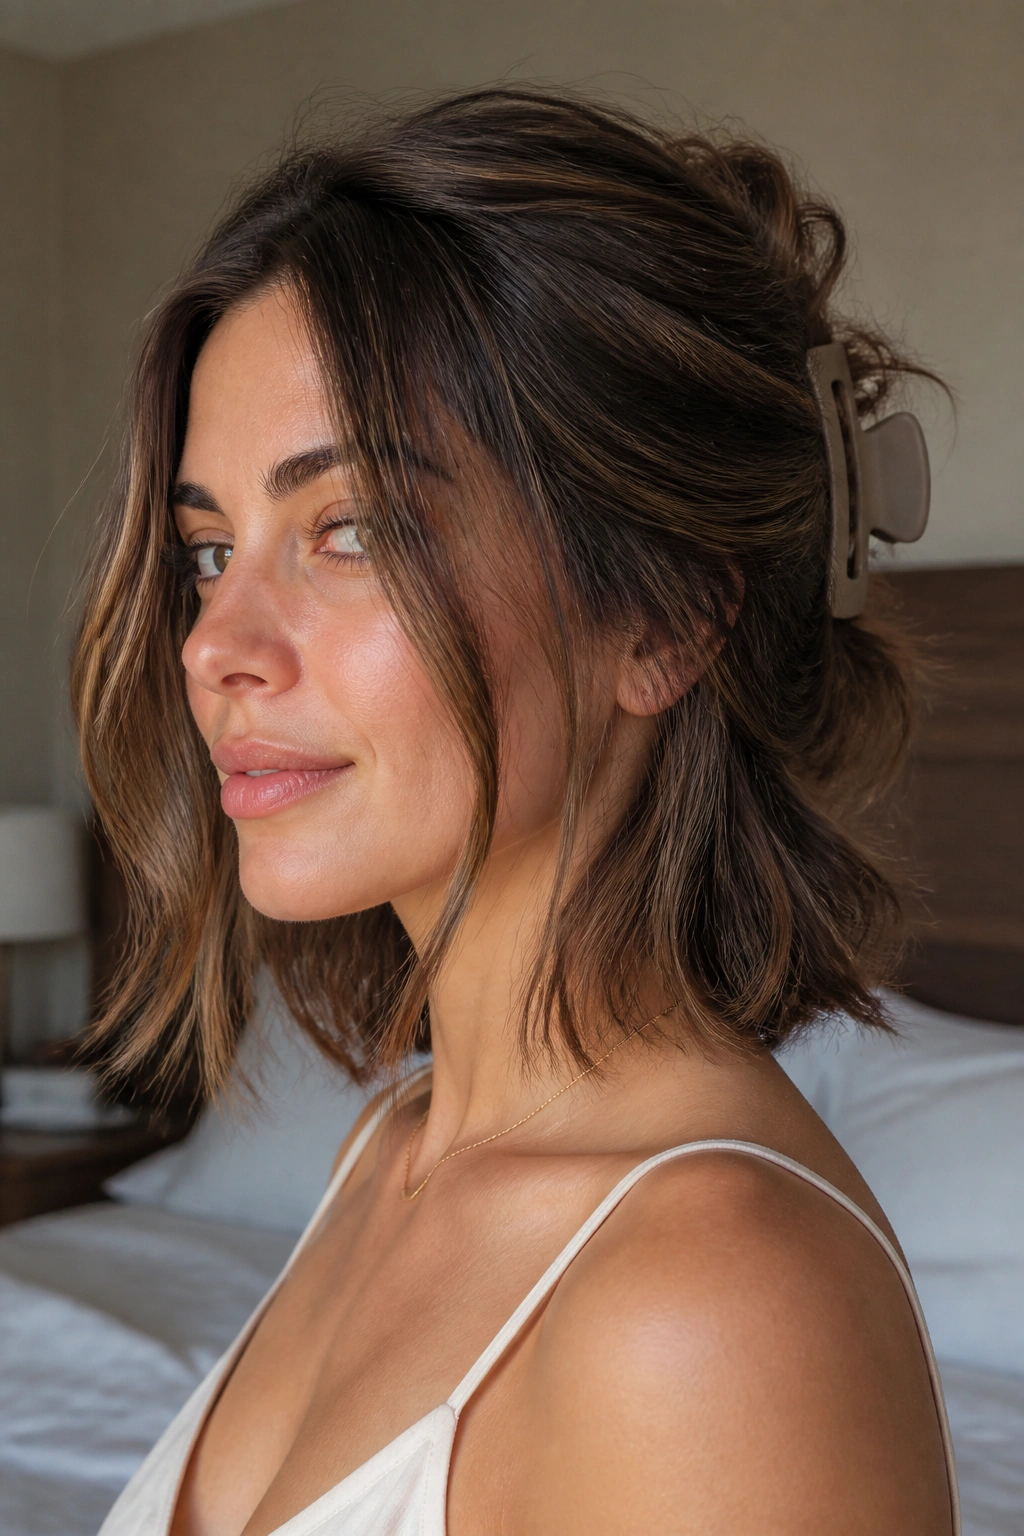
A few oversized clips can change the whole mood of medium-length hair. They pull the sides back just enough to show the texture, while the front pieces stay loose and soft around the face.
This style is especially handy when your hair is growing out and the layers are starting to misbehave. Clip one side just above the temple, then let the other side fall forward. That slight imbalance is what keeps it from looking too neat. If both sides are pinned the same way, the shape gets stiff fast.
What Makes It Different
The clips do the styling work for you. You do not need a perfect wave pattern underneath, only enough bend that the loose pieces look deliberate. A matte claw clip gives a softer finish; a metal one feels sharper and a little dressier.
- Place the clip where the hair is flatter, not where it is thickest
- Leave the front pieces at cheekbone length if you want the face framed
- Mist the roots lightly with dry shampoo before clipping if the hair slips
- Choose one clip, not three. More can turn messy in a bad way
I like this one when the rest of the look is plain. A white T-shirt, hoops, the clipped-back hair. Done.
8. Deep Side-Part Waves with Glam Texture

A deep side part gives medium-length hair a stronger silhouette than a center part ever will. It lifts one side, softens the other, and makes the waves look fuller without adding much more effort.
Start with volumizing mousse at the roots, then blow-dry the hair in the opposite direction of the part for a few minutes. That little bit of resistance creates lift. After that, use a 1.25-inch curling iron to add loose waves through the mids only. Leave the ends relaxed so the style does not get too formal.
This is one of the better choices for finer hair, because the part creates height where the scalp needs it most. It also suits evening settings without turning stiff. Sweep the heavier side across the forehead and tuck the opposite side behind the ear if you want more shape in the jaw.
Use flexible-hold hairspray, not the helmet stuff. You want movement when you turn your head. If the hair locks in place, the whole thing loses its charm.
9. Crown Braid and Loose Lengths

A crown braid gives medium-length hair an easy frame, and the loose lengths keep it from feeling overdone. It is a good answer for windy days, busy mornings, or hair that has gone a little flat around the roots.
How to Wear It
Take a 1- to 1.5-inch section from one temple, braid it along the hairline, and pin it behind the opposite ear. Do the same on the other side if you want a fuller crown effect, or stop at one braid for a lighter look. Leave the rest of the hair loose and textured.
A little roughness helps. In fact, a braid that looks too tight can make the rest of the hair seem limp by comparison. Pancake the braid edges gently with your fingers so the plait widens a bit. That gives you the soft, lived-in shape people actually want from this style.
- Start on day-two hair for better grip
- Curl only the loose ends if the braid already feels busy
- Hide elastic ends under a wrapped strand
- Keep the braid shallow and close to the head
It is one of those styles that looks more involved than it is. Which is probably why it keeps showing up in real life.
10. Low Messy Bun with Peeled-Out Tendrils

Why does a messy bun look better when you stop trying so hard? Because medium-length hair has enough body to create a soft knot without collapsing into a tiny knot at the nape.
Gather the hair low, twist it once, and coil it into a loose bun just above the neckline. Secure it with 2 or 3 bobby pins, then gently pull out a few tendrils around the temples and ears. The word here is gentle. You are not wrecking the style; you are softening the outline.
The bun works best when the hair has a little grit. Clean, silky hair can slide apart, which means you end up fighting it with more pins than you planned. A little dry shampoo through the mids gives the hair enough texture to hold shape.
This is the one I reach for with hoops, a high-neck top, or a heavier sweater. It balances all that fabric with something loose around the face. And yes, it looks better when the tendrils are imperfect.
11. Textured Flip-Ends Lob

If you want movement without committing to curls, flip-ends are the simplest way to get there. They give medium-length hair a playful bend at the bottom and keep the top half clean.
Blow-dry with a 1.5-inch round brush, turning the ends outward for just the last inch or two. You can also use a flat iron and flick the wrist away from the face at the ends. That tiny motion matters more than people think. Too much flip and the style looks dated. Too little and it barely reads.
The best version keeps the midlengths smooth while the bottom edge lifts slightly. That contrast is what makes the cut feel fresh. If your hair is naturally wavy, do not straighten it all the way first. Leave some body in the middle so the flip has something to sit on.
A light mist of spray foam at the roots can help if the crown collapses easily. Keep the product away from the tips, where it can make the ends clump. Clean ends, soft crown. That’s the balance.
12. Diffused Curly Midi with Piecey Definition

Natural curls look especially good at medium length when the cut keeps some weight. There is enough hair to show pattern, but not so much that the curls drag themselves down by the end of the day.
Start on soaking wet hair with curl cream, then smooth in a gel over the top layer. Scrunch from the ends upward with both hands, not a towel. A cotton T-shirt or microfiber towel is kinder and usually leaves less frizz at the surface. Then diffuse on low heat and low speed, cupping the curls instead of blasting them.
How to Keep the Pieces Separate
The goal is not a single solid curl mass. You want a few defined coils, a few looser ones, and soft separation in between. That makes the style look full without turning into a helmet.
- Diffuse in 15- to 20-second sections
- Stop drying when the hair is about 90% dry
- Break the gel cast with 1 to 2 drops of lightweight oil
- Clip the roots at the crown if you need more lift
If your curls are tight, keep the layers longer and avoid too much shaping at the top. If they are loose, a little more product at the mids will keep the wave from puffing out.
13. French-Girl Waves with Slight Bend
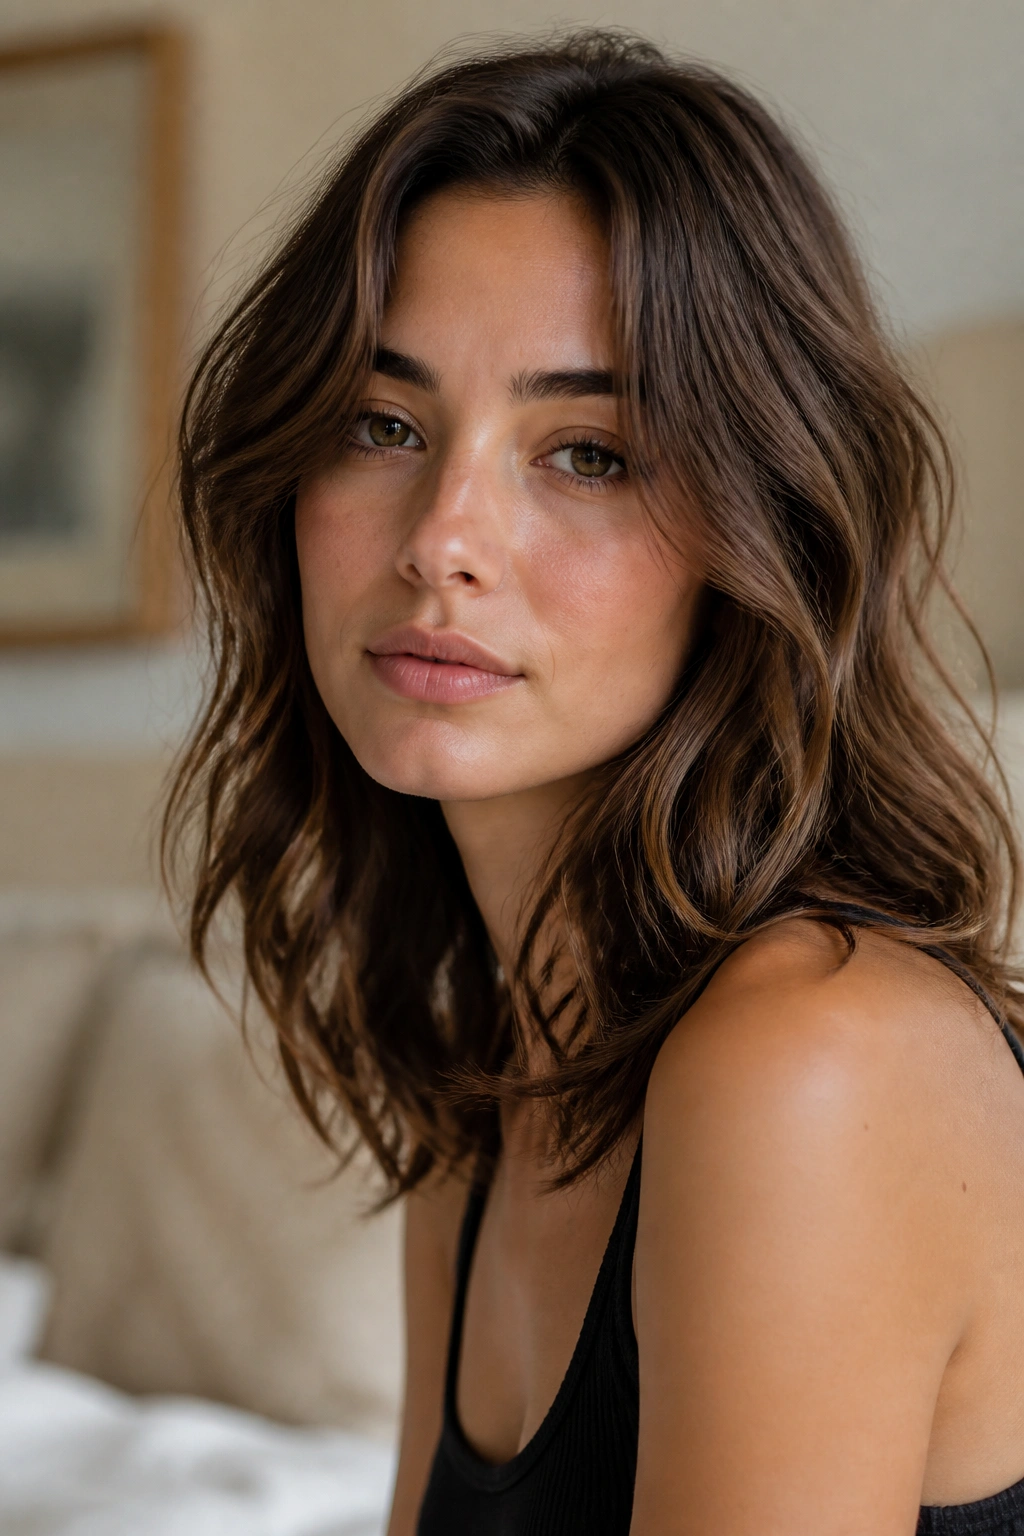
French-girl waves are less beachy and more brushed, which gives medium-length hair a softer, slightly undone finish. They sit in that nice middle ground between polished and casual.
Use a 1-inch iron or even a flat iron to create bends in 1.5-inch sections. Wrap the hair away from the face, but do not keep the curl tight around the barrel. A half turn, a pause, and a release is enough. After the hair cools, brush through it once so the waves loosen and fall into each other.
What makes this style work is restraint. If every piece gets curled the same way, the result turns overly neat. Leave a few sections straighter near the back, and let the front pieces frame the cheekbones without looking drawn on. It is subtle, but that is the point.
Use dry texture mist only on the lower half of the hair. The roots should stay soft and touchable. A side part or a shallow center part both work, though I prefer a slight off-center line because it gives the style more movement near the face.
14. Grown-Out Layers with Scrunched Texture
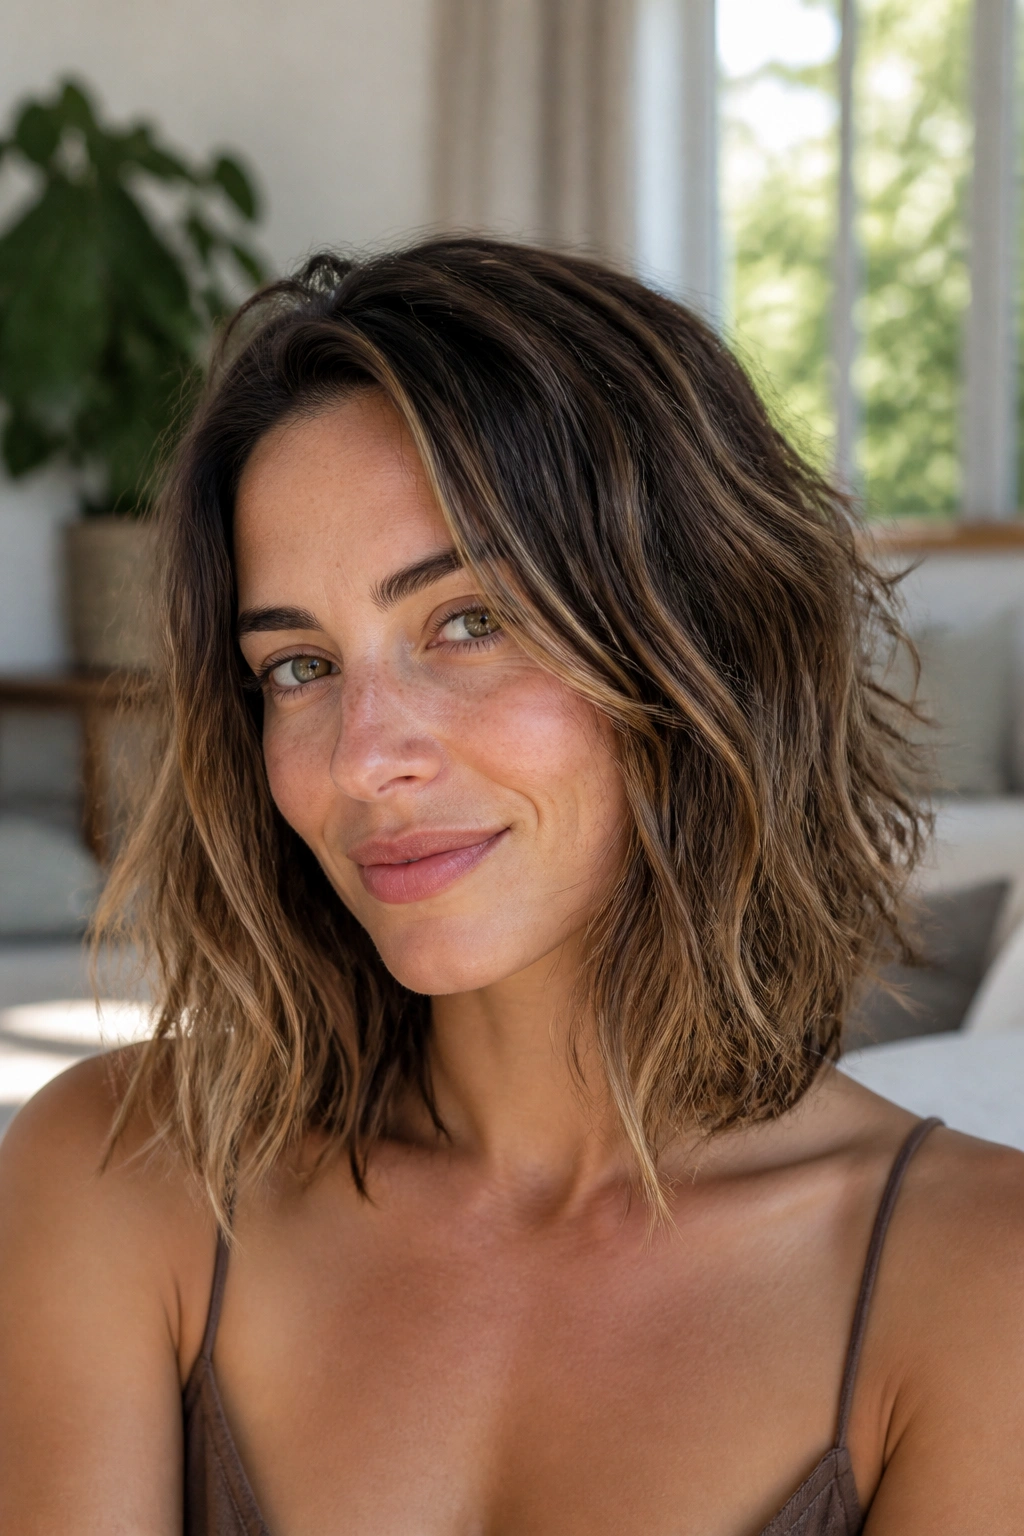
Grown-out layers are annoying until you style them with the right kind of texture. Then they start looking like a deliberate cut instead of a haircut you are waiting to fix.
This works best when the layers hit the collarbone and skim the shoulders. At that length, the waves have enough room to bounce, but the ends still feel light. Scrunch in a golf-ball-size amount of mousse on damp hair, twist the front sections away from the face, and let the rest air-dry about 70% before you diffuse the roots.
The trick is to avoid over-defining the ends. Medium-length hair with layers can look choppy if every piece gets the same amount of styling. Let some sections stay straighter. Let others take the bend. That unevenness is part of what makes it look relaxed.
- Use mousse, not heavy cream, if the hair is fine
- Diffuse only the crown if the mids already hold shape
- Finger-comb once, then stop
- Keep the part soft and movable
This is the style for anyone growing out a shape they do not want to fight every day.
15. Twisted Half-Up with Lift at the Crown

Can a half-up style feel softer than a ponytail? Absolutely, if you twist instead of pull everything straight back.
Take two front sections, each about 2 inches wide, and twist them toward the back of the head. Meet them at the crown and secure them with a small barrette or a few pins hidden under the twist. Leave the rest of the hair loose and textured. The lift at the crown gives the style shape, while the twists keep the face open.
Why It Stays Softer Than a Ponytail
A ponytail can flatten medium-length hair in a hurry. A twisted half-up lets the lower half keep its movement, which means the style still looks full from behind. It also works well when the roots need a little refresh but the ends are still worth showing off.
If the hair slips, mist the crown with dry shampoo first. That gives the twist something to grab. If the front pieces are too short, keep the twist lower and looser rather than forcing it high. A twist that sits too tight around the temples can look severe.
This one is good when you want your hair out of your face but do not want to hide the texture.
16. Pin-Curl Set for Soft Old-School Waves

This looks fancier than it feels. A pin-curl set on medium-length hair gives you soft, glossy waves that brush out into something gentler than a wand curl.
Set 1-inch sections into flat curls, pinning each one close to the scalp. You do not need 20 curls. Six to eight pins usually cover medium hair well, depending on density. Let the hair dry fully before taking anything out. Half-dry pin curls fall apart into fluff, and nobody wants that.
The Part People Skip
The brushing stage is what makes this style work. Once the curls are cool and dry, brush them out with a boar bristle brush or a soft paddle brush until the ringlets merge into broad waves. Then tuck a tiny bit of serum into the ends only.
- Use a setting lotion or light mousse before pinning
- Pin the curls in alternating directions for softer movement
- Keep the sections even so the waves blend cleanly
- Wait until the hair feels cool all the way through
The result is smoother than a beach wave and more romantic than a flat blowout. It is worth the extra half hour if you want something with a little polish.
17. Razor-Layered Midi with Natural Movement

Some styles need less styling, not more. A razor-layered midi is one of them, especially when medium-length hair tends to feel heavy around the bottom.
Razor-cut layers remove bulk and let the hair move on its own. On wavy hair, that means the pattern shows up more clearly. On thicker hair, it stops the shape from sitting in one thick block. The key is to keep the layers soft enough that the ends do not look shredded. A good razor cut should feel airy, not ragged.
This cut is best for people who like to air-dry and walk away. A small amount of leave-in conditioner and a coin-size dab of cream can be enough. If you add too much product, the movement disappears and the layers clump together. Too little, and the ends puff out.
One caution: if your hair is fine and fragile, ask for a gentler version with scissors. Razor cutting can take out more density than you want. Medium-length hair does not need to be thinned to death to look light. It just needs room to move.
18. Sleep-In Braids for a Soft Morning Tousle

Can you get texture without a hot tool? Yes, and sleep-in braids are still one of the smartest ways to do it on medium-length hair.
Braid the hair while it is slightly damp, not soaking wet. Two loose braids give you broad waves; four smaller braids create a tighter bend. Use satin scrunchies if you have them, because regular elastics can leave a harsh line at the ends. In the morning, undo the braids, shake the roots, and separate only the pieces that want to cling together.
The shape works especially well when you want a softer finish than a curling iron gives. It is a little less controlled, which is exactly why it looks natural. If the front pieces come out too crimped, run a flat iron once over the top few inches only. That usually smooths the harsh spots without killing the wave.
For thick hair, four braids tend to work better than one giant braid. For fine hair, two is usually enough. You are aiming for bend, not grit. And if the ends feel a little rough, a single drop of oil on the last inch settles them down fast.
Final Thoughts
The best tousled styles on medium-length hair do not look heavily styled. They move. They shift when you turn your head, and they still make sense if you tuck one side behind your ear or pin it back halfway through the day.
If your hair is fine, the side-part waves, flip-ends lob, and clipped-back styles usually give the best payoff for the least effort. If it is thick or naturally wavy, the shag, diffused midi, and sleep-in braids hold shape better because they work with the hair’s own weight instead of trying to fight it.
Pick the one that fits the way your hair behaves on a normal Tuesday, not the version you wish it had after three hours and a dozen tools. That is where the good stuff lives.
