



Long hair is greedy. It eats curl.
That’s why light curl hairstyles for long hair need a different hand than tight curls or short, bouncy layers. On long lengths, a curl that starts too high can puff out at the root and collapse at the ends. A curl that starts lower, with a bit of straightness near the tips, usually looks softer, cleaner, and a lot more expensive-looking.
The sweet spot is movement, not uniform spirals. A 1.25-inch barrel, a brush-out, and a little restraint often do more for long hair than a pile of styling products ever will. I’ve always liked styles that let the hair move when you turn your head, because that’s where long hair looks best — in motion, not frozen into a helmet.
These styles also solve the annoying long-hair problem nobody likes to say out loud: length can hide shape. A good curl style gives the hair a frame, keeps the front from falling flat, and makes the ends feel deliberate instead of heavy. The first look is the one I reach for when the goal is softness with enough structure to hold through the day.
1. Curtain Layers with Light Curls

Curtain layers do a lot of the heavy lifting for you. They break up long hair so the curls don’t just hang there in one big sheet, and that matters more than people think.
Why it works: the front pieces open the face, while the rest of the hair keeps the length and shine. With long hair, that little bit of shape near the cheekbones keeps the whole style from looking dragged down.
What to ask your stylist for
- Face-framing layers that start around the cheekbone or jaw.
- Soft internal layers through the mid-lengths, not chunky steps.
- Ends that stay blunt enough to keep the hair looking full.
- A curl pattern that bends away from the face in front and alternates loosely in back.
Use a 1.25-inch curling iron or wand and leave the last inch of each section out if you want that soft, lived-in bend. The ends should look a little straighter than the middle, not pinched into tiny loops.
I like this style most on thick hair, but it works on fine hair too if you keep the curls loose and brush them lightly. If the front pieces are shorter, pin them back while they cool. That tiny pause gives them a cleaner curve instead of a frizzy flip.
2. Half-Up Twist with Loose Face Pieces

If you want hair off your face without losing the length, this is the move. A half-up twist keeps the crown neat and leaves the curls visible, which is exactly what long hair is good at.
Start by gathering two sections from the temples, twist them back, and pin them where the back of the head starts to round. Don’t pull tight. Tight twists fight long hair and usually end up looking strained by midday.
The face pieces matter here. Let a few curled strands fall around the cheekbones and jaw, then stop. Any more than that and the style gets messy in a way that feels accidental instead of soft.
This version is especially good if your hair is very straight at the root. A little dry texture spray at the crown gives the pins something to grab, and that saves you from the slow, annoying slide that happens with silky hair.
One small detail makes the whole thing look better: cross the bobby pins in an X. It sounds fussy. It isn’t. It just keeps the twist from sagging.
3. Side-Part Glam Waves

A deep side part changes the whole mood of long curls. It adds shape before you even touch a curling iron, and that shape carries the style.
Small move. Big shift.
When you sweep more hair to one side, the curls look fuller on the heavier side and smoother on the lighter side. That gives the style a cleaner line, especially if your hair is long enough to hit the chest or waist. The weight of the hair works with the part instead of flattening it.
I’d use a larger barrel here, around 1.25 to 1.5 inches, and curl every section in the same direction away from the face. Brush once the hair is fully cool. Not warm. Cool. Warm curls smear; cool curls soften.
Best use case
- Date night when you want shine without stiffness.
- Narrow or long faces that need width through the cheek area.
- Hair that holds a wave but hates tiny ringlets.
Tuck the smaller side behind one ear and leave it there. That little bit of skin showing changes the whole read of the style, especially with earrings or a clean neckline.
4. Low Ponytail with Curled Ends

A low ponytail sounds plain until you give it loose ends and a little lift at the crown. Then it stops looking practical and starts looking intentional.
The trick is not the ponytail itself. It’s the shape around it. Gently lift the crown with your fingers before you secure the elastic, then smooth the top layer without flattening it to the skull. You want soft volume, not a strict slick-back.
How to keep it from looking flat
- Secure the ponytail at the nape, not mid-back.
- Wrap one small strand around the elastic and pin it underneath.
- Curl only the lower half of the ponytail so the movement stays light.
- Leave two slim front pieces out if your hairline is strong.
Long hair can make a low ponytail look heavy fast, so don’t overcurl the tail. A few soft bends through the bottom third are enough. If the ends are too springy, the ponytail starts to look like it’s wearing a costume.
This style is one of my favorites for second-day hair because the roots already have a bit of grip. A dab of smoothing cream on the flyaways and a light mist of hairspray is usually all it needs.
5. Crown Braid with Flowing Lengths

A crown braid on long hair is one of those styles that looks more complicated than it is. Good. That’s part of the appeal.
The braid sits across the top of the head like a narrow band, and the rest of the hair spills out in loose curls below it. That contrast is the whole point. The braid keeps the front controlled, while the length stays visible and soft.
What makes this version work is restraint. Use a three-strand braid, not a giant Dutch braid, unless you want the braid to become the whole story. For most long hair, a braid that’s about 1 to 1.5 inches wide is enough. Bigger than that and the style starts to feel bulky around the crown.
The hair underneath should be softly waved, not curled into stiff ribbon shapes. The braid acts like a frame, and frames need room to breathe. I’d keep a few loose bits around the temples if your hairline is high or if you want the braid to feel a little less formal.
It’s a strong choice for weddings, outdoor events, and any day when you want the hair out of your face without losing that long, flowing look.
6. Soft Brush-Out with Face-Framing Layers

Can curls look polished without turning into formal waves? Absolutely. A brushed-out curl is still one of the easiest ways to give long hair shape without making it feel stiff.
The secret is timing. Curl the hair in medium sections, let everything cool completely, and then brush it out with a paddle brush or wide, flat brush. If you brush too soon, you get frizz. If you brush too hard, you get fluff. The middle ground is a few slow passes, starting at the ends and moving up.
The part people skip
Let the curls cool.
That matters more than the curling iron itself. Long hair holds heat in the middle of the section longer than people expect, so if you rush the brush-out, the shape falls apart at the top and stays tight at the bottom. A few metal duck clips can help pin the curls in place while they set.
This style looks best when the face-framing layers fall into a soft arc instead of a hard curve. If your layers are cut around the chin or collarbone, guide them forward with your fingers after brushing. Don’t overthink it. The whole style gets better the less you fuss with it.
7. Half Bun with Loose Tendrils

When you want your hair up but not fully up, the half bun is the obvious answer. The part people get wrong is making the bun too small or too neat.
A good half bun on long hair should have a little body. Think more walnut than marble. Gather the top section from temple to temple, twist it once or twice, then pin or tie it high enough to lift the crown. Leave the lower lengths in light curls so the contrast stays clear.
Long tendrils around the ears make this style look softer. Two or three slim pieces is enough. Any more, and it starts to feel sloppy. Any less, and the whole thing turns severe.
- Use a small elastic or two bobby pins if your hair is slippery.
- Keep the bun slightly off center for a less stiff look.
- Pull the crown up with your fingers before pinning.
- Leave the ends of the lower hair loosely curled, not brush-straight.
The best version of this style looks like you put it up quickly, but not carelessly. There’s a difference, and it shows.
8. Waterfall Braid through Long Waves
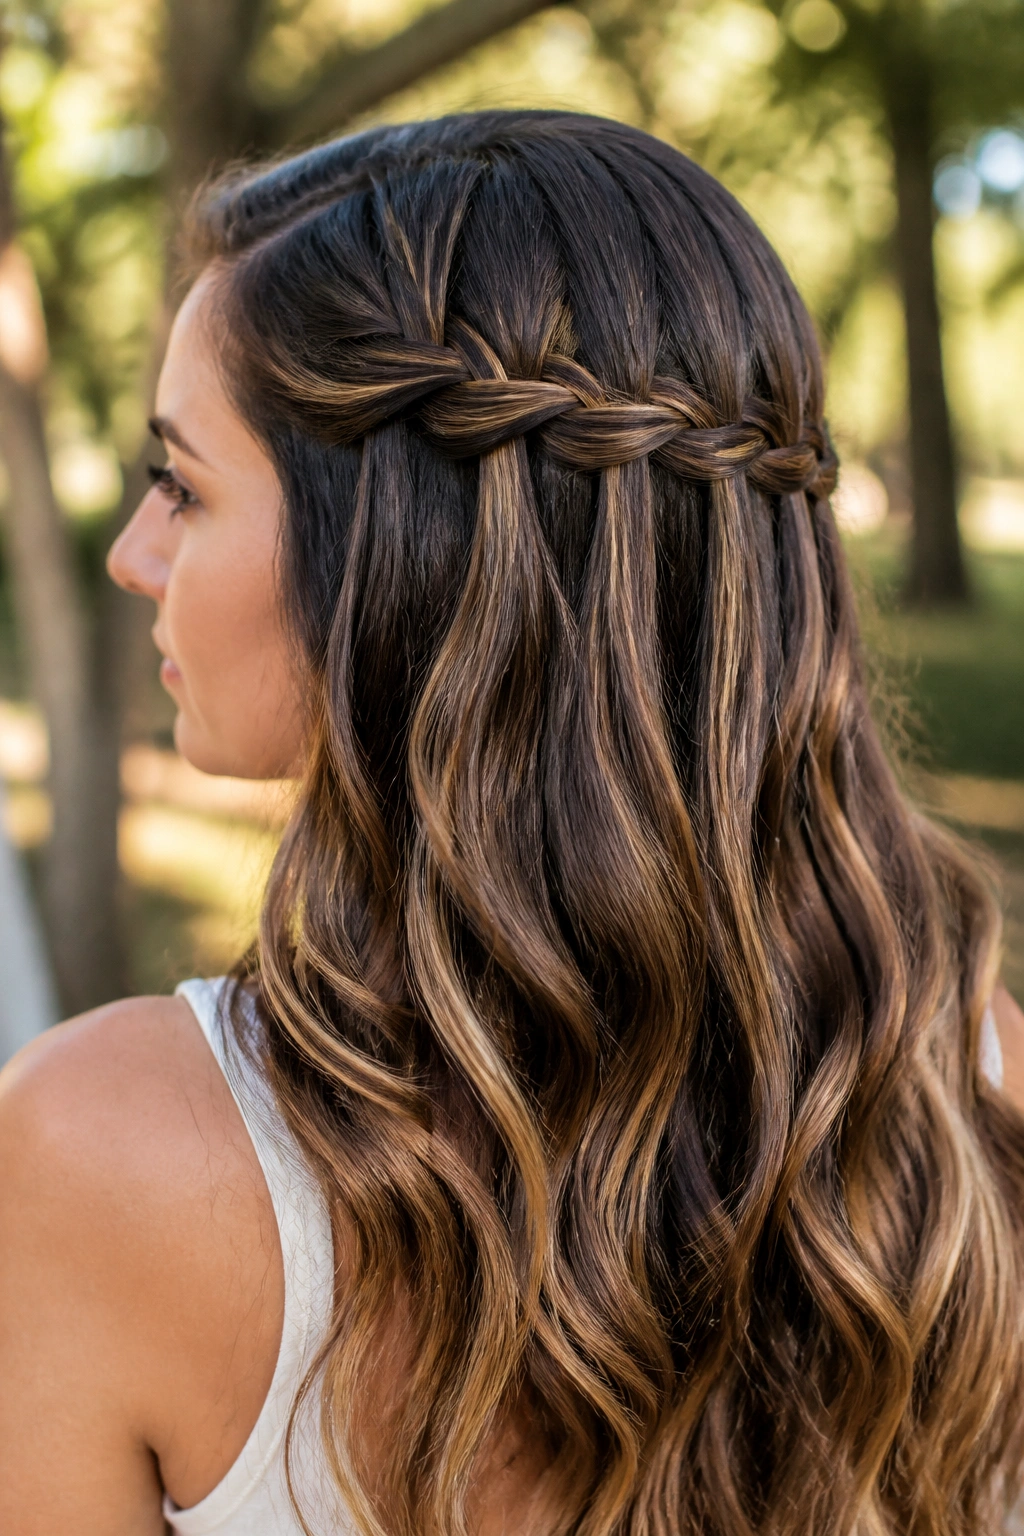
A waterfall braid is one of the few braids that actually flatters long hair instead of hiding it. Each dropped section becomes part of the wave pattern underneath, so the braid and the curls work together rather than competing.
The braid runs across the back or side of the head, and pieces are left out as you go. That open structure lets the long lengths stay visible. On very long hair, the result looks layered even if the cut is blunt.
This style likes hair with a little grip. If your hair is freshly washed and silky as glass, the braid can slide. A dry shampoo mist at the roots or a light texturizing spray through the top layer helps the sections hold their place.
The braid should sit like a thin ridge, not a thick rope. If the braid is too bulky, it swallows the waves below it. I prefer a looser weave with gently stretched links, because it keeps the style airy and stops the crown from looking cramped.
It’s a nice choice when you want detail near the top but still want the hair to move around your shoulders.
9. Claw-Clip French Twist with Drop Strands
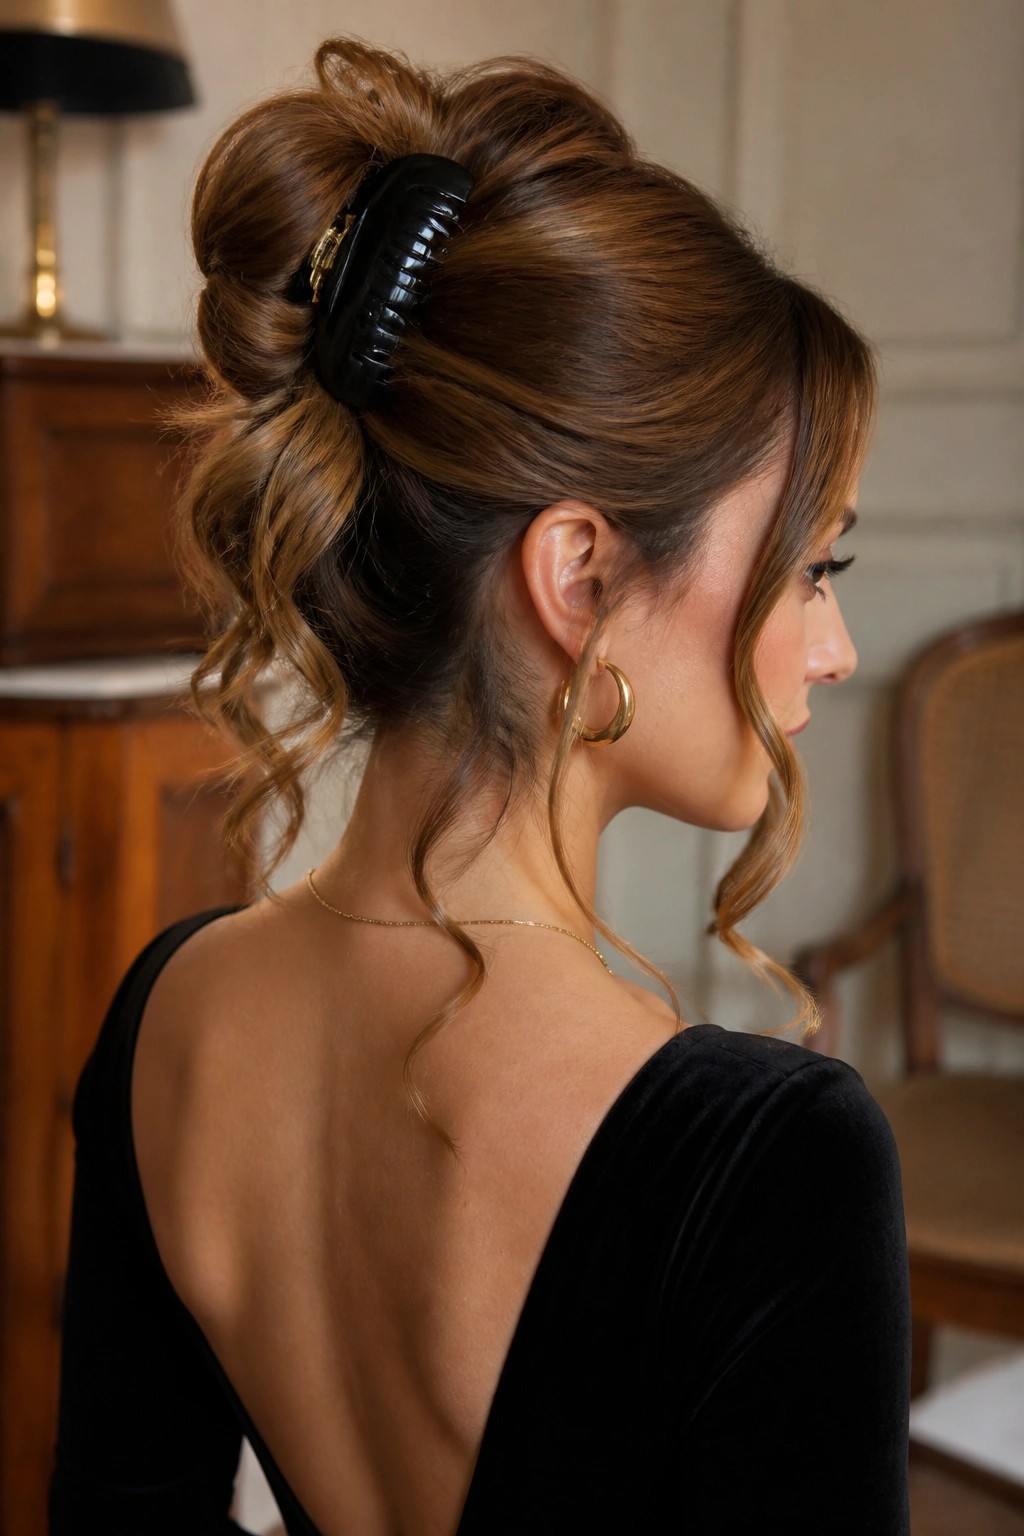
A claw-clip twist is not the same thing as a lazy bun. That’s the first thing worth saying.
With long hair, the French twist version uses the clip to hold the mid-lengths up while the ends spill in soft curls or bends. The shape sits high enough to show the neck and lower enough to feel relaxed. It’s one of the fastest ways to make long hair look controlled without pinning a dozen separate sections.
The clip matters. Use a large clip with teeth that actually grab hair — a cheap flimsy one will give up the second the hair gets heavy. Matte plastic or strong acetate usually holds better than slick metal if your strands are thick.
This style is good when you want to be able to take it down in minutes. No teasing. No complicated pinning. Twist the hair upward, tuck the ends, and secure the clip where the shell of the twist feels snug against the head.
If a few pieces fall loose around the temple, leave them. That little bit of softness keeps the style from looking too office-ready.
10. Braided Headband with Soft Curl Lengths
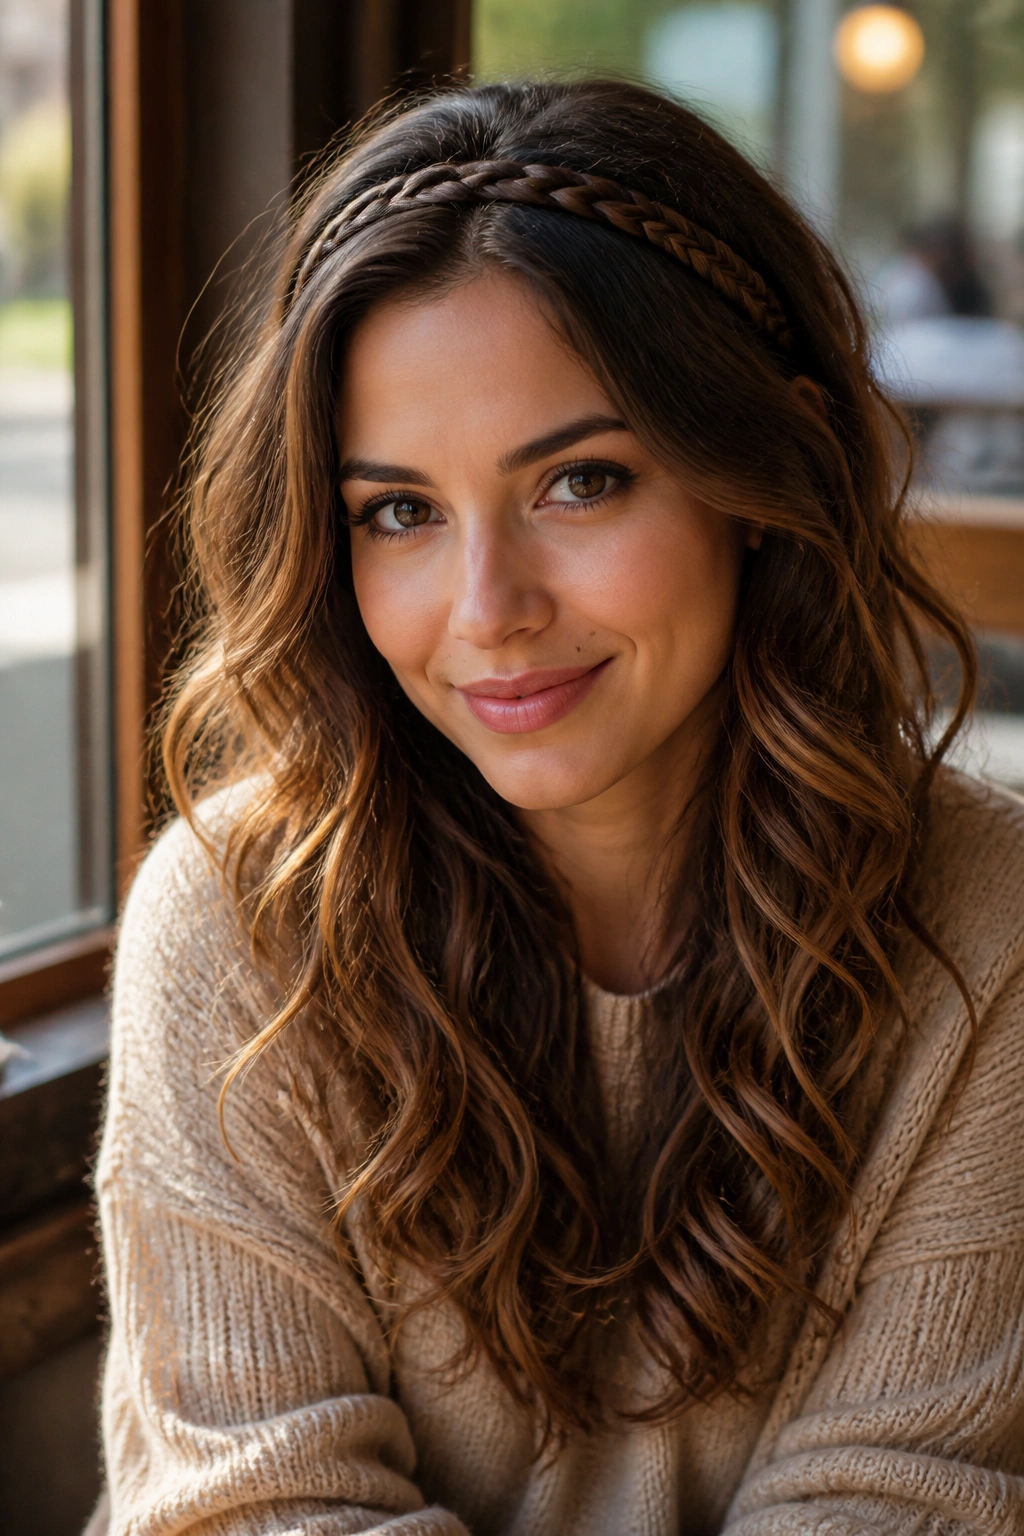
If your roots tend to get oily before the rest of your hair wakes up, this one saves the day. A braided headband disguises that front section and still leaves the length front and center.
Take a strip of hair from behind one ear, braid it across the top of the head, and pin it under the opposite side. The braid acts like a built-in accessory, which is handy when you want something prettier than a plain barrette but less committed than a full braid crown.
Where to place the braid
- Start just above one ear, not too far back.
- Keep the braid narrow, about the width of two fingers.
- Pin it under a layer of hair so the ends disappear.
- Let the rest of the hair fall in loose curls over the shoulders.
I like this style because it can look sweet or sharp depending on the rest of the hair. With brushed-out waves, it feels soft. With more defined curls, it gets a little more dressed up. Either way, it keeps the face open and the neckline visible.
A tiny bit of shine cream on the braid itself helps it look clean without turning greasy. That’s enough. No heavy product needed.
11. Old-Hollywood Brush-Out Waves

This is the most polished look on the list, and it earns that spot. Old-Hollywood waves are about shine, direction, and a clean wave pattern that runs from the part down through the length.
You need the curls to go the same way before you brush them. That part matters. If you alternate directions too much, the wave pattern gets messy instead of sculpted. Set the front pieces away from the face, let them cool fully, then brush the hair into a single, flowing shape.
The best version has a deep side part and one side tucked behind the ear. It should feel smooth at the top and fluid through the ends, almost like the hair was shaped by hand instead of by a hot tool. A small amount of shine spray on the mid-lengths helps, but skip the roots. Shine at the scalp looks greasy fast.
A lot of people make this style too big. Don’t. The charm is in the curve, not the volume. If your hair is very dense, use smaller sections and a larger barrel so the wave stays broad and heavy in a good way.
It’s the style I’d pick for a dressy evening when you want long hair to look deliberate from every angle.
12. Textured Chignon with Light Curl Pieces
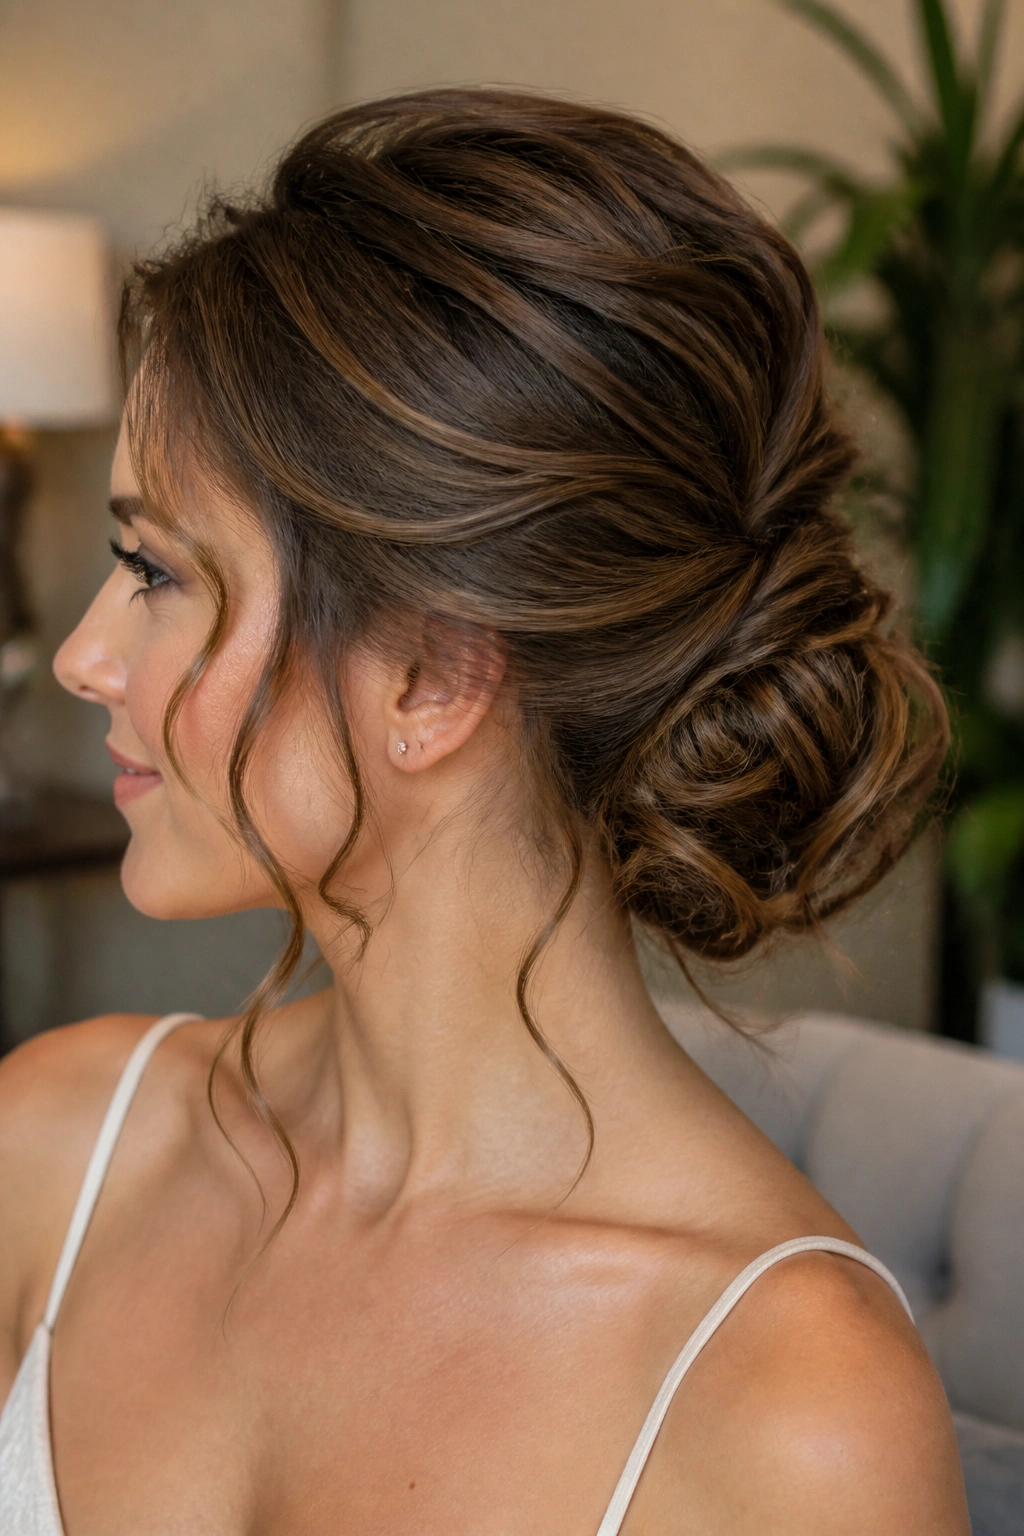
Need a low knot that doesn’t turn severe? A textured chignon solves that without much drama.
Pull the hair into a low ponytail, but don’t cinch it tight. Twist the length around the base, then pin it into a loose coil at the nape. Leave a few pieces out around the temples and one or two at the back of the neck so the style keeps a soft edge.
The danger with a chignon on long hair is over-smoothing. If you scrape every strand flat, the style loses the natural movement that makes light curls look good in the first place. A little texture through the crown and a few bent pieces near the ears keep it from looking severe.
What to leave out
- Don’t jam every curl into the knot.
- Don’t hide every loose piece.
- Don’t pull the crown so hard that the hairline lifts uncomfortably.
- Don’t use a giant knot unless the event calls for it.
A chignon like this works well when you want the neck open but still want the hair to look soft. It’s especially useful for thick long hair because the knot can absorb some of the bulk without needing a separate braid or twist.
13. Ribbon-Tied Bubble Ponytail

The bubble ponytail has a playful streak, and the ribbon keeps it from looking too school-gym. On long hair, it becomes a column of soft sections instead of a single blunt tail.
Start with a low or mid-height ponytail, then add small elastics every 2 to 3 inches down the length. Gently tug each section to form a bubble, but stop before the shape gets lumpy. The goal is roundness, not ballooning.
A ribbon tied at the base changes the whole feel. Satin gives the style a little shine. Cotton feels more casual. If your hair is already curled lightly, the bubbles will break up the waves in a nice way and keep the ponytail from looking flat.
- Use clear elastics or ones that match your hair color.
- Tug each bubble evenly on both sides.
- Leave the last few inches lightly curled or bent.
- Wrap the ribbon around the base, not the middle, unless you want the style to feel fussy.
This is a good pick when you want something fun that still holds shape. It also works well on long hair because the bubbles make the length feel intentional instead of just long.
14. Deep Side Sweep with Pinned Front

A deep side sweep is a cleaner answer when you want drama without going fully formal. Unlike a full updo, it keeps most of the hair visible, which is better if you paid good money for the length.
Sweep the hair over one shoulder, then pin the front section behind the opposite ear with two or three bobby pins hidden under a layer of hair. Curl the lengths in soft bends, and let them fall in one direction. That single sweep makes the hair look longer and shinier because the eye follows one line instead of bouncing around.
This style is especially kind to long faces and narrow jawlines. The side sweep adds width without building a lot of height, so the proportions feel softer. If you have a strong cheekbone, even better. The hair becomes a frame instead of a curtain.
I’d keep the part only slightly off center — maybe 1.5 to 2 inches — unless you want the look to feel sharper. An extreme side part can be lovely, but it changes the whole mood. This version is gentler and easier to wear when you don’t want the hair to feel stagey.
15. Mermaid Waves with Glossy Finish

Mermaid waves work because they look like long hair doing what long hair does best: moving in slow, soft bends instead of hard curls. The shape is loose, stretched, and a little uneven in the best way.
I like this style most on hair with some layering, because the layers keep the wave from sitting like one heavy sheet. Start the wave below the cheekbones and let the ends stay a touch straighter. That contrast keeps the length visible and stops the style from turning into a uniform spiral, which is rarely flattering on long hair.
A small amount of lightweight oil on the ends helps, but don’t smother the roots. Long hair shows product fast. The trick is to make the mid-lengths shine while the scalp stays clean and airy. If the waves begin to separate near the bottom, smooth them with your fingers instead of brushing them out again.
This is probably the most forgiving style on the list. It works on thick hair, fine hair, layered hair, and hair that refuses to stay curled for long. It also looks good after the wave starts to loosen a bit, which is why I keep coming back to it. Long hair likes movement more than stiffness, and mermaid waves give it exactly that.
