



A special occasion hairstyle has a brutal job description: look polished, stay put through a long night, and still make sense after hugs, dancing, and one badly timed gust of wind. The styles that survive all that usually aren’t the flashiest ones. They’re the ones with a smart shape, enough grip at the roots, and a finish that suits the neckline instead of fighting it.
That’s why special occasion hairstyles are less about chasing one “perfect” look and more about matching the hair to the event. A low bun can feel right beside a beaded gown. A glossy ponytail can look sharper than an elaborate updo if the dress already has drama. Loose waves can look expensive and relaxed at the same time, which is a useful trick when the outfit is formal but not stiff.
The mistake I see most often is overworking the hair. Too much curl, too much spray, too much teasing. The result usually looks tired before the night even starts. A better approach is to pick a shape first, then decide how much polish the style needs. A fine-tooth comb, a few good pins, and the right prep product do more work than a mountain of hairspray ever will.
Some of the hairstyles below lean bridal. Some are easier event styles for guests, bridesmaids, and anyone who wants hair that looks intentional without eating up half the afternoon. All of them can be adapted for different lengths and textures, which is the part most lists skip. Start with the one that matches your outfit and your hair’s mood, and the rest gets easier fast.
1. Sleek Low Chignon
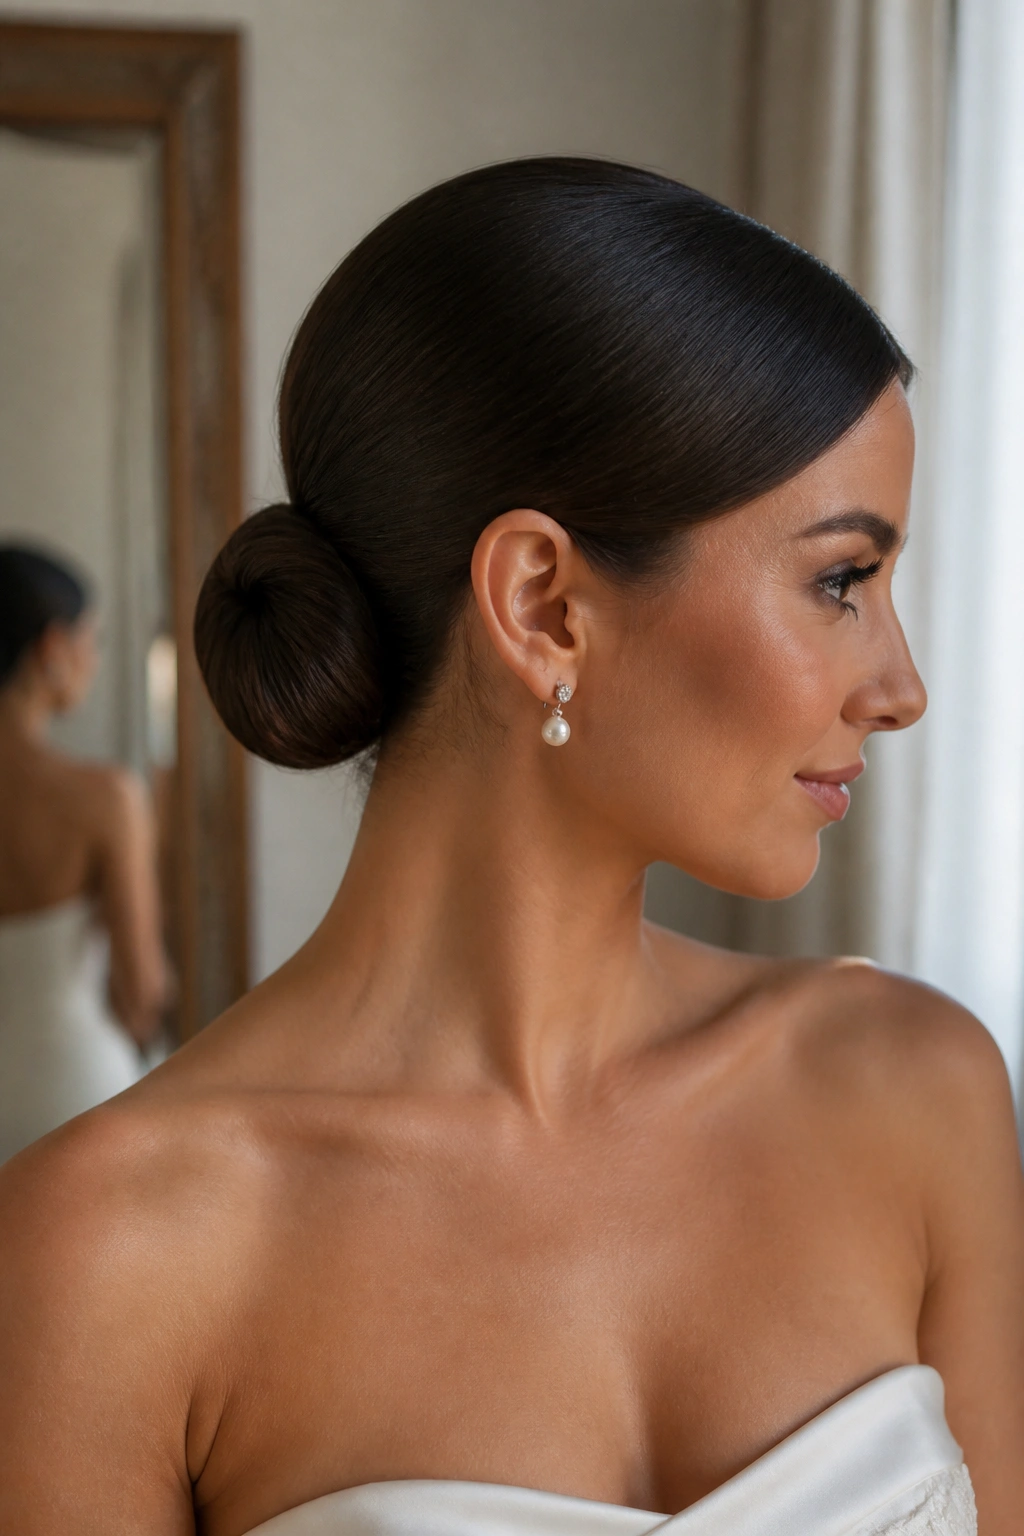
A sleek low chignon is the style I reach for when the outfit is already doing the talking. It sits at the nape, keeps the neckline open, and gives you that clean, controlled shape that works with pearl earrings, a high collar, or a dramatic back.
Why it holds so well
The trick is tension. Not painful, eye-watering tension — just enough to keep the surface smooth and the bun anchored close to the head. Start with a light smoothing cream or gel, then brush the hair back in sections so you do not trap bumps near the temples. If your hair is layered, twist the ends under the bun instead of trying to force every strand into the same path.
A chignon also behaves nicely in photos because it gives the face a defined frame. The neck looks longer. The profile looks cleaner. And if you want a veil, comb, or a single barrette, there’s room for it without crowding the style.
- Best for medium to long hair
- Works well with straight or slightly wavy textures
- Use 4 to 6 bobby pins in an X pattern for better grip
- Keep the bun low enough that it does not fight a tall collar
Tip: Pin the bun first, then smooth the surface. If you do it the other way around, the style tends to loosen while you are still finishing it.
2. Hollywood Waves
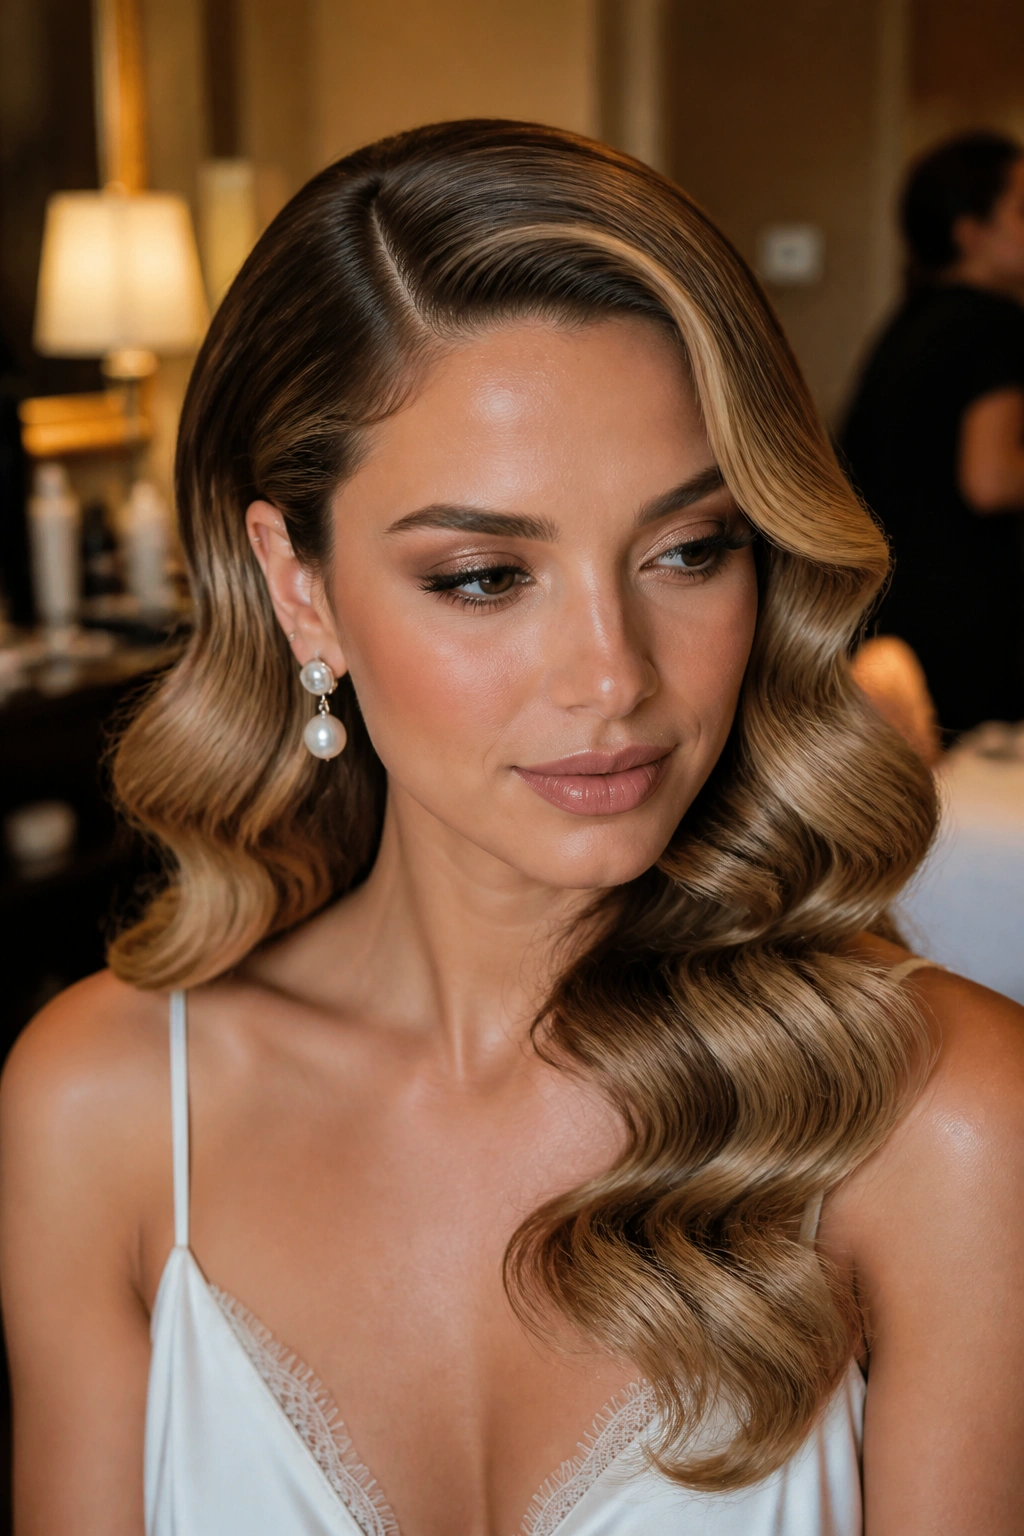
Hollywood waves look expensive because they are precise. One deep side part, one glossy bend after another, and enough structure that the curl doesn’t collapse into frizz the second you step outside.
The key is setting each section in the same direction. Wrap 1-inch pieces around a 1.25-inch curling iron, hold for about 8 seconds, then pin the curl flat against the head while it cools. That cooling step matters. Skip it and the wave falls out too soon. Brush the curls only after they are fully cold, and use a soft bristle brush so the style becomes one smooth pattern instead of a bunch of separate ringlets.
This is one of those formal hairstyles that loves a side-swept dress or a strapless neckline. It also does something useful that a lot of glossy styles forget: it adds movement. Not chaos. Movement.
If your hair is fine, mist texture spray at the roots before curling. If it is thick, work in smaller sections or the waves will look bulky instead of polished.
3. Braided Crown Updo
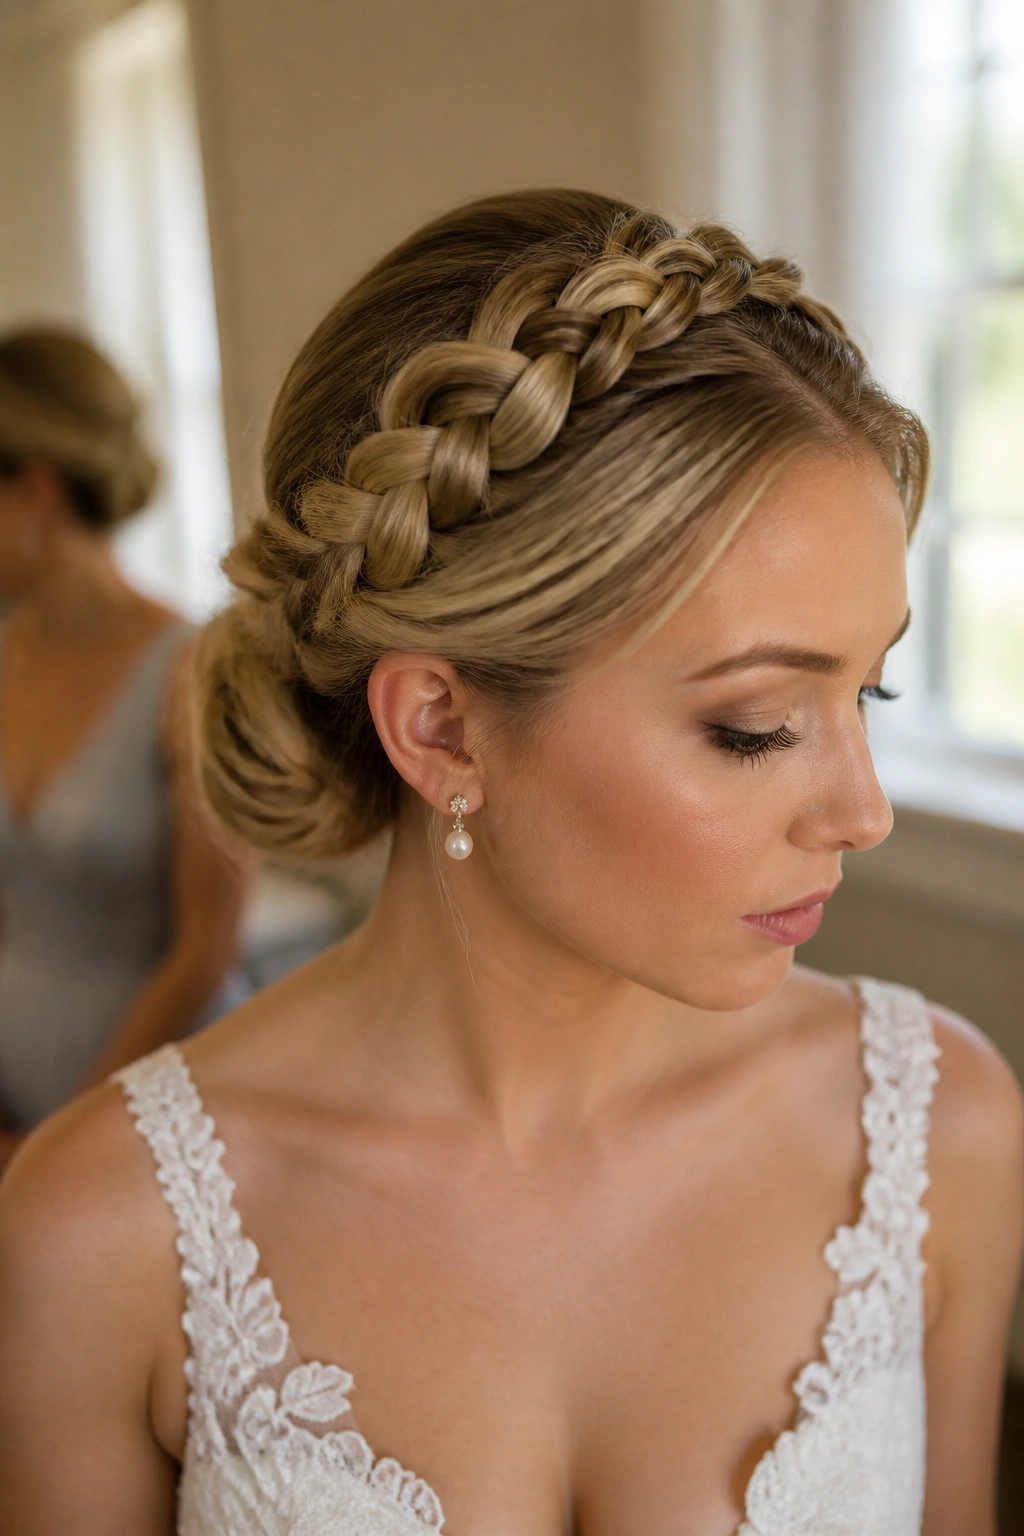
Why does a braided crown updo survive so many long events? Because the braid itself does half the work. It creates structure before you even pin the bun or tuck the ends, which makes it a smart pick for weddings, garden parties, and any occasion where you need your hair off your face for hours.
The style starts with two braids, usually Dutch braids or firm three-strand braids, that wrap along the hairline and meet at the back. From there, the length can be tucked into a low knot, folded into a bun, or pinned flat. The crown shape is what makes it feel special. It draws attention upward and keeps the style from looking plain.
How to use it
If you have fine hair, add texture spray before braiding so the strands do not slip apart. Thick hair usually needs fewer pins, but more patience while you braid. For a softer look, pull the braid loops apart by a few millimeters once the braid is secure. For a tighter, more formal finish, leave the braid compact and smooth.
This is the style I’d pick for someone who wants coverage, grip, and a little romance without softening the face too much.
4. High Polished Ponytail
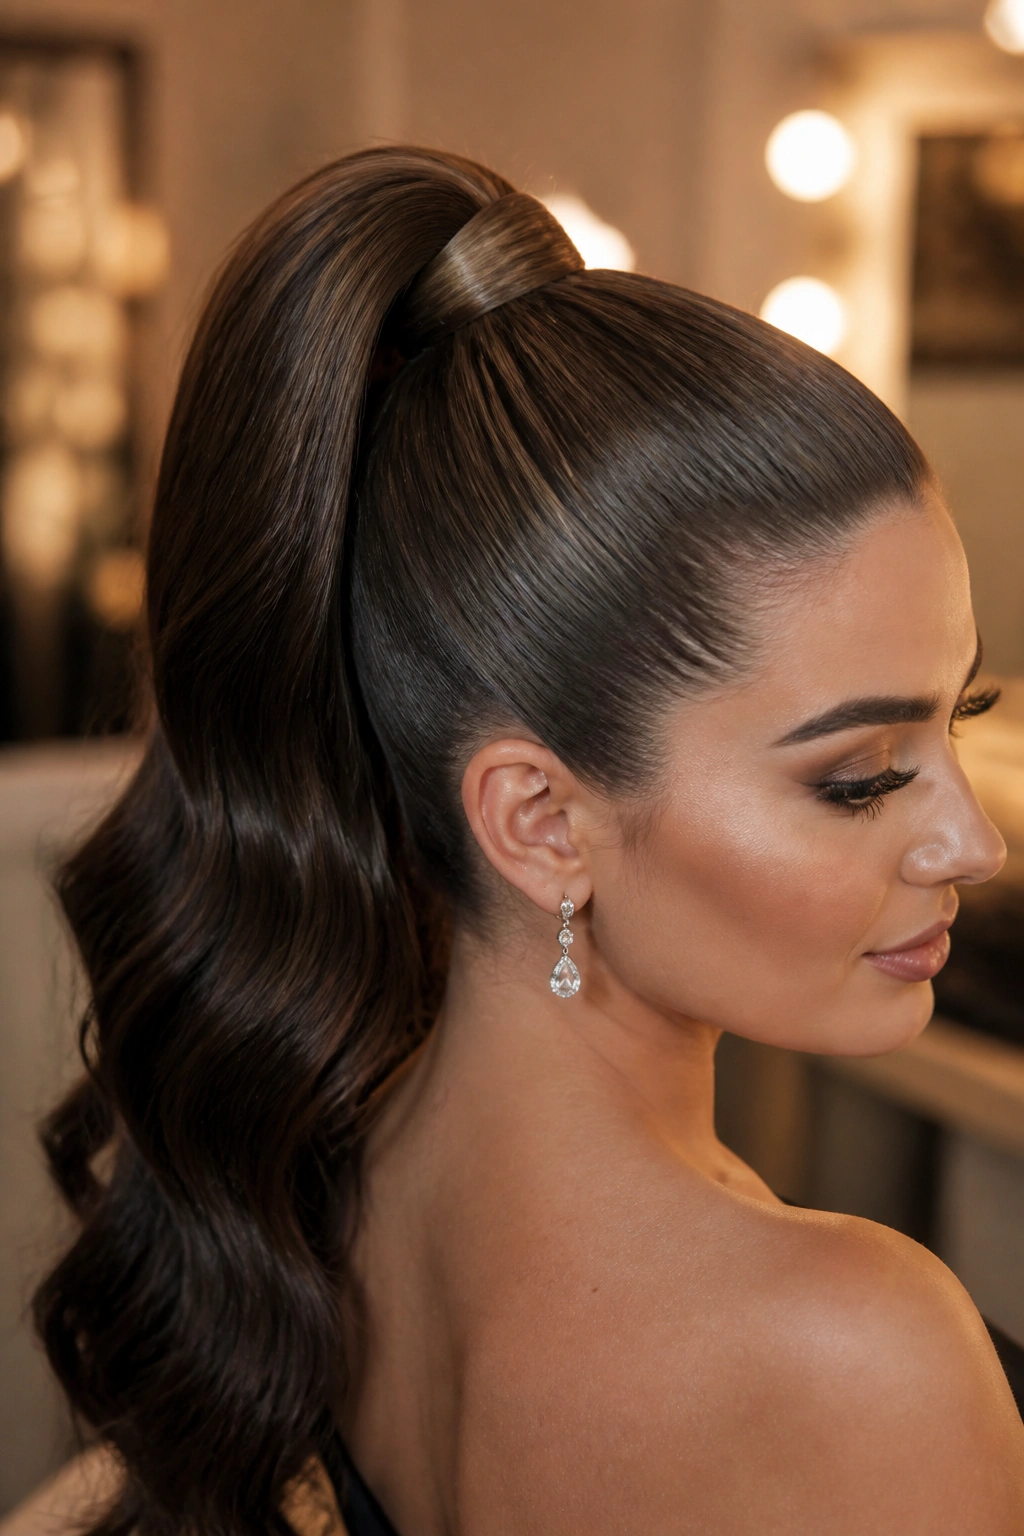
A high polished ponytail can look sharper than a complicated updo when it is done well. High at the crown, smooth through the sides, and wrapped with a strand of hair instead of a visible elastic — that last detail changes everything.
I like this style for events where you want to look pulled together but not overdone. A black-tie dinner. A cocktail wedding. A dress with statement earrings. The ponytail gives your face lift and keeps the hair off the shoulders, which lets the outfit breathe. If the hair is long, the length becomes part of the look. If it’s medium length, the higher placement creates the illusion of more swing.
- Brush the hair up with a boar bristle brush for a smoother finish
- Secure the base with two elastic bands if your hair is heavy
- Wrap a 1-inch section of hair around the elastic and pin it underneath
- Curl the tail lightly if you want a softer silhouette
Watch out: If the ponytail sits too high, it can start to look sporty. Keep it high enough to lift the face, but not so high that it feels like gym hair in a formal dress.
5. Textured French Twist
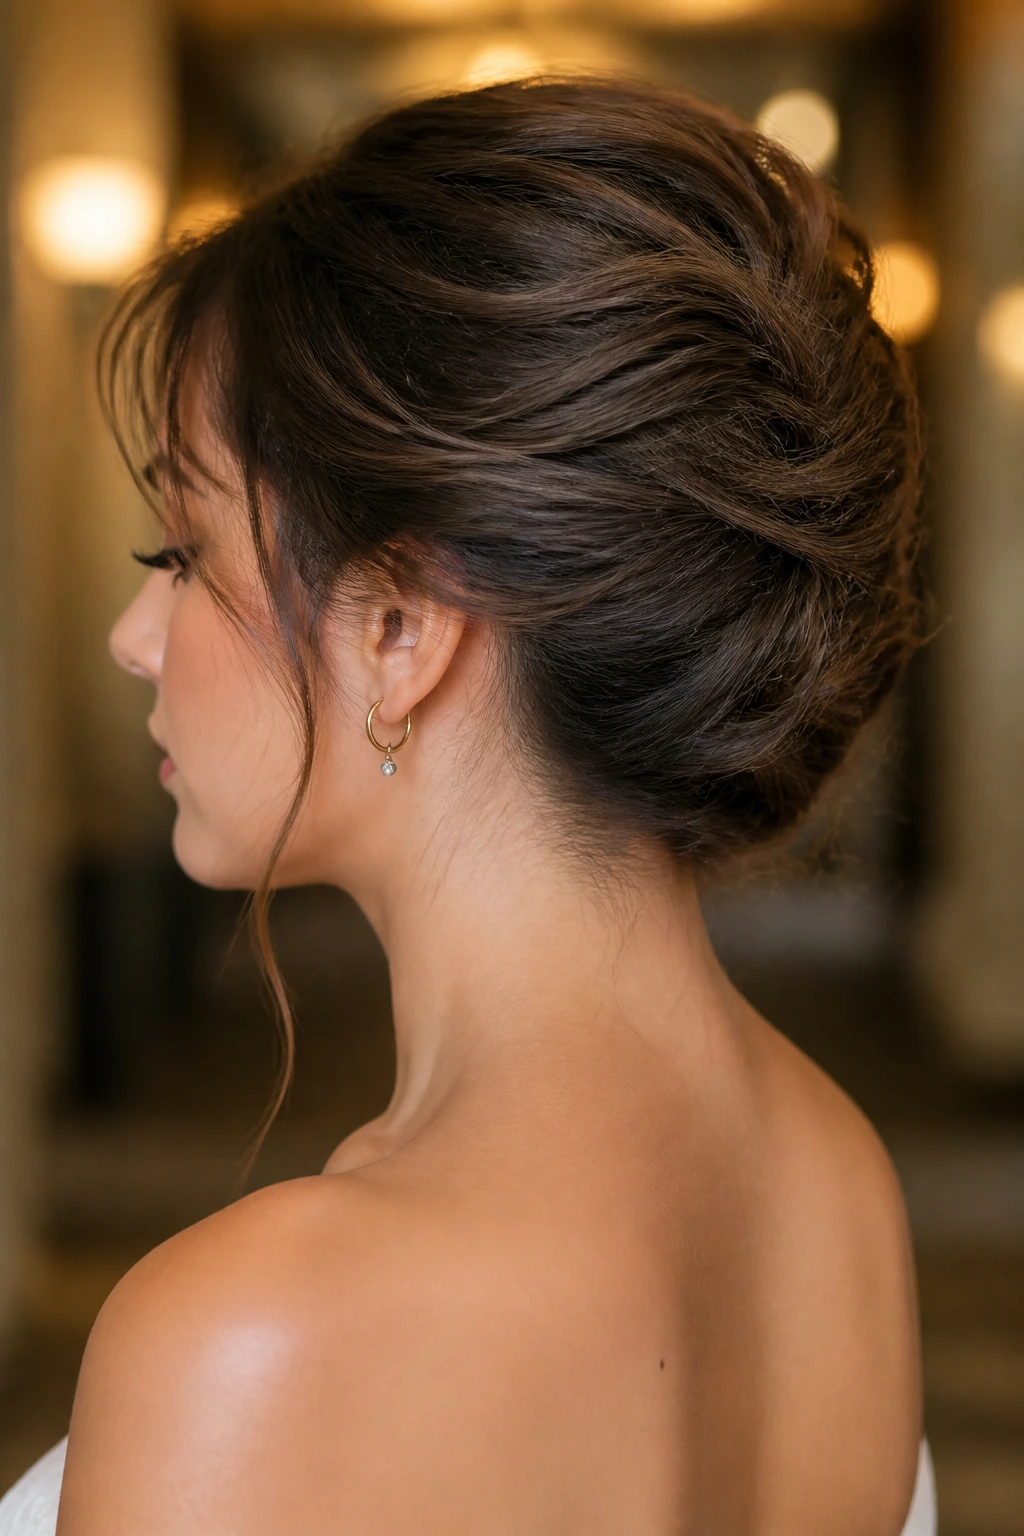
A textured French twist has a little attitude. Not messy. Not fussy either. Just enough loose texture to keep it from looking locked in place with shellac.
The style works especially well on shoulder-length and medium-long hair because it does not need huge length to build that vertical roll. Start by roughing up the roots with dry shampoo or texture spray. Then gather the hair to one side, twist it upward, and tuck the ends into the fold. The twist should look secure but not carved out of stone. A few soft pieces around the hairline make it feel modern, which matters because the old-school version can read a little severe.
I like this one for formal events where you want the neck clear but do not want a bun sitting flat against the head. It has more shape than a chignon and less weight than a full updo.
The secret is pin placement. Use long pins or a French pin to anchor the twist from the inside, not just the surface. Surface pins alone tend to slide out halfway through the night.
6. Half-Up Twisted Waves
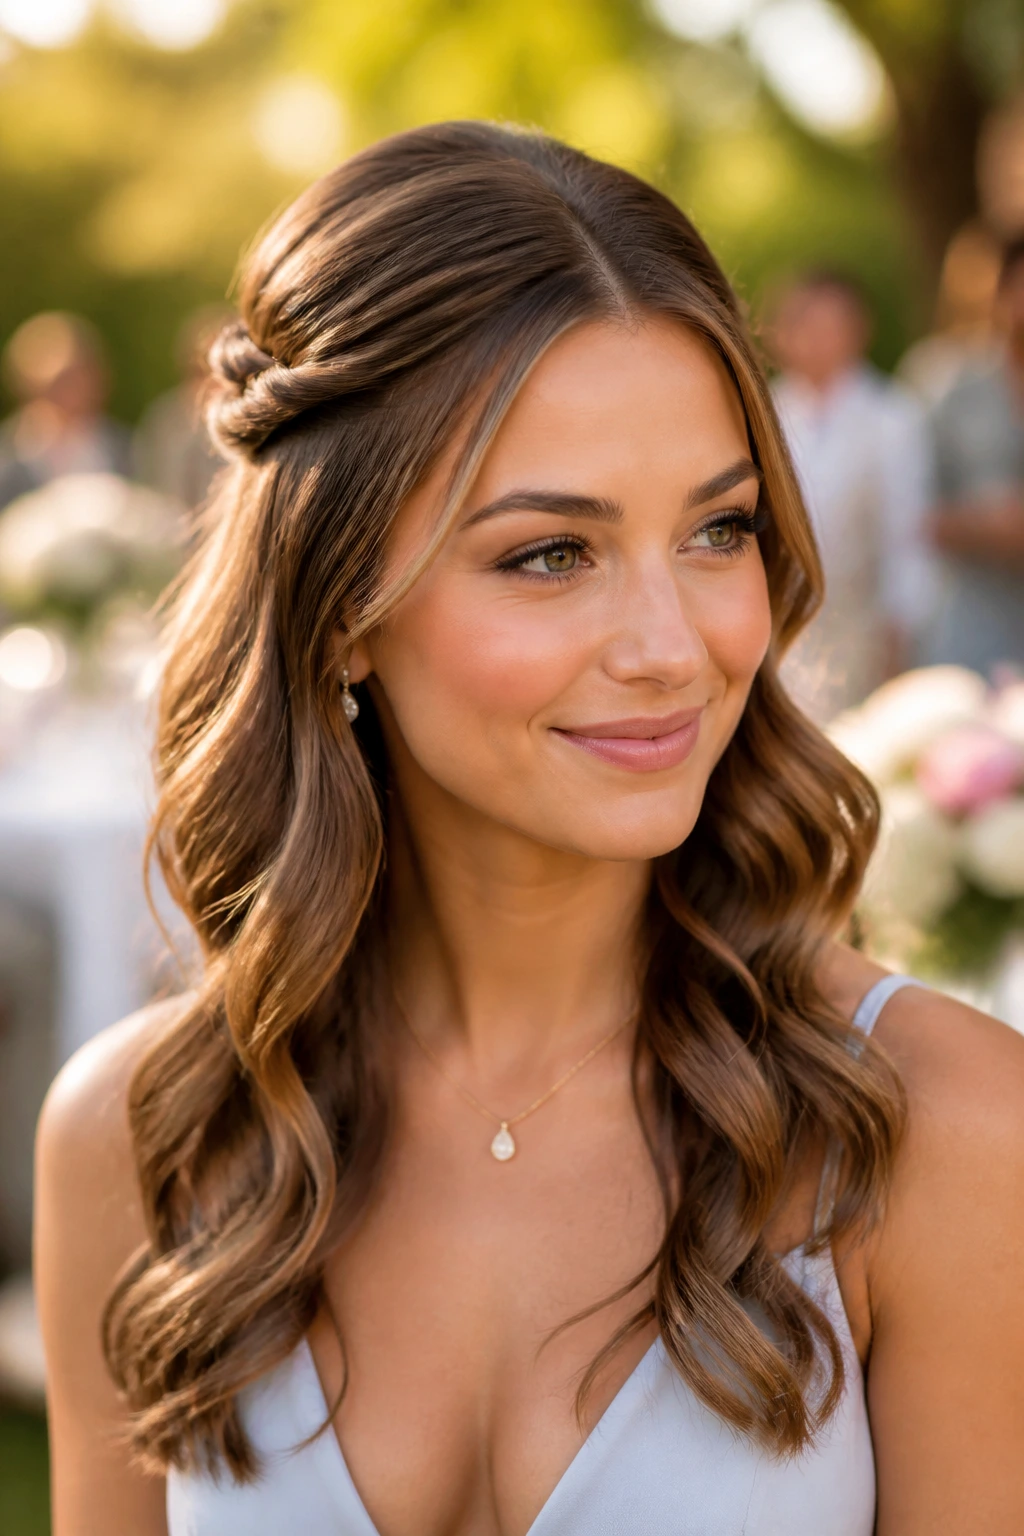
A half-up twisted waves style is the easiest way to look styled without hiding the length of your hair. It gives you the polish of an updo and keeps the ends soft, which is exactly why it works for bridesmaids, graduation dinners, and family events where you want to look finished but not formal in a stiff way.
Compared with a full updo, this one feels lighter. Compared with plain hair down, it looks more considered. That middle ground is the point. You twist two sections from the temples or just above the ears, pin them at the back of the head, and let the rest fall in loose waves. The crown gets a little lift. The sides stay tidy. The length still shows.
This style is especially good if your hair has a bit of bend already. You do not need perfect curls. In fact, hair that is a little imperfect tends to look better here because the twists keep the top controlled while the bottom stays relaxed.
If you want more hold, backcomb the crown lightly before pinning the twists. A few spritzes of flexible spray are enough. Heavy spray can kill the movement, and the movement is the part worth keeping.
7. Romantic Low Bun With Face-Framing Pieces
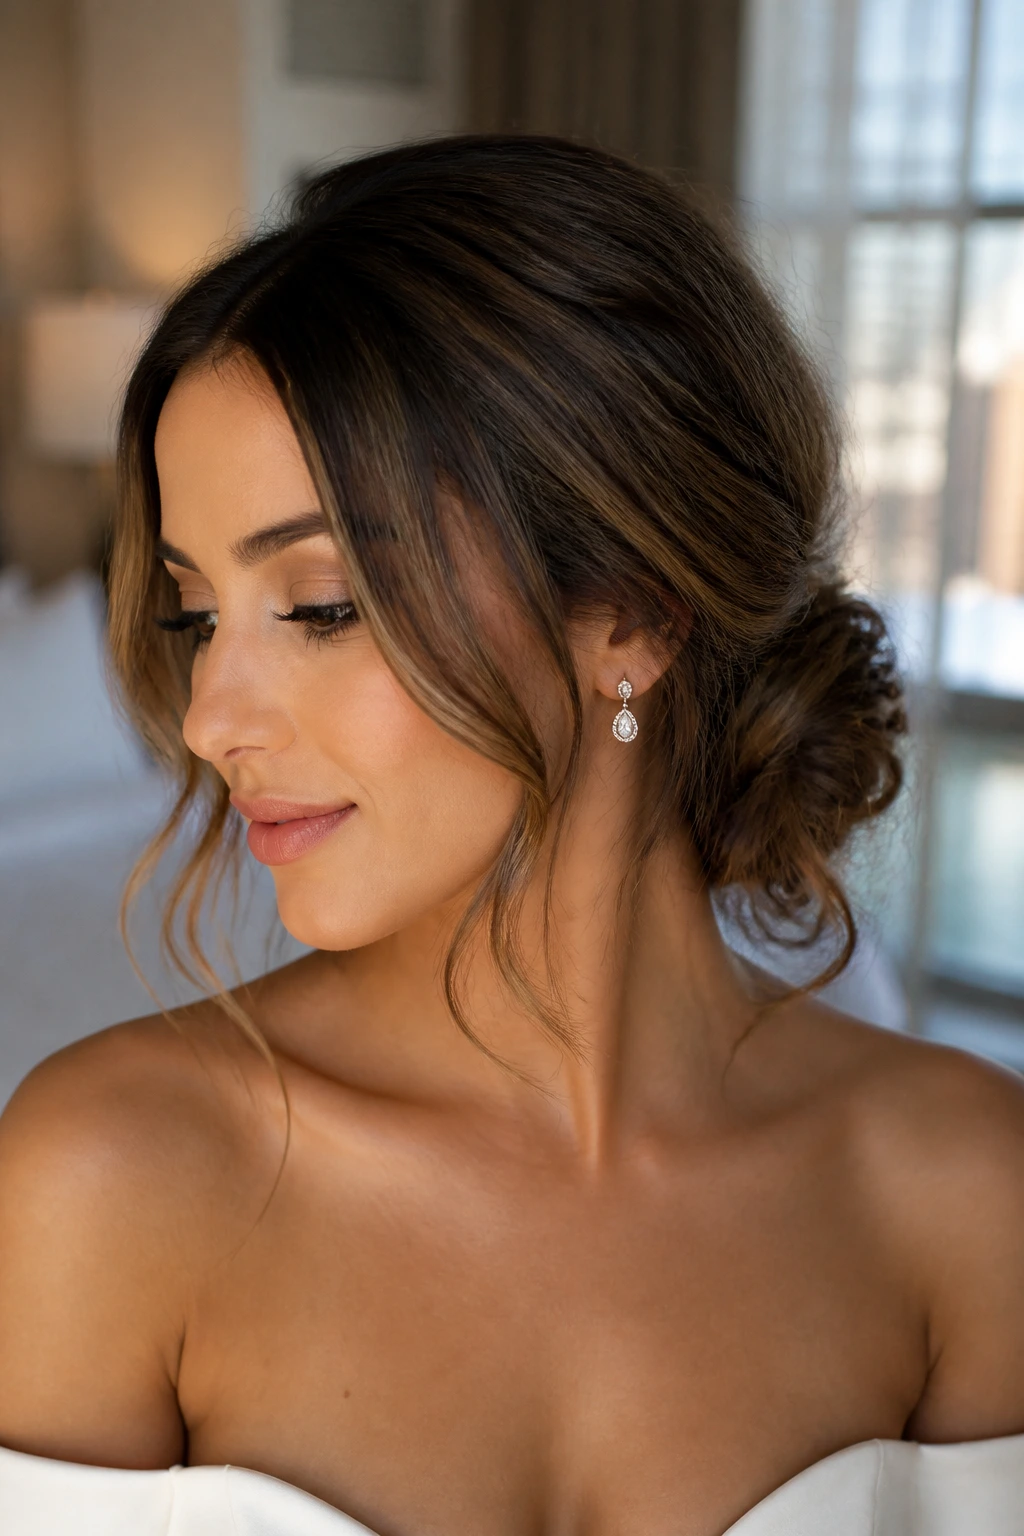
The romantic low bun with face-framing pieces is what I suggest when someone wants softness, but not sloppiness. It’s one of the most forgiving special occasion hairstyles because it gives you a secure base at the nape and a gentler finish around the cheeks.
Why it works
The pulled-out pieces near the face break up the shape in a good way. They keep the style from looking too severe, especially on square or heart-shaped faces. Curl those front pieces with a 1-inch iron, then pin the bun low and slightly off-center so the shape feels lived-in instead of rigid. If the bun sits dead center and the front pieces are too perfect, the whole thing can look dated fast.
The best version uses a little texture at the crown, too. A flat crown makes the whole style collapse visually. A small amount of lift — even half an inch — changes the balance.
- Use a lightweight mousse on damp hair before blow-drying
- Curl the face-framing pieces away from the face
- Pin the bun with crossed bobby pins under the fold
- Leave the ends tucked, not poking out
Tip: The front pieces should look intentional, not accidental. If they fall too flat, mist them with a tiny bit of water, re-curl, and let them cool before touching them again.
8. Side-Swept Curls

Side-swept curls are the answer when the dress has one shoulder, an asymmetrical neckline, or a lot of detail on one side. The hair moves to the other side and lets the outfit speak without competing for attention.
This style has a glamour-first feel, but the technical part is straightforward. Set the hair in curls with a 1.5-inch iron, pin each curl while it cools, then brush them out into one continuous wave. After that, sweep everything to one side and secure it with hidden pins behind the ear or at the nape. The crown should keep a little lift so the head shape does not flatten on one side.
I like this look because it still feels soft when the rest of the outfit is sharp. There’s a bit of movement across the collarbone. A bit of old-school drama. Not much else is needed.
Use shine spray lightly, not in a heavy cloud. The hair should look glossy when it moves, not wet. If the curls are too tight, the style starts to feel costume-like. Loose, brushed waves are the sweet spot.
9. Bubble Ponytail With Accessories
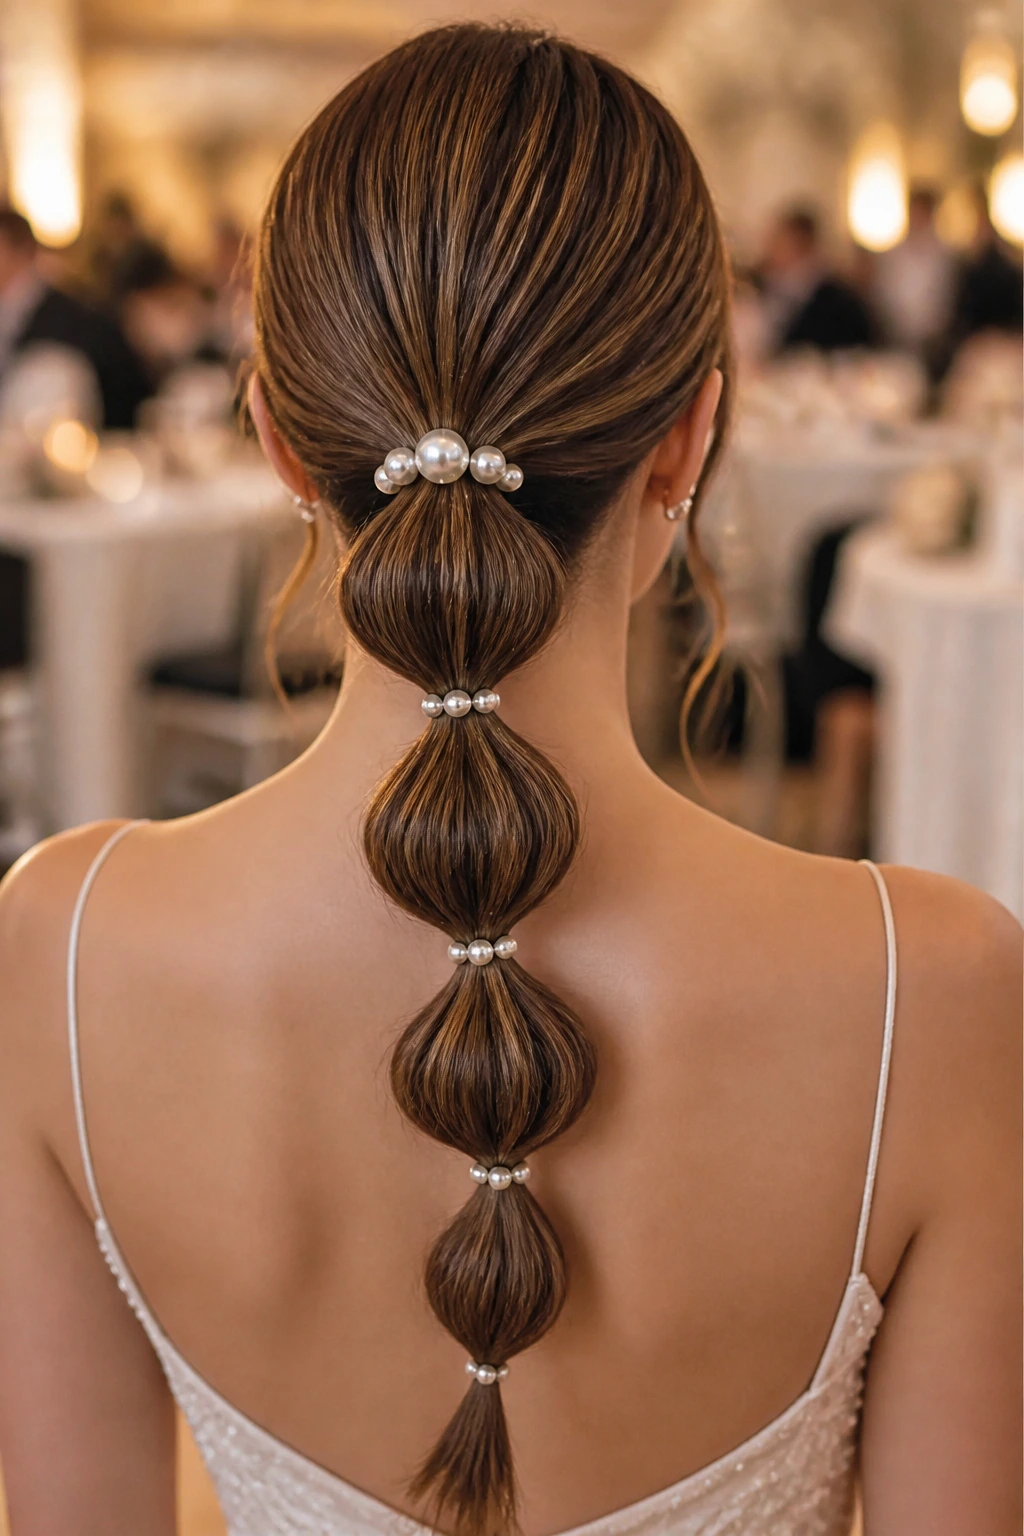
Can a bubble ponytail look formal? Absolutely. The trick is making the sections neat and the spacing deliberate, not cartoonish.
Start with a sleek base, usually low or mid-height, and secure it with a strong elastic. Then place clear elastics every 1.5 to 2 inches down the length of the ponytail. Gently tug each section outward so it rounds into a soft bubble. That shape gives the style volume without needing a lot of teasing. Add pearl pins, a slim ribbon, or a metal cuff if the outfit can handle a bit of shine.
This works best when the rest of the look is clean. A neckline with a simple line. Earrings that do some of the work. The ponytail becomes the focal point, so the hair has to be crisp at the roots.
If your hair is layered, the shorter pieces around the face should be smoothed back or tucked behind the ears. Otherwise the bubbles can lose their shape fast. Dry shampoo at the roots helps the base stay grippy, especially on hair that slips easily.
10. Rope-Braid Low Ponytail
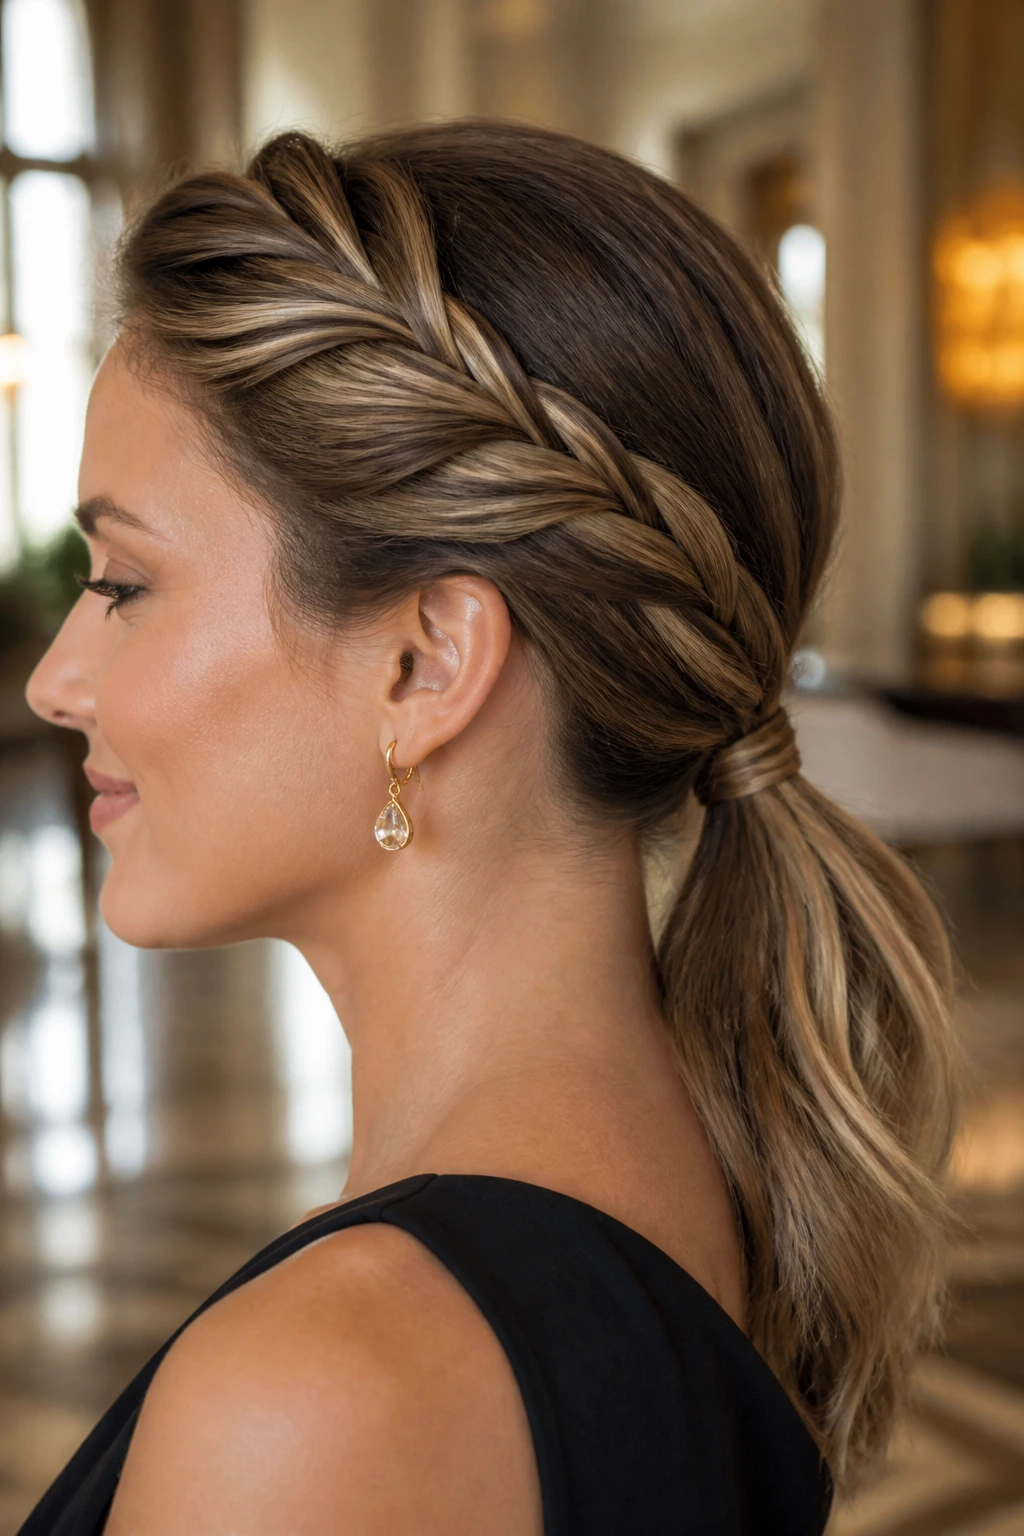
A rope-braid low ponytail is one of those styles that looks more intricate than it is. Two twisted strands, one ponytail base, and enough polish to work for a formal lunch, a rehearsal dinner, or a guest look that needs to stay neat without becoming stiff.
The braid itself is built from two sections twisted in the same direction, then wrapped around each other in the opposite direction. That opposite motion is what gives rope braids their tight, cord-like shape. Once the braid is done, pull the sides very slightly for softness, but not so much that the twist loses definition. Keep the ponytail low and use a small ribbon, barrette, or wrapped hair section at the base if you want a finished look.
- Best for medium to long hair
- Great on hair that holds texture well
- Use a light serum on the tail ends if they fray
- Works nicely with side-parted front pieces
Tip: If your hair is slippery, start with a little texturizing spray and a matte elastic. Shiny elastics can slip, and nothing ruins the clean finish faster than a braid that starts loosening halfway through dinner.
11. Crown Braid Into A Bun
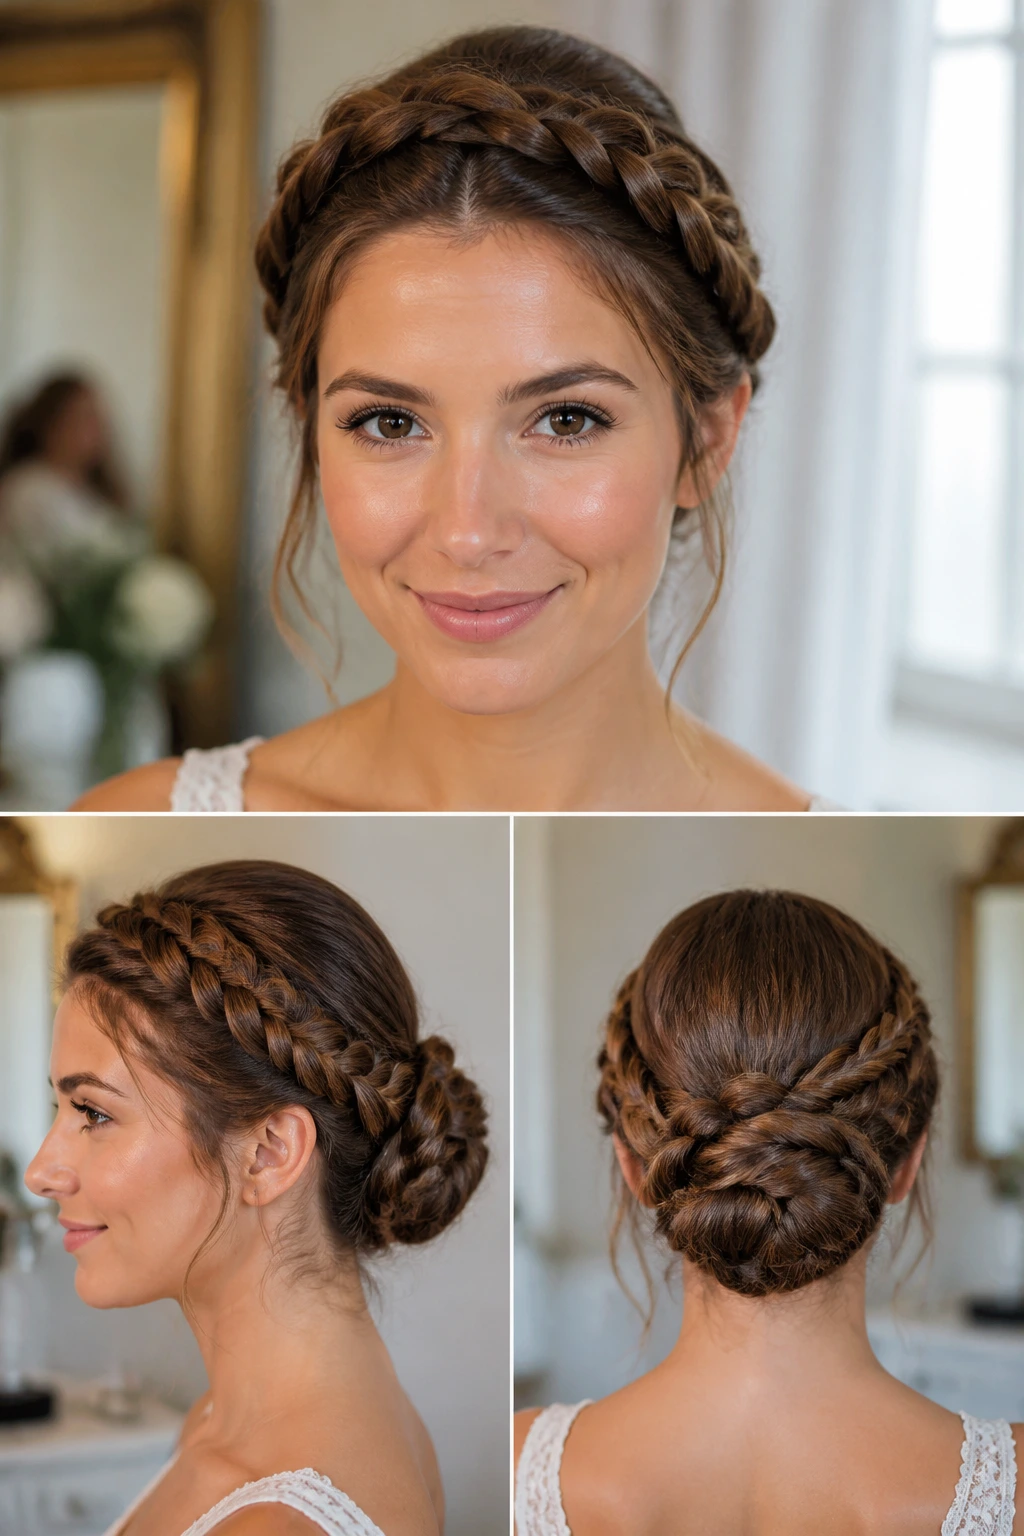
A crown braid into a bun gives you the visual impact of a braid and the security of an updo. That’s a useful combination when the event is long, the weather is warm, or the dress has a lot happening around the shoulders and you need the hair to stay calm.
The braid wraps around the head first, which creates a frame, then the leftover length gets tucked into a bun at the back. The shape feels balanced from every angle. Front view, you get texture near the hairline. Side view, the braid adds interest. Back view, the bun keeps everything contained.
This style is especially kind to medium-thick hair because the braid has enough bulk to show up. Very fine hair can still work, but it usually needs a little padding or texture spray to avoid looking too small. And yes, a tiny hair donut under the bun is fair game if you want more shape. No one sees it.
The part I like most is how it holds up under movement. The braid locks the style in place better than a plain bun would. That matters more than people think.
12. Modern Top Knot
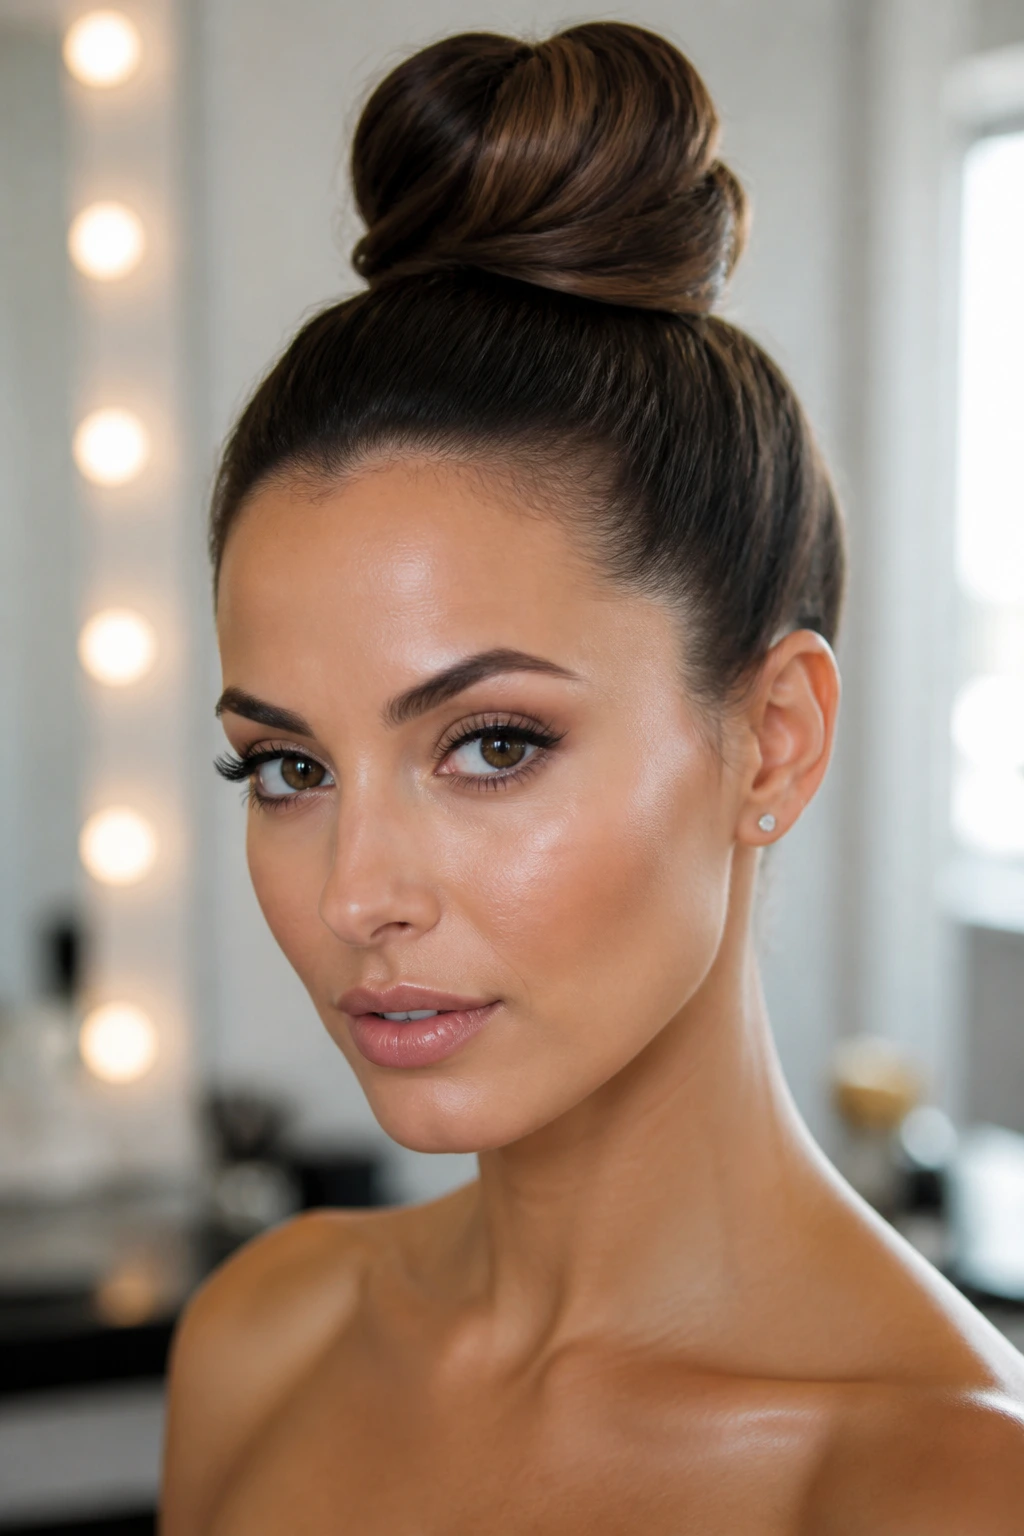
A modern top knot is not the same thing as the rushed bun you throw together before running errands. Done properly, it sits high, clean, and compact, with enough shape to read as intentional even under a formal dress.
Compared with a low bun, the top knot brings energy upward. It lengthens the neck and clears the shoulders, which is why it works well with halter necklines, high collars, and dramatic jewelry. Compared with a messy bun, it has a clear outline. No loose fluff. No random spikes.
For the best finish, smooth the sides first, gather the hair at the crown, twist the length into a tight coil, and pin the ends under the bun. If your hair is layered, use a small bun shaper or a second elastic inside the knot to stop it from collapsing. That little support makes a bigger difference than most people expect.
This is the style I’d recommend when you want clean lines and fast prep. It also handles second-day hair well, which is a quiet bonus. Hair with a little grit is easier to build into a knot that stays put.
13. Waterfall Braid Half-Up
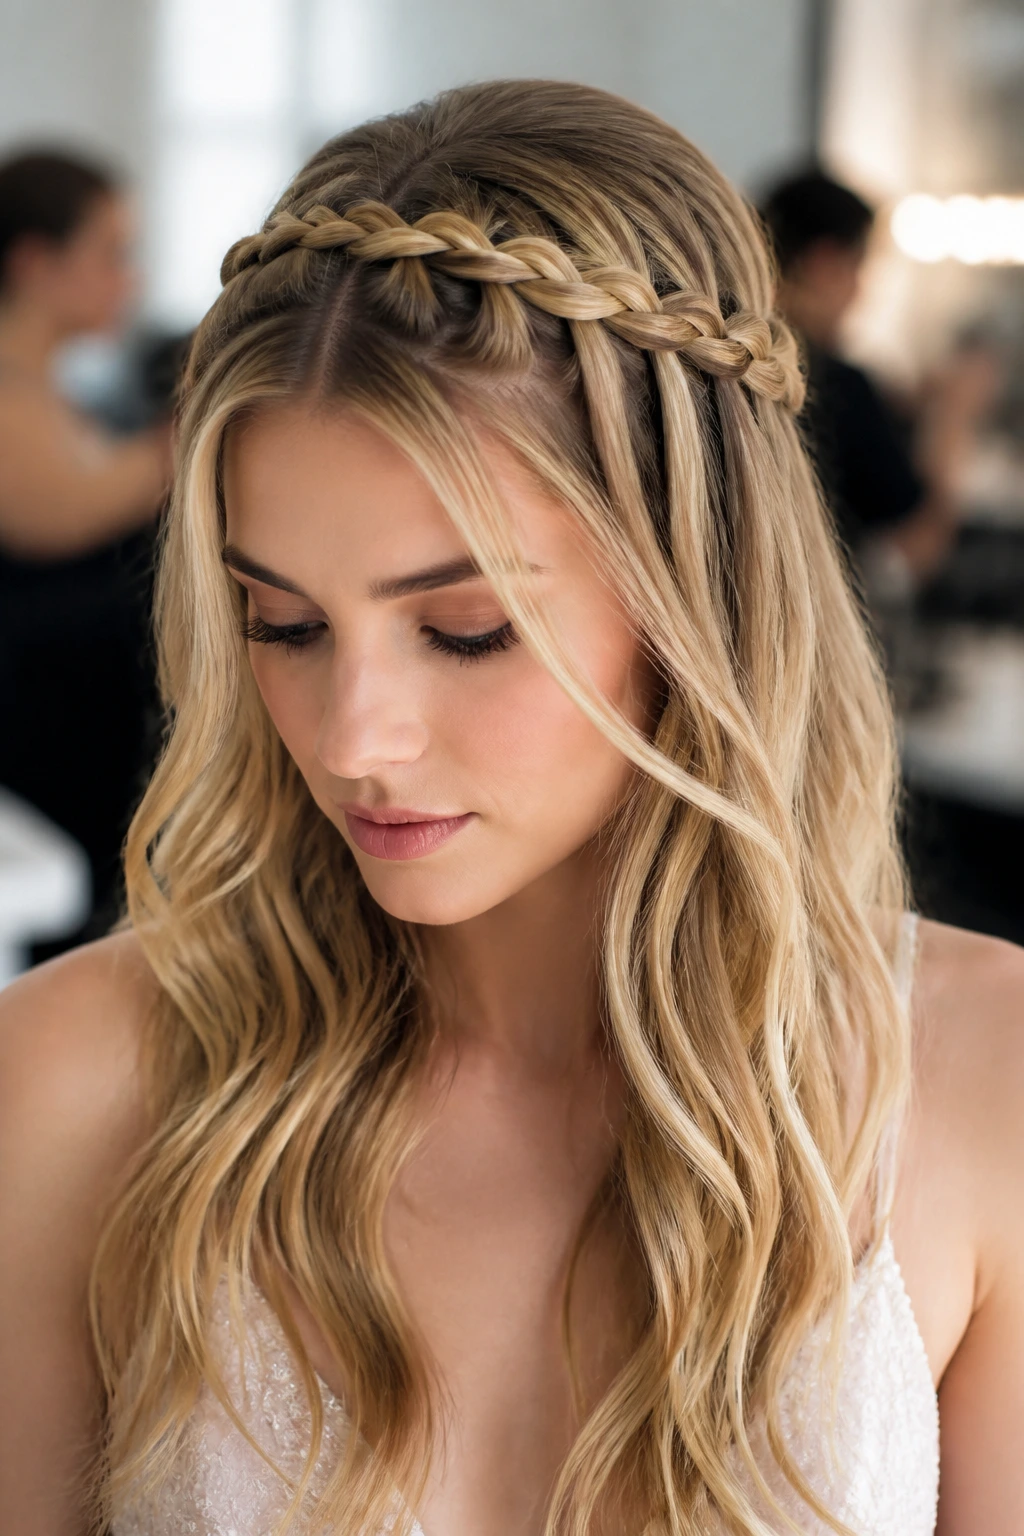
A waterfall braid half-up has a built-in sense of movement. The braid runs across the head, and the released strands fall through it like little ribbons, which is why the style works so well on long hair and soft waves.
The braid is delicate, but not fragile if you build it with enough grip. Start on one side, keep your sections even, and let each dropped strand fall in the same direction. Uneven tension makes the braid look messy fast. After the braid is set, curl the loose hair beneath it in loose bends so the whole style feels cohesive instead of half-finished.
What to watch for
Hair that is too silky can make the braid slip apart. A touch of dry shampoo or texturizing powder near the part helps. Hair that is too layered can lose the waterfall effect if the shorter pieces escape, so pin the underside lightly where needed.
This is a lovely choice for softer formal looks, especially when you want to keep some hair down. It frames the face without closing it in. And because the braid only takes part of the hair, the style still has movement if the evening turns warm.
14. Gibson Tuck
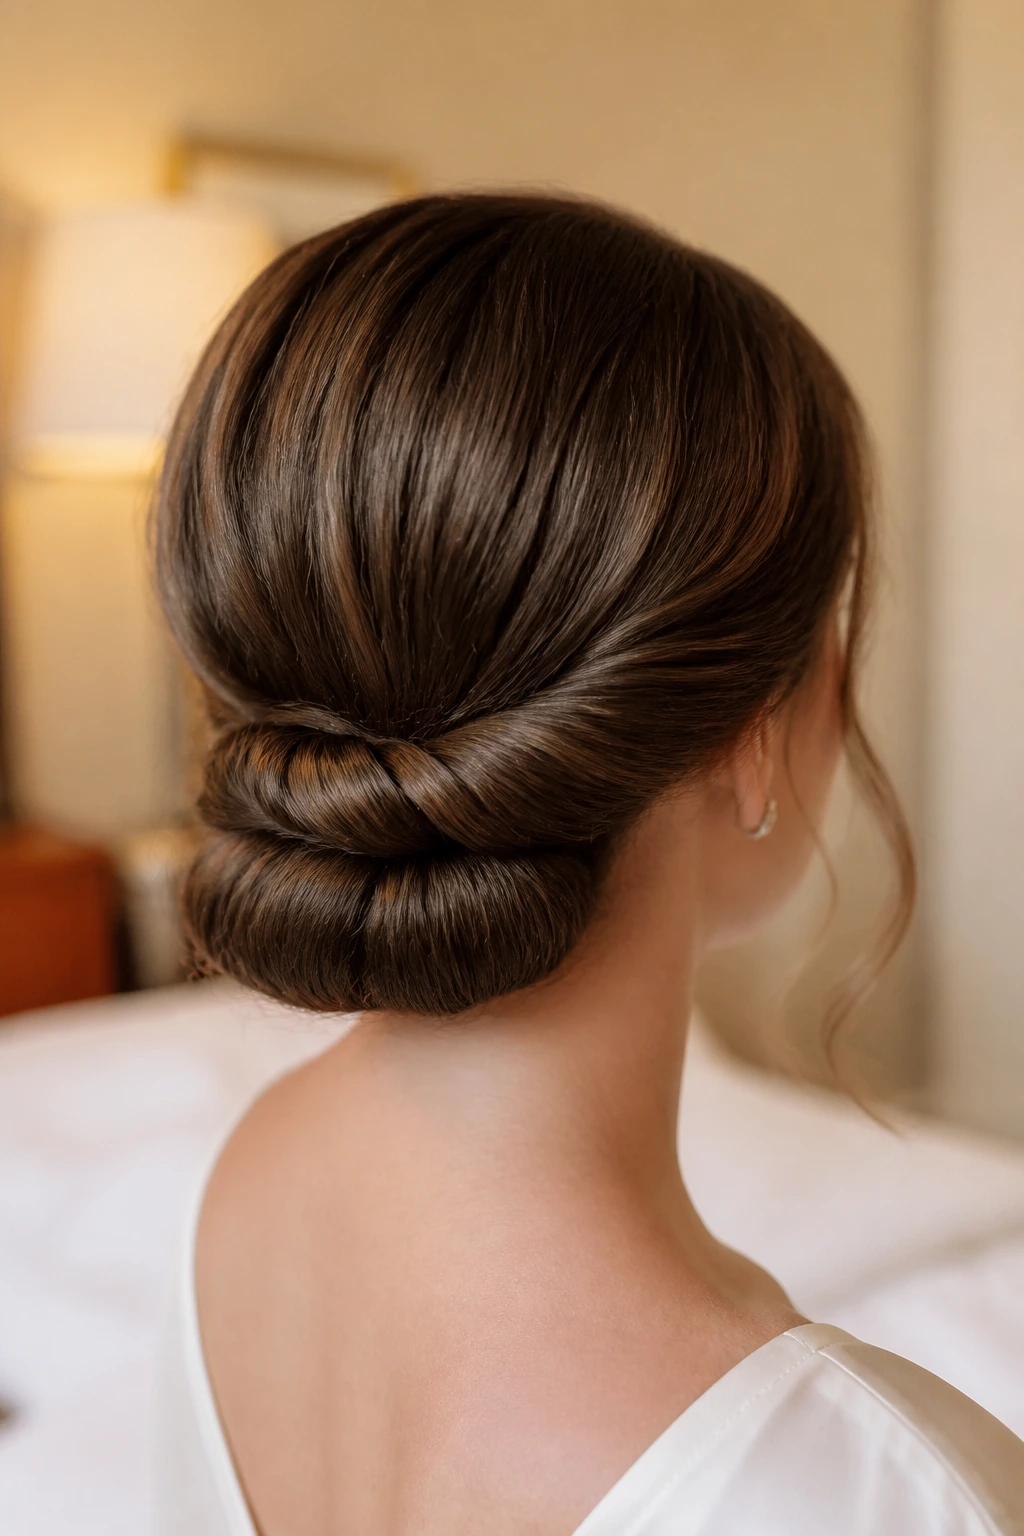
The Gibson tuck looks like something from a vintage portrait, but it wears surprisingly well with modern dresses. Hair is rolled inward along the nape and tucked into itself, creating a soft fold instead of a sharp bun.
I like it because the shape feels calm. Not plain. Calm. That’s a useful distinction. It’s one of the few formal updos that can work on shoulder-length hair without extensions or a lot of extra padding. If your hair is a little textured, the tuck grips more easily. If it’s silky, a fine mist of dry shampoo gives the roll something to catch on.
The style sits nicely under a veil, a hair vine, or a simple comb because the back has a clean surface. You can also loosen a few strands around the temples if you want a gentler frame.
One thing people miss: the tuck should not be shoved all the way up the head. Keep it low and broad. A high Gibson tuck starts to lose its charm and can feel awkward against the neckline. Low and rounded is the move here.
15. Voluminous Blowout With One Side Pinned Back

Can straight hair still feel formal? Yes — if the voluminous blowout with one side pinned back has enough root lift and shape through the ends.
The whole style depends on movement. Blow-dry with a round brush, lifting the roots away from the scalp as you go, then bend the ends inward just slightly. Once the hair is smooth, pin one side back above the ear with a decorative clip or a few hidden pins. That tiny change opens the face and gives the blowout a dressed-up finish without taking away the length.
This is a good choice when you want the hair down but not loose and flat. It pairs well with beaded necklines, one-shoulder dresses, or simple tailoring that needs a little softness nearby. It also gives you room for earrings, which matters more than people admit.
How to use it
Use a heat protectant spray before blow-drying, and set the front sections with a large round brush for a few seconds so the lift lasts. If your hair tends to go limp, clip the roots at the crown while they cool. That one step can change the entire shape.
16. Fishtail Braid Over One Shoulder

A fishtail braid over one shoulder looks detailed without being bulky. That makes it a strong pick for long hair, especially when the neckline of the dress is already doing a lot of work.
The braid itself is made from tiny sections pulled alternately from each side, which creates that woven, herringbone look. It takes more time than a basic braid, but the finish is worth it. Once it is complete, loosen the outer edges by a few millimeters for softness. Not much more. Overpulling turns a neat braid into a puffed-out mess.
I especially like this style for people who want hair secured but not pinned flat against the head. It stays in place, yet the long braid still moves when you walk. If the hair is very layered, use a clear elastic at the end and wrap a thin strand around it so the finish looks cleaner.
A small note that matters: fishtail braids look best when the hair has a bit of texture in it already. Freshly washed hair can be too slippery. A day-old base, or a quick pass with texturizing spray, makes the braid behave.
17. Wrapped Low Ponytail
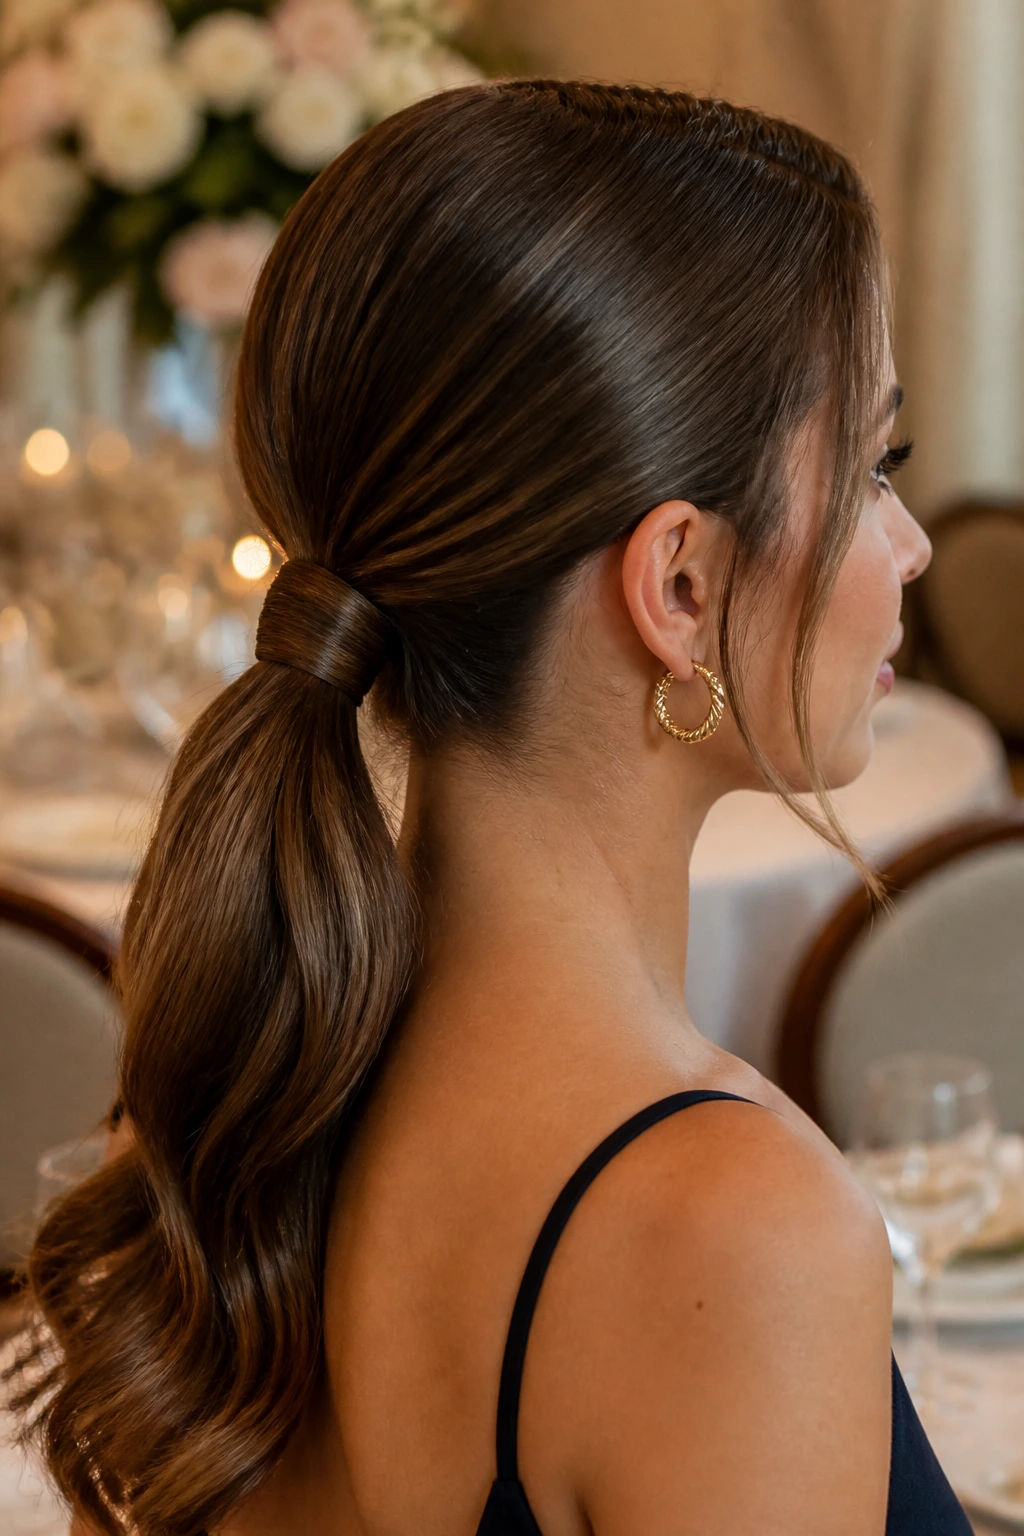
A wrapped low ponytail is one of those styles that looks understated until you notice how clean the lines are. Then it starts to feel very deliberate.
The ponytail sits low, usually at the nape, and a section of hair wraps around the elastic so the base disappears. That alone makes a big difference. Add a soft bend through the tail, and the style starts to feel formal enough for dinners, ceremonies, or a dressy work event. It’s also a good choice when you do not want the weight of a full updo but still need your hair off your face and off your collar.
This style does well on straight, wavy, and loosely curled hair. Thick hair gives you a fuller tail. Fine hair looks better if you add a little texture first, because the wrap needs enough grip to stay tidy. I’d avoid making the ponytail too tight at the crown. A hard pull can create a harsh line that fights the rest of the outfit.
The wrap is the star here, so pin it underneath with a small hairpin rather than a bulky bobby pin. Cleaner. Less fuss.
18. Retro Victory Rolls
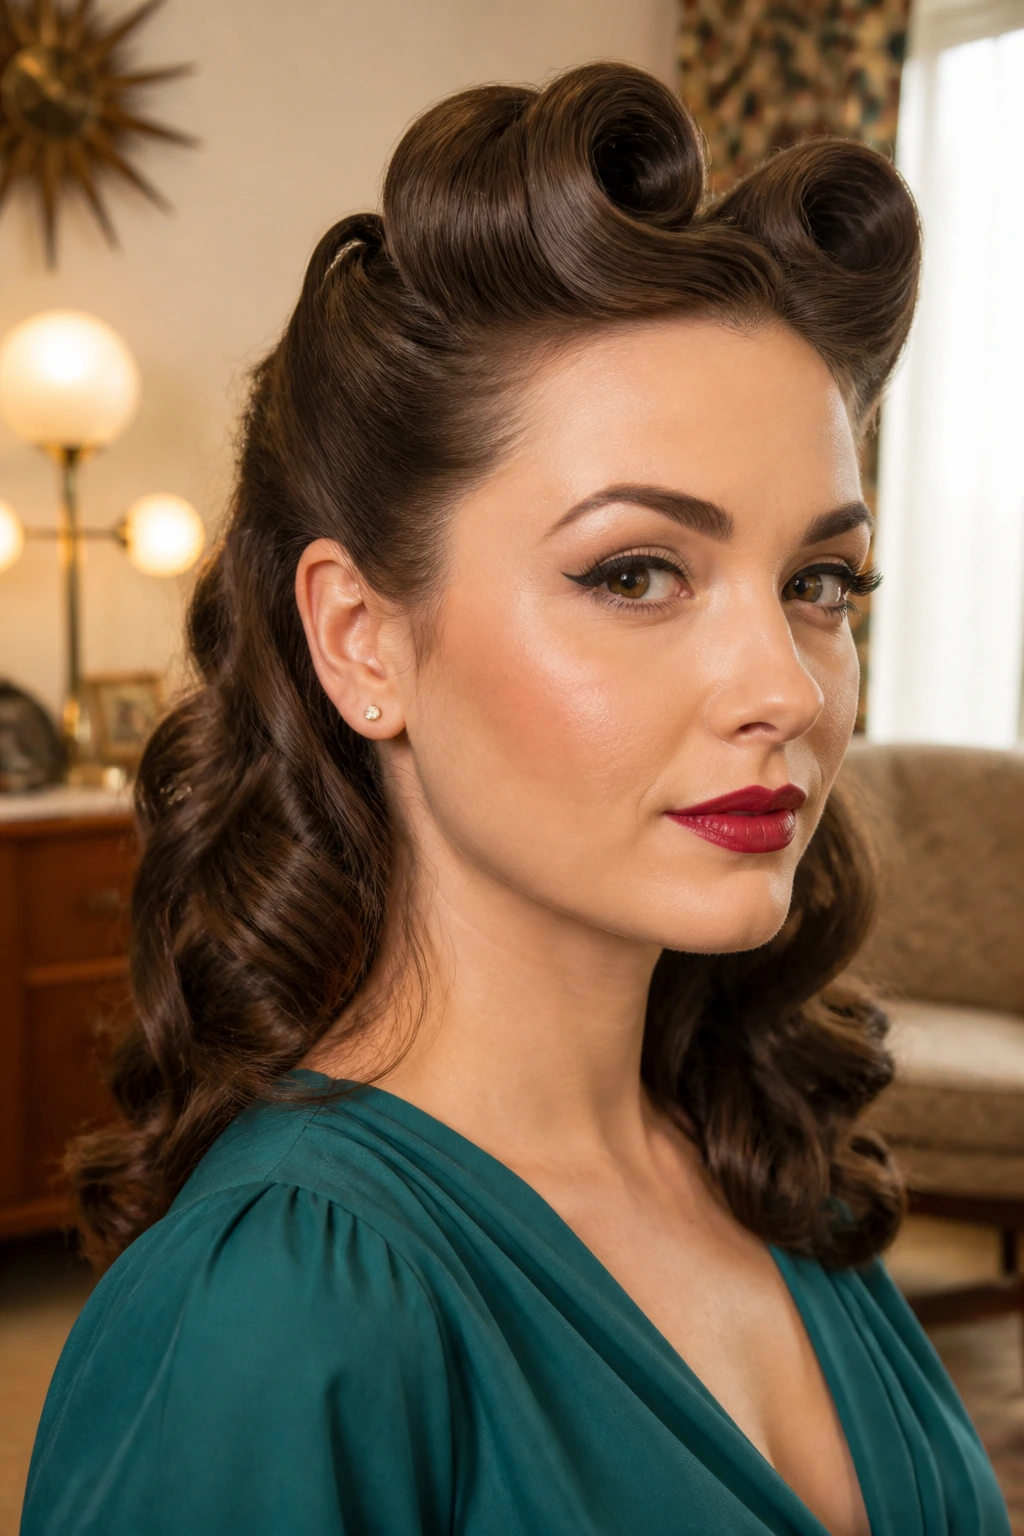
Retro victory rolls are not shy, and that is exactly why they work for themed parties, vintage-inspired weddings, and any event where a little drama feels welcome. The rolls sit high at the front and create a sculpted shape that reads immediately.
Unlike soft curls or a loose bun, this style is built on structure. You roll sections of hair inward and pin them so the front forms those classic curved loops. The rest can be left down in waves or tucked into a low roll at the back. It’s a strong look, so I would not pair it with another heavy detail near the face. Let the rolls do the talking.
This style suits medium to long hair best, though shorter lengths can still work if the sections are clean and the pins are placed carefully. Strong hold spray helps, but only after the shape is set. Spray too early and the hair gets sticky before the roll is secure.
Best use case? Events where you want your hair to feel like part of the outfit, not just an afterthought. The style has personality. Plenty of it.
19. Sleek Straight Center Part With Decorative Clip

A sleek straight center part with a decorative clip is the quiet answer to formal hair. No curl pattern. No braid. Just glassy straight lengths, a sharp center line, and one well-placed clip that gives the look a finished edge.
This works because the simplicity is the point. The hair needs to be smooth from roots to ends, so a flat iron pass and a touch of serum at the mid-lengths go a long way. Keep the clip just above the ear or slightly behind it so the face stays open. If the clip sits too far forward, the style can feel costume-y. Too far back, and you lose the detail that makes it special.
Why it stands out
Straight hair shows every line. Every part. Every choice. That means the finish has to be neat, but it also means the result can be striking when the shape is clean. If your hair is naturally textured, blow-dry it smooth first rather than fighting the flat iron too hard. Less damage. Better shine.
A crystal barrette, pearl slide, or slim metal clip can carry a lot of the visual weight here. That is useful when the dress already has a lot going on and the hair just needs to behave.
20. Soft Swept-Back Knot

The soft swept-back knot is the style I’d hand to someone who wants polish, lift, and a little softness without getting trapped in a rigid updo. It pulls the front sections away from the face, folds the length low at the back, and leaves just enough movement around the edges to keep it from feeling severe.
Compared with a strict chignon, this version is easier on layered hair. Compared with loose waves, it lasts longer and stays neater around the shoulders. That balance is why it works so well for weddings, formal dinners, and any event where you will be photographed from every angle. It also plays nicely with veils, combs, and earrings because the shape stays low and open.
The style is best when the sweep at the front is gentle, not overpulled. A little lift at the crown helps. A few invisible pins at the back help more. And if you want it to feel less structured, leave one thin piece near the temple softer than the rest. Not a mess. Just a small bend.
If you are torn between wearing the hair up or down, this is the compromise I trust most. It looks finished from the front and calm from the back, which is about as useful as formal hair gets.
